• Skip to primary navigation
  • Skip to main content
  • Skip to primary sidebar
  • Recipes
  • Tutorials
  • Online Shop
  • About Us
  • Contact Us

Sugar Geek Show logo

menu icon
go to homepage
  • Recipes
  • Tutorials
  • Online Shop
  • About Us
  • Contact Us
subscribe
search icon
Homepage link
  • Recipes
  • Tutorials
  • Online Shop
  • About Us
  • Contact Us
×
Home

Blog

Live Oak Tree Cake Tutorial

November 1, 2018 Paid Video

Live Oak Tree Cake

Skill level: Intermediate

Guest instructor Sara Weber from Sara's Sweets in Austin, Texas is back with another lovely nature-inspired cake tutorial.

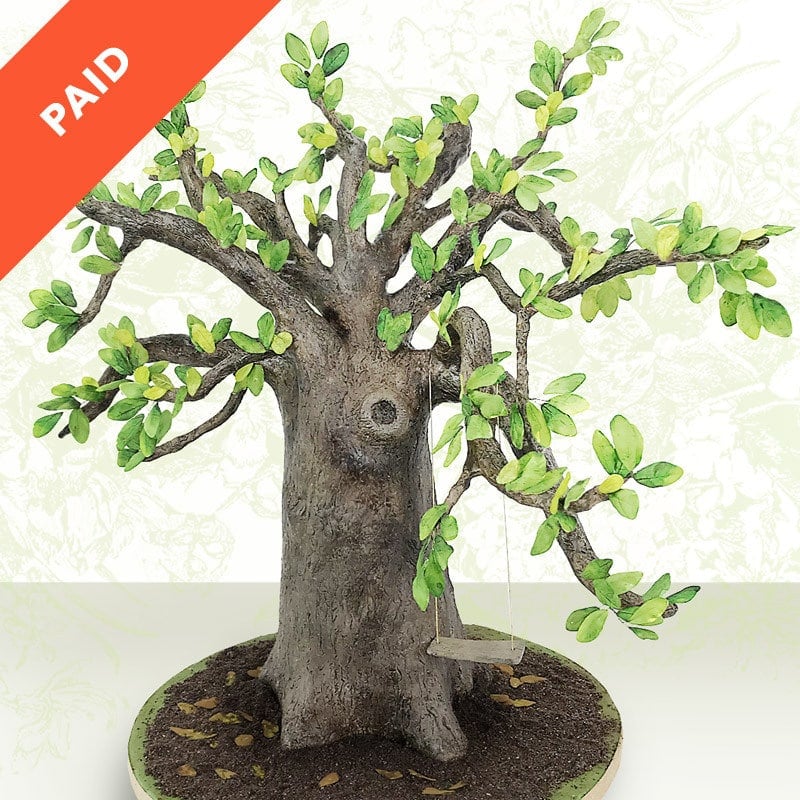
In this tutorial, Sara demonstrates how to create a Live Oak tree cake design, complete with a tree swing and all sorts of natural details.

1:46:12 Minutes of Instruction

What You Will Learn

  • How to create a sculpted cake that looks like a Live Oak tree
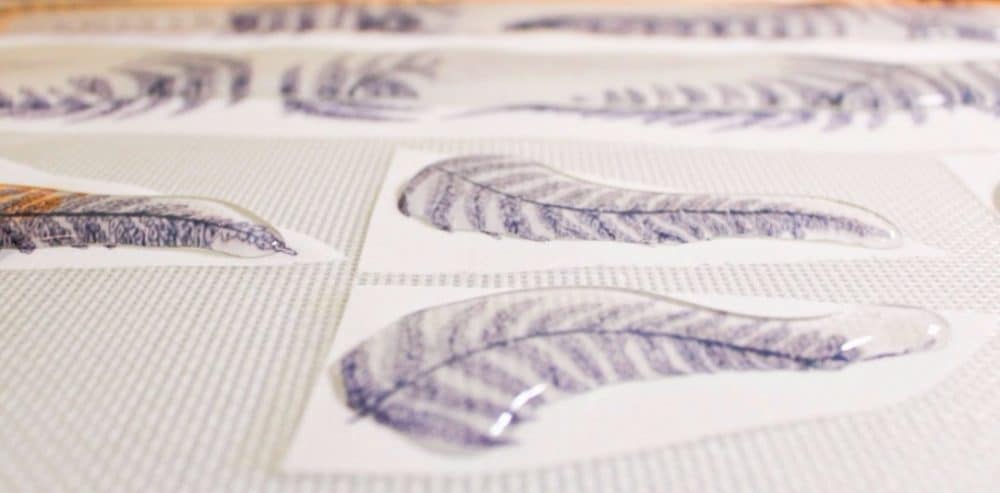
  • Learn tips and tricks on how to create the leaves for the live oak tree and a tip on how to make the leaves in bulk
  • How to create your own impression mat for making the tree bark
  • Tips on how to paint rich colors onto the tree to reflect nature
  • How to create the tree swing detail

Tutorial Chapters

  1. Cake Structure 0:10
  2. Stacking the cake 9:36
  3. Adding the limbs 14:52
  4. Building up branch base 28:30
  5. Making the leaves 30:23
  6. Coloring the leaves 40:11
  7. Carving the cake 46:43
  8. Ganache crumbcoat 55:51
  9. Final ganache crumbcoat 59:09
  10. Making a bark texture mat 1:03:09
  11. Covering the cake 1:06:54
  12. Adding bark texture 1:13:24
  13. Painting the tree 1:20:42
  14. Adding the leaves 1:26:17
  15. Finishing touches 1:37:00

Downloads

Materials List

Star Trek Bust Cake Tutorial

October 15, 2018 Course Preview

Star Trek Bust Cake Tutorial

Skill level: Intermediate

In this Trek-tacular tutorial, Liz re-creates a scene from one of her favorite old-school TV shows, Star Trek: The Next Generation.

In this Halloween special, Doctor Crusher drinks Will Riker's brains with a straw. Learn how to sculpt a body out of cake with realistic details, re-create a face out of modeling chocolate and put it all together.

1:38:42 Minutes of Instruction

What You Will Learn

  • How to create a realistic upper body from sheet cakes
  • Learn tips and tricks on how to create a realistic likeness from any photo reference
  • How to connect the head to the sheet cakes
  • Tips on how to get rich colors for flat colored areas (like Riker's shirt)
  • How to create facial hair on a bust cake

Tutorial Chapters

  1. Measuring out cakes 0:10
  2. Carving the cake 3:25
  3. Making cake clay 5:44
  4. Making the pecs 6:19
  5. Making the abs 11:55
  6. Defining the ribcage 12:57
  7. Defining arms 13:22
  8. Defining Collarbone 14:33
  9. Building up the neck 16:02
  10. Ganache Crumbcoat 16:30
  11. Attaching eyes to skull 20:39
  12. Building up the skull 24:48
  13. Building up the lips 27:57
  14. Adding the nose 31:40
  15. Making the eye lids 41:27
  16. Defining the temples 51:42
  17. Adding the ears 54:42
  18. Making the eyebrows 57:07
  19. Painting the face 58:51
  20. Adding facial hair 1:02:16
  21. Adding the hair 1:09:39
  22. Airbrushing 1:17:27
  23. Attaching the head 1:22:03
  24. Blending the neck 1:22:30
  25. Making the shirt 1:27:05
  26. Painting the shirt 1:31:05
  27. Making the communicator 1:34:40

Downloads

Materials List

Star Trek Communicator Template

Star Trek Bust Cake Tutorial

October 15, 2018 Paid Video

Star Trek Will Riker Bust Cake

Skill level: Intermediate

In this Trek-tacular tutorial, Liz re-creates a scene from one of her favorite old-school TV shows, Star Trek: The Next Generation.

In this Halloween special, Doctor Crusher drinks Will Riker's brains with a straw. Learn how to sculpt a body out of cake with realistic details, re-create a face out of modeling chocolate and put it all together.

1:38:42 Minutes of Instruction

What You Will Learn

  • How to create a realistic upper body from sheet cakes
  • Learn tips and tricks on how to create a realistic likeness from any photo reference
  • How to connect the head to the sheet cakes
  • Tips on how to get rich colors for flat colored areas (like Riker's shirt)
  • How to create facial hair on a bust cake

Tutorial Chapters

  1. Measuring out cakes 0:10
  2. Carving the cake 3:25
  3. Making cake clay 5:44
  4. Making the pecs 6:19
  5. Making the abs 11:55
  6. Defining the ribcage 12:57
  7. Defining arms 13:22
  8. Defining Collarbone 14:33
  9. Building up the neck 16:02
  10. Ganache Crumbcoat 16:30
  11. Attaching eyes to skull 20:39
  12. Building up the skull 24:48
  13. Building up the lips 27:57
  14. Adding the nose 31:40
  15. Making the eye lids 41:27
  16. Defining the temples 51:42
  17. Adding the ears 54:42
  18. Making the eyebrows 57:07
  19. Painting the face 58:51
  20. Adding facial hair 1:02:16
  21. Adding the hair 1:09:39
  22. Airbrushing 1:17:27
  23. Attaching the head 1:22:03
  24. Blending the neck 1:22:30
  25. Making the shirt 1:27:05
  26. Painting the shirt 1:31:05
  27. Making the communicator 1:34:40

Downloads

Materials List

Star Trek Communicator Template

spider cake

October 9, 2018 Blog

Spider Egg Cake Tutorial

Spider Egg Cake Tutorial For Halloween

Learn how to make this super fun spider egg cake using gelatin bubbles, marshmallows and pretzel sticks and filled with a fun sprinkle surprise inside! This cake is sure to be an awesome centerpiece at your next Halloween party!

spider cake

Edible Materials

  • Three - 6”x 2" Black Velvet cakes
  • 2 cups chocolate
  • 2 cups marshmallows
  • easy buttercream colored purple and lime green
  • sprinkles mix
  • pretzel sticks
  • black sprinkles
  • knox powdered gelatin
  • vegetable shortening

Structure Materials

  • 14" cake board

Tools

  • glass bowl
  • 4" metal cutters
  • balloon
  • toothpick
  • tape
  • styrofoam for drying

How To Make The Spider Egg

spider egg cake

To make our spider egg, start by slicing the domes off the tops of your chocolate cakes and make them nice and level. I torte my cakes in half so I have more buttercream stripes but it's not necessary. Use a 4" circle cutter to cut out the center of the cakes. Save the scraps in a bowl.

To make the base of the spider egg, cover the inside of a bowl with some plastic wrap. Pour in some melted chocolate to create a curved base. Chill it in the freezer until set and then take it out of the bowl and remove the plastic wrap. I glued my chocolate sphere down to my cake board with some more melted chocolate.

I colored some easy buttercream lime green and purple to match my sprinkles colors but you can use any colors you would like. When you're making deep colors like purple, you want to build your colors starting with a base. For example, if I just add purple to my buttercream it won't be very dark but if I start with pink, then add purple, it will have a much richer color.

spider egg

Because food coloring is water based, it doesn't like to mix with my oil based buttercream. If you remove about ¼ cup of the buttercream and melt it in the microwave until it's just melted, not too hot and mix it back into the buttercream it will create an emulsion and cause the buttercream to darken in color.

Stack your cakes on top of the chocolate sphere and alternate with your colored buttercream. Fill the center of the cakes with your sprinkles mix and then cover the top of the cake with your cake clay to create the curved part of the "egg". Give the whole thing a crumb coat and let it chill.

Once your cake is chilled, you can give it a final coat of buttercream and make it really smooth and chill it once again.

How To Make A Gelatin Bubble Spider

gelatin bubble spider

Making this gelatin spider is super simple! I start with my some powdered gelatin. It's a 2:1 recipe. I do 2 Tablespoons water, then sprinkle on 1 Tablespoon gelatin and let it absorb into the water. Then I pour two more Tablespoons on top and add the last Tablespoon of gelatin. Let the gelatin bloom for 5 minutes then melt slowly in 15 second increments. Let cool slightly and scoop off the white foam and add some black food coloring. To make the bubble, I blow up a balloon but keep it very small. Tie the balloon in a knot to form the sphere. You only want it to be 3'-4" in size.

I tape a toothpick to the base of the balloon with some painters tape. I tend to use a lot of tape at the base to help support the balloon once it has gelatin on it. Coat the balloon in some vegetable shortening and let it dry for about it minute. Once the surface goes dull you can now roll the balloon around in the melted gelatin. I did two coats on my bubble so that it was a nice dark black. Let the gelatin dry for about 5 minutes between dipping.

Depending on how big your balloon is, you might find that the balloon won't dry upside down. If that's the case then you can just hang the balloon off to the side. There might be a drip on the underside of the balloon but you won't be able to see it once it's on the cake so don't worry about it too much.

Once the balloon has dried overnight, you can pull the balloon out slightly, pop the balloon and let it deflate and pull away from the gelatin. Pull out the balloon.

To seal the hole, melt down some chocolate and spoon a bit out onto some parchment paper or a silicone mat. Place the gelatin bubble on top and chill it until it hardens up. This bit of chocolate seals the hole in the bubble as well as providing a place to easily attach the gelatin bubble to the body of the spider.

To make the body of the spider, I take some of my cake scraps from the spider egg cake and combine it with some buttercream to make cake clay. I roll that clay into a ball and roll it into some black sprinkles. Then you add a little melted chocolate to the top and glue on your gelatin bubble.

Attach 8 pretzel legs to the body with some more melted chocolate and chill the whole thing for about 10 minutes to let it set up and get really firm.

Completing The Spider Egg Cake

spider egg cake

Melt down your marshmallows until they are nice and smooth. You're going to want to wear some gloves for this part or you'll have some very sticky hands. Dip your hands into the marshmallows and stretch the marshmallows out between your fingers. Wrap the strands randomly around the cake to create the web look.

Once you're done adding webbing, attach cake pop stick to the base of your spider with some more melted chocolate and insert the spider onto the top of the cake. Dip some pretzel sticks into some melted chocolate and attach to the ends of the legs and arrange onto the cake so the spider looks like he's sitting on the egg.

I used a couple of green sprinkles for the eyes of the spider to finish off the look.

When you cut into the egg, the spider web sticks to your knife and creates a fun effect that my daughter thought was really entertaining. The sprinkles fall out of the inside of the cake like "eggs" and is pretty fun to see!

Be sure to watch the video on how I put this spider egg cake together and if you decide to make your own spider egg cake, let me know so I can see it!

Happy Halloween everyone!

Recipe

gelatin bubble spider
Print Recipe
5 from 1 vote

Gelatin Bubble Spider

Make this cute gelatin bubble spider topper for a spooky spider egg cake
Prep Time25 minutes mins
Cook Time1 minute min
Total Time26 minutes mins
Course: Dessert
Cuisine: American
Servings: 1
Calories: 429kcal
Author: Elizabeth Marek

Ingredients

Gelatin Bubble Spider

  • 2 tablespoon knox unflavored powdered gelatin
  • 4 tablespoon cool water
  • 2-3 drops black food coloring
  • ¼ cup cake scraps
  • 1 tablespoon buttercream
  • ¼ cup black sprinkles
  • ¼ cup melted chocolate
  • 16 small pretzel sticks
  • 2 green sprinkles for eyes

Other Materials Needed

  • 1 balloon
  • 1 tablespoon vegetable shortening
  • 1 toothpick

Instructions

  • Blow up the balloon to until its 3 or 4 inches wide. Tie the balloon tightly and tape the toothpick to the end of the balloon and secure well with tape. 
    Cover the balloon in a layer of vegetable shortening and let it dry for about five minutes
  • Prepare your gelatin by sprinkling it over the water slowly and letting it fully absorb for 10 minutes. Melt the gelatin in short bursts of 15 seconds in the microwave until fully melted. Do not whisk, just stir gently or you'll incorporate air
  • Let gelatin cool for 5 minutes and scoop off excess white foam. Add a couple of drops of black food coloring and mix. 
  • Dip your balloon into the gelatin and place onto the foam to dry for 5 minutes then dip again for a second coat. Let dry overnight
  • Once your balloon is dry, pop the balloon and pull it out of the gelatin bubble. Coat the hole with a little melted chocolate and place onto a silicone mat or parchment paper to cool in the fridge until set. 
  • smoosh your cake scraps with the buttercream to create some cake clay and roll into a ball. This ball should be about half the size of the gelatin bubble. Roll the cake ball in the black sprinkles. Attach the gelatin ball to the cake ball with some more melted chocolate. 
  • Add some legs by dipping the pretzel sticks into the melted chocolate and placing into the spiders body. Chill for 15 minutes. 
  • Place a cake pop stick into the base of the spiders body with some more melted chocolate and push the spider topper into the top of the egg cake (see video for preparation)
    Glue on the second half of the spiders legs with some more melted chocolate. Add the sprinkles eyes and you're done! 

Nutrition

Calories: 429kcal | Carbohydrates: 43g | Protein: 3g | Fat: 30g | Saturated Fat: 12g | Sodium: 145mg | Potassium: 127mg | Fiber: 3g | Sugar: 32g | Calcium: 11mg | Iron: 2mg

spider cake tutorial

Sugar Flower Ranunculus Tutorial

October 1, 2018 Course Preview

Ranunculus Flower Tutorial

Skill level: Intermediate

Guest instructor Ashley Barbey from The Little Vintage Baking Company brings us a beautiful autumn-themed Ranunculus flower tutorial. Ranunculus flowers are known for layer upon layer of silky petals, creating an amazing delicate bloom. Ashley combines this ranunculus with oak leaves, filler berries and flowers to create a stunning floral spray.

Learn how to create these pieces and how to properly insert and arrange these flowers on a cake.

1:46:12 Minutes of Instruction

What You Will Learn

  • How to create sugar ranunculus flower
  • Learn how to make filler berry clusters and oak leaves
  • How to arrange flowers on a cake

Tutorial Chapters

  1. Making Ranunculus center 0:39
  2. Making 1st row of petals 6:05
  3. Attaching petals to center 9:26
  4. Making 2nd row of petals 13:38
  5. Placing 2nd row of petals 14:44
  6. Making 3rd row of petals 18:13
  7. Attaching 3rd row of petals 22:01
  8. Making 4th row of petals 26:16
  9. Placing 4th row of petals 28:34
  10. Making 5th row of petals 31:30
  11. Placing 5th row of petals 33:19
  12. Making 6th row of petals 36:46
  13. Placing 6th row of petals 37:19
  14. Making 7th row of petals 41:52
  15. Placing 7th row of petals 43:17
  16. Making 8th row of petals 48:47
  17. Placing 8th row of petals 50:36
  18. Making the calyx 54:35
  19. Placing the calyx 56:33
  20. Dusting Ranunculus 57:53
  21. Making berry cluster 1:03:19
  22. Dusting berry cluster 1:04:41
  23. Assembling the berry cluster 1:07:29
  24. Making the blossoms 1:11:33
  25. Dusting the blossoms 1:16:16
  26. Wrapping blossoms 1:19:17
  27. Making oak leaves 1:20:13
  28. Dusting oak leaves 1:24:08
  29. Wrapping oak leaves 1:37:06
  30. Making an arrangement 1:38:07

Downloads

Materials List

Oak Leaf Cutter Template

Sugar Flower Ranunculus Tutorial

October 1, 2018 Paid Video

Ranunculus Flower

Skill level: Intermediate

Guest instructor Ashley Barbey from The Little Vintage Baking Company brings us a beautiful autumn-themed Ranunculus flower tutorial. Ranunculus flowers are known for layer upon layer of silky petals, creating an amazing delicate bloom. Ashley combines this ranunculus with oak leaves, filler berries and flowers to create a stunning floral spray.

Learn how to create these pieces and how to properly insert and arrange these flowers on a cake.

1:46:12 Minutes of Instruction

What You Will Learn

  • How to create sugar ranunculus flower
  • Learn how to make filler berry clusters and oak leaves
  • How to arrange flowers on a cake

Tutorial Chapters

  1. Making Ranunculus center 0:39
  2. Making 1st row of petals 6:05
  3. Attaching petals to center 9:26
  4. Making 2nd row of petals 13:38
  5. Placing 2nd row of petals 14:44
  6. Making 3rd row of petals 18:13
  7. Attaching 3rd row of petals 22:01
  8. Making 4th row of petals 26:16
  9. Placing 4th row of petals 28:34
  10. Making 5th row of petals 31:30
  11. Placing 5th row of petals 33:19
  12. Making 6th row of petals 36:46
  13. Placing 6th row of petals 37:19
  14. Making 7th row of petals 41:52
  15. Placing 7th row of petals 43:17
  16. Making 8th row of petals 48:47
  17. Placing 8th row of petals 50:36
  18. Making the calyx 54:35
  19. Placing the calyx 56:33
  20. Dusting Ranunculus 57:53
  21. Making berry cluster 1:03:19
  22. Dusting berry cluster 1:04:41
  23. Assembling the berry cluster 1:07:29
  24. Making the blossoms 1:11:33
  25. Dusting the blossoms 1:16:16
  26. Wrapping blossoms 1:19:17
  27. Making oak leaves 1:20:13
  28. Dusting oak leaves 1:24:08
  29. Wrapping oak leaves 1:37:06
  30. Making an arrangement 1:38:07

Downloads

Materials List

Oak Leaf Cutter Template

fox cake tutorial

October 1, 2018 Blog

Fox Cake Tutorial

Cute Fox Cake Tutorial Teaches The Basics Of Simple Structures

fox cake tutorial

This cute little fox cake is the 5th installment in my beanie boo series is the perfect tutorial for you if you're wanting to learn how to do a basic sitting animal cake like a dog or a cat or even a stuffed teddy bear. In this tutorial you learn how to do very simple sculpting, how to support the large cake head and how to cover the cake in fondant.

Of course I'm still using my beloved glitter eyes which you can learn how to make below.

Edible Glitter Eyes

  • 1.5″ silicone sphere mold
  • silicone cabochon mold
  • 3 oz simi cakes clear isomalt
  • black food coloring
  • silicone cups for melting isomalt
  • edible glitter (or non-toxic is fine)
  • creme brulee torch
  • cake gloss
  • nitrile gloves for hand protection
  • silmat for protecting your work surface
  • microwave for melting isomalt

edible glitter eyes

Fox Cake Materials List

Structure

  • 12” Cake board
  • Aluminum foil tape
  • ½ “ Metal Flange
  • ½” PVC pipe
  • ½” Male Adapter
  • 4- ⅝” Screw
  • 2- Skewers
  • 2- 6” cardboard cake rounds
  • Milkshake straws

Edible Materials

  • 2- 8”dome cake
  • 1- Doll Pan Cake
  • Easy buttercream
  • White Fondant
  • Brown Fondant
  • Yellow Fondant
  • Ivory Fondant
  • Orange/Red Fondant
  • Black Fondant
  • Black edible artist decorative paint
  • Modeling Chocolate

How To Make A Fox Cake

The first thing I did was bake my board. I combined three different shades of brown fondant and swirled them together to make a nice wood grain. Baking the board just makes the fondant nice and firm so when you add your cake you don't mess it up.

bake your boards

You can also just make your board ahead of time and let it dry naturally if you don't want to bake it but why not? It's so fast and easy!

So for this cake I ended up using the doll cake pan from fat daddios for the body because I saw koalipops use it for a super cute hedgehog cake BUT I don't think it was really the best idea for the fox body in hindsight. The body was a little too short and stout and I had to thin her out quite a bit.

fox cake tutorial

Fox's are naturally thin so if I did this again, I would definitely just stack two six inch rounds on top of each other for the body, carve it into an egg shape and do modeling chocolate for the neck so it was thinner but hey, it's a learning experience right?

I carved the shape of the body an the head and crumb coated them. Then I put the cakes in the fridge to chill and once the buttercream was hard, I did a final cot of buttercream and made sure they where nice and smooth.

Then I put together the structure using my pvc pipe and flange. I cut a hole out of the fondant using my flange as a template so that it fit snugly in the hole. I slid the body of the fox over the pvc pipe and onto the board. Then I placed my straws and cardboard round on top of the body so that the weight of the head is supported. If you didn't have this structure in place, the weight of the fox head would crush the body.

To form the nose, I took a small amount of modeling chocolate and formed it into a small snout and flatted out the back. I pressed that onto the front of the cake and the buttercream holds it in place.

fox cake

Lastly, I covered the cake in fondant in two pieces (front and back) using the paneling technique. Then I added on my legs, eyes, ears, and tail. I painted the legs and the ears with some edible artist decorative paints black for that nice opaque coverage.

My niece and my daughter really enjoyed digging into this cake and for some reason my niece really really wanted to eat one of the eyes (kids right?)

fox cake tutorial

I hope you enjoyed this tutorial! Don't forget to watch the video below for some visuals of how it all came together. I didn't include sound this time because I've had some feedback that people just enjoy watching and don't need all the talking so let me know if that works better for you!


Fox Cake Tutorial


Bean Paste Recipe

September 17, 2018 Paid Video

Bean Paste Recipe


[MM_Member_Decision isMember='false']

Shruti Showcases her Bean Paste Recipe

Guest instructor Shruti Archit Saxena from Shruti's Cake Addiction brings us a highly sought-after bean paste recipe and cosmos flower tutorial. Bean paste offers an exciting new medium that many cake decorators have been wanting to work with, and we are very pleased to have an expert like Shruti on Sugar Geek Show.

This is a Paid Recipe for Members Only

If you are trying to access this paid recipe, you need to become a member to see this tutorial.
Start My Free Trial

[/MM_Member_Decision]

[MM_Member_Decision membershipId='1']

Oops! Something Went Wrong!

I'm trying to view a tutorial

If you are trying to access a paid tutorial, you need to upgrade your membership to see this tutorial.
upgrade your membership

But I'm already a paying member

If you are already a member, please log in to see this tutorial.
log in

If you continue to experience this problem, please contact our support team at support@sugargeekshow.com.
[/MM_Member_Decision]

[MM_Member_Decision membershipId='2']

Recipe

Bean Paste Recipe
Print Recipe
No ratings yet

Bean Paste Recipe

Learn how to make this highly sought-after recipe! Guest instructor Shruti Archit Saxena teaches us her bean paste recipe for making flexible sugar flowers that stay pliable long after typical gumpaste flowers become brittle and break.
Prep Time16 hours hrs
Cook Time1 hour hr 20 minutes mins
Total Time17 hours hrs 20 minutes mins
Course: Dessert
Cuisine: Indian
Calories: 737kcal
Author: Elizabeth Marek

Ingredients

  • 100 g White/Lima beans
  • 85 g Granulated sugar
  • 10 g Vegetable oil
  • 10 g Vegetable shortening
  • 25 g AP flour
  • 20 g Tapioca flour
  • 20 g Corn flour
  • 18 g Liquid glucose
  • 4 g Glycerin

Instructions

  • Soak lima beans for a minimum 16-17 hours in water. Beans will get bigger in size.
  • Peel lima bean skin of each bean by pinching beans together.
  • Place beans in a heavy-bottom pot with 4 cups of water. Start cooking beans over high heat until boiling, then reduce heat to medium, regularly stirring beans for 35-40 minutes until beans break down and get mushy.
    If you use up the water and beans are still not cooked, you can add more water. 
  • Let beans cool. Then grind into a fine paste using a food processor or blender. Pass bean mixture through a fine sieve to remove any lumps.
  • Add bean mixture to a heavy-bottom pot. Start cooking at medium-low heat. Once bean mixture start bubbling, add granulated sugar, stirring constantly until mixture starts to thicken up and leaves the sides of the pan, about 10-20 minutes.
    Remove bean paste from pan.
  • While bean paste is still hot, add AP flour, tapioca starch, corn starch, oil, liquid glucose and vegetable shortening to paste and mix together, being careful not to create any lumps when mixing.
  • Place bean paste onto a sheet of foil in the center. Fold up all sides towards the center, then steam paste in a stovetop steamer on medium heat for 20 minutes.
    If bean paste is sticking to the sides of the foil, it needs to be steamed longer for another 3-4 minutes, then check again to see if the paste is ready.
  • After bean paste has cooled, but not completely cold, take out of foil and add glycerin. Begin to knead until glycerin is fully incorporated.
  • Let bean paste rest for 2-3 hours. Knead paste and add color as you would to gumpaste or fondant.

Notes

This bean paste will keep in the refrigerator for about a week and in a freezer for about 3 months.
When taking the bean paste out from the freezer, you must let it defrost first, then microwave the bean paste for 10-15 seconds at a time and knead it again to get it back to the correct consistency.
Bean paste that has been in the fridge needs to be microwaved in 2-4 second intervals and kneaded to get it back to the correct consistency.
Bean paste can be cooked for 10-12 minutes in pressure cooker or instant pot.

Nutrition

Calories: 737kcal | Carbohydrates: 140g | Protein: 3g | Fat: 20g | Saturated Fat: 11g | Sodium: 4mg | Fiber: 1g | Sugar: 85g | Iron: 1mg

[/MM_Member_Decision]

[MM_Member_Decision membershipId='3']

Recipe

Bean Paste Recipe
Print Recipe
No ratings yet

Bean Paste Recipe

Learn how to make this highly sought-after recipe! Guest instructor Shruti Archit Saxena teaches us her bean paste recipe for making flexible sugar flowers that stay pliable long after typical gumpaste flowers become brittle and break.
Prep Time16 hours hrs
Cook Time1 hour hr 20 minutes mins
Total Time17 hours hrs 20 minutes mins
Course: Dessert
Cuisine: Indian
Calories: 737kcal
Author: Elizabeth Marek

Ingredients

  • 100 g White/Lima beans
  • 85 g Granulated sugar
  • 10 g Vegetable oil
  • 10 g Vegetable shortening
  • 25 g AP flour
  • 20 g Tapioca flour
  • 20 g Corn flour
  • 18 g Liquid glucose
  • 4 g Glycerin

Instructions

  • Soak lima beans for a minimum 16-17 hours in water. Beans will get bigger in size.
  • Peel lima bean skin of each bean by pinching beans together.
  • Place beans in a heavy-bottom pot with 4 cups of water. Start cooking beans over high heat until boiling, then reduce heat to medium, regularly stirring beans for 35-40 minutes until beans break down and get mushy.
    If you use up the water and beans are still not cooked, you can add more water. 
  • Let beans cool. Then grind into a fine paste using a food processor or blender. Pass bean mixture through a fine sieve to remove any lumps.
  • Add bean mixture to a heavy-bottom pot. Start cooking at medium-low heat. Once bean mixture start bubbling, add granulated sugar, stirring constantly until mixture starts to thicken up and leaves the sides of the pan, about 10-20 minutes.
    Remove bean paste from pan.
  • While bean paste is still hot, add AP flour, tapioca starch, corn starch, oil, liquid glucose and vegetable shortening to paste and mix together, being careful not to create any lumps when mixing.
  • Place bean paste onto a sheet of foil in the center. Fold up all sides towards the center, then steam paste in a stovetop steamer on medium heat for 20 minutes.
    If bean paste is sticking to the sides of the foil, it needs to be steamed longer for another 3-4 minutes, then check again to see if the paste is ready.
  • After bean paste has cooled, but not completely cold, take out of foil and add glycerin. Begin to knead until glycerin is fully incorporated.
  • Let bean paste rest for 2-3 hours. Knead paste and add color as you would to gumpaste or fondant.

Notes

This bean paste will keep in the refrigerator for about a week and in a freezer for about 3 months.
When taking the bean paste out from the freezer, you must let it defrost first, then microwave the bean paste for 10-15 seconds at a time and knead it again to get it back to the correct consistency.
Bean paste that has been in the fridge needs to be microwaved in 2-4 second intervals and kneaded to get it back to the correct consistency.
Bean paste can be cooked for 10-12 minutes in pressure cooker or instant pot.

Nutrition

Calories: 737kcal | Carbohydrates: 140g | Protein: 3g | Fat: 20g | Saturated Fat: 11g | Sodium: 4mg | Fiber: 1g | Sugar: 85g | Iron: 1mg

[/MM_Member_Decision]

bean paste flower tutorial

September 15, 2018 Paid Video

Bean Paste Flower

Skill level: Intermediate

Guest instructor Shruti Archit Saxena from Shruti's Cake Addiction brings us a highly sought-after bean paste cosmos flower tutorial. Bean paste is an exciting medium, sugar flowers using this material are flexible, can be rolled out to ultra-thin edges and remain pliable long after a typical gumpaste flower would become brittle.

Shruti teaches out to make this bean paste recipe (a recipe closely guarded and only typically taught in person) and she shows how to make beautiful cosmos flowers using this technique as well as filler flowers. Shruti follows up with a quick demo showing how to arrange these flowers on a cake for maximum effect.

32:20 Minutes of Instruction

What You Will Learn

  • How to create fool-proof bean paste
  • Learn how to make a bean paste cosmos and filler flowers
  • How to arrange flowers on a cake

Tutorial Chapters

  1. Making the center 0:52
  2. Making the cosmos petals 5:14
  3. Thinning out the petals 8:33
  4. Making the smaller petals 11:56
  5. Assembling the big cosmos 15:40
  6. Assembling the small cosmos 20:11
  7. Making the filler flowers 22:40
  8. Arranging the flowers 27:37

Related Videos


Bean Paste Recipe

Downloads

Materials List

bean paste flower tutorial

September 15, 2018 Course Preview

Bean Paste Flower Tutorial

Skill level: Intermediate

Guest instructor Shruti Archit Saxena from Shruti's Cake Addiction brings us a highly sought-after bean paste cosmos flower tutorial. Bean paste is an exciting medium, sugar flowers using this material are flexible, can be rolled out to ultra-thin edges and remain pliable long after a typical gumpaste flower would become brittle.

Shruti teaches out to make this bean paste recipe (a recipe closely guarded and only typically taught in person) and she shows how to make beautiful cosmos flowers using this technique as well as filler flowers. Shruti follows up with a quick demo showing how to arrange these flowers on a cake for maximum effect.

32:20 Minutes of Instruction

What You Will Learn

  • How to create fool-proof bean paste
  • Learn how to make a bean paste cosmos and filler flowers
  • How to arrange flowers on a cake

Tutorial Chapters

  1. Making the center 0:52
  2. Making the cosmos petals 5:14
  3. Thinning out the petals 8:33
  4. Making the smaller petals 11:56
  5. Assembling the big cosmos 15:40
  6. Assembling the small cosmos 20:11
  7. Making the filler flowers 22:40
  8. Arranging the flowers 27:37

Related Videos

Bean Paste Recipe

Downloads

Materials List

Bean Paste Recipe

September 15, 2018 Paid Video

Bean Paste Recipe


Recipe

Bean Paste Recipe
Print Recipe
No ratings yet

Bean Paste Recipe

Learn how to make this highly sought-after recipe! Guest instructor Shruti Archit Saxena teaches us her bean paste recipe for making flexible sugar flowers that stay pliable long after typical gumpaste flowers become brittle and break.
Prep Time16 hours hrs
Cook Time1 hour hr 20 minutes mins
Total Time17 hours hrs 20 minutes mins
Course: Dessert
Cuisine: Indian
Calories: 737kcal
Author: Elizabeth Marek

Ingredients

  • 100 g White/Lima beans
  • 85 g Granulated sugar
  • 10 g Vegetable oil
  • 10 g Vegetable shortening
  • 25 g AP flour
  • 20 g Tapioca flour
  • 20 g Corn flour
  • 18 g Liquid glucose
  • 4 g Glycerin

Instructions

  • Soak lima beans for a minimum 16-17 hours in water. Beans will get bigger in size.
  • Peel lima bean skin of each bean by pinching beans together.
  • Place beans in a heavy-bottom pot with 4 cups of water. Start cooking beans over high heat until boiling, then reduce heat to medium, regularly stirring beans for 35-40 minutes until beans break down and get mushy.
    If you use up the water and beans are still not cooked, you can add more water. 
  • Let beans cool. Then grind into a fine paste using a food processor or blender. Pass bean mixture through a fine sieve to remove any lumps.
  • Add bean mixture to a heavy-bottom pot. Start cooking at medium-low heat. Once bean mixture start bubbling, add granulated sugar, stirring constantly until mixture starts to thicken up and leaves the sides of the pan, about 10-20 minutes.
    Remove bean paste from pan.
  • While bean paste is still hot, add AP flour, tapioca starch, corn starch, oil, liquid glucose and vegetable shortening to paste and mix together, being careful not to create any lumps when mixing.
  • Place bean paste onto a sheet of foil in the center. Fold up all sides towards the center, then steam paste in a stovetop steamer on medium heat for 20 minutes.
    If bean paste is sticking to the sides of the foil, it needs to be steamed longer for another 3-4 minutes, then check again to see if the paste is ready.
  • After bean paste has cooled, but not completely cold, take out of foil and add glycerin. Begin to knead until glycerin is fully incorporated.
  • Let bean paste rest for 2-3 hours. Knead paste and add color as you would to gumpaste or fondant.

Notes

This bean paste will keep in the refrigerator for about a week and in a freezer for about 3 months.
When taking the bean paste out from the freezer, you must let it defrost first, then microwave the bean paste for 10-15 seconds at a time and knead it again to get it back to the correct consistency.
Bean paste that has been in the fridge needs to be microwaved in 2-4 second intervals and kneaded to get it back to the correct consistency.
Bean paste can be cooked for 10-12 minutes in pressure cooker or instant pot.

Nutrition

Calories: 737kcal | Carbohydrates: 140g | Protein: 3g | Fat: 20g | Saturated Fat: 11g | Sodium: 4mg | Fiber: 1g | Sugar: 85g | Iron: 1mg
Howling Steampunk Wolf Cake Tutorial

September 1, 2018 Course Preview

Steampunk Wolf Cake Tutorial

Skill level: Intermediate

This howling wolf cake is a great tutorial for learning how to create an angled structure, incorporating stacked cake and RKT for filler to control the size and weight of the finished cake, creating fun details using modeling chocolate, simple airbrushing and metallic painting. You'll even learn how to create a fun, slate texture for the floor.

56:48 Minutes of Instruction

What You Will Learn

  • How to create a fun steampunk wolf cake design
  • Learn how to make an angled cake structure
  • How to stack a tall cake in a way that makes serving slices easy
  • Learn how to airbrush using cocoa butter and get a metallic finish

Tutorial Chapters

  1. Making the structure 0:10
  2. Prepping the cake board 3:16
  3. Making structure food-safe 8:24
  4. Prepping structure for cake 9:03
  5. Building up the bottom 10:51
  6. Stacking the cake 13:34
  7. Carving down the cake 16:23
  8. Applying crumbcoat 18:39
  9. Building up the back legs 19:38
  10. Building up neck & head 20:19
  11. Carving the wolf 23:23
  12. Final crumbcoat 25:24
  13. Making tile floor 26:47
  14. Attaching tiles 29:33
  15. Piping the grout 34:10
  16. Building up the metal 36:07
  17. Designing the head 43:17
  18. Adding metal to the other side 46:06
  19. Covering the tail 47:52
  20. Airbrushing with cocoa butter 48:34
  21. Finishing paint 54:53

Downloads

Materials List

Wolf Board Template 01

Wolf Board Template 02

Wolf Board Template 03

Steampunk Wolf Photo Reference

Howling Steampunk Wolf Cake Tutorial

September 1, 2018 Paid Video

Steampunk Wolf Cake

Skill level: Intermediate

This howling wolf cake is a great tutorial for learning how to create an angled structure, incorporating stacked cake and RKT for filler to control the size and weight of the finished cake, creating fun details using modeling chocolate, simple airbrushing and metallic painting. You'll even learn how to create a fun, slate texture for the floor.

56:484 Minutes of Instruction

What You Will Learn

  • How to create a fun steampunk wolf cake design
  • Learn how to make an angled cake structure
  • How to stack a tall cake in a way that makes serving slices easy
  • Learn how to airbrush using cocoa butter and get a metallic finish

Tutorial Chapters

  1. Making the structure 0:10
  2. Prepping the cake board 3:16
  3. Making structure food-safe 8:24
  4. Prepping structure for cake 9:03
  5. Building up the bottom 10:51
  6. Stacking the cake 13:34
  7. Carving down the cake 16:23
  8. Applying crumbcoat 18:39
  9. Building up the back legs 19:38
  10. Building up neck & head 20:19
  11. Carving the wolf 23:23
  12. Final crumbcoat 24:38
  13. Making tile floor 26:47
  14. Attaching tiles 29:33
  15. Piping the grout 34:10
  16. Building up the metal 36:07
  17. Designing the head 43:17
  18. Adding metal to the other side 45:47
  19. Covering the tail 47:32
  20. Airbrushing with cocoa butter 48:13
  21. Finishing paint 54:24

Sculpted Steampunk Wolf Cake Tutorial

Downloads

Materials List

Wolf Board Template 01

Wolf Board Template 02

Wolf Board Template 03

Steampunk Wolf Photo Reference

Edible Watercolor

August 24, 2018 Blog

Edible Watercolor

Guest Instructor Angela Nino of The Painted Box shows how to make edible watercolor washes.

Edible watercolor is the perfect medium to use on pretty much anything. Fondant, gumpaste, modeling chocolate, royal icing, wafer paper and more. The colors react very much like real watercolors and because it's made with alcohol, the liquid evaporates very quickly leaving behind only the color. This is really important because if you use water, the liquid tends to dissolve the sugar and cause a soppy mess.

edible watercolor
I first learned about edible watercolor from the amazing Angela Nino of The Painted Box. She makes these incredible cookies with gorgeous artistic watercolor effects. She's an artist at heart and her cookies are her medium. I was so excited when she shared this recipe with us because it really has become a staple in my cake decorating and I owe it all to her genius 😀

Watercolor Cookies Angela Nino
www.thepaintedbox.com

Check out the full tutorial on how to make edible watercolors below

Edible watercolor is the perfect medium to use on pretty much anything. Fondant, gumpaste, modeling chocolate, royal icing, wafer paper and more.

Recipe

Watercolor Cookies Angela Nino
Print Recipe
5 from 4 votes

Edible Watercolor Recipe

Make edible watercolors. Recipe from Angela Nino of The Painted Box
Prep Time5 minutes mins
Cook Time0 minutes mins
curing1 day d
Total Time1 day d 5 minutes mins
Course: Dessert
Cuisine: American
Servings: 4 ounces
Calories: 190kcal
Author: Elizabeth Marek

Ingredients

  • 4 ounces everclear or other high-proof grain alcohol
  • 1 Tablespoon food coloring

Instructions

  • Place your food coloring into a glass jar
  • Pour in your Everclear
  • Mix and cover with the lid. Let the mixture cure overnight.
  • Strain out the gel clumps. Now your edible water color is ready to use.

Nutrition

Serving: 1oz | Calories: 190kcal
narwhal cake tutorial

August 20, 2018 Free Video

Narwhal Cake Tutorial

Sculpted Narwhal Cake Tutorial For Beginners Is Fun And Easy To Make

narwhal cake tutorial

This simple narwhal cake is right on trend and a great tutorial for passionate beginner cake decorators who want to learn a little bit more about cake decorating but still keeping it simple. In this tutorial I will show you some super simple cake carving and talk about tips and tricks for covering a sculpted cake flawlessly.

We'll make a beautiful sugar horn using a mold (don't worry, it's so easy!), glitter eyes and a fun water ganache board.

how to make a narwhal horn

Narwhal Cake Materials List

Structure

  • 14" cake board
  • Two wooden skewers
  • Toothpicks

Edible Materials

  • Two 10" round cakes
  • One 8" dome cake
  • 2 lbs white fondant
  • Water ganache
  • Blue food coloring
  • Tylose powder
  • 12 oz clear isomalt
  • Easy buttercream
  • One teaspoon flash dust

glitter eyes

Tools

  • Unicorn horn mold
  • Creme brule torch
  • Cake gloss
  • Flexible smoother
  • Offset spatula
  • Fondant smoother
  • Rolling pin

Edible Glitter Eyes

  • 1.5″ silicone sphere mold
  • silicone cabochon mold
  • 3 oz simi cakes clear isomalt
  • black food coloring
  • silicone cups for melting isomalt
  • edible glitter (or non-toxic is fine)
  • creme brulee torch
  • cake gloss
  • nitrile gloves for hand protection
  • silmat for protecting your work surface
  • microwave for melting isomalt

narwhal cake tutorial

Narwhal Beanie Boo Cake

This is the first cake in my beanie boo series, cakes based off my daughter Avalon's favorite beanie boo stuffed animals. I love the shape of this beanie boo because it's very simple and basically cake shaped already so it's a great beginner cake.

Each cake in the beanie boo series progressively get's more complicated and shows you more techniques so in theory, by the time you're done watching the series you will have learned the basics of sculpting cakes and various cake structures.

narwhal beanie boo

Narwhal Cake Ideas

There are a lot of narwhal cakes out there and I just had to include a few of my favorites in this post just in case you wanted to see a few different ways of making a narwhal cake.

ice cream narwhal

I love this adorable ice cream narwhal cake! Not sure who made it so if you know please let me know so I can tag them!

cute narwhal cake

This is a super simple narwhal cake. Love the little eyelashes and sweet smile. Cake by Paris Custom Cakes.

narwhal cake topper

Check out this adorable free narwhal cake topper tutorial from crumb avenue!

How To Make A Narwhal Cake

So to make our narwhal cake you want to start off by baking your cakes! I used my red velvet cake because I had some extras from another project but you could use any cake recipe for this kind of cake. The carving is very minimal, just make sure your cakes are cold when you carve. Soft cake = soft butter which means more problems carving.

red velvet cake slice

Stack your cakes with buttercream and carve them into your desired shape. I like using the cake scraps to make cake clay to build up the top of the head. Narwhals have very big heads! Probably why they are so cute!

Crumb coat your cake then smooth it down with your acetate smoother. Take care to remove any lumps or bumps so that your fondant lays very cleanly. I always chill my cakes after the final coat of buttercream so that the buttercream is nice and firm before I cover in fondant.

narwhal cake tutorial

Make your narwhal tooth (yes it's a tooth!) using the simicakes unicorn horn mold and isomalt. I think I used about 10oz of isomalt. I put some edible glitter in my horn for some added sparkle but that's optional.

Cover your narwhal cake in a thin layer of light blue fondant and trim off the excess. Create a strip of white fondant for the lower part of the body. I formed some fins and a tail out of fondant as well and let it harden up before attaching to my cake. Usually 24 hours is enough time so make these on the first day and attach them on day two. If you have time, make them a few days in advance so they are nice and firm.

glitter eyes

Attach the isomalt horn and glitter eyes to your cake. Mix up your water ganache and pour it onto the board. Don't forget a rolled snake of white fondant for the border so the ganache doesn't drip out. Attach your fins and tails and you're done!

Super cute and easy narwhal cake. Be sure to watch the full video tutorial on how to make a narwhal cake below and if you liked this tutorial, please leave us a comment!

Learn how to make a simple narwhal cake with shiny sugar horn, glitter eyes and chocolate water effect. Dive into cake decorating with this fun tutorial!

dinosaur egg cake

August 20, 2018 Free Video

Dinosaur Egg Cake Tutorial

This Dinosaur Egg Cake With Baby Dinosaur Topper Is Perfect For A Dinosaur Birthday Party!

Learn to make a fun sculpted dinosaur egg cake using simple cake structure techniques. The dinosaur topper made from rice cereal and isomalt eyes and watercolor scales can be made ahead of time and placed on top of the egg cake before setting up.

dinosaur egg cake

Materials List

One - 8” Chocolate Dome Cake
Two - 8” Chocolate Cake Rounds
12 oz White Chocolate Melts
White Chocolate Ganache
Fondant- Black, White
Edible Artist Decorative Paint- Brown, White
Crushed Graham Crackers
Mini Marshmallows
Rice Cereal
Melted Chocolate
Chow Mein Noodles
Slivered Almonds
Edible Water Color- Blue
Airbrush Colors- Blue & Yellow
6 oz isomalt
4 lbs modeling chocolate 

Structure

1- 6”x¼” Hex bolt
1- ¼” nuts
1- ¼” split lock washers
2- ¼” fender washers
12” cake board
2- ⅜” Dowels
Aluminum foil tape
Support Straws

Tools

Offset spatula
Serrated knife
Exacto blade
Rolling pin
Thin acetate smoother
Creme brulee torch
Cornstarch poof
Modeling tools
¾” flat paint brush
Dinosaur Eye Mold- Simi Cakes
Dinosaur Eye Transfer Sheets
Reptile Skin Impression Mat
¼” drill bit
Power Drill
Pliers or ¼” wrench
Ruler
Air Brush
Paper Towel

How To Make A Dinosaur Topper

dinosaur topper

To make our dinosaur egg cake the first thing you have to do is make the dinosaur baby topper from rice cereal treats. I was deeply inspired by the work of Clay Works By Jen on Instagram. Her cute dinosaur sculptures where the perfect combination of cute and realistic for my daughter Avalon's big dinoFOUR birthday party!

First I made the baby raptor topper out of rice cereal treats. After shaping the head I carved it down a bit and added the isomalt eyes. Then I built up the features of the face like the brows, cheeks and jaw with modeling chocolate.

dinosaur topper

Then I added some white fondant over the top of my sculpture and textured it with a marvelous molds reptile skin mat. The texture makes the perfect surface to add some color. First I added a little yellow airbrush color to the top of the head and nose then I painted on some blue edible watercolors. Then I removed the excess color with a slightly damp paper towel to bring out the texture.

dinosaur topper

How To Make A Dinosaur Egg Cake

To make the dinosaur egg cake I wanted to make sure that the egg could hold it's shape under the weight of all the cake and the topper. I placed the 8" dome cake into a dome pan lined with some plastic wrap. Then I poured in some white chocolate candy melts and placed the cake inside the chocolate so that it coats the cake. Chill until set. After the cake is set I can stack the rest of the cakes with white chocolate ganache and stack on top of the dome cake.

dinosaur egg cake

I want the cake board to have a cool texture so I used my torched fondant technique on some black fondant. To get that realistic dirt look, I brushed the surface with brown and white edible artist decorative paint and some crushed graham crackers. Place it onto the board and trim off the excess fondant.

Drill a hole in the center of the cake board and attach the 8" bolt. This bolt secures the cake into place and keeps it from falling over. Combine some melted marshmallows with chow mein noodles and slivered almonds. Place the mixture around the base of the cake board to make the nest.

dinosaur egg cake

Place the cake on top of the noodles to secure them. Crumb coat the cake. Roll out some modeling chocolate to build up a jagged shell and wrap it around the top of the cake. Build up the outside of the cake with white chocolate ganache to blend the seam between the chocolate and the cake.

dinosaur egg cake

I decided to airbrush the inside of the cake with some blue airbrush color to give the topper some definition. Place the dinosaur topper on top. Don't forget to put straws under the topper to support the weight. I colored my dino with some yellow airbrush color and hand-painted on some blue edible watercolor. Wipe off the excess color with a damp paper towel.

Finish off the dinosaur cake by painting a blue stripe down the side of the cake with the airbrush and outline with white edible artist decorative paint. Add some tiny teeth around his mouth to complete his adorable face.

Dinosaur Birthday Cake

dinosaur birthday party

I loved making this cake for Avalon's fourth birthday party! I paired this dinosaur egg cake with another sculpted blue raptor cake. The table was decorated with tons of gorgeous hand-painted dinosaur cookies from the amazing Sara Sweets.

dinosaur cookies

The whole party was at a rental house on the Oregon coast with friends and family all around. Avalon had such a great time and LOVED all her dinos! Who says dinosaurs aren't for girls.

Be sure to watch the full video tutorial on how to make this dinosaur egg cake.

dinosaur egg cake


Blue Raptor Dinosaur Tutorial

August 15, 2018 Course Preview

Blue Raptor Dinosaur Tutorial

Skill level: Advanced

Avalon's Dino-FOUR birthday was this past week and I wanted to create a big showpiece cake for her birthday along with a baby dinosaur cake and this was the result!

Learn to make a cutesy blue raptor showpiece out of rice cereal treats or cake, sparkling dinosaur eyes, how to scale photo references to create any cake you want and how to make a cake structure to match.

1:30:29 Minutes of Instruction

What You Will Learn

  • How to scale photo reference to size for any cake design
  • Learn how to make cake structures based on photo reference
  • How to sculpt a realistic raptor dinosaur
  • Learn techniques for making the raptor out of cake or rice cereal treats
  • How to make edible dinosaur eyes
  • Liz showcases several different painting techniques
  • How to make a crackle board texture

Tutorial Chapters

  1. How to scale photo reference 0:10
  2. Working at ¼ scale 5:28
  3. Planning the structure 8:05
  4. Cutting the boards 11:44
  5. Building the structure 15:39
  6. Gluing structure 20:16
  7. Making the structure food-safe 23:45
  8. Adding arms 27:21
  9. Adding rice cereal treats 32:20
  10. Wrapping the rice cereal 35:56
  11. Building up the mouth 37:03
  12. Carving down 40:00
  13. Carving the head 45:41
  14. Making dinosaur eyes 48:26
  15. Building up the face 51:16
  16. Working on the mouth 58:17
  17. Making raptor teeth 1:01:01
  18. Building up arms 1:03:09
  19. Working on the feet 1:05:23
  20. Adding toe nails & finger nails 1:07:22
  21. Ganache crumb coat 1:09:57
  22. Covering in fondant 1:10:50
  23. Texturing fondant 1:14:12
  24. Detailing the face 1:16:17
  25. Painting the dinosaur 1:20:06
  26. Finishing the board 1:25:43

Sculpted Dinosaur Face Tutorial

Downloads

Materials List

Raptor Reference 01

Raptor Reference 02

Raptor Reference 03

Leg Structure Template

Blue Raptor Dinosaur Tutorial

August 15, 2018 Paid Video

Blue Raptor Dinosaur

Skill level: Advanced

Avalon's Dino-FOUR birthday was this past week and I wanted to create a big showpiece cake for her birthday along with a baby dinosaur cake and this was the result!

Learn to make a cutesy blue raptor showpiece out of rice cereal treats or cake, sparkling dinosaur eyes, how to scale photo references to create any cake you want and how to make a cake structure to match.

1:30:29 Minutes of Instruction

What You Will Learn

  • How to scale photo reference to size for any cake design
  • Learn how to make cake structures based on photo reference
  • How to sculpt a realistic raptor dinosaur
  • Learn techniques for making the raptor out of cake or rice cereal treats
  • How to make edible dinosaur eyes
  • Liz showcases several different painting techniques
  • How to make a crackle board texture

Tutorial Chapters

  1. How to scale photo reference 0:10
  2. Working at ¼ scale 5:28
  3. Planning the structure 8:05
  4. Cutting the boards 11:44
  5. Building the structure 15:39
  6. Gluing structure 20:16
  7. Making the structure food-safe 23:45
  8. Adding arms 27:21
  9. Adding rice cereal treats 32:20
  10. Wrapping the rice cereal 35:56
  11. Building up the mouth 37:03
  12. Carving down 40:00
  13. Carving the head 45:41
  14. Making dinosaur eyes 48:26
  15. Building up the face 51:16
  16. Working on the mouth 58:17
  17. Making raptor teeth 1:01:01
  18. Building up arms 1:03:09
  19. Working on the feet 1:05:23
  20. Adding toe nails & finger nails 1:07:22
  21. Ganache crumb coat 1:09:57
  22. Covering in fondant 1:10:50
  23. Texturing fondant 1:14:12
  24. Detailing the face 1:16:17
  25. Painting the dinosaur 1:20:06
  26. Finishing the board 1:25:43

Sculpted Dinosaur Face Tutorial

Downloads

Materials List

Raptor Reference 01

Raptor Reference 02

Raptor Reference 03

Leg Structure Template

Raptor Body Template 01

Raptor Body Template 02

rainbow fish cake tutorial

August 13, 2018 Free Video

Rainbow Fish Tutorial

This Rainbow Fish Cake Tutorial Is The Next Step In Learning How To Make Gravity Defying Sculpted Cake Structures

rainbow fish tutorial with a simple cake structure, glitter eyes, crackled fondant and fun watercolor scales

In this rainbow fish cake tutorial I'm going to introduce you to one of my favorite things to use in structured sculpted cakes, long bolts. If you have enjoyed the other cakes in this series so far (sculpted turtle cake & octopus cake tutorial) then you're probably ready to take the next step in sculpted cakes.

This tutorial will teach you the basics of building a simple structured cake using items you can find at your hardware store. I'll show you how to build your structure, sculpt a sphere out of cake and chocolate, make fun realistic shells and sea anemones, add the details to our rainbow fish and put it all together.

rainbow fish beanie boo

Materials List

One  6” Pink/Yellow Marbled Cake Round
One  6” Pink/Yellow Marbled Dome Cake
One  8” Vanilla Cake Dome
Food coloring - Ivory, yellow, blue, pink, purple, green, black
Confectioners glaze
Flash Dust
3 cups buttercream
12 oz candy melts
2 lbs White fondant divided
3 oz Pink fondant
3 oz Purple fondant
5 oz gumpaste
Vegetable shortening
Edible Artists Decorative paint
Hot glue (low temp)
Everclear or other alcohol
Gold dust

cake structure materials

Structure

Two 6” cardboard round
12” wooden cake board
Aluminum foil tape
Two skewers

Tools

Small offset spatula
Serrated knife
Scissors
Glue gun
Low temp glue stick
Medium round paintbrush

glitter eyes

Edible Glitter Eyes

  • 1.5″ silicone sphere mold
  • silicone cabochon mold
  • 3 oz simi cakes clear isomalt
  • black food coloring
  • silicone cups for melting isomalt
  • edible glitter (or non-toxic is fine)
  • creme brulee torch
  • cake gloss
  • nitrile gloves for hand protection
  • silmat for protecting your work surface
  • microwave for melting isomalt

Rainbow Fish Cake Structure

rainbow fish cake structure

Let's talk a little bit about the cake structure. I know that some of you may not have access to the same structure materials as other people in the world but most hardware stores have some version of a bolt. Usually you would see a bolt that is shorter but they actually come in several lengths.

If you can't find a bolt long enough then another option is threaded rod (all-thread). This also comes in various lengths but here in the US, it's generally either 12" or more. You can cut threaded rod with a hacksaw or a Dremel tool with a metal cutting attachment. Some hardware stores will even cut them for you if you ask nicely.

To support my fish cake and to create the gravity defying look, I'm using washers. Washers are flat pieces of metal with a hole in the middle which creates more surface area for a cake or a board to sit against than a small little nut. When you start tightening things down, the nut tends to dig into the surface of soft materials like boards or chocolate. The washer spreads out the pressure from tightening the nut so it doesn't dig in.

In this cake structure, I also use the washer as a way to support the weight of the heavy chocolate sphere and cake. Even though it's very small and might not seem like enough to hold the cake, it's actually very strong and you only need a couple inches to support the chocolate sphere which results in a cake that looks like it's floating.

crackle fondant

Making The Rainbow Fish Cake

For the cake I used my favorite vanilla cake recipe. I colored half the batter yellow and half bright pink using Americolor food coloring. I swirled the colors together after adding them to the cake pan. You don't have to color your cake but I liked the pop of bright colors when I cut into the cake.

Using chocolate for the support under the cake is a great way to make a sphere without using any styrofoam. Because we're using chocolate instead of cake, the sphere will not lose it's shape under the weight of the cake stacked on top.

rainbow fish cake

How To Make A Rainbow Fish Cake

Now I know what you must be thinking, this isn't like THE rainbow fish exactly and I know this. My daughter loves those books but this cake isn't inspired by THAT rainbow fish, it's actually inspired by one of her beanie boo keychains (just like my other cakes in this series) that looks like a rainbow fish. This little guy hops a ride on her backpack every morning to school and she happened to name him rainbow fish.

To make your rainbow fish cake, assemble your structure by inserting your bolt through a hold drilled into the center of your cake board. Insert your bolt and secure with your nuts, locking washer and washers.

under the sea fondant

Drill a hold in the center of an 8" cake cardboard round. Stack and fill your 8" dome on top then chill. Drill a hold in a 6" cardboard round. Then stack and fill your 6" cakes and carve into a dome. Crumb coat and chill.

Pour your chocolate into your 6" cake pan lined with plastic wrap and let chill until firm. Once chilled, drill a hold into the center of the chocolate.

Next we're going to cover our 8" cake dome in some white fondant and texture it with some crumpled up aluminum foil. Brush the surface with some ivory food coloring and wipe off the excess food coloring to reveal the texture. Place your textured cake onto the cake board.

rainbow fish cake

Screw on a nut until it is flush with the top of the cake. Place your washer on top of the nut then slide your chocolate dome on top. Place your 6" cake on top of the chocolate. Add more buttercream and ice until smooth. Add a small bit of pointed fondant to the back of the sphere to make the tail.

Cover your cake in white fondant in two pieces. One on each side. Cut off the excess. Crackle some fondant for the side fins, top fin and tail using purple fondant and flash dust. Cut the fondant into the fin shapes and insert a toothpick. Let dry overnight.

Add a small ball of fondant to the front of your fish for the nose. Cover the face of the fish with some pink fondant and cut into a round shape. Remove the excess fondant. Use some edible watercolors to color the sides of your fish. Paint on some scales using black food coloring. Add your fins to the fish and your fondant shells to the base of the cake.

Watch the full video tutorial below to see how to make this super fun rainbow fish cake tutorial.

rainbow fish sculpted cake teaches you how to build a simple gravity defying cake structure, under the sea fondant details, edible water color techniques, glitter eyes and crackled fondant.

male face sculpting tutorial

August 1, 2018 Blog

Male Face Sculpting Tutorial

Skill level: Intermediate

Learning to sculpt a face can seem so daunting but with Liz's formula for sculpting realistic faces, you'll be on your way in no time. Learn how to sculpt a male face using Liz's chocolate skull mold, realistic sugar eyes and artist calipers. Learn how to keep proportions check your work and even tips for getting sculpting a portrait.

40:58 Minutes of Instruction

Learning to sculpt a face can seem so daunting but with Liz's formula for sculpting realistic faces, you'll be on your way in no time. Learn how to sculpt a male face using Liz's chocolate skull mold, realistic sugar eyes and artist calipers. Learn how to keep proportions check your work and even tips for getting sculpting a portrait.

What You Will Learn

  • How to sculpt a realistic male face out of modeling chocolate and isomalt
  • Learn how to scale photo reference to match the size of your sculpture
  • How several common mistakes and errors artists make when sculpting the face and how to fix them
  • Learn how to add the eyes, cheeks, nose, lips and ears in a way that is repeatable and consistent
  • How to check your work for errors and fix them

Tutorial Chapters

  1. Sizing reference photos 1:03
  2. Blocking in the face 1:45
  3. Coloring modeling chocolate 6:19
  4. Building up the head 7:48
  5. Easy sculpting stand 8:42
  6. How to measure from reference 9:17
  7. Making the eyelids 11:03
  8. Adding on the cheeks 15:28
  9. Adding the brow 16:45
  10. Checking the profile 17:31
  11. Adding the lips 20:24
  12. Adding the nose 26:57
  13. Filling out eyelids & cheeks 33:41
  14. Building up the jaw & forehead 36:42
  15. Adding the ears 37:35
  16. Hairline & Smoothing the face 39:04

Sculpted Male Face Tutorial

People have been begging me to create a male face mold tutorial, so what better male face to use as a basis for our study than Elvis?! Elvis has a very 'traditional' male face with some features that carry over to a lot of other male faces, which can easily be adapted or tweaked to your liking.

Learn how to create the eyes, nose, lips, ears, cheeks, chin and hairline in this sculpting tutorial.

Downloads

Materials List

Male Reference 01

Male Reference 02

male face sculpting tutorial

August 1, 2018 Paid Video

Male Face Sculpting

Skill level: Intermediate

People have been begging me to create a male face mold tutorial, so what better male face to use as a basis for our study than Elvis?! Elvis has a very 'traditional' male face with some features that carry over to a lot of other male faces, which can easily be adapted or tweaked to your liking.

Learn how to create the eyes, nose, lips, ears, cheeks, chin and hairline in this sculpting tutorial.

40:58 Minutes of Instruction

What You Will Learn

  • How to sculpt a realistic male face out of modeling chocolate and isomalt
  • Learn how to scale photo reference to match the size of your sculpture
  • How several common mistakes and errors artists make when sculpting the face and how to fix them
  • Learn how to add the eyes, cheeks, nose, lips and ears in a way that is repeatable and consistent
  • How to check your work for errors and fix them

Tutorial Chapters

  1. Sizing reference photos 1:03
  2. Blocking in the face 1:45
  3. Coloring modeling chocolate 6:19
  4. Building up the head 7:48
  5. Easy sculpting stand 8:42
  6. How to measure from reference 9:17
  7. Making the eyelids 11:03
  8. Adding on the cheeks 15:28
  9. Adding the brow 16:45
  10. Checking the profile 17:31
  11. Adding the lips 20:24
  12. Adding the nose 26:57
  13. Filling out eyelids & cheeks 33:41
  14. Building up the jaw & forehead 36:42
  15. Adding the ears 37:35
  16. Hairline & Smoothing the face 39:04

Sculpted Male Face Tutorial

Downloads

Materials List

Male Reference 01

Male Reference 02

how to make edible eyes

July 28, 2018 Blog

Realistic Edible Eyeball Tutorial

Realistic Edible Eyeball Tutorial Made With Isomalt and Edible Image Paper Is Perfect For Sculpted Bust Cakes

A realistic edible eyeball is something I have been obsessed with for years. I started by painting fondant with food coloring to get the realistic effect that I wanted. Paying attention to lights and shadows and highlights.

realistic edible eyeball

I would meticulously add individual eyelashes made from fondant, I was that obsessed.

fairy bust cake

The problem with using fondant eyes though is that if I ever made a mistake or had to adjust an eyelid (which I often do) then the paint job would get totally messed up.

Edible Eyeball Inspiration

I would observe how eyeballs where made in the special effects world. I saw this video from the Stan Winston school and an idea for making eyeballs out of isomalt was born in my brain.

I just didn't know how yet.

Then one day I saw my dear friend Sidney from SimiCakes Isomalt post this incredible new product called an isomalt transfer sheet. It transfers a printed image onto the hot isomalt for a super realistic affect.

simicakes transfer sheets

That's it!

I immediately contacted her and asked if we could make some eyeball transfer sheets. I experimented with molds, sizes, proportions, and the process of making the eyes. The isomalt eyes impressed the judges from Halloween Wars so much, they thought they where made of glass.

Perfecting Edible Eyeballs

The edible image eyes looked great but where so small, it was a little hard to cut out so eventually we switched to edible images which where a lot easier to cut and handle without damage.

edible eye transfer sheets

The way that I make the edible eyes now uses my ½" eye molds or 1" eye molds and transfer sheets which can be purchased in our shop. You can also use this technique to make any eye you want really. Choose a silicone sphere mold the side you want and you can either print out an iris on your own edible image sheet or you can hand-paint it with food coloring and cut it out. The process is the same.

How To Make Realistic Edible Eyeballs

realistic eyeball tutorial

I hope you enjoy this realistic edible eyeball tutorial and if you use this technique, please tag me @sugargeekshow so I can see it!

Materials Needed
½" eye mold (this is what fits the chocolate skull mold) or 1" eye mold
2 oz clear isomalt
White food coloring
½" iris or 1" iris edible images
Cake gloss or other clear edible isomalt sealer

Tools
Creme brulee torch
Silicone mat
Nitrile gloves
Small scissors
X-acto blade

Realistic Edible Eyes

I love the way these realistic edible eyes look on the finished bust cake. I really feel like it gives my sculpted cakes a whole new level of life. If you want to learn more about sculpting realistic faces, bust cakes and facial anatomy, check out my Egyptian Goddess Cake Tutorial.

egyptian bust cake tutorial

Be sure to watch the full video tutorial below on how to make your own realistic edible eyeballs.

July 23, 2018 Blog

Octopus Cake Tutorial

Octopus Cake Tutorial With Beautiful Sugar Eyes and A Colorful Pink & Funfetti Cake Inside

octopus cake tutorial

This octopus cake tutorial is the second sculpted cake in my beanie boo series. If you loved the sculpted sea turtle cake, then you'll love this octopus cake tutorial! In this tutorial I show you how to make a very simple cake structure without any special tools. How to bake your cake boards so they don't get damaged and of course how to paint fondant and modeling chocolate flawlessly!

The inside of this cake is so colorful and fun! A combo of our white cake recipe colored bright pink and funfetti cake. The layers of bright yellow easy buttercream really make the colors pop.

octopus cake tutorial

Materials List
Two 6″ white cakes colored pink 
One 6″ funfetti cake
4 cups easy buttercream frosting
2 lbs fondant recipe
2 lbs modeling chocolate
2 tsp Non-toxic gold or edible gold (note: if you use the edible gold paint then you don’t need confectioners glaze)
2 teaspoon everclear
Food coloring (blue)
Yellow food coloring (I used artisan accents but you can use any brand)
Pink edible artist decorative paint or Poppy Paint
10" cake board (I used cake boards avare but any will be ok)
3" round floracraft foam cylinder
Aluminum foil tape
2 wooden skewers
Hot glue (low temp)

Edible Glitter Eyes

  • 1.5″ silicone sphere mold
  • silicone cabochon mold
  • simi cakes clear isomalt
  • black food coloring
  • silicone cups for melting isomalt
  • edible glitter (or non-toxic is fine)
  • creme brulee torch
  • cake gloss
  • nitrile gloves for hand protection
  • silmat for protecting your work surface
  • microwave for melting isomalt


octopus cake

Octopus Cake Ideas

I don't know what it is about an octopus that I find so adorable! I've loved them for a long time and when Avalon walked passed a big display of beanie boos and pulled out an octopus, I couldn't say no. I love the cute proportions of this stuffed octopus toy. The big eyes, the stubby little tentacles and the pretty pink color with gold speckles!

Early on, I knew that I wanted to cake this beanie boo. Little did I know it would be one of six beanie boo cakes that I would end up caking!

Easy Octopus Cake Tutorial

This adorable octopus cake is so fun to make! Easy cake structure, simple sculpting, edible glitter eyes and so much more!

I wanted to make this cake easy for anyone to make so I made sure to use a simple structure that doesn't require any power tools. All the supplies you need can be found at a craft or cake decorating store.

The only thing you might have to order ahead are the supplies for the glitter eyes (molds, glitter and isomalt). Of course if you don't feel comfortable making isomalt eyes or you don't have time to order, you can always hand paint the eyes with some food coloring and they will still be super cute!

octopus cake tutorial

The other specialty item is the edible artist decorative paint or the poppy paint. The reason I chose this paint is because it can paint on fondant and modeling chocolate really easily and has great coverage. Not very easy to achieve this bright pink color by coloring fondant alone. If you can't get the paint then I would suggest making the tentacles out of fondant as well as the body and then painting with with food coloring or you can color the fondant ahead of time with pink.

How To Make An Octopus Cake

To make our octopus cake the first thing you want to do is stack your layers of cake. First I trimmed off all the brown edges on the top, bottom and sides of the cakes so the slices look really nice when you cut into them. Then I layered them up with some easy buttercream colored bright yellow.

octopus cake

I place the cakes onto a 4" round cake board. I carved the stacked cake into a dome using a serrated knife. Then I crumb coated the cake and chilled it in the fridge until the buttercream was firm. Then I coated it again with another layer of buttercream and used my acetate smoother to smooth out any lumps or bumps. Back into the fridge to chill while we work on the cake structure.

Next I marble some of the white fondant with some blue food coloring and roll it out thin. I cover the board and trim off the excess. I then baked my board in the oven at 175F for 15 minutes with the door cracked and let it cool. This hardens the fondant so that it doesn't get dinged up when we're making the cake.

octopus cake

I used my styrofoam as a template and cut out a circle from the center of the cake board and removed the fondant. Wipe away the excess shortening. I cut my styrofoam down and cover it with aluminum foil tape to make it food safe. Then I glue the foam down to the board with some hot glue.  I glue the carved cake onto the styrofoam. Skewer the cake into the styro to keep it secure and trim off the excess.

Next we put a little buttercream on the underside of the cake board to make the gap between the cake and the styro a little bit smoother of a transition. Then I chill the whole thing until the buttercream is firm.

octopus cake

After the buttercream is firmed up you can cover it in your fondant and trim off the excess. Form your tentacles out of fondant or modeling chocolate and place onto the base of the cake. Adhere with a little bit of water.

Use a 3" circle cutter to cut out some of the fondant from the front of the octopus cake. Paint the surface of the cake with your edible artist decorative paints or food coloring. Place your sugar eyes into the cutouts. The last thing I do paint the surface of the octopus with some gold paint to make spots.

octopus cake

That it! That's all there is to making this adorable octopus cake. I hope you enjoyed this octopus cake tutorial and make sure you watch the full video below on how to make this cute beanie boo cake!

If you enjoyed this tutorial be sure to check out our others in the series

sculpted turtle cake with gold crackled fondant texture and cute edible glitter eyesEdible glitter eyes made from sugar are so fun to make and look great in your sculpted cakes

Gold crackled fondant! All you need is a blow torch! So fun!


turtle cake tutorial

July 16, 2018 Blog

Sculpted Turtle Cake

A Sculpted Turtle Cake With Beautiful Sugar Eyes And Golden Crackled Rainbow Skin Is Easy And Fun To Make

sculpted turtle cake

This sculpted turtle cake is the first cake in a series of six cake tutorials based off my daughter's favorite toys. In this tutorial I wanted to get you used to some basic sculpted cake techniques so we're going to do some very basic cake carving, some fun crackled fondant and molding rice cereal treats.  I love the look of the big head and flippers and the tiny body on this sculpted turtle cake. The sugar eyes have so much life and the gold crackled fondant works so great for the texture. This cake is really easy to make. A great beginners sculpted cake or a last minute order.

sculpted turtle cake

Materials List
Two 6" white cakes
One 6" dome white cake
One half sheet white cake
8 cups easy buttercream frosting
4 lbs fondant recipe
1 teaspoon confectioners glaze
2 tsp Non-toxic gold or edible gold (note: if you use the edible gold paint then you don't need confectioners glaze)
2 teaspoon everclear
Edible water color (electric blue, yellow)
Food coloring (blue, ivory)
Two glitter eyes
Graham cracker crumbs
8 oz marshmallows
1 lb rice cereal
¼ cup candy melts

Specialty Tools
Acetate smoother
Piping Bag
Large silicone sphere molds
Cabochon mold
Creme brulee torch

Sculpted Turtle Cake Ideas

sea turtle

I admit, cakes are my whole world but since I had my daughter my whole world basically revolves around her and her interests. Can you blame me? Who can say no to that face? Avalon's first obsession was finding nemo, then finding dory. She LOVED all those colorful animals and fish but especially loved the sea turtles.

squirt finding nemo

In 2017 we had the chance to go to Maui for 10 days and Avalon got to see REAL sea turtles swimming in the ocean. She would ask me to watch the videos over and over again.

avalon in maui

Last summer we took her to a carnival for the first time. Even though she was too scared to even go on the smallest rides, she really enjoyed playing some games with daddy. He won her this little knock-off turtle cake. I didn't really think it would be anything special at first but here we are a year later and it's still one of the "special buddies" that has to go night-night with us at snuggle time.

toy turtle

We also used this turtle as the inspiration for one of my best friends daughters 3rd birthday cake which just happened to be televised on Food Networks Ridiculous Cakes - Sink or Swim episode. It was HUGE and a little stressful to make but she loved it.

ridiculous cakes turtle cake

Even though I love the proportions of the stuffed turtle, I'm not a huge fan of the colors. For the crackled look and color inspiration, I was inspired by ANOTHER one of her turtle toys. A purse and stuffed turtle combo. I love the pretty blues, colorful rainbow and crackled metallic look and thought this would be perfect inspiration for a sculpted turtle cake.

turtle cake ideas

How To Make A Sculpted Turtle Cake

Make sure you watch the video to see the whole process explained on how to make the sculpted turtle cake.

In this tutorial I wanted to get you used to some basic sculpted cake techniques so we're going to do some very basic cake carving, some fun crackled fondant and molding rice cereal treats. 

So to make this sculpted turtle cake, we're starting out with some cakes that are already pretty much the shape that we want them to be. Tort your two six inch cakes in half. Three of the layers will be for the shell. Torte the dome in half and add the last layer of the 6" cake. Fill them with buttercream and carve. Crumbcoat and chill.

how to make a turtle cake

Next, roll out some of your white fondant a little thicker than what you would to cover a cake (about ¼"). Torch the surface with your creme brulee torch. Then brush the surface with some confectioners glaze. If you don't have confectioners glaze you can use edible artist decorative paints gold, rainbow dust gold or poppy paints gold. Then combine your gold dust with some Everclear, lemon extract or rose water. Brush onto the surface and let it completely dry.

how to make a turtle cake

Once your fondant is dry you can roll it out to make it crackled! Cover your cakes with the crackled fondant and trim off the excess. Paint your cakes with some of your edible water colors. I diluted mine down with some extra Everclear so they where very transparent. I rolled out some marbled blue fondant for the shell and used a modeling tool to make the shell texture. Add on a little gold paint to make the shell pop!

how to make a turtle cake

Next I form my flippers by melting down some marshmallows and combining them with some rice cereal. I leave out the butter and add a little melted candy melts so they are really stable. Let the mixture cool for about 10 minutes then form into flippers. Let the flippers cool and then cover in a little buttercream. Then you can cover them in some more crackled fondant and paint them like you did the cakes.

how to make a turtle cake

Carve down your sheet cake to make a slight dome. I colored my buttercream ivory before frosting the sheet cake. Then I cover the buttercream with a thin layer of graham cracker crumbs. Color some more buttercream with some blue food coloring and pipe around the edges. Pipe some white buttercream around the top edge and then blend the two together with an offset spatula.

Insert a few straws into the cake and level off with scissors. These straws support the weight of the turtle head and body. Without them, the cakes would crush the cake below. Add your flippers to the sides of the turtle.

how to make a turtle cake

Cut out a circle from the turtle head using a cutter where the eyes will go. Insert your glitter eyes and finish then off with a little rope of fondant. This keeps the heavy glitter eye from falling out.

sculpted sea turtle cake tutorial

That's it! your sculpted turtle cake is complete! Be sure to watch the full video tutorial with instructions below!

If you loved this cake be sure to check out the other cakes in this series

Gold crackled fondant! All you need is a blow torch! So fun!Sculpted octopus cake tutorialEdible glitter eyes made from sugar are so fun to make and look great in your sculpted cakes


Realistic Unicorn Cake Tutorial

July 15, 2018 Course Preview

Realistic Unicorn Cake Tutorial

Skill level: Intermediate

Unicorn cakes are super trendy right now, and what better way to embrace this trend than to innovate on it. Liz Marek returns for her take on the unicorn trend, with a realistic, 80s-tastic neon unicorn bust cake.

This cake features real horse anatomy, a glowing isomalt (or Jolly Rancher) unicorn horn, beautiful sparkly eyes and a neon-rainbow unicorn mane.

Wow your clients and up your cake game with this stunning cake design, sure to be a show-stopper at your next event.

1:19:09 Minutes of Instruction

What You Will Learn

  • How to sculpt a realistic unicorn bust out of cake
  • Learn how to create a gravity-defying cake structure
  • How to get bright, neon colors that work together
  • Learn how to airbrush a pearlescent color onto the unicorn
  • How to save time by using simple techniques to achieve beautiful results

Tutorial Chapters

  1. Scaling images for cake decorating 0:10
  2. Making the structure 6:19
  3. Cutting foam board 8:47
  4. Stacking the cakes 11:13
  5. Adding bottom of mouth 18:42
  6. Carving down the cake 24:28
  7. Refining the face 32:28
  8. Adding cake clay 33:26
  9. Adding the crumb coat 40:17
  10. Making the ears 44:18
  11. Adding ganache 46:57
  12. Smoothing out ganache 49:07
  13. Covering the cake in fondant 50:15
  14. Making the nostrils & mouth 56:42
  15. Placing the ears 58:45
  16. Making the unicorn horn 59:34
  17. Making the eyes 1:05:29
  18. Placing the eyes, eyelids, & eyelashes 1:07:25
  19. Airbrushing 1:10:19
  20. Placing the horn 1:14:25
  21. Decorating the cake board 1:14:48
  22. Adding the mane 1:17:18

Downloads

Materials List

Unicorn Cake Planning Template

Unicorn Head - Front Template 01

Unicorn Head - Front Template 02

Structure Template 01

Structure Template 02

Structure Template 03

Structure Template 04

Structure Template 05

Structure Template 06

Realistic Unicorn Bust Reference

Realistic Unicorn Cake Tutorial

July 15, 2018 Paid Video

Realistic Unicorn Cake

Skill level: Intermediate

Unicorn cakes are super trendy right now, and what better way to embrace this trend than to innovate on it. Liz Marek returns for her take on the unicorn trend, with a realistic, 80s-tastic neon unicorn bust cake.

This cake features real horse anatomy, a glowing isomalt (or Jolly Rancher) unicorn horn, beautiful sparkly eyes and a neon-rainbow unicorn mane.

Wow your clients and up your cake game with this stunning cake design, sure to be a show-stopper at your next event.

1:19:09 Minutes of Instruction

What You Will Learn

  • How to sculpt a realistic unicorn bust out of cake
  • Learn how to create a gravity-defying cake structure
  • How to get bright, neon colors that work together
  • Learn how to airbrush a pearlescent color onto the unicorn
  • How to save time by using simple techniques to achieve beautiful results

Tutorial Chapters

  1. Scaling images for cake decorating 0:10
  2. Making the structure 6:19
  3. Cutting foam board 8:47
  4. Stacking the cakes 11:13
  5. Adding bottom of mouth 18:42
  6. Carving down the cake 24:28
  7. Refining the face 32:28
  8. Adding cake clay 33:26
  9. Adding the crumb coat 40:17
  10. Making the ears 44:18
  11. Adding ganache 46:57
  12. Smoothing out ganache 49:07
  13. Covering the cake in fondant 50:15
  14. Making the nostrils & mouth 56:42
  15. Placing the ears 58:45
  16. Making the unicorn horn 59:34
  17. Making the eyes 1:05:29
  18. Placing the eyes, eyelids, & eyelashes 1:07:25
  19. Airbrushing 1:10:19
  20. Placing the horn 1:14:25
  21. Decorating the cake board 1:14:48
  22. Adding the mane 1:17:18

Sculpted Unicorn Cake Tutorial

Something I've been wanting to do for a while now was a sculpted horse head cake. I love horses and one aspect of anatomy that every great artist can achieve is (A) sculpting human anatomy and (B) sculpting horses!

When the unicorn cake trend started, I had a feeling it was going to be here to stay, and while the simple unicorn cake style is right up my alley, I felt like I could innovate on this by taking it a step further and making a realistic horse head. I hope you like this design and draw a lot of inspiration from it, as well as learning the anatomy of a horse head.

Downloads

Materials List

Unicorn Cake Planning Template

Unicorn Head - Front Template 01

Unicorn Head - Front Template 02

Structure Template 01

Structure Template 02

Structure Template 03

Structure Template 04

Structure Template 05

Structure Template 06

Realistic Unicorn Bust Reference

glitter eye tutorial

July 9, 2018 Free Video

Edible Glitter Eye Tutorial

Edible Glitter Eye Tutorial Made From Isomalt and Edible Glitter

These edible glitter eyes are perfect for using in your whimsical sculpted cakes. I first made these eyes for a gravity defying sea turtle cake for my friends daughter's birthday which HAPPENED to be filmed for an upcoming episode of Ridiculous Cakes on Food Network. Tune in on June 9th 10:30pm | 9:30c to see how the cake came together.

ridiculous cakes turtle

Beanie Boo Eyes

beanie boo

I was originally inspired to make these eyes from looking at my daughter's toys. She LOVES the pretty glitter eyes and has about a billion different versions. Seriously, she needs a beanie boo intervention. When my friends daughter asked for a beanie boo turtle cake for her 3rd birthday, I was stoked to finally figure out how to make these babies out of sugar!

edible glitter eyes

I went through a LOT of trial and error. Cracked isomalt, bubbles, imperfections but finally, I figured out a process that was repeatable and pretty goof-up proof.

How To Make Edible Glitter Eyes

Materials

  • 2" silicone mold
  • silicone cabochon mold
  • simi cakes clear isomalt
  • black food coloring
  • silicone cups for melting isomalt
  • edible glitter (or non-toxic is fine)
  • creme brulee torch
  • cake gloss
  • nitrile gloves for hand protection
  • silmat for protecting your work surface
  • microwave for melting isomalt

Start by melting your clear isomalt. I melt mine for 30 seconds at first and then in 10 second increments until liquid. Make sure you wear hand protection because that isomalt gets HOT. Let the bubbles settle down. Color a small amount with a drop of black food coloring. Pour the black isomalt into the second from largest sphere from the cabochon mold. Let it cool then torch the surface so it's free of bubbles.

edible glitter eyes

**tip** when re-melting isomalt, go in 10 second increments to prevent over-heating or burning. Never fill your cup more than half way to prevent getting burns.

Fill your silicone sphere mold halfway with clear isomalt and rotate the mold so the liquid coats the sides of the mold. This way you don't get a seam in the side of your eye. Let it cool.

edible glitter eyes

Pour more clear isomalt into the remaining space of the mold half way. Place the black isomalt sphere in the center. Use the tip of a knife to position it so you don't burn your finger.

edible glitter eyes

Sprinkle some edible glitter onto the surface. Let cool a couple of minutes then cover the surface with some more black isomalt. Let cool.

edible glitter eyesedible glitter eye

Remove the eye from the mold and torch the surface to remove the bubbles. Place eye in a spare container and spray with cake gloss to keep it shiny.

edible glitter eye

You can now use your awesome glitter eyes for your next cake project!

edible glitter eyes

Let me know if you liked this tutorial in the comments or if you have any questions and don't forget to tune into Food Network and watch us create these awesome eyes for our giant gravity defying turtle cake!

Watch this video tutorial on how to make your own edible glitter eyes

gold crackled fondant

July 9, 2018 Blog

Gold Crackled Fondant Tutorial

Gold Crackled Fondant Is A Beautiful Texture For Many Different Cake Applications

gold crackled fondant

Gold crackled fondant is so beautiful and easy to make! All you need is some fondant, non-toxic or edible gold paint, everclear or rose water, confectioners glaze, a blow torch and a rolling pin! I love the beautiful effect the gold crackle has on a simple tiered cake or you can use it on sculpted cakes for a reptile scale or weathered look. Check out my cute sea turtle cake tutorial to see how this gold crackled fondant looks on a sculpted cake.

I first fell in love with the gold crackled look from that amazing work from Angela Morrison. Her technique uses gumpaste over fondant and is really beautiful as well!

How To Make Gold Crackle

gold crackled fondant

Making gold crackle is easier than you think. Here are the supplies that you're going to need.

Gold Crackled Fondant Materials List

Fondant
Creme brulee torch
Confectioners glaze
Corn starch
Non-toxic gold or edible gold  (note: if you use the edible gold paint then you don't need confectioners glaze)
Everclear, rosewater or lemon extract
Rolling pin
X-acto blade
Fondant smoother
Chilled Cake

How To Achieve Crackle Fondant On A Cake

gold crackled fondant

First roll out your fondant to about half as thick as you normally would. Torch the surface with your creme brulee torch until the surface is nicely toasted. If there are any light spots, that place will not crackle.

Paint the surface with confectioners glaze then paint it with your gold/everclear mixture. Let dry completely to avoid the gold from flaking off when you crack it with your rolling pin.

gold crackled fondant

Crackle your fondant by rolling it out with your rolling pin. Go in both directions. The more you roll, the bigger the cracks will be. I prefer to keep my cracks pretty small.

Now you can cover your cake in one piece or you can panel it depending on the final look you are going for.

Edible Crackle Paint

gold crackled fondant

If you want to make a crackle that isn't gold, you can paint the surface of your fondant with food coloring and it will crackle the same way. I used black airbrush for this crackled fondant tutorial but you could use any type of food coloring. Just paint it on and let it dry. Edible artist decorative paints are great for this because it dries really fast.

For the inside of this cake I used my delicious vanilla cake recipe from scratch filled with easy buttercream frosting. I always make sure my cakes are fully chilled before covering with fondant.

Recipe

gold crackled fondant
Print Recipe
4.95 from 20 votes

Gold Crackled Fondant

How to make a beautiful gold crackled texture on fondant. This recipe is enough to cover one 6" round cake plus a little leftover. 
Prep Time13 minutes mins
Cook Time10 minutes mins
Total Time23 minutes mins
Course: Dessert
Cuisine: American
Servings: 1
Calories: 3245kcal
Author: Elizabeth Marek

Ingredients

Gold Crackled Fondant

  • 1 ½ lbs fondant
  • 1 teaspoon confectioners glaze
  • 2 teaspoon Non-toxic gold or edible gold

Instructions

Tools Needed

  • Creme brulee torch
    Corn starch duster
    Rolling pin
    X-acto blade
    Fondant smoother
    Chilled Cake
  • Roll out fondant to half as thick as your normally do. Torch the surface of the fondant until it's brown and bubbly. Let cool. 
  • Brush the surface of the fondant with confectioners glaze. Combine your everclear and gold dust to make a paint. Paint over the glaze and let dry fully. At least 10 minutes. 
  • Use a bench scraper to loosen the fondant from the table and then using a rolling pin, roll out your fondant to the desired thickness. The more you roll, the thicker the cracks will be. I like thinner cracks. 
  • Cover your cake in one piece as you would normally or panel to keep the texture more intact. 

Video

Notes

Gold crackled fondant is so beautiful on a cake! Learn how to make two ways, traditional and paneled fondant. 

Nutrition

Serving: 1g | Calories: 3245kcal | Carbohydrates: 342g | Protein: 74g | Fat: 180g | Saturated Fat: 14g | Sodium: 224mg | Potassium: 1837mg | Fiber: 20g | Sugar: 272g | Vitamin A: 85IU | Calcium: 401mg | Iron: 12.9mg

Gold Crackled Fondant Tutorial

glitter eye tutorial

July 3, 2018 Blog

Edible Glitter Eye Tutorial

Edible Glitter Eye Tutorial Made From Isomalt and Edible Glitter

These edible glitter eyes are perfect for using in your whimsical sculpted cakes. I first made these eyes for a gravity defying sea turtle cake for my friends daughter's birthday which HAPPENED to be filmed for an upcoming episode of Ridiculous Cakes on Food Network. Tune in on June 9th 10:30pm | 9:30c to see how the cake came together.

ridiculous cakes turtle

Beanie Boo Eyes

beanie boo

I was originally inspired to make these eyes from looking at my daughter's toys. She LOVES the pretty glitter eyes and has about a billion different versions. Seriously, she needs a beanie boo intervention. When my friends daughter asked for a beanie boo turtle cake for her 3rd birthday, I was stoked to finally figure out how to make these babies out of sugar!

edible glitter eyes

I went through a LOT of trial and error. Cracked isomalt, bubbles, imperfections but finally, I figured out a process that was repeatable and pretty goof-up proof.

How To Make Edible Glitter Eyes

Materials

  • 2" silicone sphere mold (large eyes) or 1 ½" silicone sphere mold for smaller eyes
  • silicone cabochon mold
  • simi cakes clear isomalt
  • black food coloring
  • silicone cups for melting isomalt
  • edible glitter (or non-toxic is fine)
  • creme brulee torch
  • cake gloss
  • nitrile gloves for hand protection
  • silmat for protecting your work surface
  • microwave for melting isomalt

Start by melting your clear isomalt. I melt mine for 30 seconds at first and then in 10 second increments until liquid. Make sure you wear hand protection because that isomalt gets HOT. Let the bubbles settle down. Color a small amount with a drop of black food coloring. Pour the black isomalt into the second from largest sphere from the cabochon mold. Let it cool then torch the surface so it's free of bubbles.

edible glitter eyes

**tip** when re-melting isomalt, go in 10 second increments to prevent over-heating or burning. Never fill your cup more than half way to prevent getting burns.

Fill your silicone sphere mold halfway with clear isomalt and rotate the mold so the liquid coats the sides of the mold. This way you don't get a seam in the side of your eye. Let it cool.

edible glitter eyes

Pour more clear isomalt into the remaining space of the mold half way. Place the black isomalt sphere in the center. Use the tip of a knife to position it so you don't burn your finger.

edible glitter eyes

Sprinkle some edible glitter onto the surface. Let cool a couple of minutes then cover the surface with some more black isomalt. Let cool.

edible glitter eyesedible glitter eye

Remove the eye from the mold and torch the surface to remove the bubbles. Place eye in a spare container and spray with cake gloss to keep it shiny.

edible glitter eye

You can now use your awesome glitter eyes for your next cake project!

edible glitter eyes

Let me know if you liked this tutorial in the comments or if you have any questions and don't forget to tune into Food Network and watch us create these awesome eyes for our giant gravity defying turtle cake!

Watch this video tutorial on how to make your own edible glitter eyes

Edible Glitter Eye Tutorial

slice of lemon raspberry cake on a plate

July 2, 2018 Blog

Lemon Raspberry Cake

This fresh lemon raspberry cake recipe is packed full of lemon flavor and swirled with a fresh raspberry filling throughout the cake. Get a sweet and tangy bite of lemon and raspberry in each mouthful and pair it with homemade raspberry buttercream, cream cheese frosting, or stabilized whipped cream.slice of lemon raspberry cake on a plate

The buttermilk in this lemon raspberry layer cake gives it an extra tender crumb. Paired with tart raspberries, it makes the perfect combination for a summer BBQ dessert, Mother's Day cake, or springtime treat!

Table of contents

  • Ingredients
  • How to Make a Lemon Raspberry Cake
    • Making Raspberry Filling
    • Making Lemon Raspberry Cake
    • How to Make Raspberry Buttercream
    • Assembling and Decorating the Cake
  • Tips for Baking From Scratch
  • FAQ
  • Related Recipes

Ingredientsbowls of ingredients for lemon raspberry cake on a table

Lemon: In this tender cake, the lemon flavor is added in 3 ways. Lemon peel from a fresh lemon, lemon extract that enhances the natural lemon flavor, and lemon juice to add some acid and a hint of tartness. 

Buttermilk: Buttermilk tenderizes the gluten in the cake flour, which is already soft, creating a melt-in-your-mouth feel with this cake crumb. Learn how to make your own with milk and vinegar, sour cream, or Greek yogurt in my buttermilk substitutes blog post.

Raspberries: Juicy raspberries are a perfect match for lemon flavor, they both enhance each other's natural flavors. A little bit of lemon is added to the berries in the filling to brighten the berry flavor. slice of lemon raspberry cake

How to Make a Lemon Raspberry Cake

To make this lemon raspberry cake, you'll want to start off by making the raspberry filling first. I like to make it the day ahead and strain out the seeds, but you can leave them in if you prefer. Then make the lemon cake and swirl in the filling, bake it, and then make the buttercream while the cakes are cooling. 

Making Raspberry Filling

  1. Add your raspberries and sugar to a medium-sized saucepan over medium heat.hand pouring sugar onto raspberries in a pot.
  2. Heat your raspberry puree until it begins to bubble. Increase the heat to medium-high heat if needed.raspberries bubbling while being cooked in a pot.
  3. In a small bowl, combine the water and the ClearJel (or cornstarch) and mix until smooth. Don't just add the ClearJel (or cornstarch) directly to the hot liquid or you'll end up with lumps of thickener in your filling.hands whisking water and cornstarch together.
  4. Add your ClearJel mixture (or cornstarch slurry) to the hot liquid and mix for one more minute to thicken the mixture.hand pouring cornstarch slurry into cooked raspberries in a pot while stirring.
  5. Add in the lemon juice and lemon zest and continue cooking for one more minute until thickened.hand pouring lemon juice into raspberry mixture in a pot.
  6. Transfer the mixture to a heat-proof container and cover it with plastic wrap (so that it's touching the surface) and allow it to cool to room temperature or place it into the refrigerator to cool before using it.finished raspberry filling in a mason jar.

Making Lemon Raspberry Cake

  1. Preheat the oven to 335º F/168º C or 350º F/177º C and prepare three 6-inch cake pans (or two 8-inch pans) with cake goop or another preferred pan spray or parchment paper. Make sure all ingredients are at room temperature or slightly warm (eggs, buttermilk, butter).hands holding a pastry brush preparing a cake pan with pan release
  2. Measure out the buttermilk and place 4 ounces in a separate measuring cup. pouring buttermilk from a bowl to a container
  3. Add oil to the 4 ounces of buttermilk and set aside.pouring oil into a measuring cup of buttermilk
  4. To the remaining buttermilk, add your eggs (lightly whisked to break them up), lemon extract, lemon juice, and lemon zest.hand pouring lemon into a bowl of eggs
  5. Measure out the cake flour, sugar, salt, baking powder, and baking soda into the bowl of your stand mixer.stand mixer bowl full of dry ingredients
  6. Attach the paddle to the mixer and mix on low speed (setting 1 on Kitchen Aid mixers) until the dry ingredients are combined. I recommend a stand mixer for this recipe, but you can do this with a large bowl and electric mixer, just mix by texture instead of time.
  7. Slowly add chunks of softened butter to the flour mixture and mix on medium speed until the batter resembles coarse sand.hand holding mixed dry ingredients
  8. Add the milk/oil mixture all at once to the dry ingredients and mix on medium speed (speed 4 on Kitchenaid) for 2 full minutes until it's white and fluffy. pouring liquid ingredients into a stand mixer bowl
  9. Scrape the bowl. This is an important step because if you skip it, you will have hard lumps of flour in your batter. If you do it later, they will not mix in fully.fluffy batter in a stand mixer bowl
  10. Slowly add in the rest of your wet ingredients in 3 parts and mix until combined. Stop to scrape the sides of the bowl one more time halfway through. Your batter should be thick and not too runny.adding egg mixture to a stand mixer bowl
  11. Fill the pans ¾ full and give each a tap to level out the batter and get rid of any air bubbles.3 pans full of cake batter
  12. Add 3 to 4 large dollops of your raspberry filling to the cake batter and use a spoon or knife to swirl it through the batter. swirling raspberry puree into cake batter
  13. Bake the cakes for 35 to 40 minutes until a toothpick inserted in the center comes out with a few crumbs. pot holders holding a baked cake
  14. After the cakes have cooled for 10 minutes, flip them onto cooling racks to cool completely. Or wrap them in plastic wrap and freeze them.

How to Make Raspberry Buttercream

  1. Place the egg whites and powdered sugar in the bowl of your stand mixer with the whisk attachment and whip on high speed for 3-5 minutes.hand pouring a container of pasteurized egg whites into a glass stand mixer bowl
  2. Add the softened butter in small chunks then vanilla and salt. Whip on high until light and fluffy and white, about 8 to 10 minutes.hand adding chunks of butter into bowl
  3. Set aside 2 cups of vanilla buttercream if you want to do the ombre design. Add a drop of yellow food color to give it a slight tint.
  4. Add about ½ cup of the strained raspberry purée to the buttercream and continue to whip until combined. 
  5. Mix in about 1-2 drops of pink food coloring to enhance the raspberry color if you choose. 
  6. Optional: switch to the paddle attachment and mix on low for 15-20 minutes until all air bubbles are gone.
  7. Stored it in an airtight container for up to a week in the refrigerator or for 3 months in the freezer. 

Assembling and Decorating the Cake

  1. Trim the dome from the top of the cake rounds and the browned edges. hands removing the dome off a cake
  2. Place the first cake layer on the cake board and spread raspberry buttercream over the top. Using a piping bag and round tip, pipe a dam around the outer edge of the cake. spreading pink buttercream on a cake
  3. Spread 1 to 2 tablespoons of raspberry filling within the dammed area. If you overfill the center it could possibly squeeze out once you start stacking other layers. spreading raspberry filling in the center of a cake
  4. Place a few fresh raspberries on top of the raspberry filling. finger pressing raspberries onto a cake
  5. Spread a thin layer of raspberry frosting on the bottom of the next layer to sandwich in the berries. spatula spreading buttercream on the bottom of a cake layer
  6. Repeat the process with the remaining cake layers.3 layers of lemon raspberry cake
  7. Once all 3 layers are placed, cover it in a crumb coat of buttercream. Chill it for 5-10 minutes until the buttercream has set. covering a lemon raspberry cake in pink frosting
  8. Spread a final coat of buttercream on the cake. I used the yellow buttercream to make an ombré, but you can do all raspberry if you prefer. spreading yellow buttercream onto a cake
  9. Spread some raspberry buttercream around the bottom half of the cake. spreading pink buttercream onto the bottom of a cake
  10. Then smooth the whole cake using the bench scraper, creating an ombré, watercolor effect between the 2 buttercream colors. smoothing out a buttercream cake with a bench scraper
  11. Using a piping bag fitted with a star tip, pipe 8-10 dollops on top around the cake. (Make sure the dollops and raspberries are touching, to create a dam for the center raspberry filling.)piping dollops onto a cake
  12. Then, fill the center of the top of the cake with 2-3 tablespoons of raspberry filling.spreading raspberry filling into the center of a cake
  13. Make sure to keep the cake chilled, but take it out a few hours before you're going to serve it. This cake is best eaten at room temperature!lemon raspberry cake

Tips for Baking From Scratch

  1. Weigh your ingredients to avoid cake failure. Using a kitchen scale for baking is super easy and gives you the best results every single time. 
  2. Make sure all your cold ingredients are room temperature or slightly warm (butter, milk, eggs, to create a cohesive batter. Curdled batter causes cakes to collapse.
  3. No buttermilk? You can make your own buttermilk 
  4. Need more help with making your first cake? Check out my how to decorate your first cake blog post. 
  5. Make your own pan release (cake goop!) The best pan release ever! 
  6. Chill your cakes before frosting and filling. You can cover a frosted and chilled cake in fondant if you wish. This cake is also great for stacking. I always keep my cakes chilled in the refrigerator before delivery for easy transportation.

FAQ

Can I use different berries? 

Yes, you can use any frozen or fresh berries you prefer and they all pair well with this lemon cake. You will find other berry-filling recipes on the blog. This cake would also be delicious with the addition of homemade lemon curd. 

Can I use frozen raspberries for my lemon raspberry cake? 

To make the raspberry filling, I prefer to use frozen because they are already partially broken down through the freezing process, this makes the reduction process quicker. You can also use frozen berries when filling the cake, however, they will be softer as they thaw. I prefer to use fresh raspberries for the inside of the cake and the decor on top, however, both are delicious! 

Can I use raspberry jam instead of making my filling? 

Yes! If you are pinched on time, you can use store-bought raspberry preserves or jam in place of the filling. 

Related Recipes

Lemon Velvet Cake

Lemon Blueberry Buttermilk Cake

Buttermilk Lemon Pound Cake

Strawberry Cake Mix


Cake Batter and Frosting Calculator

Select an option below to calculate how much batter or frosting you need. Adjust the servings slider on the recipe card to change the amounts the recipe makes.

Choose a pan type

Choose a cake pan size
(based on 2" tall cake pan)

Choose a cake pan size
(based on 2" tall cake pan)

Choose a cake pan size
(based on 2" tall cake pan)

Cupcake Tin Size

Choose number of pans

Cups of Batter Needed

8 cups

Cups of Frosting Needed

5 cups

Note: measurements are estimated based off the vanilla cake recipe using standard US cake pans and sizes. Measurements used are for 2" tall cake pans only. Your results may vary. Do not overfill cake pans above manufacturer's recommended guidelines.

Recipe

slice of lemon raspberry cake on a plate
Print Recipe
4.89 from 97 votes

Lemon Raspberry Cake Recipe

Moist and velvety lemon cake with juicy raspberry filling and raspberry buttercream frosting. Based on our lemon velvet cake, this recipe highlights the sweet flavor of fresh raspberries and the subtle tang of lemons.
Prep Time30 minutes mins
Cook Time40 minutes mins
Decorating Time1 hour hr
Total Time2 hours hrs 10 minutes mins
Course: Dessert
Cuisine: American
Servings: 8 cups
Calories: 1379kcal
Author: Elizabeth Marek

Ingredients

Raspberry Filling

  • 16 ounces fresh or frozen raspberries
  • 5 ounces sugar
  • 1 Tablespoon lemon zest
  • 1 Tablespoon lemon juice
  • 4 ounces cool water
  • 1 Tablespoon corn starch

Lemon Raspberry Cake

  • 13 ounces cake flour
  • 12 ounces granulated sugar
  • ½ teaspoon salt
  • 2 teaspoons baking powder
  • ½ teaspoon baking soda
  • 8 ounces unsalted butter
  • 8 ounces buttermilk
  • 3 ounces vegetable oil
  • 3 large eggs
  • 2 Tablespoon lemon zest
  • 2 Tablespoon fresh lemon juice
  • 2 teaspoons lemon extract
  • 2 Tablespoons AP Flour for dusting berries
  • 10 ounces raspberries You can use frozen but don't thaw them

Raspberry Buttercream

  • 4 ounces pasteurized egg whites room temperature
  • 16 ounces unsalted butter room temperature
  • 16 ounces powdered sugar sifted
  • 1 teaspoon lemon extract
  • ½ teaspoon salt
  • 4 ounces raspberry puree strained
US Customary - Metric

Instructions

Making Raspberry Filling

  • Add your raspberries and sugar to a medium-sized saucepan over medium heat.
  • Heat your raspberry puree until it begins to bubble. Increase the heat to medium-high heat if needed.
  • In a small bowl, combine the water and the ClearJel (or cornstarch) and mix until smooth. Don't just add the ClearJel (or cornstarch) directly to the hot liquid or you'll end up with lumps of thickener in your filling.
  • Add your ClearJel mixture (or cornstarch slurry) to the hot liquid and mix for one more minute to thicken the mixture.
  • Add in the lemon juice and lemon zest and continue cooking for one more minute until thickened.
  • Transfer the mixture to a heat-proof container and cover it with plastic wrap (so that it's touching the surface) and allow it to cool to room temperature or place it into the refrigerator to cool before using it.

Making Lemon Raspberry Cake

  • Preheat the oven to 335º F/168º C or 350º F/177º C and prepare three 6-inch cake pans (or two 8-inch pans) with cake goop or another preferred pan spray or parchment paper. Make sure all ingredients are at room temperature or slightly warm (eggs, buttermilk, butter).
  • Measure out the buttermilk and place 4 ounces in a separate measuring cup. 
  • Add oil to the 4 ounces of buttermilk and set aside.
  • To the remaining buttermilk, add your eggs (lightly whisked to break them up), lemon extract, lemon juice, and lemon zest.
  • Measure out the cake flour, sugar, salt, baking powder, and baking soda into the bowl of your stand mixer.
  • Attach the paddle to the mixer and mix on low speed (setting 1 on Kitchen Aid mixers) until the dry ingredients are combined. I recommend a stand mixer for this recipe, but you can do this with a large bowl and electric mixer, just mix by texture instead of time.
  • Slowly add chunks of softened butter to the flour mixture and mix on medium speed until the batter resembles coarse sand.
  • Add the milk/oil mixture all at once to the dry ingredients and mix on medium speed (speed 4 on Kitchenaid) for 2 full minutes until it's white and fluffy. 
  • Scrape the bowl. This is an important step because if you skip it, you will have hard lumps of flour in your batter. If you do it later, they will not mix in fully.
  • Slowly add in the rest of your wet ingredients in 3 parts and mix until combined. Stop to scrape the sides of the bowl one more time halfway through. Your batter should be thick and not too runny.
  • Fill the pans ¾ full and give each a tap to level out the batter and get rid of any air bubbles.
  • Add 3 to 4 large dollops of your raspberry filling to the cake batter and use a spoon or knife to swirl it through the batter. 
  • Bake the cakes for 35 to 40 minutes until a toothpick inserted in the center comes out with a few crumbs. 
  • After the cakes have cooled for 10 minutes, flip them onto cooling racks to cool completely. Or wrap them in plastic wrap and freeze them.

How to Make Raspberry Buttercream

  • Place the egg whites and powdered sugar in the bowl of your stand mixer with the whisk attachment and whip on high speed for 3-5 minutes.
  • Add the softened butter in small chunks then vanilla and salt. Whip on high until light and fluffy and white, about 8 to 10 minutes.
  • Set aside 2 cups of vanilla buttercream if you want to do the ombre design. Add a drop of yellow food color to give it a slight tint.
  • Add about ½ cup of the strained raspberry purée to the buttercream and continue to whip until combined. 
  • Mix in about 1-2 drops of pink food coloring to enhance the raspberry color if you choose. 
  • Optional: switch to the paddle attachment and mix on low for 15-20 minutes until all air bubbles are gone.
  • Stored it in an airtight container for up to a week in the refrigerator or for 3 months in the freezer. 

Assembling and Decorating the Cake

  • Trim the dome from the top of the cake rounds and the browned edges. 
  • Place the first cake layer on the cake board and spread raspberry buttercream over the top. Using a piping bag and round tip, pipe a dam around the outer edge of the cake. 
  • Spread 1 to 2 tablespoons of raspberry filling within the dammed area. If you overfill the center it could possibly squeeze out once you start stacking other layers. 
  • Place a few fresh raspberries on top of the raspberry filling. 
  • Spread a thin layer of raspberry frosting on the bottom of the next layer to sandwich in the berries. 
  • Repeat the process with the remaining cake layers.
  • Once all 3 layers are placed, cover it in a crumb coat of buttercream. Chill it for 5-10 minutes until the buttercream has set. 
  • Spread a final coat of buttercream on the cake. I used the yellow buttercream to make an ombré, but you can do all raspberry if you prefer. 
  • Spread some raspberry buttercream around the bottom half of the cake. 
  • Then smooth the whole cake using the bench scraper, creating an ombré, watercolor effect between the 2 buttercream colors. 
  • Using a piping bag fitted with a star tip, pipe 8-10 dollops on top around the cake. (Make sure the dollops and raspberries are touching, to create a dam for the center raspberry filling.)
  • Then, fill the center of the top of the cake with 2-3 tablespoons of raspberry filling.
  • Make sure to keep the cake chilled, but take it out a few hours before you're going to serve it. This cake is best eaten at room temperature!

Notes

  1. Weigh your ingredients to avoid cake failure. Using a kitchen scale for baking is super easy and gives you the best results every single time. 
  2. Make sure all your cold ingredients are room temperature or slightly warm (butter, milk, eggs, to create a cohesive batter. Curdled batter causes cakes to collapse.
  3. No buttermilk? You can make your own buttermilk 
  4. To prevent blueberries from sinking, I wash them (to get them wet) then roll them in flour. Then I add them to the batter halfway through baking
  5. Do not fall for the “just add cornstarch to regular flour” trick. It does not work for this recipe. Your cake will look and taste like cornbread. If you can’t find cake flour, use pastry flour which isn’t quite as soft as cake flour but it’s better than all-purpose flour. 
  6. Make your own pan release (cake goop!) The best pan release ever! 
  7. If you’re in the UK search for Shipton mills cake and pastry flour. If you’re in another part of the country, search for low protein cake flour.
  8. Need more help with making your first cake? Check out my how to decorate your first cake blog post.
  9. Make the raspberry filling first, then make the lemon cake and swirl in the filling, bake it, and then make the buttercream while the cakes are cooling. 

Nutrition

Serving: 1serving | Calories: 1379kcal | Carbohydrates: 176g | Protein: 12g | Fat: 73g | Saturated Fat: 45g | Polyunsaturated Fat: 4g | Monounsaturated Fat: 19g | Trans Fat: 3g | Cholesterol: 256mg | Sodium: 461mg | Potassium: 392mg | Fiber: 8g | Sugar: 125g | Vitamin A: 2432IU | Vitamin C: 31mg | Calcium: 143mg | Iron: 2mg
Dragon Castle Cake Tutorial

July 1, 2018 Course Preview

Dragon Castle Cake Tutorial

Skill level: Intermediate

Birthday cakes are one of my favorite things to make and this castle cake with a dragon cake topper is the perfect sort of cake to make for the little king or queen's birthday.

Learn how to make a dragon cake topper with posable wings, isomalt dragon fire, all the little details on the castle, how to hand-letter fancy monograms and more!

1:04:39 Minutes of Instruction

What You Will Learn

  • Learn how to create a stylized dragon cake topper with posable wings
  • How to make isomalt dragon fire
  • Learn how to make hand-lettered castle flags and banners
  • How to cover a large double barrel cake
  • Liz Marek's simple technique to make realistic stone texture

Tutorial Chapters

  1. Making the dragon armature 0:10
  2. Building up dragon 4:55
  3. Adding teeth to jaws 7:45
  4. Painting the dragon wings 9:07
  5. Prepping the cakes 14:53
  6. Stacking double barrel 17:01
  7. Making dragon fire 19:50
  8. Adding jaws to dragon head 21:05
  9. Roughing out the dragon head 23:07
  10. Roughing out the body 23:45
  11. Making dragon legs 24:27
  12. Adding texture to dragon 27:30
  13. Adding dragon horns 28:15
  14. Attaching wings to body 29:03
  15. Making dragon spines 31:22
  16. Covering cake board 32:50
  17. Coloring castle brick 34:27
  18. Paneling the double barrel 37:28
  19. Paneling the towers 41:57
  20. Making the front gate 46:35
  21. Adding turrets 47:54
  22. Finishing the front gate 51:03
  23. Making flags 55:00
  24. Airbrushing 59:09
  25. Finishing fire 1:00:24

Downloads

Materials List

Black Letter Example 01

Black Letter Example 02

Dragon Castle Cake Tutorial

July 1, 2018 Paid Video

Dragon Castle Cake

Skill level: Intermediate

Birthday cakes are one of my favorite things to make and this castle cake with a dragon cake topper is the perfect sort of cake to make for the little king or queen's birthday.

Learn how to make a dragon cake topper with posable wings, isomalt dragon fire, all the little details on the castle, how to hand-letter fancy monograms and more!

1:04:39 Minutes of Instruction

What You Will Learn

  • Learn how to create a stylized dragon cake topper with posable wings
  • How to make isomalt dragon fire
  • Learn how to make hand-lettered castle flags and banners
  • How to cover a large double barrel cake
  • Liz Marek's simple technique to make realistic stone texture

Tutorial Chapters

  1. Making the dragon armature 0:10
  2. Building up dragon 4:55
  3. Adding teeth to jaws 7:45
  4. Painting the dragon wings 9:07
  5. Prepping the cakes 14:53
  6. Stacking double barrel 17:01
  7. Making dragon fire 19:50
  8. Adding jaws to dragon head 21:05
  9. Roughing out the dragon head 23:07
  10. Roughing out the body 23:45
  11. Making dragon legs 24:27
  12. Adding texture to dragon 27:30
  13. Adding dragon horns 28:15
  14. Attaching wings to body 29:03
  15. Making dragon spines 31:22
  16. Covering cake board 32:50
  17. Coloring castle brick 34:27
  18. Paneling the double barrel 37:28
  19. Paneling the towers 41:57
  20. Making the front gate 46:35
  21. Adding turrets 47:54
  22. Finishing the front gate 51:03
  23. Making flags 55:00
  24. Airbrushing 59:09
  25. Finishing fire 1:00:24

Sculpted Dragon Castle Cake Tutorial

Fly you fools! I made this cake for my friend's son's birthday and he absolutely loved it. The isomalt fire adds a level of detail that really makes the dragon pop off the cake without too much difficulty. I know many cakers are scared of working with isomalt, but this technique is a good entry point.

Downloads

Materials List

Black Letter Example 01

Black Letter Example 02

gluten free cake

June 25, 2018 Blog

Gluten-Free Cake

Gluten-Free Cake From Scratch With Low Sugar Strawberry Frosting

You won't believe this is a gluten-free cake! Bob's Red Mill 1:1 baking flour is my favorite for making gluten-free cake that tastes just like the real thing. I really like this particular flour because it doesn't have an odd aftertaste or strange texture. This cake is so light and fluffy, no one even realizes it's gluten-free! I like to pair this cake with my stabilized whipped cream recipe mixed with some strawberry puree light and low carb cake.

gluten free cake

If you wanted to make this cake even lower in sugar, replace the sugar in the cake recipe with Swerve baking sugar which can usually be found in the grocery store baking aisle. 

This gluten-free cake recipe is great for a birthday celebration for that special someone! Everyone deserves to have cake on their birthday right? My dad can't have gluten and he loves this gluten-free vanilla cake with my chocolate ganache.

Easy Gluten Free Cake Recipe

gluten free cake

My Dad developed a gluten allergy about 10 years ago at the age of 62. He had such bad pain in his chest that he thought he was having a heart attack and went to the hospital. If you knew my old-school tough guy Dad, you'd know what a big deal that was!

All his doctors told him he was fine and healthy and gave him steroids for his chest pain. (Insert annoyed eye roll from me). After talking with my Dad about his pain, I remembered a friend of mind who also was allergic to wheat and her symptoms seemed very similar. I urged my Dad to try giving up wheat for a week and he laughed at me .

"I've been eating bread my whole life. I'm not allergic to bread"

gluten free cake

After a few weeks my Dad's symptoms got so bad he couldn't eat anything. He couldn't lay down and he could barely walk he was in so much pain. After a few days of only drinking water, he felt better. The first thing he did when he felt better was to try and eat some bread.

His pain was so bad he said he almost passed out. That's when he really knew it was the wheat. He was devastated! How was he going to eat? He was sure he was going to starve to death lol.

Of course, he didn't and ten years later, he's healthier than I've ever seen him and 50 lbs lighter. A lot of his other health issues disappeared with the wheat consumption (like inflammation in his knees and migraines).

gluten free cake

When I see comments online laughing about how people never used to be allergic to wheat and that they must be making it up, I wish I could introduce them to my dad. He is never one to complain or admit weakness.

He most definitely did not choose to be gluten-free but it has changed his whole life. I still make my Dad goodies whenever I go visit using bobs red mill 1:1 gluten-free baking flour because I don't have to change any of my recipes. I just replace the flour with the gluten-free flour and it turns out perfect every time.

The texture of this cake is seriously so wonderful! Light, fluffy and moist!

gluten free cake

There might be other brands of 1:1 gluten-free flour in your area or you can order from Amazon but I can't guarantee the same results. Just make sure you look for something that says 1:1 replacement, not just gluten-free flour.

Tips For Making A Great Gluten Free Cake Recipe

Make sure you whip it good! As I said, this recipe uses the reverse mixing method which is the same way I make my famous vanilla cake recipe. Reverse mixing makes a nice tender crumb but you also have to remember that there isn't any gluten in this cake (aka structure) so it's SUPER important that you do that first bit of mixing for the full 2 minutes to develop your structure.

gluten free cake

Make sure your eggs, butter and milk are room temperature. Everyone always forgets this step and it can cause the cake to get a wet gummy layer at the bottom or worse, collapse. No bueno.

Sugar Free Strawberry Frosting

berry frosting

I don't like super sweet frostings and wanted this cake to be as low carb/low sugar as possible. I decided to go with some stabilized whipped cream and add in some strawberry puree (made without added sugar) to make it taste sweet without actually adding any sugar. The taste is soooo good! If you don't want to make your own puree then you can get some sugar free strawberry jam and that works just as good!

The stabilized whipped cream is strong enough to frost the cake and hold its shape for days. Amazing what a little gelatin can do. 

Gluten Free Cake Mix

gluten free cake

Don't want to fuss with making your cake from scratch? Bob's Red Mill makes some really amazing cake mixes as well! Vanilla or chocolate. The best thing about them is that they don't have any weird aftertaste. I can't even tell the difference.

Most grocery stores carry Bob's Red Mill cake mixes, I get mine from Safeway in the gluten-free section.

Gluten-Free Cupcakes

This recipe makes some really great gluten-free cupcakes as well! Just use a small ice cream scoop or a spoon to portion out your batter into your cupcake pans with cupcake liners. Try not to overfill (like I did) so that you have a nice even top. Bake at 350℉ for 18-20 minutes until the center is just set. Let cool. Frost your cupcakes with your favorite buttercream! So yummy!

gluten free cupcakes

Ready to make the most delicious gluten-free cake ever? Watch my video tutorial on how to make my super moist and tender gluten-free vanilla cake recipe with fresh buttercream frosting.

Cake Batter and Frosting Calculator

Select an option below to calculate how much batter or frosting you need. Adjust the servings slider on the recipe card to change the amounts the recipe makes.

Choose a pan type

Choose a cake pan size
(based on 2" tall cake pan)

Choose a cake pan size
(based on 2" tall cake pan)

Choose a cake pan size
(based on 2" tall cake pan)

Cupcake Tin Size

Choose number of pans

Cups of Batter Needed

8 cups

Cups of Frosting Needed

5 cups

Note: measurements are estimated based off the vanilla cake recipe using standard US cake pans and sizes. Measurements used are for 2" tall cake pans only. Your results may vary. Do not overfill cake pans above manufacturer's recommended guidelines.

Recipe

gluten free cake
Print Recipe
4.88 from 55 votes

The Best Gluten-Free Cake With Sugar Free Strawberry Frosting

This Gluten-Free Cake recipe is so light and fluffy, no one will know it's gluten-free! Topped with fresh strawberry frosting, this is a real guilt-free treat. Makes enough batter for two 8"x2" cake rounds.
Prep Time15 minutes mins
Cook Time30 minutes mins
Total Time45 minutes mins
Course: Dessert
Cuisine: American
Servings: 24
Calories: 293kcal
Author: Elizabeth Marek

Ingredients

Gluten Free Cake Ingredients

  • 14 oz Bobs Red Mill 1:1 cake flour
  • 12 oz granulated sugar or sugar substitute. follow directions on package
  • 1 teaspoon baking soda
  • 2 teaspoon baking powder
  • 1 teaspoon salt
  • 1 tablespoon vanilla extract
  • 10 oz whole milk
  • 3 large eggs
  • 1 oz vegetable oil
  • 6 oz butter

Strawberry Whipped Cream Frosting

  • 8 oz heavy cream
  • 8 oz strawberry puree
  • 1 teaspoon powdered gelatin
  • 1 tablespoon cold water
  • 1 teaspoon heavy cream
US Customary - Metric

Instructions

Cake Directions

  • Heat oven to 350º F and prepare two 8" round cake pans with pan release
  • Measure out the liquid ingredients and place them into a bowl. Whisk to combine. 
  • Measure out dry ingredients and place them into the stand mixer bowl.
  • Attach the paddle to the mixer, and turn on the slowest speed (setting 1 on Kitchen Aid mixers). Slowly add chunks of your softened butter until it is all added. Let mix until batter resembles coarse sand.
  • Add ⅓ of your liquid ingredients while mixing on low until just moistened. This part is crucial. Don't add too much liquid.
  • Increase mixing speed to medium (setting 5 on Kitchen Aid mixer). Let the mixture whip up until it has thickened and lightened in color. It should look like soft-serve ice cream. If you do not let the batter mix fully, you will end up with very short, crumbly cakes. I let mine mix for a full 2 minutes. 
  • Scrape the bowl. This is an important step. If you skip it, you will have hard lumps of flour and unmixed ingredients in your batter. If you do it later, they will not mix in fully.
  • Slowly add in the rest of your liquid ingredients, stopping to scrape the bowl one more time halfway through. Your batter should be thick and not too runny. I have to spoon mine into pans with a rubber spatula.
  • Fill pans ½ full. Give the pan a little tap on each side to level out the batter and get rid of any air bubbles. 
    I always start by baking for 30 minutes for 8" and smaller cakes and 35 minutes for 9" and larger cakes and then checking for doneness. If the cakes are still really jiggly, I add another 10 minutes. I check every 5 minutes after that until I'm close and then it's every 2 minutes. Cakes are done when a toothpick inserted in the center comes out with a few crumbs.
  • After cakes have cooled for 10 minutes or the pans are cool enough to touch, flip the cakes over and remove from the pans onto the cooling racks to cool completely. Wrap in plastic wrap and chill in the refrigerator.
  • Once the cakes are chilled in the refrigerator (about an hour for this size, longer for larger cakes), tort, fill and crumb coat all at once. If you do not plan on crumb coating the same day, you can leave the wrapped cakes on the countertop. Chilling can dry out your cakes before they are iced, so avoid keeping them in the refrigerator longer than necessary. Cakes can be frozen in freezer bags for later use as well.

Strawberry Frosting

  • Sprinkle gelatin over water and let set for 5 minutes. Heat in microwave for 5 seconds until granules are dissolved.
    Whip cream to soft peaks and then add in your vanilla. 
    Add in 1 teaspoon cream to gelatin mixture then drizzle in your melted gelatin while mixing on low.
    Fold in ½ cup cold pureed strawberries or sugar free jam

Video

Notes

Gluten free cake that is so tasty, no one will even know it's gluten free!

Nutrition

Serving: 1g | Calories: 293kcal | Carbohydrates: 27g | Protein: 2g | Fat: 19g | Saturated Fat: 12g | Cholesterol: 95mg | Sodium: 376mg | Potassium: 155mg | Sugar: 26g | Vitamin A: 640IU | Vitamin C: 9.7mg | Calcium: 77mg | Iron: 0.3mg


closeup of a slice of funfetti cake

June 21, 2018 Blog

Funfetti Cake

Funfetti cake recipe (also called confetti cake) is a soft, delicious vanilla cake layers with brightly colored rainbow sprinkles mixed in and frosted with a sweet vanilla buttercream frosting.

I have spent nearly 10 years perfecting this recipe! Tweaking it and updating it every time I make a change. The last time I developed this recipe, my daughter Avalon was only four years old! Now my she is almost 11 and my son is 5 and this funfetti recipe is still one of our favorites to make with a couple of changes.

I truly believe that buttermilk and clear vanilla extract make all the difference and recreates that perfect nostalgic funfetti flavor from a box but 100% from scratch. 

The other secret to moist funfetti cake is a small amount of corn syrup. This invert sugar is hygroscopic and absorbs moisture from the air, keeping this cake SUPER moist.

Pro-tip: You can add 1 ounce of corn syrup to your cake recipes to make them super moist.

Be sure to watch the video in the recipe card for a full visual example on how to create this cake from start to finish including how to bake the funfetti cake layers, how to make the buttercream frosting, color frosting pink, how to make a gold drip and how to decorate it all together.

What's In This Blog Post

  • Ingredients
  • How To Make Funfetti Cake
  • How To Make The Buttercream Frosting
  • Cake Assembly & Decorating
  • Making The Gold Drip
  • Finishing The Cake
  • FAQ

You won't need any fancy tools or ingredients for this cake but let's go over everything so we can set ourselves up for success. 

Ingredients

funfetti cake ingredients

Pro-tip: Always bring your cold ingredients (egg whites, buttermilk, butter, etc) to room temperature (roughly 70ºF). Baking is a science and essentially an emulsion of water and oil-based ingredients. If everything is not the same temperature, your cake batter will split and not rise properly. 

Buttermilk is a magical ingredient when it comes to baking. The acid breaks down the gluten that develops while mixing, making this funfetti cake EXTRA tender and moist. If you don't have buttermilk on hand, don't worry, you can easily make your own or even use sour cream or yogurt instead. This recipe is very forgiving.

All-purpose flour is needed for this recipe. Usually, I use cake flour for my cake recipes and the reverse creaming method, but I have noticed that this cake needs a little more structure to suspend those sprinkles properly.

Unsalted butter is used in this recipe and most baking recipes because salted butter can taste TOO salty. If all you have is salted butter on hand, just leave the salt out in this recipe.

Egg whites are used in this cake recipe instead of whole eggs so that the cake batter is nice and white. You can use fresh or boxed egg whites. If you use egg yolks, save them for the next time you want to make some yummy lemon curd.

Clear vanilla extract (imitation vanilla) is used because of its distinct flavor profile. If all you have is pure vanilla extract, no worries! Your cake will still be delicious.

Gold powder is used to do this gold drip. I like a very bright gold. You can use any gold powder you like or you can omit this step completely. You can find gold powder online or at most cake decorating stores. 

Corn Syrup is used in this recipe to keep the cake ultra moist. Because corn syrup is an invert sugar and is hygroscopic (attracts moisture) this cake stays super moist just like the boxed mix version. You can replace corn syrup with honey or agave syrup if you want or leave it out completely.

How To Make Funfetti Cake

  1. Preheat your oven to 350ºF. (176ºC).
  2. Coat your three cake pans with cake goop or your preferred brand of pan release.
  3. Combine your flour, baking powder, and salt in a medium bowl and set it aside for now.
  4. Combine your warmed buttermilk, oil, and vanilla extract together and set aside. Hand holding clear bowl over glass measuring cup pouring oil into glass container.
  5. Place the softened butter into the bowl of a stand mixer with the paddle attachment attached and cream it on medium speed until smooth its smooth. 
  6. While mixing on low speed, sprinkle your sugar into the butter and then bump the speed up to medium. Allow the butter and sugar to mix until it has lightened in color and looks fluffy.small boy adding a bowl of sugar to funfetti cake ingredients
  7. Next, add in the room temperature egg whites one at a time (roughly), letting them fully combine into the butter mixture before adding the next egg white. The final mixture will be light and airy. close up of egg white and butter mixture
  8. While mixing on low, add in ⅓ of your flour mixture to the butter and egg mixture and mix until combined.
  9. Add in ½ of your milk mixture to the bowl of the stand mixer (still mixing on low) and mix until combined. 
  10. Repeat this process again. Flour mixture, milk mixture, then flour mixture.
  11. Fold in your rainbow sprinkles by hand just until everything is combined together.closeup of funfetti cake batter and sprinkles in a mixing bowl
  12. Divide your cake batter evenly between your three prepared pans.  close up of funfetti cake batter in a cake pan
  13. Bake your cakes for 30-35 minutes or until a toothpick comes out clean when poked in the center. 
  14. Let the cake layers cool on a wire rack for 15-20 minutes, then flip them out of the cake pans onto the wire rack. 
  15. Wrap the cake layers while they are still warm and place into the freezer to freeze for an hour. This rapid cooling locks in the moisture.
  16. Once the cake layers are cool but not frozen, you can then trim off the brown edges of your cakes and frost them as desired. See more instructions in the video tutorial. 

How To Make The Buttercream Frosting

  1. Next, let's make the vanilla buttercream frosting.
  2. On low speed, whip your softened unsalted butter until it's smooth and lump-free with the whisk attachment.close up of creaming butter in the bowl of a stand mixer
  3. Add in the clear vanilla extract and the salt and mix until combined.
  4. While mixing on low, add in your sifted powdered sugar. Stop to scrape the bowl with a rubber spatula as needed to make sure everything mixes properly.
  5. Add in the heavy cream and mix until super smooth. Don't over-mix.close up of buttercream frosting

Cake Assembly & Decorating

Watch this video on how to decorate your first cake if you want more details.

Click on this image to go to the how to decorate your first cake tutorial
  1. Trim the brown sides and bottom from your cake layers with a serrated knife. You can also level the cake so it's flat by trimming off the dome if needed (makes a great snack!) close up of cake getting brown bits trimmed off
  2. Place your first cake layer onto the cake plate.
  3. Spread an even layer of the frosting onto the top of the cake layer using your offset spatula.
  4. Repeat the process with the other two cake layers.close up of stacked funfetti cake layers with buttercream frosting
  5. Cover the top and the sides of the cake with a thin layer of frosting. This is called a crumb coat and helps lock in all the crumbs so the final layer of frosting is beautiful and pristine.
  6. Place the cake into the fridge fo 20 minutes or until the frosting feels firm to the touch.
  7. Apply another layer of frosting to the entire cake in an even layer. Use a bench scraper to make the sides straight and even.frosted funfetti cake
  8. Place the cake into the fridge to chill while you make the gold drip (optional).


Making The Gold Drip

  1. This is totally optional but I LOVE a gold drip and think it looks so pretty on this cake. All you need is to melt 6 ounces of candy melts with 1 ounce of hot water in the microwave. The color of the candy melts doesn't really matter. You won't see the color.water ganache in a bowl
  2. Combine your gold dust and oil together to make a thick paste (see recipe video).gold dust paste
  3. Paint the inside of your piping bag with the gold dust mixture.gold dust inside a piping bag
  4. Allow the drip mixture to cool to about 90ºF before filling your piping bag.
  5. Pipe the drip around the edge of the cake.gold piped drip on a white cake

Finishing The Cake

  1. Color your leftover buttercream with some food coloring. I used electric pink from americolor. Protip: Mix your buttercream with an immersion blender to get a bright and vivid color.close up of bright pink buttercream
  2. Place the buttercream into the piping bag with a 1M star piping tip.
  3. Pipe a border around the base of your cake.
  4. Add some sprinkles on top of the border.
  5. Add another border around the top of the cake and some more sprinkles.
  6. Your funfetti cake is now complete!

This really is the ULTIMATE birthday cake! Soft, fluffy, moist, and delicious! You'll never need another funfetti cake recipe.

If you loved this recipe don't forget to leave me a review and check out some of my other popular cake flavors!

close up of a slice of vanilla cake
Moist Vanilla Cake
slice of pink velvet cake with whipped cream frosting and fresh raspberries on a white plate
Pink Velvet Cake
close up of rainbow cake slice on a blue plate
Rainbow Cake

FAQ

Is funfetti cake just vanilla cake with sprinkles?

Yes funfetti cake is a moist vanilla cake with rainbow sprinkles mixed in.

What is the difference between confetti cake and funfetti cake

What Is Funfetti? Funfetti cake is just another name for a confetti cake. In fact, the only difference is that ``Funfetti'' is a name trademarked by Pillsbury. Confetti cake is traditionally a white or vanilla cake filled with rainbow sprinkles that look a lot like a shower of confetti.

What are the best sprinkles to use in funfetti cake?

Rainbow jimmies are the best sprinkles to use in funfetti cake because they don't dissolve into nothing like nonperils do.

Can you make this recipe into cupcakes?

Yes this funfetti cake makes great cupcakes! I baked mine for 18 minutes.

Recipe

closeup of a slice of funfetti cake
Print Recipe
4.98 from 104 votes

Homemade Funfetti Cake Recipe

This homemade funfetti cake with sweet and creamy buttercream frosting tastes just like it came from a box but it totally homemade. This is my go-to cake recipe for birthdays and special occasions!
Prep Time15 minutes mins
Cook Time25 minutes mins
Total Time40 minutes mins
Course: Dessert
Cuisine: American
Servings: 12 servings
Calories: 1197kcal
Author: Elizabeth Marek

Equipment

  • 3 8" round cake pans
  • 1 Piping Bag
  • 1 1M Piping Tip

Ingredients

Cake Ingredients

  • 20 ounces All Purpose Flour
  • 4 teaspoon baking powder
  • 1 teaspoon salt
  • 12 ounces unsalted butter room temp
  • 16 ounces sugar
  • 1 Tablespoon clear vanilla extract
  • 8 ounces egg whites
  • 1 ounce corn syrup or honey
  • 14 ounces buttermilk room temp
  • 2 ounces vegetable oil
  • 6 ounces rainbow sprinkles

Gold Drip (optional)

  • 6 oz white chocolate or candy melts
  • 1 oz warm water
  • 2 teaspoon gold dust see notes
  • 3 drops oil

Buttercream Frosting

  • 12 ounces unsalted butter room temp
  • 28 ounces powdered sugar
  • 1 Tablespoon vanilla extract
  • 4 ounces heavy whipping cream
US Customary - Metric

Instructions

Cake Instructions

  • Preheat your oven to 350ºF. (176ºC).
    Coat your three cake pans with cake goop or your preferred brand of pan release.
  • Combine your flour, baking powder, and salt in a medium bowl and set it aside for now.
  • Combine your warmed buttermilk, oil, corn syrup, and vanilla extract together and set aside.
  • Place the softened butter into the bowl of a stand mixer with the paddle attachment attached and cream it on medium speed until smooth its smooth. 
  • While mixing on low speed, sprinkle your sugar into the butter and then bump the speed up to medium. Allow the butter and sugar to mix until it has lightened in color and looks fluffy.
  • Next, add in the room temperature egg whites one at a time (roughly), letting them fully combine into the butter mixture before adding the next egg white. 
  • While mixing on low, add in ⅓ of your flour mixture to the butter and egg mixture and mix until combined.
  • Add in ½ of your milk mixture to the bowl of the stand mixer (still mixing on low) and mix until combined. 
  • Repeat this process again. Flour mixture, milk mixture, then flour mixture.
  • Fold in your rainbow sprinkles by hand just until everything is combined together.
  • Divide your cake batter evenly between your three prepared pans.
  • Bake your cakes for 30-35 minutes or until a toothpick comes out clean when poked in the center. 
  • Let the cake layers cool on a wire rack for 15-20 minutes, then flip them out of the cake pans onto the wire rack. 
  • Wrap warm and place into the freezer to freeze for an hour. This rapid cooling locks in the moisture. Once the cake layers are cool but not frozen, you can then trim off the brown edges of your cakes and frost them as desired. See more instructions in the video tutorial. 

Gold Drip Instructions

  • Melt the chocolate in microwave or in a glass bowl over a pot of simmering water (bane marie) and add in the water. Whisk until combined and smooth.
  • Combine the gold powder and oil into a thick paste.
  • Paint the bottom 2" of the inside of your piping bag with the gold mixture.
  • Add in the chocolate drip mixture, and now it's ready to pipe.

Vanilla Buttercream

  • On low speed, whip your softened unsalted butter until it's smooth and lump-free with the whisk attachment.
  • Add in the clear vanilla extract and the salt and mix until combined.
  • While mixing on low, add in your sifted powdered sugar. Stop to scrape the bowl with a rubber spatula as needed to make sure everything mixes properly.
  • Add in the heavy cream and mix until smooth. Don't over-mix.

Cake Assembly & Decorating

  • Trim the brown sides and bottom from your cake layers with a serrated knife. You can also level the cake so it's flat by trimming off the dome if needed (makes a great snack!)
  • Place your first cake layer onto the cake plate.
  • Spread an even layer of the frosting onto the top of the cake layer using your offset spatula.
  • Repeat the process with the other two cake layers.
  • Cover the top and the sides of the cake with a thin layer of frosting. This is called a crumb coat and helps lock in all the crumbs so the final layer of frosting is beautiful and pristine.
  • Place the cake into the fridge fo 20 minutes or until the frosting feels firm to the touch.
  • Apply another layer of frosting to the entire cake in an even layer. Use a bench scraper to make the sides straight and even.
  • Add some sprinkles to the outside of the cake using your hands.
  • I colored the remaining frosting pink and piped some borders around the base of the cake and added some dollops on top. 
  • Place the cake into the fridge to chill while you make the gold drip (optional).
  • Pipe the drip around the edge of the cake.
  • Decorate the cake with the remaining pink buttercream as desired!

Video

Notes

Tips for success!
  1. Make sure all your ingredients are room temperature. Remember, baking is a science and temperature of your ingredients is one of the most important things you can do to make a successful cake. 
  2. Using a kitchen scale to measure your ingredients is very important for a successful cake. All ingredients (dry and liquid) are measured the same. No measuring cups! 
  3. I use this brand of edible gold powder for a very shiny gold drip.

Nutrition

Serving: 1serving | Calories: 1197kcal | Carbohydrates: 166g | Protein: 10g | Fat: 57g | Saturated Fat: 35g | Polyunsaturated Fat: 2g | Monounsaturated Fat: 15g | Trans Fat: 2g | Cholesterol: 139mg | Sodium: 287mg | Potassium: 329mg | Fiber: 1g | Sugar: 128g | Vitamin A: 1615IU | Vitamin C: 0.1mg | Calcium: 154mg | Iron: 2mg
berry filling recipe

June 18, 2018 Blog

Berry Filling Recipe

Berry Filling Recipe That Can Be Used For Cakes, Pies or Baked Goodies

berry filling recipe

Making a good, stable berry filling is easier than you think. Just choose your berries and go! I've made this recipe using strawberries, blackberries, blue berries and even marion berries (It's an Oregon thing) and even thrown in some chopped peaches because I love how they taste with berries. You can combine your berries too if you like. Adjust the sugar for the amount of sweetness that you desire.

This filling works great with my easy pie crust recipe.

How To Prepare Your Berries To Make A Filling

berry filling

Depending on the season, you might have a ton of fresh fruit on hand that you want to make into a filling and then freeze for later use. Or it might be the dead of winter and your bride just HAS to have strawberry fruit filling so frozen is your only option. This process works for either situation.

berry filling

First of all prepare your fruit. If it's fresh you'll want to slice your berries so they cook more evenly (strawberries, peaches and large marion berries) but if you're using frozen you probably won't need to slice them. Just defrost them. When berries are frozen, they release their juices. I like to strain this juice from the berries and collect separately into a bowl. Combine this juice with some water until you get 6 oz.

berry filling

You can use any type of berry for this including strawberries, blackberries, blueberries, raspberries, marion berries or any combo you like!

How To Make Berry Filling

Place your berries in a medium pot with sugar, salt and 3 oz of your juice/water mixture. Bring to a boil and cook for 5-6 minutes. Combine your remaining 3 oz of water/juice and your 2 oz of corn starch together in a bowl to make a slurry. Pour this mixture into your hot berry mixture. Mix with a spatula constantly so it doesn't burn and the mixture begins to thicken and goes from cloudy to clear.

berry filling

Remove the mixture from the pan and add in your lemon juice and zest.

If your mixture seems really loose and watery, you can also add more corn starch. Dissolve 1 Tablespoon of cornstarch into 2 teaspoon of water and add into the mixture and cook until clear while stirring constantly.

The mixture when hot should appear thick but it will still be runny. Once it cools it should be pretty stable and not runny.

How To Use Berry Filling

berry filling

You can use berry filling in cakes or pies. Make sure you cool your filling first. I pour mine into a sheet pan and stick it in the fridge so it cools faster. You can pour it into a pie crust for berry pie or you can use it as a cake filling.

Make sure you pipe a dam around the outside of your cake with some buttercream before putting in your fruit filling so it doesn't ooze out the edges. Check out how pretty this vanilla cake looks with some berry filling and berry buttercream!

berry filling for cake

You can also combine your berry filling with buttercream to make a berry buttercream. So yummy. If you don't like visible seeds in your buttercream, use an immersion blender to blend up your fruit filling first to make it nice and smooth before adding it to your buttercream. Start with ¼ cup of cooled filling and add it to your room temperature buttercream. Whisk together on high until smooth and creamy.

You always want to keep fruit filling refrigerated until delivery to keep the fruit from going bad. Once it's delivered though it should be fine at room temperature for 6 hours.

How To Store Berry Filling

berry filling

I store my filling in the fridge until I need it (for up to three days) and if I'm not going to use it right away or if I have leftovers I will divide it up and store it in the freezer. Once unfrozen it can't be frozen again so I divide mine up into 1 cup batches so I can take out as much as I need. Store frozen for up to 6 months. Name and label your bags so you know what they are.

Recipe

berry filling recipe
Print Recipe
4.78 from 9 votes

Berry Filling Recipe

This thick berry filling recipe works great for pies, cakes or even in baked goodies. Firm enough that it will hold it's shape when sliced into and full of delicious flavor! Can be made with fresh or frozen berries. One recipe makes about 4 cups (enough to fill one 9" pie)
Prep Time10 minutes mins
Cook Time20 minutes mins
cooling time1 hour hr
Total Time30 minutes mins
Course: Dessert
Cuisine: American
Servings: 4 cups
Calories: 313kcal
Author: Elizabeth Marek

Ingredients

  • 28 oz frozen or fresh berries
  • 6 oz Juice from berries plus water if you need more, divide in half
  • 5 oz sugar
  • 2 oz cornstarch
  • ½ teaspoon salt
  • 1 lemon zest
  • 1 tablespoon lemon juice
US Customary - Metric

Instructions

  • Defrost or slice berries and strain off excess juice into a bowl. Combine the juice with enough water to make 6 oz total. 
  • Place berries, sugar, salt and ½ of juice/water mixture into a medium sauce pan. Bring to a boil, stirring constantly and cook 5-6 minutes
  • Combine corn starch with second measure of juice/water mixture and make a slurry. Pour mixture into the hot berries and stir constantly until mixture goes from cloudy to clear and is thick. Mixture should be slightly thick when hot. If too loose and watery, add more cornstarch (1 tablespoon dissolved in 2 teaspoon water) as needed. 
  • Remove mixture from heat and stir in lemon juice and zest. 
  • Cool mixture fully before using. Store excess in the fridge or freeze for up to 6 months. 

Nutrition

Calories: 313kcal | Carbohydrates: 77g | Fat: 1g | Sodium: 296mg | Potassium: 150mg | Fiber: 5g | Sugar: 56g | Vitamin A: 90IU | Vitamin C: 7.8mg | Calcium: 19mg | Iron: 0.5mg

pie crust recipe

June 18, 2018 Blog

Flaky Pie Crust Recipe

This flaky pie crust uses all butter and makes the most beautiful, tender pie crusts

A flaky pie crust recipe made with all butter couldn't be easier. You only need flour, salt and butter to make a gorgeous pie crust with tender flaky layers. 

I first learned how to make this pie crust recipe in pastry school and I was surprised and how easy it really was. Having a French pastry chef to demo for you does tend to help I must admit. I have this flaky pie crust recipe with my mealy pie crust recipe for every pie I have made. 

How Do You Make A Good Flaky Pie Crust

pie crust recipe

Some of the issues that come up with making your own pie crust recipe is the dough can turn out super tough and hard to cut. Not really what we're looking for in a flaky pie crust recipe. The second issue is the bottom layer of the pie not baking all the way through and you end up getting a soggy bottom (to your pie). Yuck. The last issue is being able to handle your pie crust recipe easily so your pie ends up looking pretty and not like someone dropped it on the way to the oven.

all butter pie crust

The secret to a perfect flaky pie crust recipe is all about the butter and keeping it cold cold cold. I achieve this by using a cheese grater to grate my butter straight out of the fridge and as soon as it's grated I put it in the freezer to make sure it stays cold until I need it.

The reason why pie dough get's tough is the second you start working the butter into the flour, it warms up and starts saturating the flour. Then you add in water which activates the gluten in the flour and things start getting tough.

flaky pie crust recipe

The key to keeping things flaky is to keep the butter cold enough that the flour coats the butter without combining with it and using only enough water to make things stick together and then immediately stop mixing.

pie crust recipe

Once the dough comes together you place the dough into the fridge to chill for at least 1 hour. This allows the water to absorb fully into the flour without making more gluten and also keeps the butter cold. When you roll out your pie crust you should see little chunks of butter in the dough. These chunks form the flaky layers you want in your crust. No chunks of dough, no flakes.

pie crust without shortening

How To Make Mealy Pie Dough ( Pâte Brisée)

Mealy pie dough is a little bit different than the top crust. You can make yours by hand but this pie dough is so forgiving, you can make it your stand mixer with the paddle attachment. Simply place your flour and butter in the bowl and mix until a sandy texture is formed. Then add in your egg and water until a dough forms. Wrap in plastic and let chill for an hour before rolling out.

mealy pie dough

Because the flour and butter is combined together first, you get a crust with the texture of a shortbread cookie. Firm but cuts easily and is very tender. Not as tender as the flaky top crust but perfect for holding together when you cut without getting tough.

I roll out my mealy pie dough between two pieces of parchment paper. I try to get mine really thin, like ⅛th of an inch. This way the bottom layer bakes quickly is very crunchy and not doughy. Then I flip the paper over into the pie pan. Press the dough into your pie pan and trim off the excess. Fill your pie with your filling and bake until the pie crust starts to shrink away from the edge of the pan. When your pie shrinks this means that the center of your bottom crust is baked through and you won't have a doughy center.

How To Make A Single Pie Crust Pie (No Bake)

no bake strawberry pie crust

You can use this flaky pie crust for the top layers of your pies or for no-bake pies. If you use it for liquid fillings like pumpkin pie, the dough will absorb the liquid and become gooey. Mealy dough is best for liquid pie fillings. 

How to blind bake your flaky pie crust

Blind baking is when you bake your pie crust before you fill it. Depending on the filling, you might bake it halfway or all the way. 

Roll your dough out and then place it into your pie tin. Cut off the excess and flute the edges. Poke some holes in the bottom of the crust so it doesnt puff up. Freeze for 20 minutes.

Place some aluminum foil over the top of your crust and fil it with pie weights or dried beans. Bake for 10 minutes then remove the foil. Put the pie back in the oven and bake another 15-20 minutes or until the crust is golden brown and shrinks slightly from the sides. 

Let it cool and fill with your desired filling like pastry cream, coconut custard, lemon curd or chocolate mousse and top with stabilized whipped cream.

How To Make A Double Crust Pie

pie crust recipe

For a double pie crust pie, roll out your mealy pie dough and place it in your pie tin. Cut off the excess but leave about ¼" of extra dough all the way around.

Fill your pie with your desired (fully cooled) filling like my summer berry filling or apple pie filling. Put your pie pan into the fridge while you work on the top layer. You always want to keep your dough as cold as possible at all times.

Take out some of your flaky pie dough and use a nice sturdy rolling pin to start rolling it out. We used a wooden rolling pin and would actually "beat" the top of the dough a couple of times to start to flatten it out which can be extremely stiff due to the cold butter.

pie crust recipe

Roll out your flaky pie crust recipe between two pieces of parchment paper. I make the top layer about ⅛" thick. Make sure you moisten the edges of the bottom layer of crust with some water or egg white before adding the top layer of crust or it will split during baking and your filling will leak out. Flip the top layer of crust onto the top and press down the edges to seal them down. You can also crimp with your fingers or press with a fork. I keep things pretty simple here.

pie crust recipe

When you place a crust on top of your pie, it's important to make some vents for air to escape. You can make some very simple knife slices or you can use a cookie cutter to make some pretty shapes and decorate the top. For my "Fathers Day Pie" I simply used a paring knife to cut out some letters.

double crust pie recipe

Brush the surface of your pie crust recipe with some egg white and then sprinkle with some granulated sugar. If you skip this step then your pie won't brown very nicely and will seem visually dry on top.

How To Perfectly Bake Pie

how to bake pie

To bake your pie, you want to preheat your to 400℉. Move your rack to the bottom of the oven. You want more heat on the bottom than the top. Place your pie into the oven and bake for 30 minutes or until the top of pie starts to brown. Then I place a pie crust protector over the edges of the pie so they don't brown too quickly. You can also form a barrier using aluminum foil strips.

For the last 10 minutes of baking I place a baking sheet on a rack near the top of the oven to keep the pie from browning before the bottom of the crust is finished. Once the edges of the pie start pulling away from the sides I know the pie is done. You can remove the pan and brown the top more if you need.

How To Make Decorative Crust Pies

decorative pie crust recipe

If you have seen some of those fancy decorative crust pies on pinterest you might want to know how to make one for yourself. Essentially you can use the same flaky pie crust for the top but you would cut it into strips or shapes before attaching to the top of the pie. As you may have guessed, using cold dough is important for handling and shaping.

decorative pie crust

For this flower pie crust I simply cut out some long trips of flaky pie dough and made a simple wreath look around the edges of the pie. I cut out some flower shapes using a fondant punch and placed that on top. I brushed the whole surface with egg white and dusted with granulated sugar and then baked as usual. Super fun and easy way to make a pie look really fancy!

Recipe

flakey pie crust
Print Recipe
5 from 9 votes

Flaky Pie Crust Recipe

A flaky all-butter pie crust that melts in your mouth. Perfect for no-bake pies, cream pies or for using as a top crust on double-crust pies.
Prep Time5 minutes mins
Cook Time30 minutes mins
Resting time2 hours hrs
Total Time35 minutes mins
Course: Dessert
Cuisine: American
Servings: 2 9" pie crusts
Calories: 1189kcal
Author: Elizabeth Marek

Ingredients

  • 10 ounces all purpose flour or all-purpose flour
  • ¼ teaspoon salt
  • 8 oz cold unsalted butter grated
  • 2 oz ice water
US Customary - Metric

Instructions

  • Place the flour and salt into a medium-sized bowl
  • Grate your cold butter directly into the flour mixture
  • Toss the mixture until the butter is coated with flour
  • Add in the water in small amounts and mix with your other hand until the flour is almost all gone. Press the dough together and wrap in plastic wrap to chill at least one hour but overnight is best
  • To use dough, roll out dough between two pieces of parchment paper to ⅛" of an inch. Place into pie dish and press flat against bottom and sides. Trim off the excess, leaving ¼ of an inch around the outside of the pan to allow for shrinking.

Video

Nutrition

Calories: 1189kcal | Carbohydrates: 122g | Protein: 23g | Fat: 73g | Saturated Fat: 44g | Cholesterol: 182mg | Sodium: 905mg | Potassium: 637mg | Fiber: 18g | Vitamin A: 2125IU | Calcium: 78mg | Iron: 6.3mg


Mermaid Cake Tutorial

June 15, 2018 Course Preview

Mermaid Cake Tutorial

Skill level: Intermediate

Liz's latest tutorial is here and it's full of cute! Liz made this adorable sculpted mermaid cake for her best friends daughter's 5th birthday! In this tutorial you'll learn how to a make a gravity-defying structure, how to sculpt those adorable proportions, make flexible gelatin mermaid tail, hand-painted details and more!

1:07:40 Minutes of Instruction

What You Will Learn

  • Learn how to create a cut stylized mermaid cake dipping out of the water
  • How to make a gravity-defying cake structure
  • Learn how to sculpt a posable mermaid tail
  • How to make cute styled eyes, nose and mouth
  • Liz Marek's tips and tricks for making beautiful hair easily

Tutorial Chapters

  1. Making the cake structure 0:10
  2. Making the bottom of chin 1:01
  3. Assembling cake structure 2:34
  4. Stacking the cakes 8:07
  5. Carving the head 9:48
  6. Making the top of head 12:32
  7. Crumbcoating the head 13:31
  8. Stacking the tail 14:14
  9. Carving the tail 15:34
  10. Making the tail tip 16:55
  11. Adding the nose 18:33
  12. Building up the shoulders 20:11
  13. Making the tail flipper 22:17
  14. Making skin-toned fondant 25:48
  15. Smoothing out the body 26:32
  16. Creating the eyes 32:10
  17. Adding the eyebrows 40:34
  18. Adding the mouth 41:32
  19. Paneling the tail in fondant 43:32
  20. Finishing the tail fins 47:32
  21. Painting the scales 49:43
  22. Adding the hair 50:47
  23. Making the water 1:00:34
  24. Adding the arms 1:04:47

Downloads

Materials List

Wooden Head Board Template

Cake Head Board Template

Mermaid Head Template - Front

Mermaid Head Template - Side

Mermaid Head Reference - Front

Mermaid Head Reference - Side

Mermaid Tail Cake Template

Cute Proportions Reference

Cute Hair Reference

Mermaid Cake Tutorial

June 15, 2018 Paid Video

Mermaid Cake

Skill level: Intermediate

Mermaid birthday parties are all the rage right now and what better way to celebrate than with a super cute mermaid cake? This little beauty is perfect for your special occasion, complete with golden mermaid tail, cartoony eyes, cutesy nose and mouth and the long, beautiful mermaid hair we all wish we had when we were little.

Liz Marek teaches how to create this stunning gravity-defying cake, offering several tips and tricks on how to create hair (a tricky subject for many cake decorators) and how to get an awesome water effect on the cake board.

1:07:40 Minutes of Instruction

What You Will Learn

  • Learn how to create a cut stylized mermaid cake dipping out of the water
  • How to make a gravity-defying cake structure
  • Learn how to sculpt a posable mermaid tail
  • How to make cute styled eyes, nose and mouth
  • Liz Marek's tips and tricks for making beautiful hair easily

Tutorial Chapters

  1. Making the cake structure 0:10
  2. Making the bottom of chin 1:01
  3. Assembling cake structure 2:34
  4. Stacking the cakes 8:07
  5. Carving the head 9:48
  6. Making the top of head 12:32
  7. Crumbcoating the head 13:31
  8. Stacking the tail 14:14
  9. Carving the tail 15:34
  10. Making the tail tip 16:55
  11. Adding the nose 18:33
  12. Building up the shoulders 20:11
  13. Making the tail flipper 22:17
  14. Making skin-toned fondant 25:48
  15. Smoothing out the body 26:32
  16. Creating the eyes 32:10
  17. Adding the eyebrows 40:34
  18. Adding the mouth 41:32
  19. Paneling the tail in fondant 43:32
  20. Finishing the tail fins 47:32
  21. Painting the scales 49:43
  22. Adding the hair 50:47
  23. Making the water 1:00:34
  24. Adding the arms 1:04:47

Sculpted Mermaid Cake Tutorial

I grew up watching The Little Mermaid and loved it. It was my favorite Disney movie by far. Little did I know at the time, mermaids would become a trend, far into the future with no end in sight. Mermaids are EVERYWHERE right now, on the toy shelves, in the fashion department (I can't tell you how many "I am a mermaid" shirts I've seen lately) and online in my facebook feed every time I scroll through.

What better way to meet the trend than with a cutesy birthday cake?!

Downloads

Materials List

Wooden Head Board Template

Cake Head Board Template

Mermaid Head Template - Front

Mermaid Head Template - Side

Mermaid Head Reference - Front

Mermaid Head Reference - Side

Mermaid Tail Cake Template

Cute Proportions Reference

Cute Hair Reference

closeup of slice of chocolate wasc cake with chocolate ganache

June 13, 2018 Blog

Chocolate WASC

Chocolate WASC Is The Easiest Way To Make Box Mix Taste Like Scratch

Chocolate WASC is the chocolate version of our popular WASC recipe that with an addition of a few ingredients, your box cake will taste almost like scratch. The texture is light and fluffy but is still sturdy enough to carve a cake or stack into for a wedding cake. Chocolate WASC is a great option if you're not quite ready to take the plunge into baking a chocolate cake recipe from scratch.

closeup of slice of chocolate wasc cake with chocolate ganache

Chocolate Sour Cream Cake

One of the ingredients that makes this cake so dang good is the sour cream. It adds a nice tang to the flavor and an extra level of moistness. Sour cream is a popular ingredient used in a lot of chocolate cake recipes giving it a similar flavor that you might get from using buttermilk or mayonnaise.

Chocolate Cake With Coffee

I like to use coffee as my liquid instead of water because the coffee brings out the chocolate flavor. Your batter will smell like strong coffee but don't worry, it won't taste like coffee. You don't have to use coffee, you can use water or even milk if you want.

chocolate wasc with chocolate frosting and chocolate chips on top

How To Make Chocolate WASC

Chocolate WASC starts with a nice chocolate-y box mix. I usually use Duncan Hines chocolate fudge cake but devils food cake will also do nicely. Just pour the contents of the mix into a bowl and add in your extra ingredients. Just ignore the instructions on the back of the box and use the recipe below instead.

Mix all your ingredients together until combined and then mix vigorously for two minutes. I used a stand mixer with a paddle attachment but you can also just use a bowl and a spoon.

I tweaked this recipe to contain melted butter so that when you chill it the cake is a bit firmer and easier to handle.

close up of chocolate cake with slice cut out of it

Why not just make it from scratch?

I get this question a lot. A LOT. I get it. If you're going to go through all this trouble of adding so many ingredients to a box mix, why not just make it from scratch? I used to think the same thing. But over the years of teaching countless bakers of all skill levels, I have learned that a lot of people are super intimidated to bake from scratch. They have little to no knowledge of how to measure, how to mix or even what a good scratch cake should taste like. 

The thing about box mix is it isn't just the same ingredients as a cake from scratch. A box contains emulsifiers that basically make the cake bake up perfectly no matter what you do to it. The problem? Those emulsifiers make the cake taste a bit fake. Like eating strawberry flavored candy. It's good but doesn't exactly taste like a real strawberry right?

So adding in these extra ingredients gives you the best of both worlds. A recipe that makes the baker do more than just opening a box but the emulsifiers still ensure that the cake bakes up successfully and the added ingredients make the cake taste more like homemade. Thus giving the baker much-needed confidence and a bit of a taste of what a homemade cake tastes like so if they choose to take a leap two baking from scratch, it's not so scary. 

close up of a slice of chocolate cake with chocolate frosting and chocolate chips on top

Chocolate WASC Cake For Cupcakes

This recipe works great for cupcakes and rise up perfectly. I get about 36 cupcakes from one box.

I like using my chocolate buttercream for this recipe. The yummy flavor pairs perfectly with the chocolate cake without it being too heavy. If you're looking for other yummy chocolate cake recipes, check out my guinness beer cake which is the epitome of decadent.

Other doctored box mix recipes you might want to try!

WASC (white almond sour cream cake)
Strawberry cake mix recipe

Cake Batter and Frosting Calculator

Select an option below to calculate how much batter or frosting you need. Adjust the servings slider on the recipe card to change the amounts the recipe makes.

Choose a pan type

Choose a cake pan size
(based on 2" tall cake pan)

Choose a cake pan size
(based on 2" tall cake pan)

Choose a cake pan size
(based on 2" tall cake pan)

Cupcake Tin Size

Choose number of pans

Cups of Batter Needed

8 cups

Cups of Frosting Needed

5 cups

Note: measurements are estimated based off the vanilla cake recipe using standard US cake pans and sizes. Measurements used are for 2" tall cake pans only. Your results may vary. Do not overfill cake pans above manufacturer's recommended guidelines.

Recipe

closeup of slice of chocolate wasc cake with chocolate ganache
Print Recipe
4.87 from 255 votes

Chocolate WASC Cake (doctored chocolate cake mix)

This is the chocolate version of the WASC recipe. Starting with a box mix and adding in some extra ingredients, you can get a great tasting cake in a flash that tastes almost like scratch. Shhh I won't tell. This recipe makes two 8" round cakes that are 2" tall. 
Prep Time5 minutes mins
Cook Time30 minutes mins
Total Time35 minutes mins
Course: Dessert
Cuisine: American
Servings: 8 cups
Calories: 390kcal
Author: Elizabeth Marek

Ingredients

Chocolate WASC Recipe

  • 1 box Duncan Hines Chocolate Fudge Cake Mix
  • 5 oz Ap flour 1 cup
  • 2 oz cocoa powder ½ cup
  • 12 oz cold coffee 1 ½ cups
  • 2 oz vegetable oil ¼ cup
  • 4 oz melted butter ½ cup
  • 3 large eggs
  • 6 oz sour cream ¾ cup
  • 7 oz sugar 1 cup
  • 1 teaspoon salt
  • 1 tablespoon vanilla extract

Chocolate Frosting

  • 16 ounces Semi-Sweet Chocolate
  • 16 ounces heavy whipping cream
  • ½ teaspoon salt
US Customary - Metric

Instructions

Chocolate WASC Instructions

  • Preheat oven to 335℉. Prepare two 8" round cake pans. I prefer to use cake goop. 
  • Add all dry ingredients into the bowl of your stand mixer with a paddle attachment. Add in the rest of your ingredients and mix on low for 1 minute. 
  • Stop and scrape the bowl and then mix on medium for two minutes. 
  • Pour batter into your cake pans and bake for 30- 35 minutes until a toothpick comes out of the center with just a few sticky crumbs clinging to the toothpick. 
  • Let cool a few minutes in the pan before turning out onto a cooling rack. Let cool fully and frost. 

Chocolate Frosting

  • Place the heavy whipping cream into a medium-sized pot over medium-high heat. Whisk occasionally to prevent burning. Do not walk away!
  • Heat cream until steam is rising from the surface but it isn't boiling.
  • Pour hot cream over the chocolate and let sit for 5 minutes
  • Add in salt and whisk until smooth. If you have any un-melted lumps, you can use an immersion blender to get them out.
  • Pour chocolate into a shallow dish and cover with plastic wrap let cool at room temperature until a peanut butter consistency. If chocolate is too firm, you can microwave for 10 seconds and then stir with a spatula or whip with a hand mixer.
  • Frost cake as desired.

Video

Notes

Don't worry about any of the ingredients on the back of the box, just use the ingredients listed in the recipe. 
This recipe makes enough batter for three 6"x2" cakes or two 8"x2" cakes (round). 
This recipe makes 40 cupcakes with about 1.25 ounces of batter per cupcake tin. 
You can use dark beer in place of coffee or just plain water. 

Nutrition

Serving: 1g | Calories: 390kcal | Carbohydrates: 38g | Protein: 5g | Fat: 26g | Saturated Fat: 15g | Cholesterol: 67mg | Sodium: 353mg | Potassium: 250mg | Fiber: 3g | Sugar: 22g | Vitamin A: 488IU | Vitamin C: 1mg | Calcium: 68mg | Iron: 3mg

chocolate WASC

chocolate WASC

chocolate wasc cake

Chocolate WASC is the chocolate version of our popular WASC recipe that with an addition of a few ingredients, your box cake will taste almost like scratch. The texture is light and fluffy but is still sturdy enough to carve a cake or stack into for a wedding cake.

Crab Cake Tutorial

June 1, 2018 Course Preview

Sculpted Crab Cake Tutorial

Skill level: Intermediate

Liz Marek returns to teach her award-winning giant sculpted crab cake tutorial. This gravity-defying piece stands over a beach and showcases realistic textures and details. Learn how to create a jaw-dropping piece from start to finish.

Please note: the final competition piece had a cake topper figurine that is not featured in this tutorial.

1:40:16 Minutes of Instruction

What You Will Learn

  • Learn how to create a realistic giant sculpted crab cake
  • How to make a gravity-defying cake structure
  • Learn how to sculpt modeling chocolate into highly detailed crab legs
  • Several tips and tricks for airbrushing cocoa butter colors
  • Learn how to create a realistic beach branch and ocean water from sugar

Tutorial Chapters

  1. Making the cake structure 0:10
  2. Bending threaded rod 2:54
  3. Assembling structure 4:52
  4. Adding armature wire 7:29
  5. Making the crab legs 10:49
  6. Adding the cake to crab 35:34
  7. Defining top of crab 37:22
  8. Ganache crumb coat 39:19
  9. Covering cake in fondant 41:04
  10. Defining the eye sockets 42:07
  11. Carving the beach 45:49
  12. More crab details 51:01
  13. Adding the sand 52:02
  14. Airbrushing the crab indentations 54:06
  15. Adding carapace texture 56:58
  16. Airbrushing crab blue 58:48
  17. Edge highlighting 1:00:44
  18. Airbrushing highlights 1:01:43
  19. Cleaning your airbrush 1:07:18
  20. Making textured fondant 1:07:46
  21. Making Rocks 1:09:48
  22. Covering cake in fondant 1:10:16
  23. Adding beach water 1:11:56
  24. Airbrushing beach 1:17:54
  25. Adding shine to water 1:18:53
  26. Adding beach wood supports 1:19:50
  27. Making beach wood branch 1:20:44
  28. Adding texture onto branch 1:21:37
  29. Making crab eyes 1:25:26
  30. Adding shine to crab 1:27:27
  31. Adding crab armor (timelapse) 1:28:03
  32. Finishing the eyes 1:37:19

Downloads

Materials List

Crab Structure Template

1 - Lifesize Crab Reference 01

2 - Lifesize Crab Reference 02

3 - Lifesize Crab Reference 03

4 - Crab Reference Photos 01

5 - Crab Reference Photos 02

6 - Crab Reference Photos 03

7 - Crab Reference Photos 04

8 - Crab Reference Photos 05

« Previous Page
Next Page »

Primary Sidebar

Liz Marek with strawberry cake

Hi, I'm Liz! I'm an artist and cake decorator from Portland, Oregon. Cakes are my obession, which is why I'm dedicated to crafting tried-and-true recipes, small cake tutorials, as well as advanced online cake courses!

More about me →

Buy Flawless Fondant

Sugar Geek Flawless Fondant
It's incredibly stretchy, stays soft on the cake and can be rolled 50% thinner than other brands without tearing or becoming transparent. No elephant skin, no frustration, just flawless fondant every time. Buy Fondant

Our Cake Greatest Hits

Check our our best cake recipes

Summer Recipes

  • closeup of vanilla cake with vanilla buttercream slice on a white plate
    Moist Vanilla Cake Using Cake Flour
    Cook Time45 Minutes
  • slice of pink velvet cake with whipped cream frosting and fresh raspberries on a white plate
    Pink Velvet Cake
    Cook Time40 Minutes
  • slice of fresh strawberry cake on a white plate with strawberries behind it
    Fresh Strawberry Cake
    Cook Time1 Hours 10 Minutes
  • close up shot of double chocolate chip cookie
    Chewy Double Chocolate Chip Cookies
    Cook Time20 Minutes
  • Fast Bread Recipe
    Cook Time1 Hours
  • sourdough bread cut open to show crumb
    Beginners Sourdough Bread Recipe Step-By-Step
    Cook Time25 Hours 10 Minutes

Popular Recipes

  • ganache cake with dark, milk, and white chocolate on it
    The Best Chocolate Ganache Recipe
    Cook Time20 Minutes
  • close up of easy buttercream rosettes
    Easy Buttercream Frosting
    Cook Time10 Minutes
  • close up slice of marble cake
    Moist and Fluffy Marble Cake Recipe
    Cook Time40 Minutes
  • close up of red velvet cake slice
    Red Velvet Cake Recipe
    Cook Time1 Hours 40 Minutes

Footer

↑ back to top

About

  • Privacy Policy
  • Terms of Service
  • Fondant

Newsletter

  • Sign Up! for emails and updates

Contact

  • Contact
  • About Us
  • About Liz Marek

Copyright © 2024 Sugar Geek Show, Inc. All Rights Reserved.

Rate This Recipe

Your vote:


A rating is required
A name is required
An email is required