• Skip to primary navigation
  • Skip to main content
  • Skip to primary sidebar
  • Father's Day
  • Recipes
  • Free Tutorials
  • Sign Up
  • About Liz

Sugar Geek Show logo

menu icon
go to homepage
  • Father's Day
  • Recipes
  • Free Tutorials
  • Sign Up
  • About Liz
subscribe
search icon
Homepage link
  • Father's Day
  • Recipes
  • Free Tutorials
  • Sign Up
  • About Liz
×
Home

Blog

close up of tomahawk steak

July 8, 2025 4th of July

Reverse Seared Tomahawk Steak Recipe

My favorite tomahawk steak recipe is the reverse sear method using a sous vide. I start low and slow until it hits the perfect doneness on the inside, then finish it off with a blazing hot sear to get that gorgeous crust on the outside. It's the best of both worlds-tender on the inside, crispy on the outside.

close up of tomahawk steak

One of the reasons I think using a sous vide to reverse sear a tomahawk is it seems to me that the extended time in the sous vide really tenderizes the steak to a level you don't normally get with just grilling.

Recently, my family and I traveled to Olympic National Park for Gage's birthday. Because he practices the carnivore diet, steak is a big deal! I wanted his birthday dinner to be extra special and convinced him we could make tomahawks in the sous vide and then do a reverse sear on the Blackstone grill.

Don't worry, if you don't have a grill or a sous vide, I'll teach you how to reverse sear a tomahawk to perfection no matter what's in your kitchen.

close up of sliced tomahawk steak

We got our tomahawks from an amazing butcher nearby called the The Meating Place. Not only do they have amazing steaks, but incredible bacon, pepperoni sticks, soup bones, AND award-winning reubens at the cafe across the parking lot.

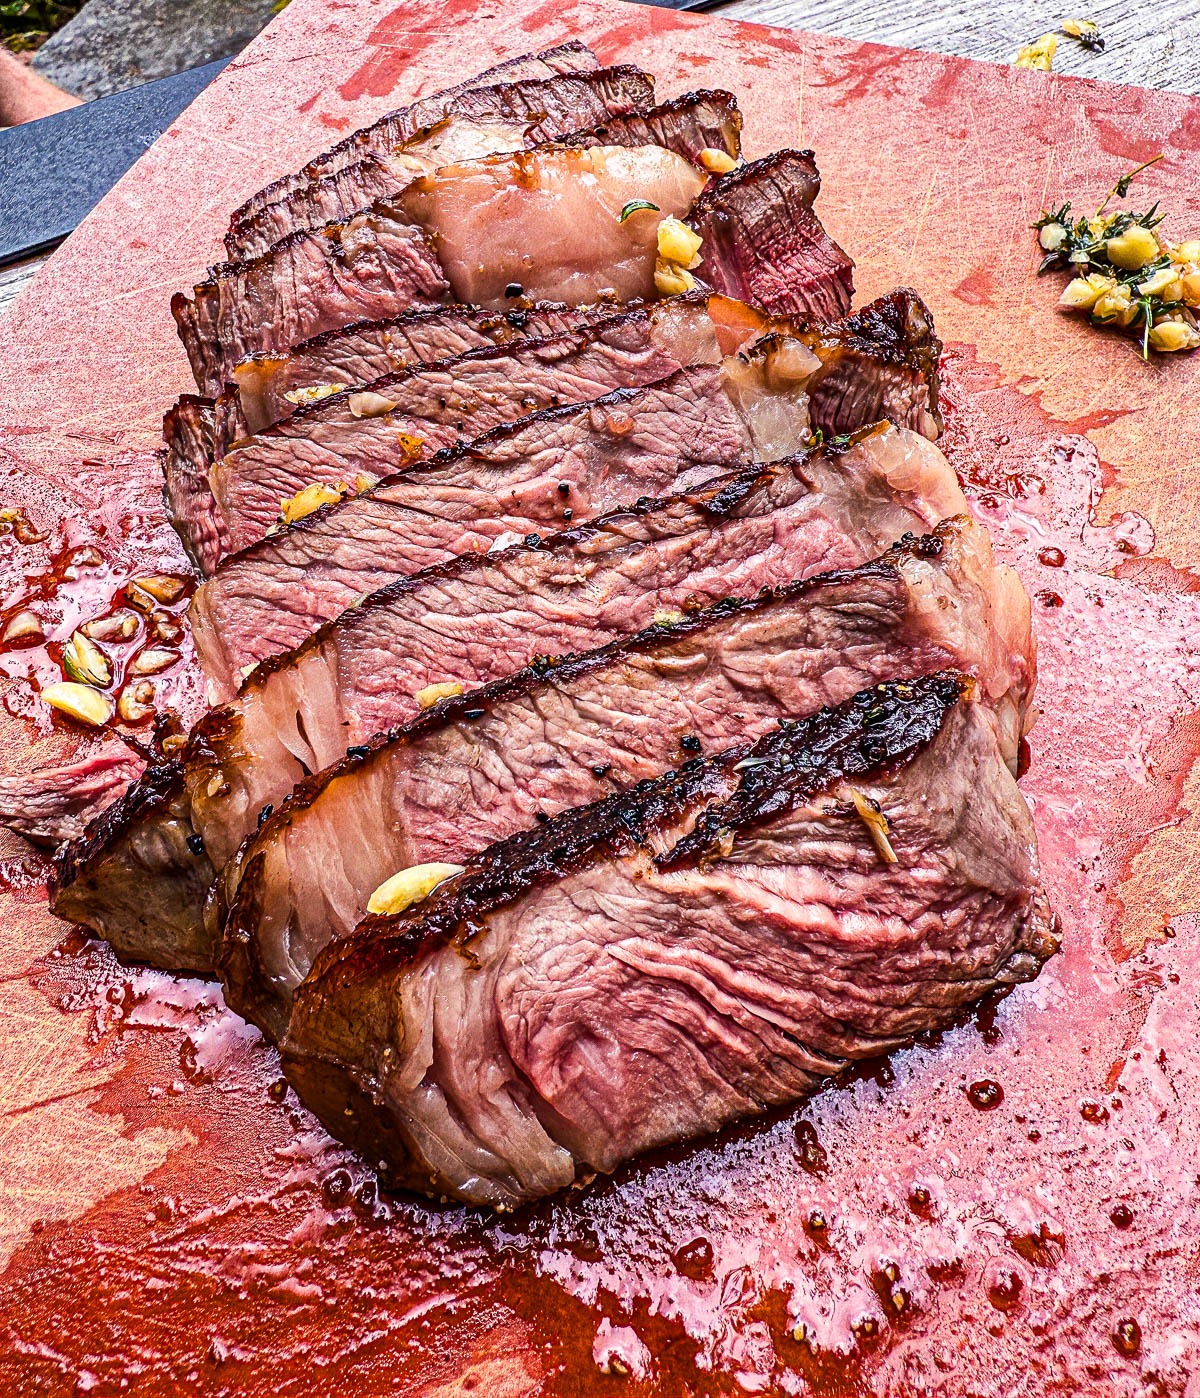
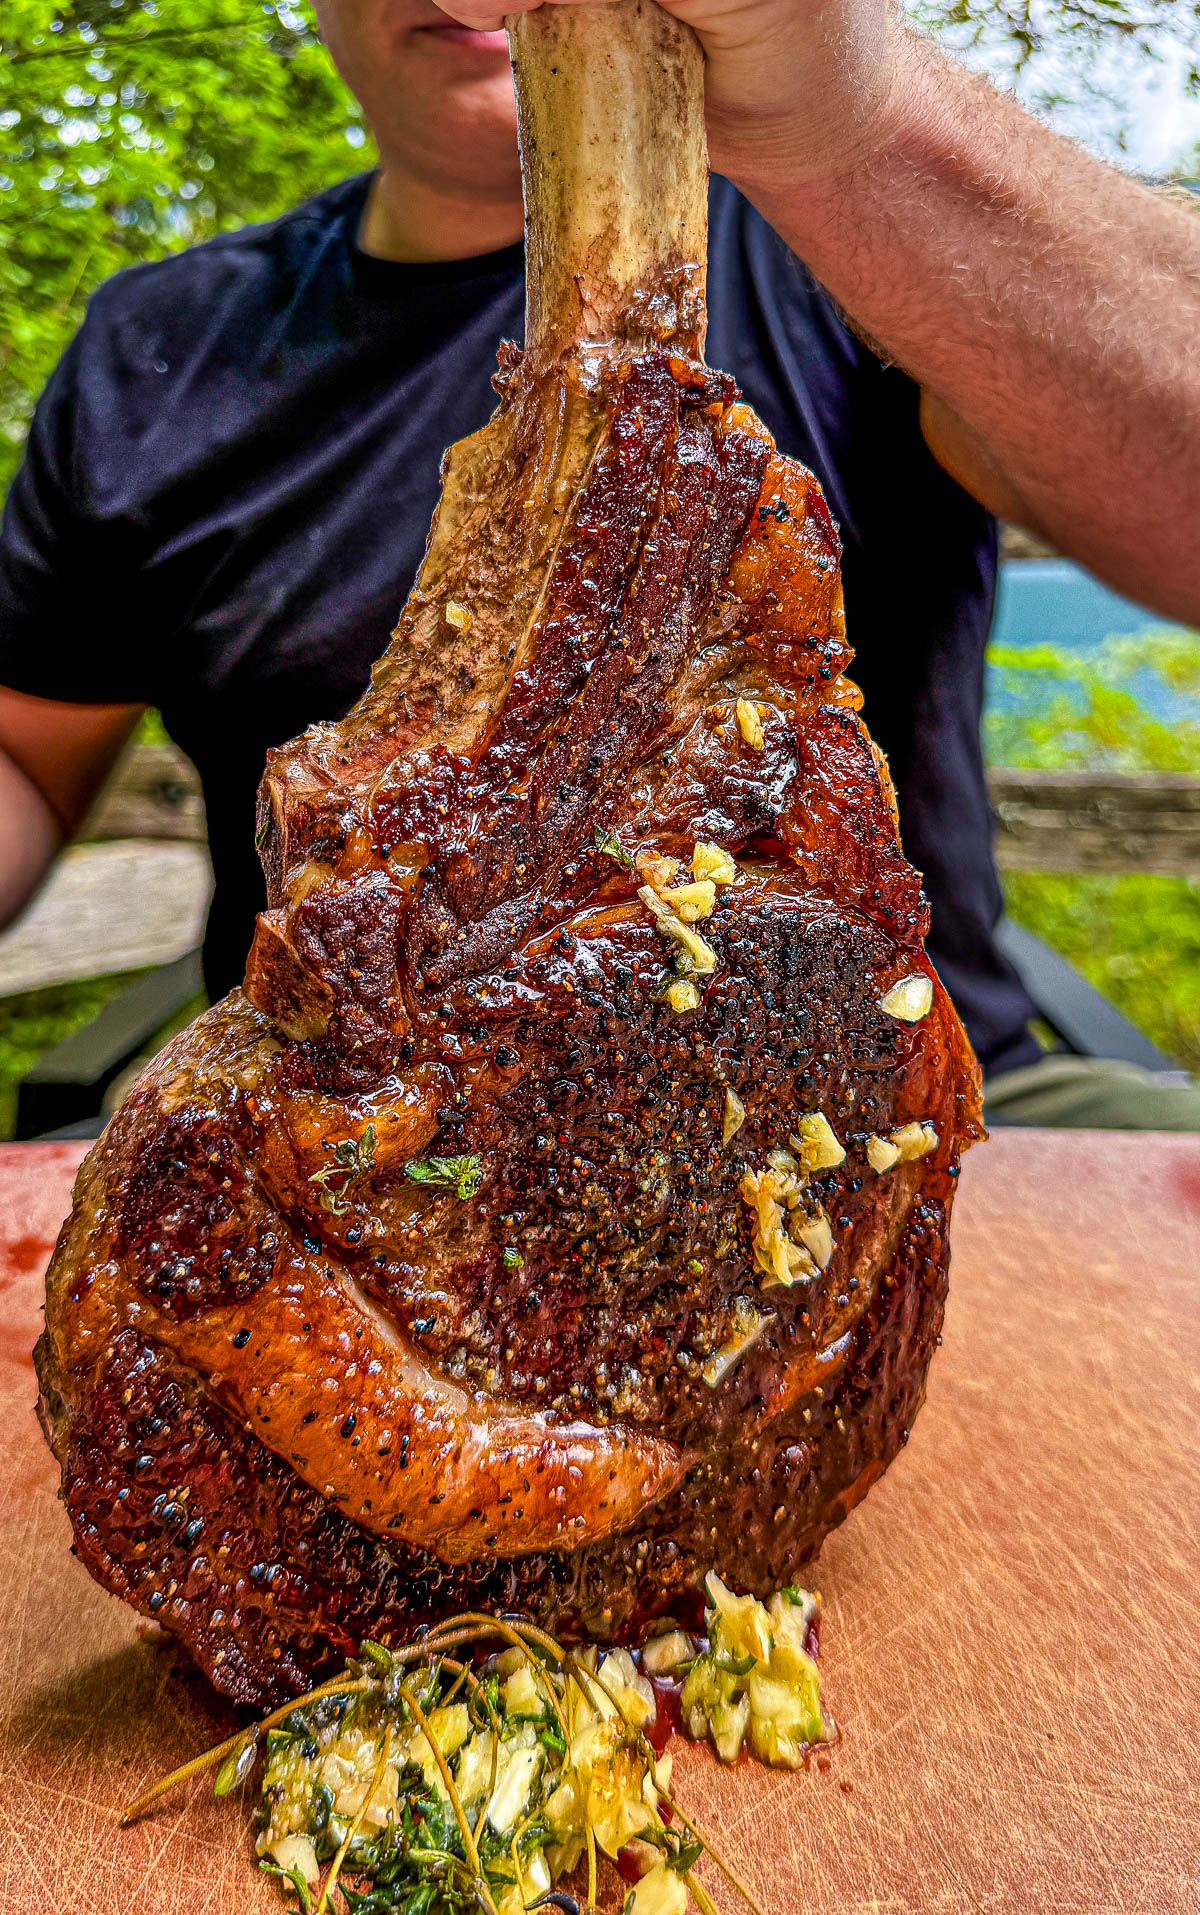
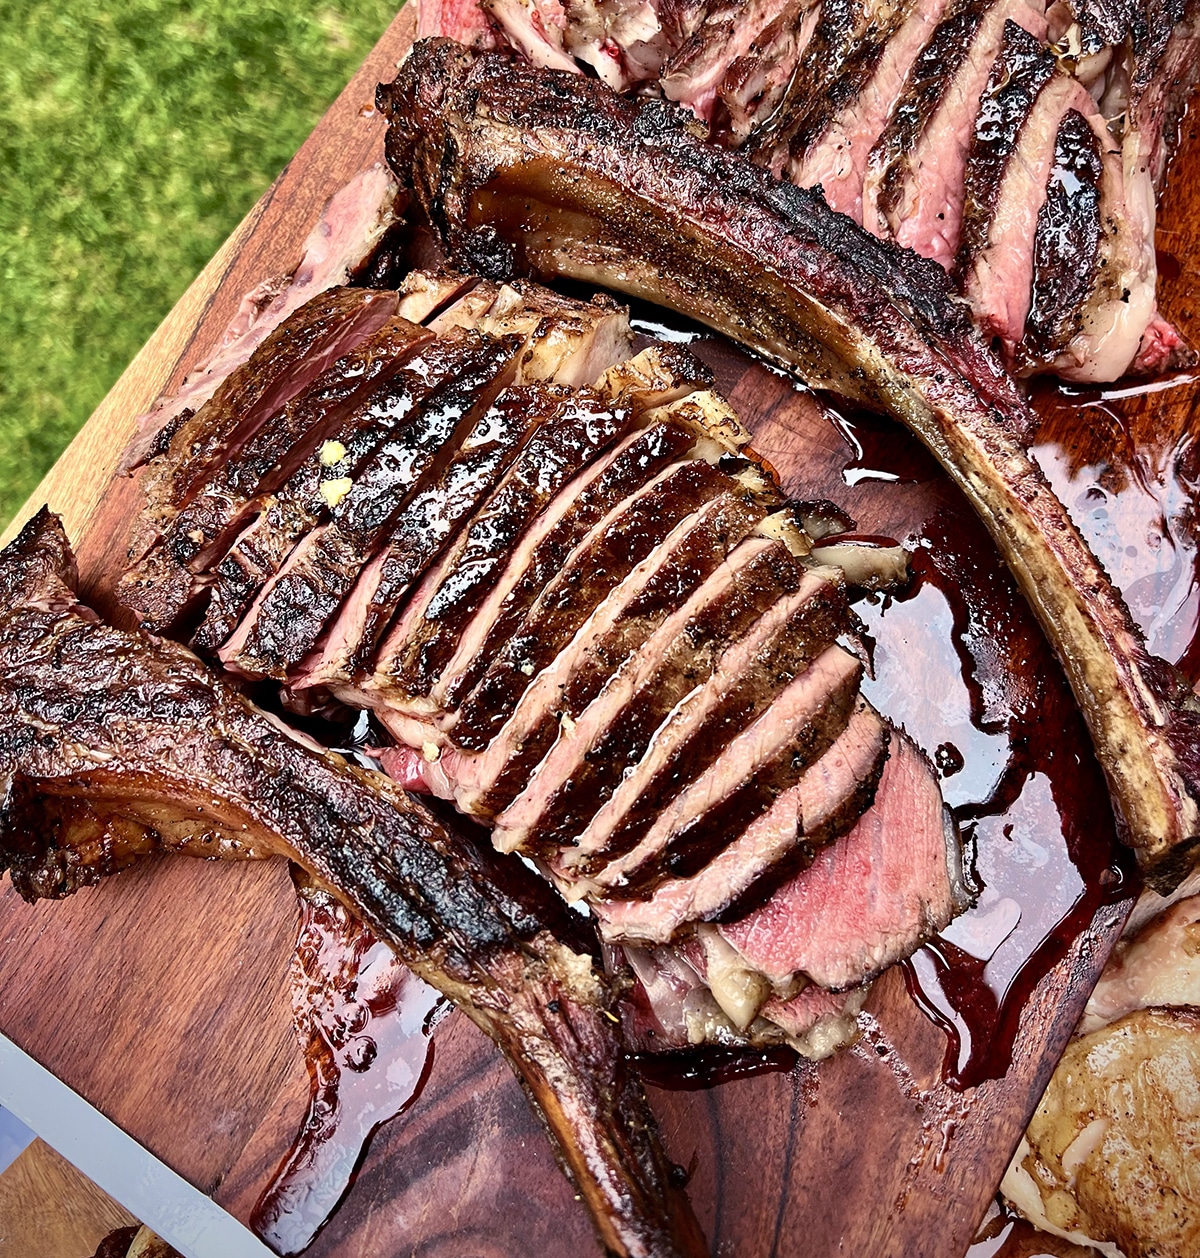
Let me tell you, this was the BEST steak of my life! So perfectly done in the middle with the most delicious brown crust. I'll never make a tomahawk any other way! This is FOOL-PROOF!

If you love a showstopping beef dinner, try my Instant Pot pot roast for those nights when you want the same deep, beefy flavor with almost zero hands-on effort.

What's In This Blog Post?

  • Ingredients Needed
  • Equipment Needed
  • Ribeye vs Tomahawk
  • How To Pick A Good Tomahawk Steak
  • How To Reverse Sear In A Sous Vide
  • How To Reverse Sear In An Oven
  • Revese Seared Tomahawk FAQs

Ingredients Needed

close up of prime tomahawk steak in the grocery store
close up of melted butter, thyme, garlic, and salt
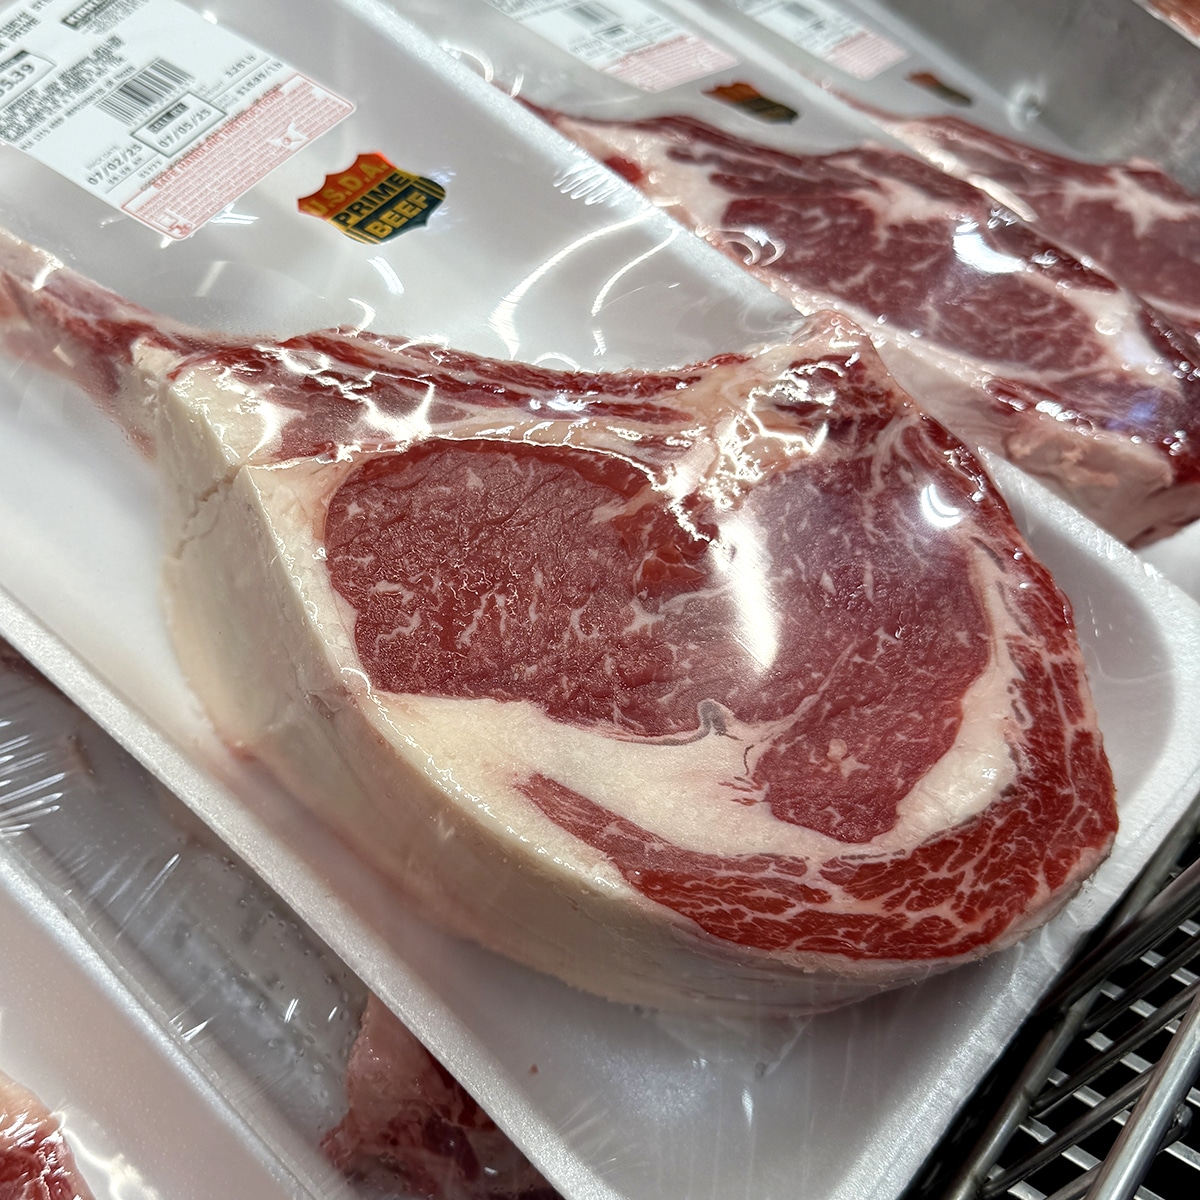
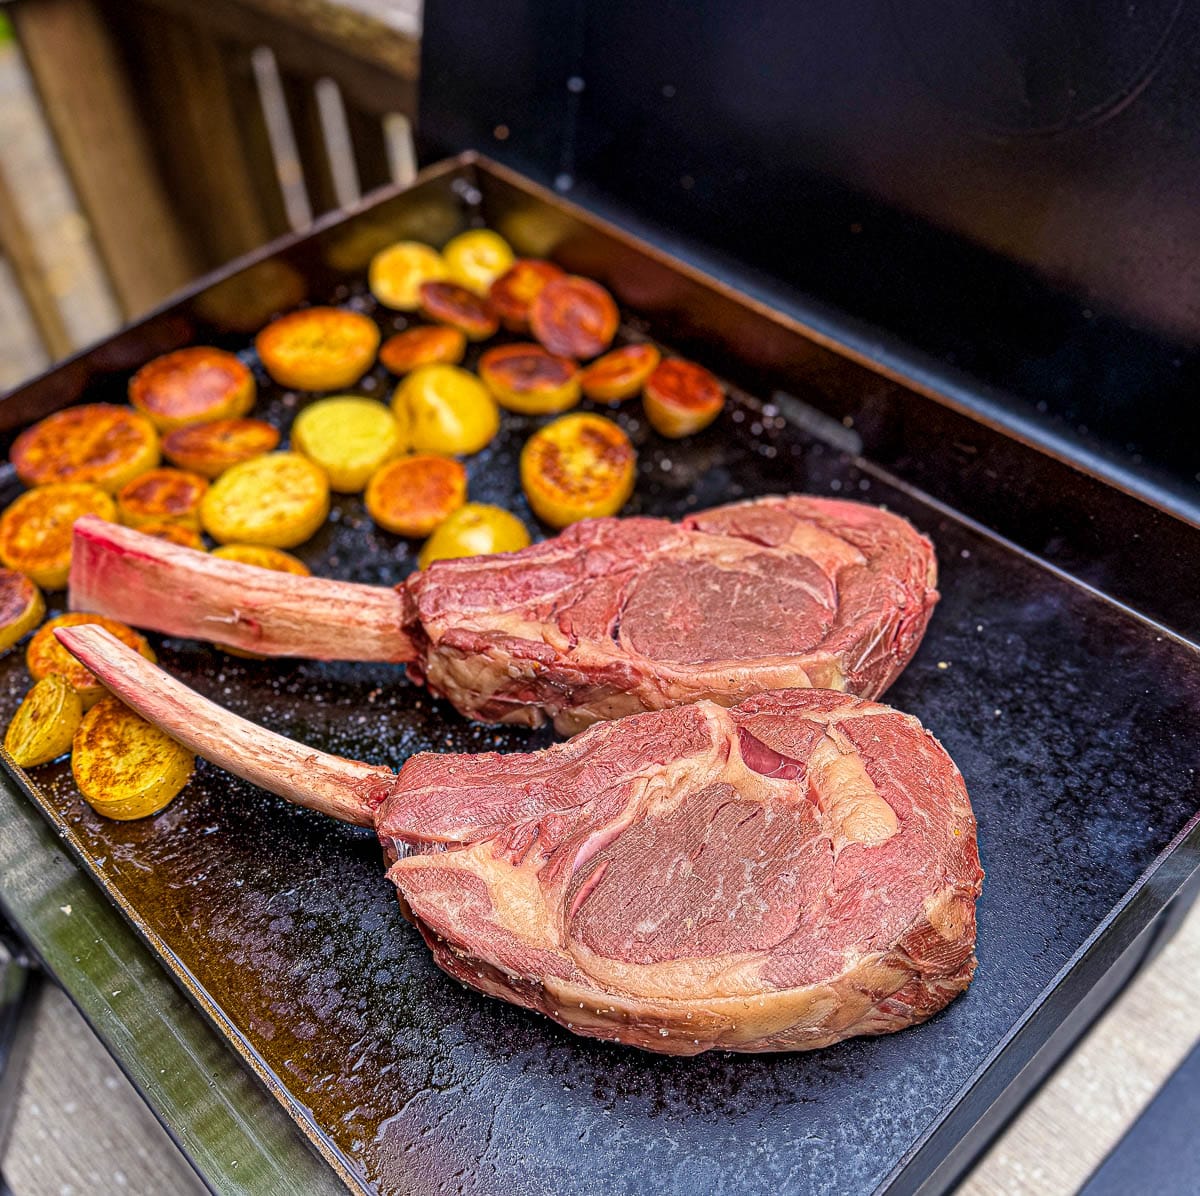
  • Tomahawk - A thick tomahawk steak that is at least 2" is perfect for the sous vide. Anything thinner and you risk over-cooking your prime grade steak during the sear stage.
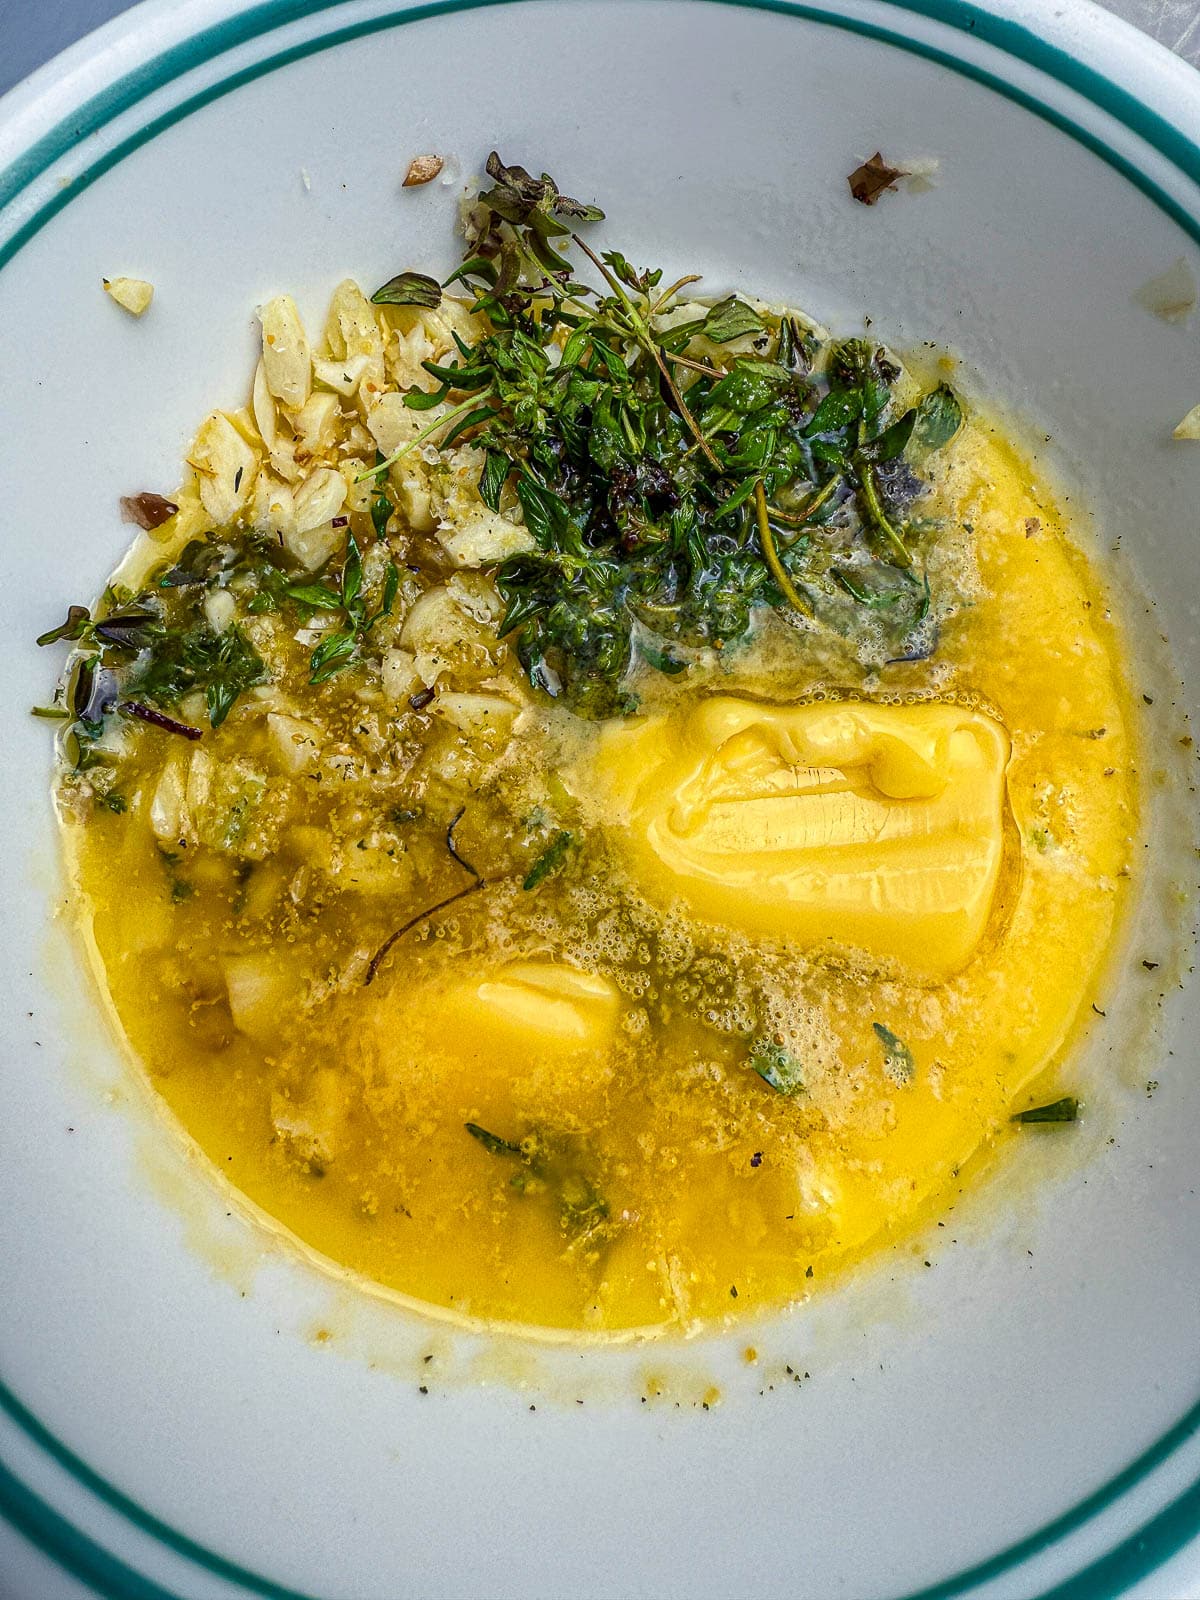
  • Butter - There's no better way to finish a perfectly seared Tomahawk steak than with some melted butter.
  • Garlic - A few cloves of garlic add some delicious flavor to your finished steak.
  • Thyme - Adding in some fresh thyme to the butter and garlic at the end of the sear creates the most delicious buttery and flavorful crust.
  • Salt - A big piece of meat needs a lot of salt! More than you think you'd need. some kosher salt is a great choice.

Equipment Needed

tomahawk in a sous vide

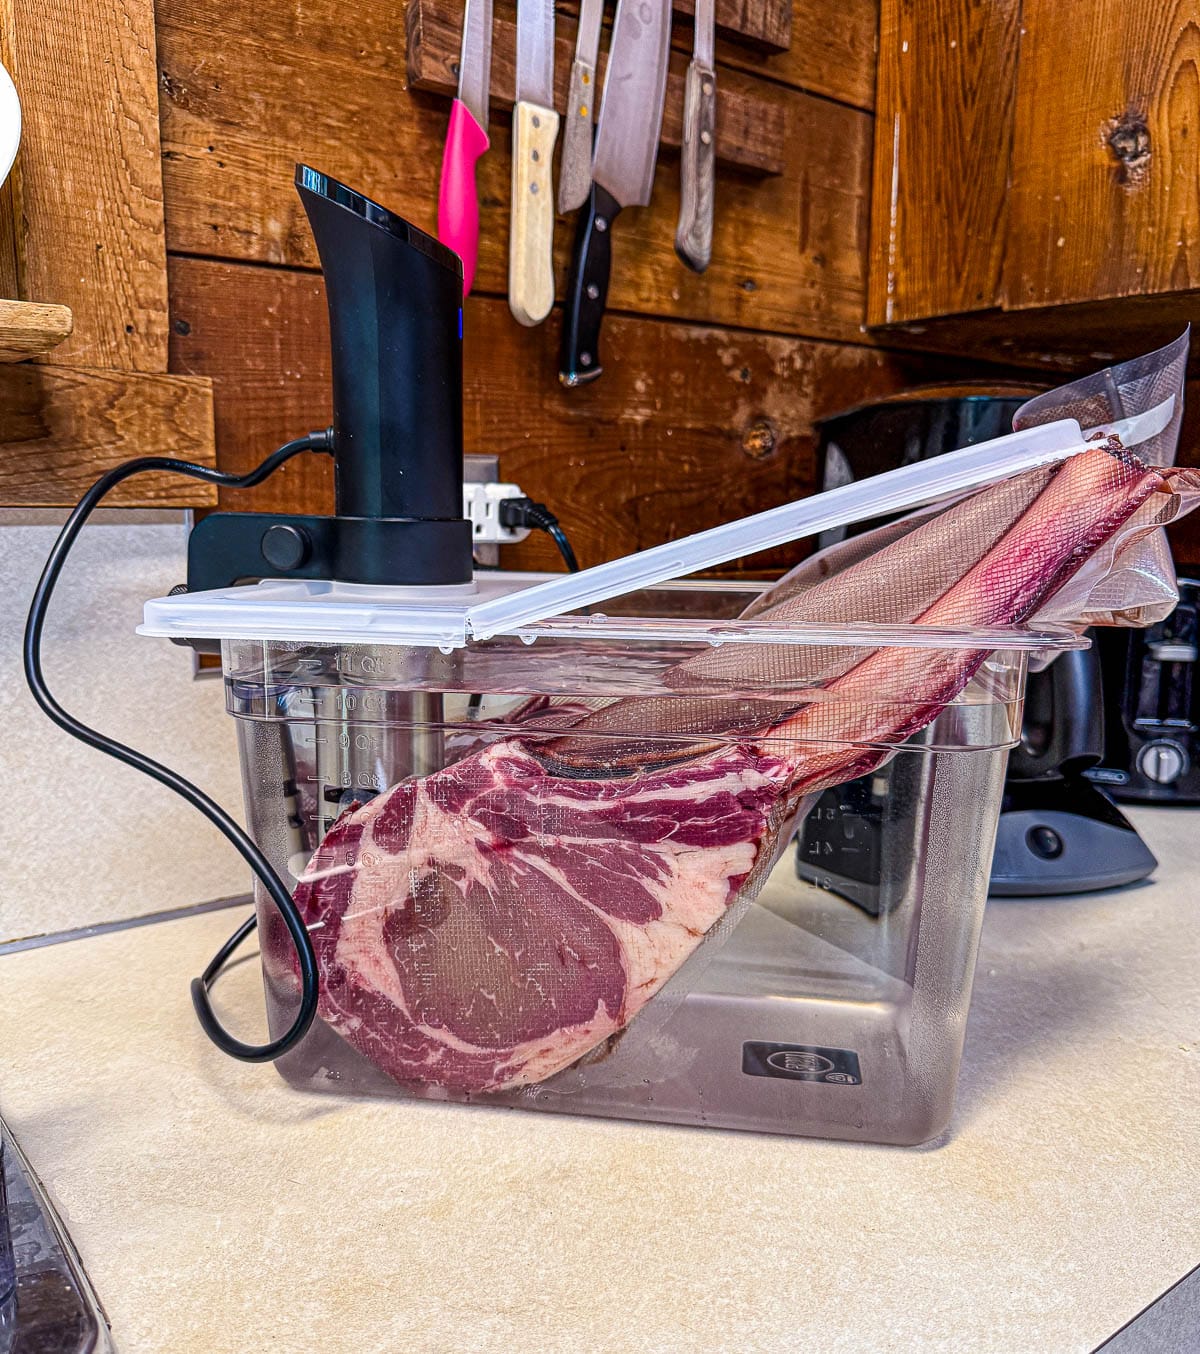
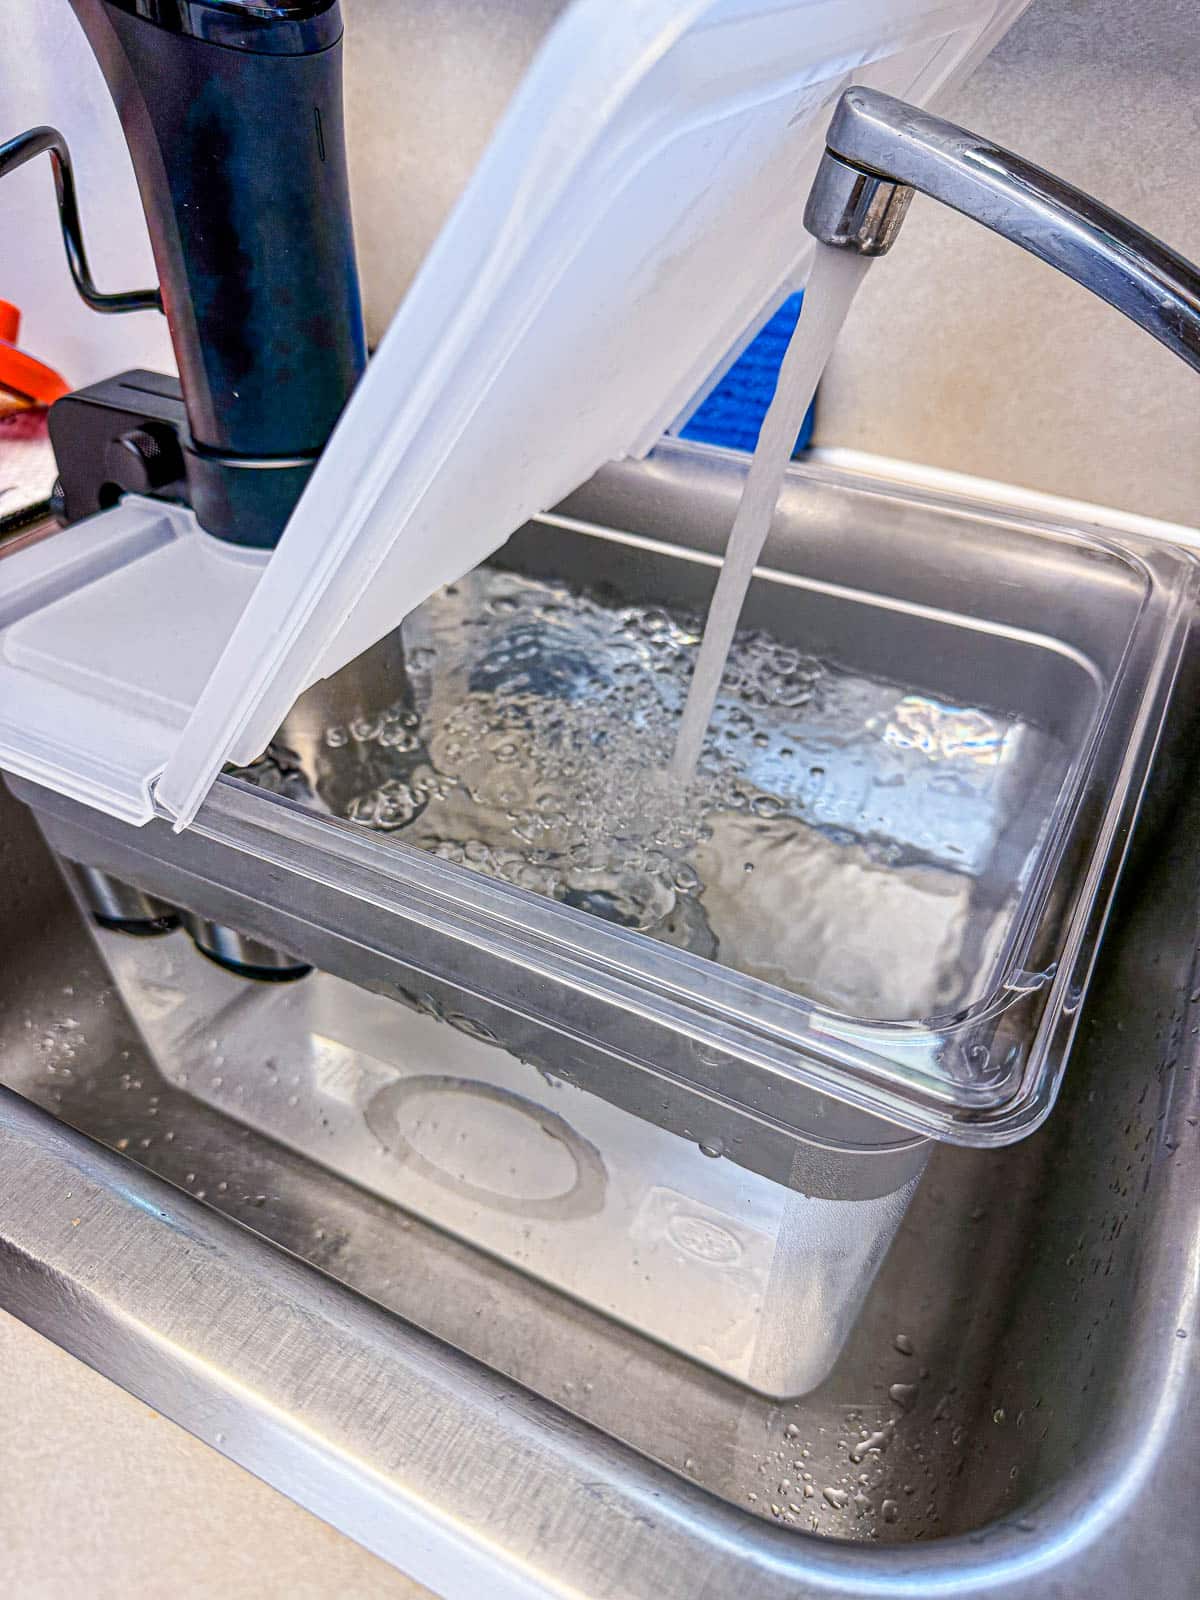
Sous Vide - To reverse sear a tomahawk steak to perfection, we love to use our sous vide. Ever wonder. how those steak restaurants grill their steaks to perfection every time even when they are busy? A sous vide allows you to seal up your steaks, let them cook while you're doing other things then sear them to perfection when you're ready.

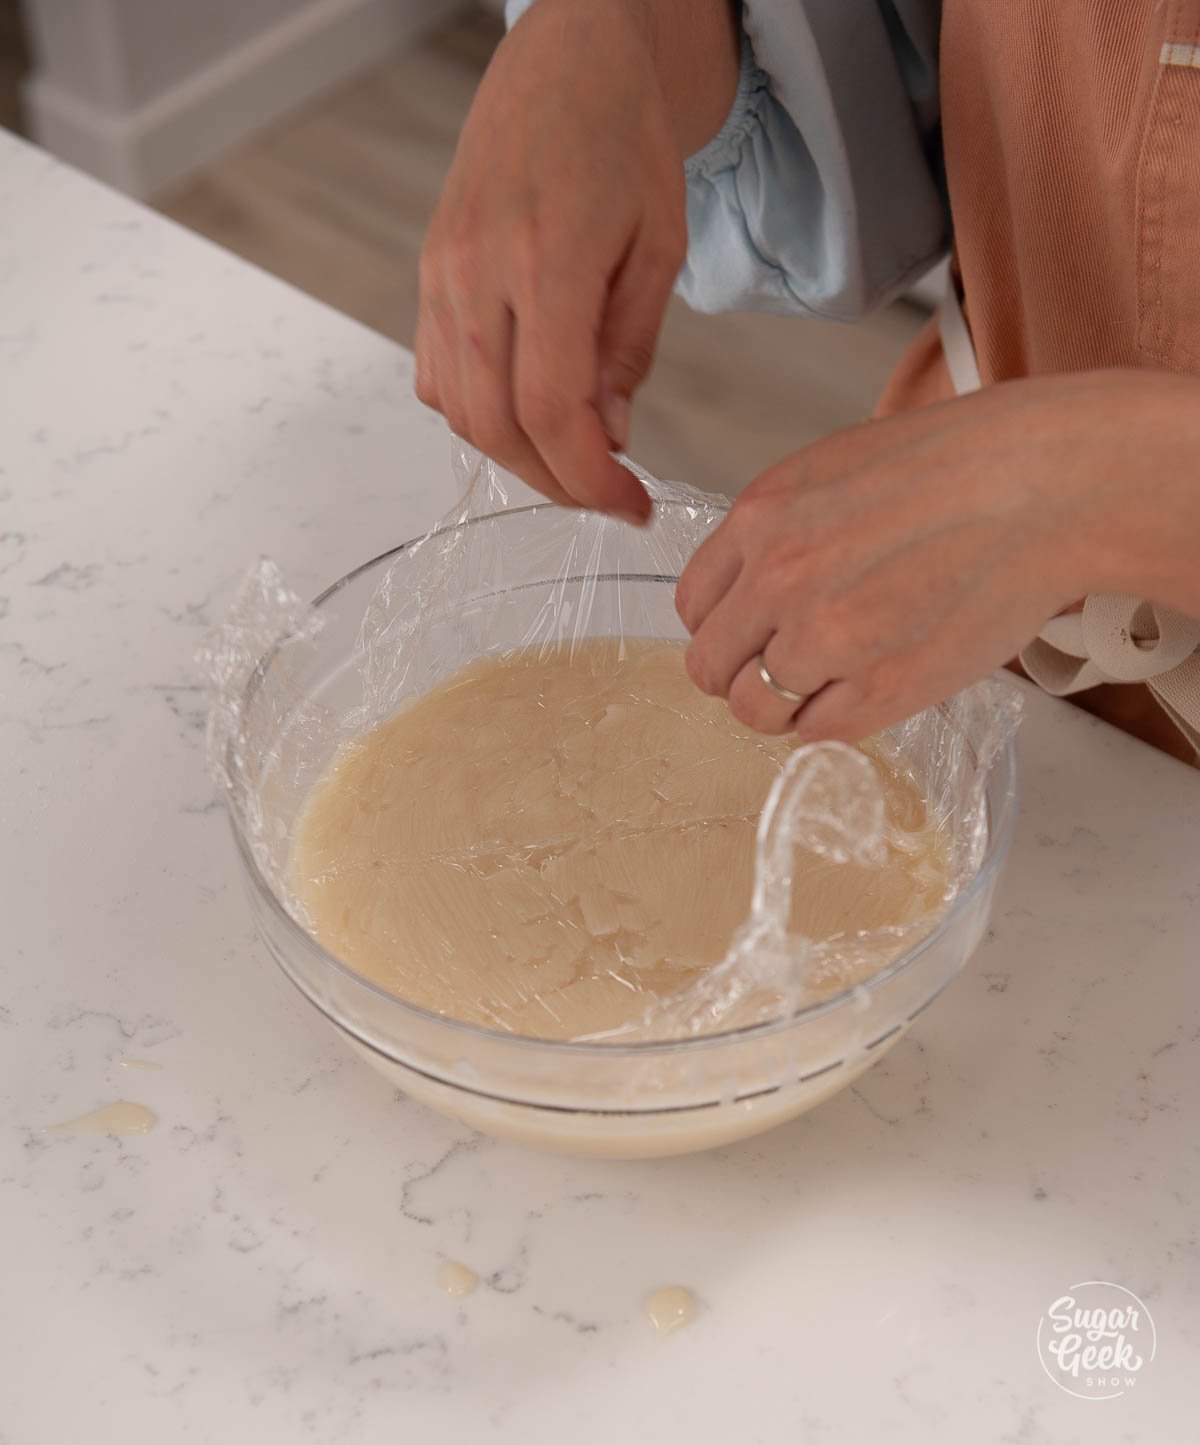
Vacuum Sealer - We buy a lot of meat in bulk so we use our vacuum sealer to make sure it doesn't get freezer burned. The vacuum sealer is also perfect for sealing the tomahawk steaks before cooking in the sous vide. If you don't have a sous vide you can use the water displacement method by placing the tomahawks in a large ziplock bag. Push the steak in the bag down into the water, allowing the pressure of the water to push the air out. When you get to the top, seal the bag around the bone. Make sure the bags stay upright while cooking so that the water doesnt get into the bag.

Blackstone Grill or Cast Iron Pan - Nothing better than a super hot cast iron pan to get that perfect sear on your steak! If you want to learn how to reverse sear on a grill, check out our friends at Vindulge on how to grill a tomahawks steak.

Ribeye vs Tomahawk

A tomahawk is essentially a ribeye but with the rib bone still in. Leaving the bone in the steak while cooking helps keep the steak from overcooking because the bone insulates the meat against the heat.

The shape of the bone sticking out of the steak resembles the shape of a tomahawk, which is where it gets its name.

close up of a man holding a grilled tomahawk steak

The cost of a tomahawk and a ribeye is similar in price, but you might have to go to your local butcher to get a tomahawk steak, or you can even buy them online.

Technically, you ARE paying for the bone when you buy a Tomahawk steak, which may seem silly, but it's a specialty cut and does truly look impressive. If you want to save a bit of money, you can ask for a cowboy steak, which has a slightly shorter bone.

During the holidays, you can find prime Tomahawks at Costco!

close up of prime tomahawk steak in the grocery store

How To Pick A Good Tomahawk Steak

If you're going to drop some coin for a premium cut of meat then you should know what to look for. You want to choose a tomahawk that has some nice marbling but not big sections of gristle. Gristle looks semi-transparent and is chewy and hard. Marbling (fat) is white and should look like the roots of a tree going through the meat. Marbling = juicy. Marbling good. Gristle bad.

How To Reverse Sear In A Sous Vide

vacuum seal tomahawk
filling a sous vide container with water
tomahawk in a sous vide
close up of tomahawk steak
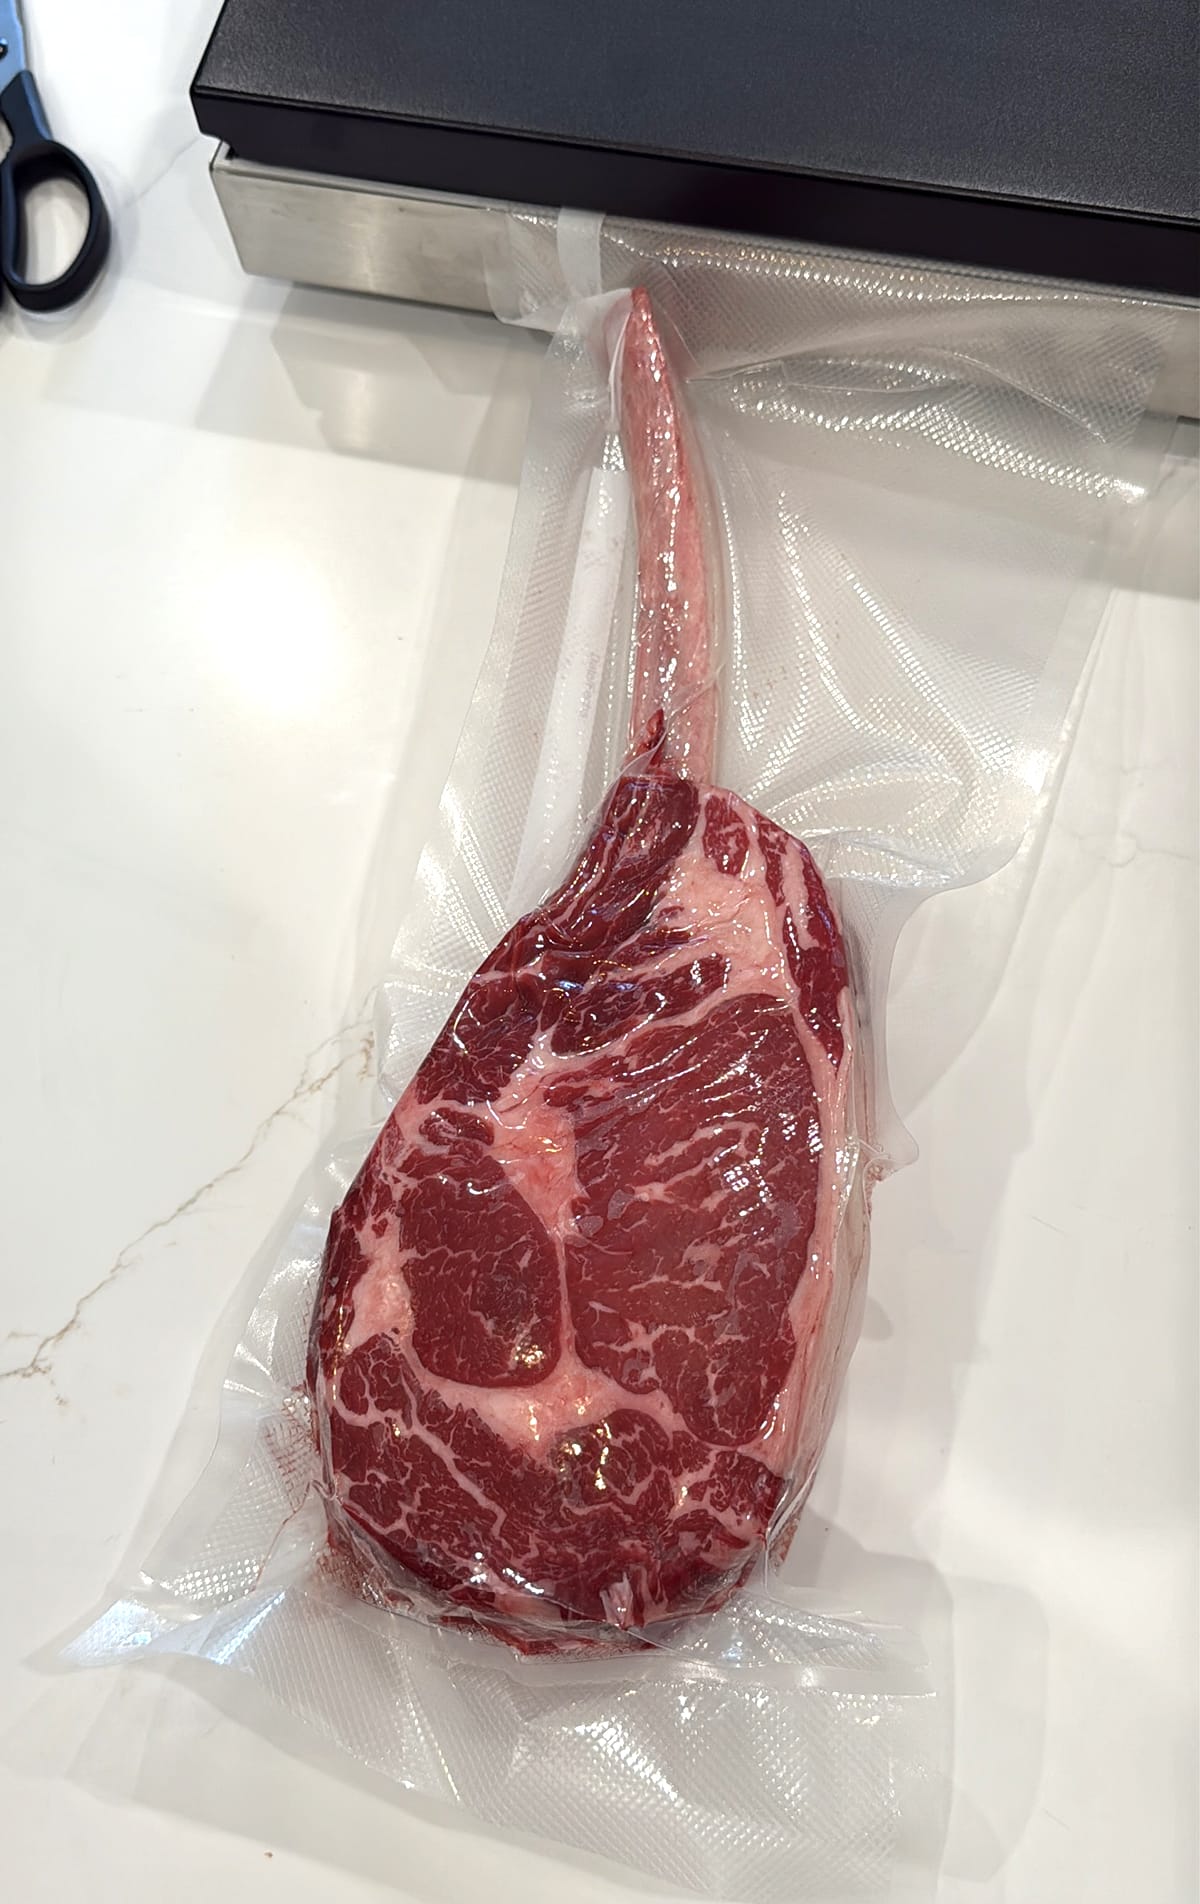
  1. Seal your tomahawk with your vacuum sealer so that no water gets on your steak during cooking.
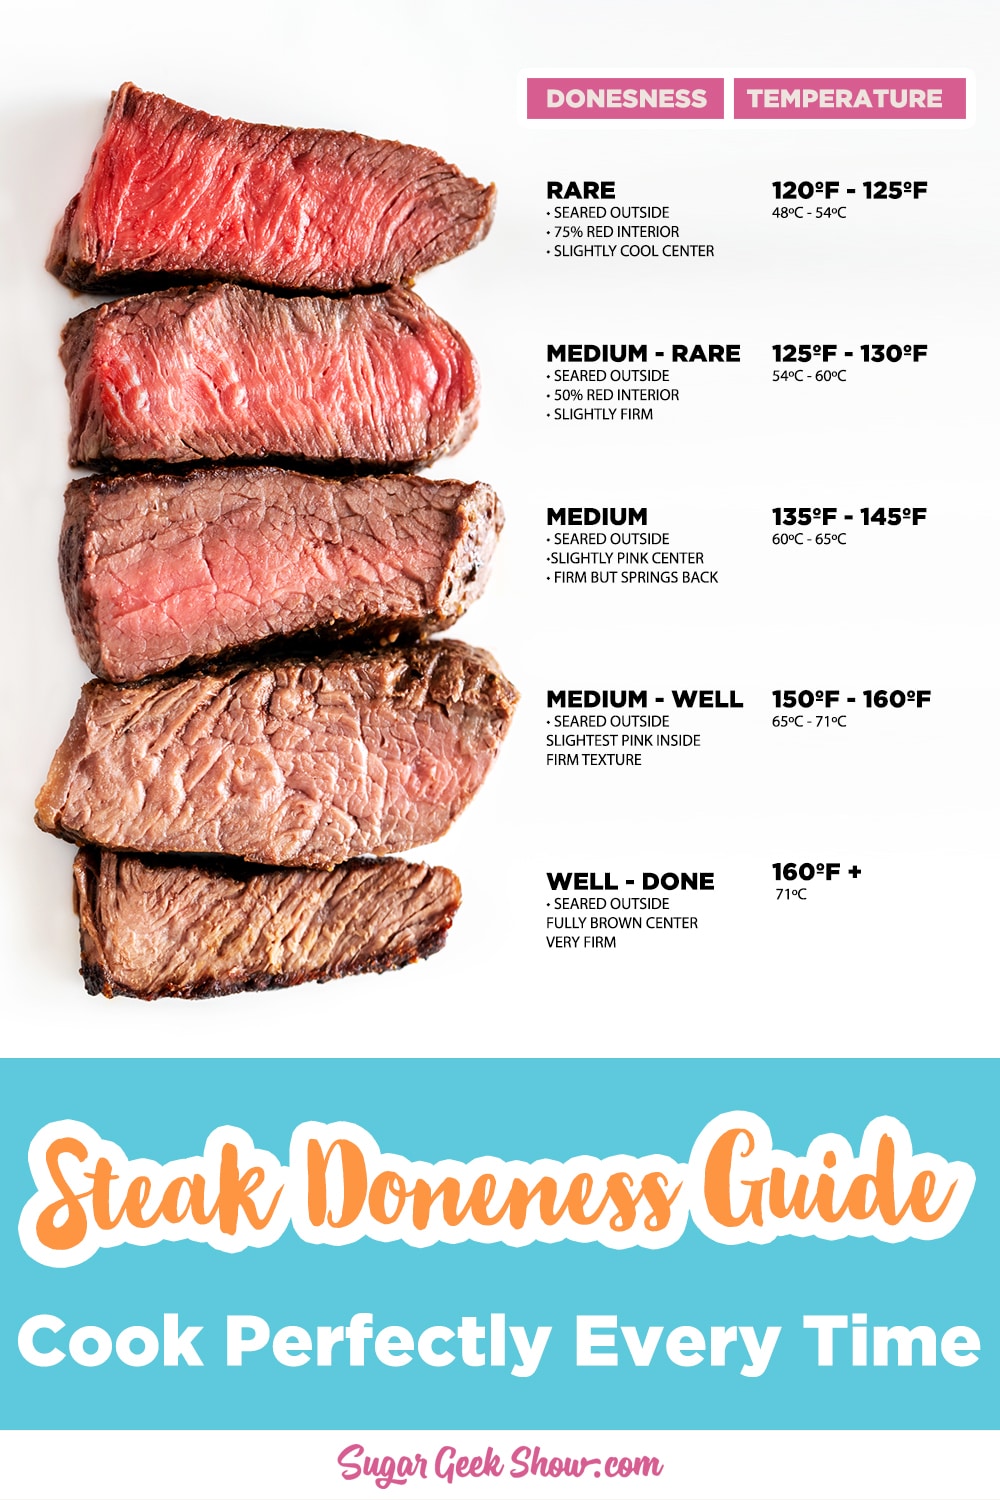
  2. Place the sealed steaks into the sous vide and set the temperature to 10 degrees below your desired doneness. 130ºF for medium doneness, 120ºF for rare.steak doneness guide
  3. Your steaks should reach the correct doneness after 1-2 hours depending on how big they are, but can be held at temperature for up to 6 hours without losing texture. Our tomahawks were a little over 2 lbs each.
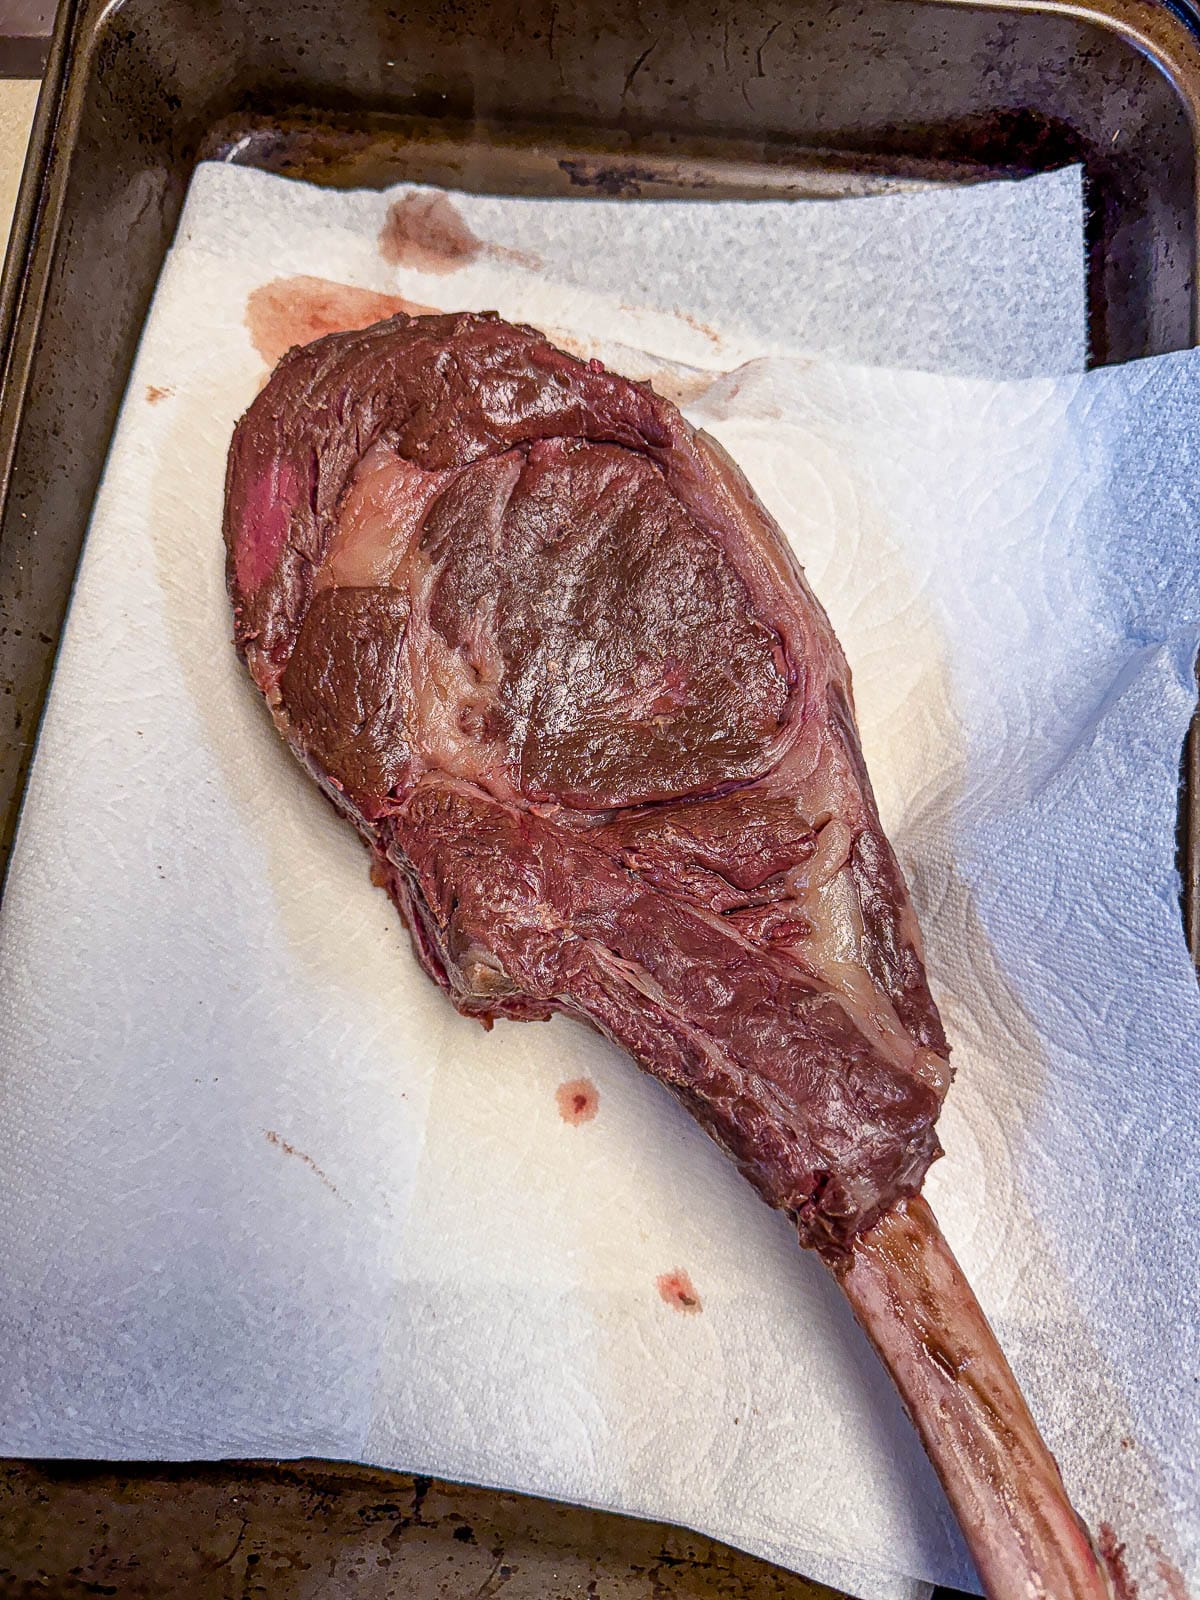
  4. Remove the steaks from the packaging and dry the steaks.
  5. Let the steaks rest for 20 minutes before searing. Resting ensures the juices absorb back into the steak, keeping it moist and tender.
  6. Season the tomahawks liberally on all sides with steak seasoning or your steak seasoning of choice.
  7. Preheat your Blackstone, grill, or cast iron pan to high. The grill should be smoking hot (literally).
  8. I like to put a little oil on the grill, but there's enough fat in the tomahawk that you don't have to.
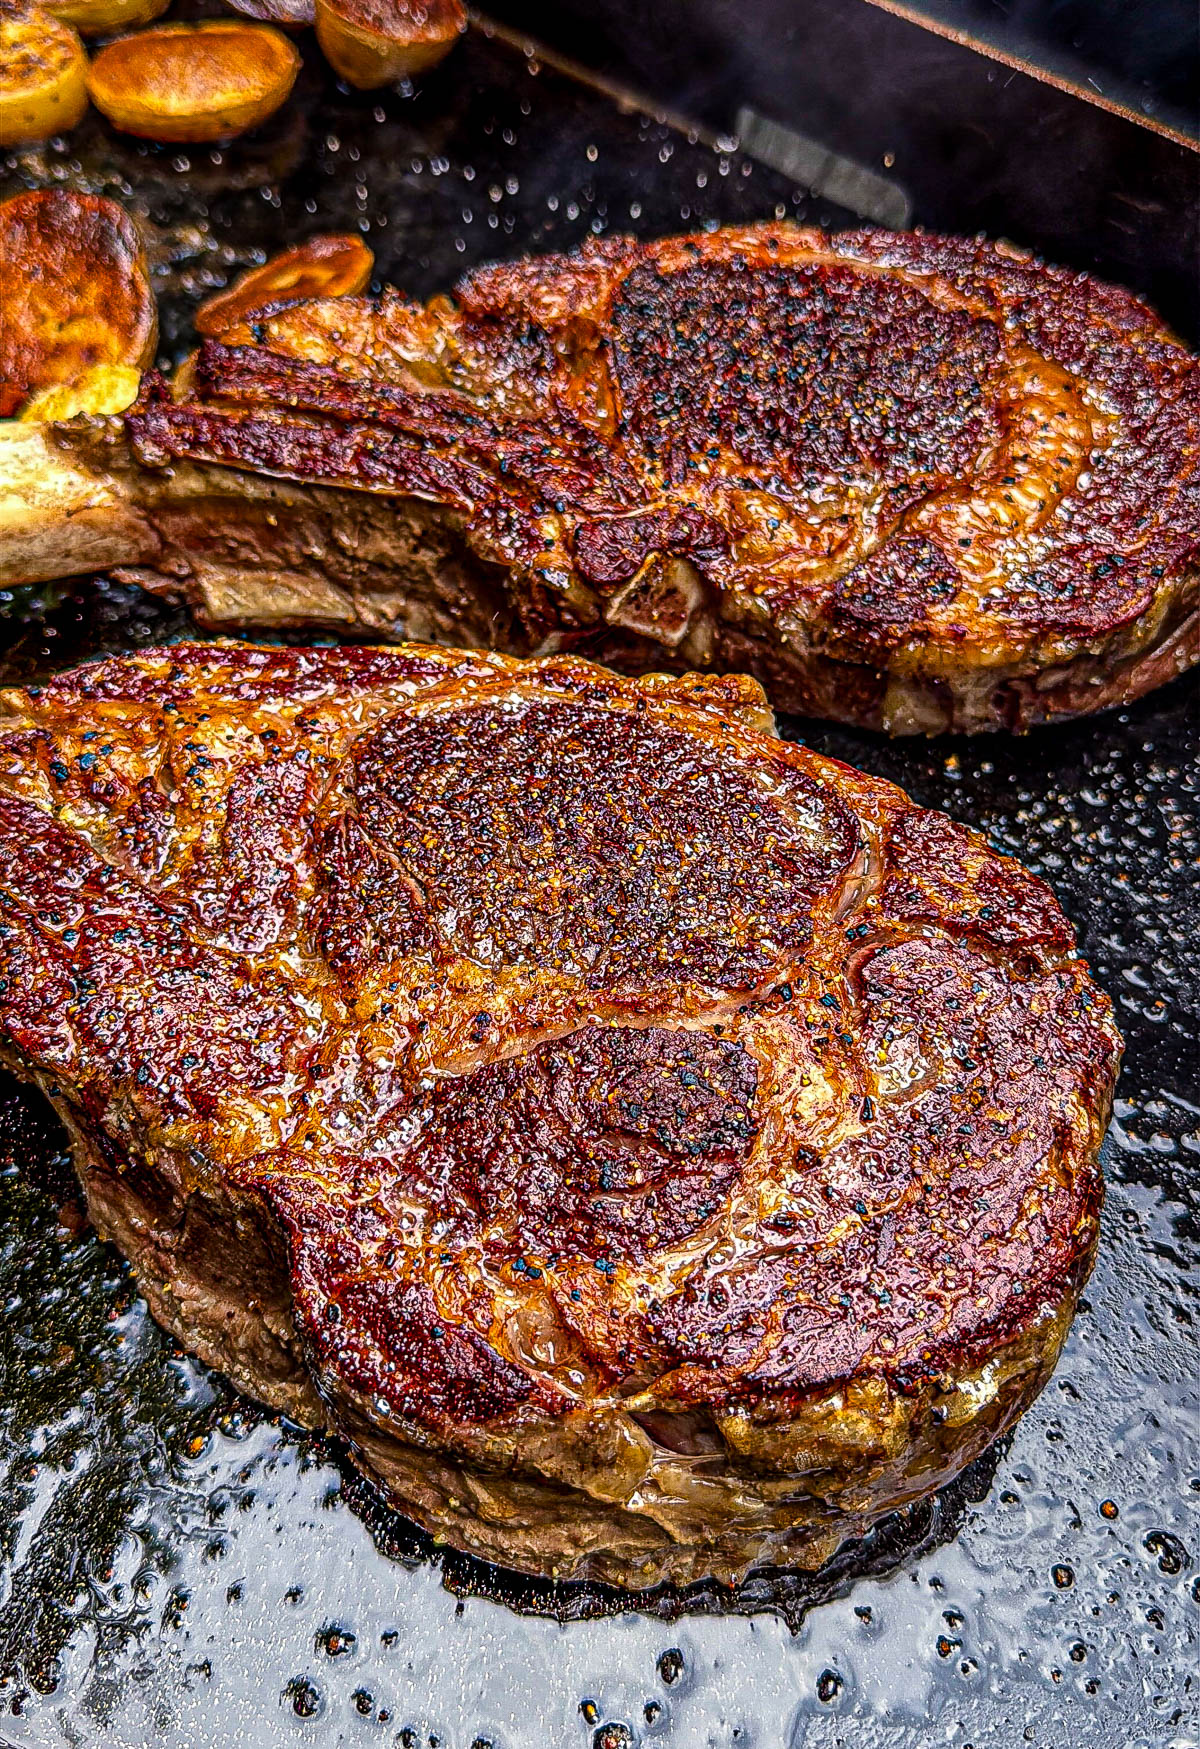
  9. Sear each side for about 2 minutes or until a beautiful dark brown crust forms.
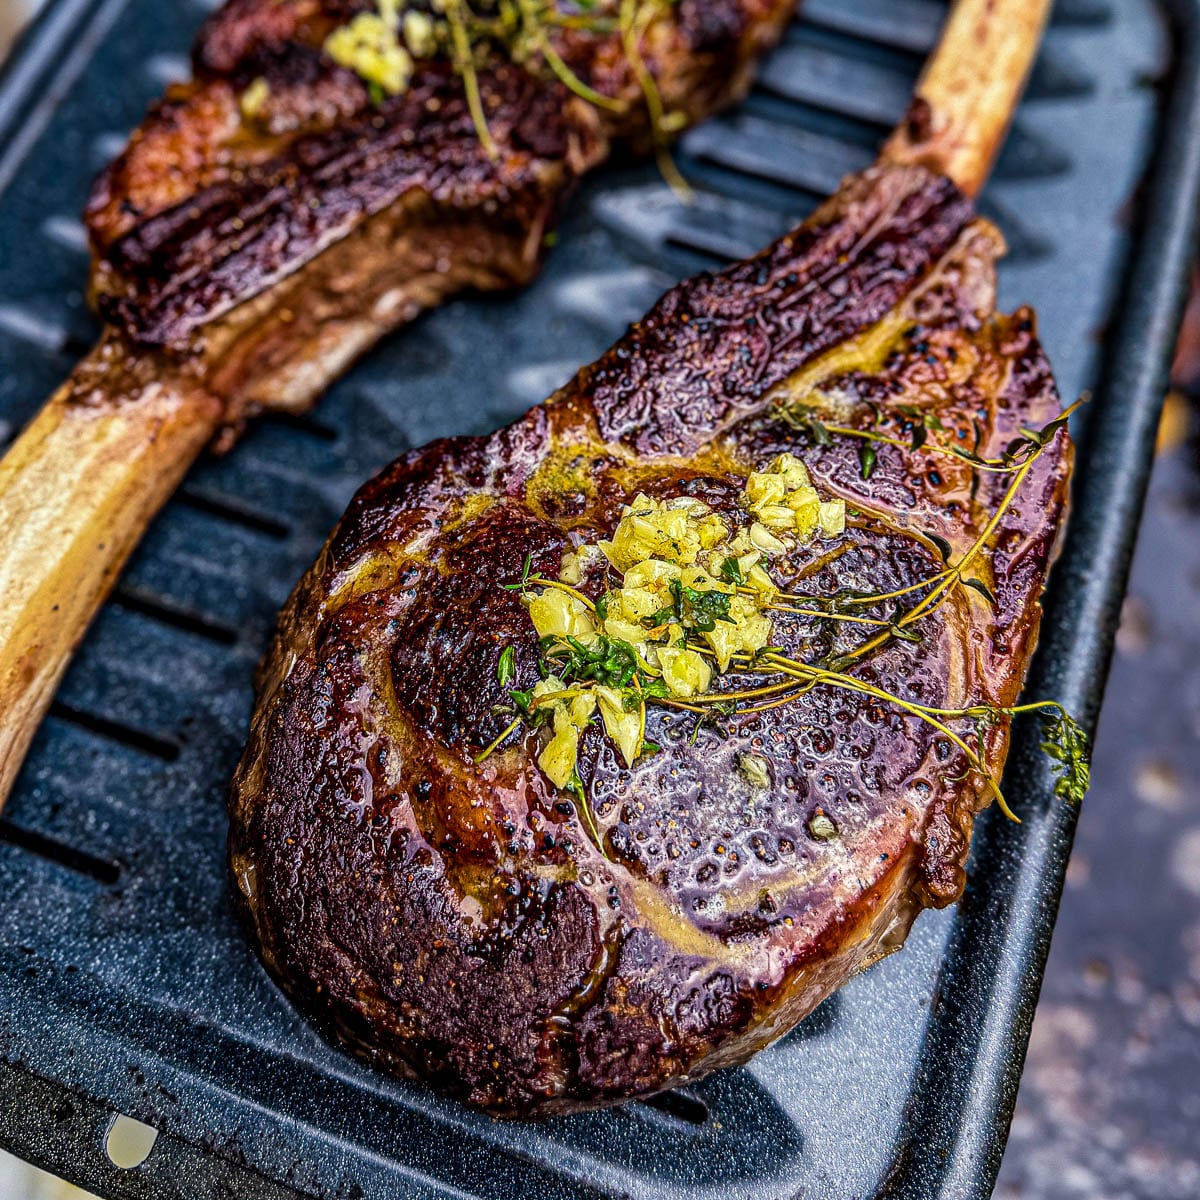
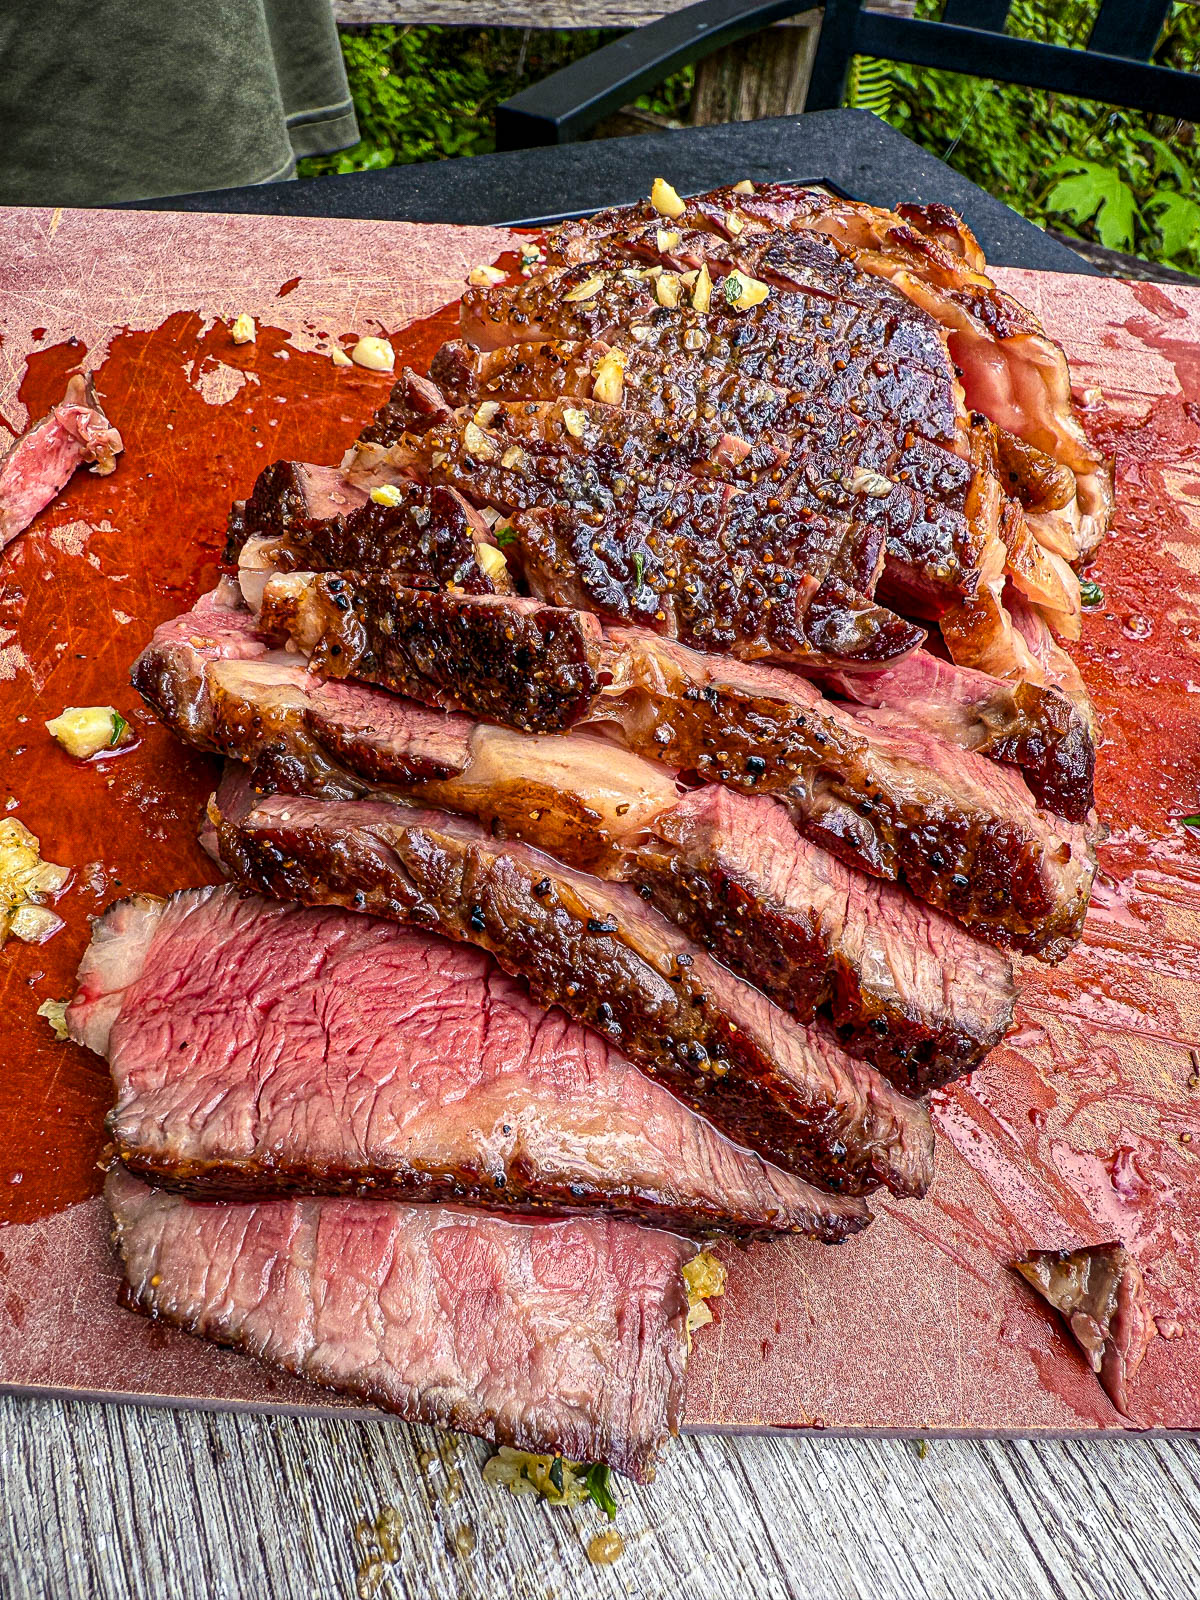
  10. Add some melted butter, garlic, and thyme on top of the steak while searing the other side.
  11. Cut the bone off the ribeye. Slice the ribeye against the grain in thin pieces and serve alongside the bone for a fun presentation.
close up of carved tomahawk steak

How To Reverse Sear In An Oven

  1. Bring your steaks to room temperature for 2-3 hours so they are no longer cold at all in the middle. Cold steaks cook unevenly and can end up burnt on the outside and raw in the middle.
  2. Season your steaks on all sides liberally.
  3. Preheat your oven to 225ºF.
  4. Cook your steaks on a sheet pan until the internal temperature reaches ten degrees lower than your desired doneness. 130ºF for medium, 120ºF for rare.
  5. Let your steaks rest for 15-20 minutes before searing.
  6. Heat your cast iron pan (or grill) on high until it's smoking hot.
  7. Sear your tomahawk for about two minutes or until a dark brown crust forms then flip.
  8. Place your butter, garlic, and thyme on top and let it melt while you sear the second side.
  9. Cut the bone off the ribeye. Slice the ribeye against the grain in thin pieces and serve alongside the bone for a fun presentation.
close up of sliced tomahawk steak

If you love a showstopping beef dinner, try my Instant Pot pot roast for those nights when you want the same deep, beefy flavor with almost zero hands-on effort.

Revese Seared Tomahawk FAQs

Why are tomahawk steaks so expensive?

The answer is essentially demand. Tomahawks are considered a specialty cut, although they are gaining popularity. Specialty items usually need someone with specialized skills to prepare, which may be hard to find, resulting in a higher price. The average price of a good quality tomahawk steak is $24.99/lb.

Does a tomahawk steak taste better than a ribeye?

No. A ribeye steak is a tomahawk without the bone. The bone adds nothing but an impressive presentation and maybe some amount of protection during the cooking process but ultimately is the same thing.

Leave Me A Review
⭐️⭐️⭐️⭐️⭐️

If you tried this Chocolate Cupcake Recipe or any other recipe on my blog, please leave a 🌟 star rating and let me know how it goes in the comments. I love hearing from you!

Recipe

close up of tomahawk steak
Print Recipe
No ratings yet

Reverse Seared Tomahawk Recipe

Reverse searing your tomahawk ensures the perfect steak every time. Cook low and slow until your desired doneness then finished with a flaming hot sear to lock in that moisture and flavor.
Prep Time5 minutes mins
Cook Time6 minutes mins
Sous Vide Cooking2 hours hrs
Total Time2 hours hrs 11 minutes mins
Course: Main Course
Cuisine: American
Diet: Gluten Free
Servings: 4 servings
Calories: 105kcal
Author: Liz Marek

Equipment

  • 1 sous vide
  • 1 vacuum sealer or zip lock bag
  • 1 cast iron pan blackstone or grill

Ingredients

  • 2 giant Tomahawk steaks
  • 2 teaspoons salt
  • 2 teaspoons pepper
  • ¼ cup butter
  • 4 teaspoons minced garlic
  • 2 teaspoons fresh thyme

Instructions

  • Salt and pepper your tomahawk steaks liberally on all sides.
  • Seal the tomahawks steaks with the vacuum sealer or place them into large ziplock bags.
  • Place the tomahawks into the sous vide with the water.
  • Set the temperature on the sous vdie to your desired doneness (128ºF/55ºC for medium rare) or (134ºF/61ºC for medium doneness).
  • Let your steaks cook for 3-4 hours in the sous vide.
  • When you're ready to grill, take your tomahawk steaks out of the sous vide and remove the plastic seal.
  • Dry the steaks off as much as you can with a paper towel.
  • Heat your blackstone or your cast iron pan to very high until it begins to smoke.
  • Sear your tomahawk steaks on each side for aout 2 minutes or until a nice, rich brown crust forms.
  • Turn off the heat and add the butter, garlic, and thyme to the pan and let it foam up. Coat the steaks in the butter mixture and remove them from the grill.
  • Let your steaks rest for about 15 minutes before you cut and serve the steaks.

Video

Notes

If you don't have a sous vide, then you can cook your steaks low and slow in the oven.
If you don't have a vacuum sealer, then you can use a ziplock bag instead.
Make sure you dry the steaks off completely before searing your steaks.


Nutrition

Serving: 6ounces | Calories: 105kcal | Carbohydrates: 1g | Protein: 0.3g | Fat: 12g | Saturated Fat: 7g | Polyunsaturated Fat: 0.4g | Monounsaturated Fat: 3g | Trans Fat: 0.5g | Cholesterol: 31mg | Sodium: 1254mg | Potassium: 23mg | Fiber: 0.4g | Sugar: 0.01g | Vitamin A: 408IU | Vitamin C: 2mg | Calcium: 13mg | Iron: 0.3mg
close up shot of breakfast scramble

June 26, 2025 Breakfast

Breakfast Scramble

This breakfast scramble is my all-time favorite for feeding a crowd-perfect for lazy weekends, family camping trips, or hosting brunch. The crispy, golden potatoes steal the spotlight, but when you mix in savory sausage, smoky bacon, caramelized onions, and fluffy eggs, it turns into a hearty dish everyone will be asking for again and again.

The best part about this breakfast scramble is that you can add in the things you love! For instance, when my best friend visits, I always replace the cilantro with green onions and add in some sautéed mushrooms. I know that cilantro tastes like soap to her, and she LOVES mushrooms.

Sometimes I add in eggs, sometimes I don't. My boyfriends LOVES eggs but I am more of a bacon fan haha! Like I said, add what you like!

The secret ingredient to this best breakfast scramble in my opinion is the steak seasoning. I have been using steak seasoning on my potatoes for as long as I can remember, and it always adds the BEST flavor!

What's In This Blog Post

  • Breakfast Scramble Ingredients
  • Tips For The Best Breakfast Scramble
  • How to make your breakfast scramble
  • More Breakfast Recipes

Breakfast Scramble Ingredients

Yukon Gold Potatoes - My favorite potatoes because they are so flavorful, tender, but hold their shape perfectly after sautéing.

Onions - I love yellow onions because they are sweet and caramelize so well but you can use white onions, red onions, or even shallots.

Bacon - I have the MOST amazing butcher nearby called the Meating Place, and they have this delicious peppered bacon that we adore. Use whatever bacon you like!

Sausage - My kids LOVE kielbasa sausage so I like to add that into the scramble as well. You could use any kind of sausage you like or even ham!

Eggs - What breakfast scramble would be complete without eggs! Add a little water into the whisked eggs to make them extra soft and fluffy.

Shredded Cheese - I'm always team give me all the cheese so a smattering of freshly shredded parmesan, colby jack, pepperjack, or even mozzerella tastes incredible!

Cilantro - Top your breakfast scramble off with some fresh cilantro, parsley, or green onion for color and flavor!

Steak Seasoning - I love using this steak seasoning on potatoes!

Tips For The Best Breakfast Scramble

  1. I would suggest getting all your ingredients together before you start cooking your breakfast scramble. That way, everything will be ready to go as soon as you begin and you won't accidentally leave anything out.
  2. Cut your potatoes into small cubes so that they cook quickly.
  3. Cook your scramble on medium heat. This will create some nice browning on your potatoes but won't burn the rest of your ingredients.
  4. Add a little water to your scrambled eggs to make them extra fluffy.

How to make your breakfast scramble

  1. Get all your ingredients ready. Chop up your bacon, sausage, onion, garlic, and potatoes.
  2. Heat your skillet on medium heat for 10 minutes.
  3. Add in your oil, potatoes, and steak seasoning. Let them brown while covered for 15 minutes or until your potatoes are tender.
  4. Stir the potatoes and then add in your onions, bacon, and butter. Cook until the bacon is crisp. This should take about 10 minutes.
  5. Add in your sausage and brown until crispy, and then flip.
  6. Add in your scrambled eggs, cheese, garlic, and cilantro if desired and scramble everything together!
  7. Serve hot and enjoy!
breakfast scramble ingredients
breakfast scramble

More Breakfast Recipes

close up of sausage gravy on biscuits
keto sausage gravy
close up of keto biscuits on a plate
keto biscuits
stack of bacon cheddar scones on a white plate
bacon cheddar scones

Recipe

close up of breakfast scramble
Print Recipe
No ratings yet

Breakfast Scramble

This breakfast scramble made with yellow potatoes, bacon, sausage, onions, and fluffy eggs is easy to make and always satisfies a crowd!
Prep Time15 minutes mins
Cook Time30 minutes mins
Course: Breakfast
Servings: 6 people
Calories: 338kcal
Author: Liz Marek

Ingredients

  • 2 Tablespoons olive oil
  • 6 medium yukon gold potatoes
  • 1 Tablespoon steak seasoning
  • ½ large onion
  • 4 slices bacon
  • 1 cup diced ham or sausage
  • 6 large eggs
  • ⅓ cup cheese
  • 2 Tablespoons cilantro

Instructions

  • Heat your skillet over medum heat and then add in your oil.
  • Add in your diced potatoes and let them cook covered for 10-15 minutes or until they form a nice brown color.
  • Season your potatoes with your steak seasoning.
  • Flip your potatoes and continue cooking for another 10 minutes or until knife tender.
  • Add in your onions, bacon, and butter and saute until your bacon is brown and crispy.
  • Move your cooked potatoes and other ingredients to the side of the pan and add in your sausage. This keilbasa sausage I like is already cooked so all you have to do is brown it.
  • Add in your egg mixture and scramble everything together until the eggs are cooked through.
  • Top your scramble with some cheese and cilantro and serve hot!

Video

Notes

Cooking on medium heat is the best way to promote browning without burning.
Make sure you taste your potatoes to see if they are done enough before you add in the bacon and sausage. 

Nutrition

Serving: 1serving | Calories: 338kcal | Carbohydrates: 32g | Protein: 13g | Fat: 18g | Saturated Fat: 5g | Polyunsaturated Fat: 3g | Monounsaturated Fat: 8g | Trans Fat: 0.04g | Cholesterol: 202mg | Sodium: 220mg | Potassium: 842mg | Fiber: 4g | Sugar: 2g | Vitamin A: 369IU | Vitamin C: 35mg | Calcium: 103mg | Iron: 3mg

avocado crema in a grey bowl

June 16, 2025 Blog

Avocado Crema

This avocado crema is my go-to for steak salad dressing, tacos, nachos, and more. It's so versatile and has the perfect amount of spice and zip. Best part? It only takes 10 minutes to make! Just blend it all together and go!

Since I've been keto again, I've been looking for ways to add fat to my salads and this is the perfect way. The sour cream, mayonnaise, and avocado add much needed fat to my steak salads or steak tacos to make this the perfect keto salad dressing.

What's In This Blog Post

  • Ingredients
  • How To Make The Dressing

Ingredients

Because I follow the keto diet and my boyfriend does carnivore(ish), we like to keep our ingredients pretty clean with no sugar. We also stay away from seed oils so I like to use avocado mayo from primal kitchen or you can make your own mayo.

I prefer to use sour cream for my crema but some recipes call for greek yogurt which also works really well!

Depending on how big your avocado is, you might want to thin your avocado crema out with some extra lime juice, milk, or water.

How To Make The Dressing

This recipe could not be easier. Just add all your ingredients to the blender and you're done! You can adjust the spice level to your preference. I like a little spice myself!

If your crema is too thick you can add in more lime juice, milk or water to thin it out. I usually add more lime juice because I love that zesty kick!

I'm using my ninja blender to make my dressing because it chops everything up super fine and makes this cilantro lime dressing ULTRA creamy but any kind of blender will do. Heck, you can even mix by hand if you needed to. Just chop up the cilantro and garlic first and add it in with everything else and mix.

Recipe

avocado crema in a grey bowl
Print Recipe
5 from 1 vote

Cilantro Lime Dressing

Creamy cilantro lime dressing with avocado and just hte perfect amount of spice!
Prep Time10 minutes mins
Total Time10 minutes mins
Course: Salad
Cuisine: American
Servings: 16 ounces
Calories: 54kcal
Author: Liz Marek

Ingredients

  • 1 cup sour cream or plain yogurt
  • ¼ cup mayonnaise I prefer avocado mayonaise
  • ¼ cup lime juice about 2 limes
  • ¼ cup cilantro
  • 3 whole garlic cloves
  • 1 teaspoon salt
  • ½ teaspoon pepper
  • 1 teaspoon cumin
  • 1 whole ripe avocado optional
  • ½ teaspoon chili pepper flake optional

Instructions

  • Add all the ingredients to a blender or food processor
  • Blend until combined

Notes

If your dressing is too thick, you can add heavy cream, water or more lime juice to make it more fluid.

Nutrition

Serving: 2ounces | Calories: 54kcal | Carbohydrates: 1g | Protein: 0.4g | Fat: 5g | Saturated Fat: 2g | Polyunsaturated Fat: 2g | Monounsaturated Fat: 1g | Trans Fat: 0.01g | Cholesterol: 10mg | Sodium: 172mg | Potassium: 28mg | Fiber: 0.1g | Sugar: 1g | Vitamin A: 113IU | Vitamin C: 1mg | Calcium: 17mg | Iron: 0.1mg
close up of sausage gravy on biscuits

May 15, 2025 Breakfast

Keto Sausage Gravy

I LOVE this keto sausage gravy because it's just my regular sausage gravy, but without any flour as a thickener. It's perfect over my keto biscuits. Or if you're not into keto, this still goes perfectly with my flaky buttermilk biscuits!

The first time I made this keto sausage gravy for my partner, he was blown away. He couldn't believe it was keto. I really think it's the spices that take this gravy over the top. And if you're not keto? Well, I still think you will love this recipe. My kids sure do!

What's In This Blog Post

  • Ingredients
  • How To Make The Sausage Gravy
  • FAQ
  • Other Recipes You Might Love

Ingredients

The secret to this thick and creamy sausage gravy is the cream cheese. The perfect ingredient (in my opinion) to thicken and cream a sauce with no added carbs.

If you don't have any cream cheese on hand, you can always thicken your gravy with some tapioca flour or arrowroot powder. Two common ingredients used in keto recipes for thickening.

I'm using oregano, sage, and thyme for my spices, but you can really use anything you like. Fresh or dried also works.

How To Make The Sausage Gravy

close up of cooking sausage with spices
  1. Preheat a medium frying pan over medium heat.
  2. Once the pan is hot, add some avocado oil to the pan.
  3. Add your sausage with the salt, pepper, garlic powder, chili flakes, onion powder, thyme, sage, and oregano.
  4. Brown your breakfast sausage and break it up into pieces with your spatula as it cooks.
  5. Once your sausage is done cooking, add in the cream and the cream cheese in small pieces.
  6. Bring the mixture to a simmer and whisk gently to break up the cream cheese.
  7. The gravy will thicken as it cools.
  8. Serve the gravy over my fluffy keto biscuit recipe and top with fresh green onions.

FAQ

Can you eat almond flour on keto?

Yes! Almond flour is low in carbs and high in healthy fats. It's a popular substitute for traditional flour in baking and cooking, allowing keto dieters to enjoy many baked goods and dishes

What are other ways to thicken gravy without flour

You can make a rich, thick gravy that's keto by using flour alternatives such as coconut flour, almond flour, flaxseed meal, and sunflower seed flour, xanthan gum, heavy cream, sour cream, or cream cheese.

Other Recipes You Might Love

Flaky Buttermilk Biscuits
bacon cheddar biscuits on parchment paper on metal pan
Cheddar Chive Biscuits
closeup of strawberry shortcake on blue plate
Strawberry Shortcake
gluten free cake
Gluten Free Vanilla Cake
close up of pink macarons
French Macarons

Recipe

close up of sausage gravy on biscuits
Print Recipe
No ratings yet

Keto Sausage Gravy

Thick and flavorful sausage gravy that's low carb and keto! Pairs perfectly with my keto biscuits.
Prep Time5 minutes mins
Cook Time12 minutes mins
Total Time17 minutes mins
Course: Breakfast
Cuisine: American
Servings: 4 cups
Calories: 1011kcal
Author: Liz Marek

Ingredients

  • 1 pound breakfast sausage
  • 1 Tablespoon butter
  • 1 Tablespoon avocado oil
  • 1 teaspoon salt
  • 1 teaspoon pepper
  • ¾ teaspoon garlic powder
  • ¾ teaspoon onion powder
  • ¼ teaspoon oregano
  • ¼ teaspoon thyme
  • ¼ teaspoon sage
  • ½ teaspoon chili flake optional
  • 2 ½ cups heavy cream
  • 4 ounces cream cheese
US Customary - Metric

Instructions

  • Preheat a medium frying pan over medium heat.
  • Once the pan is hot, add some avocado oil to the pan.
  • Add your sausage to the pan with the salt, pepper, garlic powder, chili flakes, onion powder, thyme, sage, and oregano.
  • Brown your breakfast sausage and break it up into pieces with your spatula as it cooks.
  • Once your sausage is done cooking, add in the cream and the cream cheese in small pieces.
  • Bring the mixture to a simmer and whisk gently to break up the cream cheese.
  • The gravy will thicken as it cools. Serve the gravy over my fluffy keto biscuit recipe!

Video

https://youtu.be/RYxcBOAYslg

Notes

No cream cheese? You can use other things to thicken the gravy like xantham gum or arrowroot powder! 

Nutrition

Serving: 1cup | Calories: 1011kcal | Carbohydrates: 7g | Protein: 23g | Fat: 100g | Saturated Fat: 52g | Polyunsaturated Fat: 7g | Monounsaturated Fat: 33g | Trans Fat: 0.4g | Cholesterol: 286mg | Sodium: 1459mg | Potassium: 486mg | Fiber: 0.4g | Sugar: 5g | Vitamin A: 2825IU | Vitamin C: 2mg | Calcium: 145mg | Iron: 2mg
close up of keto biscuits on a plate

May 3, 2025 Biscuits and Scones

Fluffy Keto Biscuits

These keto biscuits are my go-to for making biscuits and gravy. They are light, fluffy, gluten-free, and only take 12 minutes to bake. Even my kids prefer them over traditional biscuits!

You won't believe how soft and fluffy these keto biscuits are! They have an amazingly soft texture and flavor. Perfect for sweet or savory meals.

What's In This Blog Post

  • Ingredients
  • How To Make Keto Biscuits

Ingredients

There are no special ingredients in this recipe except maybe the almond flour but if you're into making more keto recipes, you will see that almond flour is very common.

Superfine almond flour is what I prefer for baking.

Mozzarella cheese is commonly used in keto baking to bind things together and create a good structure. I like to get the big bags from Costco because we also use a lot of mozzarella cheese in keto baking.

Eggs are used to add moisture and structure.

How To Make Keto Biscuits

Making these biscuits could not be easier. It's the perfect breakfast for a lazy weekend.

  1. Preheat the oven to 400ºF
  2. Combine the almond flour, mozzarella, baking powder, and salt together in a medium-sized bowl.
  3. Add in the softened butter and work it into the dry ingredients with your hands until you create a crumbly mixture.close up of keto biscuit mix
  4. Add in the eggs and whisk vigorously with a fork to combine everything together. The dough will look lumpy and wet.close up of keto biscuit dough
  5. Grease your muffin tins with some butter.
  6. Place two heaping tablespoons of batter into the muffin tin.keto biscuit dough in a muffin pan
  7. Bake the biscuits for 10-12 minutes or until golden brown on top.
  8. Remove the biscuits from the oven and brush them with more melted butter if you prefer.
  9. Enjoy!

Recipe

close up of keto biscuits on a plate
Print Recipe
No ratings yet

Keto Biscuits

Keto biscuits made with almond flour, mozzerella cheese, and eggs make biscuits so delicious, no one will even know they are gluten free and low carb!
Prep Time5 minutes mins
Cook Time12 minutes mins
Total Time17 minutes mins
Course: Breakfast
Cuisine: American
Servings: 9 biscuits
Calories: 180kcal
Author: Liz Marek

Equipment

  • 1 muffin pan

Ingredients

  • 1 ¼ cups almond flour
  • ¾ cup finely shredded mozzarella cheese
  • 1 Tablespoon baking powder
  • 1 teaspoon salt
  • 4 Tablespoons unsalted butter soft but not melted
  • 3 large eggs
  • 2 Tablespoons salted butter melted

Instructions

  • Preheat your oven to 400ºF and grease a muffin pan with butter.
  • Combine the almond flour, mozzarella cheese, baking powder, and salt together in a bowl.
  • Add the softened butter to the almond flour mixture and work it in with your fingertips until the mixture resembles and crumbly mixture.
  • Add the eggs in and mix vigourously with a fork until a lumpy dough is created.
  • Place about two Tablespoons of the biscuit batter into each muffin tin.
  • Bake for 10-15 minutes or untll they are golden brown.
  • Brush the melted butter onto the tops of the biscuits and serve warm.

Video

Notes

Don't overmix your dough, it will be lumpy and wet and that is totally normal and helps create that perfect biscuit texture.
You can make these biscuits without a muffin pan, they will just be flatter like a cookie.

Nutrition

Serving: 1biscuit | Calories: 180kcal | Carbohydrates: 4g | Protein: 5g | Fat: 17g | Saturated Fat: 6g | Polyunsaturated Fat: 1g | Monounsaturated Fat: 3g | Trans Fat: 0.3g | Cholesterol: 82mg | Sodium: 304mg | Potassium: 160mg | Fiber: 2g | Sugar: 1g | Vitamin A: 323IU | Calcium: 102mg | Iron: 1mg
Festive cake with sprinkles and a pink drip with sprinkles on top.

April 22, 2025 Free Tutorials

Drip Cake Recipe

A drip cake is one of the easiest ways to make a decorated cake look professional, and the same simple recipe works for soft pink, deep red, navy blue, white, or even shiny gold. This walkthrough uses my water ganache method as the base, which means the drip itself takes less than five minutes from start to finish. Once you have the colored drip down, I'll also show you how to add a metallic gold finish using a quick bag-coating trick. This same technique works on any cake, including my vanilla cake, funfetti cake, or easy chocolate cake.

Festive cake with sprinkles and a pink drip with sprinkles on top.

Quick Glance: Drip Cake Recipe

  • Recipe Name: Drip Cake Recipe
  • Why You'll Love It: Creates a dramatic metallic drip that looks like real gold and instantly elevates cakes for weddings, birthdays, and luxury desserts.
  • Time and Difficulty: Less than 5 minutes, great for beginners
  • Main Ingredients: White chocolate, water, gold luster dust
  • Method: Make the water ganache, make the gold paste, coat the piping bag, pour the ganache into the piping bag to make the drips gold.
  • Texture and Flavor: Smooth, glossy ganache with a rich white chocolate flavor and a metallic gold finish.
  • Quick Tip: Always apply gold drip to a cold cake so the drips set quickly and don't run down the sides too far.
ChatGPT
Google AI
Perplexity
Grok
Add us as a trusted site on Google
[feast_advanced_jump_to]

Why This Is The BEST Cake Drip Recipe

I've been working with water ganache since 2010, and after testing dozens of versions, this is the method I keep coming back to for any color of drip cake. The base ganache uses just two ingredients (candy melts plus hot water), and the result is a smooth, glossy drip that sets quickly, holds its color beautifully, and works in any climate.

The reason water ganache wins over a traditional cream-based ganache is stability. Cream ganache sweats in humid conditions, separates if it sits too long, and has a short shelf life. Water ganache doesn't have any of those problems. The chemistry of candy melts (which use vegetable fat instead of cocoa butter) makes the chocolate-to-water ratio forgiving. There's no tempering, no risk of seizing, and you can reheat it to bring it back if it sets too soon. White chocolate works the same way.

For colored drips, the easiest path is to start with colored candy melts (pink, red, blue, green, etc.) and skip food coloring entirely. If you want a custom shade, you can tint the candy melts with any kind of food coloring (it doesn't have to be oil-based because we have already added water) to the water ganache after you've made it.

PRO TIP: Add a drop of white food coloring to your water ganache if it's too transparent. The color will not change much but the white food coloring makes the color more opaque.

For metallic finishes (gold, silver, rose gold, copper, bronze), I have a separate trick: coat the inside of the piping bag with a thick paste of oil and edible luster dust before adding the ganache. As the white ganache passes through the bag, it picks up the metallic coating and pipes out already shiny. Brushing gold on after the drip sets is slow and streaky; mixing dust directly into the ganache dulls the shine because chocolate is opaque, and the metallic particles get buried. The bag-coating trick gives you even color on every drip without any of that.

close up of a decorated cake with pink frosting and a gold drip

One thing that's true for every color: the cake has to be cold, and the ganache has to be cooled to about 90ºF. Pulling a cake straight out of the fridge (or even a quick freezer chill) gives you a surface cold enough to stop a drip before it runs all the way down. Without that, even a perfect ganache will pool at the base of the cake.

Drip Cake Ingredients

The base recipe is just two ingredients. The optional add-ons depend on what color or finish you want.

  • Candy melts or white chocolate. Both work. Candy melts (Wilton, Merckens, Ghirardelli) come in dozens of colors and are made with vegetable fat instead of cocoa butter, which makes the chocolate-to-water ratio extra forgiving and means you don't need to temper anything, the way you would for a traditional chocolate ganache. Real white chocolate also works as long as you melt it gently. Pick the color you want for the drip: white, pink, red, blue, green, purple, or whatever matches your design. Don't substitute chocolate chips; they contain stabilizers that prevent clean melting.
  • Hot water. Replaces the cream you'd use in a traditional ganache. Tap water is fine; it doesn't need to be filtered. The water hydrates the sugar in the chocolate without adding dairy, which is what makes the drip heat-stable. You can also adjust consistency by slightly increasing or decreasing the water by a teaspoon at a time.

Optional for tinting white ganache to a custom color:

  • Food Coloring. Use this if you can't find candy melts in the exact shade you want. Any kind of food coloring will work.

Optional for a metallic gold (or silver, rose gold, copper, bronze) finish:

  • Gold luster dust. This is what creates the metallic finish. Quality matters here more than anywhere else in the recipe. I use super gold dust from Truly Mad Plastics because it's exceptionally shiny and non-toxic; cheaper dusts can look chalky or dull. Substitutions: silver, rose gold, copper, bronze, or any metallic dust uses this exact same technique. For a deeper antique tone, mix a touch of bronze dust into the gold.
  • Neutral oil. The job of the oil is to bind the dust into a paintable paste. Use something flavorless like vegetable oil, canola, grapeseed, or light corn oil. Don't use olive oil or coconut oil; both can carry flavor through to the finished drip. You only need a tiny amount.

How To Make A Colored Drip Cake Step-By-Step

This is the base method that works for any color. If you want a metallic gold or silver finish, follow these steps first to make the ganache, then jump to the Gold Drip Variation section below for the bag-coating technique.

Saucepan with water inside on a black stovetop.
  1. Heat the water. In a small microwave-safe bowl, heat the water for about 30 seconds, until it's hot to the touch but not boiling. Or you can heat it on the stovetop in a saucepan.
Saucepan pouring hot water onto a bowl of white candymelts.
  1. Combine the hot water and candy melts. Microwave the candy melts for 1 minute to soften them up.

    Pour the hot water over your candy melts (or chopped white chocolate) and let it sit for one to five minutes without stirring. The heat needs time to melt through.
Whisk mixing white chocolate mixture in a clear bowl.
  1. Stir until smooth. Whisk gently until you have a smooth, glossy ganache. If chunks remain, microwave another 15 to 30 seconds and whisk again.

Pink water ganache in a clear bowl being mixed with a whisk.
  1. Color the ganache. Add in your food coloring of choice, plus a couple drops of white food coloring to make the drip less transparent. Mix until smooth.
Pink ganache with a whisk in a clear bowl with a laser thermometer above.
  1. Cool the ganache. Let the ganache sit for one to two minutes until it's slightly warm but not hot. I shoot for about 90°F. It should flow slowly off a spoon. If it's too warm, the drips will run all the way down the cake.
Pouring pink ganache into a piping bag.
  1. Piping Bag. Fold a piping bag over a cup and pour the ganache inside. Snip a small amount of the tip off.

    If you don't have a piping bag, you can use a ziplock bag with the corner snipped off, or you can just spoon it onto the cake, but your drips will not be as neat.
Piping bag with pink ganache piping a drip onto a white cake.
  1. Test the consistency. Pipe a single drop down the side of a cold drinking glass or bowl. It should set within a few seconds without running all the way down. This is your dry run before committing to the cake.
Pink piping bag piping drips on top of a white cake.
  1. Pipe the drips. Pipe drips along the edge of a chilled cake (a freshly frosted vanilla cake with easy buttercream is my go-to base). Squeeze with even pressure to make a drip, stop, move the bag over slightly, and repeat.
Piping bag piping pink ganache on to the top of a white cake.
  1. Once the drips are placed, fill in the top of the cake with a smooth pool of ganache and then smooth it with an offset spatula if desired.
Hand placing a pink donut on top of a white cake with pink ganache drips.
  1. Decorate the cake as desired.


Cake Batter and Frosting Calculator

Select an option below to calculate how much batter or frosting you need. Adjust the servings slider on the recipe card to change the amounts the recipe makes.

Choose a pan type

Choose a cake pan size
(based on 2" tall cake pan)

Choose a cake pan size
(based on 2" tall cake pan)

Choose a cake pan size
(based on 2" tall cake pan)

Cupcake Tin Size

Choose number of pans

Cups of Batter Needed

8 cups

Cups of Frosting Needed

5 cups

Note: measurements are estimated based off the vanilla cake recipe using standard US cake pans and sizes. Measurements used are for 2" tall cake pans only. Your results may vary. Do not overfill cake pans above manufacturer's recommended guidelines.

Festive cake with sprinkles and a pink drip with sprinkles on top.

How To Make A Gold Drip Variation

To turn the colored drip into a metallic gold drip, as I did on my rainbow cake, you'll start with the white candy melts version of the base recipe and add two extra steps before piping. The trick is to coat the inside of the piping bag with a paste of luster dust and oil before filling it with ganache. As the ganache passes through the bag, it picks up the metallic coating and pipes out already shiny.

close up of gold dust and oil mixed together
  1. Make the gold paste. In a small bowl, mix 2 teaspoons of edible gold luster dust and ¼ teaspoon of neutral oil into a thick, glossy paste roughly the consistency of toothpaste. If it's too runny, add more dust; if it's too dry, add a single drop of oil at a time.
close up of piping bag coated with gold mixture
  1. Coat the piping bag. Place a piping bag into a tall cup or container and fold the edges down. Use a small paintbrush (or an offset spatula) to apply a thick, even layer of gold paste to the inside bottom of the bag, about two to three inches up from the tip. The thicker the coating, the more reflective the finish; for a heavier metallic look, double-coat the bag.
Pouring pink ganache into a piping bag lined with gold.
  1. Fill. Carefully pour your cooled water ganache into the bag without disturbing the dust coating.

    Pull the piping bag out of the cup, twist the top to close it, then stip a small amount of the tip off.
Close up of a piping bag piping gold drip onto a white cake.
  1. Pipe drips along the edge of a chilled cake just like the base method. The ganache picks up the gold paste as it passes through the bag and comes out already metallic.
Close up of a cake with a gold drip, piped frosting on top and sprinkles.

For other metallic colors (silver, rose gold, copper, bronze, antique gold), swap the gold dust for whichever color you want and follow these same steps. For a custom antique gold, mix a small amount of bronze dust into the gold paste before coating the bag.

You can also use this same bag-coating technique with buttercream instead of ganache. Microwave a small amount of buttercream until it's just melted enough to flow, coat the bag with metallic dust, paste the same way, and pipe.

If you'd rather skip the metallic finish entirely and use a traditional cream-based chocolate drip, my chocolate drip recipe walks through the cream-and-chocolate ratios.

Common Drip Cake Problems To Avoid

  • Skipping the refrigeration. If you don't refrigerate your cake, your drips are going to drip all down the cake and maybe even become transparent.
  • Using hot water ganache. Hot water ganache will not only drip down the cake, but it will also melt your outer layer of buttercream. Always cool your water ganache to about 90ºF before piping it onto your chilled cake.
  • Using Chocolate Chips. Chocolate chips have stabilizers in them that can make your drip very chunky and should be avoided.
  • Skipping the white food coloring. White candy melts, and white chocolate is pretty transparent, so if you don't add a drop of white food coloring to your water ganache, you could potentially have a transparent drip.

Final Thoughts

I wish I'd had this recipe fifteen years ago. I spent so much time painting individual drips with gold dust and a tiny brush, and the result was always slow, streaky, and inconsistent. Once I figured out the bag-coating trick, drip cakes went from being one of the most stressful parts of a wedding cake setup to something I could knock out in five minutes between layers.

It's also the technique that's most fun to teach in classes, because the moment people see that first gold drip come out of the bag perfectly even, you can watch the lightbulb go off. If you've been frustrated by streaky metallic drips in the past, this is the fix. The first time you try it, you probably won't go back.

Other Cake Techniques To Try

  • vintage cake with fresh flowers
    Vintage Cake With Buttercream Piping
  • strawberry fault line cake
    Strawberry Fault Line Cake Tutorial
  • close up of a white cake with gold drip and pink piped borders on a blue plate
    How To Decorate A Cake (Beginners Guide)
  • Pastel colored buttercream flowers on a white cake.
    Easy Buttercream Flowers

Drip Cake FAQs

What is a drip cake?

A drip cake is a decorated cake with a controlled "drip" of ganache, chocolate, or another liquid topping running down the sides from the top edge. It's a popular finishing technique for wedding cakes, birthday cakes, and celebration cakes because it's visually dramatic but quick to execute once you know the method.

Can I use dark or milk chocolate for the ganache instead of white?

Yes. Any kind of chocolate works for the base ganache because the gold paste coats each drip from the inside of the piping bag, regardless of what color the ganache underneath is. White chocolate gives the cleanest, brightest gold; darker chocolate gives a slightly warmer, more antique tone.

Can I mix the luster dust directly into the ganache instead?

You can, but the result is much duller. Chocolate is opaque, and mixing gold dust into melted ganache buries the metallic particles inside the mixture instead of letting them sit on the surface where they reflect light. The bag-coating method keeps the dust concentrated on the outside of each drip, which is what creates the shine.

Is the oil taste noticeable?

No. The amount of oil is tiny (a quarter teaspoon for the entire batch), and using a neutral oil like vegetable, canola, or grapeseed means the flavor blends invisibly into the chocolate. You won't taste it.

Why does my drip run down too far?

Two reasons, almost always. The first is ganache temperature; if it's too hot, it stays liquid all the way down. Cool it until a test drip on a cold glass sets within a few seconds. The second is cake temperature; the cake needs to be cold (refrigerator-cold or briefly freezer-chilled) so the drip stops on contact.

Does this technique work with buttercream drips?

Yes. Microwave a small amount of easy buttercream for a few seconds until it's just melted enough to flow, coat the piping bag with metallic dust paste the same way, and pipe. The result is a slightly softer drip than chocolate ganache, but the same metallic finish.

Can I make a drip cake the day before?

Yes. Once the drips set (a few minutes at room temperature, or faster in the fridge), the finished cake holds beautifully overnight. Store covered at room temperature if your kitchen is cool, or in the fridge if it's warm or humid. Bring to room temperature before serving so the cake itself isn't cold.

Watch: How To Decorate A Cake Step-by-Step

Before you start decorating, watch the video below where I show you every step of decorating a cake from start to finish. Seeing the process in action makes it much easier to follow along

- Liz Marek.

Start Learning Now
smiling woman holding a decorated cake in her hands

Recipe

Festive cake with sprinkles and a pink drip with sprinkles on top.
Print Recipe
No ratings yet

Drip Cake Recipe

A glossy, smooth drip made with candy melts and hot water. Works in any color: white, pink, red, blue, green, or whatever shade of candy melt you start with. See the notes section for the gold variation.
Prep Time5 minutes mins
Total Time5 minutes mins
Course: Dessert
Cuisine: American
Servings: 6 ounces
Calories: 62kcal
Author: Liz Marek

Equipment

  • 1 Piping Bag Or you can use a ziplock bag

Ingredients

Drip Recipe

  • 6 ounces candy melts
  • 1 ounce hot water
US Customary - Metric

Instructions

  • Heat the water in a microwave-safe bowl for about 30 seconds, until hot but not boiling.
  • Microwave the candy melts for about 1 minute on full power just to begin the softening process.
  • Pour the hot water over the candy melts or chopped chocolate. Let sit for 1 to 5 minutes without stirring. (Alternatively: microwave the water and candy melts together for 30 seconds, then stir.)
  • Whisk gently until smooth. If chunks remain, microwave another 15 to 30 seconds and whisk again.
  • Cool for 1 to 2 minutes until warm but not hot (about 90°F). Test the consistency by piping a drop down a cold drinking glass; it should set within a few seconds.
  • Spoon the cooled ganache into a piping bag, snip a small hole at the tip, and the drip is ready to pipe onto a chilled cake.

Video

Notes

Color options
  1. Use colored candy melts (pink, red, blue, etc.) for the easiest custom color.
  2. For a custom shade, tint white candy melts with food coloring and a touch of white food coloring to make it less transparent.
Gold (or other metallic) finish variation
  1. Mix 2 teaspoons edible gold luster dust with ¼ teaspoon neutral oil into a thick paste.
  2. Place a piping bag in a tall cup, fold the edges down, and use a small paintbrush to coat the inside bottom of the bag with a thick layer of paste, about 2 to 3 inches up from the tip. For a heavier metallic look, double-coat.
  3. Carefully fill the bag with cooled white water ganache without disturbing the dust coating. Pipe as normal. The same technique works for silver, rose gold, copper, or bronze dust.
Make-ahead and storage
  1. The ganache is best used within 30 minutes of making it. If it sets too soon, microwave in 5 to 10-second bursts and whisk smooth.
  2. Once piped onto a cake, drips set within a few minutes at room temperature.
Critical do-nots
  1. Don't substitute chocolate chips for the candy melts or chopped chocolate; the stabilizers prevent clean melting.
  2. Don't use olive oil or coconut oil for the metallic paste; they carry flavor through to the finished drip.
  3. Don't apply to a warm cake. Always pipe onto a chilled cake.

Nutrition

Serving: 1ounce | Calories: 62kcal | Carbohydrates: 8g | Fat: 3g | Saturated Fat: 3g | Sodium: 13mg | Sugar: 8g
close up of sliced sourdough focaccia

February 20, 2025 Bread

Easy Sourdough Focaccia Recipe

This sourdough focaccia is the easiest, most forgiving bread you can make with an active starter. Mix, fold once, let it sit overnight, and bake it the next day in a pool of olive oil with a shower of flaky salt and rosemary. If you can stir, you can pull this off, even if you've never made my no-knead easy focaccia recipe before.

close up of sliced sourdough focaccia

Sourdough focaccia is hands-down my favorite thing to make with a happy starter, second only to my beginner sourdough bread. It's the recipe I push anyone brand new to sourdough to start with. Underproofed? Still tastes great. Overproofed? Even better. No shaping, no scoring, no Dutch oven, just dimple, drown in olive oil, and bake.

Quick Glance at the Recipe: Easy Sourdough Focaccia

  • Recipe Name: Easy Sourdough Focaccia
  • Why You'll Love It: No kneading, no shaping, no Dutch oven. The most beginner-friendly sourdough bake there is, and the most forgiving if your timing is off.
  • Time and Difficulty: 10 minutes of hands-on work, 14 hours total (most of it overnight rise). Beginner-friendly!
  • Main Ingredients: Active sourdough starter, bread flour, water, honey, olive oil, flaky sea salt, and fresh rosemary.
  • Method: Mix, one coil fold, 12-hour bulk rise, transfer to oiled sheet pan, 1 to 2-hour second rise, dimple, top, bake at 425º F.
  • Texture and Flavor: Soft pillowy crumb, chewy interior, crackly olive-oil crust, gentle tang.
  • Quick Tip: Look for 50% rise during bulk, NOT doubled. Focaccia wants a less-developed dough than a traditional sourdough loaf, so it has room to puff in the pan.
ChatGPT
Google AI
Perplexity
Grok
Add us as a trusted site on Google
[feast_advanced_jump_to]

What Makes This Sourdough Focaccia So Good

If you are brand new to sourdough, this is the recipe to start with. Here is why:

  • It is endlessly adaptable. Rosemary and salt is the classic, but you can swap in anything you like, fresh tomatoes, olives, garlic, caramelized onions, even ham and cheese. Check out my focaccia bread art recipe for more inspiration!
  • It is almost impossible to screw up. Underproofed focaccia still bakes into a tasty flatbread. Overproofed focaccia is somehow even better; the bubbles get bigger, and the crumb gets airier. Sourdough loaves punish you for bad timing. Focaccia loves it.
  • No kneading. No shaping. No Dutch oven. You mix the dough in one bowl, do ONE coil fold, and let time do the rest. A 9x13 metal pan is all the special equipment you need.
  • The fermentation does the flavor work. A 12-hour overnight rise builds the kind of tangy, complex flavor that a same-day yeasted focaccia just cannot match. Stretch it to 24 or 36 hours in the fridge, and it gets even better.
  • It rescues a forgotten dough. If you ever start a loaf of sourdough and forget about it overnight, that "ruined" dough is now perfect focaccia dough. More on that down in the Make This Recipe Your Own section.

Sourdough Focaccia Ingredients

This dough is built from really simple pantry staples. The only thing that matters is that your starter is active and bubbly the night you mix. I always recommend weighing your ingredients on a digital kitchen scale for sourdough, eyeballing flour is the #1 way beginners end up with a dense bake.

  • Sourdough starter, the #1 ingredient for success here is a happy, active, bubbly starter that has at least doubled within the last 4 to 6 hours of feeding. If your starter has been napping in the fridge, give it 2 to 3 daily feedings before you bake. No starter yet? Start with my sourdough starter for beginners guide, it takes about a week to get going.
  • Bread flour, with its higher protein, gives you that chewy, open crumb people associate with great focaccia. I love Caputo brand bread flour because it isn't processed the way most American flour is, and it doesn't have any additives. All-purpose flour works too if it's what you have on hand; the result will be softer and slightly moister with a tighter crumb.
  • Water, warmed to about 110º F. Not hot, just warm to the touch. Hot water will kill your starter. I aim for water that feels like a comfortable bath.
  • Honey, just a touch to feed the yeast and add a little depth of flavor. You can swap in sugar 1:1 if you don't have honey, but honey gives a noticeably nicer finish.
  • Olive oil, focaccia lives and dies by olive oil. Use one you actually like the taste of, and you'll taste it in every bite. I go through SO MUCH olive oil that I just buy the giant Costco bottle, but use whatever you have.
  • Garlic powder, I add this INTO the dough rather than on top, because raw garlic on the surface burns to bitter little char specks at 425º F. Powder in the dough gets you the flavor without the burn.
  • Flaky sea salt, the finishing salt, is what makes focaccia taste like restaurant focaccia. I love Jacobsen flake salt, which is made right here in Oregon. Maldon works too. Regular table salt does not; it dissolves, and you lose the crunch.
  • Fresh rosemary, finely chopped. Dried works in a pinch, but fresh is so much better here. Thyme is a great swap.

How To Make Sourdough Focaccia Step-By-Step

Before you begin, make sure your starter is active and bubbly (it should at least double within 4 to 6 hours of feeding). Lightly oil a large bowl for the bulk rise. Plan backward from when you want to bake; this is a roughly 14-hour process. If you want to bake in the morning, mix the dough between 7-9pm the night before.

Dissolving water, sourdough starter, and honey in a clear glass bowl.
  1. Whisk the sourdough starter, warm water, and honey together in a large bowl until everything is dissolved.
focaccia bread ingredients in a mixing bowl
  1. Add the bread flour, salt, and garlic powder. Mix until a shaggy, sticky dough forms. Cover and let it rest for 30 minutes. This rest hydrates the flour and gets the gluten relaxed and ready to stretch before you do any folding.
Hand pulling and stretching sourdough focaccia dough out of a clear glass bowl.
  1. With wet hands, grab one edge of the dough, stretch it up until it doesn't want to stretch any further, and fold it onto the middle. Rotate the bowl 90 degrees and repeat on all four sides. This is the only fold you'll do, one set of coil folds is plenty for focaccia. For the standalone tutorial, see my sourdough stretch and fold guide with the 4-set method and the tight-and-bouncy finish signal.
Sourdough focaccia dough in a glass bowl covered in plastic wrap.
  1. Cover the bowl with lightly oiled plastic wrap (the oil keeps the dough from sticking as it rises into it) and leave it at room temperature, ideally 68 to 80º F, for 12 hours.

PRO TIP:This is a high-hydration dough at roughly 80% hydration, which is way wetter than a sandwich loaf. If it feels soupy and sticky and unmanageable, that is exactly how it should feel. Don't add more flour to tighten it up, you'll just end up with a dense focaccia.

Thin layer of olive oil in a sheet pan.
  1. The next morning, pour a thin layer of olive oil all over the bottom of a 9x13 sheet pan. A layer of parchment underneath the oil helps with sticking if your pan tends to grab.
Sourdough focaccia on a sheet pan covered in plastic wrap.
  1. Dump the dough into the pan, then flip it once so both sides get coated in oil. Cover with plastic wrap and let it rise at room temperature for another 1 to 2 hours, until it's puffy and you see bubbles popping up across the surface. Don't try to stretch it to the corners; the dough will spread on its own as it rises.

PRO TIP: Those dimples are not just for looks. They give the olive oil somewhere to pool, which creates the crispy-on-top, soft-underneath contrast that makes good focaccia good focaccia. They also keep the dough from doming up into a loaf shape in the oven. Press all the way down to the bottom of the pan with confident fingers.

Sourdough focaccia on a sheet pan dimpled with olive oil.
  1. Preheat your oven to 425º F. With oiled fingertips, press deep dimples all over the surface, all the way down to the bottom of the pan. Drizzle 2 Tablespoons of olive oil over the top so it pools in the dimples. Scatter flake salt, finely chopped rosemary, and any other toppings you like.
sourdough focaccia dough dimpled with olive oil and sprinkled with rosemary and sea salt.
  1. Bake for 25 to 30 minutes, until the top is deeply golden brown and the edges have pulled away from the sides of the pan.
Baked sourdough focaccia bread.
  1. Immediately lift the focaccia out of the pan and onto a wire cooling rack. If it sits in the pan, the bottom steams, and the crust goes soft. We worked too hard for that crispy bottom to let it go.
sliced focaccia on a wooden board
  1. Wait until it cools fully before slicing and serving up!

Want a sweet version for the weekend? My lemon blueberry sourdough focaccia uses this same dough with a jammy blueberry filling baked right into the crumb. Refer to the recipe card below for the precise quantities and timing.

Common Sourdough Focaccia Problems To Avoid

  • Gummy or doughy crumb. Almost always underproofing or pulling it out of the oven too early. The center should read 200 to 210º F when probed. If you're not sure, give it 5 more minutes. Focaccia is forgiving of a slightly darker bake.
  • Dense bottom, fluffy top. Your starter wasn't active enough, or your kitchen was too cold during the bulk rise. Cold rooms slow fermentation way down. If your room is under 68º F, find a warmer spot (top of the fridge, inside a turned-off oven with the light on) or extend the bulk to 14 to 18 hours.
  • Dough overflowed the bowl overnight. You probably overproofed. Don't panic, dimple it into the pan as usual, but cut the second rise to 30 to 45 minutes since the dough is already past peak. It'll still bake into great focaccia.
  • Focaccia stuck to the pan. Either not enough olive oil in the pan, or the pan was new and seasoning-shy. A layer of parchment underneath the oil is the safety net. Cast iron and well-used metal pans rarely stick.
  • Olive oil pooled in one corner instead of staying on top. You didn't dimple deep enough. Press all the way down to the bottom of the pan, not just the top inch of the dough.
  • No big bubbles, flat surface. This is the dead giveaway for a weak starter. The next time you bake, give your starter a 2 to 3 day spa treatment with fresh feedings before you mix the dough.

Final Thoughts

If you are scared of sourdough, please make this first. There's a reason this is the recipe I push everyone toward, even more than my beginner sourdough bread. You don't need a Dutch oven. You don't need to shape. You don't need to score. You don't even need to nail the timing. You just need a starter, a sheet pan, and a bottle of olive oil you actually like the taste of.

One more reason I love this recipe: my dad has a tough time with regular wheat bread, but he can usually handle long-fermented sourdough like this one just fine. The fermentation breaks down a chunk of the gluten before it ever hits your stomach, which is why a lot of folks with gluten sensitivity (NOT celiac, please talk to your doctor about that) can eat sourdough when regular bread isn't an option. Read more here about why some gluten-sensitive people can still eat sourdough.

The day I figured out you could "save" a forgotten sourdough as focaccia was the day I stopped being scared of overproofing my dough in general. Focaccia is the safety net of the sourdough world. Make it once, mess with the toppings, then start branching out into sourdough rolls, sourdough sandwich bread, and the rest of my sourdough recipes.

If you love how forgiving focaccia is, my sourdough english muffin recipe is the breakfast cousin, same overnight ferment, totally different format, perfect for eggs benedict and toast-and-jam Saturdays.

Make This Sourdough Focaccia Your Own

Same-day vs overnight vs cold-retard. This recipe scales to your schedule. Here is what you get with each option:

  • Same-day (no overnight), 4 to 6 hours total at warm room temp (75 to 80º F). Less tang, smaller bubbles, lighter crust. Good if you want focaccia tonight and you have a vigorous starter.
  • Overnight room temp (the default), 12 hours at 68 to 80º F. Balanced tang, classic open crumb. This is the recipe as written.
  • Cold retard in the fridge, 24 to 48 hours after the bulk rise. The biggest, holiest crumb and the most pronounced sour tang. Pull from the fridge, let it sit at room temp for an hour before dimpling so the dough isn't fridge-cold going into the oven.
focaccia bread art

Topping variations. The dough is a blank canvas. You can change up the toppings and make unlimited flavor profiles:

  • Cherry tomatoes pressed into the dimples with extra flake salt
  • Thinly sliced shallots and fresh thyme
  • Roasted garlic cloves and Parmesan
  • Olives and lemon zest
  • Caramelized onions with goat cheese
  • Bacon, cheddar, and chopped scallions
  • See my focaccia bread art tutorial for the showstopper version

Sourdough Focaccia FAQs

How do I know when bulk fermentation is actually done?

You're looking for the dough to rise by about 50%, not double. The surface should be domed and jiggly, with visible bubbles under the surface when you peek at it from the side of a clear bowl. Focaccia wants a less-developed dough than a traditional sourdough loaf so it has room to puff in the pan, which is why doubling is too far.

My kitchen is cold. Will my dough still rise?

Yes, just slower. Below 68º F, plan on 14 to 18 hours instead of 12. You can also park the dough on top of the fridge or inside a turned-off oven with the light on, both spots usually run 5 to 10 degrees warmer than the rest of the kitchen.

Can I bake this in a cast-iron or a glass pan?

Cast iron is incredible for focaccia; you get an even crispier bottom. Glass works, but bakes a touch slower, so add 3 to 5 minutes and check for that deep golden top. Metal is the middle ground and the easiest to get right the first time.

How do you make focaccia taste fresh again?

Wrap a piece in foil and warm it at 350º F for 5 to 7 minutes, or in a toaster oven for 3 to 4. Do NOT microwave, the crust goes rubbery, and the crumb goes gummy. Frozen focaccia goes straight from freezer to a 350º F oven, no thawing needed, just add a few minutes.

More Sourdough Recipes To Bake

  • unbaked dough in a clear bowl with hand
    How To Stretch And Fold Sourdough
  • Jar of flat sourdough starter in a kitchen environment.
    Why Is My Sourdough Starter Not Rising? (And How To Fix It)
  • sourdough starter in clear jar
    How To Feed A Sourdough Starter
  • sourdough starter in a clear jar on white background
    Sourdough Discard Recipes (The Complete Guide)

Leave Me A Review
⭐️⭐️⭐️⭐️⭐️

If you tried this Sourdough Focaccia Recipe or any other recipe on my blog, please leave a 🌟 star rating and let me know how it goes in the comments. I love hearing from you!

Recipe

close up of sliced sourdough focaccia
Print Recipe
5 from 2 votes

Sourdough Focaccia

Sourdough focaccia is some of the easiest breads you can make! Just mix everything together, let it rise, dimple it with some olive oil, rosemary, and salt and bake! SOOO soft, chewy, and delicious!
Prep Time10 minutes mins
Cook Time25 minutes mins
Rising14 hours hrs
Total Time14 hours hrs 35 minutes mins
Course: Side Dish
Cuisine: Italian
Servings: 12 servings
Calories: 189kcal
Author: Liz Marek

Equipment

  • 1 9"x13" Pan

Ingredients

  • 75 grams Sourdough Starter
  • 400 grams Water Warmed to 110ºF
  • 25 grams Honey
  • 500 grams Bread Flour
  • 10 grams Salt
  • 2 grams Garlic Powder
  • 35 grams Olive Oil
  • 2 grams Fresh Rosemary Finely chopped
  • 2 grams Flake Salt

Instructions

  • Before you begin: Confirm your starter is active and bubbly; it should at least double within 4 to 6 hours of its last feeding. Lightly oil a large mixing bowl for the bulk rise. Plan backwards from when you want to bake, this is roughly a 14 hour process from mix to oven.
  • About 12 hours before you want to bake, whisk the sourdough starter, warm water, and honey together in a large bowl until everything is dissolved. I usually mix at 8 or 9pm so I can bake in the morning.
  • Add the bread flour, salt, and garlic powder. Mix until combined into a shaggy, sticky dough. Cover and rest 30 minutes to hydrate the flour and wake the gluten.
  • With wet hands, pull one edge of the dough up until it stops stretching, then fold it over onto itself. Rotate 90 degrees and repeat on all four sides (one set of coil folds is enough).
  • Cover the bowl with lightly oiled plastic wrap and let it bulk ferment at room temperature (68 to 80º F) for 12 hours, until the dough has risen by about 50% and is domed and jiggly with visible bubbles. Cold room = longer ferment.
  • The next morning, coat a 9x13 sheet pan with a thin even layer of olive oil. Transfer the dough to the pan and flip it once to coat both sides.
  • Cover with plastic wrap and let it second-rise at room temperature for 1 to 2 hours, until very puffy and bubbly. The dough will spread on its own, no stretching needed.
  • Preheat your oven to 425º F. With oiled fingertips, press deep dimples through the entire surface, all the way down to the bottom of the pan.
  • Drizzle 2 Tablespoons of olive oil over the top so it pools in the dimples. Scatter flake salt, chopped rosemary, and any additional toppings.
  • Bake 25 to 30 minutes, until deeply golden brown and the edges pull away from the pan. Internal temperature should read 200 to 210º F.
  • Immediately remove the focaccia from the pan onto a wire rack to keep the crust crispy. Let it cool 10 to 15 minutes before slicing.

Video

Notes

Ingredient notes: Bread flour gives the chewiest, most open crumb. All-purpose flour works and bakes up softer and slightly moister. Honey can be swapped 1:1 for granulated sugar. Garlic powder goes IN the dough, not on top, raw garlic burns at 425º F.
Pan options: A standard 9x13 metal sheet pan is the easiest setup. Cast iron gives an even crispier bottom. Glass bakes a touch slower, add 3 to 5 minutes. A half sheet pan (13x18) makes a thinner, crispier focaccia, watch for it to be done at 20 to 22 minutes.
Make ahead and storage: Room temperature in a ziplock bag for up to 2 days. Reheat at 350º F for 5 to 7 minutes (do not microwave, the crust goes rubbery). Freeze in a ziplock freezer bag up to 3 months and reheat straight from frozen at 350º F for 10 to 12 minutes. For a longer cold retard, after the bulk rise, transfer to the oiled pan and refrigerate up to 48 hours before baking. Let the cold dough sit at room temperature for 1 hour before dimpling and baking.
Substitutions: Active starter can be swapped 1:1 for sourdough discard, expect a longer bulk rise (14 to 18 hours) and slightly less rise overall. Fresh thyme works in place of rosemary. Maldon flake salt works in place of Jacobsen.
Critical do-nots:
  • Don't use hot water, anything above 115º F will kill your starter.
  • Don't skip the dimpling step, dimples are what create the crispy-on-top, soft-underneath texture.
  • Don't leave the focaccia in the pan after baking, the bottom steams and the crust goes soft.

Nutrition

Serving: 1serving | Calories: 189kcal | Carbohydrates: 33g | Protein: 5g | Fat: 4g | Saturated Fat: 1g | Polyunsaturated Fat: 1g | Monounsaturated Fat: 2g | Sodium: 326mg | Potassium: 46mg | Fiber: 1g | Sugar: 2g | Vitamin A: 6IU | Vitamin C: 0.05mg | Calcium: 8mg | Iron: 0.4mg
Slice of strawberry cheesecake with a chocolate curl on top on a black plate.

January 17, 2025 4th of July

Strawberry Cheesecake Recipe

This classic strawberry cheesecake recipe has a crisp graham cracker crust, a silky cream cheese filling, and a glossy, fresh strawberry topping, finished with real chocolate curls. It is lighter and creamier than a dense New York slice, and if you have made my classic cheesecake recipe you already know the method that makes it foolproof.

Slice of strawberry cheesecake with a chocolate curl on top on a black plate.

Quick Glance at the Recipe: Strawberry Cheesecake

  • Recipe Name: Strawberry Cheesecake
  • Why You'll Love It: Lighter and creamier than New York style, with a crisp graham crust, a fresh strawberry topping, and real tempered chocolate curls. A true bakery-quality slice you make at home.
  • Time and Difficulty: Intermediate. About 15 minutes of active prep, the rest is baking, cooling, and chilling (about 2 hours total).
  • Main Ingredients: Graham cracker crust, cream cheese filling, fresh strawberry topping, and real chocolate for the curls.
  • Method: Bake the crust, mix the filling, bake low and slow in a water bath, cool slowly in the oven, chill, cook a fresh strawberry topping, add optional chocolate curls
  • Texture and Flavor: Silky, creamy filling, crisp buttery crust, bright sweet-tart strawberries, and crisp chocolate curls.
  • Quick Tip: Use a thermometer and pull the cheesecake at 150º F in the center. The jiggle test is a guess; the thermometer is the truth.
ChatGPT
Google AI
Perplexity
Grok
Add us as a trusted site on Google
[feast_advanced_jump_to]

What Makes This Strawberry Cheesecake So Good

Most strawberry cheesecake recipes online give you a dense New York slice with a spoonful of canned pie filling on top. This one is different, and here is why it wins:

  • It is a classic-style cheesecake, not New York style. The sour cream and a touch of heavy cream lighten the texture so the slice is creamy and almost mousse-like instead of heavy and firm. If you like a dense brick, the New York version is fine, but this is the one people go back for seconds of.
  • The topping is fresh-cooked strawberries, not canned filling. Real berries, lemon juice, and a little zest taste like summer. There is no gluey, overly sweet canned flavor anywhere near this cake.
  • I use ClearJel instead of cornstarch in the topping. It sets up shinier, clearer, and not gummy, and it holds better in the fridge so the topping does not turn to water on you the next day. More on that below.
  • Real tempered chocolate curls. Crisp, snappy curls of real chocolate that melt in your mouth, like a chocolate-covered strawberry sitting on top of your slice. Same technique as my tempering chocolate tutorial. Totally optional but such a game changer!
  • A foolproof water bath, plus a no-bath backup. The water bath is what keeps the texture creamy edge to edge, and I show you how to make it genuinely leakproof. If you do not want to fuss with it, I have a no-bath method too.

Secrets To A Flawless Cheesecake

These are the four things that take a cheesecake from "fine" to flawless. None of them are hard, but skipping them is where most cheesecakes go wrong.

  • Everything cold needs to be room temperature first. Cream cheese, eggs, sour cream, and heavy cream all need to be at room temperature so they blend smooth with no lumps. Cold cream cheese is the number one cause of a lumpy filling.
  • Do not overbake it. This is the single biggest secret to that silky texture. I always use a thermometer to check the center instead of relying on the jiggle test, because the jiggle test is a guess and the thermometer is not.
  • Use a water bath. It prevents overbaking, sinking, and too much browning. If you do not want to do one, that is totally fine, and I have alternate instructions below.
  • Turn the oven off and let it cool slowly inside. This is something I discovered making my classic cheesecake. Leaving the cheesecake in the turned-off oven for an hour lets it cool down SLOWLY, which is what stops cracks from forming.

Strawberry Cheesecake Ingredients

This is a short list of mostly pantry and dairy-case staples. I always recommend weighing your ingredients with a digital kitchen scale for the most accurate results, especially the cream cheese and sugar. The only slightly unusual item is ClearJel, which is worth buying ahead if you want the shiniest topping.

strawberry cheesecake ingredients

Cream cheese. Full-fat, block-style cream cheese only. I prefer classic Philadelphia. The tubs of spreadable cream cheese have extra moisture and will not give you the right texture. Bring it fully to room temperature before you start.

Granulated sugar. Sweetens both the crust and the filling. Nothing fancy needed here.

Sour cream and heavy whipping cream. This is what lightens the texture and makes the final cheesecake creamier than a New York style slice. Use full-fat sour cream and bring both to room temperature.

Honey. A small amount in the filling for a soft, rounded sweetness. It is subtle but it is part of what makes this filling taste a little different from everyone else's.

Eggs. Room temperature, added one at a time so you do not beat extra air into the batter. Cold eggs do not incorporate well and lead to overmixing, which causes cracks. Vanilla extract and salt. The vanilla rounds out the filling and the salt keeps it from tasting flat. A scraped vanilla bean is delicious here if you have one.

Graham crackers and unsalted butter. Crushed graham crackers plus melted butter and sugar make the classic crisp, buttery crust.

Strawberries. The topping here is my 10 minute strawberry topping. You cook down half the berries into a thick, glossy sauce, then fold in the other half at the end, so you get big beautiful chunks of strawberry instead of mush. Fresh berries in peak season are ideal, but frozen work great off-season since they are picked and frozen at peak ripeness.

Lemon juice and lemon zest. These brighten up the strawberry topping and keep it from tasting one-note sweet.

ClearJel (or cornstarch). ClearJel thickens the strawberry topping so it does not run off the cake, and it looks less cloudy, shinier, and not as gummy as cornstarch. You can use cornstarch if that is what you have, but it is stronger than ClearJel, so use half as much.

Real chocolate for the curls. Use a bar that lists cocoa butter in the ingredients (I use Lindt 70%). Do not use chocolate chips, candy melts, or chocolate bark. If there is no cocoa butter, it is not real chocolate and it will not curl properly.

close up of cheesecake with strawberry topping

How To Make Strawberry Cheesecake Step-By-Step

Before you start: pull the cream cheese, eggs, sour cream, and heavy cream and bring them to room temperature (this takes a couple of hours, so plan ahead). Preheat your oven to 350º F for the crust. Move one rack to the lowest position and a second rack to the middle. Cut a parchment round for the bottom of the pan. This is a high-level overview. The full measurements and detailed steps are in the recipe card below.

Graham cracker mixture pressed into the bottom of a cheesecake pan.
  1. Make the graham cracker crust. Crush the graham crackers (a food processor or a zip-top bag and a rolling pin both work), mix with the sugar and melted butter until it looks like wet sand, press firmly into the bottom and partway up the sides of the pan, and bake at 350º F until you can smell it toasting. Let it cool.
close up of finished cheesecake filling in the bowl of a stand mixer
  1. Mix the filling. Beat the room-temperature cream cheese on low until it is completely smooth and no longer lumpy. Add the sugar, then the sour cream, heavy cream, honey, salt, and vanilla, and finally the eggs one at a time. Keep the mixer on low the whole time and scrape the bowl often, the goal is smooth, not airy. Every bit of mixing on low matters here, because air whipped into the batter is what makes a cheesecake puff up, then sink and crack.

PRO TIP: Drop a parchment round in the bottom of the pan before you press in the crumbs. It makes lifting the finished cheesecake off the base so much easier later. Press the crust tight with a flat-bottomed measuring cup or glass so it does not crumble when you slice.

cheesecake in springform pan
  1. Pour the filling into your springform pan over the cooled graham cracker crust.
Cheesecake pan in a waterbath in an oven.
  1. Set up your water bath (full instructions in the next section), and bake at 335º F. Do not open the oven door while it bakes. You are looking for a center that reaches 150º F on a thermometer and still has a slight wobble.
image of the oven door cracked
  1. Cool it slowly, then chill. When the cheesecake hits the right temperature, turn the oven off, crack the door, and leave the cheesecake inside for one more hour. This slow cooldown is what prevents cracks. Then refrigerate for at least 6 hours, ideally overnight, before you take it out of the pan.
close up of strawberry topping with a wooden spoon
  1. Cook the strawberry topping. This is my 10 minute strawberry topping. Simmer half the strawberries with the water, sugar, salt, lemon juice, and zest until thickened and reduced, whisk to crush them into a sauce, stir in a ClearJel slurry to set it, then fold in the remaining strawberries off the heat. Let it cool completely (it thickens more as it cools) before it goes anywhere near the cheesecake.

PRO TIP: Wait to cover the cheesecake with plastic wrap until it is fully cooled. If you cover it warm, condensation forms and drips water onto the surface.

Close up of chocolate curls on a white countertop.
  1. Make the chocolate curls. Melt and temper real chocolate, spread it thin on a stone counter or the back of a sheet pan, wait for the shine to go matte, then push a bench scraper at a 45º angle to form curls.
Strawberry cheesecake on a black plate with strawberries in the background.
  1. Assemble. Lift the chilled cheesecake off the base onto a plate, spoon the cooled strawberry topping over the top, and pile the chocolate curls in the center.

PRO TIP: Do not stress if your curls crack or break. Even the broken ones look beautiful piled on the cheesecake, and you can always re-melt and re-temper the chocolate to try again. Refer to the recipe card below for the full measurements and timing.

Baking The Cheesecake In A Water Bath

I always bake cheesecake in a water bath because it gives the BEST results, baking gently and evenly at a low temperature so the outside does not overbake while the center finishes. There are two ways to do it, and there is also the option to skip it.

Cheesecake in a waterbath.

Method 1, the leakproof water bath (what I do). The trick to a water bath that does not leak is to put your 9" cheesecake pan inside a 10" cake pan first, which acts as a dry barrier. (If you do not have a 10" pan, wrap the cheesecake pan in two layers of heavy-duty foil instead.) Set that inside a larger roasting pan, place everything in the oven on the lowest rack, then pour hot water into the outer pan until it comes about ¾ of the way up the sides of the cheesecake pan. The water keeps the oven humid so the cheesecake bakes gently and does not brown or crack.

Method 2, the steam-pan method (no direct bath). If you don't have a large cake pan (if you're not a baker like me why would you) then you can put a sheet pan or roasting pan filled ¾ with hot water on the lowest oven rack and bake the cheesecake on the rack directly above it. The steam does most of the work of a water bath without the cheesecake pan ever touching the water. You will get some browning around the edges still but not as much as without and if you're putting a topping on top, you won't even notice it anyway.

cheesecake without a waterbath

Do you have to use a water bath at all? No. You can skip it completely. You will get a little more browning on top and a slightly less even texture inside, but the strawberry topping covers the browning and no one will ever know. Here is the honest tradeoff for THIS recipe specifically: because this is a lighter, classic-style filling (sour cream plus cream, more moisture than a dense New York batter), it benefits from the gentle, humid heat more than a heavy brick-style cheesecake does. The no-bath crowd online is usually baking a much denser batter that is more forgiving. So if you want that signature silky, creamy texture edge to edge, the bath (or at least the steam pan) is worth it here. If you mostly care about flavor and the topping is going on anyway, skip it.

The cheesecake on the left was baked without a water bath (note the slightly raised edges and more browning) and the cheesecake on the right was baked with a waterbath.

Two cheesecakes side by side to compare the color and texture.

However you bake it, the finish line is the same: a center that reads 150º F on a thermometer with a slight wobble. Turn the oven off, crack the door, and let it rest inside for one hour before chilling.

ClearJel vs Cornstarch For The Topping

People always ask why I reach for ClearJel instead of cornstarch. Both will thicken the topping, but they do not behave the same.

  • ClearJel sets up clear and shiny, so the strawberries look glossy and bright instead of cloudy. It also does not turn gummy, and it holds its set better in the fridge, which matters a lot if you are making the topping ahead or storing leftovers (see the weeping fix below).
  • Cornstarch works fine and is probably already in your pantry. It clouds the sauce slightly and can read a touch gummy, but on a cheesecake covered in fresh berries, most people will not notice. Cornstarch is stronger than ClearJel, so use half as much.

Either way, mix your thickener with cool water into a slurry first, then stir it into the simmering berries and cook for one minute so it activates. Adding dry starch straight to hot liquid gives you lumps.

Make-Ahead, Storage, And Freezing

Cheesecake is the rare dessert that is actually better made ahead, because it needs that long chill to set and slice cleanly anyway.

  • Make-ahead: Bake the cheesecake a day (even two days) before you want to serve it and keep it chilled. Make the strawberry topping up to a week ahead and store it in the fridge in a separate container (it also freezes for up to 6 months). Make the chocolate curls the day of, since they are happiest crisp and fresh.
  • Storing leftovers: Keep the cheesecake covered in the fridge for up to 5 days. If you have a lot left, store the topping separately and spoon it onto slices as you go, so the cake does not get soggy.
  • Freezing: The plain cheesecake freezes beautifully. Chill it fully, then wrap it (whole or in slices) in plastic and then foil and freeze up to 2 months. Thaw overnight in the fridge. I do not recommend freezing it with the strawberry topping on, since the topping releases water as it thaws. Freeze the cake bare and add fresh topping after it thaws.

PRO TIP: For clean, bakery-style slices, run a large knife under hot water, wipe it dry, and cut. Wipe the blade clean between every slice. A warm, clean knife glides through cold cheesecake instead of dragging.

Common Strawberry Cheesecake Problems To Avoid

  • Dense and heavy instead of creamy. You overbaked it. A few degrees past set turns this lighter filling rubbery. Pull it at 150º F in the center with a slight wobble and let the slow cooldown finish the job.
  • A soggy line at the bottom of the crust. Water leaked into the pan during the bath. Use the pan-in-pan barrier or two tight layers of heavy-duty foil, or switch to the steam-pan method where the cheesecake never sits in water.
  • Cloudy or gummy topping. Usually too much thickener, or cornstarch added dry. Use a slurry, cook it just one minute, and remember cornstarch needs only half the amount of ClearJel.
  • Chocolate curls that crack or will not curl. The chocolate was too cold and hard when you scraped, or it was not real chocolate. Work while it is just matte (not fully set), and use a bar with cocoa butter in it. Chips and candy melts will not curl. If it sets too hard, warm the surface slightly and try again.

Final Thoughts

This really is the most delicious cheesecake you will ever have, and I think it will be your go-to from now on. The texture is the whole thing for me: that cool, silky, creamy slice with the bright strawberries and the snap of real chocolate on top. It tastes like a chocolate-covered strawberry grew up and became dessert.

If you only take one thing from this post, let it be the thermometer and the slow cooldown. Those two habits fixed cheesecake for me more than any other tip, and once you bake to 150º F and let it rest in the turned-off oven, you stop getting cracks and sad, overbaked edges. If you love this one, my classic cheesecake recipe is the plain canvas it is built on.

Make This Strawberry Cheesecake Recipe Your Own

Crust variations

The graham cracker crust is classic, but you have options. Swap the graham crumbs one-for-one for crushed gingersnaps, Biscoff cookies, vanilla wafers, or shortbread. For a chocolate base, use crushed chocolate sandwich cookies (scrape the filling out first) and you have an Oreo-style crust that plays beautifully with the chocolate curls.

Pan options

This recipe is built for a 9" cheesecake pan. If you use an 8" pan the cheesecake will be taller and need extra time, so add 15 to 20 minutes and keep baking to 150º F in the center. A 10" pan gives you a thinner cheesecake that bakes a little faster. You can also bake the filling as mini cheesecakes in a lined muffin tin for individual servings (start checking them early, since they bake much faster).

Flavor and topping twists

A scraped vanilla bean in place of the extract is delicious in the filling. You can swap the strawberry topping for the same cooked-fruit method with raspberries, blackberries, or cherries (my homemade cherry cheesecake walks through exactly that, or you can pour my from-scratch cherry pie filling on top for an even easier swap).

Strawberry Cheesecake FAQs

Can I add strawberries right into the cheesecake batter?

I do not recommend it. Fresh strawberries stirred into the filling release water as the cheesecake bakes, which makes the texture wet and a little mushy and can keep it from setting properly. Keep the berries in the cooked topping on top, where they belong, and the filling stays smooth and creamy.

My cheesecake browned on top. Did I ruin it?

Not at all. A browned top almost always means you skipped or shortened the water bath, and since the entire surface gets covered in strawberry topping, no one will ever see it. As long as the center hit 150º F and you cooled it slowly, the texture inside is exactly right.

Can I do half strawberry and half another fruit on top?

Yes, and it looks beautiful. The trick is to keep the two toppings in separate sections rather than swirled, because the cooked fruit sauces are loose enough that they will bleed into each other and turn muddy. Spoon each one onto its own half (or pipe a thin chocolate line down the middle as a divider) and add them close to serving time.

What chocolate works best for the curls, and can I skip them?

Use a real chocolate bar that lists cocoa butter in the ingredients, like Lindt. Skip chocolate chips, candy melts, and bark, because the added stabilizers make them too soft to curl. And yes, you can absolutely skip the curls. A scatter of shaved chocolate or a few fresh strawberries on top is just as pretty with a lot less effort.

Other Cheesecake Recipes You'll Love

slice of cherry cheesecake on a black plate
Cherry Cheesecake
slice of cheesecake on a white plate with whole cheesecake in the background
Classic Cheesecake
four mini heart cheesecakes on a marble background
Mini Cheesecake Hearts
pumpkin cheesecake bars with turkey piped on top on blue plate
Pumpkin Cheesecake Bars

Leave Me A Review
⭐️⭐️⭐️⭐️⭐️

If you tried this Strawberry Cheesecake Recipe or any other recipe on my blog, please leave a 🌟 star rating and let me know how it goes in the comments. I love hearing from you!

Recipe

Slice of strawberry cheesecake with a chocolate curl on top on a black plate.
Print Recipe
No ratings yet

Strawberry Cheesecake Recipe

Homemade strawberry cheesecake with a crisp buttery graham cracker crust, a creamy classic-style filling, a fresh strawberry topping, and homemade chocolate curls.
Prep Time15 minutes mins
Cook Time2 hours hrs
Cooling6 hours hrs
Total Time8 hours hrs 15 minutes mins
Course: Dessert
Cuisine: American
Servings: 16 servings
Calories: 428kcal
Author: Liz Marek

Equipment

  • 1 Stand mixer with paddle attachment
  • 1 9" cheesecake pan

Ingredients

For The Cheesecake Crust

  • 6 ounces graham crackers crushed
  • 3 ounces unsalted butter melted
  • 3 ounces granulated sugar

For The Cheesecake Filling

  • 32 ounces cream cheese softened to room temperature
  • 9 ounces granulated sugar
  • 2 ounces sour cream room temperature
  • 2 ounces heavy cream room temperature
  • 1 ounce honey
  • 4 large eggs warmed to room temperature
  • ½ teaspoon salt
  • 1 Tablespoon vanilla extract

For Strawberry Topping

  • 16 ounces frozen strawberries or fresh if in season
  • 4 ounces sugar
  • ¼ teaspoon salt
  • 4 ounces water
  • 1 Tablespoon fresh lemon juice
  • 1 teaspoon lemon zest
  • 2 Tablespoons ClearJel or 1 Tablespoon Cornstarch
  • 1 ounce cool water for the ClearJel or Cornstarch
  • 16 ounces fresh strawberries to stir in at the end

Chocolate Curls

  • 8 ounces chocolate 1 bar real chocolate that lists cocoa butter in the ingredients (I like Lindt 70%)
US Customary - Metric

Instructions

  • Before you begin: Bring the cream cheese, eggs, sour cream, and heavy cream to room temperature. Preheat the oven to 350º F. Move the bottom rack to the lowest position and place a second rack in the middle. Cut a parchment round for the bottom of the pan. The cheesecake bakes in a water bath at 335º F (the same temperature as the Classic Cheesecake recipe).

Making the Graham Cracker Crust

  • Grind the graham crackers in a food processor, or roll them in a large zip-top bag with a rolling pin, until finely crushed.
  • Combine the graham cracker crumbs, melted butter, and sugar in a medium bowl until the mixture holds together.
  • Place a parchment round in the bottom of the 9" pan to prevent sticking (optional). Pour in the crumb mixture and press it firmly and evenly into the bottom and partway up the sides with a flat-bottomed measuring cup.
  • Bake the crust for 5 minutes at 350º F, until you can smell it toasting, then let it cool.

Making the Cheesecake Filling

  • Place the room-temperature cream cheese in the bowl of a stand mixer with the paddle attachment. Beat on low until extra smooth and no longer lumpy.
  • Sprinkle in the granulated sugar while mixing on low until combined and smooth.
  • Add the room-temperature sour cream, heavy cream, honey, salt, and vanilla extract while mixing on low. Scrape the bowl to make sure all the cream cheese is incorporated.
  • Add the eggs one at a time on low speed, letting each fully combine before adding the next. Do not whip in air.
  • Pour the filling into the cooled graham cracker crust.

Baking the Cheesecake

  • Set up the water bath: place the 9" cheesecake pan inside a 10" cake pan (or wrap it in two layers of heavy-duty foil), then set it inside a larger roasting pan. Place everything on the lowest oven rack. Carefully pour hot water into the outer pan until it reaches about ¾ of the way up the sides of the cheesecake pan. (No-bath option: skip the bath and instead set a pan of hot water on the lowest rack with the cheesecake on the rack above it.)
  • Bake at 335º F for about 60 minutes without opening the oven door. The cheesecake should be set but still slightly jiggly in the center, with an internal temperature of 150º F.
  • If it has not reached 150º F or is still too jiggly in the center, keep baking in 10-minute increments until done.
  • Turn off the oven and crack the door open. Let the cheesecake cool inside for 60 more minutes to prevent cracking.
  • Move the cheesecake to the fridge to chill for at least 6 hours, ideally overnight. Wait until it is fully cool to cover it with plastic wrap so condensation does not drip onto the top.
  • Run a knife around the outside, or warm the outside of the pan with a kitchen torch, to release the cheesecake from the pan.

Making the Strawberry Topping

  • Combine the frozen (or fresh if using all fresh) strawberries with the water, salt, sugar, lemon juice, and zest in a large saucepan and bring to a simmer over medium-high heat, stirring occasionally.
  • Simmer 5 to 10 minutes until thickened and reduced by ⅓. Use a whisk to crush the berries into more of a sauce.
  • Stir the ClearJel (or cornstarch) together with the cool water in a separate cup to make a slurry.
  • Add the slurry to the simmering strawberries and cook 1 minute, stirring constantly, until thickened.
  • Remove from the heat and stir in the remaining strawberries. Let the topping cool completely (it thickens as it cools) before spooning it over the cheesecake.

Chocolate Curls

  • Chop the chocolate and place it in a medium microwave-safe bowl. Microwave 1 minute and stir.
  • Continue microwaving in short bursts until the chocolate is 75% melted, then stir off the heat until fully melted (a few unmelted bits are fine).
  • Spread the chocolate in a thin, even layer on a stone countertop (granite or quartz) or the back of a metal sheet pan.
  • Wait until the shine disappears and the surface goes matte (about 30 seconds).
  • Push a bench scraper into the chocolate at a 45º angle to form curls.
  • Lift the chilled cheesecake off the base onto a serving plate. Spoon the cooled strawberry topping over the top in an even layer, then pile the chocolate curls in the center right before serving.

Video

Notes

Ingredient notes
  • Use full-fat, block-style cream cheese (I like Philadelphia). Do not use the spreadable tub kind; the extra moisture changes the texture.
  • A scraped vanilla bean can replace the vanilla extract and tastes delicious here.
  • Use real chocolate with cocoa butter for the curls. Chocolate chips, candy melts, and bark will not curl.
Pan options
  • 9" cheesecake pan: standard, bake about 60 minutes to 150º F.
  • 8" pan: taller cheesecake, add 15 to 20 minutes, bake to 150º F in the center.
  • 10" pan: thinner cheesecake, check a little earlier.
  • Mini cheesecakes in a lined muffin tin: bake much faster, start checking early.
Make-ahead and storage
  • Bake the cheesecake 1 to 2 days ahead and keep chilled. Make the topping up to a week ahead and store separately (it freezes up to 6 months). Make the curls the day of.
  • Store leftovers covered in the fridge up to 5 days. For lots of leftovers, store the topping separately and add to slices.
  • Freeze the bare cheesecake (whole or sliced), wrapped in plastic then foil, up to 2 months. Thaw overnight in the fridge and add fresh topping. Do not freeze with the topping on.
Substitutions
  • ClearJel out? Use half as much cornstarch.
  • No water bath? Use the steam-pan method (pan of hot water on the rack below), or skip it and accept a little browning under the topping.
  • Fresh strawberries in peak season are ideal for the topping, but frozen work great off-season since they are frozen at peak ripeness.
Critical do-nots
  • Do not mix the filling on anything but low speed; whipped-in air causes puffing, sinking, and cracks.
  • Do not overbake; pull at 150º F with a slight wobble in the center.
  • Do not rush the cooldown; the hour in the turned-off oven is what prevents cracks.
  • Do not put hot or warm topping on the cheesecake; cool it completely first.

Nutrition

Serving: 1serving | Calories: 428kcal | Carbohydrates: 45g | Protein: 5g | Fat: 27g | Saturated Fat: 15g | Polyunsaturated Fat: 1g | Monounsaturated Fat: 7g | Trans Fat: 0.2g | Cholesterol: 92mg | Sodium: 295mg | Potassium: 181mg | Fiber: 2g | Sugar: 36g | Vitamin A: 795IU | Vitamin C: 17mg | Calcium: 68mg | Iron: 1mg
close up of oatmeal raisin m&m cookie

December 18, 2024 Cookies

Oatmeal Raisin M&M Cookie Recipe

This oatmeal M&M cookie recipe makes giant soft and chewy oatmeal cookies with tons of M&M candies and sweet raisins. These are the PERFECT Christmas cookies for the oatmeal cookie lover in your life.

I've never been a big fan of oatmeal raisin cookies and didn't think may other's loved them either but I was very mistaken! Many of my friends and family LOVE oatmeal raisin cookies and I never knew!

Then when my partner told me his FAVORITE Christmas cookie was his Mom's oatmeal raisin cookies with M&M's added in, I knew I had to see what all the fuss was about.

So I re-created the recipe that I got from his mom and they were pretty good but you know me, I had to make some tweaks! I felt like the original recipe was lacking a little moisture and flavor. So I added in a little butter, an extra egg yolk, a pinch of nutmeg, and some honey so that those centers stay SUPER soft and chewy.

I have to admit, I LOVE these oatmeal raisin cookies! The M&M's add a wonderful crunch when you bite into the soft cookie as well as some sweetness from the chocolate to balance out the raisins and spices.

Oatmeal Raisin M&M Cookie Recipe Ingredients

This oatmeal raisin M&M cookie recipe uses very simple ingredients. I had everything I needed on hand except the rolled oats but they are easy to get at the grocery store.

  • Old-fashioned oats are the best oats for baking. Their flat round shape holds up well during the baking process and gives you that perfect "chew" and texture. Avoid quick oats which will not hold up to the baking process. Steel-cut oats should also be avoided because they create a coarse and hard texture that isn't ideal for baking.
  • Baking powder and baking soda is needed for rise and for flavor.
  • Dark brown sugar is necessary for a chewy cookie because it naturally keeps the cookie softer for longer as well as adding tons of flavors. If you don't have dark brown sugar, you can use light brown sugar even white sugar with molasses as a substitute.
  • Cinnamon, anise, nutmeg, and vanilla extract are the perfect spices 
  • Vegetable shortening is key for the best oatmeal cookies. You can definitely use melted butter or even melted coconut oil but nothing will keep your cookies as moist and chewy as good ol' vegetable oil.
  • Butter is a great way to add more flavor without sacrificing structure and moisture.
  • Honey helps keep moisture in the cookie because its hygroscopic and draws moisture into the cookie.
  • Whole Wheat Flour gives a lot of flavor and texture to these cookies and help them keep their size.

How To Make Oatmeal Raisin M&M Cookies Step-by-Step

  1. Preheat your oven to 350ºF (148ºC).
  2. Spread your oats onto a baking sheet in an even layer and toast them in the oven for 15 minutes or until golden brown. Be sure to stir the oats every 5 minutes so they brown evenly. Toasting your oats first will add even more flavor and result in a chewier cookie.
  3. Line two cookie sheets with parchment paper or brush with cake goop.
  4. Set your oats aside to cool on a wire rack.
  5. Sift together your flour, baking soda, baking powder, salt, cinnamon, allspice, and nutmeg in a medium bowl and set it aside.Close up oatmeal raisin m&m cookie dry ingredients in the bowl of a stand mixer
  6. In the bowl of your stand mixer with the paddle attachment attached (or you can do this with a hand mixer or whisk), cream together the brown sugar, butter, and vegetable shortening, until it's light and fluffy.close up creamed butter and sugar in the bowl of a stand mixer
  7. Add in the vanilla extract and honey and stir to combine.
  8. While mixing on low, add the eggs in one at a time. Allow the first to fully mix in before adding the next. Mix until combined.close up of adding eggs to the oatmeal cookie mixture
  9. While mixing on low, add the flour mixture to the shortening mixture in three parts.
  10. Stir in the oats, raisins, and M&M's, and set the dough aside. close up of oatmeal raisin m&m cookie ingredients in the bowl of a stand mixer
  11. Measure the dough out into ⅓ cup scoops (about 100 grams of dough). You can also use a cookie scoop if you have one.cookie dough on a kitchen scale
  12. Place the dough onto your prepared baking sheets.
  13. Flatten the dough into a disk about 4" across. close up of cookies on a sheet pan
  14. Bake the cookies for 9 minutes or until they are very lightly browned. Be careful not to over-bake them so they keep their soft centers. Baking time may vary depending on your oven.close up of oatmeal raisin m&m cookies on a red plate

FAQ

Why are my cookies hard?

You are over-baking your cookies. The center of your cookies should still be soft and will set up after they cool. This is the secret to a soft and chewy cookie.

More Christmas Cookie Recipes You'll Love

close up of red velvet cookies stuffed with cream cheese filling
Red Velvet Cream Cheese Cookie
close up of linzer cookies on a floral plate
Linzer Cookies
black plate with silver chocolate crinkle cookies
Glitter Crinkle Cookies
gingerbread cookie
Gingerbread Men Cookies
close up of snickerdoodle cookies
Snickerdoodle Cookies
chocolate peppermint cookies
Chocolate Peppermint Cookies

Recipe

close up of oatmeal raisin m&m cookie
Print Recipe
No ratings yet

Oatmeal Raisin M&M cookies

Giant soft and chewy oatmeal raisin cookies that stay soft for days! Packed full of m&ms in every bite.
Prep Time10 minutes mins
Cook Time9 minutes mins
Total Time19 minutes mins
Course: Dessert
Cuisine: American
Servings: 12 cookies
Calories: 385kcal
Author: Liz Marek

Equipment

  • 1 large cookie scoop
  • 2 cookie sheet pans

Ingredients

  • 9 ounces old fashioned oats toasted
  • 9 ounces whole wheat flour
  • 3 ounces shortening
  • 2 ounces unsalted butter softened
  • 5 ounces white sugar
  • 4 ounces brown sugar
  • 5 ounces raisins
  • 1 teaspoon vanilla
  • 2 large eggs
  • 1 large egg yolk
  • 1 teaspoon salt
  • 1 teaspoon baking powder
  • 1 teaspoon baking soda
  • 2 teaspoons cinnamon
  • 1 teaspoon allspice
  • ¼ teaspoon nutmeg
US Customary - Metric

Instructions

  • Sift together your dry ingredients (flour, spices, baking powder, and baking soda) and set them aside.
  • Cream together the shortening and the butter until smooth.
  • While mixing on low, sprinkle in the white and brown sugar and mix on medium speed until light and fluffy.
  • Mix in the vanilla and the honey.
  • While mixing on low, add in the eggs, letting each one mix in fully before adding in the next.
  • While mixing on low, add in the dry ingredients and toasted oats, and mix until combined.
  • Mix in the raisins and M&Ms until blended in and then set the dough aside.
  • Scoop the dough immediate using a 3 ounce cookie scoop or divide into 12 equal balls.
  • Place the cookie dough on a prepared cookie sheet 2" inches apart. The dough does not spread very much.
  • Bake the cookies at 350ºF for 9 minutes then remove them from the oven and let them cool for five minutes.
  • Remove the cookies from the cookie sheet and cool fully on a wire rack.

Video

Notes

Toasting your rolled oats will result in a better texture and flavor of the cookie.
If you don't want to use honey you can use maple syrup or corn syrup.
Don't overbake your cookies. They should still be a little soft in the center when you pull them out. 
 

Nutrition

Serving: 1cookie | Calories: 385kcal | Carbohydrates: 61g | Protein: 7g | Fat: 14g | Saturated Fat: 5g | Polyunsaturated Fat: 3g | Monounsaturated Fat: 5g | Trans Fat: 1g | Cholesterol: 56mg | Sodium: 307mg | Potassium: 316mg | Fiber: 5g | Sugar: 21g | Vitamin A: 187IU | Vitamin C: 1mg | Calcium: 56mg | Iron: 2mg
close up of a slice of lemon tart with creme fraiche and a raspberry on a white plate

July 17, 2024 Easter

The Best Lemon Tart Recipe

This truly is the best lemon tart recipe (tarte au citron) you'll ever make! The tart crust (pâte sucrée) is buttery and crisp and the mock crème fraîche is super creamy with a hint of tang. The lemon custard filling is the perfect amount of tart and sweet and has the texture of Crème Brûlée. The secret ingredient is heavy cream resulting in the smoothest, creamiest, dreamiest lemon tart you've had outside of the South of France.

close up of a slice of lemon tart with creme fraiche and a raspberry on a white plate

To make a true classic lemon tart you begin by making the tart shell which is extremely simple. Just blend up everything in a food processor or stand mixer, let it chill for an hour, roll it out, then bake it in the tart pan. Baking the tart shell ahead of time (blind baking) will ensure the crust is nice and crisp before you add in the lemon custard filling for the final bake which only takes 20-30 minutes. 

You can top your lemon tart with some homemade crème fraîche or use the mock crème fraîche in this recipe and some freshly sliced lemons, strawberries, raspberries or even just a dusting of powdered sugar if you prefer. close up of lemon tart on a blue plate

I brought two of these lemon tarts to my neighbor's Bastille Day celebration and I was so happy when it received rave reviews! Truly one of the most impressive lemon desserts you can make.

Lemon Tart Ingredients

Overhead shot of lemon tart ingredients
  • Organic Lemons - I learned on a recent trip to the Amalfi coast that using organic lemons can greatly improve the taste of your recipes if you are using the zest. Some grocery store lemons have wax and sometimes left over pesticides or other sprays on the skin of the lemon that can not only taste bad but be harmful if eaten.
  • European Style Unsalted Butter - Buy the good stuff! Cheap butter contains more water and less butter solids resulting in a wet and sticky dough that can get tough instead of puffing up and becoming the crispy buttery crust you want. Go with unsalted so you can control the salt level in your crust.
  • Heavy Whipping Cream - The addition of cream takes the lemon custard filling to another level! Sometimes, it is also referred to as double cream. We will also use some to make the mock crème fraîche.
  • Yogurt - This adds a little tanginess to the whipped cream but is easier to make than standard crème fraîche.
  • Whole Eggs - We're using whole eggs to set our custard. If you can find some farm fresh eggs then your tart will have a beautiful yellow color. The darker the yolks, the more yellow your tart will be since the lemon juice doesn't really have a color.

Making the Tart Dough

  1. First, in the bowl of your stand mixer with the paddle attachment attached, mix the room temperature butter, salt, and powdered sugar until it's smooth.
  2. Next, add in the room-temperature eggs and lemon zest and mix until smooth. If your mixture looks curdled, don't worry, just keep mixing until it comes together.tart crust ingredients mixed together in a bowl
  3. Add in the flour in thirds until the mixture just begins to come together. Do not over-mix.close up of tart crust dough mixed together in a bowl
  4. Form the dough into a flat disk and then wrap the dough in some plastic wrap and refrigerate it for one hour. If you skip this step your tart dough will sink down the sides of the pan during baking.tart dough in a rectangle shape covered in plastic wrap

Preparing the Tart Shells

  1. Lightly dust the surface of your workbench and your rolling pin with flour. 
  2. Roll the tart dough out to ⅛" thick, moving the dough every 1-2 rolls to make sure it's not stuck to the surface of the workbench.tart dough rolled out on a kitchen counter
  3. Carefully lift the dough up with your hands or roll it gently onto your rolling pin and place it inside your 9" tart tin (make sure it is the kind with a removable bottom). tart dough placed into a tart tin with leftover dough draped over the sides
  4. Use your fingers to press the dough into the edges of the tart pan. These ridges help keep the tart dough from falling down the sides of the tart tin while baking.
  5. Trim off the excess dough with a knife and set it aside to use in another tart or you can freeze the dough to use later.tart dough in a tart pan with leftovers trimmed off
  6. Place your tart shell in the freezer for 30 minutes.

How To Blind Bake Your Tart Shell

Blind baking ensures the tart shell will be crisp and buttery instead of soggy which can happen when baking desserts with very liquidy fillings.

  1. Preheat the oven to 350ºF (176ºC)
  2. Crumple up a piece of parchment paper (not wax paper) and place it into the tart shell.
  3. Fill the parchment up with pie weights or dry beans. This will hold the shell down and keep it from puffing up during blind baking.close up of pie weights in a tart shell with parchment paper
  4. Place the tart shell on a sheet pan and bake it for 25 minutes.
  5. After 25 minutes, remove the parchment paper will pie weights and continue baking for 10 more minutes. If the top edge of the tart starts to get too brown you can place a pie crust protector on top.tart shells on baking sheets halfway through blind baking
  6. Remove the tart shell from the oven and lightly egg wash the inside of the crust. This helps to seal the shell from the moisture of the liquid filling. Continue baking for 5 more minutes or until the interior is an even golden brown.egg washing tart crust
  7. Set the tart aside to cool on a wire rack while you make the filling.close up of blind baked lemon tart

How to Make the Lemon Tart Filling

  1. For best results, use fresh lemon juice, not bottled. Zest and juice your lemons, taking care to make sure no lemon seeds are in the juice.
  2. Combine the heavy cream, eggs, and sugar in a large measuring cup and blend until smooth using an immersion blender (or you can use a regular blender if needed) until its smooth. Lemon tart filling in a glass bowl
  3. Slowly stream in the lemon juice and lemon zest while blending until smooth. I used an immersion blender for this but you could use a regular blender.blended lemon tart filling in a clear bowl
  4. Pour the mixture into a heavy-bottomed medium-sized sauce pan and heat over medium heat while whisking constantly to prevent scalding. Heat the mixture to 120ºF (48ºC) then remove it from the heat. Heating the mixture helps dissolve the sugar and helps the custard set faster in the oven.pouring lemon tart filling into a saucepan
  5. Pour the filling through a fine sieve back into the measuring cup and allow it to rest for about 15 minutes so that any bubbles and foam can rise to the top. Scoop the foam off from the top before pouring the filling into the tart shell.

Assembling the Lemon Tart

  1. Reduce the oven heat to 250ºF.
  2. Place the lemon tart shell onto a sheet pan and into the middle of the oven on a sheet pan.
  3. Carefully pour the lemon curd filling into the tart shell until it reaches the top edge of the tart shell. It's much easier to do this in the oven than try to move the full tart shell into the oven after filling it.pouring lemon filling into blind baked tart shell in the oven
  4. Bake the tart for 25-30 minutes or until the center of the tart has a very slight wiggle when you tap the edge of the tart tin but the edges do not move. Make sure you do not over-bake your tart or it will begin to curdle and be very dry instead of having that perfect creamy texture.
  5. Remove the lemon tart from the oven and place it into the fridge to chill for 3-4 hours before topping with mock crème fraîche and fresh fruit if desired.

Making the Mock Crème Fraîche

  1. Place the whipped cream and powdered sugar into the bowl of your stand mixer with the whisk attachment attached.
  2. Whisk on medium speed until soft peaks form.whipped cream at soft peaks
  3. Add in your yogurt (I used lemon yogurt for extra flavor) and mix until firm but soft peaks form.whipped cream and yogurt in a mixing bowl with whisk
  4. The cream should hold it's shape but don't over-do the mixing or it will look curdled.mock creme fraiche
  5. Serve the lemon tart with freshly piped cream, fresh berries, and enjoy!slice of lemon tart with creme fraiche and fresh raspberries

FAQ

How do I know when a lemon tart is done?

The tart shells will be medium brown in color. A white or light brown shell indicates that it is underbaked. Allowing your tart shell to get darker in color will bring out all of the caramelization of the butter and sugar together which is what gives your tart shell flavor!

Chef Christophe Rull recommends checking on your tart shell's progress every 10 minutes while baking. Depending on the oven you are using, the back of the oven may distribute more heat than the front. For instance, if you notice that the shells on the back of the oven are darker in color than the tarts on the front, rotate the baking sheet to distribute more heat to the underbaked shells.

What does pâte sucrée mean?

Pâte sucrée is French for "sugary dough." 

Why did my lemon tart crack?

It can be either from the oven being too hot or for over-baking. It's best to bake a custard-style lemon tart at a lower temperature for longer to avoid cracking and to stop baking when the center is still jiggly and the edges of the tart are set.

How long do lemon tart last in the fridge? 

Lemon tarts will stay fresh for 1-2 days if you store them in an airtight container in the refrigerator. 

  What is the difference between a lemon tart and a lemon meringue pie? 

The biggest difference between lemon tarts and lemon meringue pies is that lemon meringue pies will be topped with a mountain of meringue. Lemon meringue pie topping is made using eggs, cream of tartar, sugar, and vanilla extract that is whipped on high speed to produce fluffy, creamy peaks of light and creamy meringue. 

  How do I know when a lemon tart is done? 

The tart shells will be medium brown in color. A white or light brown shell indicates that it is underbaked. Allowing your tart shell to get darker in color will bring out all of the caramelization of the butter and sugar together which is what gives your tart shell flavor!

More Recipes You'll Love

Fresh fruit tart

Pâte sucrée (tart dough recipe)

Lemon curd

Lemon shortbread cookies

Recipe

close up of a slice of lemon tart with creme fraiche and a raspberry on a white plate
Print Recipe
4.80 from 5 votes

The Best Lemon Tart Recipe

This amazing lemon tart has a crisp buttery crust, creamy lemon filling that's not too sweet and not too sour and is topped with a super easy mock creme fraiche.
Prep Time10 minutes mins
Cook Time2 hours hrs
Refrigeration1 hour hr
Total Time3 hours hrs 10 minutes mins
Course: Dessert
Cuisine: French
Servings: 8 servings
Calories: 732kcal
Author: Liz Marek

Equipment

  • 9" Tart Pan
  • 1 Lemon Zester
  • 1 Lemon Juicer

Ingredients

Pâte Sucrée

  • 8 ounces unsalted butter
  • 4 ounces powdered sugar
  • ½ teaspoon salt
  • 1 large egg
  • 12 ounces Flour all purpose
  • 1 teaspoon lemon zest

Lemon Tart Filling

  • 5 ounces lemon juice freshly squeezed
  • 1 Tablespoon lemon zest
  • 7 large eggs
  • 8 ounces sugar
  • 6 ounces heavy cream

Mock Crème Fraîche

  • 4 ounces heavy cream
  • 6 ounces yogurt
US Customary - Metric

Instructions

Tart Shell

  • First, in the bowl of your stand mixer, mix the room temperature butter and powdered sugar with the paddle attachment. Mix until it is smooth.
  • Next, add in the eggs, and lemon zest and mix until combined.
  • Mix in the salt and and flour until just combined.
  • Wrap the dough in plastic wrap and press into a disc shape. Refrigerate for 1 hour.
  • Divide the tart dough in half (the other half can be used for another tart or be frozen for later use).
  • Roll the tart dough out to ⅛" thick
  • Place the dough into the 9" tart pan and press firmly against the bottom and sides.
  • Trim off the excess dough and freeze the tart for 30 minutes.
  • Place some crumpled up parchment paper and pie weights into the tart pan.
  • Place the tart pan on a sheet pan and bake in the oven at 350ºF for 25 minutes.
  • Remove the parchment and pie weights and continue baking for 10 minutes.
  • Brush the tart with egg wash and continue baking for 7-8 minutes or until golden brown.
  • Remove the tart pan from the oven to cool and reduce the temperature to 280ºF

How to Make the Lemon Filling

  • Zest and juice your lemons, being sure to remove any seeds and set aside.
  • Place your eggs, sugar, cream, and zest into a large container and blend using an immersion blender (or regular blender) until smooth.
  • Slowly add in the lemon juice while blending and mix until smooth.
  • Add the mixture to a medium sized saucepan over medium heat and warm the mixture to 110-120ºF then remove it from the heat and set it aside for 15 minutes.
  • Skim any bubbles that arise to the surface before filling your tart shells.

Assembling the Lemon Tart

  • Place your tart shell (still in the pan) onto the sheet pan in the oven in the middle of the rack.
  • Carefully pour the lemon filling into the tart pan up to the brim of the shell.
  • Bake the tart for 25-30 minutes or until the center is still wobbly but the outer edges of the tart are set.
  • Remove the tart from the oven and refrigerate for 3-4 hours before decorating with fresh fruit and creme fraiche.

Mock Crème Fraîche Instructions

  • Whip your heavy whipping cream in the bowl of your stand mixer until soft peaks form.
  • Add in the yogurt
  • Continue mixing on low until firm but soft peaks form and it can hold it's shape.

Notes

Important Things To Note Before You Start
  1. Practice Mise en Place (everything in its place). Measure out your ingredients ahead of time. Then, have them ready before you start. This will reduce the chances of accidentally leaving something out.
  2. Use a scale to weigh your ingredients (including liquids) unless otherwise instructed (Tablespoons, teaspoons, pinch, etc). Scaled ingredients are much more accurate than using cups and ultimately help ensure the success of your recipe. 
  3. Wash your lemons well so no wax or residue is left on the lemon zest.

Nutrition

Serving: 1serving | Calories: 732kcal | Carbohydrates: 79g | Protein: 13g | Fat: 42g | Saturated Fat: 25g | Polyunsaturated Fat: 3g | Monounsaturated Fat: 11g | Trans Fat: 1g | Cholesterol: 290mg | Sodium: 240mg | Potassium: 209mg | Fiber: 1g | Sugar: 45g | Vitamin A: 1522IU | Vitamin C: 8mg | Calcium: 93mg | Iron: 3mg
close up of windowpane test being performed on dough

January 2, 2024 Culinary Techniques

Windowpane Test For Bread

A windowpane test is an important step to making sure your dough is ready to use. We test by taking a small piece of dough and gently stretching it between your fingers to the point that you can see light shining through it. This is where it gets the windowpane name. This is a simple test we perform to see if our dough has developed enough gluten through mixing and is ready to bake or needs to be mixed longer.

What's In This Blog Post

  • How To Do The Windowpane Test
  • Why Does The Windowpane Test Work
  • What type of flour is best for making dough?
  • When Should You Do The Windowpane Test

If you've somehow found this post and don't know what a windowpane test is or maybe you just heard the word before but didn't understand its significance, let me explain. 

The windowpane test is especially helpful if you are new to making bread dough, pizza dough, or any kind of rich dough with yeast and needs a lot of mixing and you just don't know when your bread recipes are done mixing. Terms like "mix until smooth" or "mix until the dough bounces back" are very vague.

close up of a smooth ball of dough on a workbench

When I was first learning to bake bread in my early 20's, I had no idea what I was looking for and often wondered WHY my bread was not rising as expected. It wasn't until I attended pastry school in 2010 that this very short demonstration on the best ways to check for gluten development changed my whole outlook on baking bread. 

Now I never have under-mixed dough.

How To Do The Windowpane Test

  1. After your dough has been mixing in your stand mixer (or if you're mixing by hand) and the rough texture of the bread begins to smooth out and "cleans" the bowl, that is a good time to test your dough. close up of dough in a mixing bowl
  2. Take a piece of dough about the size of a golf ball and press it flat to about ¼" thick. Let it rest on the workbench for 5 minutes which allows the gluten strands to relax and will give you a more accurate representation of how much gluten is developed. 
  3. Begin slowly stretching the dough with your fingers. The center will get thinner and thinner until you form a thin membrane. If you can stretch the dough to the point you can see light shining through without breakage, your dough is likely ready to bulk ferment (your first rise).close up of hands pulling dough very thinly
  4. If your dough tears, feels sticky or rough, then you need to mix your dough for longer until you have enough gluten development to perform the window pane test successfully. Proper gluten development can take anywhere from 15-30 minutes of mixing time so be patient.

Why Does The Windowpane Test Work

Gluten changes as it's handled. The dough becomes smoother, stronger, less wet and less lumpy as more gluten strands are developed through kneading.

What you are seeing when you look at a smooth ball of dough are strands of protein (glutenin and gliadin) linked together in a very fine web along with yeast, water, and small gas bubbles released from the yeast. The more strands you have, the more small gas bubbles are trapped during the proofing process. These gas bubbles heat up during baking and improve the overall rise and volume of the dough.

What type of flour is best for making dough?

Bread flour, all purpose flour or 00 flour works best for making doughs that needs a lot of gluten development because it contains more protein that can produce stronger gluten strands about 12.7% rather than all-purpose flour which is at about 11%. Double 00 flour has between 12% and 13% protein content which is pretty high and most often used for pizza dough or pasta. For context, pastry and cake flours have less protein, about 7% to 10%, respectively.

When gluten is underdeveloped and weak, it cannot trap air, resulting in a flat or dense loaf of bread. 

When Should You Do The Windowpane Test

You should perform a windowpane test whenever you are unsure of the gluten development in your dough. This test is especially helpful to new bakers or when you are working with a new recipe that you're not sure what it should look and feel like. 

Sometimes when you use whole wheat flour or other types of gritty flours it can be hard to tell when your dough has the right elasticity to handle these doughs carefully.

close up of woman holding dough in her hands to do the windowpane test

Breads that are enriched with eggs and butter such as brioche, panettone, or fast bread are especially difficult to develop gluten because of the added fat. These breads are always good for performing a windowpane test. 

You do not need to perform a windowpane test if you are making a bread that will be resting for a long time such as sourdough or overnight focaccia. The reason for this is that gluten can also develop with time, not just kneading. So a dough that is undeveloped on day one can be very developed on day two. 

Keep in mind that yeast will break down gluten as it ferments. So you don't want to leave your dough to proof for too long or your bread could collapse during baking. If you think you may have over-proofed your dough, perform the windowpane test after fermentation and shaping to see if it still holds together.

close up of creamsicle cake

June 8, 2023 Memorial Day

Orange Creamsicle Cake

Everyone loves orange desserts and Orange Creamsicle cake is a wonderful addition to all your summer parties! A vanilla orange cake that is bursting with orange flavor and topped with a fluffy mascarpone or whipped cream frosting that no one will be able to resist.slice of orange cake

The flavor combination of tart orange sherbet and creamy vanilla ice cream is classic and so nostalgic! A combination of tart, sweet, and tangy flavors creates the perfect balance. The ingredients in this cake recreate that childhood memory in a cake that won't melt in your hand! It is the perfect summer dessert. 

[feast_advanced_jump_to]

Ingredients

Orange juice concentrate: This ingredient is perfect for getting the most orange flavor into the cake. It is orange juice that has had a lot of the water removed, so the orange flavor is intense. This is why you add cold water to it when you make a pitcher of orange juice from concentrate. It adds a lot of flavor without too much liquid. You will need to cook your orange juice down if you are using fresh, to remove some of the water. 

Citric Acid: This is a weak, naturally occurring acid found in citrus fruits and is what you taste on the outside of sour candies. A little bit adds some tartness, but you don't want to add too much as it will throw off the chemical balance of the cake. 

Orange zest: Orange juice adds a lot of flavor, but the zest is where the fragrant uniquely orange flavor and smell come from. Adding orange zest gives the cake another layer of flavor and has the whole house smelling like an orange grove

Cake Flour: This type of flour has a protein level of 9% or less, so look for a flour that specifies protein content or ask your local flour supply. If you're located in another country, you can find cake flour but it might need to be ordered online. In the UK, look for Shipton mills cake and pastry flour. 

Step-by-Step Instructions

I love making sheet cakes because they don't require a ton of complicated decorating. Mascarpone frosting or stabilized whipped cream both go really well with this cake, it all depends on your preference. Top with some fresh orange slices and you're ready to serve!

Making Orange Cake

  1. Preheat your oven to 335℉ and make sure all your ingredients are at room temperature (milk, eggs, orange juice, butter). 
  2. Prepare a standard rectangle 9-inch x 13-inch sheet cake pan with cake goop on the sides and parchment paper on the bottom. This recipe will also work in two 8" round cake pans.
  3. In the bowl of your stand mixer, combine together the cake flour, sugar, salt, baking powder, and baking soda. Whisk and set aside.dry ingredients in a glass bowl
  4. Measure the milk, orange juice concentrate, oil, eggs, extracts, and zest in a small bowl and whisk to combine. pouring milk into a bowl of orange concentrate
  5. Add the room-temperature butter to the dry ingredients in the stand mixer with the paddle attachment. Mix on low speed until the mixture resembles coarse sand.hand holding mixed dry ingredients
  6. Add in ⅓ of the wet ingredients mixture, turn it up to medium speed, and mix for one full minute. The batter will look lighter in color and fluffier. Make sure to scrape the bowl.hand pouring cup of liquid into stand mixer bowl
  7. Add in the drops of food color and citric acid and mix until combined.hand holding food coloring bottle
  8. Slowly pour in the remaining liquid and mix on low speed until just combined. 
  9. Pour the cake batter into the prepared pan and bake it for 35-40 minutes until a toothpick comes out clean. pouring cake batter into a pan
  10. Cool the cake for 10 minutes in the pan, and then flip it out onto a cooling rack. You can also leave it in the pan and serve it from there.hands lifting a cake out of pan with parchment paper
  11. Once the cake has cooled completely, place it on a serving tray.placing a cake on a cooling rack

Making Mascarpone Frosting

  1. Mascarpone frosting is the perfect pairing, but stabilized whipped cream is a great, light combination as well.
  2. In a medium bowl or the bowl of a stand mixer add the mascarpone cheese and cream cheese and mix with the whisk attachment or an electric mixer. 
  3. Once the chunks have smoothed out, add the vanilla and powdered sugar and blend until combined. 
  4. In a separate bowl, whip the cold heavy cream to medium-stiff peaks. pouring whipped cream into a bowl
  5. Fold about 2 cups of whipped cream into the mascarpone mixture. Repeat with the remaining cream until it's all incorporated.

Decorating the Cake

  1. Frost the top (and sides, optional) of the cool cake with a plentiful amount of fluffy mascarpone frosting. covering a rectangle orange cake with white frosting
  2. Slice fresh oranges into wedges and place them on top of the cake in a geometric pattern. slicing oranges with a knife
  3. Pipe some shells of frosting in a pattern on top of the cake.
  4. Store this cake wrapped in plastic wrap or in an airtight container in the refrigerator. Because of the mascarpone cheese frosting, the frosted cake needs to be refrigerated if you are not serving it within 2 hours. The whipped topping can melt at warmer temperatures, so take note if it is exposed to sunlight.orange creamsicle cake

FAQ

Can I use fresh orange juice instead of concentrate?

Yes, if you use fresh orange juice straight, it will have a lighter orange flavor than the concentrate. Or, you can cook the orange juice down to remove some water so the flavor is more concentrated. 

What if I can't find Mascarpone cheese? 

You can substitute mascarpone cheese with some similar options, however, the taste will be slightly different. You can sub cream cheese, creme fraiche, ricotta cheese, blended cottage cheese, or full-fat sour cream. 

Can I use this cake as a layer cake?  

Yes, this cake is very stable. Using the reverse creaming method creates a great cake to layer and stack. You can bake it in cake rounds or squares, it would be a really pretty wedding cake! 

Can I make this an orange poke cake? 

Absolutely! Use the end of a wooden spoon and poke holes in the baked cake while it is still in the pan. Then pour a prepared box of orange jello over the cake and let it soak in the fridge until it sets up.

Related Recipes

Lemon blueberry cake

Strawberry crunch cake

Hawaiian dole whip

Lemon Pound Cake

Recipe

slice of orange cake
Print Recipe
4.91 from 21 votes

Orange Creamsicle Cake

This orange creamsicle cake tastes just like the frozen ice cream bars I used to enjoy when I was a kid. The secret is using real orange juice concentrate, orange zest and a super creamy frosting. This orange creamsicle cake recipe will be a huge hit, having you humming the ice cream truck song all day long. 
Prep Time15 minutes mins
Cook Time45 minutes mins
Chilling Time1 hour hr
Total Time2 hours hrs
Course: Dessert
Cuisine: American
Servings: 8 cups
Calories: 1097kcal
Author: Liz Marek

Equipment

  • 1 9" x 13" cake pan

Ingredients

Orange Cake Ingredients

  • 10 ounces cake flour
  • 10 ounces granulated sugar
  • ½ teaspoon salt
  • 1 ½ teaspoons baking powder
  • 1 teaspoon baking soda
  • ¼ teaspoon citric acid optional
  • 6 ounces unsalted butter softened
  • 7 ounces orange juice concentrate defrosted at room temperature
  • 4 ounces milk warmed
  • 4 large eggs room temperature
  • 2 teaspoons orange extract
  • 1 zest orange
  • 2 ounces vegetable oil
  • 1-2 drops yellow food coloring
  • 1 drop orange food coloring

Mascarpone Frosting

  • 16 ounces mascarpone cheese softened
  • 2 teaspoons vanilla extract
  • 1 ½ cups powdered sugar
  • 2 ½ cups heavy whipping cream
US Customary - Metric

Instructions

Making Orange Cake

  • Preheat your oven to 335℉ and make sure all your ingredients are at room temperature (milk, eggs, orange juice, butter). 
  • Prepare a standard rectangle 9-inch x 13-inch sheet cake pan with cake goop on the sides and parchment paper on the bottom. This recipe will also work in two 8" round cake pans.
  • In the bowl of your stand mixer, combine together the cake flour, sugar, salt, baking powder, and baking soda. Whisk and set aside.
  • Measure the milk, orange juice concentrate, oil, eggs, extracts, and zest in a small bowl and whisk to combine. 
  • Add the room-temperature butter to the dry ingredients in the stand mixer with the paddle attachment. Mix on low speed until the mixture resembles coarse sand.
  • Add in ⅓ of the wet ingredients mixture, turn it up to medium speed, and mix for one full minute. The batter will look lighter in color and fluffier. Make sure to scrape the bowl.
  • Add in the drops of food color and citric acid and mix until combined.
  • Slowly pour in the remaining liquid and mix on low speed until just combined. 
  • Pour the cake batter into the prepared pan and bake it for 35-40 minutes until a toothpick comes out clean. 
  • Cool the cake for 10 minutes in the pan, and then flip it out onto a cooling rack. You can also leave it in the pan and serve it from there.
  • Once the cake has cooled completely, place it on a serving tray.

Making Mascarpone Frosting

  • In a medium bowl or the bowl of a stand mixer add the mascarpone cheese and cream cheese and mix with the whisk attachment or an electric mixer. 
  • Once the chunks have smoothed out, add the vanilla and powdered sugar and blend until combined. 
  • In a separate bowl, whip the cold heavy cream to medium-stiff peaks. 
  • Fold about 2 cups of whipped cream into the mascarpone mixture. Repeat with the remaining cream until it's all incorporated.

Decorating the Cake

  • Frost the top (and sides, optional) of the cool cake with a plentiful amount of fluffy mascarpone frosting. 
  • Slice fresh oranges into wedges and place them on top of the cake in a geometric pattern. 
  • Pipe some shells of frosting in a pattern on top of the cake.
  • Store this cake wrapped in plastic wrap or in an airtight container in the refrigerator. Because of the mascarpone cheese frosting, the frosted cake needs to be refrigerated if you are not serving it within 2 hours. The whipped topping can melt at warmer temperatures, so take note if it is exposed to sunlight.

Notes

  1. Weigh your ingredients to avoid cake failure. Using a kitchen scale for baking is super easy and gives you the best results every single time. 
  2. Make sure all your cold ingredients are room temperature or slightly warm (butter, milk, eggs, to create a cohesive batter. Curdled batter causes cakes to collapse.
  3. No buttermilk? You can make your own buttermilk 
  4. To prevent blueberries from sinking, I wash them (to get them wet) then roll them in flour. Then I add them to the batter halfway through baking
  5. Do not fall for the "just add cornstarch to regular flour" trick. It does not work for this recipe. Your cake will look and taste like cornbread. If you can't find cake flour, use pastry flour which isn't quite as soft as cake flour but it's better than all-purpose flour. 
  6. Make your own pan release (cake goop!) The best pan release ever! 
  7. If you're in the UK search for Shipton mills cake and pastry flour. If you're in another part of the country, search for low protein cake flour.
  8. Need more help with making your first cake? Check out my how to decorate your first cake blog post. 
  9. Mascarpone frosting is the perfect pairing, but stabilized whipped cream is a great, light combination as well.
  10. In a medium bowl or the bowl of a stand mixer add the mascarpone cheese and cream cheese and mix with the whisk attachment or an electric mixer. 
  11.  

Nutrition

Serving: 1cup | Calories: 1097kcal | Carbohydrates: 97g | Protein: 15g | Fat: 73g | Saturated Fat: 45g | Polyunsaturated Fat: 3g | Monounsaturated Fat: 12g | Trans Fat: 1g | Cholesterol: 281mg | Sodium: 381mg | Potassium: 402mg | Fiber: 1g | Sugar: 68g | Vitamin A: 2671IU | Vitamin C: 36mg | Calcium: 213mg | Iron: 1mg
closeup of cake slice on a white plate

June 6, 2023 Blog

Eggless Chocolate Cake

This moist eggless chocolate cake recipe is so good you won't even notice it's eggless! This one-bowl recipe uses basic ingredients and is so easy to make. Pair it with an eggless, flour-based, ermine frosting or chocolate ganache. closeup of cake slice on a white plate

To find the best egg replacer, I decided to use my easy chocolate cake recipe as the base recipe and tested out different types of egg replacers to see which one made the best-tasting eggless cake. Keep in mind that if you decide to do your own testing with a different recipe, you might find that a different egg replacer works better for you.

[feast_advanced_jump_to]

Ingredientseggless ingredients

Applesauce: The most important ingredient in this recipe is of course the unsweetened applesauce, which is what we are using in place of eggs but be sure to read the full blog post for other egg substitutes that you might want to try. 

Coffee: This enhances the chocolate flavor of the cake, and it does NOT taste like coffee. If you don't want to use coffee though, you can just use hot water. 

Cocoa powder: I'm using Hershey's unsweetened cocoa powder but you can use any kind you like.

Step-by-step instructions

This is a very easy, one-bowl cake recipe and is a great recipe for anyone who likes chocolate cake. You just add the wet ingredients to the dry ingredients, mix for two minutes, add the coffee and it's done! Ermine is my favorite frosting because it's light, fluffy, and not too sweet. Other good options for eggless frosting are my traditional American buttercream, stabilized whipped cream, or ganache chocolate frosting.

Making the cake

  1. Preheat your oven to 350ºF and prepare two 8"x2" cake pans with cake goop or another preferred type of pan release and parchment paper. spreading cake goop on a cake pan with a pastry brush
  2. Combine the flour, sugar, cocoa powder, baking powder, baking soda, and salt in the bowl of your stand mixer with the paddle attachment. Mix on low for a few seconds until combined. You can also do this with a hand mixer and a large bowl if you prefer.
  3. Add in the applesauce, buttermilk, oil, and vanilla, and mix on medium speed for 2 minutes. Scrape the bowl. adding applesauce to chocolate cake batter in a mixing bowl
  4. Turn the mixer down to low and add in the hot coffee and mix until just it's just combined. adding coffee to chocolate cake mixture
  5. Pour the batter into your prepared cake pans.pouring eggless cake batter into cake pan
  6. Bake the cakes in your preheated oven for 40-45 minutes until a toothpick inserted into the center of the cake comes out clean.
  7. Let the cake cool in the pan for about 15 minutes and then flip them out to cool on a wire rack. I wrap my cakes in plastic wrap and freeze them for at least 30 minutes to lock in moisture.eggless chocolate cake

Making ermine frosting

  1. Whisk together your flour and sugar in a medium saucepan over medium heat. Cook for about 2 minutes to toast the flour. Be careful not to burn it! flour and sugar in a large saucepan
  2. Slowly add in your milk, whisk to combine, and bring your heat to medium-high.adding milk to the sugar and flour mixture in a saucepan 
  3. Bring the mixture to a simmer, whisk continuously until it is thick and pudding-like. Once it's simmering, cook for one minute more to make sure the flour taste is cooked out. ermine frosting base in a large saucepan with a metal whisk
  4. (Optional) If your mixture has any lumps, place a colander on top of a heat-proof bowl and push your mixture through and into the bowl. Transfer the mixture into a heat-proof bowl or a shallow cake pan if you want it to cool down faster. straining ermine frosting base
  5. Cover the mixture with plastic wrap so that it is touching the surface without any air bubbles in between, this will prevent a skin from forming on the top of the mixture. Let cool in the refrigerator for a few hours until it's completely cooled down. Or you can spread it onto a sheet pan and freeze it for 30 minutes to cool faster. If it's even a little warm it will melt your butter later.covering ermine frosting
  6. Add your softened butter to the bowl of your stand mixer and whisk on high until very light and fluffy, about 2-3 minutes. closeup of whipped butter in a mixing bowl
  7. Place the cooled flour mixture into a piping bag and slowly pipe it into your butter as you whip at medium speed. Incorporating the base slowly ensures a smooth buttercream. piping bag with ermine base above mixing bowl
  8. Add in your vanilla and salt, then mix until everything is light and creamy. If you have a lot of bubbles you can mix your frosting on low with the paddle attachment to make it smoother. Ermine frosting sets up after a few hours, so you'll want to use it immediately. It does not freeze or store well.

Assembling the cake

If you want more information on how to frost and fill your cake the first time, you can check out my tutorial on how to decorate your first cake.how to make a cake tutorial

  1. Trim the domes off your cooled cake so it's nice and level.knife cutting through an eggless chocolate cake layer
  2. Add a nice thick layer of your ermine frosting on top and make it even with your offset spatula.adding ermine frosting on top of the cake layer
  3. Add your second layer of cake on top.adding the second layer of cake to the frosting layer
  4. Frost the entire cake in a thin layer of ermine frosting and then refrigerate it for 15 minutes to set the crumb coat.covering the cake in a thin layer of buttercream
  5. Apply your final coat of buttercream and smooth out the edges.smoothing out the frosting with an offset spatula
  6. Use a 1M piping tip in a piping bag to add a rope border around the top of the cake and finish with some fun sprinkles. piping a rope border on top of the cake
  7. This cake can be stored at room temperature for up to 6 hours, then cover the cut part in plastic wrap and refrigerate. closeup of cake with white frosting and colorful sprinkles

Egg Replacements

Let's dive into some of my most successful experiments on my journey to find the best egg replacer.

What do eggs do?

Eggs have two jobs. To bind the ingredients together and create a structure that traps air and helps the cake rise. Egg yolks can also add flavor and moisture to a cake. So if we remove the eggs, we need to find something else that can do that job.

Applesauce

A common replacement for eggs is ¼ cup unsweetened applesauce per egg. The pectin in the applesauce acts as a binder much like an egg does while also adding moisture like an egg would. unsweetened applesauce recipe

This makes the best, rich chocolate flavor and texture in my opinion. The applesauce cake layer had a great taste, texture, and only a slight divot at the top of the cake.eggless cake cut in half

Banana

My second test was with an unripe banana. I decided to go with a green banana since it's starchier and has more pectin than when it's ripe and the starches turn to sugar. The unripe banana actually worked really well but you could definitely taste the banana. Not a bad flavor at all but if you don't like bananas, it might not be the best choice. chocolate cake cut in half

Pectin

So this got me thinking, maybe I could try STRAIGHT PECTIN. Why not right? I combined 1 Tablespoon of powdered pectin with 3 Tablespoons of water per egg.

The pectin didn't work QUITE as well as I had hoped. It fell a bit and was a bit crumbly but maybe after some tweaking of amounts of liquid and fat, it could work. The best part was that it didn't leave behind any aftertaste so it's definitely worth more experimenting.cake cut in half

Ground flax

Ground flax is another popular replacement. When combined with water and given time to rest, the flax makes a gluey substance that resembles the structure of an egg as well as some fat. I found that the flax was not quite strong enough to support the cake and it left behind an odd sort of flavor and texture. Flax might be better in cookies or muffins in my opinion. 

Yogurt/buttermilk

Another option is using Greek yogurt or buttermilk as a replacement. I actually thought the rise on this worked out really well. The cake was very moist and fudgy. The center fell a TINY bit but I think if I reduced the liquid a bit then it would be perfect so yogurt is another great option.chocolate cake sliced in half

Tofu

The last thing we tested was blended tofu which worked surprisingly well but was a little dry and crumbly. You could add more fat to the recipe to account for the dryness. Maybe even half tofu, half applesauce.chocolate cake sliced in half

Commercial egg replacer

I also tested just a traditional egg replacer and it did pretty well. It was a little dry but had good structure and is a really good option if you want to have a pretty good egg replacer on your shelf to use at any time. I used the Bobs Red Mill Commercial egg replacer but there are tons of brands out there. Just look for them in the baking aisle or buy them online.cake sliced in half

The best egg replacers

Now that you know the results of my tests, you can do some of your own testing with your favorite recipe. Let me know if you find something that works for you!

The amounts listed below are equal to one egg

  1. Commercial egg replacer - 1 Tablespoon replacer + 2 Tablespoons water
  2. ¼ cup unsweetened applesauce + ½ teaspoon extra baking powder
  3. ½ large ripe banana mashed + ½ teaspoon extra baking powder
  4. 1T pectin powder + 3T water
  5. 1 Tablespoon Ground Flax + 3 Tablespoons Water. Let sit for 5 minutes before using.
  6. 4 Tablespoons Soy Yogurt
  7. ¼ cup silken tofu blended (may need to add 2 ounces more oil, yogurt, or butter to the recipe for extra moisture)

FAQ

Can this cake be made into an eggless vanilla cake?

This eggless cake recipe is formulated to be a chocolate cake, but we're working on testing a vanilla option. I would recommend starting with a good vanilla cake recipe that has AP flour and the traditional mixing method for the best results

Can I bake this cake in a different-sized cake pan?

Yes, you can use the cake batter and frosting calculator below to calculate the exact amounts.

Can I color the ermine frosting?

Yes, you can with regular gel food coloring but it works best with lighter colors.

Related Recipes

Texas Sheet Cake

Chocolate WASC

Cream cheese frosting

The Best chocolate cake recipe

Recipe

closeup of cake slice on a white plate
Print Recipe
4.87 from 22 votes

Eggless Chocolate Cake Recipe

How to make the best eggless chocolate cake recipe with ermine frosting. Tastes so good, you won't even notice it's eggless!
Prep Time10 minutes mins
Cook Time40 minutes mins
Course: Dessert
Cuisine: American
Servings: 6 cups
Calories: 1694kcal
Author: Liz Marek

Ingredients

Eggless Chocolate Cake

  • 12 ounces all purpose flour
  • 16 ounces granulated sugar
  • 4.5 ounces natural cocoa powder like Hershey's
  • 2 teaspoons baking powder
  • 2 teaspoons baking soda
  • 1 teaspoon salt
  • 5 ounces unsweetened applesauce
  • 9 ounces buttermilk or regular milk plus 1 Tablespoon of white vinegar
  • 9 ounces hot coffee
  • 5 ounces vegetable oil
  • 1 Tablespoons vanilla extract

Ermine Buttercream

  • 14 ounces granulated sugar
  • 3 ounces all-purpose flour
  • 16 ounces milk
  • 16 ounces unsalted butter softened but not melted
  • 2 teaspoons vanilla extract
  • ½ teaspoon salt
US Customary - Metric

Instructions

Eggless Chocolate Cake

  • Preheat your oven to 350ºF and prepare two 8"x2" cake pans with cake goop or another preferred type of pan release and parchment paper. 
  • Combine the flour, sugar, cocoa powder, baking powder, baking soda, and salt in the bowl of your stand mixer with the paddle attachment. Mix on low for a few seconds until combined. You can also do this with a hand mixer and a large bowl if you prefer.
  • Add in the applesauce, buttermilk, oil, and vanilla, and mix on medium speed for 2 minutes. Scrape the bowl. 
  • Turn the mixer down to low and add in the hot coffee and mix until just it's just combined. 
  • Pour the batter into your prepared cake pans.
  • Bake the cakes in your preheated oven for 40-45 minutes until a toothpick inserted into the center of the cake comes out clean.
  • Let the cake cool in the pan for about 15 minutes and then flip them out to cool on a wire rack. I wrap my cakes in plastic wrap and freeze them for at least 30 minutes to lock in moisture.

Making ermine frosting

  • Whisk together your flour and sugar in a medium saucepan over medium heat. Cook for about 2 minutes to toast the flour. Be careful not to burn it! 
  • Slowly add in your milk, whisk to combine, and bring your heat to medium-high. 
  • Bring the mixture to a simmer, whisk continuously until it is thick and pudding-like. Once it's simmering, cook for one minute more to make sure the flour taste is cooked out. 
  • (Optional) If your mixture has any lumps, place a colander on top of a heat-proof bowl and push your mixture through and into the bowl. Transfer the mixture into a heat-proof bowl or a shallow cake pan if you want it to cool down faster. 
  • Cover the mixture with plastic wrap so that it is touching the surface without any air bubbles in between, this will prevent a skin from forming on the top of the mixture. Let cool in the refrigerator for a few hours until it's completely cooled down. Or you can spread it onto a sheet pan and freeze it for 30 minutes to cool faster. If it's even a little warm it will melt your butter later.
  • Add your softened butter to the bowl of your stand mixer and whisk on high until very light and fluffy, about 2-3 minutes. 
  • Place the cooled flour mixture into a piping bag and slowly pipe it into your butter as you whip at medium speed. Incorporating the base slowly ensures a smooth buttercream. 
  • Add in your vanilla and salt, then mix until everything is light and creamy. If you have a lot of bubbles you can mix your frosting on low with the paddle attachment to make it smoother. Ermine frosting sets up after a few hours, so you'll want to use it immediately. It does not freeze or store well.

Assembling the cake

  • Trim the domes off your cooled cake so it's nice and level.
  • Add a nice thick layer of your ermine frosting on top and make it even with your offset spatula.
  • Add your second layer of cake on top.
  • Frost the entire cake in a thin layer of ermine frosting and then refrigerate it for 15 minutes to set the crumb coat.
  • Apply your final coat of buttercream and smooth out the edges.
  • Use a 1M piping tip in a piping bag to add a rope border around the top of the cake and finish with some fun sprinkles. 

Video

Notes

  1. No buttermilk? You can make your own buttermilk 
  2. Weigh your ingredients to avoid cake failure. Using a kitchen scale for baking is super easy and gives you the best results every single time. 
  3. Make sure all your cold ingredients are room temperature or slightly warm (butter, milk, eggs, to create a cohesive batter. Curdled batter causes cakes to collapse.
  4. Make your own pan release (cake goop!) The best pan release ever! 
  5. Need more help with making your first cake? Check out my how to decorate your first cake blog post. 
  6. A stand mixer works best for this cake recipe, but you can also use a hand mixer. Just go by look and consistency instead of time while mixing, you will have to mix for longer. I use a Bosch Universal Plus mixer!

Nutrition

Serving: 1slice | Calories: 1694kcal | Carbohydrates: 218g | Protein: 16g | Fat: 92g | Saturated Fat: 62g | Trans Fat: 2g | Cholesterol: 175mg | Sodium: 1041mg | Potassium: 735mg | Fiber: 9g | Sugar: 151g | Vitamin A: 2089IU | Vitamin C: 1mg | Calcium: 251mg | Iron: 7mg
close up of coffee crumb cake

May 30, 2023 Quick Breads

Cinnamon Coffee Crumb Cake

This coffee crumb cake is so moist and buttery with a swirl of cinnamon inside, huge crumbs on top, and a generous drizzle of cream cheese espresso glaze! It's truly the perfect breakfast and only takes minutes to make. You can bake it ahead and have it ready for gatherings or have a slice every morning with your coffee. No one said you had to share!close up of coffee crumb cake

This delicious cake is a mashup of the New York crumb cake and a classic coffee cake. The perfect complement to any cup of coffee or tea. 

[feast_advanced_jump_to]

Ingredientscoffee crumb cake ingredients

Sour Cream adds moisture to the coffee cake and can also be substituted with Greek yogurt. If you don't have sour cream you can use buttermilk or any of these buttermilk substitutions. 

Espresso in the cream cheese glaze adds that extra special something. It's rare to have actual coffee in coffee cake recipes, but I felt like it needed it! 

Brown sugar is used in both the cinnamon swirl and crumb topping. The crumb mixture is like a chunky cinnamon streusel and the moisture in the brown sugar helps hold it together. 


Step-By-Step Instructions

The 3 components of this coffee crumb cake are the coffee cake, the cinnamon sugar filling for the center of the cake, and the coarse crumb topping.

Making the crumb topping

  1. Add the flour, brown sugar, white sugar, salt, cinnamon, and soft (almost melted) butter to a large bowl. Mix together with a spoon or spatula to combine until most of the flour is combined.crumb cake topping ingredients in a clear bowl
  2. Use your clean hands to press the topping together. You should have very chunky crumbs, some large and some small. If it's too crumbly and dry, microwave it for about 5 seconds to melt the butter more, then work it with your hands until it comes together. crumb topping

Making the cinnamon sugar filling

  1. Add the brown sugar and cinnamon to a medium bowl and mix together to combine. If it's really lumpy, sift it together. sifting cinnamon filling

Making the coffee cake

  1. Preheat the oven to 350°F. Grease an 8"x4" loaf pan with pan release on the bottom and up the sides. I recommend using cake goop! Or you can line the bottom and sides with parchment paper to easily flip it out later. You can also use an 8"x8" nonstick square cake pan, it will just take less time to bake. If you want to use a larger bundt pan, make 1 and a half batches of this recipe.
  2. Make sure your butter, sour cream, egg, and cream cheese are all room temperature so that the ingredients combine together well. I place my eggs (still in the shell) into a bowl of warm water for a few minutes and leave out the butter and sour cream for a few hours. If needed, I microwave them for a few seconds until they are room temperature or even slightly warm.
  3. Place the butter and granulated sugar into the bowl of your stand mixer with the whisk attachment. Mix on medium-high speed and cream together until light and fluffy, about 2-3 minutes. (Or longer if you're using a hand mixer.) butter and flour creamed together
  4. Add your egg, sour cream, and vanilla to the creamed butter and mix until cohesive. If it has big chunks of cold butter in there, one of your ingredients was too cold.butter and sugar creamed together on a whisk
  5. Add in the flour, baking soda, baking powder, and salt. Mix on medium-low speed until the batter is thick and just combined. If your flour is really lumpy, sift these dry ingredients before adding them to the mixer.
  6. Place half of the batter into the greased loaf pan and smooth it out in an even layer.coffee crumb cake in a loaf pan
  7. Sprinkle the cinnamon sugar filling on top until it's completely covered.cinnamon sugar mix on cake batter
  8. Add the rest of the cake batter on top. smoothing cake batter with spatula
  9. Sprinkle the thick crumbs evenly on top, covering the surface of the loaf.adding cake crumbs on top of coffee cake batter in loaf pan
  10. Bake at 350ºF for 40-50 minutes and rotate halfway through for even baking. When a toothpick comes out clean from the center, it's done!baked coffee crumb cake
  11. Rest the loaf at room temperature until the pan is completely cool, about 2 hours. Do NOT flip your cake out while it's warm, it could collapse.
  12. Loosen the edges with a knife, place a piece of plastic wrap on top of the cake, and flip it upside down to remove it from the pan. close up of coffee crumb cake on a plate

Making cream cheese glaze

  1. Place the softened cream cheese in a large bowl and blend it until smooth with a hand mixer or whisk. 
  2. Slowly pour in the melted butter a little at a time. Do not pour it all in there at once or you could end up with a soupy cream cheese mess.adding melted butter to cream cheese
  3. Add the vanilla, sift in the powdered sugar, and mix until you don't see any lumps.cream cheese espresso glaze
  4. While mixing, pour in the coffee (or espresso, milk, or water) a little at a time. Keep adding until you get the desired consistency of a glaze. I like a thinner glaze so it's easy to pipe.glaze in a piping bag
  5. Place the glaze into a piping bag and drizzle on top of the loaf. You can also use a spoon or a plastic bag with the corner cut off.drizzling glaze over crumb cake loaf
  6. Enjoy this cake at room temperature for up to three days. To keep the coffee crumb cake moist, store it in a plastic bag or wrap it with plastic wrap.

FAQ

Can I add other toppings to this cake?

Make this recipe your own! When assembling the loaf in the pan, add your favorite toppings/fillings like blueberries, dried fruit, or even swirl in cream cheese filling.

How long is this cake good for?

Enjoy at room temperature for up to three days. To keep the coffee crumb cake moist, store it in a plastic bag or wrap it with plastic wrap.

What's the difference between coffee cake and crumb cake?

Crumb cake has a thicker layer of chunky streusel crumbs on top of a buttery vanilla cake. Coffee cake has less streusel on top but more cake. 

Does coffee crumb cake have coffee?

Most modern coffee crumb cake recipes don't have coffee in them, although original early versions of the dessert did. This recipe uses coffee in the glaze, but its name implies the drink it's best served with. 

Related recipes

Classic Cake Donut Recipe
Baked Donut Recipe
Lemon Pound Cake
Pumpkin Spice Cake

Recipe

close up of coffee crumb cake
Print Recipe
4.85 from 39 votes

Coffee Crumb Cake Recipe

Moist and buttery with a swirl of cinnamon inside, huge crumbs on top, and a generous drizzle of cream cheese espresso glaze! It's truly the perfect breakfast treat and only takes minutes to make.
Prep Time10 minutes mins
Cook Time45 minutes mins
Total Time55 minutes mins
Course: Breakfast
Cuisine: American
Servings: 8 servings
Calories: 530kcal
Author: Liz Marek

Equipment

  • Hand Mixer Or Whisk
  • 8" x 4" Loaf Pan, 2.5" tall or 8" x 8" square nonstick pan

Ingredients

Cake

  • 3 ounces unsalted butter room temperature
  • 4 ounces granulated sugar
  • 6 ounces all-purpose flour
  • ½ teaspoon baking soda
  • ½ teaspoon baking powder
  • ½ teaspoon salt
  • 1 teaspoon vanilla extract
  • 1 large egg room temperature
  • 5 ounces sour cream room temperature

Cinnamon Swirl

  • 1 teaspoon cinnamon
  • 1 ounce light brown sugar sifted

Crumb Topping

  • 6 ounces all-purpose flour
  • 4 ounces unsalted butter almost melted
  • 3 ounces light brown sugar
  • 2 ounces granulated sugar
  • 2 teaspoons cinnamon
  • ¼ teaspoon salt

Cream Cheese Glaze

  • 2 ounces cream cheese room temperature
  • 1 ounce unsalted butter melted
  • ½ teaspoon vanilla extract
  • 3 ounces powdered sugar
  • 4 teaspoons coffee or milk, water or espresso
US Customary - Metric

Instructions

Cinnamon Sugar Filling

  • Add the brown sugar and cinnamon to a medium bowl and mix together to combine. If it's really lumpy, sift it together. 

Making the crumb topping

  • Add the flour, brown sugar, white sugar, salt, cinnamon, and soft (almost melted) butter to a large bowl. Mix together with a spoon or spatula to combine until most of the flour is combined.
  • Use your clean hands to press the topping together. You should have very chunky crumbs, some large and some small. If it's too crumbly and dry, microwave it for about 5 seconds to melt the butter more, then work it with your hands until it comes together. 

Making the coffee cake

  • Preheat the oven to 350°F. Grease an 8"x4" loaf pan with pan release on the bottom and up the sides. I recommend using cake goop! Or you can line the bottom and sides with parchment paper to easily flip it out later.
    You can also use an 8”x8” nonstick square cake pan, it will just take less time to bake. If you want to use a larger bundt pan, make 1 and a half batches of this recipe.
  • Make sure your butter, sour cream, egg, and cream cheese are all room temperature so that the ingredients combine together well. I place my eggs (still in the shell) into a bowl of warm water for a few minutes and leave out the butter and sour cream for a few hours. If needed, I microwave them for a few seconds until they are room temperature or even slightly warm.
  • Place the butter and granulated sugar into the bowl of your stand mixer with the whisk attachment. Mix on medium-high speed and cream together until light and fluffy, about 2-3 minutes. (Or longer if you're using a hand mixer.) 
  • Add your egg, sour cream, and vanilla to the creamed butter and mix until cohesive. If it has big chunks of cold butter in there, one of your ingredients was too cold.
  • Add in the flour, baking soda, baking powder, and salt. Mix on medium-low speed until the batter is thick and just combined. If your flour is really lumpy, sift these dry ingredients before adding them to the mixer.
  • Place half of the batter into the greased loaf pan and smooth it out in an even layer.
  • Sprinkle the cinnamon sugar filling on top until it's completely covered.
  • Add the rest of the cake batter on top. 
  • Sprinkle the thick crumbs evenly on top, covering the surface of the loaf.
  • Bake at 350ºF for 40-50 minutes and rotate halfway through for even baking. When a toothpick comes out clean from the center, it's done!
  • Rest the loaf at room temperature until the pan is completely cool, about 2 hours. Do NOT flip your cake out while it's warm, it could collapse.
  • Loosen the edges with a knife, place a piece of plastic wrap on top of the cake, and flip it upside down to remove it from the pan. 

Making cream cheese glaze

  • Place the softened cream cheese in a large bowl and blend it until smooth with a hand mixer or whisk. 
  • Slowly pour in the melted butter a little at a time. Do not pour it all in there at once or you could end up with a soupy cream cheese mess.
  • Add the vanilla, sift in the powdered sugar, and mix until you don't see any lumps.
  • While mixing, pour in the coffee (or espresso, milk, or water) a little at a time. Keep adding until you get the desired consistency of a glaze. I like a thinner glaze so it's easy to pipe.
  • Place the glaze into a piping bag and drizzle on top of the loaf. You can also use a spoon or a plastic bag with the corner cut off.
  • Enjoy this cake at room temperature for up to three days. To keep the coffee crumb cake moist, store it in a plastic bag or wrap it with plastic wrap.

Video

Notes

  1. All my recipes are measured in ounces, not cups. Cups leave way too much room for error and a scale is super simple to use. It's my #1 recommended tool for baking success. You can watch my video on how to use a kitchen scale if you're not familiar.
  2. For this recipe, I'm using a Bosch universal plus mixer! You can use a kitchen aid or a hand mixer if you like, any mixer will work. You can try to use a whisk, but it will take a while to fully cream the butter and sugar.
  3. Make sure your butter, sour cream, egg, and cream cheese are all room temperature so that the ingredients combine together well.
  4. If you don't have sour cream you can use buttermilk or any of these buttermilk substitutions. 
  5. For your pan release, I recommend using cake goop! Or you can line the bottom and sides with parchment paper to easily flip it out later.
  6. I'm using an 8" x 4" Loaf Pan, 2.5" tall. You can also use an 8"x8" nonstick square pan, it will just take less time to bake. If you want to use a larger bundt pan, make 1 and a half batches of this recipe. You can also use this recipe to make muffins!
  7. Make this recipe your own! When assembling the loaf in the pan, add your favorite toppings/fillings like blueberries, dried fruit, or even swirl in cream cheese filling.
  8. After your cake is done baking, make sure to rest it at room temperature until the pan is completely cool, about 2 hours. Do NOT flip your cake out while it's warm, it could collapse.
  9. All my recipes are measured in ounces, not cups. Cups leave way too much room for error and a scale is super simple to use. It's my #1 recommended tool for baking success. You can watch my video on how to use a kitchen scale if you're not familiar. 
  10. You might be wondering what kind of mixer I am using. I'm using my favorite mixer, which is the Bosch universal plus mixer! You can use a kitchen aid or a hand mixer if you like, any mixer will work. You can try to use a whisk, but it will take a while to fully cream the butter and sugar.
  11. Sour Cream adds moisture to the coffee cake and can also be substituted with Greek yogurt. If you don't have sour cream you can use buttermilk or any of these buttermilk substitutions. 

Nutrition

Serving: 1serving | Calories: 530kcal | Carbohydrates: 64g | Protein: 4g | Fat: 30g | Saturated Fat: 18g | Cholesterol: 101mg | Sodium: 341mg | Potassium: 110mg | Fiber: 1g | Sugar: 46g | Vitamin A: 948IU | Vitamin C: 1mg | Calcium: 69mg | Iron: 1mg

May 26, 2023 Cake

Blackberry Cake

This blackberry cake recipe is made with swirls of blackberry puree, whole blackberries, and blackberry buttercream! Add a hint of lime to bring out the fresh flavor.

What makes this cake extra special is the boost of lime flavor! Using lime zest in your recipe will get a more concentrated flavor, resulting in a cake that's packed with bold summer flavors you will love!  If you're familiar with my fresh strawberry cake recipe then this will be very similar.

Table of contents

  • Special Ingredients
  • Step-by-step Instructions
    • Making Blackberry Puree
    • Making Blackberry Cake
    • Making Blackberry Buttercream
    • Decorating the Cake
  • FAQ
  • More recipes you'll love

Special Ingredients

Blackberries: You can use fresh or frozen blackberries to make the puree in this cake. Frozen berries are flash-frozen at the peak of ripeness, so they have the best flavor. It's best to use fresh, juicy blackberries for the center and top of the cakes.

Lime: I really like the combination of blackberry and lime because the tartness brings out the flavor of the berries. You can also use lemon juice and lemon zest instead if you prefer to make a lemon blackberry cake. You could also switch out the berries in my lemon blueberry cake too!

Buttermilk: The acidity in buttermilk not only breaks down the gluten structure, making baked goods more tender, but it also adds a delicious flavor. If you do not have buttermilk you can make your own buttermilk substitute using milk and white vinegar or substituting sour cream.

Step-by-step Instructions

The key to blackberry cake is making a puree of concentrated blackberry flavor, and mixing that into our cake and buttercream. I recommend making the puree first, then the cakes, and making the buttercream while the cakes are cooling.

Making Blackberry Puree

  1. Combine lime juice and cornstarch to make a slurry and mix until there are no lumps.  frozen blackberries in a saucepan
  2. Mix the blackberries and salt in a saucepan and use an immersion blender to make the filling smooth.  immersion blender blending frozen blackberries in a saucepan
  3. Turn on the heat and cook down the berries. Keep stirring to keep the puree from cooking too quickly on the bottom of the pan.
  4. Once the puree has thickened up slightly, remove it from the heat and stir in the lime zest. pouring blackberry puree into a glass bowl
  5. Transfer the puree to a large bowl to cool to room temperature. You will use about 6 Tablespoons of the puree to add to your cake. About ¼ to ½ cup of puree will be for the buttercream. If you choose to strain the seeds out of all of the puree, add a couple of extra ounces of berries to account for the loss in straining. I chose to leave the seeds in for the cake and strain the seeds out for the buttercream. The seeds can be left in for the buttercream too, your choice. 
  6. Store leftover puree in the fridge for up to a week or freeze for 6 months.

Making Blackberry Cake

  1. Heat oven to 335º F/168º C and prepare two 8"x2" round cake pans with cake goop or another pan release and parchment paper if you prefer.
  2. Measure out the buttermilk and place 4 oz in a separate measuring cup. Add the oil to the 4oz of buttermilk and set aside. 
  3. Add your eggs and lime zest to the remaining milk and gently whisk to combine. Keep the lime juice separate, you will add this at the end. adding lime zest to buttermilk and eggs in a measuring cup
  4. Place the flour, sugar, baking soda, and salt into the bowl of your stand mixer with the paddle attachment. I'm using my Bosch universal plus mixer but you can use a hand mixer, just mix for longer. 
  5. Turn the mixer onto the slowest speed (setting 1 on Kitchen Aid mixers). Slowly add chunks of your softened butter until it is all added. Let everything mix until it looks like coarse sand. adding softened butter to dry ingredients in a stand mixershowing the coarse sand texture of cake batter
  6. Add your milk/oil mixture all at once to the flour mixture. Mix on medium (speed 4 on KitchenAid) for 1 full minute to develop the structure. Don't worry, this will not over-mix the cake. Because it is AP flour you do not need to mix as long as cake flour (more gluten, less time needed). closeup of cake texture on a spatula
  7. Scrape the bowl. This is an important step. If you skip it, you will have hard lumps of flour and unmixed ingredients in your batter. If you do it later, they will not mix in fully.
  8. Slowly add in the rest of your milk/eggs/zest ingredients in 3 parts. Next, pour in the lime juice with the last addition of liquid, stopping to scrape the bowl one more time halfway through. Your batter should be thick and not too runny. adding egg mixture to mixing cake battercloseup of cake texture on a spatula
  9. Fill your pans ½ full with cake batter.
  10. Spoon about 2 tablespoons of room-temperature puree over the batter. Use a small spatula or knife to gently fold the puree in to create a swirl effect into the batter.swirling blackberry puree into cake batter in pans
  11. Add the floured blackberries to the top of the batter. Do not push them down as their weight will cause them to sink anyway as the cake heats up. adding fresh blackberries to blackberry cake batter in cake pans
  12. Place the cakes in the preheated oven. I start by baking for 30 minutes for  6" and 8" cakes and 35 minutes for 9" and larger cakes and then checking for doneness. If the cakes are still really jiggly, I add another 5 minutes. I check every 2 minutes after that until I'm close and then it's every 1 minute. Cakes are done when a toothpick inserted in the center comes out with a few crumbs. 
  13. After the cakes have cooled for 10 minutes or the pans are cool enough to touch, place a wire rack on top and flip the cakes over to remove them from the pans. Let them rest on a cooling rack to cool completely, or wrap in plastic wrap and chill in the freezer.hand with an ovenmitt holding a blackberry cake pan

Making Blackberry Buttercream

  1. Strain out the seeds of the blackberry filling. This is optional but it will make a smoother texture when scraping the sides.
  2. Place the egg whites and powdered sugar in the bowl of your stand mixer with the whisk attachment and whip on high speed for 3-5 minutes. An electric mixer and a large mixing bowl will also work, just mix for longer. egg whites and powdered sugar in a stand mixer bowl
  3. Add the softened butter in small chunks then vanilla and salt. Whip on high until light and fluffy and white, about 8 to 10 minutes.hand adding a stick of butter to a stand mixer bowl
  4. Add about ½ cup of the blackberry purée to the buttercream and continue to whip until combined. adding blackberry puree to buttercream
  5. Mix in about 1-2 drops of pink food coloring to enhance the color if you choose. 
  6. Optional: switch to the paddle attachment and mix on low for 15-20 minutes until all air bubbles are gone.paddle attachment with pink buttercream
  7. Stored it in an airtight container for up to a week in the refrigerator or for 3 months in the freezer. 

Decorating the Cake

If you haven't ever decorated a cake before, you might want to check out my blog post on how to decorate your first cake. It goes over everything from tools to techniques.

how to make a cake tutorial
  1. Once your cakes are chilled, trim off the dome and brown edges of the cake. This is optional but makes for pretty slices. blackberry cake on cake board
  2. Place your first cake layer onto a board.
  3. Spread on about ¼" of your blackberry buttercream.
  4. Layer some fresh blackberries into the buttercream.layering fresh blackberries in blackberry buttercream
  5. Spread some more buttercream on top of the blackberries and then add your next layer of cake.
  6. Repeat the process with layer two and then add your final layer of cake on top.  blackberry cake layers with blackberry buttercream
  7. Cover the whole cake in a thin layer of buttercream. This is the crumb coat.  blackberry cake covered in blackberry buttercream
  8. Place the cake into the fridge or freezer for 20 minutes to set the buttercream layer.
  9. Apply your final coat of buttercream and use a bench scraper and offset spatula to make it nice and smooth.
  10. Decorate the top of the cake with more dollops of buttercream, fresh berries and some lime zest. I used a 1M piping tip for this design. blackberry cake
  11. Store your blackberry cake in the fridge until you're ready to serve it. It's best to eat soft cake, so make sure you take it out of the fridge a few hours before you serve it. Cold butter makes a cold cake taste dry!

FAQ


How long does blackberry puree last

Blackberry puree lasts for up to 2-3 days in the refrigerator if kept in an airtight container. 


Can you freeze blackberry puree?

Yes, you can freeze blackberry puree! Pour your leftover blackberry puree into ice cube trays or baby food containers, and store them in the freezer for up to 6 months. When you're ready to use your puree, remove the container from the freezer to allow it to thaw, and then use the puree to use for another baking recipe, smoothie, or even a homemade popsicle.


What kind of flour is best to use for this cake?

I use all-purpose flour in this recipe because the cake needed just a little more structure to hold those big juicy berries. AP flour has more protein and less starch, so it is just a little stronger than cake flour. The higher acid in the batter tenderizes the gluten proteins as well, so you do not end up with a tough cake. Too much acid in the batter will cause the protein to become too weak and the cake will be crumbly and dense. It's a very fine balance to find the right texture and keep the colors bright!

Why is my blackberry cake green?

When the acidic blackberries bake with baking powder, they oxidize and turn green. Lowering the alkalinity of the batter and using baking soda instead kept the blackberries that nice, deep purple/red color. For an even deeper purple, you can add a few drops of violet food coloring to the puree.

More recipes you'll love

Berry Wash (How to Make Fresh Berries Last Longer)

Lemon Cake Recipe

Fresh Berry Cake Filling 

Lemon Blueberry Buttermilk Cake Recipe

Recipe

Print Recipe
4.84 from 60 votes

Blackberry Lime Cake

The best blackberry cake is made with fresh blackberries and a hint of lime. This incredibly moist and tender cake goes so well with a scoop of vanilla ice cream on a hot summer day.
Prep Time30 minutes mins
Cook Time30 minutes mins
Decorating time1 hour hr
Total Time2 hours hrs
Course: Dessert
Cuisine: American
Servings: 8 cups
Calories: 1550kcal
Author: Liz Marek

Equipment

  • 2 8"x2" round cake pans or three 6" pans
  • Stand mixer with paddle and whisk attachments
  • Immersion blender

Ingredients

Blackberry Cake

  • 8 ounces buttermilk slightly warm
  • 3 ounces vegetable oil
  • 3 large eggs room temperature
  • 1 Tablespoon lime zest (About 1 lime)
  • 1 Tablespoon lime juice
  • 12 ounces all-purpose flour
  • 11 ounces granulated sugar
  • 1 teaspoon salt
  • 1 teaspoon baking soda
  • 8 ounces unsalted butter softened
  • 2 Tablespoons all-purpose flour (For dusting on blackberries)
  • 4 ounces blackberries (You can use frozen, but don't thaw them)

Blackberry Puree

  • 16 ounces fresh or frozen blackberries
  • 1 tablespoon lime zest
  • 2 tablespoon lime juice
  • 1 tablespoon corn starch
  • ⅛ teaspoon salt

Blackberry Buttercream Frosting

  • 24 ounces unsalted butter room temperature (You can use salted butter but it will affect the taste and you need to leave out additional salt)
  • 24 ounces powdered sugar sifted if not from a bag
  • 2 teaspoons vanilla extract
  • 6 ounces pasteurized egg whites room temperature
  • 2 ounces blackberry puree (You can add more if you want to)
  • 1 drop Americolor electric pink food coloring (Optional)
US Customary - Metric

Instructions

Blackberry Puree

  • Combine lime juice and cornstarch to make a slurry and mix until there are no lumps.  
  • Mix the blackberries and salt in a saucepan and use an immersion blender to make the filling smooth.  
  • Turn on the heat and cook down the berries. Keep stirring to keep the puree from cooking too quickly on the bottom of the pan.
  • Once the puree has thickened up slightly, remove it from the heat and stir in the lime zest. 
  • Transfer the puree to a large bowl to cool to room temperature. You will use about 6 Tablespoons of the puree to add to your cake. About ¼ to ½ cup of puree will be for the buttercream. If you choose to strain the seeds out of all of the puree, add a couple of extra ounces of berries to account for the loss in straining. I chose to leave the seeds in for the cake and strain the seeds out for the buttercream. The seeds can be left in for the buttercream too, your choice. 
  • Store leftover puree in the fridge for up to a week or freeze for 6 months.

Making Blackberry Cake

  • Heat oven to 335º F/168º C and prepare two 8"x2" round cake pans with cake goop or another pan release and parchment paper if you prefer.
  • Measure out the buttermilk and place 4 oz in a separate measuring cup. Add the oil to the 4oz of buttermilk and set aside. 
  • Add your eggs and lime zest to the remaining milk and gently whisk to combine. Keep the lime juice separate, you will add this at the end. 
  • Place the flour, sugar, baking soda, and salt into the bowl of your stand mixer with the paddle attachment. I'm using my Bosch universal plus mixer but you can use a hand mixer, just mix for longer. 
  • Turn the mixer onto the slowest speed (setting 1 on Kitchen Aid mixers). Slowly add chunks of your softened butter until it is all added. Let everything mix until it looks like coarse sand.
  • Add your milk/oil mixture all at once to the flour mixture. Mix on medium (speed 4 on KitchenAid) for 1 full minute to develop the structure. Don't worry, this will not over-mix the cake. Because it is AP flour you do not need to mix as long as cake flour (more gluten, less time needed). 
  • Scrape the bowl. This is an important step. If you skip it, you will have hard lumps of flour and unmixed ingredients in your batter. If you do it later, they will not mix in fully.
  • Slowly add in the rest of your milk/eggs/zest ingredients in 3 parts. Next, pour in the lime juice with the last addition of liquid, stopping to scrape the bowl one more time halfway through. Your batter should be thick and not too runny. 
  • Fill your pans ½ full with cake batter.
  • Spoon about 2 tablespoons of room-temperature puree over the batter. Use a small spatula or knife to gently fold the puree in to create a swirl effect into the batter.
  • Add the floured blackberries to the top of the batter. Do not push them down as their weight will cause them to sink anyway as the cake heats up. 
  • Place the cakes in the preheated oven. I start by baking for 30 minutes for  6" and 8" cakes and 35 minutes for 9" and larger cakes and then checking for doneness. If the cakes are still really jiggly, I add another 5 minutes. I check every 2 minutes after that until I'm close and then it's every 1 minute. Cakes are done when a toothpick inserted in the center comes out with a few crumbs. 
  • After the cakes have cooled for 10 minutes or the pans are cool enough to touch, place a wire rack on top and flip the cakes over to remove them from the pans. Let them rest on a cooling rack to cool completely, or wrap in plastic wrap and chill in the freezer.

Making Blackberry Buttercream

  • Strain out the seeds of the blackberry filling. This is optional but it will make a smoother texture when scraping the sides.
  • Place the egg whites and powdered sugar in the bowl of your stand mixer with the whisk attachment and whip on high speed for 3-5 minutes. An electric mixer and a large mixing bowl will also work, just mix for longer. 
  • Add the softened butter in small chunks then vanilla and salt. Whip on high until light and fluffy and white, about 8 to 10 minutes.
  • Add about ½ cup of the blackberry purée to the buttercream and continue to whip until combined. 
  • Mix in about 1-2 drops of pink food coloring to enhance the color if you choose. 
  • Optional: switch to the paddle attachment and mix on low for 15-20 minutes until all air bubbles are gone.
  • Stored it in an airtight container for up to a week in the refrigerator or for 3 months in the freezer. 

Decorating the blackberry cake

  • Once your cakes are chilled, trim off the dome and brown edges of the cake. This is optional but makes for pretty slices. 
  • Place your first cake layer onto a board.
  • Spread on about ¼" of your blackberry buttercream.
  • Layer some fresh blackberries into the buttercream.
  • Spread some more buttercream on top of the blackberries and then add your next layer of cake.
  • Repeat the process with layer two and then add your final layer of cake on top.  
  • Cover the whole cake in a thin layer of buttercream. This is the crumb coat.  
  • Place the cake into the fridge or freezer for 20 minutes to set the buttercream layer.
  • Apply your final coat of buttercream and use a bench scraper and offset spatula to make it nice and smooth.
  • Decorate the top of the cake with more dollops of buttercream, fresh berries and some lime zest. I used a 1M piping tip for this design. 

Video

Notes

  1. To keep the blackberries and puree from turning blue and green during baking the acidity level had to be higher, when the acidic berries touch the alkaline they oxidize and turn green. Lowering the alkalinity of the batter kept the blackberries that nice deep purple red color. 
  2. I used AP flour in this recipe because the cake needed just a little more structure to hold those big juicy berries. AP flour has more protein, less starch, so is just a little stronger than cake flour. The higher acid in the batter tenderizes the gluten proteins as well, so you do not end up with a tough cake. Too much acid in the batter will cause the protein to become too weak and the cake will be crumbly and dense. It's a very fine balance to find the right texture and keep the colors bright!

Nutrition

Serving: 1cup | Calories: 1550kcal | Carbohydrates: 168g | Protein: 12g | Fat: 96g | Saturated Fat: 59g | Polyunsaturated Fat: 4g | Monounsaturated Fat: 25g | Trans Fat: 4g | Cholesterol: 317mg | Sodium: 572mg | Potassium: 301mg | Fiber: 5g | Sugar: 128g | Vitamin A: 3137IU | Vitamin C: 17mg | Calcium: 102mg | Iron: 3mg
close up of sliced lemon pound cake

May 25, 2023 Bundt Cakes

Lemon Pound Cake Recipe

This lemon pound cake recipe is absolutely divine! A super moist and tender crumb with a dash of lemon and a delicious buttermilk glaze. It's so easy to bake up for last-minute guests or bring to a special occasion.

close up of sliced lemon pound cake

If you're looking for a super moist and lemony pound cake with a velvet smooth crumb, this is the one for you. I've had my fair share of dry pound cake so when I was testing recipes, super moist was my #1 goal without losing that classic pound cake denseness and texture. Truthfully though, the real star of this lemon pound cake is the tart lemon glaze made with buttermilk. It's the perfect sweet and zesty topping and really gives this lemon pound cake its WOW factor!

Table of contents

  • Making Lemon Pound Cake
  • Making Lemon Buttermilk Glaze
  • How to flavor pound cake
  • FAQ
  • Related Recipes

Moist pound cake ingredients

Buttermilk adds much-needed moisture but it's also acidic which breaks down the gluten in the flour, resulting in a very tender and moist crumb. For the glaze, we're using powdered buttermilk instead of fresh because it adds a ton of flavor without making the glaze too thin.

Cake flour makes the pound cake incredibly light but if you can't get your hands on cake flour, all-purpose will still work just fine. Just replace two Tablespoons of flour with cornstarch and sift together. Be very careful not to over-mix which will make your pound cake tough and hard.

Baking powder gives the pound cake just enough lift to make it light without losing that classic pound cake texture.

Lemon extract and lemon zest together bring out the bright lemon flavor in this cake. You can easily switch these out for other flavors if you prefer. 

powdered buttermilk

Making Lemon Pound Cake

  1. Preheat your oven to 350ºF and make sure the rack is in the center of the oven.
  2. Prepare your 5"x9" loaf pan with cake goop or any kind of preferred pan release. If you don't have loaf pans, you can use bundt pans or even cake pans.
  3. Weigh out your wet and dry ingredients using a scale instead of using measuring cups for a more accurate recipe, and bring your ingredients to room temperature. When your wet ingredients are room temperature or even a little warm, they will mix together more easily and your lemon pound cake will have a better texture.
  4. Sift together your cake flour, baking powder, baking soda, and salt, then set aside.lemon pound cake dry ingredients
  5. Cream the butter and sugar together in the bowl of a stand mixer with the paddle attachment on medium speed for 2-3 minutes until light, white, and fluffy. If your butter is too cold, your butter and sugar are not going to cream very easily.close up of creamed butter and sugar on a green spatula
  6. While mixing on low, add in your room temperature eggs, one at a time, letting each mix in fully before you add in the next. I'm using a stand mixer, but you can also use a hand-electric mixer if you'd like. Scrape the sides of the bowl.adding eggs to pound cake ingredients
  7. Add the lemon extract and zest to the buttermilk and set aside.
  8. While mixing on low, add ⅓ of the buttermilk mixture, then ⅓ of the flour mixture, repeat two more times with the remaining flour and buttermilk mixture and mix until just combined. Don't overmix. adding buttermilk to mixing bowladding flour to pound cake mixture
  9. Pour your cake batter into a prepared 5"x9" loaf pan and bake for 35-45 minutes or until a toothpick inserted into the center comes out cleanly. lemon pound cake batter in a blue loaf pan
  10. Cool it for 10 minutes, then flip the cake onto a wire rack. If you want extra moisture, add a simple lemon syrup to the top straight out of the oven.lemon pound cake on a cooling rack
  11. Let the cake cool at room temperature or wrap the whole cake in plastic wrap and freeze it to lock in the moisture. 

Making Lemon Buttermilk Glaze

  1. Combine the powdered sugar, salt, buttermilk powder, and lemon juice in a large bowl.lemon buttermilk glaze ingredients in a bowl
  2. Mix until smooth with a hand mixer or whisk. Make sure to spend enough time beating the mixture so you don't have lumps.lemon buttermilk glaze in a bowl
  3. Add in your softened butter and mix until smooth and creamy. lemon buttermilk glaze on a blue spatula
  4. Pour the glaze over the top of the cake (I put mine on a cooling rack over a pan to catch the glaze) and then garnish with fresh lemons if you like.glazing lemon pound cake

How to flavor pound cake

Don't like lemon? No problem! You can flavor this pound cake in so many different ways with simple ingredients! Leave out the lemon zest and replace it with fresh blueberries or raspberries. Add a layer of cream cheese frosting or mix in some chocolate chips. You can also add vanilla extract and add in some spices to make a spice pound cake! Replace the buttermilk with pumpkin puree for a yummy pumpkin pound cake. The options are truly endless!

close up of pound cake sliced

FAQ

Can I use a bundt cake pan?

Yes, you can absolutely make this lemon loaf cake in a bundt cake pan. Double it to make sure you have enough batter, and bake it for longer.

Can I use lemon juice to add more lemon flavor?

Lemon juice actually doesn't have a lot of lemon flavor and it adds a lot of liquid to the recipe. For true lemon lovers, try adding more lemon zest and extract.

What if I don't have buttermilk? What can I use as a substitution?

You can use regular milk plus 2 Tablespoons of white vinegar as a buttermilk substitute or you can check out my buttermilk substitute blog post for more substitutions.

Why is it called pound cake?

Pound cake first came from Europe around the 1700s. A typical pound cake was made of one pound of butter, flour, sugar, and eggs. This type of cake was very heavy, dry, and dense. The only sort of lift in the cake came from the eggs.

The difference between a pound cake and a regular cake is how dense the cake is. A pound cake usually only has a glaze or is paired with whipped cream and berries because of how heavy it is while a traditional cake is much lighter in texture and can therefore be paired with richer fillings and frostings. Pound cakes are typically baked in a loaf pan or a bundt cake pan and take much longer to bake than a traditional cake.

What is the best flour to use for pound cake?

I find that cake flour makes a very light and fluffy pound cake. All-purpose will also work just fine, Just replace two Tablespoons of flour with cornstarch and sift it together. Be very careful not to over-mix which will make your pound cake tough and hard.

Related Recipes

Moist Lemon cake recipe

Lemon blueberry cake recipe

Lemon raspberry cake recipe

Homemade lemon curd recipe

Recipe

close up of sliced lemon pound cake
Print Recipe
4.59 from 17 votes

Lemon Buttermilk Pound Cake

Moist and tender lemon pound cake with a lemon buttermilk glaze. This is the perfect easy cake to throw together for a last-minute gathering, brunch, or spring dessert. Works great in a bundt pan too!
Prep Time20 minutes mins
Cook Time40 minutes mins
Chilling Time30 minutes mins
Total Time1 hour hr 30 minutes mins
Course: Dessert
Cuisine: American
Servings: 8 slices
Calories: 464kcal
Author: Liz Marek

Equipment

  • 5-inch by 9-inch loaf pans
  • Stand mixer or hand mixer

Ingredients

Lemon Pound Cake

  • 4 ounces unsalted butter softened but not melted
  • 8 ounces granulated sugar
  • 4 large eggs room temperature
  • 8 ounces cake flour
  • ¼ teaspoon baking soda
  • ½ teaspoon baking powder
  • ½ teaspoon salt
  • 5 ounces buttermilk room temperature
  • 1 teaspoon lemon extract
  • 2 Tablespoons lemon zest

Lemon Buttermilk Glaze

  • 6 ounces powdered sugar sifted
  • 2 ounces fresh lemon juice
  • 2 Tablespoons buttermilk powder
  • 1 Tablespoon unsalted butter very soft but not melted
  • ⅛ teaspoon salt
US Customary - Metric

Instructions

Making Lemon Pound Cake

  • Preheat your oven to 350ºF and make sure the rack is in the center of the oven.
  • Prepare your 5"x9" loaf pan with cake goop or any kind of preferred pan release. If you don't have loaf pans, you can use bundt pans or even cake pans.
  • Weigh out your wet and dry ingredients using a scale instead of using measuring cups for a more accurate recipe, and bring your ingredients to room temperature. When your wet ingredients are room temperature or even a little warm, they will mix together more easily and your lemon pound cake will have a better texture.
  • Sift together your cake flour, baking powder, baking soda, and salt, then set aside.
  • Cream the butter and sugar together in the bowl of a stand mixer with the paddle attachment on medium speed for 2-3 minutes until light, white, and fluffy. If your butter is too cold, your butter and sugar are not going to cream very easily.
  • While mixing on low, add in your room temperature eggs, one at a time, letting each mix in fully before you add in the next. I'm using a stand mixer, but you can also use a hand-electric mixer if you'd like. Scrape the sides of the bowl.
  • Add the lemon extract and zest to the buttermilk and set aside.
  • While mixing on low, add ⅓ of the buttermilk mixture, then ⅓ of the flour mixture, repeat two more times with the remaining flour and buttermilk mixture and mix until just combined. Don't overmix. 
  • Pour your cake batter into a prepared 5"x9" loaf pan and bake for 35-45 minutes or until a toothpick inserted into the center comes out cleanly. 
  • Cool it for 10 minutes, then flip the cake onto a wire rack. If you want extra moisture, add a simple lemon syrup to the top straight out of the oven.
  • Let the cake cool at room temperature or wrap the whole cake in plastic wrap and freeze it to lock in the moisture. 

Making Lemon Buttermilk Glaze

  • Combine the powdered sugar, salt, buttermilk powder, and lemon juice in a large bowl.
  • Mix until smooth with a hand mixer or whisk. Make sure to spend enough time beating the mixture so you don't have lumps.
  • Add in your softened butter and mix until smooth and creamy. 
  • Pour the glaze over the top of the cake (I put mine on a cooling rack over a pan to catch the glaze) and then garnish with fresh lemons if you like.

Video

Notes

  1. If you can't get your hands on cake flour, all-purpose will still work just fine. Just replace two Tablespoons of flour with cornstarch and sift together.
  2. If you want to make your pound cake EXTRA moist you can brush on some simple syrup right out of the oven or you can add in 2 ounces of vegetable oil to the liquids in the recipe.
  3. Don't forget to grease your pans! Using cake goop is the best way to make sure your loaf doesn't stick to the pan.
  4. Weigh out your ingredients using a scale and bring ingredients to room temperature. When your ingredients are room temperature or even a little warm, they will mix together more easily and your lemon pound cake will have a better texture.
  5. You can use regular milk plus 2 Tablespoons of white vinegar as a buttermilk substitute or you can check out my buttermilk substitute blog post for more substitutions
  6. If you don't have buttermilk powder for the glaze, use 2 Tablespoons of real buttermilk and add an extra ¼ cup of powdered sugar. 
  7. I recommend using a nonstick metal pan, but if you want to use a glass pan, bake for an extra 10 minutes. 
  8. To bake this in a bundt pan, double the recipe to make sure you have enough batter and bake for longer. 

Nutrition

Serving: 1slice | Calories: 464kcal | Carbohydrates: 73g | Protein: 8g | Fat: 16g | Saturated Fat: 9g | Trans Fat: 1g | Cholesterol: 130mg | Sodium: 245mg | Potassium: 150mg | Fiber: 1g | Sugar: 51g | Vitamin A: 567IU | Vitamin C: 5mg | Calcium: 74mg | Iron: 1mg

350 f 40-45 mins

Finely textured slice of olive oil cake with a dusting of powdered sugar on top.

May 24, 2023 Cake

Lemon Olive Oil Cake

This lemon olive oil cake is a bright, tender Italian-style dessert that comes together in just 40 minutes. Perfect for Mother's Day, dinner parties, or any time you want something simple and special. For more citrus baking, try my Lemon Cake Recipe.

Quick Glance: Lemon Olive Oil Cake

  • Recipe Name: Lemon Olive Oil Cake
  • Why You'll Love It: Bright, fresh, and tender with real lemon juice and plenty of zest. Not too sweet and surprisingly simple.
  • Time and Difficulty: Easy. About 15 minutes prep and 25 minutes in the oven.
  • Main Ingredients: Extra-virgin olive oil, fresh lemon juice, lemon zest, eggs, flour
  • Method: Whip eggs and sugar until fluffy, drizzle in olive oil, add wet and dry ingredients, and bake in a single 9-inch pan.
  • Texture and Flavor: Tender, moist, fragrant, bright, and not too sweet.
  • Quick Tip: Use good-quality extra-virgin olive oil. It's the star flavor alongside the lemon, and the cheap stuff will taste flat.
ChatGPT
Google AI
Perplexity
Grok
Add us as a trusted site on Google
[feast_advanced_jump_to]

Lemon olive oil cake is one of those desserts that feels fancy but takes almost no effort. It's light, not too sweet, and has that perfect balance of bright citrus and rich olive oil flavor that makes it feel like something you'd order at an Italian restaurant. I love serving it for Mother's Day brunch, dinner parties, or anytime I want a dessert that isn't a traditional frosted cake.

The cake is naturally dairy-free (the only dairy was the buttermilk powder and it's no longer needed), making it a great option for guests with dietary restrictions. It's also beautifully versatile, topped with just powdered sugar it feels elegant and simple, or dressed up with fresh berries, a dollop of whipped cream, or a drizzle of lemon curd for something more special.

What Makes This Lemon Olive Oil Cake Work So Well

Whipping the eggs and sugar first is the key to the cake's light texture. Most cakes rely on creaming butter and sugar together to build structure, but olive oil cakes whip air into the eggs instead. That aerated egg mixture is what gives you a tender, slightly springy crumb without any butter.

Using real lemon juice instead of water adds another layer of flavor and acidity. The acid in lemon juice reacts with the baking powder for a better rise and gives the cake a bright, fresh citrus note that you can't get from extract alone. Paired with the zest of two whole lemons, the citrus flavor comes through in every bite.

Extra-virgin olive oil does double duty: it keeps the cake moist for days and gives it a distinctive, slightly fruity flavor that sets it apart from every other cake in your recipe box. Since the olive oil is one of the two main flavors (along with the lemon), using a quality oil makes a noticeable difference.

Lemon Olive Oil Cake Ingredients

The beauty of an olive oil cake is that the ingredient list is short, and most of these are pantry staples. What you choose matters more than how many things you use.

Lemon olive oil ingredients in bowls on a white countertop.
  • Extra-Virgin Olive Oil. Use a good-quality extra-virgin olive oil you'd be happy to drizzle over a salad. It's one of the two main flavors in this cake, so cheap or off-brand oil will taste flat. A mild, fruity Italian or California olive oil works beautifully. Don't substitute canola or vegetable oil unless you don't mind losing the signature flavor.
  • Fresh Lemon Juice. Real lemon juice, not bottled, brings bright acidity and fresh flavor. The acid also reacts with the baking powder for extra lift. Two medium lemons will give you the 3 ounces you need.
  • Lemon Zest. Zest is where the essential oils live, which means most of the lemon's aromatic flavor. Using the zest of two whole lemons gives this cake its bright, fragrant citrus flavor. Zest only the yellow skin, not the bitter white pith underneath.
  • Eggs. Room-temperature eggs whip up with more volume than cold ones. The whipped eggs and sugar create the cake's structure, so this step matters.
  • Granulated Sugar. Regular white sugar. It sweetens the cake and helps the whipped eggs hold their air.
  • All-Purpose Flour. Standard all-purpose works perfectly here. Cake flour would make the cake too delicate for the moisture from the olive oil and lemon juice.
  • Baking Powder. Gives the cake its lift. Make sure yours is fresh, older baking powder loses its power.
  • Vanilla Extract. Rounds out the flavor and balances the lemon. Use real vanilla extract, not imitation.
  • Kosher Salt. Balances the sweetness and brings out the other flavors.
  • Powdered Sugar. For dusting the top. It's all the "frosting" this cake needs.

Tips For Success

  • Use a kitchen scale for the most consistent results. Weight measurements beat cup measurements every time.
  • Bring your eggs to room temperature before whipping. Cold eggs won't whip up to the same volume.
  • Zest before juicing. It's much easier to zest a whole, firm lemon than a squeezed one.
  • Use a microplane or fine zester. Coarse zest gives you bitter white pith in the cake.
  • Drizzle the olive oil in slowly while whipping so it emulsifies with the eggs without deflating them.
  • Don't overmix once the flour goes in. Fold just until combined. Overmixing develops gluten and makes the cake tough.

Lemon Olive Oil Cake Step-By-Step

Cake pan prepared with pan release on a white countertop.
  1. Preheat the oven to 350°F (177°C) and prepare a 9-inch cake pan with cake goop or parchment paper. You can also use a springform pan or loaf pan if you prefer, just adjust the baking time.
Close up of a mixer whisking eggs and sugar together.
  1. In the bowl of a stand mixer fitted with the whisk attachment, whisk the eggs on medium-high speed until foamy. With the mixer still running, slowly sprinkle in the granulated sugar until all of it is added. Take your time with this. Continue whipping on high until the mixture reaches the ribbon stage. This will take a few minutes.
Close up of lemon zest on a zester.
  1. While the mixer is going, zest and juice your two lemons.

Thick and foamy eggs and sugar mixture dripping off a whisk attachment.
  1. You'll know the egg mixture is ready when the mixture is thick, foamy, and sort of lays on the surface for a few seconds when you drizzle it back on itself.
Olive oil being drizzled into whipping egg and sugar mixture.
  1. While the mixer is still running, slowly drizzle the olive oil down the side of the bowl between the whisk blades until fully incorporated.

    Add the lemon juice, zest, and vanilla extract. Mix briefly on low until combined.
Sifter with flour mixture inside on top of the bowl of a stand mixer.
  1. Place a sifter over the bowl and sift in the flour, baking powder, and salt.
Close up of lemon olive oil cake batter in the bowl of a stand mixer.
  1. Fold everything together with a rubber spatula until you no longer see any flour streaks. Do not overmix.
Olive oil cake batter in a cake pan on a countertop.
  1. Pour the batter into the prepared pan.
Olive oil cake on a cooling rack.
  1. Bake for 25 -30 minutes, or until the cake is golden brown and a toothpick inserted into the center comes out clean.

    Cool the cake in the pan for 10 minutes, then turn it out onto a wire rack to cool completely.

Powdered sugar dusted olive oil cake with a slice taken out of it.
  1. Place the cooled cake on a serving plate and dust the top with powdered sugar. For a pretty pattern, lay a paper doily or cutout shape on top before dusting, then lift it away. Top with fresh berries, lemon curd, or a dollop of whipped cream if you want something more.

Common Lemon Olive Oil Cake Mistakes

  • Opening the oven door during baking. The cake will sink in the middle.
  • Using low-quality olive oil. The oil flavor comes through in the finished cake, so it has to taste good.
  • Using bottled lemon juice instead of fresh. Bottled lemon juice tastes metallic and flat. Fresh is non-negotiable.
  • Zesting too deeply. If you zest into the white pith, your cake will taste bitter.
  • Cold eggs. Cold eggs won't whip to full volume, and your cake will be denser.
  • Overmixing after the flour goes in. Fold just until combined. Overmixing develops gluten and toughens the cake.

Lemon Olive Oil Cake FAQ

Does olive oil cake taste like olive oil?

Yes, but in a subtle, pleasant way. The olive oil flavor is rich and slightly fruity, not savory or heavy. Paired with the bright lemon, it tastes more like a fragrant Mediterranean dessert than a salad.

Can I use canola or vegetable oil instead of olive oil?

Technically, yes, but the cake won't have the signature flavor that makes olive oil cake special. If you're going to substitute, you may want to try a different recipe. The olive oil is the point.

Is olive oil cake healthier than a butter-based cake?

Olive oil contains heart-healthy monounsaturated fats, so many people consider it a slightly healthier choice than butter. That said, this is still a dessert with sugar and flour, so moderation matters.

What do you serve with lemon olive oil cake?

Fresh berries (strawberries, blueberries, raspberries) are my favorite. A dollop of stabilized whipped cream, a drizzle of lemon curd, or a scoop of vanilla ice cream all work beautifully. This cake also pairs great with espresso or a glass of Prosecco.

Can I make this cake ahead of time?

Yes. The flavor actually deepens overnight, so this is a great make-ahead cake. Bake it, let it cool completely, wrap it tightly in plastic wrap, and store at room temperature for up to 5 days. You can also freeze the unfrosted cake for up to 2 months.

Can I make this cake in a loaf pan?

Yes. Pour the batter into a greased 9x5-inch loaf pan and bake for about 35 to 45 minutes, or until a toothpick comes out clean. Check for doneness starting at 35 minutes.

Can I make this cake gluten-free?

Yes, substitute a 1:1 gluten-free all-purpose flour blend (look for one that contains xanthan gum). The texture will be slightly different but still delicious.

More Easy Dessert Recipes To Try

  • close up of sliced lemon pound cake
    Lemon Pound Cake Recipe
  • vanilla bundt cake with vanilla glaze
    Moist Vanilla Bundt Cake Recipe
  • close up of chocolate mousse in a clear cup
    Easy Chocolate Honey Mousse Recipe
  • closeup of strawberry shortcake slice on a white plate
    Strawberry Shortcake Cake

Leave Me A Review
⭐️⭐️⭐️⭐️⭐️

If you tried this Lemon Olive Oil Cake Recipe or any other recipe on my blog, please leave a 🌟 star rating and let me know how it goes in the comments. I love hearing from you!

Recipe

Finely textured slice of olive oil cake with a dusting of powdered sugar on top.
Print Recipe
4.84 from 6 votes

Lemon Olive Oil Cake

This lemon olive oil cake is moist, and tender with a touch of lemon and olive oil flavor. It comes together in less than 40 minutes and makes a fantastic last minute dessert!
Prep Time15 minutes mins
Cook Time25 minutes mins
Total Time40 minutes mins
Course: Dessert
Cuisine: Italian
Servings: 12 servings
Calories: 262kcal
Author: Liz Marek

Equipment

  • 1 9" x 2" cake pan

Ingredients

  • 3 large eggs room temperature
  • 5 ounces granulated sugar
  • 6 ounces extra-virgin olive oil
  • 4 ounces lemon juice
  • 2 teaspoons lemon zest zest from two lemons
  • ½ teaspoon vanilla extract
  • 7 ounces all purpose flour
  • 1.5 teaspoons baking powder
  • ½ teaspoon kosher salt
  • ¼ cup powdered sugar for dusting
US Customary - Metric

Instructions

  • Preheat the oven to 350°F and coat an 9" cake pan with cake goop or parchment paper. You can also use a springform pan or loaf pan if you prefer, just adjust the baking time. 
  • In the bowl of a stand mixer fitted with the whisk attachment, whisk the eggs on medium-high speed until foamy.
  • With the mixer still running, slowly sprinkle in the granulated sugar until all of it is added. Continue whipping on high until the mixture reaches the ribbon stage. The mixture should be thick, foamy, and lay on the surface for a few seconds when drizzled back on itself.
  • With the mixer still running, slowly drizzle the olive oil down the side of the bowl between the whisk blades until fully incorporated.
  • Add the lemon juice, zest, and vanilla extract. Mix briefly on low until combined.
  • Place a sifter over the bowl and sift in the flour, baking powder, and salt.
  • Fold everything together with a rubber spatula until you no longer see any flour streaks. Do not overmix.
  • Pour the batter into the prepared pan and smooth the top with a spatula.
  • Bake for 25-30 minutes, or until the cake is golden brown and a toothpick inserted into the center comes out clean.
  • Cool the cake in the pan for 10 minutes, then turn it out onto a wire rack to cool completely.
  • Place the cooled cake on a serving plate and dust the top with powdered sugar. For a pretty pattern, lay a paper doily or cutout shape on top before dusting, then lift it away.
  • Store in an airtight container at room temperature for up to 5 days.

Video

Notes

  1. Use good-quality extra-virgin olive oil. It's one of the main flavors in the cake, so cheap or off-brand oil will taste flat.
  2. Use fresh lemon juice only. Bottled lemon juice tastes metallic and dull. Two medium lemons give you the 3 ounces you need.
  3. Zest your lemons before juicing. A microplane or fine zester gives you the cleanest zest without the bitter white pith underneath.
  4. This cake is naturally dairy-free. Perfect for guests with dietary restrictions.
Pan options
  1. A 9-inch round cake pan is the recommended size and gives you the quick 25-minute bake.
  2. Springform pan works beautifully for easy release and a clean presentation.
  3. 9x5-inch loaf pan also works. Bake for 35 to 45 minutes and check for doneness starting at 35.
Make-ahead and storage
  1. This cake tastes even better the next day. The flavor deepens overnight.
  2. Store in an airtight container at room temperature for up to 5 days.
  3. Freeze the unfrosted cake for up to 2 months. Wrap tightly in plastic wrap and thaw on the counter still wrapped before serving.
Serving ideas
  1. Top with a simple dusting of powdered sugar for an elegant finish.
  2. Pair with fresh berries, whipped cream, lemon curd, or a scoop of vanilla ice cream.
  3. Serve with coffee, espresso, or a glass of Prosecco.
High altitude baking
  1. At elevations above 5,000 feet, reduce the baking powder by ¼ teaspoon and increase the oven temperature by 25°F to prevent the cake from collapsing.
Critical do-nots
  1. Do not use bottled lemon juice. Fresh only.
  2. Do not zest into the white pith. It will make the cake bitter.
  3. Do not overmix after the flour goes in. Fold just until combined.
  4. Do not open the oven door during baking. The cake will sink in the middle.

Nutrition

Serving: 1serving | Calories: 262kcal | Carbohydrates: 28g | Protein: 3g | Fat: 16g | Saturated Fat: 2g | Polyunsaturated Fat: 2g | Monounsaturated Fat: 11g | Trans Fat: 0.01g | Cholesterol: 47mg | Sodium: 116mg | Potassium: 96mg | Fiber: 1g | Sugar: 15g | Vitamin A: 68IU | Vitamin C: 4mg | Calcium: 33mg | Iron: 1mg
slice of angel food cake with strawberries on top

May 23, 2023 4th of July

Angel Food Cake Recipe

This Angel food cake is insanely soft and fluffy and melts in your mouth. It has a light marshmallowy flavor that will have you eating more than one slice! Top it with some stabilized whipped cream and fresh berries for a new favorite recipe.slice of angel food cake with strawberries on top

Not all cakes need butter to be delicious! It's bright white on the inside with a golden brown crumb around the exterior. This tall, tender, and timeless cake has a cloud-like crumb and light flavor, the perfect cake for fresh fruit. Making this cake at home is easy and you'll love the result, perfect for snacking or an amazing dessert.

Table of contents

  • Ingredients
  • How to Separate an Egg
  • Making Angel Food Cake
  • Frequently Asked Questions
  • Related Recipes

Ingredientsbowls of ingredients for angel food cake

Egg whites are the main ingredient in this angel food cake recipe. There are no leaving agents, so the egg whites and sugar whipped into a meringue is all of the structure of the cake. A small amount of flour is then folded into the egg whites to make the cake. You can use fresh egg whites carefully separated from the egg yolk or you can use pasteurized egg whites from a box. The fresh ones will whip up a little higher, but I tested both and they both make a nice angel food cake.

Cake flour has the least amount of protein so it makes a really light texture. Also, you don't agitate the flour much, just barely fold it in and then bake it. This is what gives the angel food cake that spongy light-as-air texture.

Cream of tartar is an acid, a byproduct of fermenting grapes into wine. Its scientific name is potassium bitartrate, aka potassium hydrogen tartrate or tartaric acid. The added acid to the egg whites helps the protein stabilize, allowing the stiff peaks to hold up while folding and baking.

How to Separate an Egg

  1. Set up 3 bowls, one for the yolks, one to crack the whites into, and one for all the egg whites. The reason we have the 2nd and 3rd bowls is if you mess up and accidentally get some yolk in the 2nd bowl, it won't ruin all of your already separated eggs.hands cracking an egg over a bowl
  2. Crack the egg on a flat surface and gently break it apart with two hands. Then hold it over the 2nd bowl and slowly move the yolk back and forth between the two eggshells. Be careful to not break the yolk. Once all the white is in the 2nd bowl, add the yolk to the 1st bowl and pour the whites into the 3rd bowl. Repeat until all your eggs are separated. Save your leftover egg yolks to make lemon curd or pastry cream or French buttercream. Egg yolks can be stored in the fridge for up to three days.pouring egg whites into a bowl

Making Angel Food Cake

  1. Preheat your oven to 375ºF. It's important that the oven is fully pre-heated before you put the cake in the oven, which can take up to 30 minutes. 
  2. To ensure your bowl and whisk are clean, wipe them out with a clean towel and some white vinegar to remove any bits of fat that might be there. hand cleaning out a metal bowl
  3. Sift together the first quantity of sugar, flour, and cornstarch into a large bowl and set it aside.pouring sugar
  4. Weigh the egg whites into the bowl of a stand mixer with a food scale. Whip with the whisk attachment on medium for 30 seconds until they start to get foamy. foamy eggs in a stand mixer bowl
  5. Reduce the speed to low and add in your cream of tartar, salt, and vanilla.adding a bowl of vanilla to a stand mixer bowl
  6. Continue mixing on low and begin sprinkling in the second amount of remaining sugar. sprinkling sugar into a stand mixer bowl
  7. Increase to medium speed and whip the mixture to soft but firm peaks. They should look glossy and moist and the peaks should gently fold over when you scoop them. meringue on a whisk
  8. Sift the dry ingredients into the egg mixture about ⅓ cup at a time and gently fold them together with a rubber spatula. Refer to the video to see how to fold properly. The idea is to avoid knocking any air out of the meringue while folding to keep the batter very fluffy. sifting dry ingredients into a bowl of meringue
  9. Repeat this sifting and folding process until all of the flour mixture has been folded into the meringue.sifting dry ingredients into a bowl of meringue
  10. Carefully pour the angel food cake batter into an ungreased tube pan (ungreased angel food cake pan). You need the cake to stick to the sides of the pan to help it rise while it's baking.adding batter to an angel food tube pan
  11. Slide a knife or offset spatula through the batter to pull out any big air bubbles that might be trapped in there. Smooth the top with a spoon so the batter is level.running a spatula through batter
  12. Bake the angel food cake in the oven on the center rack for 40-45 minutes or until the top is lightly golden brown and the top springs back when you touch it. baked angel food cake in the pan
  13. Take the cake out of the oven and cool it upside down for about 1 hour. Some tube pans have little feet that hold the pan upside down or the center tube might just be a little taller than the sides. If your pan doesn't have these options you can cool the pan upside down on a wine bottle to keep it elevated. Cooling the cake upside down helps the cake keep its volume.upside down angel food cake in the pan
  14. Once the pan is completely cool, you can slide a butter knife between the cake and the pan to detach the cake. If it's an invert pan with a removable bottom, you can push it out now or just give the cake a couple of gentle shakes to get the cake to come out.  sliding a knife around the edges of an angel food cake in the panflipping an angel food cake out of the pan
  15. I like to dust the top of the cake with some powdered sugar and add some whipped cream and fresh strawberries but the possibilities are endless! This is easiest to slice with a serrated knife.angel food cake topped with whipped cream and strawberries
  16. Store the cake at room temperature for up to 4 days (without whipped cream) in an airtight container or covered it with plastic wrap.closeup of angel food cake with strawberries and whipped cream

Frequently Asked Questions

Can I substitute anything for Cream of Tartar? 

Yes, you can substitute 1 teaspoon of vinegar or lemon juice for every ½ teaspoon of cream of tartar. So in this recipe, you can use 2 teaspoons of lemon juice. It can be left out as well, the egg whites just may not whip as firm or hold their shape as well.

Do I Have To Use An Angel Food Cake Pan

Angel Food Pans - An angel food cake pan is designed specifically for this cake because it has flat sides to assist in the rising of the cake. It needs to stick to the sides of the pan so it can help it rise while baking. Also, the center is designed so that it can be cooled upside down and not disturb the top of the baked cake. 
Bundt Cake Pans - These will not work for angel food cake because the intricate design will not allow the cake to release. Since we're not using any pan release, we have to cut the cake away from the sides and that's not possible with a bundt cake pan. 
Loaf Pans - A 9" x 5" loaf pan can work, just make sure to not grease this either. When it comes out of the oven, turn the pan upside down and rest the handles on jars, cans, or cups on top of a cooling rack. Let it cool until the pan is completely cool (about 2 hours).
Cake Pans - You can bake this angel food cake recipe in a standard cake pan. Just remember not to grease the pan. You can put a circle of parchment paper in the bottom of the pan to help it release but don't put any on the sides. Only fill the pans halfway to allow for rising.

Why Did My Angel Food Cake Shrink?

After your angel food cake is done baking, it needs to cool completely upside down to set the structure of the cake. If you turn it over then the cake will collapse in on itself as it cools. 
Also, make sure that you do not overwhip your egg whites. They should be at nice soft peaks. Over-whipping your eggs can cause your cake to shrink.

Do I Need Cream Of Tartar?

If you're using pasteurized egg whites, yes. If you're using fresh egg whites... probably. Cream of tartar is basically citrus that adds stabilization to the egg whites and helps prevent your meringue from collapsing. So if you're using fresh eggs and really don't want to use it, you can leave it out. But it's going to help your meringue stay nice and strong, so I like to use it.

Can I flavor the angel food cake with anything else? 

Yes! I love to fold some shaved chocolate into the batter as I'm folding in the whites, for a chocolate chip angel food. You could also swap the vanilla for lemon extract or almond extract, and add some lemon zest for a bright flavor. 

Can I use all-purpose flour instead of cake flour? 

Technically yes, but the airy texture of the cake will be different. It will be a denser cake and a less tender crumb, because of the extra gluten from the flour making it slightly tougher.

Related Recipes

Strawberry Shortcake Cake

Charlotte Cake

Lemon Pound Cake

Lofthouse Cookies

Recipe

slice of angel food cake with strawberries on top
Print Recipe
4.86 from 27 votes

Angel Food Cake Recipe

This angel food cake recipe makes the lightest, fluffiest, and most cloud-like cake you'll ever taste. This homemade Angel food cake is fat-free and has very little flour so it's also one of the healthiest dessert options.
Prep Time15 minutes mins
Cook Time45 minutes mins
cooling1 hour hr
Total Time3 hours hrs
Course: Dessert
Cuisine: American
Servings: 10 cups
Calories: 345kcal
Author: Liz Marek

Equipment

  • Stand mixer or hand mixer
  • Whisk Attachment

Ingredients

Angel Food Cake Recipe

  • 1 ½ cups egg whites (fresh or pastuerized)
  • 1 teaspoon cream of tartar
  • ¼ teaaspoon salt
  • 1 teaspoon vanilla extract
  • ¾ cup sugar first quantity
  • ¾ cup sugar second quantity
  • 1 ¼ cup cake flour
  • ¼ cup cornstarch

Strawberry Topping

  • 2 cups fresh strawberries trimmed and quartered
  • ½ cup sugar
  • ½ teaspoon lemon zest
  • 1 teaspoon lemon juice

Whipped Cream

  • 1 cup heavy whipping cream
  • ¼ cup powdered sugar
US Customary - Metric

Instructions

Strawberry Topping

  • Combine the strawberries, sugar, zest, and lemon juice together in a bowl and set aside while the angel food cake is cooling. The sugar will dissolve over time and create a delicious syrup!

How to Separate an Egg

  • Set up 3 bowls, one for the yolks, one to crack the whites into, and one for all the egg whites. The reason we have the 2nd and 3rd bowls is if you mess up and accidentally get some yolk in the 2nd bowl, it won't ruin all of your already separated eggs.
  • Crack the egg on a flat surface and gently break it apart with two hands. Then hold it over the 2nd bowl and slowly move the yolk back and forth between the two eggshells. Be careful to not break the yolk. Once all the white is in the 2nd bowl, add the yolk to the 1st bowl and pour the whites into the 3rd bowl. Repeat until all your eggs are separated. Egg yolks can be stored in the fridge for up to three days.

Making Angel Food Cake

  • Preheat your oven to 375ºF. It's important that the oven is fully pre-heated before you put the cake in the oven, which can take up to 30 minutes. 
  • To ensure your bowl and whisk are clean, wipe them out with a clean towel and some white vinegar to remove any bits of fat that might be there. 
  • Sift together the first quantity of sugar, flour, and cornstarch into a large bowl and set it aside.
  • Weigh the egg whites into the bowl of a stand mixer with a food scale. Whip with the whisk attachment on medium for 30 seconds until they start to get foamy. 
  • Reduce the speed to low and add in your cream of tartar, salt, and vanilla.
  • Continue mixing on low and begin sprinkling in the second amount of remaining sugar. 
  • Increase to medium speed and whip the mixture to soft but firm peaks. They should look glossy and moist and the peaks should gently fold over when you scoop them. 
  • Sift the dry ingredients into the egg mixture about ⅓ cup at a time and gently fold them together with a rubber spatula. Refer to the video to see how to fold properly. The idea is to avoid knocking any air out of the meringue while folding to keep the batter very fluffy. 
  • Repeat this sifting and folding process until all of the flour mixture has been folded into the meringue.
  • Carefully pour the angel food cake batter into an ungreased tube pan. You need the cake to stick to the sides of the pan to help it rise while it's baking.
  • Slide a knife or offset spatula through the batter to pull out any big air bubbles that might be trapped in there. Smooth the top with a spoon so the batter is level.
  • Bake the angel food cake in the oven on the center rack for 40-45 minutes or until the top is lightly golden brown and the top springs back when you touch it. 
  • Take the cake out of the oven and cool it upside down for about 1 hour. Some tube pans have little feet that hold the pan upside down or the center tube might just be a little taller than the sides. If your pan doesn't have these options you can cool the pan upside down on a wine bottle to keep it elevated. Cooling the cake upside down helps the cake keep its volume.
  • Once the pan is completely cool, you can slide a butter knife between the cake and the pan to detach the cake. If it's an invert pan with a removable bottom, you can push it out now or just give the cake a couple of gentle shakes to get the cake to come out.  
  • I like to dust the top of the cake with some powdered sugar and add some whipped cream and fresh strawberries but the possibilities are endless! This is easiest to slice with a serrated knife.
  • Store the cake at room temperature for up to 4 days (without whipped cream) in an airtight container or covered it with plastic wrap.

Video

Notes

  1. BEFORE YOU START - For best results, use a food scale to weigh your ingredients. Converting this recipe to cups could lead to failure. Read my blog post on how to use a scale for more information.
  2. I'm using my Bosch Universal Plus mixer for this recipe, you can use a KitchenAid mixer with a metal bowl or a hand mixer. 
  3. There is no baking powder or rising ingredient in this recipe. The only thing that creates lift is the egg whites, so be sure to whip them up to be super light and fluffy. All the air is going to give the cake its lift! 
  4. Make sure you use a metal bowl to make the meringue, and that the bowl is super clean. Any grease will prevent your egg whites from whipping up. You can even wipe it out with a little bit of white vinegar to be extra cautious.
  5. Remember to not let a speck of egg yolk into your egg whites. Any lingering yolks could stop your meringue from whipping up.
  6. You can use pasteurized egg whites instead of fresh. If you use pasteurized, you MUST also use cream of tartar to help stabilize. 
  7. The cornstarch in this recipe helps to keep the cake super light and fluffy and not too dense or "eggy."
  8. When folding your meringue and flour together, sweep underneath the meringue with a spatula and gently drag up through the center to fold on top. Be careful to never smash or mix vigorously, be patient! 
  9. DO NOT GREASE YOUR PAN! Angel food cake cools upside down, so it actually needs to stick to the sides of the pan. This ensures that the cake doesn't collapse in on itself while cooling.
  10. A tube pan is best to use for angel food cake. The large tube in the center helps bring some of the heat up through the middle of the cake, baking it faster and more evenly. You cannot use a bundt cake pan, but you can use a 9"x5" if needed.

Nutrition

Serving: 8ounces | Calories: 345kcal | Carbohydrates: 61g | Protein: 7g | Fat: 9g | Saturated Fat: 6g | Polyunsaturated Fat: 1g | Monounsaturated Fat: 2g | Cholesterol: 27mg | Sodium: 78mg | Potassium: 193mg | Fiber: 1g | Sugar: 45g | Vitamin A: 354IU | Vitamin C: 17mg | Calcium: 26mg | Iron: 0.4mg

May 19, 2023 Cake

Red White And Blue Cake

This red, white, and blue cake is the perfect cake to celebrate the Fourth of July or memorial day. Sandwich a red cake and a blue cake together with vanilla ice cream and top it all off with stabilized whipped cream. When you slice into it, it's so fun to see the red, white, and blue stripes appear!

close up of red white and blue cake with slice taken out of the front

Ever since I made my Oreo ice cream cake, I've been obsessed with making more and more ice cream cakes! They are SO easy and fun! If you don't want to make an ice cream cake though, just divide the batter into 3 bowls when coloring them and leave one white layer for the center.

PRO TIP - You definitely want to make this cake at least 1 day in advance because you have to freeze the cake and ice cream layers before you assemble it. Ideally, the cake should be totally frozen (at least 6 hours) before you serve it to prevent premature melting.

close up of red white and blue ice cream cake on a white plate
 

Ingredients

red white and blue ice cream cake ingredients separated into bowls

Buttermilk: This vanilla cake recipe is my white velvet buttermilk cake which I often use to make colored layers of cake. Buttermilk tenderizes the gluten in the cake flour, which is already soft, creating a melt-in-your-mouth feel with this cake crumb. Learn how to make your own with milk and vinegar, sour cream, or Greek yogurt in my buttermilk substitutes blog post.

Cake Flour: This recipe works best with cake flour because the layers are nice and moist. If you can't find cake flour in your area then I recommend you try my white cake recipe or doctored white cake mix which uses all-purpose flour. The cake is a bit more firm but still very very tasty.

Ice Cream: The best part about this cake is that you can use any flavor of ice cream, as long as it's white! Cookies and cream, cookie dough, or chocolate chips would also be delicious.

Whipped Cream: Any type of whipped-topping like stabilized whipped cream, CoolWhip, or Bettercreme is going to work well with ice cream cake because it doesn't get too hard while frozen. If you're traveling a long distance with your cake, use a more stable buttercream like easy buttercream or American buttercream frosting.

Food Coloring: I like using Americolor food coloring gel but you can use whatever colors you like. Just keep in mind that some blue food coloring might look more purple or green once it's baked. That's why I recommend using Americolor super red for the red cake, and electric blue food coloring because I know it bakes up a nice bright, true blue.

How to make a red, white, and blue cake

If you're making this into an ice cream cake, I recommend a two-day process. First, make the cake layers and let them cool, then make the ice cream layer and let that chill for 6 hours, assemble the cakes and cover the whole cake in whipped cream and decorate with some sprinkles. If you don't want to make the ice cream layer, divide the batter into 3 bowls and leave one of them white, just bake for less time!

Making the Red and Blue Cake Layers

  1. Preheat your oven to 335ºF (170ºC) and prepare two 8"x2" cake pans with cake goop or your preferred pan release.
  2. Bring your buttermilk, egg whites, and butter to room temperature (a little warm is even better) so that your ingredients mix together smoothly and your cake bakes up properly. If you don't have buttermilk, check out my buttermilk substitutes blog post for alternatives.
  3. Combine the flour, sugar, baking powder, baking soda, and salt in the bowl of a stand mixer with the paddle attachment. bowl pouring flour into a stand mixer mixing bowl
  4. Divide your buttermilk in half. Combine ½ of the buttermilk with the oil and set aside. combining milk with oil in a measuring cup
  5. Combine the other ½ of the buttermilk, egg whites, and vanilla extract together, whisk to break up the eggs, and set aside.  adding vanilla to milk and eggs in a bowl
  6. Add your softened butter to the dry ingredients and mix on low until the mixture resembles coarse sand. close up of cake batter texture in a females hand
  7. Add in your buttermilk/oil mixture and let it mix until the dry ingredients are moistened, then bump the speed up to medium (setting 4 on my KitchenAid, speed 2 on my Bosch) and let it mix for 2 full minutes to develop the cake's structure. If you don't let your cake mix on this step your cake may not rise properly. The batter should look white and fluffy and not broken or curdled.
  8. Scrape the sides of the bowl and then reduce the speed to low. Add in your egg white mixture in three batches, letting the batter mix for 15 seconds between additions. Mix until everything is combined. The finished cake batter should look smooth and not curdled. adding milk mixture to cake battercloseup of finished cake batter on a spatula
  9. Divide your cake batter evenly into two bowls. I like to weigh my cake pans so that I know each layer is even. adding cake batter to a clear bowl on a kitchen scale
  10. Add 1 Tablespoon of red food coloring to the first bowl and stir until fully mixed. I like the Super Red gel food color by Americolor.mixing red food coloring into white cake batter
  11. Add 1 Tablespoon of electric blue food coloring to the second bowl and stir until fully mixed. adding blue food coloring to white cake batter
  12. Pour each cake batter into a prepared 8"x2" round cake pan.red and blue cake batter in cake pans
  13. Bake the layers for 30-35 minutes or until the center bounces back when you lightly touch it. finished red and blue cake layers on a cooling rack
  14. Once your layer is baked, remove it from the oven and immediately tap it on the countertop to release excess air. This helps prevent shrinking as the cake cools.
  15. Let the cake cool for 10-15 minutes in the pan and then flip the cake out onto a wire rack.turning baked cake layers onto a cooling rack
  16. Once your cake has cooled down a little, carefully trim off the dome of your cake layer so it's nice and flat on top. cutting the dome off the finished cake layers
  17. Wrap your warm cake in plastic wrap and place it into the freezer until it's time to assemble the red white and blue ice cream cake. PRO TIP - Freezing your cake while it's still warm locks in the moisture, you can then freeze your cake for a few days without it drying out.

Making the Ice Cream layer

  1. Take the ice cream out of the freezer 30 minutes before you need to use it to allow it to soften.
  2. Cover the inside of an 8" cake pan in aluminum foil or parchment paper.  putting aluminum foil inside a cake pan
  3. Spread the softened ice cream into the cake pan evenly and smooth out the top.  placing softened ice cream into an aluminum foil lined cake pansmoothing ice cream in an aluminum foil lined cake pan
  4. Place it back into the freezer overnight or for a minimum of 6 hours.

Making Stabilized Whipped Cream

  1. Sprinkle the gelatin over the water and let it bloom for 5 minutes. If you don't want to use gelatin, check out my stabilized whipped cream blog post for 5 other substitutes.sprinkling gelatin into cold water
  2. Microwave the gelatin for 15 seconds and then stir. If the gelatin isn't fully melted continue melting in 5-second increments until the liquid is clear. Don't over-heat it. melted gelatin on a spoon
  3. Add 1 Tablespoon of cream to the gelatin and stir to combine. Set aside while you make the whipped cream.
  4. Begin whipping your heavy whipping cream in the bowl of your stand mixer with the whisk attachment on medium speed.
  5. Once the whipped cream is thick and foamy, add in the powdered sugar and the vanilla.adding vanilla to whipping cream
  6. Continue whipping the cream until you see lines beginning to form in the surface of the cream (soft peaks).
  7. Reduce the speed to low and then begin drizzling in the melted gelatin in a steady stream. adding gelatin mixture to whipping cream
  8. Continue mixing until firm peaks (holding their shape but still creamy) form but don't over-mix it or it will begin to curdle and turn to butter. finished whipped cream on a green spatula

Assembling the Cake

  1. Place your frozen blue layer cake onto your cake platter or cake board and apply a thin layer of whipped cream to the top.blue cake layer on a cake board
  2. Unwrap your ice cream layer from the foil and place it on top of the blue layer, then spread another thin layer of whipped cream on top. unwrapping ice cream cake layer from aluminum foilice cream layer on top of blue cake layer
  3. Add the second layer of cake on top.red cake layer on top of ice cream and blue cake layer
  4. Cover the outside of the cake with more whipped cream and smooth it out with your offset spatula and bench scraper. If it starts to melt, freeze it after doing the crumb coat before doing a final coat of frosting on the entire cake.smoothing red white and blue ice cream cake with bench scraper
  5. Pipe the remaining frosting with a 1M piping tip and piping bag to make a cute shell border.  piping a border with a piping bag and 1M piping tip
  6. Place the red white and blue ice cream cake into the freezer until you're ready to serve it.
  7. Right before serving, you can add some patriotic sprinkles, fresh berries, and fresh strawberries on the outside and on top of the cake. Leave this part to the end so that the berries don't get all soggy and the sprinkles don't melt and get weird-looking after being frozen. adding strawberries and blueberries to the top of the ice cream cake
hand pulling a slice of red white and blue ice cream cake out of the main cake

FAQ

How do you keep an ice cream cake from melting?

Work very quickly! Have your frosting ready to use. Place your cake back into the freezer in between steps if needed. Make your room as cold as possible.

Can I put an ice cream cake in the fridge?

You can move your cake from the freezer to the fridge 30 minutes before you are ready to serve it. Your cake should not be permanently stored in the fridge or it will melt.

How to make ice cream cake gluten-free

You can make any of my cake recipes gluten-free by replacing the flour with Bob's Red Mill gluten-free baking mix or another kind of gluten-free flour like Cup4Cup. Make sure your ice cream is also gluten-free (check the ingredients) because sometimes ice cream contains wheat.

How do you cut an ice cream cake?

Take the cake out of the freezer and place it into the fridge or let it sit at room temperature for 30 minutes before cutting. Use a knife dipped in hot water before slicing.

What frosting is best to use for ice cream cake?

I'm using stabilized whipped cream for this recipe because it will soften at the same rate as the ice cream filling. Any type of whipped-topping like CoolWhip or Bettercreme is going to work well. If you're traveling a long distance with your cake, use a more stable buttercream like easy buttercream or American buttercream. Then store the cake in a cooler with dry ice to keep everything from melting, especially during warmer weather.

Other Recipes You'll Love

Oreo Ice Cream Cake

Red Velvet Cake With Cream Cheese Frosting

Berry Chantilly Cake

Recipe

close up of red white and blue cake with slice taken out of the front
Print Recipe
5 from 6 votes

Red White And Blue Ice Cream Cake

Red and blue layers of moist vanilla cake and vanilla ice cream make the most festive 4th of July cake ever! You won't believe how easy it is to make your own ice cream cake!
Prep Time10 minutes mins
Cook Time40 minutes mins
freezing1 day d
Total Time1 day d 50 minutes mins
Course: Dessert
Cuisine: American
Servings: 8 cups
Calories: 208kcal
Author: Liz Marek

Equipment

  • Stand Mixer
  • Two 8"x2" cake pans
  • Tin foil
  • Bench scraper or spatula

Ingredients

Cake Ingredients

  • 14 ounces cake flour
  • 13 ounces granulated sugar
  • 1 teaspoon salt
  • 1 Tablespoon baking powder
  • ½ teaspoon baking soda
  • 5 ounces egg whites room temperature
  • 4 ounces vegetable oil
  • 10 ounces buttermilk slightly warm and divided into two cups evenly
  • 6 ounces butter unsalted and softened
  • 2 teaspoons vanilla
  • 1 Tablespoon super red food coloring, I use Americolor gel colors
  • 1 Tablespoon electric blue food coloring

Ice Cream Layer

  • 48 ounces vanilla ice cream

Stabilized Whipped Cream

  • 16 ounces Heavy Whipping Cream
  • 3 ounces Powdered Sugar
  • 1 ½ teaspoons Vanilla
  • 1 ½ teaspoons Powdered Gelatin I use KNOX
  • 2 Tablespoons Cool Water
  • 1 ½ teaspoons Heavy Whipping Cream
  • 2 Tablespoons Red White And Blue Sprinkles For garnish
US Customary - Metric

Instructions

  • NOTE: It is SUPER IMPORTANT that all the room temperature ingredients listed above are room temperature and measured by weight so that the ingredients mix and incorporate correctly. Learn more about how and why to use a scale for baking in my tutorial.

Making the Red and Blue Cake Layers

  • Preheat your oven to 335ºF (170ºC) and prepare two 8"x2" cake pans with cake goop or your preferred pan release.
  • Bring your buttermilk, egg whites, and butter to room temperature (a little warm is even better) so that your ingredients mix together smoothly and your cake bakes up properly. If you don't have buttermilk, check out my buttermilk substitutes blog post for alternatives.
  • Combine the flour, sugar, baking powder, baking soda, and salt in the bowl of a stand mixer with the paddle attachment. 
  • Divide your buttermilk in half. Combine ½ of the buttermilk with the oil and set aside. 
  • Combine the other ½ of the buttermilk, egg whites, and vanilla extract together, whisk to break up the eggs, and set aside.  
  • Add the softened butter to the dry ingredients and mix on low until the mixture resembles coarse sand. 
  • Add in your buttermilk/oil mixture and let it mix until the dry ingredients are moistened, then bump the speed up to medium (setting 4 on my KitchenAid, speed 2 on my Bosch) and let it mix for 2 full minutes to develop the cake's structure. If you don't let your cake mix on this step your cake may not rise properly. The batter should look white and fluffy and not broken or curdled.
  • Scrape the sides of the bowl and then reduce the speed to low. Add in your egg white mixture in three batches, letting the batter mix for 15 seconds between additions. Mix until everything is combined. The finished cake batter should look smooth and not curdled. 
  • Divide your cake batter evenly into two bowls. I like to weigh my cake pans so that I know each layer is even. 
  • Add 1 Tablespoon of red food coloring to the first bowl and stir until fully mixed. I like the Super Red gel food color by Americolor.
  • Add 1 Tablespoon of electric blue food coloring to the second bowl and stir until fully mixed. 
  • Pour each cake batter into the cake pans.
  • Bake the layers for 30-35 minutes or until the center bounces back when you lightly touch it. 
  • Once your layer is baked, remove it from the oven and immediately tap it on the countertop to release excess air. This helps prevent shrinking as the cake cools.
  • Let the cake cool for 10-15 minutes in the pan and then flip the cake out onto a wire rack.
  • Once your cake has cooled down a little, carefully trim off the dome of your cake layer so it's nice and flat on top. 
  • Wrap your warm cake in plastic wrap and place it into the freezer until it's time to assemble the red white and blue ice cream cake. PRO TIP - Freezing your cake while it's still warm locks in the moisture, you can then freeze your cake for a few days without it drying out.

Making the Ice Cream layer

  • Take the ice cream out of the freezer 30 minutes before you need to use it to allow it to soften.
  • Cover the inside of an 8" cake pan in aluminum foil or parchment paper.  
  • Spread the softened ice cream into the cake pan evenly and smooth out the top.  
  • Place it back into the freezer overnight or for a minimum of 6 hours.

Making Stabilized Whipped Cream

  • Sprinkle the gelatin over the water and let it bloom for 5 minutes. If you don't want to use gelatin, check out my stabilized whipped cream blog post for 5 other substitutes.
  • Microwave the gelatin for 15 seconds and then stir. If the gelatin isn't fully melted continue melting in 5-second increments until the liquid is clear. Don't over-heat it. 
  • Add 1 Tablespoon of cream to the gelatin and stir to combine. Set aside while you make the whipped cream.
  • Begin whipping your heavy whipping cream in the bowl of your stand mixer with the whisk attachment on medium speed.
  • Once the whipped cream is thick and foamy, add in the powdered sugar and the vanilla.
  • Continue whipping the cream until you see lines beginning to form in the surface of the cream (soft peaks).
  • Reduce the speed to low and then begin drizzling in the melted gelatin in a steady stream. 
  • Continue mixing until firm peaks (holding their shape but still creamy) form but don't over-mix it or it will begin to curdle and turn to butter. 

Assembling the Cake

  • Place your frozen blue layer cake onto your cake platter or cake board and apply a thin layer of whipped cream to the top.
  • Unwrap your ice cream layer from the foil and place it on top of the blue layer, then spread another thin layer of whipped cream on top. 
  • Add the second layer of cake on top.
  • Cover the outside of the cake with more whipped cream and smooth it out with your offset spatula and bench scraper. If it starts to melt, freeze it after doing the crumb coat before doing a final coat of frosting on the entire cake.
  • Pipe the remaining frosting with a 1M piping tip and piping bag to make a cute shell border.  
  • Place the red white and blue ice cream cake into the freezer until you're ready to serve it.
  • Right before serving, you can add some patriotic sprinkles, fresh berries, and fresh strawberries on the outside and on top of the cake. Leave this part to the end so that the berries don't get all soggy and the sprinkles don't melt and get weird-looking after being frozen. 

Video

Notes

Important Things To Note Before You Start
 
1. Bring all your ingredients to room temperature or even a little warm (eggs, buttermilk, butter, etc) to ensure your batter does not break or curdle.
2. Use a scale to weigh your ingredients (including liquids) unless otherwise instructed (Tablespoons, teaspoons, pinch, etc). Metric measurements are available in the recipe card. Scaled ingredients are much more accurate than using cups and help ensure the success of your recipe. 
3. Practice Mise en Place (everything in its place). Measure out your ingredients ahead of time and have them ready before you start mixing to reduce the chances of accidentally leaving something out.
4. Freeze your cakes and ice cream layer a minimum of 6 hours before assembling the cake. 
6. If the recipe calls for specific ingredients like cake flour, replacing it with all-purpose flour and cornstarch is not recommended unless specified in the recipe that it’s ok. Substituting ingredients may cause this recipe to fail. 
7.  Gel food coloring works best for this cake, I like to use Americolor super red and electric blue. Using liquid food coloring will not have the same desired effect. 
8. If you don't have buttermilk, check out my buttermilk substitutes blog post for alternatives.
9. No cake flour where you live? Try searching for Shipton mills soft cake and pastry flour, or use any flour that has a protein content of 9% or less.

Nutrition

Serving: 1serving | Calories: 208kcal | Carbohydrates: 21g | Protein: 1g | Fat: 13g | Saturated Fat: 8g | Cholesterol: 28mg | Sodium: 111mg | Potassium: 60mg | Sugar: 15g | Vitamin A: 335IU | Calcium: 31mg | Iron: 0.2mg
tiramisu cheesecake cut open

May 19, 2023 Cheesecake

Tiramisu Cheesecake

This no-bake tiramisu cheesecake is soon to be one of your favorite desserts. Layers of mascarpone and cream cheese filling, crunchy Oreo crust, espresso-soaked ladyfingers, and chocolate ganache combine to make a perfect bite in every mouthful.tiramisu cheesecake cut open

Whether you love or hate traditional tiramisu, I guarantee you'll want to eat this entire cake in one sitting. Tiramisu cheesecake is very easy to make and is the perfect dessert for special occasions.

Table of contents

  • Ingredients
    • Making the Oreo Crust
    • Making the Cheesecake Filling
    • Assembling the Tiramisu Cheesecake
    • Making the ganache drizzle
  • FAQ
  • Related Recipes

Ingredientsbowls of ingredients for tiramisu cheesecake

Mascarpone Cheese is tangy, sweet, and extra smooth Italian cream cheese. It's what gives tiramisu and this recipe that special something.

Oreos make a great crust for a no-bake cheesecake, but you can also use chocolate graham cracker crumbs instead.

Coffee is a classic ingredient for tiramisu, and you can use whatever brand type you like! Just make sure the coffee is cooled down so it doesn't melt the filling.

Making the Oreo Crust

I'm using a cake pan with a cake ring and acetate because that is what I had on hand but you can definitely use a traditional cheesecake springform pan and that works great as well.

  1. Add the Oreos to a food processor and blend while pouring in some melted butter. Mix until combined and it comes together.pouring melted butter into a food processor of oreos
  2. Line an 8" cake ring or springform pan with acetate and tape it together.cake ring and pan lined with acetate
  3. Place an 8" cake board at the bottom of the cake ring and transfer the entire ring to the bottom of a 9-inch cake pan for easy transportation. 
  4. Add the blended Oreo crust to the bottom of the cake ring and press it evenly to the edges. Set it aside.spreading cookie crumbs into the base of a cake pan

Making the Cheesecake Filling

  1. Blend the mascarpone cheese and cream cheese on low speed until smooth in a large bowl with an electric mixer or a stand mixer with a paddle attachment.blended mascarpone and cream cheese in a bowl
  2. Add the vanilla and powdered sugar, one cup at a time, and mix until it's all combined and smooth.adding vanilla to bowl of frosting
  3. In a separate bowl, whip the heavy whipping cream on medium speed until stiff peaks form (just holding their shape). Do not overwhip the cream!blending a bowl of heavy whipping cream
  4. Gently fold the whipped cream into the cream cheese mixture until it's combined.whipped cream and mascarpone frosting in a bowl

Assembling the Tiramisu Cheesecake

  1. Spread half of the cheesecake batter on top of the Oreo crust with a rubber spatula. Pro-tip: Use a piece of acetate to evenly smooth the surface of the cream all the way to the edges.layer of cheesecake in a cake pan
  2. Soak the lady fingers in a bowl of espresso for about 10 seconds. You can make the ladyfingers from scratch, or use store-bought if you prefer.soaking ladyfingers in a bowl of coffee
  3. Place the soaked ladyfingers on top of the cheesecake mixture to completely cover the top. You can break a few in half or squish them to fit around the corners.laying a layer of ladyfingers on top of cheesecake
  4. Spread the remainder of the cheesecake filling on top of the ladyfingers. spreading a layer of cheesecake on top of ladyfingers
  5. Refrigerate the tiramisu cheesecake for at least 6 hours or until the mascarpone cheesecake has set.
  6. Take the cheesecake out of the pan, remove the cake ring, and carefully peel off the acetate. If you used a springform pan or cake pan, wrap it in aluminum foil and use hot water on the sides to help it remove easier.unwrapped tiramisu cheesecake
  7. Add a dusting of cocoa powder to the top of the cheesecake to cover all of the white spots.tiramisu cheesecake with cocoa powder on top
  8. Chill the finished tiramisu cheesecake in the fridge while making the ganache. Topping it with ganache is optional, but makes it really pretty.

Making the ganache drizzle

These photos are for a big batch of ganache but the process is the same.

  1. Heat the cream in the microwave or over the stove until it is just steaming.saucepan of heavy cream on the stove with a whisk stirring
  2. Pour the cream over the chocolate and let it sit for 5 minutes.whisk pushing down chocolate under cream
  3. Whisk the chocolate and cream together until smooth and fully combined.whisk in smooth chocolate ganache
  4. Let it cool for a few minutes to make sure it doesn't melt the top of the cheesecake.
  5. Place the ganache into a piping bag and drizzle it on top of the cheesecake in long strips. You can add a few dollops of whipped cream, chocolate curls, or chocolate shavings on top if you'd like.piping ganache on top of a cheesecake
  6. Cut the cheesecake and enjoy! Store this dessert covered with plastic wrap or in an airtight container in the fridge for about 5 days. Don't let it sit out at room temperature for longer than 4 hours.slice of tiramisu cheesecake

FAQ

Is no-bake cheesecake as good as baked cheesecake?

The main difference between a no-bake cheesecake and a baked cheesecake is the texture. A baked cheesecake is creamy, fluffy, and full, while a no-bake cheesecake is usually more dense and smooth. Both are delicious, and a no-bake cheesecake takes a fraction of the time to make.

What kind of cheese is used in tiramisu?

This Italian dessert is typically made with mascarpone, which is like a buttery, sweet Italian cream cheese. This recipe also has cream cheese for added flavor and smooth texture. Make sure both are at room temperature or slightly warm!

What does tiramisu cheesecake taste like?

This tiramisu cheesecake is creamy and sweet from the cheesecake, has elements of crunch from the Oreo crust, and doesn't have an overwhelming coffee flavor. The mascarpone, cream cheese, and ganache balance out the rich coffee syrup.

Related Recipes

Cherry cheesecake

Hawaiian dole whip

Texas sheet cake

Cream cheese frosting

Recipe

tiramisu cheesecake cut open
Print Recipe
No ratings yet

Tiramisu Cheesecake

Why pick one Italian dessert when you can have both? Combine classic Italian tiramisu, and creamy cheesecake in this no-bake cheesecake recipe! This delicious cheesecake is a subtle nod to the classic tiramisu but with a creamy cheesecake layer and the perfect crunchy texture from the Oreo crust.
Prep Time30 minutes mins
Chilling Time1 hour hr
Total Time1 hour hr 28 minutes mins
Course: Dessert
Cuisine: Italian
Servings: 8 cups
Calories: 874kcal
Author: Liz Marek

Equipment

  • 1 8" cake ring or a cake pan
  • Acetate

Ingredients

Cheesecake Filling

  • 1 cup mascarpone cheese softened
  • 2 cups cream cheese softened
  • 1 teaspoon vanilla extract
  • 1 cup powdered sugar
  • 2 cups heavy cream

Oreo Cookie Crust

  • 1.5 cups oreo cookies
  • 0.25 cup unsalted butter melted

Ladyfinger layer

  • 10 whole ladyfingers homemade or storebought
  • 1.5 cups strong coffee cooled

Decoration and Ganache drip

  • 3 ounces semi-sweet chocolate
  • 2 ounces heavy whipping cream
  • 0.25 cup Dutched cocoa powder for dusting
US Customary - Metric

Instructions

Making the Oreo Crust

  • Add the Oreos to a food processor and blend while pouring in some melted butter. Mix until combined and it comes together.
  • Line an 8" cake ring or springform pan with acetate and tape it together.
  • Place an 8" cake board at the bottom of the cake ring and transfer the entire ring to the bottom of a 9-inch cake pan for easy transportation. 
  • Add the blended Oreo crust to the bottom of the cake ring and press it evenly to the edges. Set it aside.

Making the Cheesecake Filling

  • Blend the mascarpone cheese and cream cheese on low speed until smooth in a large bowl with an electric mixer or a stand mixer with a paddle attachment.
  • Add the vanilla and powdered sugar, one cup at a time, and mix until it's all combined and smooth.
  • In a separate bowl, whip the heavy whipping cream on medium speed until stiff peaks firm. Do not overwhip the cream!
  • Gently fold the whipped cream into the cream cheese mixture until it's combined.

Assembling the Tiramisu Cheesecake

  • Spread half of the cheesecake batter on top of the Oreo crust with a rubber spatula. Pro-tip: Use a piece of acetate to evenly smooth the surface of the cream all the way to the edges.
  • Soak the lady fingers in a bowl of espresso for about 10 seconds. You can make the ladyfingers from scratch, or use store-bought if you prefer.
  • Place the soaked ladyfingers on top of the cheesecake mixture to completely cover the top. You can break a few in half or squish them to fit around the corners.
  • Spread the remainder of the cheesecake filling on top of the ladyfingers. Pro-tip: Use a piece of acetate to evenly smooth the surface of the cream all the way to the edges.
  • Refrigerate the tiramisu cheesecake for at least 6 hours or until the mascarpone cheesecake has set.
  • Take the cake out of the pan, remove the cake ring, and carefully peel off the acetate. If you used a springform pan or cake pan, wrap it in aluminum foil and use hot water on the sides to help it remove easier.
  • Add a dusting of cocoa powder to the top of the cheesecake to cover all of the white spots.
  • Rest it in the fridge while making the ganache. Topping it with ganache is optional, but makes it really pretty.

Making the ganache drip

  • Heat the cream in the microwave or over the stove until it is just steaming.
  • Pour the cream over the chocolate and let it sit for 5 minutes.
  • Whisk the chocolate and cream together until smooth and fully combined.
  • Let it cool for a few minutes to make sure it doesn't melt the top of the cheesecake.
  • Place the ganache into a piping bag and drizzle it on top of the cheesecake in long strips. You can add a few dollops of whipped cream, chocolate curls, or chocolate shavings on top if you'd like.
  • Cut the cheesecake and enjoy! Store this dessert covered with plastic wrap or in an airtight container in the fridge for about 5 days. Don't let it sit out at room temperature for longer than 4 hours.

Notes

Make sure to bring the mascarpone and cream cheese to room temperature, or slightly warmed, so that they combine together smoothly. 
Oreos make a great crust for a no-bake cheesecake, but you can also use chocolate graham cracker crumbs instead.
Coffee is a classic ingredient for tiramisu, and you can use whatever type you like! Espresso will give the strongest, most concentrated coffee flavor.

Nutrition

Serving: 1cup | Calories: 874kcal | Carbohydrates: 50g | Protein: 10g | Fat: 72g | Saturated Fat: 43g | Polyunsaturated Fat: 3g | Monounsaturated Fat: 17g | Trans Fat: 0.3g | Cholesterol: 179mg | Sodium: 334mg | Potassium: 335mg | Fiber: 3g | Sugar: 35g | Vitamin A: 2325IU | Vitamin C: 0.4mg | Calcium: 158mg | Iron: 5mg
closeup of strawberry shortcake slice on a white plate

May 17, 2023 4th of July

Strawberry Shortcake Cake

This strawberry shortcake cake recipe is 4 layers of moist vanilla cake with homemade whipped cream and fresh berries. Make the cake from scratch or doctor up a cake mix if you're looking for an easy version. Super light, summery, and the perfect cake to bring to a birthday party, BBQ, or picnic. 

closeup of strawberry shortcake slice on a white plate
 

Typically, "shortcake" refers to a tender flaky biscuit but I wanted to transform the traditional strawberry shortcake into an actual layer cake while still staying true to those very distinct flavors. I had TWO slices of this cake after the photographs were done because it's SO good! 

Table of contents

  • Strawberry shortcake cake ingredients
  • Making a Strawberry Shortcake Cake
    • Making the Vanilla Cake
    • Making the Whipped Cream
    • Assembling the Strawberry Shortcake Cake
  • FAQ
  • Related Recipes

Strawberry shortcake cake ingredients

Strawberries - The best time to make this cake is during strawberry season, which is May through August in the pacific northwest. Late summer strawberries are actually the tastiest because they get the most warmth and sunshine, aka flavor! 

Cake Flour- Cake flour has a protein level of 9% or less so look for a flour that specifies protein content or ask your local flour supply. If you're in the UK, search for Shipton Mills soft cake and pastry flour. I don't recommend doing the homemade cake flour hack (replacing some flour with cornstarch) for this recipe because of the reverse creaming method. The texture of the cake will be more like cornbread because of the extended mixing. If you're located in another country, you can find cake flour but it might need to be ordered online. In the UK, look for Shipton mills cake and pastry flour. 

Stabilized Whipped Cream- Stabilized whipped cream makes it easier to stack cakes so that it doesn't melt. I like to stabilize it with gelatin, but you can also stabilize it using corn starch or pudding mix or powdered milk, or 5 ways shown in my blog post. 

Making a Strawberry Shortcake Cake

I recommend making the vanilla cake layers either the day ahead or early enough so that they have time to chill. Then wash your berries to let them dry, and make the whipped cream right before you're ready to use it. The stabilized whipped cream will start to set up quickly, so it can't be chilled and reused.

Making the Vanilla Cake

  1. Bring all your ingredients to room temperature, meaning the milk, eggs, and butter should not be even a tiny bit cold. This will ensure that the cake batter mixes together correctly and you'll get a better rise and texture in your final cake. 
  2. Preheat your oven to 335ºF and prepare two 8"x2" round cake pans with cake goop or another preferred kind of pan release and parchment paper. 
  3. I like to pre-measure all my ingredients and have them ready to go so that mixing goes very easily and I don't forget anything. To measure we are using a scale. If you haven't used a scale before, don't be intimidated. It's actually easier than using cups and way fewer dishes (yay). You can get a great scale online or in any local store that sells kitchen equipment. 
  4. Divide your milk in half and add your oil to one half and add the eggs and vanilla to the second half. Set them aside. pouring oil into milk in a measuring cup
  5. Place your cake flour, sugar, baking powder, baking soda, and salt into the bowl of your stand mixer with the paddle attachment attached. dry ingredients going into a mixing bowl
  6. Add in your softened butter and mix at low speed until the flour mixture resembles a coarse sand texture. hand holding butter over dry ingredients in a mixing bowlvanilla cake ingredients in a mixing bowl
  7. Add your milk/oil mixture and increase the speed to medium. Let your cake batter mix for 2 full minutes. Scrape after 1 minute if you need to. The texture should be light, white, and fluffy after 2 minutes. Don't worry you won't overmix it. vanilla cake ingredients close up on a blue spatula
  8. Reduce the speed to low and slowly add in the milk/egg mixture in a steady stream until it's all added in. This takes me about 1 minute. Once the egg mixture is all mixed in, your cake batter is ready to bake!closeup of vanilla cake batter on a blue spatula
  9. Divide your cake batter into your cake pans evenly and bake for 30-35 minutes or until the center bounces back when you lightly touch it. vanilla cake on a cooling rack
  10. Let your cakes cool in the pan for 15 minutes or until the pan is just barely warm to the touch.
  11. Turn the cake out onto a cooling rack to cool the rest of the way or pop them into the freezer to cool them down faster. For me, it takes about an hour and then they are chilled and ready to go. You can also fully freeze your cakes (wrapped in plastic wrap) and that will help seal in the moisture and keep them moist until you're ready to frost your cakes. 

Making the Whipped Cream

  1. Add your powdered gelatin to the cold water and let it bloom for 5 minutes. blooming gelatin in water
  2. Start mixing your 24 ounces of heavy cream in the stand mixer with the whisk attachment until it begins to look thick and foamy. Add the powdered sugar and the vanilla.  adding vanilla to whipped cream mixture
  3. Continue mixing until you start to see lines forming on the surface of the whipped cream (soft peaks)
  4. Microwave the gelatin for 15 seconds and stir. The gelatin granules should look transparent. If they aren't fully melted then go for another 5 seconds.
  5. Add 1 Tablespoon of heavy cream to the melted gelatin and stir.
  6. Drizzle the gelatin mixture into the heavy cream mixture and continue mixing on medium until firm peaks form. Don't over-mix it!adding gelatin mixture to thickened whipped creamclose up of stabilized whipped cream

Assembling the Strawberry Shortcake Cake

  1. Start by slicing your cakes length-wise (tort) with a serrated knife so the layers are thinner. torting a vanilla cake layer
  2. Slice 1 lb of washed strawberries but keep 4-5 whole for decorating the top.slicing strawberries
  3. Place the first layer of cake onto your cake board or cake platter and apply a thin layer of your stabilized whipped cream.
  4. Arrange a single layer of your sliced berries on top of the whipped cream.
  5. Cover the sliced berries in another layer of whipped cream so the top is nice and flat. adding whipped cream to strawberries on a slice of cake
  6. Stack your next layer of cake on top of the berries and whipped cream and repeat the process. I like to leave the sides of the cake without any frosting, but you can cover it if you like.adding cake layer on top of whipped cream and strawberries
  7. Finish with a few dollops of whipped cream and whole berries on top of the cake!adding strawberries to the top of strawberry shortcake
  8. I highly recommend refrigerating the cake until you need to eat it because it will make it much easier to slice. If you plan on refrigerating the cake overnight, then wrap the cake in plastic wrap first to keep it from drying out.
closeup of strawberry shortcake on a blue plate

FAQ

Can you make this recipe into cupcakes?

It's better to use my vanilla cupcake recipe so the cupcakes don't shrink. Put strawberries into the center of the cupcake by cutting a small piece of the cupcake out and then frost with stabilized whipped cream.

Does this cake need to be refrigerated?

Yes, because of the fresh berries and the whipped cream. However, cold cake can taste dry so it's best to bring the cake out of the fridge a few hours before you are going to eat it so it has a chance to come to room temperature. 

How far in advance can you make this strawberry shortcake

You can make this cake a day in advance but it can dry out in the fridge so you should brush the layers of vanilla cake with simple syrup and then wrap the cake in plastic wrap to help it stay moist.

Related Recipes

Moist Vanilla Cake Recipe

Strawberry Shortcake Recipe

Fresh Strawberry Cake

Strawberry Macarons

Recipe

closeup of strawberry shortcake slice on a white plate
Print Recipe
4.80 from 68 votes

Strawberry Shortcake Cake

Nothing says summer like this strawberry shortcake cake! Super moist and fluffy layers of vanilla cake layered with juicy strawberries and stabilized whipped cream. If you love traditional strawberry shortcake then you will LOVE this layer cake version. 
Prep Time25 minutes mins
Cook Time30 minutes mins
Total Time55 minutes mins
Course: Dessert
Cuisine: American
Servings: 8 cups
Calories: 1070kcal
Author: Liz Marek

Equipment

  • Two 8"x2" round cake pans
  • Stand mixer with paddle and whisk attachments

Ingredients

Vanilla Shortcake

  • 10 ounces milk room temperature, divided evenly into two measuring cups
  • 3 ounces canola oil
  • 1 Tablespoon vanilla extract
  • 3 Large eggs room temperature
  • 13 ounces cake flour
  • 13 ounces sugar
  • 3 teaspoons baking powder
  • ¼ teaspoon baking soda
  • ½ teaspoon salt
  • 8 ounces unsalted butter room temperature

Stabilized Whipped Cream

  • 24 ounces heavy whipping cream
  • 4 ounces powdered sugar
  • 2 teaspoons gelatin I use KNOX brand
  • 3 Tablespoons cold water
  • 2 teaspoons vanilla extract
  • 1 Tablespoon heavy whipping cream for the gelatin
  • 16 ounces fresh strawberries washed and sliced for the filling
US Customary - Metric

Instructions

Making the Vanilla Cake

  • Bring all your ingredients to room temperature, meaning the milk, eggs, and butter should not be even a tiny bit cold. This will ensure that the cake batter mixes together correctly and you'll get a better rise and texture in your final cake. 
  • Preheat your oven to 335ºF and prepare two 8"x2" round cake pans with cake goop or another preferred kind of pan release and parchment paper. 
  • Measure out your ingredients with a food scale. If you haven't used a scale before, don't be intimidated. It's actually easier than using cups and way fewer dishes (yay). You can get a great scale online or in any local store that sells kitchen equipment. 
  • Divide your milk in half and add your oil to one half and add the eggs and vanilla to the second half. Set them aside. 
  • Place your cake flour, sugar, baking powder, baking soda, and salt into the bowl of your stand mixer with the paddle attachment attached. 
  • Add in your softened butter and mix at low speed until the flour mixture resembles a coarse sand texture. 
  • Add your milk/oil mixture and increase the speed to medium. Let your cake batter mix for 2 full minutes. Scrape after 1 minute if you need to. The texture should be light, white, and fluffy after 2 minutes. Don't worry you won't overmix it. 
  • Reduce the speed to low and slowly add in the milk/egg mixture in a steady stream until it's all added in. This takes me about 1 minute. Once the egg mixture is all mixed in, your cake batter is ready to bake!
  • Divide your cake batter into your cake pans evenly and bake for 30-35 minutes or until the center bounces back when you lightly touch it. 
  • Let your cakes cool in the pan for 15 minutes or until the pan is just barely warm to the touch.
  • Turn the cake out onto a cooling rack to cool the rest of the way or pop them into the freezer to cool them down faster. For me, it takes about an hour and then they are chilled and ready to go. You can also fully freeze your cakes (wrapped in plastic wrap) and that will help seal in the moisture and keep them moist until you're ready to frost your cakes. 

Making the Whipped Cream

  • Add your powdered gelatin to the cold water and let it bloom for 5 minutes. 
  • Start mixing your 24 ounces of heavy cream in the stand mixer with the whisk attachment until it begins to look thick and foamy. Add the powdered sugar and the vanilla.  
  • Continue mixing until you start to see lines forming on the surface of the whipped cream (soft peaks)
  • Microwave the gelatin for 15 seconds and stir. The gelatin granules should look transparent. If they aren't fully melted then go for another 5 seconds.
  • Add 1 Tablespoon of heavy cream to the melted gelatin and stir.
  • Drizzle the gelatin mixture into the heavy cream mixture and continue mixing on medium until firm peaks form. Don't over-mix it!

Assembling the Strawberry Shortcake Cake

  • Start by slicing your cakes length-wise (tort) with a serrated knife so the layers are thinner. 
  • Slice 1 lb of washed strawberries but keep 4-5 whole for decorating the top.
  • Place the first layer of cake onto your cake board or cake platter and apply a thin layer of your stabilized whipped cream.
  • Arrange a single layer of your sliced berries on top of the whipped cream.
  • Cover the sliced berries in another layer of whipped cream so the top is nice and flat. 
  • Stack your next layer of cake on top of the berries and whipped cream and repeat the process. 
  • Finish with a few dollops of whipped cream and whole berries on top of the cake!
  • I highly recommend refrigerating the cake until you need to eat it because it will make it much easier to slice. If you plan on refrigerating the cake overnight, then wrap the cake in plastic wrap first to keep it from drying out.

Video

Notes

1. Using cake flour will make these vanilla shortcake layers SUPER moist and tender. If you don't have cake flour you can use my white cake recipe instead. 
2. Keep your berries fresh for up to a week by using my natural berry wash. 
3. Don't want to use gelatin? Check out my blog post for more ways to stabilize your whipped cream. 
4. Cake flour has a protein level of 9% or less so look for a flour that specifies protein content or ask your local flour supply. If you're in the UK, search for Shipton Mills soft cake and pastry flour.
5. I don't recommend doing the homemade cake flour hack (replacing some AP flour with cornstarch) for this recipe because of the reverse creaming method. The texture of the cake will be more like cornbread because of the extended mixing.
6. Make your own pan release (cake goop!) The best pan release ever! 
7. Need more help with making your first cake? Check out my how to decorate your first cake blog post. 

Nutrition

Serving: 1cup | Calories: 1070kcal | Carbohydrates: 103g | Protein: 13g | Fat: 69g | Saturated Fat: 37g | Polyunsaturated Fat: 6g | Monounsaturated Fat: 22g | Trans Fat: 1g | Cholesterol: 233mg | Sodium: 252mg | Potassium: 458mg | Fiber: 2g | Sugar: 67g | Vitamin A: 2153IU | Vitamin C: 34mg | Calcium: 201mg | Iron: 1mg
chocolate fudge frosting on a cupcake

May 9, 2023 Frosting and Icing

Chocolate Fudge Frosting

This silky-smooth chocolate fudge frosting will remind you of that classic canned frosting but without any of the preservatives. It's the perfect indulgent chocolate frosting to keep on hand for your favorite cake. It pairs perfectly with a deep chocolate cake, a classic yellow layer cake, or any of your favorite treats!chocolate fudge frosting on a cupcake

Homemade fluffy chocolate fudge frosting is super simple to make using staple ingredients you probably have in your pantry. Two kinds of chocolate and butter make this super rich and easy to spread. I much prefer it over a tub of store-bought frosting, and you can whip it up in under 10 minutes total. The perfect complement to cake or just dipping with pretzels or graham crackers. 

Ingredients

There are 2 types of cocoa powder, dutch process cocoa powder and natural cocoa powder. A Dutch-process cocoa powder has a noticeably darker hue and will result in a dark chocolate frosting. Dutch process cocoa also has a smoother, more mellow flavor that's often associated with earthy, woodsy notes. Dutch-process cocoa powder starts with cocoa beans that have been washed in an alkaline solution of potassium carbonate, which neutralizes their acidity. So, dutch-process cocoa powder is neutral. Because it is neutral, it does not react with baking soda.

Coffee enhances the chocolate flavor, giving the frosting a richer flavor. Coffee is optional, you can use hot water or milk instead if you prefer. 

Corn syrup adds a glossiness to the frosting that makes it shiny. It also adds a little sweetness and keeps it from setting up too hard. 

Making Chocolate Fudge Frosting

  1. Add the chocolate chips, coffee, vanilla, and corn syrup to a microwave-safe bowl.pouring corn syrup into a bowl of chocolate
  2. Melt the chocolate mixture together in the microwave. Heat for 30 seconds and stir and then heat in 10-second increments and stir until it is fully melted and smooth. Let the chocolate mixture cool, but not harden. mixing a bowl of chocolate with a spatula
  3. Mix the butter, sugar, cocoa powder, and salt in the bowl of your stand mixer with the paddle on high speed for about 1 minute until light and fluffy. You can also use a large bowl and an electric mixer if you prefer.spatula of chocolate frosting mix
  4. Add the cooled chocolate mixture to the butter mixture and mix until it is smooth and fluffy. The desired consistency of the frosting will be different depending on the temperature. If it is too stiff, warm it up slightly in the microwave and stir. If it is too soft let it sit in the refrigerator for a few minutes to set up.pouring a bowl of chocolate to a bowl of frosting
  5. The frosting can be used immediately to frost a cake or put into a piping bag for decorations. yellow cake in chocolate frosting on a cake plate
  6. Cover it with plastic wrap and stored it at room temperature for 3 days. If you plan to keep it longer, keep it in an airtight container in the refrigerator or freezer.bowl of chocolate frosting 

FAQ

What's the difference between chocolate frosting and chocolate buttercream? 

Chocolate buttercream is made by adding chocolate to a buttercream recipe. You can make chocolate buttercream from Swiss buttercream, American buttercream, and Italian buttercream and just add the melted chocolate and cocoa powder to any recipe. Buttercream has a creamy consistency, light and airy. The chocolate fudge icing flavor is much more intense and the consistency is thicker and fudgy, not as much air is whipped into it. 

Does chocolate fudge icing need to be refrigerated?

This frosting does not need to be refrigerated if you are going to use it right away. As long as the frosting is covered or stored appropriately it is ok to be stored at room temperature for a couple of days. I recommend refrigerating it if you are not going to use it within 2-3 days as it does contain butter.

What is fudge icing made of?

This chocolate fudge frosting recipe is made with butter, powdered sugar, cocoa powder, salt, corn syrup, coffee, vanilla, and chocolate chips. Some recipes use heavy cream to make the frosting more like American buttercream, but this stays nice and soft, doesn't crust, and is extra luscious and shiny.

Related Recipes

Yellow Cake

Chocolate Cupcake Recipe

American Buttercream

Funfetti Cake

Recipe

chocolate fudge frosting on a cupcake
Print Recipe
4.60 from 171 votes

Chocolate Fudge Frosting

This homemade chocolate frosting recipe comes together quickly with just a few ingredients! The best chocolate fudge frosting has a classic fudgy texture with an ultra-rich, deep chocolatey flavor. You'll eat it with or without cake! 
Prep Time15 minutes mins
Total Time15 minutes mins
Course: Dessert
Cuisine: American
Servings: 8 cups
Calories: 863kcal
Author: Liz Marek

Equipment

  • 1 Stand mixer with the paddle attachment or an electric hand mixer

Ingredients

  • 2 cups unsalted butter softened
  • 2 cups powdered sugar
  • 1 cup cocoa powder
  • ½ teaspoon salt
  • ½ cup corn syrup
  • ¼ cup coffee
  • 1 teaspoon vanilla extract
  • 2 cups semisweet chocolate
US Customary - Metric

Instructions

  • Add the chocolate chips, coffee, vanilla, and corn syrup to a microwave-safe bowl.
  • Melt the chocolate mixture together in the microwave. Heat for 30 seconds and stir and then heat in 10-second increments and stir until it is fully melted and smooth. Let the chocolate mixture cool, but not harden. 
  • Mix the butter, sugar, cocoa powder, and salt in the bowl of your stand mixer with the paddle on high speed for about 1 minute until light and fluffy. You can also use a large bowl and an electric mixer if you prefer.
  • Add the cooled chocolate mixture to the butter mixture and mix until it is smooth and fluffy.
    The desired consistency of the frosting will be different depending on the temperature. If it is too stiff, warm it up slightly in the microwave and stir. If it is too soft let it sit in the refrigerator for a few minutes to set up.
  • The frosting can be used immediately to frost a cake or put into a piping bag for decorations. 
  • Cover it with plastic wrap and stored it at room temperature for 3 days. If you plan to keep it longer, keep it in an airtight container in the refrigerator or freezer.

Notes

  1. As long as the frosting is covered or stored appropriately it is ok to be stored at room temperature for a couple of days. I recommend refrigerating it if you are not going to use it within 2-3 days as it does contain butter.
  2. A Dutch-process cocoa powder has a noticeably darker hue and will result in a dark chocolate frosting. Dutch process cocoa also has a smoother, more mellow flavor that's often associated with earthy, woodsy notes.
  3. Coffee enhances the chocolate flavor, giving the frosting a richer flavor. Coffee is optional, you can use hot water or milk instead if you prefer. 

Nutrition

Serving: 1cup | Calories: 863kcal | Carbohydrates: 76g | Protein: 5g | Fat: 64g | Saturated Fat: 40g | Polyunsaturated Fat: 2g | Monounsaturated Fat: 17g | Trans Fat: 2g | Cholesterol: 125mg | Sodium: 172mg | Potassium: 430mg | Fiber: 7g | Sugar: 62g | Vitamin A: 1440IU | Calcium: 58mg | Iron: 4mg
vintage cake with fresh flowers

May 2, 2023 Cake

Vintage Cake With Buttercream Piping

Do you love a vintage cake design? Obsessed with those perfectly piped buttercream borders? You Can learn how to recreate the timeless beauty of vintage design and it's easier than you think. These beautiful retro cakes are perfect for Mother's Day, bridal showers, baby showers, and even birthdays. 

There is no special flavor for this delicious cake, you could even use a doctored boxed cake mix but I am especially fond of my white velvet cake which tastes amazing and like a classic wedding cake flavor. 

closeup of buttercream frosting

I'm using my easy vanilla buttercream recipe but you could use Italian buttercream, stabilized whipped cream, swiss meringue buttercream, cream cheese frosting, American buttercream, or even white chocolate ganache. If it's pipeable, you can use it. 

If you love this classic Americana cake style, try my classic red velvet cake recipe - same retro vibe, with cocoa, buttermilk tang, and cream cheese frosting.

What's In This Blog Post

  • Equipment Needed
  • How To Fill A Piping Bag
  • Practicing Your Piping
  • How To Prepare Your Cakes
  • How To Make A Vintage Cake Step By Step
  • FAQ

Equipment Needed

  • Piping Tips
  • Piping Bags
  • Food Coloring (optional)
  • Cake Board

How To Fill A Piping Bag

  1. Place your piping tip into your piping bag. 
  2. Cut the tip of the bag off just enough so that the tip of the piping tip comes through the bottom but is still secure in the bag.
  3. Add one cup of buttercream into the piping bag and twist the top. You should only have enough buttercream in the bag to feel comfortable in your hand.
  4. Squeeze the buttercream down towards the piping tip and now your bag is ready for piping. 

Practicing Your Piping

closeup of vintage heart piped cake

If you've never piped with buttercream before, doing some practicing can help! You can pipe right onto a cake board for practice and then scrape it off and reuse the buttercream. Here is a video example of how to do some piping techniques. 

How To Prepare Your Cakes

Need more info on how to frost and fill your cake like a pro? Check out my free tutorial on how to make a cake.

  1. Bake your round cake layers and let them cool.two vanilla cakes cooling on a rack
  2. Prepare your buttercream frosting and color it if you desire.
  3. Freeze your cakes for an hour or refrigerate them in plastic wrap overnight so they are firm enough to handle while frosting. 
  4. Trim the brown edges off the tops and sides of your cake.
  5. Fill your cakes with whatever filling or frosting that you like. three layers of vanilla cake with vanilla buttercream
  6. Cover your cake in a thin layer of buttercream (The crumbcoat) and refrigerate your cake until the buttercream is firm. crumbcoat cake
  7. Apply your final coat of buttercream to the cake and smooth it out carefully.close up of final coat of buttercream
  8. Now you have the perfect canvas to make the perfect cake! 

How To Make A Vintage Cake Step By Step

To get the vintage look, you want to layer your buttercream accents. Start with larger tips to lay down a base and continue with smaller and smaller piping.

  1. Make sure your buttercream is very smooth and bubble-free. I like to use an immersion blender to make it super creamy.
  2. Place your chilled cake onto the cake board.
  3. Use a round cutter or piece of paper (space key) to mark equal spaces around the top ⅓ and bottom ⅓ of the cake. This will be the guide for the ruffles later. The space key should be about 3" wide. 
  4. Apply your first piped border around the base and at the top of the cake. I chose to do a shell border using a 1M piping tip.buttercream cake with borders piped
  5. Pipe a reverse shell on top of the base border and below the top border with an open star tip Wilton 18.buttercream cake with borders piped
  6. Following the guidelines that we made earlier, use your Wilton 104 to make some ruffles. The round part of the tip should be pointing up. This is easiest if your cake is on a turntable.buttercream details piped on a white cake
  7. Pipe a round pearl border on top of the ruffles using a round Wilton #4 piping tip.
  8. Pipe some trios of shells to form a fleur d' lis on the points of where the ruffles meet using a Wilton #16 star tip. vintage buttercream cake
  9. Pipe some small dots between the fleur d' lis in groups of three.
  10. Pipe some stars around the top of the reverse shell border, at the base of the fleur d' lis, and anywhere else you like with some pink buttercream and the Wilton #16 tip.
  11. Finish the top of your vintage cake with some fresh flowers.

Hungry for more vintage cake techniques? These cake trends are inspired by a technique called Lambeth and used by career pastry chefs to make the most beautiful and elaborate vintage cake designs. Sometimes used with royal icing to make the most delicate and beautiful layers of detail. 

FAQ

What is a vintage cake?

What Are Vintage Cakes? Vintage cakes are vintage or "retro" because they've been around (and around and around) for centuries. They're known for their frilly, over-piped design and can be traced back to the French Rococo style of the 1700s - an age known for its ornate and gilded designs.

What kind of frosting do you use for vintage cakes?

Vintage cakes are made with buttercream frosting using traditional piping techniques. Think buttercream swirls, lace, basketweave, and frills. Mix it all together in a variety of colors, patterns, and shapes and you get this delightful on-trend current style.

Recipe

vintage cake with fresh flowers
Print Recipe
4.50 from 4 votes

Vintage cake with vanilla buttercream

How to make a beautiful vintage inspired buttercream cake with fresh flowers! This cake is perfect for Mother's day, small weddings, bridal showers, baby showers, birthdays and more!
Prep Time10 minutes mins
Cook Time40 minutes mins
Decorating1 hour hr
Total Time1 hour hr 50 minutes mins
Course: Dessert
Cuisine: American
Servings: 8 cups
Calories: 1488kcal
Author: Liz Marek

Equipment

  • 1M wilton piping tip
  • #18 wilton piping tip
  • 104 wilton piping tip
  • #4 wilton piping tip
  • #16 wilton piping tip
  • 1 Tall bench scraper
  • 1 Turntable
  • 1 8" cakeboard or plate
  • 1 6" cake cardboard
  • 6 Piping Bags
  • 1 Offset Spatula

Ingredients

White Velvet Cake Ingredients

  • 14 ounces cake flour
  • 13 ounces granulated sugar
  • 1 teaspoons salt
  • 1 Tablespoons baking powder
  • ½ teaspoons baking soda
  • 5 ounces egg whites room temperature
  • 4 ounces vegetable oil
  • 10 ounces buttermilk room temperature or slightly warm
  • 6 ounces butter unsalted and softened
  • 2 teaspoons vanilla

Easy Buttercream Frosting

  • 24 ounces unsalted butter softened
  • 24 ounces powdered sugar
  • 2 teaspoons vanilla extract
  • ½ teaspoon salt
  • 6 ounces pastuerized egg whites
  • ¼ teaspoon salt
US Customary - Metric

Instructions

  • NOTE: It is SUPER IMPORTANT that all the room temperature ingredients listed above are room temperature and measured by weight so that the ingredients mix and incorporate correctly.
    Heat oven to 335º F/168º C
  • Prepare three 6"x2" cake pans with cake goop or preferred pan spray. Fill your pans about ⅔ of the way full of batter. 
  • Combine flour, sugar, baking powder, baking soda, and salt in the bowl of a stand mixer with paddle attachment. Mix for 10 seconds to combine. 
  • Combine ½ cup of the milk and the oil together and set aside. 
  • Combine the remaining milk, egg whites and vanilla together, whisk to break up the eggs and set aside. 
  • Add your softened butter to the dry ingredients and mix on low until mixture resembles a coarse sand (about 30 seconds). Add in your milk/oil mixture and let mix until dry ingredients are moistened and then bump up to med (setting 4 on my kitchenaid) and let mix for 2 minutes to develop the cakes structure. If you don't let your cake mix on this step your cake could collapse. 
  • Scrape your bowl and then reduce speed to low. Add in your egg white mixture in three batches, letting the batter mix for 15 seconds between additions. 
  • Scrape down the sides again to make sure everything has incorporated then pour into prepared pans. Bake 35-40 minutes until a toothpick inserted into the center comes out cleanly but the cake has not begun to shrink yet from the sides of the pan. 
    IMMEDIATELY TAP PAN FIRMLY on countertop once to release the steam from the cake. This stops the cake from shrinking. 
  • Let cakes cool for 10 minutes inside the pan before flipping them out. The cake will shrink a bit and that is normal. Flip onto a cooling rack and let cool fully. I chill my cakes before handling or you can wrap them in plastic wrap and freeze them to trap moisture in the cake. Thaw on the countertop while still wrapped before frosting. 

Buttercream Frosting

  • Place your egg whites, powdered sugar, vanilla and salt into the bowl of your stand mixer with the whisk attachment.
  • Mix on high for 5 minutes
  • Reduce the speed to low and slowly add in your softened butter in small pieces until it's all added in.
  • Mix on high for 5 minutes or until your buttercream no longer tastes of butter and tastes sweet
  • Switch to the paddle attachment and mix on low for 5-15 minutes until your buttercream is very soft and doesn't have any bubbles.

Notes

IMPORTANT: Make sure all your ingredients are at room temp and you're using a scale to measure. Substituting ingredients may cause this recipe to fail. (see notes at the bottom of the recipe)
Important Things To Note Before You Start
1. Bring all your ingredients to room temperature or even a little warm (eggs, buttermilk, butter, etc) to ensure your batter does not break or curdle. 
2. Use a scale to weigh your ingredients (including liquids) unless otherwise instructed (Tablespoons, teaspoons, pinch etc). Metric measurements are available in the recipe card. Scaled ingredients are much more accurate than using cups and help ensure the success of your recipe. 
3. Practice Mise en Place (everything in it's place). Measure out your ingredients ahead of time and have them ready before you start mixing to reduce the chances of accidentally leaving something out.
4. Chill your cakes before frosting and filling. You can cover a frosted and chilled cake in fondant if you wish. This cake is also great for stacking. I always keep my cakes chilled in the refrigerator before delivery for easy transporting. 
5. If the recipe calls for specific ingredients like cake flour, replacing it with all purpose flour and cornstarch is not recommended unless specified in the recipe that it’s ok. Substituting ingredients may cause this recipe to fail. 

Nutrition

Serving: 1serving | Calories: 1488kcal | Carbohydrates: 170g | Protein: 10g | Fat: 88g | Saturated Fat: 55g | Polyunsaturated Fat: 4g | Monounsaturated Fat: 23g | Trans Fat: 3g | Cholesterol: 232mg | Sodium: 794mg | Potassium: 309mg | Fiber: 1g | Sugar: 131g | Vitamin A: 2716IU | Calcium: 142mg | Iron: 1mg
the best mothers day cake ideas text over buttercream cupcake photo

May 2, 2023 Mother's Day

The Best Mother's Day Cake Recipes

These are the best Mother's day cakes to make for Mom on her special day. From a simple moist pound cake, classic carrot cake with lots of cream cheese frosting, easy bundt cake, layered chocolate cake, or a show-stopping cake with layers of sweet frosting, this blog post covers them all. Even if you've never made a cake before, you'll find the best Mother's day cake ideas right here.

I'm going to start with some super easy cake recipes for beginners and slowly work our way towards more complicated layered cakes and desserts. Use the table of contents below to look through the different types of cakes you can make or just scroll down and prepare to blow Mom away with your amazing baking skills this year!

Pound Cake

close up of sliced lemon pound cake

A classic moist lemon pound cake is always a favorite and pretty darn easy to make. Top with a nice glaze and some fresh edible flowers or fruit and you've got the perfect Mother's day brunch dessert.

Mom's Blackberry Sponge Cake

close up of blackberry sponge cake on a white plate

I have to start this off with my own mom's favorite dessert. We not only made this blackberry sponge cake for Mother's day but it was a pretty common dessert growing up, especially during the summertime when fresh blackberries were in abundance. This cake is really more like a cobbler but I had to include it for nostalgia's sake.

Bundt Cake

Honey Cake with slice removed

I love a beautiful bundt cake! There's just something so satisfying about them. I've got a TON of bundt cake recipes on the blog but I especially love the chocolate bundt cake (for the chocolate lover) or the honey bundt cake which is SUPER moist cake.

Sheet Cake

close up of texas sheet cake on a serving spoon

Don't underestimate the power of a pretty sheet cake! They are seriously coming back in style and could not be easier to make. You COULD use a box mix and I won't judge you but you might want to check out my WASC (White Almond Sour Cream) recipe that makes a simple box mix taste a MILLION times better but is still super easy to make. If you like piping on cakes this is the perfect cake to practice some easy borders or buttercream flowers and even write a nice message in the center! looking for a chocolate sheet cake? Check out my classic Texas sheet cake recipe.

Blueberry Pancake Cake

This is a great cake for kids to make for Mom. All you need is your favorite pancake mix and some blueberries. Mix it all together and bake it in a cake pan! Top with some whipped cream and fresh berries and serve it to Mom breakfast in bread style. Don't forget the coffee!

If you're in a practical joker mood you can also dress your blueberry pancake cake up to look like an actual stack of pancakes using my pancake cake tutorial! Pretty easy to do and fun!

Olive Oil Cake

This cake might sound a little strange to you but olive oil cake is actually quite delicious and a beautiful cake to serve at a Mother's day dinner. The texture is light and extremely moist. I like to serve this cake straight from the pan or transfer it to a pretty cake plate. Be careful, you might just eat the entire cake all by yourself.

Carrot Cake

Carrot cake with pineapple and brown butter cream cheese frosting

I absolutely LOVE LOVE carrot cake. Every time I see it on the menu I have to try it. This is my favorite carrot cake recipe and has tons of freshly grated carrots, toasted pecans for crunch (you can leave them out if you don't like them), and of course lots and lots of delicious cream cheese. Even though this is a layered cake, it's fairly easy to make and the frosting is nice and rustic.

Rich Chocolate Cake

easy chocolate cake recipe

This is my favorite chocolate cake recipe! It's a one-bowl method so it's easy to make. Frost it with my favorite rich chocolate ganache recipe and some fresh strawberries and you've got the perfect gift for your chocolate-loving mama.

Red Velvet Cake

close up of red velvet cake slice

This classic Southern red velvet cake has always been one of my favorite flavors for a Mother's day dessert. This beautiful cake only takes one bowl to make and is frosted with a smooth and creamy cream cheese frosting. The secret to this classic southern recipe is of course, buttermilk!

Coconut Layer Cake

southern coconut cake made with toasted coconut and coconut cream cheese frosting

Coconut cake makes a truly show-stopping cake! Super moist layers of cake with generous layers of frosting and lots of shredded coconut. If your mom loves coconut she will love this cake.

Pink Velvet Cake

slice of pink velvet cake with whipped cream frosting and fresh raspberries on a white plate

One of the most (if not the most) popular cake recipes on the blog. This pink velvet cake is a very light and delicate cake that isn't too sweet with stabilized whipped cream between those cute pink layers.

Berry Chantilly Cake

close up of berry chantilly cake

Is mom obsessed with the berry chantilly cake from whole foods? Well, you COULD just go buy another one or impress her with this homemade version!

Strawberry Cake

fresh strawberry cake recipe

This fresh strawberry cake has an incredibly moist texture and is made with fresh strawberries and fresh fruit. It takes a bit more work since you have to make the strawberry puree first but the cake has such a bright flavor, it's definitely worth it!

Lemon Cake

close up of lemon slice

I looooove this lemon velvet cake filled with fresh lemon curd! It uses lots of lemon zest and lemon oil so you have a truly natural flavor. It's also easy to turn into a lemon raspberry cake by folding in some fresh raspberries or a lemon blueberry cake. This is one of the moistest cakes I have ever had.

Rose Cake

close up of rose cake

This rose cake may look complicated but it's actually really easy to add edible flowers to your Mother's day cake. Just make sure you source them from a place that hasn't sprayed them with pesticides (aka mom's garden).

Flower Bouquet Cupcakes

Ok again, not really a CAKE but still a super cute idea and if you love to pipe buttercream flowers, this is really a fun one! Plus what could be easier to serve? Learn how to make this beautiful cupcake bouquet with buttercream flowers here.

Angel Food Cake

close up of an angel food cake slice

The lightest, fluffiest, and most beautiful Mother's day cake in my opinion. Nothing looks prettier than fresh strawberries on top of that snow-white cake. Angel food cake is a type of sponge cake and is a little trickier but totally doable! The sweetness of the strawberries and whipped cream is all you need with this light and fluffy cake.

German Chocolate Cake

close up of german chocolate cake

The first time I made this German chocolate cake I was surprised that the chocolate flavor is not that strong. This is a lighter chocolate cake but the homemade coconut pecan filling is truly the star! This is a family favorite in my house.

Mirror Glaze Cake

chocolate mirror glaze cake with gold drizzle on a black plate

Nothing says I really know what I'm doing in the kitchen like a mirror glaze cake! These cakes are mostly mousse and topped with a beautiful shiny glaze.

Cheesecake

slice of cherry cheesecake on a black plate

Is cherry cheesecake technically a cake? Well, either way, I know I love cheesecake and would absolutely LOVE someone to make me one! If you're not into cherries, you can always go with my classic cheesecake recipe with the PERFECT texture.

Ice Cream Cake

closeup of oreo ice cream cake slice

You may not immediately think of this ice cream cake for Mother's day but it's a really fun cake to make for a family celebration. Use your favorite cake and ice cream to make it your own.

Flourless Chocolate Cake

flourless chocolate cake with fresh raspberries

Need a gluten-free cake for Mother's day? This is a fantastic decadent flourless chocolate cake with no gluten!

Tiramisu Cheesecake

If you love tiramisu, then this is a great option! A twist on the classic dessert and in my opinion, much easier to make! This is a great dessert to make in advance and keeps well in the fridge. This makes a big cheesecake, enough for the whole family to enjoy

Charlotte Cake

charlotte cake on a blue platter

Another beautiful cake that is really visually stunning is the classic Charlotte cake. The lady fingers can be a bit hard to make if you haven't ever done it before but if you're nervous you can also use pre-made ones as well but of course, the homemade ones will taste divine!

Lunchbox Cakes

heart shaped cake in a to go box

I'm obsessed with the lunchbox cake trend. Not only are these tiny gorgeous cakes adorable but they are perfect to slip into mom's lunchbox to brighten up her day.

Vintage Piped Cake

Ok if you want to get REALLY fancy you can't go wrong with these over-the top over-piped vintage cakes that almost look like tiny wedding cakes! If you're a caking pro or just really know your way around an offset spatula, this might be the perfect cake to make.

Red Wine Chocolate Bundt Cake

Slice of wine cake with chocolate drizzle on top.

For the wine lovers, my red wine chocolate cake infuses spiced red wine into both the batter and the ganache for a grown-up chocolate dessert.

Did I miss your favorite? tell me in the comments what you're making for Mother's day!

cupcake bouquet

May 1, 2023 Cupcakes

How To Make A Cupcake Bouquet With Buttercream Flowers

cupcake bouquet

This is how you can make a very simple cupcake bouquet with buttercream flowers. This is the perfect dessert to bring to a Mother's Day brunch, bridal showers, or even baby showers. All you need are some cupcakes, a piping bag with piping tips, buttercream frosting, and a special occasion to bring your beautiful cupcake bouquet.  

closeup of buttercream flowers

What's In This Blog Post

  • Tools Needed
  • Ingredients Needed For A Cupcake Bouquet
  • How To Make The Vanilla Cupcakes
  • How To Make The Colors Of Frosting
  • Step By Step Instructions
  • FAQ

Tools Needed

  • Leaf tip
  • 1M piping tip
  • #2 round piping tip
  • #6 round piping tip
  • Small star tip
  • Flat tip
  • Piping bags
  • Cake board
  • Food coloring (yellow, pink, purple, green)

Ingredients Needed For A Cupcake Bouquet

vanilla cupcake ingredients.

How To Make The Vanilla Cupcakes

This is my favorite basic vanilla cupcake recipe and makes about 24 cupcakes but you could use any cupcake recipe or even a box mix. I especially love Duncan Hines cake mix to make red velvet cupcakes or chocolate cupcakes because it's just so quick and easy. These cupcakes are mixed using the reverse creaming method which makes a very moist and closed crumb but requires more mixing. Don't worry, you won't over-mix!

  1. Preheat your oven to 350ºF and line your cupcake pans with cupcake liners.cupcake pan with white cupcake liners.
  2. Combine the vanilla and buttermilk and set it aside. 
  3. Combine the eggs and oil in a separate container and set it aside. whisking eggs and oil together in a measuring cup.
  4. Place the cake flour, sugar, salt, baking powder, and baking soda into the bowl of your stand mixer with the paddle attachment attached. 
  5. Add the softened room temperature butter in small pieces and mix on low until the mixture resembles coarse sand.adding flour to a stand mixer bowl.
  6. Pour the milk mixture into the dry ingredients and mix on medium speed for 2 minutes to develop the cupcake texture. It will be very light and fluffy. a spatula showing the texture of the cake batter mixture before adding the eggs and oil.
  7. Reduce the mixing speed to slow and slowly add in the egg mixture and mix until the cupcake batter is homogenous. hand adding the egg and oil mixture to the mixing bowl.
  8. Scoop your cupcake batter into your lined pans with a cupcake scoop or spoon. They should be ⅔ of the way full (about 1.5 ounces) for the best dome.Cupcake pan with filled cupcake liners ready to bake.
  9. Bake the cupcakes for 15-20 minutes or until the center is just barely set. If you're making mini cupcakes, bake for less time. 
  10. Let your cupcakes totally cool before you frost them.finished baked vanilla cupcakes in the cupcake pan.

How To Make The Colors Of Frosting

The first thing you need to do is make your vanilla buttercream and get it colored. I chose a nice yellow, pink, purple and a pale green but you can always choose different colors depending on what you like best. 

  1. Place your egg whites, powdered sugar, salt, and vanilla into the bowl of your stand mixer with the whisk attachment attached. egg whites and powdered sugar in a stand mixer bowl
  2. Mix on high for 5 minutes. 
  3. Reduce the speed to low and slowly add in your unsalted butter in 2" pieces until it's all added in. hand adding a stick of butter to a stand mixer bowl
  4. Mix on high for 5 minutes or until it looks light, fluffy, and no longer tastes like butter. It should have a sweet vanilla taste and just melt in your mouth.
  5. Switch to the paddle attachment and mix on low for 10 minutes to help remove bubbles.picture showing the texture of the buttercream after using the paddle attachment.
  6. Divide your buttercream into different bowls. I saved some of the white as well for some roses, buds, and the bow.close up of coloring buttercream
  7. Add a drop of food coloring of your choice to each bowl and mix until well blended. 
  8. I used an immersion blender to get out any remaining bubbles and make the buttercream really smooth for piping. italian meringue buttercream colored light pink in a bowl with a spatula

Step By Step Instructions

To see a video tutorial of how to make these buttercream flowers, check out the video at the bottom of this blog post in the recipe card.

  1. Arrange your cupcakes on a cake board or platter. Place a dollop of buttercream under each cupcake to prevent them from sliding around.cupcakes arranged on a cake board surrounded by bowls of buttercream
  2. I find it easier to pipe directly on the board but if you want to hold the cupcake and then place it onto the board if this is your first time piping flowers and that works better for you. 
  3. Start with your 1M piping tip and some white buttercream to make some white rosettes. Some people also like to use Russian piping tips if you don't feel comfortable with your cake decorating skills.close up of white buttercream rosette on a cupcake
  4. Follow up with the drop flower tip for the hydrangea flower. I did pink and purple hydrangea cupcakes.pink, purple and white buttercream flower cupcakes
  5. Then add your yellow petal flowers. These look kind of like garden roses to me. closeup of buttercream flower cupcakes
  6. Fill in the edge of the cupcake with some green buttercream and the leaf tip. close up of buttercream leaves
  7. I like to go back in and add some small blobs of green and then white in the center to look like buds. This is a great way to just give the whole cupcake bouquet a finished look. Some people like to use little squares of tissue paper in between the cupcakes to fill the gaps and that works just fine too.closeup of buttercream flower cupcakes
  8. I also added some more white buttercream flowers using a small star tip to fill in some gaps. 
  9. Now I'm using a round piping tip and some green buttercream to make the buttercream stems coming down from the flowers. buttercream flower stems
  10. I used a flat piping tip to make a little bow with some white buttercream but you could use a round piping tip as well. 

The best thing about this cupcake bouquet is that it's so easy to serve. Everyone just grabs a flower! No need to cut and serve. 

closeup of finished cupcake bouquet

FAQ

Do you need to refrigerate the cupcake bouquet?

These cupcakes taste best at room temperature so no need to refrigerate.

How do you store leftover cupcakes?

Store leftover cupcakes at room temperature lightly covered with plastic wrap or in an airtight container for up to 5 days.

Recipe

cupcake bouquet
Print Recipe
5 from 1 vote

Cupcake Bouquet With Buttercream Flowers

How to make a beautiful cupcake bouquet with buttercream flowers. The perfect dessert for Mothers Day, baby showers, bridal showers, or birthdays.
Prep Time10 minutes mins
Cook Time20 minutes mins
Decorating Time30 minutes mins
Total Time30 minutes mins
Course: Dessert
Cuisine: American
Servings: 24 cupcakes
Calories: 209kcal
Author: Liz Marek

Equipment

  • 6 Piping Bags
  • 1 9"x13" cake board
  • 6 piping tips
  • 24 cupcake liners
  • 2 cupcake pans
  • 1 Immersion blender optional

Ingredients

Vanilla Cupcake Recipe

  • 10 ounces cake flour
  • 9 ounces granulated sugar
  • ½ teaspoon salt
  • 2 teaspoons baking powder
  • ¼ teaspoon baking soda
  • 2 large eggs room temperature
  • 4 ounces vegetable oil
  • 5 ounces buttermilk room temperature or slightly warm
  • 4 ounces unsalted butter softened
  • 2 teaspoons vanilla extract

Easy Buttercream Frosting Recipe

  • 6 ounces pasteurized egg whites
  • 24 ounces powdered sugar
  • 24 ounces unsalted butter softened
  • 2 teaspoons vanilla extract
  • ½ teaspoon salt
US Customary - Metric

Instructions

Making Vanilla Cupcakes

  • Preheat the oven to 350ºF and line two cupcake pans (or a muffin pan will do) with paper liners. You can also bake one pan at a time if you only have one cupcake pan. This recipe will make about 24 cupcakes.
  • Combine the vanilla and buttermilk in a separate measuring cup and set it aside. 
  • Next, add the eggs and oil to a separate bowl then whisk and set them aside. 
  • Add the cake flour, sugar, salt, baking powder, and baking soda to the bowl of your stand mixer with the paddle attachment. You can use a large bowl and an electric mixer if you don't have a stand mixer, just mix for longer. Use these photos as a guide instead of mixing by time. 
  • Then add the softened butter to the rest of the dry ingredients and mix on low until the mixture resembles a sandy texture. Depending on how soft your butter is, this might take a minute or two. 
  • Pour the milk mixture into your dry ingredients and increase the speed to medium (speed 4 on a KitchenAid, speed 2 on a Bosch). Mix for 1 ½ minutes to develop the fluffy structure of the cupcake. The batter will go from being yellow to a fluffy white.
  • Slowly add your egg mixture in three parts and mix on low until it's fully combined.
  • Fill your liners ⅔ of the way full with the cupcake batter. I use my kitchen scale to measure out 1.5 ounces of batter per cupcake.
  • Bake the cupcakes for 15-20 minutes or until they are just starting to turn golden brown and the center of the cupcake springs back when you lightly touch it. I rotate my cupcakes halfway through baking for even browning. If you're making mini cupcakes, bake for less time.
  • Let your cupcakes cool in the pans for five minutes, then move them to a cooling rack to cool completely.
  • Place your favorite frosting into a piping bag with a tip, I like a 1M or a 2F, and pipe a swirl on top. I love using my easy vanilla buttercream and topping them with a few sprinkles. Swiss meringue buttercream or strawberry buttercream would also be delicious.

Making Easy Buttercream

  • Place the pasteurized egg whites and powdered sugar in the bowl of your stand mixer with the whisk attachment. Combine the ingredients on low and then whip them on high for 4-5 minutes (until shiny) to dissolve the powdered sugar.
  • Now add in the salt and vanilla extract. If you want to add in any food coloring, now is the time.
  • Add in your softened butter piece-by-piece, then whip it on high. It will look curdled at first. This is definitely normal. It will also look pretty yellow, just keep whipping.
  • After your buttercream looks like this, remove about 1 cup of buttercream and melt it in the microwave for 10-15 seconds.
  • Pour it back into the whipping buttercream to bring it all together.
  • Whip it on high for 8-10 minutes until the buttercream is white, light, and shiny. If it tastes like sweet ice cream, then it's ready!
  • Finally, switch to a paddle attachment and mix the buttercream on low speed for up to 15-20 minutes to make the buttercream ultra smooth and remove any air bubbles. This step is optional, but if you want really creamy frosting, you don't want to skip this final step.
  • For extra white buttercream, add a drop of purple food coloring. The purple counteracts the yellow in the butter, toning the buttercream to make it white.

Cupcake Bouquet Assembly

  • Place your cupcakes onto your cake board
  • Pipe your buttercream flowers onto the cupcakes
  • Add your buttercream stems and bow

Notes

  1. For the best rise, fill your liners ⅔ with cupcake batter or 1 ½ ounces per cupcake
  2. Make sure all your ingredients are at room temperature before mixing your batter (milk, butter, eggs). 
  3. Use clear vanilla extract for that "classic grocery store cake" flavor. Use good quality vanilla extract, vanilla bean paste, or even a vanilla bean for true vanilla flavor. One vanilla bean = 2 teaspoons vanilla extract. 
  4. Preheat your oven to 350ºF for 30 minutes before baking to give your cupcakes a good rise and set the dome. 
  5. Baked cupcakes can be frozen for up to 6 months.
  6. Buttermilk is essential to this recipe because it adds flavor and moisture. If you have whole milk and white vinegar or lemons, you can make your own buttermilk substitute.
  7. Cake flour is what makes these cupcakes extra soft and fluffy. If you don't have cake flour, you can try using my cake flour substitute recipe, or try searching for "Shipton Mills soft cake and pastry flour."

Nutrition

Serving: 1cupcake | Calories: 209kcal | Carbohydrates: 25g | Protein: 2g | Fat: 11g | Saturated Fat: 7g | Cholesterol: 16mg | Sodium: 198mg | Potassium: 93mg | Sugar: 14g | Vitamin A: 195IU | Calcium: 40mg | Iron: 0.2mg
lemon blueberry scone on a cooling rack

May 1, 2023 Biscuits and Scones

Lemon Blueberry Scones

These Lemon Blueberry Scones are delightful any time of day, but I love warm scones right out of the oven. Fresh juicy berries combined with dried blueberries and lemon zest add a bright, concentrated flavor to these easy homemade scones. Served plain or topped with sweet lemon glaze they will be the first thing to go at any occasion they are invited to! lemon blueberry scone on a cooling rack

This is such an easy recipe! I love a cream scone because it keeps the scone super moist, comes together really quickly, and is nearly fail-proof. The fresh and dried blueberries combined are the best because you get the juiciness of a blueberry and the concentrated flavor of dried blueberry.

Lemon Blueberry Scone Ingredientsingredients for lemon blueberry scones in bowls

Heavy cream: Cream scones are my favorite scones! Using heavy cream in this recipe adds moisture and fat. This makes tender scones, less crumbly, more cakey, and moist. Some scone recipes use cold butter, which has less moisture and more fat, resulting in a drying flakier scone. Since I decided to use some dried fruit in these scones, the extra moisture from the cream helps plump the dried fruit slightly, resulting in them releasing a more concentrated flavor. 

Blueberries: Dried Blueberries have so much flavor! All of the water is removed and they are left with all of that amazing blueberry flavor and sweetness, which works really well in a baked good. Using dried with fresh blueberries combines the concentrated flavor with the juicy blueberries tartness, and as they bake they release that gorgeous deep blueberry color.  So in this scone recipe, you are getting all of the best parts of a juicy berry. I chose to use frozen blueberries so that they keep their shape as I mix the scone dough. You can buy fresh berries and pop them in the freezer for about 30 minutes to firm them up before adding them to the dough. 

Lemon: The lemon zest in this scone dough is subtle but so important to enhance the flavor of the berries. It adds an extra depth of lemon flavor that makes a good scone great. The glaze on top of the scones is a burst of tangy fresh lemon juice, balancing the sweet scone perfectly. Make sure your lemons are room temperature or even slightly warmed in the microwave for a second, as they will release more juice and oils.

Making the Lemon Blueberry Scone

  1. Preheat the oven to 425°F and prepare a sheet pan with parchment paper. 
  2. Combine the flour, baking powder, salt, sugar, and zest in a large mixing bowl or the bowl of your stand mixer. Make sure the zest is dispersed and not clumped up.dry ingredients in a glass bowl
  3. Add the dried blueberries and the frozen blueberries and gently toss to combine. Pro-tip: Frozen blueberries keep their shape while mixing the scone dough together, and dried blueberries have a more concentrated flavor. hand adding a cup of dried blueberries to a bowl of dry ingredients
  4. Add the heavy cream to the dry ingredients and begin mixing gently, take note to not crush the blueberries. You can use a wooden spoon or spatula, but it may be easier using your hands as this is a thick strong dough. pouring cream from a container into a glass bowl of flour
  5. Mix until the dough just begins to stick together. There may still be some drier pockets. If the dough is not sticking together at all you can add a few extra tablespoons of cream until it begins to form a dough ball. scone dough in a glass bowl
  6. Dump the dough out onto a prepared baking sheet and form the dough into an 8" round disk. You can use a cake ring or cake pan to press it into if you have one.8" cake ring over scone dough
  7. Place the sheet pan in the freezer for 20-30 minutes so the dough firms up and the flour has a few minutes to hydrate. Baking cold scones will help them keep their shape as they bake. 8" mound of scone dough on a sheet pan
  8. Once the dough round has chilled, cut it into 8 equal wedges. cutting a disc of scone dough with a knife
  9. Brush the tops of the scones with some heavy cream and add a few blueberries on top.brushing the tops of scones with cream
  10. Space the wedges out so they don't bake back together when they expand in the oven.scones spread out on a sheet pan in a circle
  11. Place them into a preheated oven, and bake the scones for 15-18 minutes. The scones should be slightly golden brown on the edges and feel firm when pressed with a finger. baked scones on a sheet pan

Making the Lemon Glaze

  1. Combine the powdered sugar, lemon juice, salt, and lemon zest in a large bowl with a whisk or an electric mixer.mixing glaze ingredients with a hand mixer
  2. Add the warmed/soft butter to the glaze and whip for a few seconds until combined, smooth, and slightly fluffy. If the glaze looks lightly separated, warm it for just a few seconds in the microwave and whip it again. The butter should blend into the glaze. If you are not using the glaze right away, be sure to cover it so that it does not form a crust. butter and glaze in a glass bowl
  3. Using a pouring cup or a spoon, drizzle the glaze over the tops of the cooled scones, as much or as little as you prefer. pouring glaze on top of scones
  4. Let the glaze finish dripping and dry before stacking or storing the scones.hand holding a scone
  5. To store the scones, transfer them to an airtight container or wrap them with plastic wrap and store them at room temperature for up to 4 days. If you choose to freeze the scones to be eaten at a later date, freeze them before glazing and glaze them when you are ready to serve for the best results. Un-glazed scones can be refreshed in the oven, bake for 8 minutes at 300°F, then let cool and glaze.

If you love these lemon blueberry scones, the same flavor combo goes into my sweet sourdough focaccia, where the blueberries get cooked into a jammy filling and folded into a buttery sourdough crumb.

FAQ

Can I use a plant-based alternative to cream? 

Most plant-based milk doesn't contain enough fat to make this recipe successful. However, you could substitute it with a can of full-fat coconut milk. The final result may vary based on the fat content. 

Can I use different berries? 

The best part of this lemon blueberry scones recipe is its versatility. You can swap out the blueberries and lemon zest for any other fruit or flavor. Chocolate chips, orange zest and currants, poppy seeds, or even savory, some bacon and chives, ham and cheese, so many delicious options! 

Can I double this recipe? 

Yes, this recipe multiplies very easily and you can shape it into any shape you want. You can form it in a square and cut small squares, or even use a round biscuit cutter and make round scones.

What is the secret to making good scones?

To get light, and fluffy scones, the trick is to not overmix your dough. Cream scones are harder to overmix than butter scones because the cream combines with the dry ingredients more easily. I also like using a food scale to weigh my ingredients and mix the dry ingredients together to make sure they are all accurate and combined well. 

Recipe

lemon blueberry scone on a cooling rack
Print Recipe
4.34 from 6 votes

Lemon Blueberry Scones

This perfect cream scone recipe is made with 2 kinds of blueberries, lemon zest, and tart lemon icing. The best part is that there's no cold butter required! These easy blueberry lemon scones are delicious for breakfast with your morning coffee, brunch, Mother's Day, or a perfect treat with afternoon tea time!
Prep Time15 minutes mins
Cook Time15 minutes mins
Chilling Time30 minutes mins
Total Time1 hour hr
Course: Breakfast, Dessert
Cuisine: American
Servings: 8 scones
Calories: 407kcal
Author: Liz Marek

Ingredients

Lemon Blueberry Scone Ingredients

  • 2 cups all purpose flour
  • ¼ cup granulated sugar
  • 1 teaspoon salt
  • 1 Tablespoon baking powder
  • 1 Tablespoon lemon zest
  • ¼ cup dried blueberries
  • ½ cup frozen blueberries or fresh
  • 1 cup heavy cream plus a few extra Tablespoons in case the dough is dry

Lemon Glaze Ingredients

  • 2 cups powdered sugar
  • ¼ cup lemon juice or more depending on consistency)
  • 1 Tablespoon lemon zest
  • ½ teaspoon salt
  • 2 Tablespoons unsalted butter very soft or slightly melted
US Customary - Metric

Instructions

Making the Lemon Blueberry Scones

  • Preheat the oven to 425°F and prepare a sheet pan with parchment paper. 
  • Combine the flour, baking powder, salt, sugar, and zest in a large mixing bowl or the bowl of your stand mixer. Make sure the zest is dispersed and not clumped up.
  • Add the dried blueberries and the frozen blueberries and gently toss to combine. Pro-tip: Frozen blueberries keep their shape while mixing the scone dough together, and dried blueberries have a more concentrated flavor. 
  • Add the heavy cream to the dry ingredients and begin mixing gently, take note to not crush the blueberries. You can use a wooden spoon or spatula, but it may be easier using your hands as this is a thick strong dough. 
  • Mix until the dough just begins to stick together. There may still be some drier pockets. If the dough is not sticking together at all you can add a few extra tablespoons of cream until it begins to form a dough ball. 
  • Dump the dough out onto a prepared baking sheet and form the dough into an 8" round disk. You can use a cake ring or cake pan to press it into if you have one.
  • Place the sheet pan in the freezer for 20-30 minutes so the dough firms up and the flour has a few minutes to hydrate. Baking cold scones will help them keep their shape as they bake. 
  • Once the dough round has chilled, cut it into 8 equal wedges. 
  • Brush the tops of the scones with some heavy cream and add a few blueberries on top.
  • Space the wedges out so they don't bake back together when they expand in the oven.
  • Place them into a preheated oven, and bake the scones for 15-18 minutes. The scones should be slightly golden brown on the edges and feel firm when pressed with a finger. 

Making the Lemon Glaze

  • Combine the powdered sugar, lemon juice, salt, and lemon zest in a large bowl with a whisk or an electric mixer.
  • Add the warmed/soft butter to the glaze and whip for a few seconds until combined, smooth, and slightly fluffy.
    If the glaze looks lightly separated, warm it for just a few seconds in the microwave and whip it again. The butter should blend into the glaze. If you are not using the glaze right away, be sure to cover it so that it does not form a crust. 
  • Using a pouring cup or a spoon, drizzle the glaze over the tops of the cooled scones, as much or as little as you prefer. 
  • Let the glaze finish dripping and dry before stacking or storing the scones.
  • To store the scones, transfer them to an airtight container or wrap them with plastic wrap and store them at room temperature for up to 4 days.

Notes

  1. If you choose to freeze the scones to be eaten at a later date, freeze them before glazing and glaze them when you are ready to serve for the best results. Un-glazed scones can be refreshed in the oven, bake for 8 minutes at 300°F, then let cool and glaze.
  2. Preheat your oven 30 minutes ahead of time to give the biscuits the best lift.
  3. Use a scale to weigh your ingredients (including liquids) unless otherwise instructed (Tablespoons, teaspoons, pinch etc). Metric measurements are available in the recipe card. Scaled ingredients are much more accurate than using cups and help ensure the success of your recipe. 
  4. Practice Mise en Place (everything in its place). Measure out your ingredients ahead of time and have them ready before you start mixing to reduce the chances of accidentally leaving something out.

Nutrition

Serving: 1scone | Calories: 407kcal | Carbohydrates: 68g | Protein: 4g | Fat: 14g | Saturated Fat: 9g | Polyunsaturated Fat: 1g | Monounsaturated Fat: 3g | Trans Fat: 0.1g | Cholesterol: 41mg | Sodium: 449mg | Potassium: 270mg | Fiber: 2g | Sugar: 40g | Vitamin A: 531IU | Vitamin C: 6mg | Calcium: 96mg | Iron: 2mg
slice of cake coming out of a pancake cake

April 26, 2023 Cake

Blueberry Pancake Cake

This blueberry pancake cake is soft, fluffy, and full of tangy buttermilk flavor and fresh blueberries. The best part is that it's made from very basic ingredients and a pancake mix! A realistic-looking stack of pancakes made of fondant brings this easy cake together. slice of cake coming out of a pancake cake

Don't be intimidated by the fondant work of this cake, it comes together really easily with just a few ingredients. You also don't have to make the fondant pancakes, as the cake and buttercream alone make a delicious treat! Forget the cinnamon rolls, blueberry pancake cake will be a new brunch favorite! 

Table of contents

  • Ingredients
  • How to Make a Blueberry Pancake Cake
    • The Blueberry Pancake Cake Layers
    • The Maple Buttercream Frosting
    • Assembling the Cake
    • The Pancake Fondant Decoration
    • The Gelatin Syrup and Butter
  • FAQ
  • Related Recipes

Ingredientsbowls of ingredients for pancake cake on a table

Pancake mix: Most types of pancake mix will work for this cake, but I like the flavor of Krusteaz buttermilk pancake mix. There is already all-purpose flour, sugar, egg whites, and leavening in this mix, so just adding wet ingredients makes it into a cake!

Blueberries: Fresh and juicy blueberries add bursts of flavor to this cake. Frozen blueberries will also work for the inside of the cake, no need to thaw them! But dried blueberries won't work as well. 

Fondant: Making the fondant "pancakes" as decoration is totally optional, but it's so fun and easy to make it look like a realistic stack of pancakes. 

Gelatin: Just like the "fondant pancakes", the gelatin syrup drips are optional. They add a fun gummy element to the cake that brings it to life! 

How to Make a Blueberry Pancake Cake

This cake just by itself or with frosting is delicious as it is! If you want to take it up a notch and make it look like a realistic stack of pancakes, you can make the fondant strips, gelatin syrup, and fondant butter. I would make the cake layers the day ahead and frost and decorate on the day you're going to serve.

The Blueberry Pancake Cake Layers

  1. Preheat the oven to 350ºF/176ºC and prepare three 8-inch round cake pans with cake goop, parchment paper, or another preferred pan release. You can also bake this in a sheet pan, 9" cake pans, or a bundt pan. hand brushing a cake pan with cake goop
  2. Add the pancake mix and milk to a large bowl and whisk it together until just combined. Do not overmix! It's okay if the flour mixture is lumpy.pouring milk into a bowl of pancake mix
  3. Fold in the fresh blueberries and let the mixture sit for 2 minutes.adding blueberries to a bowl of pancake mix
  4. Pour the batter into the prepared pan.weighing a pan of cake batter on a food scale
  5. Bake the cakes for 15 to 20 minutes until a toothpick inserted comes out clean.
  6. While the cakes are still warm, brush the tops with melted butter. brushing the top of a cake with melted butter
  7. Let the cake cool for 10 minutes, then flip the cakes out onto a wire rack.cake layer flipped onto a cooling rack
  8. Cool the cakes completely at room temperature, or wrap them in plastic wrap and freeze for 30 minutes or overnight.

The Maple Buttercream Frosting

  1. Mix the room-temperature butter in a large separate bowl with a hand mixer until smooth.mixing butter in a large bowl with an electric mixer
  2. Add the powdered sugar one cup at a time and mix until it's fully combined.mixing butter and powdered sugar in a large bowl
  3. Pour in the vanilla and maple syrup and mix together until the frosting is smooth, light, and fluffy.maple frosting in a large bowl

Assembling the Cake

  1. Trim the top of the 2 cake layers so they are flat, and leave the 3rd full to be the top. 
  2. Place the first cake layer down on a cake board and spread a layer of buttercream evenly across the top. Pro-tip: For extra blueberry flavor, add some homemade blueberry sauce in between layers. spreading frosting on a layer of cake
  3. Repeat this process with the remaining 2 layers. stacking a 3rd cake layer on top of 2 others
  4. Spread a thin layer of frosting around the entire cake as a crumb coat. Leave the cake at room temperature while you decorate so that the buttercream stays sticky. spreading a crumb coat of frosting on a cake

The Pancake Fondant Decoration

  1. Add the Everclear and brown food coloring to a medium bowl and mix them together. This will be your "paint" for coloring the golden brown edges of the pancakes.adding brown food gel to a bowl
  2. Color about a pound of fondant with a few drops of ivory food coloring.hands stretching fondant
  3. Sprinkle powdered sugar on the work surface and roll out about ½ cup of fondant into long strips, about ½  inch thick.hands rolling a long strip of fondant
  4. Cut the strip in half lengthwise with a pizza cutter.pizza cutter cutting a fondant strip in half lengthwise
  5. Starting at the bottom, place a strip on the cake with the flat-cut side facing the cake. It should stick to the buttercream, but you can dab a little bit of water to help.hands placing a strip of fondant against a cake
  6. Spread some of the brown mixture with a paintbrush onto the top and inside of the fondant strip. It doesn't need to be fully covered or perfect, it will just help the fluffy pancakes look more realistic.hand painting a strip of fondant on the outside of a cake
  7. Repeat steps 3 through 6 and works up to the top edge of the cake. cake covered up halfway in fondant strips
  8. Roll out a piece of fondant into a large circle about ½ inch thick. Then place it on top of the cake and paint it to look like a pancake.brushing food color onto fondant on top of a cake
  9. Use a small ball modeling tool to create small dots on the side of the fondant to represent air bubbles.making dots in fondant with a modeling tool

The Gelatin Syrup and Butter

  1. Sprinkle gelatin onto a small bowl of cold water and microwave it for about 15 seconds until just melted.
  2. Add a few drops of brown food coloring and mix it together. bowl of brown gelatin mixture
  3. Drizzle spoonfuls of gelatin "syrup" from the top of the cake and let it drip down the sides.drizzling brown gelatin mixture down the side of a cake
  4. Pour the rest of the gelatin mixture on top of the cake. 
  5. Color about ¼ cup of fondant yellow and form it into a ½ inch thick rectangle.hands holding yellow fondant
  6. Cut the yellow fondant into 2 equal-sized squares with a knife or bench scraper. These will be the "butter" pieces. cutting yellow fondant squares with a bench scraper
  7. Add some fresh blueberries and the "butter" pieces on top of the cake before the gelatin fully cools. hand placing blueberries and fondant butter on top of a cake
  8. Now serve and enjoy! This cake can be stored at room temperature for up to 4 days. blueberry pancake cake

FAQ

What is the difference between cake mix and pancake mix?

The funny thing about both cake mix and pancakes mix is that you can add water to the dry ingredients, put it in a cake pan, and it'll bake up into a cake! Cake mixes are typically sweeter, have vanilla and other flavorings, and need to be mixed until they're smooth and cohesive. 

What is a pancake cake?

A pancake cake is just pancake batter baked into layers of cake. It's delicious by itself, but cover it in buttercream and decorate it with fondant to make a realistic-looking stack of pancakes, and it's a true "pancake cake." 

Can I flavor my pancake cake?

Adding blueberries to this recipe makes them taste like sweet blueberry pancakes. You can also add chocolate chips, vanilla extract, lemon zest, or lemon juice to flavor this recipe.

What frosting goes with a pancake cake?

This frosting recipe is a maple buttercream, but cream cheese frosting or stabilized whipped cream would also pair well. 

Related Recipes

Blueberry Muffins

Sourdough Discard Pancakes

Lemon Blueberry Cake Recipe

Brown Butter Buttermilk Pancakes

Recipe

slice of cake coming out of a pancake cake
Print Recipe
5 from 3 votes

Blueberry Pancake Cake

Cake for breakfast? Absolutely! This blueberry pancake cake is actually made from a buttermilk pancake mix and you only need milk and blueberries to bake it up into three delicious layers. Some maple buttercream frosting and fondant bring this cake to life as a realistic-looking stack of pancakes. 
Prep Time30 minutes mins
Cook Time30 minutes mins
Decorating Time30 minutes mins
Total Time1 hour hr 30 minutes mins
Course: Breakfast, Dessert
Cuisine: American
Servings: 12 cups
Calories: 743kcal
Author: Liz Marek

Equipment

  • 3 8" x 2" cake pans

Ingredients

Blueberry Pancake Cake

  • 4 cups pancake mix Krusteaz buttermilk
  • 2 ⅔ cups milk
  • 2 ½ cups fresh blueberries or frozen
  • ¼ cup melted butter for brushing

Gummy "Syrup"

  • 2 teaspoons gelatin powder
  • ½ cup cold water
  • 1-2 drops brown food coloring

Fondant Decoration

  • 1 pound white fondant
  • 1-2 drops ivory food coloring for the pancakes
  • 1-2 drops yellow food coloring for the butter
  • 3 Tablespoons Everclear
  • 4 to 5 drops brown food coloring for the pancake edges

Maple Frosting

  • 2 cups unsalted butter room temperature
  • 7 cups powdered sugar
  • 1 teaspoon vanilla extract
  • ¼ cup maple syrup
  • ½ teaspoon salt
US Customary - Metric

Instructions

The Blueberry Pancake Cake Layers

  • Preheat the oven to 350ºF/176ºC and prepare three 8-inch round cake pans with cake goop, parchment paper, or another preferred pan release. 
  • Add the pancake mix and milk to a large bowl and whisk it together until just combined. Do not overmix! It's okay if the flour mixture is lumpy.
  • Fold in the fresh blueberries and let the mixture sit for 2 minutes.
  • Pour the batter into the prepared pans.
  • Bake the cakes for 15 to 20 minutes until a toothpick inserted comes out clean.
  • While the cakes are still warm, brush the tops with melted butter. 
  • Let the cake cool for 10 minutes, then flip the cakes out onto a wire rack.
  • Cool the cakes completely at room temperature, or wrap them in plastic wrap and freeze for 30 minutes or overnight.

The Maple Buttercream Frosting

  • Mix the room-temperature butter in a large separate bowl with a hand mixer until smooth.
  • Add the powdered sugar one cup at a time and mix until it's fully combined.
  • Pour in the vanilla and maple syrup and mix together until the frosting is smooth, light, and fluffy.

Assembling the Cake

  • Trim the top of the 2 cake layers so they are flat, and leave the 3rd full to be the top. 
  • Place the first cake layer down on a cake board and spread a layer of buttercream evenly across the top.
  • Repeat this process with the remaining 2 layers. 
  • Spread a thin layer of frosting around the entire cake as a crumb coat. Leave the cake at room temperature while you decorate so that the buttercream stays sticky. 

The Pancake Fondant Decoration

  • Add the Everclear and brown food coloring to a medium bowl and mix them together. This will be your "paint" for coloring the golden brown edges of the pancakes.
  • Color about a pound of fondant with a few drops of ivory food coloring.
  • Sprinkle powdered sugar on the work surface and roll out about ½ cup of fondant into long strips, about ½  inch thick.
  • Cut the strip in half lengthwise with a pizza cutter.
  • Starting at the bottom, place a strip on the cake with the flat-cut side facing the cake. It should stick to the buttercream, but you can dab a little bit of water to help.
  • Spread some of the brown mixture with a paintbrush onto the top and inside of the fondant strip. It doesn't need to be fully covered or perfect, it will just help the fluffy pancakes look more realistic.
  • Repeat steps 3 through 6 and works up to the top edge of the cake. 
  • Roll out a piece of fondant into a large circle about ½ inch thick. Then place it on top of the cake and paint it to look like a pancake.
  • Use a small ball modeling tool to create small dots on the side of the fondant to represent air bubbles.

The Gelatin Syrup and Butter

  • Sprinkle gelatin onto a small bowl of cold water and microwave it for about 15 seconds until just melted.
  • Add a few drops of brown food coloring and mix it together. 
  • Drizzle spoonfuls of gelatin "syrup" from the top of the cake and let it drip down the sides.
  • Pour the rest of the gelatin mixture on top of the cake. 
  • Color about ¼ cup of fondant yellow and form it into a ½ inch thick rectangle.
  • Cut the yellow fondant into 2 equal-sized squares with a knife or bench scraper. These will be the "butter" pieces. 
  • Add some fresh blueberries and the "butter" pieces on top of the cake before the gelatin fully cools. 
  • Now serve and enjoy! This cake can be stored at room temperature for up to 4 days. 

Notes

  1. It's important to not overmix the cake mix, or it will have a dense texture. The light and fluffy texture comes from mixing just until the batter is incorporated.
  2. You can also bake this in a sheet pan, two 9" cake pans, or a bundt pan. Just bake them at different times.
  3. Practice Mise en Place (everything in its place). Measure out your ingredients ahead of time and have them ready before you start mixing to reduce the chances of accidentally leaving something out.
  4. For extra blueberry flavor, add some homemade blueberry sauce in between layers. 

Nutrition

Serving: 1cup | Calories: 743kcal | Carbohydrates: 94g | Protein: 6g | Fat: 40g | Saturated Fat: 24g | Polyunsaturated Fat: 3g | Monounsaturated Fat: 10g | Trans Fat: 1g | Cholesterol: 129mg | Sodium: 375mg | Potassium: 219mg | Fiber: 2g | Sugar: 78g | Vitamin A: 1276IU | Vitamin C: 3mg | Calcium: 181mg | Iron: 1mg
fork going through a slice of peanut butter sheet cake

April 19, 2023 Cake

Peanut Butter Texas Sheet Cake

This peanut butter Texas sheet cake recipe is packed with peanut butter flavor from the soft cake and gooey peanut butter glaze. Similar to the chocolate Texas sheet cake, this huge and tasty peanut butter version comes together in just 30 minutes. Bring it to a party of peanut butter lovers and the entire cake will disappear!fork going through a slice of peanut butter sheet cake

This really is the easiest cake you could make because there's no special decorating required and you can serve it right out of the pan. My favorite part of this cake is when the glaze sets up and almost becomes like a peanut butter fudge on top of the cake. You could also get fancy and do chocolate icing or cream cheese frosting on top of the peanut butter cake.

Table of contents

  • Ingredients
  • Making a Peanut Butter Sheet Cake
    • The Peanut Butter Cake
    • The Frosting
  • FAQ
  • Related Recipes

Ingredients

Sugar: Adding both brown sugar and granulated sugar to the dry ingredients adds extra moisture to this cake. I love how the richness of the brown sugar brings out the true peanut butter flavor.

Buttermilk: The tanginess from the acidity of the buttermilk is crucial to the moisture and flavor of this cake. Check out my buttermilk substitutes blog post for alternatives, or replace the buttermilk with equal parts of sour cream.

Peanut butter: Creamy, salted peanut butter will work best for this recipe. If you're using unsalted, just add another ½ teaspoon of salt to the cake.

Making a Peanut Butter Sheet Cake

The trick to this cake is the timing of making the glaze. You want to start making the glaze while the cake is in the oven so that the cake rests for 5 minutes and you pour warm glaze onto the warm cake. If you make your glaze too quickly, you can keep whisking it over low heat to keep it liquid.

The Peanut Butter Cake

  1. Preheat the oven to 375°F. Prepare a large sheet pan with cake goop or pan spray and parchment paper. A 12×17 jellyroll sheet will work well.hand using brush to brush cake pan release on sheet pan.
  2. Combine eggs, vanilla extract, and buttermilk in a separate mixing bowl and set it aside.hands pouring bowl of eggs into measuring cup.
  3. Combine the sugar, brown sugar, flour, baking soda, and salt, in a large mixing bowl.hands using hand mixer to whisk dry ingredients in bowl.
  4. Melt the butter in a medium saucepan over medium heat.hand holding spatula mixing butter in stove pot.
  5. Add the peanut butter and milk and bring it to a simmer, then remove it from the heat and set it aside. hand using spatula to scoop peanut butter into stove top.
  6. Add the hot peanut butter mixture to the flour mixture and stir until completely combined. hands using hand mixer to mix together batter in bowl.
  7. Next, add the egg mixture to the batter and mix until combined.hands pouring measuring cup of wet ingredients into bowl of batter.
  8. Pour the cake batter into the prepared pan.hand pouring bowl of batter into sheet pan.
  9. Bake the cake for 15 minutes until the center of the cake springs back when touched. Pro-Tip: Make the frosting while the cake is baking.final photo of sheet cake that has been baked.
  10. The frosting will spread best over a warm cake, so let it cool for only 5 minutes before adding the glaze.

The Frosting

  1. Combine butter, buttermilk, and peanut butter in a small saucepan and bring it to a simmer over medium heat.hand pouring cup of cream into stove pot.
  2. Remove the mixture from the heat and whisk in the powdered sugar and vanilla until combined and the sugar is dissolved. Pro-Tip: If the mixture is too thick, add a tablespoon of water at a time. If it's too runny, add ¼ cup of powdered sugar.hand using hand mixer to whisk together powdered sugar and peanut butter glaze.final photo of peanut butter glaze on spatula.
  3. Spread peanut butter icing onto the warm cake with a spatula. The glaze should be at an easy-spreading consistency and will be set up when it cools.hand pouring bowl of peanut butter glaze onto baked sheet cake.
  4. Serve the whole cake directly on the sheet pan and store leftovers at room temperature in an air-tight container for up to 4 days.peanut butter texas sheet cake in a pink pan

FAQ

Does a Texas sheet cake need to be refrigerated?

Not technically, but if you're going to continue to serve it for longer than four days, or if you live in a hot area, it will stay fresher in the refrigerator.

Can I make this recipe into a chocolate cake?

Yes! It's the same process, just take out the peanut butter and add cocoa powder. The traditional Texas sheet cake is usually a delicious chocolate cake topped with nuts and chocolate frosting. Both this and the chocolate are incredibly moist and tender cakes.

Why is it called a Texas sheet cake?

It is unclear whether or not the Texas sheet cake originated in Texas. Some say the recipe first showed up in a Texas newspaper, others say it gets its name from being big like the size of Texas. Either way, this recipe is a real crowd-pleaser and is widely known as a symbol of friendship and hospitality.

What size pan should I use for a Texas sheet cake?

A half sheet pan is typically about 13″ wide by 18″ long and is about 2″ tall. You can also use a cookie sheet or jelly roll pan as long as it has sides. You may have to slightly adjust your batter recipe and baking time, or bake leftover batter as cupcakes if you're using a smaller pan.

Related Recipes

Chocolate Texas Sheet Cake

Peanut Butter Chocolate Eggs

Moist Peanut Butter Cookies

Lofthouse Copycat Cookies

Recipe

fork going through a slice of peanut butter sheet cake
Print Recipe
4.24 from 13 votes

Peanut Butter Texas Sheet Cake

This is a moist peanut butter sheet cake glazed with creamy peanut butter frosting that soaks into the cake. A little bit of tangy buttermilk takes this cake to a whole new level. The perfect cake for large gatherings, birthday parties, weddings, and BBQs.
Prep Time15 minutes mins
Cook Time15 minutes mins
Total Time30 minutes mins
Course: Dessert
Cuisine: American
Servings: 24 servings
Calories: 334kcal
Author: Liz Marek

Equipment

  • 1 Hand mixer optional

Ingredients

Peanut Butter Cake

  • ¼ cup creamy peanut butter
  • 1 cup milk
  • ½ cup unsalted butter
  • 1 cup granulated sugar
  • 1 cup light brown sugar
  • 2 cups all purpose flour
  • 1 teaspoon salt
  • 1 teaspoon baking soda
  • 2 large eggs
  • 1 teaspoon vanilla extract
  • ½ cup buttermilk

Peanut Butter Glaze

  • ¾ cup unsalted butter
  • ½ cup creamy peanut butter
  • ⅓ cup buttermilk
  • 3 ½ cups powdered sugar sifted
  • 1 Tablespoon vanilla extract
  • ¼ cup peanuts optional, for decoration
US Customary - Metric

Instructions

The Peanut Butter Cake

  • Preheat the oven to 375°F. Prepare a large sheet pan with cake goop or pan spray and parchment paper. A 12×17 jellyroll sheet will work well.
  • Combine eggs, vanilla extract, and buttermilk in a separate mixing bowl and set it aside.
  • Combine the sugar, brown sugar, flour, baking soda, and salt, in a large mixing bowl.
  • Melt the butter in a medium saucepan over medium heat.
  • Add the peanut butter and milk and bring it to a simmer, then remove it from the heat and set it aside. 
  • Add the hot peanut butter mixture to the flour mixture and stir until completely combined. 
  • Next, add the egg mixture to the batter and mix until combined.
  • Pour the cake batter into the prepared pan.
  • Bake the cake for 15 minutes until the center of the cake springs back when touched. Pro-Tip: Make the frosting while the cake is baking.
  • The frosting will spread best over a warm cake, so let it cool for only 5 minutes before adding the glaze.

The Peanut Butter Glaze

  • Combine butter, buttermilk, and peanut butter in a small saucepan and bring it to a simmer over medium heat.
  • Remove the mixture from the heat and whisk in the powdered sugar and vanilla until combined and the sugar is dissolved. Pro-Tip: If the mixture is too thick, add a tablespoon of water at a time. If it's too runny, add ¼ cup of powdered sugar.
  • Spread peanut butter icing onto the warm cake with a spatula. The glaze should be at an easy-spreading consistency and will be set up when it cools.
  • Serve the whole cake directly on the sheet pan and store leftovers at room temperature in an air-tight container for up to 4 days.

Notes

  • Cake goop on its own will release your cake from the pan with no problems. If you're using another type of pan release, you may want to have a layer of parchment paper for protection.
  • A half sheet pan is typically about 13″ wide by 18″ long and is about 2″ tall. You can also use a cookie sheet or jelly roll pan as long as it has sides. You may have to slightly adjust your batter recipe and baking time, or bake leftover batter as cupcakes if you're using a smaller pan.
  • If your glaze is too thick, you can add 1-2 Tablespoons of water to thin it out to the desired consistency.
  • If your glaze is too runny, add ¼ cup of powdered sugar.
  • Feel free to add toasted peanuts to your Texas sheet cake
  • If you don't have a sheet pan you can use any kind of cake pan, cupcake, or even a loaf pan.

Nutrition

Serving: 1serving | Calories: 334kcal | Carbohydrates: 46g | Protein: 5g | Fat: 16g | Saturated Fat: 7g | Polyunsaturated Fat: 2g | Monounsaturated Fat: 5g | Trans Fat: 0.4g | Cholesterol: 43mg | Sodium: 201mg | Potassium: 117mg | Fiber: 1g | Sugar: 36g | Vitamin A: 348IU | Calcium: 42mg | Iron: 1mg
raspberry buttercream on a vanilla cupcake

April 17, 2023 Frosting and Icing

Raspberry Buttercream

This is the best raspberry buttercream recipe made from real raspberries! Thick raspberry filling made from delicious fresh raspberries or frozen berries mixed into creamy easy vanilla buttercream frosting. It pairs perfectly with white chocolate raspberry cake, pink velvet cake, or lemon raspberry cake.raspberry buttercream on a vanilla cupcake

The trick to this raspberry buttercream frosting is getting the raspberry puree to the right consistency. The longer the berries are reduced, the thicker they will become and the more flavor will be concentrated. When raspberries are fresh, juicy, and warmed by the sun, there's nothing like it, but frozen raspberries are a wonderful alternative that gives the same vibrant raspberry flavor.

Table of contents

  • Ingredients
  • Making Raspberry Filling
  • Making Fresh Raspberry Buttercream
  • FAQ
  • Related Recipes

Ingredientsbowls of ingredients for raspberry buttercream

Raspberries: If you have fresh berries available then this is a great way to use them and save that seasonal flavor. If not, frozen berries are just as good because they are picked at the peak of ripeness and flash-frozen. The freezing process starts to break down the berries, so as they thaw they will release their juices and break down quicker in the cooking process. Freeze-dried raspberries won't work as well in this buttercream, because the butter will prevent the raspberries from rehydrating and releasing their flavor (and they are expensive).

Pasteurized Egg whites: Pasteurized egg whites are heat-treated (like milk) so they are safe to eat without cooking. They usually come in a box carton in the egg aisle. If you don't have pasteurized egg whites then you can use my Swiss Meringue Buttercream recipe instead. 

Butter: Using good quality, real butter is best, but you can substitute it with margarine, vegan butter, or vegetable shortening. I can't guarantee the taste will be the same, but you can use whatever is your preference! You can also mix the raspberry puree into any of my buttercream recipes, like Swiss meringue buttercream, American buttercream, and even cream cheese frosting.

Making Raspberry Filling

  1. Add your raspberries and sugar to a medium saucepan over medium heat.hand pouring sugar onto raspberries in a pot.
  2. Heat your raspberry puree until it begins to bubble. Increase the heat to medium-high heat if needed.raspberries bubbling while being cooked in a pot.
  3. In a small bowl, combine the water and the ClearJel (or cornstarch) and mix until smooth. Don't just add the ClearJel (or cornstarch) directly to the hot liquid or you'll end up with lumps of thickener in your filling.hands whisking water and cornstarch together.
  4. Add the ClearJel mixture (or cornstarch slurry) to the hot liquid and mix with a rubber spatula for one more minute to thicken the mixture.hand pouring cornstarch slurry into cooked raspberries in a pot while stirring.
  5. Add in the lemon juice and lemon zest and continue cooking for one more minute until thickened.hand pouring lemon juice into raspberry mixture in a pot.
  6. If you do not want seeds in your raspberry filling, press the filling through a fine mesh strainer to remove them.straining the seeds out of raspberry filling
  7. Transfer the mixture to a heat-proof container and cover it with plastic wrap (so that it's touching the surface) and allow it to cool to room temperature or place it into the refrigerator to cool before using it.finished raspberry filling in a mason jar.

Making Fresh Raspberry Buttercream

  1. Place the pasteurized egg whites and powdered sugar in the bowl of a stand mixer with the whisk attachment and mix on low until combined. egg whites and powdered sugar in a stand mixer bowl
  2. Bump up the speed to medium-high and mix for 3-5 minutes until white and glossy.glossy mixed egg whites and powdered sugar in a stand mixer bowl
  3. Add the softened butter in small chunks then vanilla and salt while the mixer is on medium speed.hand adding a stick of butter to a stand mixer bowl
  4. Whip on high speed until light and fluffy and white, about 8 to 10 minutes. When it tastes like ice cream and no longer tastes buttery, it's done!glass bowl full of buttercream
  5. Optional: switch to the paddle attachment and mix on low speed for 15-20 minutes until all air bubbles are gone or until your desired consistency.smooth buttercream in a stand mixer bowl
  6. Add about ½ cup of the strained raspberry purée to the buttercream and continue to mix until combined. adding raspberry filling to a bowl of buttercream
  7. Mix in about 1-2 drops of pink food coloring to enhance the raspberry pink color if you choose. squeezing a bottle of food coloring into a stand mixer bowl
  8. If the buttercream is splitting, it's probably too cold. Microwave about a cup of the buttercream and mix it back in, or use an immersion blender to emulsify the buttercream.
  9. Stored it in an airtight container for up to a week in the refrigerator or for 3 months in the freezer.black spoon filled with raspberry buttercream

FAQ

Would this be the same with other berries like blueberries or blackberries? 

Yes, follow the recipe the same way for other berries. You can choose to swap the lemon for lime or orange too for a different combination. 

How do you keep raspberry buttercream from splitting?

If the buttercream begins to separate, warm a little in the microwave and add it back to the batch, make sure you let it mix long enough to allow the puree to fully emulsify with the butter. 

Do I have to make raspberry filling or can I use store-bought? 

You can use raspberry jam or raspberry sauce from your local grocery store. However, store-bought won't have the same intense berry flavor as making it from frozen or fresh fruit. It will also contain more sugar, changing the flavor of the final product. 

Can you add fresh fruit to buttercream?

You don't want to add just straight-up chopped strawberries or raspberries to the buttercream. The best way to flavor buttercream with fruit is to cook the fruit into a puree first and pour that into your already prepared buttercream.

Related Recipes

White Chocolate Raspberry Cake

Pistachio Cake with Raspberry Filling

Lemon Raspberry Cake

Pink Velvet Cake

Recipe

raspberry buttercream on a vanilla cupcake
Print Recipe
4.84 from 12 votes

Raspberry Buttercream

This easy raspberry buttercream recipe made from real raspberries is sweet, bursting with fresh raspberry flavor, and has the slightest hint of lemon. It's similar to Swiss meringue buttercream, so it's perfect for stacking cakes, is great under fondant, and is so easy to make!
Prep Time30 minutes mins
Chilling Time1 hour hr
Total Time1 hour hr 30 minutes mins
Course: Dessert
Cuisine: American
Servings: 6 cups
Calories: 1031kcal
Author: Liz Marek

Ingredients

Raspberry Filling

  • 16 ounces fresh or frozen raspberries
  • 5 ounces granulated sugar
  • 1 Tablespoon lemon zest
  • 1 Tablespoon lemon juice
  • 4 ounces cool water
  • 1 Tablespoon corn starch

Raspberry Buttercream

  • 4 ounces pasteurized egg whites
  • 16 ounces powdered sugar can add more if you want sweeter frosting
  • 1 teaspoon lemon extract
  • ½ teaspoon salt
  • 16 ounces unsalted butter slightly warm
  • 4 ounces raspberry puree
  • 1-2 drops pink food coloring optional
US Customary - Metric

Instructions

Making Raspberry Filling

  • Add your raspberries and sugar to a medium saucepan over medium heat.
  • Heat your raspberry puree until it begins to bubble. Increase the heat to medium-high heat if needed.
  • In a small bowl, combine the water and the ClearJel (or cornstarch) and mix until smooth. Don't just add the ClearJel (or cornstarch) directly to the hot liquid or you'll end up with lumps of thickener in your filling.
  • Add the ClearJel mixture (or cornstarch slurry) to the hot liquid and mix with a rubber spatula for one more minute to thicken the mixture.
  • Add in the lemon juice and lemon zest and continue cooking for one more minute until thickened.
  • If you do not want seeds in your raspberry filling, press the filling through a fine mesh strainer to remove them.
  • Transfer the mixture to a heat-proof container and cover it with plastic wrap (so that it's touching the surface) and allow it to cool to room temperature or place it into the refrigerator to cool before using it.

Making Fresh Raspberry Buttercream

  • Place the pasteurized egg whites and powdered sugar in the bowl of a stand mixer with the whisk attachment and mix on low until combined. 
  • Bump up the speed to medium-high and mix for 3-5 minutes until white and glossy.
  • Add the softened butter in small chunks then vanilla and salt while the mixer is on medium speed.
  • Whip on high speed until light and fluffy and white, about 8 to 10 minutes. When it tastes like ice cream and no longer tastes buttery, it's done!
  • Optional: switch to the paddle attachment and mix on low speed for 15-20 minutes until all air bubbles are gone or until your desired consistency.
  • Add about ½ cup of the strained raspberry purée to the buttercream and continue to mix until combined. 
  • Mix in about 1-2 drops of pink food coloring to enhance the raspberry pink color if you choose. 
  • If the buttercream is splitting, it's probably too cold. Microwave about a cup of the buttercream and mix it back in, or use an immersion blender to emulsify the buttercream.
  • Stored it in an airtight container for up to a week in the refrigerator or for 3 months in the freezer.

Nutrition

Serving: 1cup | Calories: 1031kcal | Carbohydrates: 122g | Protein: 4g | Fat: 62g | Saturated Fat: 39g | Polyunsaturated Fat: 3g | Monounsaturated Fat: 16g | Trans Fat: 2g | Cholesterol: 163mg | Sodium: 247mg | Potassium: 148mg | Fiber: 5g | Sugar: 106g | Vitamin A: 2083IU | Vitamin C: 25mg | Calcium: 41mg | Iron: 1mg
bunny butt cake on a cake board

April 5, 2023 Cake

Bunny Butt Cake

This bunny butt cake is an easy Easter cake that everyone of all ages can enjoy. It makes an adorable display on any dessert table and it's deceptively easy to make! This big bunny is a vintage design that is getting new life, moms and grandmas had great ideas and I love giving them a modern moment! bunny butt cake on a cake board

Made with our simple one-bowl vanilla cake, easy buttercream, some fondant, and a bag of shredded coconut, this cake comes together from start to finish in about 3 hours.

Table of contents

  • Ingredients
  • Making a Bunny Butt Cake
    • Making The Easy Vanilla Cake
    • Easy Buttercream Frosting
    • Preparing the fondant bunny feet and ears
    • Making the cake pop dough tail and feet
    • Assembling the Bunny Butt Cake
  • FAQ
  • More Easter Favorites

Ingredientsingredients for a bunny butt cake

Sweetened Shredded Coconut: This bag of goodness is so versatile! It is a great addition to cake batter to flavor a cake as well as an easy way to decorate the outside of your cake. 

Easy Buttercream: This frosting is great for these fun quick projects because it comes together fast and tastes great. The consistency is great for the "grass" but also for sticking the white coconut for the bunny texture. 

Vanilla cake (One Bowl): This cake recipe is perfect for this project because it is fast and easy. The cake is sturdy and handles well, so no worries about it crumbling or breaking apart once it has cooled. All simple ingredients are found on a baker's shelf, nothing obscure or hard to find. I kept the flavor vanilla, but you could add coconut extract to change the flavor to match the decor.

Making a Bunny Butt Cake

This is an easy cake to make, but it does have 5 different components to come together. I recommend you make the fondant bunny ears and feet first, then vanilla cake and cupcakes, then the frosting, the tail and feet, and finally assemble it all together.

Making The Easy Vanilla Cake

  1. Preheat the oven to 335ºF (168ºC) and prepare one 7-inch hemisphere-shaped cake pan or a 2-quart ovenproof bowl of equivalent size, with cake goop or another pan release.
  2. Measure out all of the ingredients using a digital kitchen scale. Pro-tip: You can mix the wet and dry ingredients separately for a finer texture, or just measure and add directly into the bowl of your stand mixer for fewer dishes.
  3. In a large bowl, combine and mix together the buttermilk, butter, oil, eggs, and vanilla. The wet ingredients should all be slightly warm.easy vanilla cake wet ingredients
  4. Combine the flour, sugar, salt, baking soda, and baking powder in the bowl of your stand mixer with the paddle attachment on low speed.easy vanilla cake dry ingredients
  5. While the mixer is on low speed, pour the wet ingredients slowly into the dry ingredients.adding wet ingredients into dry ingredients
  6. Mix the batter on medium speed and mix for 1 minute until the batter is combined and looks like pancake batter. Scrape the sides of the bowl to make sure all of the ingredients are combined.close up of easy vanilla cake batter
  7. Pour cake batter into the dome cake pan and then fill 6 prepared muffin cups with the remaining batter.
  8. Bake the cupcakes in the same oven as the cake, but set a time to remove them at 12-15 minutes.
  9. Use an empty 6-inch cake pan as a stabilizer for your dome pan while it is baking. Bake the cake for 40-50 minutes, or until a toothpick inserted in the center comes out clean.
  10. Allow the cake to cool for 10 minutes and flip it out onto a wire rack. Pro-tip: If you plan to frost and decorate the cake on the same day, you can place the cakes into the freezer unwrapped for about an hour or until they are cold (but not frozen). If you plan to decorate your cake at a later date, then you will wrap the cakes in plastic wrap first before freezing them.

Easy Buttercream Frosting

  1. Place the egg whites and the powdered sugar in the bowl of your stand mixer. Use the whip attachment and combine the ingredients on low speed, and then whip them on high for 4-5 minutes (until shiny) to dissolve the powdered sugar.stand mixer bowl filled with meringue
  2. Then, add the salt and the vanilla extract. hand adding vanilla to powdered sugar mixture in a mixing bowl.
  3. Add in the softened butter piece-by-piece, and whip it with the whisk attachment to combine. It will look curdled at first. This is normal. It will also look pretty yellow, keep whipping.hand adding chunks of butter into bowl
  4. Whip it on high speed with the whisk attachment for 8-10 minutes until the buttercream is white, light, and shiny. If it tastes like sweet ice cream, then it's ready!hand holding whisk covered in frosting
  5. Finally, switch to a paddle attachment and mix the buttercream on low speed for up to 18-20 minutes to make the buttercream ultra smooth and remove any air bubbles.smooth buttercream in a stand mixer bowl
  6. Color about 2 cups of buttercream green for the grass and prepare a piping bag with a grass tip.green and pink buttercream in bowls
  7. Color about 2 cups of buttercream pink for the body of the bunny, or leave it white if you prefer.

Preparing the fondant bunny feet and ears

  1. Make the ears and feet a day ahead so that they have time to dry, or you can buy a cute little set already made. fondant bunny ears and feet
  2. Color about 2 ounces of white fondant with pink food coloring for the details in the ears and feet.jar of pink food coloring and white fondant
  3. Roll the white and pink fondant very thin on a surface prepared with cornstarch to avoid sticking.hands rolling out white fondant with a rolling pin
  4. While the fondant surface dries slightly, trace ears and feet shapes on a piece of paper and cut them out. This is to make a guide for your blade while cutting out the shapes.cutting paper with scissors
  5. Cut all of the white and pink shapes out with a sharp blade.cutting fondant shapes out with an exacto blade
  6. Using a brush moistened with water, brush the pink bits and stick them to the white bunny's feet and ears.brushing water onto a piece of pink fondant
  7. Bend over one ear and lay all of the cutouts on a tray lined with parchment paper to dry. The ears need extra dry time to stand up.Placing fondant ears and feet on a sheet pan

Making the cake pop dough tail and feet

  1. Crumble the cupcakes in a large bowl.Mashing cupcakes in a bowl with a fork
  2. Add about ½ cup of buttercream to the crumbs and mix them together until it forms a dough. You can use another tablespoon of the buttercream if the dough is still crumbly.Adding buttercream to a bowl of cupcake crumbles
  3. Using your hands, create one big cake ball of dough for the tail and 2 smaller balls for the feet. I elongated the shape of the feet so they are a little more rabbit-like and so they match the fondant feet.scoops of cake pop dough
  4. Roll the tail ball and feet in the shredded coconut.rolling a ball in shredded coconut
  5. Let the cake dough balls set up in the fridge for 10 minutes while you assemble the bunny.

Assembling the Bunny Butt Cake

  1. Trim the bunny cake so that the dome can sit level and trim the cake board to fit evenly with the cake. trimming the edges off a cake board
  2. On a large round cake board or platter, place the baked domed cake flat side down in the center.hands placing a dome cake on a cake board
  3. Spread a generous layer of easy buttercream evenly over the cake.spreading buttercream on a cake
  4. Press the shredded coconut onto the side of the cake until fully covered.covering a dome cake in coconut
  5. Add two wooden skewers to the top-back of the dome cake and add the tail. adding a cake pop dough ball onto 2 skewers on a cake
  6. Using a dollop of buttercream, stick the bunny feet in the desired locations.adding a ball of cake pop dough to the back of a cake
  7. Pipe the green grass buttercream around the bottom edge of the bunny's body and fill in the remaining space on the platter.piped grass around a bunny cake
  8. Use another dollop of buttercream on the foot pads and stick the bottoms of bunny feet with the toes facing down.bunny cake fondant feet
  9. Next, add the fondant ears on the front of the bunny with a dollop of buttercream.bunny cake ears
  10. Sprinkle colorful jellybeans or chocolate eggs around in the "grass".adding jelly beans to a bunny butt cake

FAQ

Can I use cake mix?

Yes, that is a great way to make this cake even easier! You can use any flavor you choose, strawberry cake, chocolate cake, or even banana cake would be good! Make sure you fill at least 3 cupcakes first so that there is enough batter for the dome cake. However, the quantity of batter should be the same between a box mix and the scratch recipe.

Can I make this into cupcakes?

Yes, you can make super cute bunny butt cupcakes with this recipe and mini fondant or marshmallow ears. This vanilla cake can make 24 cupcakes.

What if I don't have fondant?

Using candy melts, you can pipe the same shapes. It will harden even quicker than the fondant!

Can I torte this cake and fill it?

Yes, slice the dome in half and fill it with buttercream, lemon curd, jam, or ganache. You could even hollow the center of the cake and fill it with candy, sprinkles, or mini marshmallows for a fun surprise!

Looking for more Easter dessert ideas? My Speckled Easter Cake is fun, but still has a soft, understated look that fits right in with the rest of your Easter spread. These Carrot Cake Bars are simple and easy to serve, and my Carrot Cake With Pineapple Recipe is always a reliable classic. And for or a pop of color, you can opt for a pretty Pink Velvet Cake!

More Easter Favorites

  • pink speckled cake with easter eggs on top
    Speckled Easter Cake
  • M&M cookies on cooling
    Easy M&M Cookie Recipe
  • Carrot cake bar held up by a server
    Carrot Cake Bars
  • peanut butter eggs layered in a bowl
    Peanut Butter Egg Recipe

Recipe

bunny butt cake on a cake board
Print Recipe
5 from 2 votes

Bunny Butt Cake

This is an easy and adorable colorful Easter Bunny Butt Cake that makes a memorable Easter cake, a festive centerpiece, and a fun way to celebrate spring! 
Prep Time30 minutes mins
Cook Time30 minutes mins
Decorating Time2 hours hrs
Total Time3 hours hrs
Course: Dessert
Cuisine: American
Servings: 8 cups
Calories: 1561kcal
Author: Liz Marek

Equipment

  • 1 7" hemisphere-shaped cake pan or a 2-quart ovenproof bowl of equivalent size
  • 1 Cupcake Tin
  • 6 cupcake liners

Ingredients

Easy Vanilla Cake

  • 16 ounces all-purpose flour
  • 16 ounces granulated sugar
  • 1 teaspoon salt
  • 1 teaspoon baking soda
  • 1 teaspoon baking powder
  • 3 Large eggs slightly warm
  • 5 ounces vegetable oil
  • 10 ounces buttermilk slightly warm
  • 4 ounces unsalted butter melted
  • 2 teaspoon vanilla extract

Easy Buttercream

  • 6 ounces pasteurized egg whites from a box
  • 24 ounces powdered sugar
  • 2 teaspoons vanilla extract
  • ½ teaspoon salt
  • 24 ounces unsalted butter softened

Decorating

  • 1 cup white fondant
  • 1 teaspoon green food coloring
  • 1 teaspoon pink food coloring
  • 1 bag sweetened shredded coconut
  • ¼ cup jelly beans
US Customary - Metric

Instructions

Easy Vanilla Cake

  • Preheat the oven to 335ºF (168ºC) and prepare one 7-inch hemisphere-shaped cake pan or a 2-quart ovenproof bowl of equivalent size, with cake goop or another pan release.
  • Measure out all of the ingredients using a digital kitchen scale. Pro-tip: You can mix the wet and dry ingredients separately for a finer texture, or just measure and add directly into the bowl of your stand mixer for fewer dishes.
  • In a large bowl, combine and mix together the buttermilk, butter, oil, eggs, and vanilla. The wet ingredients should all be slightly warm.
  • Combine the flour, sugar, salt, baking soda, and baking powder in the bowl of your stand mixer with the paddle attachment on low speed.
  • While the mixer is on low speed, pour the wet ingredients slowly into the dry ingredients.
  • Mix the batter on medium speed and mix for 1 minute until the batter is combined and looks like pancake batter. Scrape the sides of the bowl to make sure all of the ingredients are combined.
  • Pour cake batter into the dome cake pan and then fill 6 prepared muffin cups with the remaining batter.
  • Bake the cupcakes in the same oven as the cake, but set a time to remove them at 12-15 minutes.
  • Use an empty 6-inch cake pan as a stabilizer for your dome pan while it is baking. Bake the cake for 40-50 minutes, or until a toothpick inserted in the center comes out clean.
  • Allow the cake to cool for 10 minutes and flip it out onto a wire rack. Pro-tip: If you plan to frost and decorate the cake on the same day, you can place the cakes into the freezer unwrapped for about an hour or until they are cold (but not frozen). If you plan to decorate your cake at a later date, then you will wrap the cakes in plastic wrap first before freezing them.

Easy Buttercream Frosting

  • Place the egg whites and the powdered sugar in the bowl of your stand mixer. Use the whip attachment and combine the ingredients on low speed, and then whip them on high for 4-5 minutes (until shiny) to dissolve the powdered sugar.
  • Then, add the salt and the vanilla extract. 
  • Add in the softened butter piece-by-piece, and whip it with the whisk attachment to combine. It will look curdled at first. This is normal. It will also look pretty yellow, keep whipping.
  • Whip it on high speed with the whisk attachment for 8-10 minutes until the buttercream is white, light, and shiny. If it tastes like sweet ice cream, then it's ready!
  • Finally, switch to a paddle attachment and mix the buttercream on low speed for up to 18-20 minutes to make the buttercream ultra smooth and remove any air bubbles.
  • Color about 2 cups of buttercream green for the grass and prepare a piping bag with a grass tip.
  • Color about 2 cups of buttercream pink for the body of the bunny, or leave it white if you prefer.

Preparing the fondant bunny feet and ears

  • Make the ears and feet a day ahead so that they have time to dry, or you can buy a cute little set already made. 
  • Color about 2 ounces of white fondant with pink food coloring for the details in the ears and feet.
  • Roll the white and pink fondant very thin on a surface prepared with cornstarch to avoid sticking.
  • While the fondant surface dries slightly, trace ears and feet shapes on a piece of paper and cut them out. This is to make a guide for your blade while cutting out the shapes.
  • Cut all of the white and pink shapes out with a sharp blade.
  • Using a brush moistened with water, brush the pink bits and stick them to the white bunny's feet and ears.
  • Bend over one ear and lay all of the cutouts on a tray lined with parchment paper to dry. The ears need extra dry time to stand up.

Making the cake pop dough tail and feet

  • Crumble the cupcakes in a large bowl.
  • Add about ½ cup of buttercream to the crumbs and mix them together until it forms a dough. You can use another tablespoon of the buttercream if the dough is still crumbly.
  • Using your hands, create one big cake ball of dough for the tail and 2 smaller balls for the feet. I elongated the shape of the feet so they are a little more rabbit-like and so they match the fondant feet.
  • Roll the tail ball and feet in the shredded coconut.
  • Let the cake dough balls set up in the fridge for 10 minutes while you assemble the bunny.

Assembling the Bunny Butt Cake

  • Trim the bunny cake so that the dome can sit level and trim the cake board to fit evenly with the cake. 
  • On a large round cake board or platter, place the baked domed cake flat side down in the center.
  • Spread a generous layer of easy buttercream evenly over the cake.
  • Press the shredded coconut onto the side of the cake until fully covered.
  • Add two wooden skewers to the top-back of the dome cake and add the tail. 
  • Using a dollop of buttercream, stick the bunny feet in the desired locations.
  • Pipe the green grass buttercream around the bottom edge of the bunny's body and fill in the remaining space on the platter.
  • Use another dollop of buttercream on the foot pads and stick the bottoms of bunny feet with the toes facing down.
  • Next, add the fondant ears on the front of the bunny with a dollop of buttercream.
  • Sprinkle colorful jellybeans or chocolate eggs around in the "grass".

Notes

  1. The best investment you can make when you're getting started with baking is a digital kitchen scale! Weighing your ingredients will help you avoid cake failure. Using a kitchen scale for baking is super easy and gives you the best results every single time. 
  2. Practice Mise en Place (everything in its place). Measure out your ingredients ahead of time and have them ready before you start mixing to reduce the chances of accidentally leaving something out.
  3. Need more help with making your first cake? Check out my how to decorate your first cake blog post. 
  4. Make sure all of your cold ingredients (e.g. butter, eggs, milk) are at room temperature or a little warm. Why? Because we want to create an emulsion and allow the ingredients to fully mix together. 
  5. Make your own pan release (cake goop!) The best pan release ever! 
  6. I recommend you make the fondant bunny ears and feet first, then vanilla cake and cupcakes, then the frosting, the tail and feet, and finally assemble it all together.

Nutrition

Serving: 1cup | Calories: 1561kcal | Carbohydrates: 194g | Protein: 13g | Fat: 84g | Saturated Fat: 52g | Polyunsaturated Fat: 4g | Monounsaturated Fat: 22g | Trans Fat: 3g | Cholesterol: 287mg | Sodium: 697mg | Potassium: 218mg | Fiber: 2g | Sugar: 147g | Vitamin A: 2824IU | Vitamin C: 0.001mg | Calcium: 107mg | Iron: 3mg
Carrot cake bar held up by a server

April 3, 2023 Brownies and Bars

Carrot Cake Bars

These easy carrot cake bars with cream cheese frosting are simple to decorate, serve and eat. A pecan shortbread crust under this springy cake creates a hybrid cake bar that you can eat with your hand or a fork! This is a great recipe for when you have little time to put together a dessert for a crowd.Carrot cake bar held up by a server

Is it a bar or is it cake? Both! This cake bar will satisfy a carrot cake lover and maybe even convert some carrot cake haters. I love the cute but simple decor covering an amazing flavor of warm spices and flavors in a moist tender cake. This is a good one to add to your Easter recipes!   

These pair perfectly with my cream cheese frosting without powdered sugar. Light, tangy, and pipeable with none of the chalky aftertaste of traditional versions.

Table of contents

  • Carrot Cake Bars Ingredients
  • How to Make Carrot Cake Bars
    • Making the Crust
    • Making Carrot Cake
    • Making Cream Cheese Frosting
    • Assembling the Carrot Cake Bars
  • FAQ
  • More Easter Favorites

Carrot Cake Bars Ingredientsbowls of ingredients for carrot cake bars

Carrots are obviously the key to this recipe, but it's important to use good-quality ingredients. If you don't like the stringy texture of graded carrots, you can pulse them in a food processor to break down the shreds for a more consistent cake texture. You can grate your own, or a good cheat is buying shredded carrots from the store.

Oil is the key to moisture in this cake. Many of our cake recipes use butter like the white velvet cake, coconut cake, and even my chunky carrot cake recipe, but oil will keep this cake moist even if it's cold or at room temperature.

Spices enhance the flavor of the carrot, and you can customize the spice combinations to your liking. I kept it simple, but allspice and cloves are good additions to carrot cake as well.

Buttermilk adds a tangy flavor to the cake and it tenderizes the crumb. If you do not have buttermilk you can substitute by adding a teaspoon of lemon juice to a cup of regular milk. Check out my buttermilk substitutes blog post for more recipes.

How to Make Carrot Cake Bars

There are 4 separate components to making these carrot cake bars; the cookie crust, the carrot cake, the cream cheese frosting, and the piped carrot decorations. This cream cheese frosting recipe is made without powdered sugar and has a cheesier flavor and smoother consistency. If you like a sweeter frosting though, try my traditional cream cheese frosting.

Making the Crust

  1. Spray a 9"x13" baking pan with cooking spray and preheat the oven to 350°F and position the rack in the center of the oven. Pro-tip: If you line the pan with parchment paper, leave some overhang and it will be easy to lift the cake out of the pan.Hand spraying a pan with a can of pan release.
  2. Grind the cookies and salt into crumbs in a food processor. Hands adding a bowl of cookies into a food processor
  3. Melt the butter in the microwave and then add it to the crumbs and pulse briefly to combine.Hand adding melted butter into a food processor
  4. Press the crumb mixture evenly into the bottom of the baking pan, then set it aside while you mix the cake. Pressing crust into a baking pan

Making Carrot Cake

  1. Shred the carrots using a food processor with a grating attachment or by hand with a box grater.
  2. Combine the flour, baking powder, baking soda, salt, cinnamon, ginger, and nutmeg in a large bowl and set aside.Glass bowl of dry ingredients for cake
  3. Combine the buttermilk and vanilla extract, and set aside. 
  4. Add granulated sugar, brown sugar, and oil to the bowl of a stand mixer and mix until combined.Hand adding oil to a stand mixer bowl
  5. Add the eggs one at a time, letting each combine fully before adding the next.Hand adding a bowl of eggs to a stand mixer bowl
  6. Turn the mixer to medium speed and mix until it lightens in color, about 2 minutes. Mixed batter in a stand mixer bowl
  7. With the mixer on low speed, add half of the flour mixture and then half the buttermilk mixture. Repeat the process with the dry ingredients and the wet ingredients until everything is combined.Hand adding a bowl of flour to a stand mixer bowlHand adding buttermilk to a stand mixer bowl of batter
  8. Stop the mixer, and then fold in the carrots with a spatula. Hand adding a bowl of carrots to batter
  9. Pour the carrot cake batter over the pressed crumbs and bake for 35-40 minutes until a toothpick comes out of the cake clean. Hands with oven mitts removing a carrot cake from the oven

Making Cream Cheese Frosting

  1. Make sure the butter and cream cheese are both slightly warm and at the same temperature. If one is colder than the other, they will not mix together properly and create lumps.
  2. Begin mixing the cream cheese in the bowl of a stand mixer with a paddle attachment until it's smooth.adding a bowl of cream cheese to a glass stand mixer bowl
  3. Then, add the butter in chunks and mix until incorporated. Pro-Tip: Using an electric mixer works really well for cream cheese frosting because it emulsifies the butter and cream cheese quickly. Just be careful not to over-mix.adding a bowl of butter to a glass stand mixer bowl
  4. Once the butter is incorporated, add the granulated sugar and vanilla. Continue to mix for 30 seconds to 1 minute until smooth and the sugar is dissolved. Hand pouring a container of sugar into a stand mixer bowl
  5. Cover with plastic wrap until you are ready to frost the cake. Keep the remaining frosting in the refrigerator as cream cheese frosting should not be stored at room temperature for more than 4 hours.

Assembling the Carrot Cake Bars

  1. Once the cake has fully cooled, remove the cake from the pan and place it on a cutting board or the plate you choose to serve it from. The cake can also be left in the cake pan for transporting and serving as well. To remove this cake, loosen the edges of the cake with a knife. Place a board on top of the cake pan, then flip it out and remove the pan.inverting a cake out of a rectangular pan onto a cutting board
  2. Then, place the serving board or plate on the cake (bottom side up) and flip it back over so the top of the cake is upright again.Rectangular carrot cake on a wooden cutting board
  3. Spread an even layer of cream cheese frosting on top of the moist carrot cake and create some pretty rustic swooshes with an offset spatula. Carrot cake frosted in cream cheese frosting
  4. Put about ½ cup of cream cheese frosting in a small bowl, add a drop of orange food coloring, and mix it together. Repeat this with a few drops of green food coloring in another bowl.bowls of orange and green frosting
  5. Fill 2 piping bags, the orange fitted with a small round tip and the green fitted with a leaf tip.piping bags of green and orange frosting
  6. Score lines on the top of the frosting to determine the number of servings you would like.Hands scoring lines in the top of frosting
  7. Pipe a carrot shape on top of the bars with the orange frosting by starting thin and getting thicker at the top.Hand piping a carrot on top of frosting
  8. Using the green frosting, add some leaves on top of the carrot.piping green frosting leaves next to a frosting carrot
  9. Cut the cake bars, cleaning the knife between cuts to avoid drag.carrot cake bars on a cutting board
  10. Keep the remaining cake in an airtight container in the refrigerator for up to 5 days. This cake also freezes well for up to 2 months. carrot cake bar on a plate

FAQ

What's the difference between carrot cake bars and a carrot sheet cake?

If you love carrot cake you will love carrot cake bars! It's basically the same thing except this cake holds together well and has a crunchy bottom crust which allows it to be handled without a plate and a fork. However, it still has the signature cream cheese frosting for the classic carrot flavor

Do I have to have a crust?

No, you can omit the crust part altogether. Just make sure the bottom of the prepared baking dish is well coated with cake goop to avoid sticking. This easy carrot cake recipe can easily be baked in a square pan or round pans for cake layers as well.

Do I have to use shredded carrots?

Similar to coconut, some people don't enjoy the texture of shredded carrots in their cake. You can take them a step further and pulse them in a food processor to break down the shreds for a more consistent cake texture. If the shredding of the carrots is holding you back, most grocery store produce sections will have bags of freshly grated carrots.

What can I substitute for buttermilk?

If you don't have buttermilk you can substitute the same amount of sour cream for this recipe, or add a tablespoon of lemon juice to regular milk. Check out my buttermilk substitute blog post for more info.

Building an Easter dessert lineup? This Carrot Cake With Pineapple Recipe is a great traditional option if you want a full layer cake. My Speckled Easter Cake is fun yet pretty with a soft, pastel finish. For something cute and decorative, you have to make this Bunny Butt Cake for your Easter table!

More Easter Favorites

  • Moist carrot cake with pineapple, toasted coconut, candied pecans and big chunks of carrots. Frosted with brown butter cream cheese frosting
    Carrot Cake With Pineapple Recipe
  • Piping cream cheese frosting onto a cupcake.
    Cream Cheese Frosting Without Powdered Sugar
  • slice of coconut cake on a plate
    Coconut Cake Recipe
  • pink speckled cake with easter eggs on top
    Speckled Easter Cake

Recipe

Carrot cake bar held up by a server
Print Recipe
No ratings yet

Carrot Cake Bars

Carrot Cake Bars are my new favorite way to eat carrot cake. Enjoy all of the flavors of a classic carrot cake with cream cheese frosting in a casual, fun way! Soft, moist, and perfectly spiced, these dessert bars make a quick snack, easy dessert, or breakfast treat! 
Prep Time25 minutes mins
Cook Time35 minutes mins
Chilling Time30 minutes mins
Total Time1 hour hr 30 minutes mins
Course: Dessert
Cuisine: American
Servings: 12 bars
Calories: 765kcal
Author: Liz Marek

Equipment

  • 1 9" x 13" rectangular metal pan

Ingredients

Carrot Cake Bars Crust

  • 1 box pecan or vanilla shortbread cookies
  • ¼ cup unsalted butter
  • 1 pinch salt

Carrot Cake

  • 1 ¾ cups all purpose flour
  • 1 teaspoon baking powder
  • ½ teaspoon baking soda
  • ½ teaspoon salt
  • 2 teaspoon cinnamon
  • 1 teaspoon ginger
  • ½ teaspoon nutmeg
  • 4 large eggs
  • 1 cup granulated sugar
  • 1 cup brown sugar
  • ¾ cup vegetable oil
  • ½ cup buttermilk room temperature
  • 1 teaspoon vanilla extract
  • 5 cups shredded carrots

Cream Cheese Frosting

  • 2 cups cream cheese softened and room temperature
  • ¾ cup unsalted butter softened and room temperature
  • ¾ cup granulated sugar
  • ¼ teaspoon salt
  • 1 teaspoon vanilla extract
US Customary - Metric

Instructions

Making the Crust

  • Spray a 9"x13" baking pan with cooking spray and preheat the oven to 350°F and position the rack in the center of the oven. Pro-tip: If you line the pan with parchment paper, leave some overhang and it will be easy to lift the cake out of the pan.
  • Grind the cookies and salt into crumbs in a food processor. 
  • Melt the butter in the microwave and then add it to the crumbs and pulse briefly to combine.
  • Press the crumb mixture evenly into the bottom of the baking pan, then set it aside while you mix the cake. 

Making Carrot Cake

  • Shred the carrots using a food processor with a grating attachment or by hand with a box grater.
  • Combine the flour, baking powder, baking soda, salt, cinnamon, ginger, and nutmeg in a large bowl and set aside.
  • Combine the buttermilk and vanilla extract, and set aside. 
  • Add granulated sugar, brown sugar, and oil to the bowl of a stand mixer and mix until combined.
  • Add the eggs one at a time, letting each combine fully before adding the next.
  • Turn the mixer to medium speed and mix until it lightens in color, about 2 minutes. 
  • With the mixer on low speed, add half of the flour mixture and then half the buttermilk mixture. Repeat the process with the dry ingredients and the wet ingredients until everything is combined.
  • Stop the mixer, and then fold in the carrots with a spatula. 
  • Pour the carrot cake batter over the pressed crumbs and bake for 35-40 minutes until a toothpick comes out of the cake clean. 

Making Cream Cheese Frosting

  • Make sure the butter and cream cheese are both slightly warm and at the same temperature. If one is colder than the other, they will not mix together properly and create lumps.
  • Begin mixing the cream cheese in the bowl of a stand mixer with a paddle attachment until it's smooth.
  • Then, add the butter in chunks and mix until incorporated. Pro-Tip: Using an electric mixer works really well for cream cheese frosting because it emulsifies the butter and cream cheese quickly. Just be careful not to over-mix.
  • Once the butter is incorporated, add the granulated sugar and vanilla. Continue to mix for 30 seconds to 1 minute until smooth and the sugar is dissolved. 
  • Cover with plastic wrap until you are ready to frost the cake. Keep the remaining frosting in the refrigerator as cream cheese frosting should not be stored at room temperature for more than 4 hours.

Assembling the Carrot Cake Bars

  • Once the cake has fully cooled, remove the cake from the pan and place it on a cutting board or the plate you choose to serve it from. The cake can also be left in the cake pan for transporting and serving as well.
    To remove this cake, loosen the edges of the cake with a knife. Place a board on top of the cake pan, then flip it out and remove the pan.
  • Then, place the serving board or plate on the cake (bottom side up) and flip it back over so the top of the cake is upright again.
  • Spread an even layer of cream cheese frosting on top of the moist carrot cake and create some pretty rustic swooshes with an offset spatula. 
  • Put about ½ cup of cream cheese frosting in a small bowl, add a drop of orange food coloring, and mix it together. Repeat this with a few drops of green food coloring in another bowl.
  • Fill 2 piping bags, the orange fitted with a small round tip and the green fitted with a leaf tip.
  • Score lines on the top of the frosting to determine the number of servings you would like.
  • Pipe a carrot shape on top of the bars with the orange frosting by starting thin and getting thicker at the top.
  • Using the green frosting, add some leaves on top of the carrot.
  • Cut the cake bars, cleaning the knife between cuts to avoid drag.
  • Keep the remaining cake in an airtight container in the refrigerator for up to 5 days. This cake also freezes well for up to 2 months. 

Notes

  1. Carrots are obviously the key to this recipe, but it's important to use good-quality ingredients. If you don't like the stringy texture of graded carrots, you can pulse them in a food processor to break down the shreds for a more consistent cake texture. You can grate your own, or a good cheat is buying shredded carrots from the store.
  2. Oil is the key to moisture in this cake. Many of our cake recipes use butter like the white velvet cake, coconut cake, and even my chunky carrot cake recipe, but oil will keep this cake moist even if it's cold or at room temperature.
  3. Spices enhance the flavor of the carrot, and you can customize the spice combinations to your liking. I kept it simple, but allspice and cloves are good additions to carrot cake as well.
  4. Buttermilk adds a tangy flavor to the cake and it tenderizes the crumb. If you do not have buttermilk you can substitute by adding a teaspoon of lemon juice to a cup of regular milk. Check out my buttermilk substitutes blog post for more recipes.
  5. Bring all your ingredients to room temperature or even a little warm to ensure your batter does not break or curdle. 
  6. Use a scale to weigh your ingredients (including liquids) unless otherwise instructed (Tablespoons, teaspoons, pinch etc). Metric measurements are available in the recipe card. Scaled ingredients are much more accurate than using cups and help ensure the success of your recipe. 

Nutrition

Serving: 1bar | Calories: 765kcal | Carbohydrates: 93g | Protein: 9g | Fat: 41g | Saturated Fat: 21g | Polyunsaturated Fat: 5g | Monounsaturated Fat: 11g | Trans Fat: 1g | Cholesterol: 142mg | Sodium: 525mg | Potassium: 376mg | Fiber: 3g | Sugar: 60g | Vitamin A: 10031IU | Vitamin C: 3mg | Calcium: 121mg | Iron: 3mg
Piping cream cheese frosting onto a cupcake.

March 29, 2023 Frosting and Icing

Cream Cheese Frosting Without Powdered Sugar

Cream cheese frosting without powdered sugar is the ultimate light and tangy frosting that actually tastes like cream cheese rather than sweet paste. It is not too sweet, super smooth, and has a cleaner, more intense cream cheese flavor with none of the starchy aftertaste you get from powdered sugar versions. It is the perfect complement to red velvet cake, but also incredible on cinnamon rolls or blueberry muffins.

Piping cream cheese frosting onto a cupcake.

Quick Glance: Cream Cheese Frosting Without Powdered Sugar

  • Recipe Name: Cream Cheese Frosting Without Powdered Sugar
  • Why You'll Love It: Light, tangy, and pipeable with zero starchy aftertaste and a cleaner, more intense cream cheese flavor than any powdered sugar version
  • Time and Difficulty: 20 minutes / Easy
  • Main Ingredients: Cream cheese, unsalted butter, granulated sugar, vanilla, salt
  • Method: Beat cream cheese, add butter, stream in sugar, mix until smooth
  • Texture and Flavor: Thick, fluffy, and creamy with a bright, tangy flavor and mild sweetness
  • Quick Tip: The butter and cream cheese must be the exact same temperature before mixing, or you'll end up with lumps
ChatGPT
Google AI
Perplexity
Grok
Add us as a trusted site on Google
[feast_advanced_jump_to]

Why This Recipe Works

The reason this frosting works differently from traditional cream cheese frosting comes down to how granulated sugar and cream cheese interact. When you beat granulated sugar directly into cream cheese, the cream cheese absorbs the sugar crystals and dissolves them through its own moisture content. This creates a light, aerated texture as the sugar works through the fat. Powdered sugar, by contrast, contains a significant amount of cornstarch to prevent clumping, and that starch is what gives conventional cream cheese frosting its slightly gluey, one-dimensional texture.

Using granulated sugar also makes this frosting more forgiving. Powdered sugar frostings can break or turn soupy very quickly if you over-mix, because the starch absorbs moisture rapidly. This version is more structured and harder to ruin because the granulated sugar does not melt the cream cheese the same way.

The key to getting this frosting smooth is temperature. Cream cheese and butter are both high-fat dairy products that need to be at exactly the same temperature to emulsify cleanly. If one is warmer than the other, the fats will not come together properly and you will end up with lumps that no amount of mixing will fix. Get the temperature right and the frosting comes together in minutes into something that is thick, pipeable, and genuinely delicious.

Cream Cheese Frosting Without Powdered Sugar Ingredients

Here's what you need and why each ingredient matters.


Cream cheese frosting ingredients in clear bowls on a white countertop.

Cream cheese is the base of this frosting and provides the signature tangy flavor and creamy texture. Use full-fat block cream cheese, not the spreadable kind sold in tubs. Tub cream cheese has a higher water content and will produce a frosting that's too loose to pipe. Make sure it's fully at room temperature before mixing or it will leave lumps in the finished frosting.

Unsalted butter gives this frosting structure and richness while toning down the sharpness of the cream cheese. It creates a stable emulsion when beaten together with the cream cheese and allows the frosting to hold its shape when piped. Unsalted butter is used so the salt level can be controlled. Both the butter and cream cheese must be at the exact same temperature before combining or the mixture will look broken and lumpy.

Granulated sugar sweetens the frosting and dissolves completely into the moisture of the cream cheese during mixing, leaving no grittiness. The coarser texture of granulated sugar also helps aerate the cream cheese as it's beaten in, contributing to the light, fluffy final texture. Do not substitute powdered sugar in this recipe as it will change the texture and add a starchy aftertaste.

Vanilla extract adds warmth and depth that complements the tangy cream cheese flavor. Use pure vanilla extract for the best results. You can substitute with almond extract, lemon zest, orange zest, or coconut extract, depending on what you're frosting.

Salt balances the sweetness and enhances the overall flavor. Without it the frosting can taste one-dimensional. Do not skip it.

How to Make Cream Cheese Frosting Without Powdered Sugar Step-By-Step

Make sure the butter and cream cheese are both fully at room temperature and feel the same temperature when you touch them. If either feels cold, microwave for 10 seconds at a time until they match. This is the most important step. Mismatched temperatures are the number one cause of lumpy cream cheese frosting.

Hand adding cream cheese into the bowl of a stand mixer with a pink spatula.
  1. Add the room temperature cream cheese to the bowl of your stand mixer with the paddle attachment. Mix on low speed until completely smooth with no lumps. The cream cheese should look satiny and uniform before you add anything else.
Adding butter to cream cheese in the bowl of a stand mixer.
  1. With the mixer on low to medium speed, add the butter in chunks, waiting a few seconds between additions. The mixture will look slightly curdled at first as the two fats come together. Keep mixing and it will smooth out into a creamy, cohesive base.
Hand pouring a container of sugar into a stand mixer bowl.
  1. With the mixer running on low, slowly stream in the granulated sugar. Adding it gradually prevents it from flying out of the bowl and gives the cream cheese time to begin dissolving the crystals.

    Add the vanilla and salt and mix briefly to incorporate.
Pink spatula holding cream cheese frosting above a bowl of a stand mixer.
  1. Scrape down the sides and bottom of the bowl thoroughly with a spatula. Cream cheese hides under the paddle and along the bottom. Mix on medium-high speed for 30 seconds to 1 minute until the frosting is completely smooth, fluffy, and no sugar grittiness remains when you rub a small amount between your fingers.
Piping cream cheese frosting onto a cupcake.
  1. Use immediately to frost a cake or pipe onto cupcakes. The frosting holds its shape well at room temperature for up to 4 hours.

Batter & Frosting Calculator

Cake Batter and Frosting Calculator

Select an option below to calculate how much batter or frosting you need. Adjust the servings slider on the recipe card to change the amounts the recipe makes.

Choose a pan type

Choose a cake pan size
(based on 2" tall cake pan)

Choose a cake pan size
(based on 2" tall cake pan)

Choose a cake pan size
(based on 2" tall cake pan)

Cupcake Tin Size

Choose number of pans

Cups of Batter Needed

8 cups

Cups of Frosting Needed

5 cups

Note: measurements are estimated based off the vanilla cake recipe using standard US cake pans and sizes. Measurements used are for 2" tall cake pans only. Your results may vary. Do not overfill cake pans above manufacturer's recommended guidelines.

This recipe makes 6 cups of frosting, enough to frost and fill a two-layer 8-inch cake or frost about 24 cupcakes. Store leftovers in an airtight container in the fridge for up to 5 days or freeze for up to 6 months. Bring to room temperature and rewhip briefly before using.

Common Mistakes to Avoid

Using cream cheese and butter at different temperatures. This is the most common reason cream cheese frosting turns out lumpy. Cold butter added to soft cream cheese, or soft butter added to cold cream cheese, causes the fats to seize instead of emulsifying. Both must be at the same room temperature before they touch each other.

Using tub cream cheese instead of block. Spreadable cream cheese in a tub contains more water and stabilizers than block cream cheese. The extra moisture will make the frosting too soft to pipe and may cause it to weep or slide off the cake. Always use full-fat block cream cheese.

Not scraping the bowl. Cream cheese sticks to the sides and bottom of the bowl and hides under the paddle attachment. If you don't scrape thoroughly before the final mix, you'll have streaks of unmixed cream cheese in the finished frosting. Scrape at least once before the final 30 seconds of mixing.

Over-mixing after the sugar is fully incorporated. Once the frosting looks smooth and fluffy, stop. Continuing to mix introduces too much air and can cause the frosting to become loose and difficult to pipe cleanly. Thirty seconds to one minute on medium-high at the end is all you need.

Using low-fat cream cheese. Low-fat cream cheese has a higher water content and fewer fat molecules to create a stable structure. The frosting will be softer, less flavorful, and more prone to weeping. Full-fat block cream cheese is non-negotiable for the best result.

Cream Cheese Frosting Without Powdered Sugar FAQs

What is the difference between cream cheese frosting made with granulated sugar and powdered sugar?

Powdered sugar contains about 3% cornstarch, which leaves a slightly starchy, chalky aftertaste in the finished frosting. Granulated sugar dissolves completely into the high moisture content of the cream cheese during mixing, producing a cleaner, tangier, more intensely flavored frosting with no aftertaste. The granulated sugar version is also more forgiving and harder to over-mix because the coarser sugar adds physical resistance during mixing that fine powder doesn't provide.

Can I use low-fat cream cheese?

It's not recommended. Low-fat cream cheese has a higher water content and less fat, which results in a softer, looser frosting that doesn't pipe as cleanly and is more likely to weep or slide. For the best texture and flavor, always use full-fat block cream cheese.

Can I use this frosting under fondant?

No. Cream cheese frosting has a high moisture content that will begin to dissolve fondant on contact. If you need to cover a cream cheese-frosted cake with fondant, apply a thin layer of American buttercream over the cream cheese frosting first and let it crust before applying the fondant.

How long can I leave out a cake frosted with cream cheese frosting?

A cake frosted with cream cheese frosting can be left at room temperature for up to 4 hours. After that it should be refrigerated. Store covered in the refrigerator for up to 5 days. Bring to room temperature before serving for the best texture.

Can I add other flavors besides vanilla?

Yes. This frosting takes on added flavors very well. Try almond extract, lemon zest, orange zest, or coconut extract in place of or in addition to the vanilla. You can also stir in 2 tablespoons of cocoa powder for a chocolate cream cheese frosting, or fold in a few tablespoons of fruit jam for a fruity variation.

Is this a crusting cream cheese frosting recipe?

No. This frosting does not crust because of the high fat content from the cream cheese and butter.

More Frosing Recipes To Try

  • close up of a red velvet cupcake with cream cheese frosting piped on top surrounded by other cupcakes
    Easy Cream Cheese Frosting
  • Piping easy buttercream rosettes onto a cake using a 1M star piping tip
    Easy Buttercream Frosting
  • Close up of pink Italian meringue buttercream piped into rosettes.
    Italian Meringue Buttercream
  • chocolate fudge frosting on a cupcake
    Chocolate Fudge Frosting

Watch: How To Decorate A Cake Step-by-Step

Before you start decorating, watch the video below where I show you every step of decorating a cake from start to finish. Seeing the process in action makes it much easier to follow along

- Liz Marek.

Start Learning Now
smiling woman holding a decorated cake in her hands

Recipe

Piping cream cheese frosting onto a cupcake.
Print Recipe
4.80 from 97 votes

Cream Cheese Frosting Without Powdered Sugar

This delicious cream cheese frosting recipe is thick, fluffy, and pipeable. Easy cream cheese frosting is made with granulated sugar and whips together quickly! This is the best cream cheese frosting and it consists of 5 simple ingredients.
Prep Time20 minutes mins
Total Time20 minutes mins
Course: Dessert
Cuisine: American
Servings: 6 cups
Calories: 666kcal
Author: Liz Marek

Equipment

  • 1 Stand mixer with the paddle attachment Or a large bowl and electric hand mixer

Ingredients

  • 2 cups cream cheese room temperature or slightly warm
  • 1 cup unsalted butter same temperature as the cream cheese
  • 1 cup granulated sugar
  • 1 teaspoon vanilla extract
  • ½ teaspoon salt
US Customary - Metric

Instructions

  • Make sure the butter and cream cheese are both at room temperature. If one is cold, you will end up with lumpy cream cheese frosting. If they feel cold to the touch, microwave them for ten seconds.
  • In the bowl of the stand mixer with the paddle attachment, add the room-temperature block of cream cheese and mix it on low speed until smooth. You can also do this in a large bowl with an electric hand mixer.
  • With the mixer on low speed to medium speed, begin adding chunks of butter to the whipped cream cheese and mix until incorporated.
  • Slowly pour in the sugar while the mixer is mixing.
  • Then add the salt and vanilla. 
  • Make sure you scrape the bowl to get all of the cream cheese from the sides and the bottom of the bowl, then mix on medium-high speed for another 30 seconds to one minute to make sure all the butter chunks are smoothed out and the sugar is dissolved. 
  • Use the frosting immediately to frost a cake or cupcakes. 
  • If you plan on storing it for later, keep it in an airtight container in the refrigerator for up to 5 days. Freeze it for up to 6 months, then allow it to come back to room temperature and mix it briefly with an electric mixer.

Video

Notes

  • Use full-fat block cream cheese, not spreadable tub cream cheese. Tub cream cheese has too much water and will make the frosting too soft to pipe.
  • The butter and cream cheese must be at the exact same temperature before mixing. If either is cold, microwave in 10-second increments until they match.
  • Scrape the sides and bottom of the bowl thoroughly before the final mix. Cream cheese hides under the paddle and will leave streaks if not scraped.
  • Do not over-mix once the frosting looks smooth and fluffy. Thirty seconds to one minute on medium-high at the end is all you need.
  • This frosting can be left at room temperature for up to 4 hours. Refrigerate for up to 5 days in an airtight container.
  • Freeze for up to 6 months. Bring fully to room temperature and rewhip briefly before using.
  • This is not a crusting frosting and is not recommended under fondant.
  • Flavor variations: substitute vanilla with almond extract, lemon zest, or orange zest. Add 2 tablespoons of cocoa powder for a chocolate version.


Nutrition

Serving: 1cup | Calories: 666kcal | Carbohydrates: 37g | Protein: 5g | Fat: 57g | Saturated Fat: 35g | Polyunsaturated Fat: 2g | Monounsaturated Fat: 15g | Trans Fat: 1g | Cholesterol: 158mg | Sodium: 436mg | Potassium: 111mg | Sugar: 36g | Vitamin A: 1962IU | Calcium: 83mg | Iron: 0.1mg
{ "@context": "https://schema.org", "@type": "WebPage", "@id": "https://sugargeekshow.com/cream-cheese-frosting-without-powdered-sugar/", "name": "Cream Cheese Frosting Without Powdered Sugar", "about": [ {"@type": "Thing", "name": "Cream cheese", "sameAs": "https://en.wikipedia.org/wiki/Cream_cheese"}, {"@type": "Thing", "name": "Buttercream", "sameAs": "https://en.wikipedia.org/wiki/Buttercream"}, {"@type": "Thing", "name": "Granulated sugar", "sameAs": "https://en.wikipedia.org/wiki/Sugar"}, {"@type": "Thing", "name": "Butter", "sameAs": "https://en.wikipedia.org/wiki/Butter"}, {"@type": "Thing", "name": "Vanilla extract", "sameAs": "https://en.wikipedia.org/wiki/Vanilla_extract"}, {"@type": "Thing", "name": "Emulsion", "sameAs": "https://en.wikipedia.org/wiki/Emulsion"}, {"@type": "Thing", "name": "Frosting", "sameAs": "https://en.wikipedia.org/wiki/Buttercream"}, {"@type": "Thing", "name": "Cake decorating", "sameAs": "https://en.wikipedia.org/wiki/Cake_decorating"}, {"@type": "Thing", "name": "Confectionery", "sameAs": "https://en.wikipedia.org/wiki/Confectionery"}, {"@type": "Thing", "name": "Powdered sugar", "sameAs": "https://en.wikipedia.org/wiki/Powdered_sugar"} ] }

peanut butter eggs layered in a bowl

March 24, 2023 Candy

Peanut Butter Egg Recipe

For this copycat Reese's peanut butter egg recipe, all you need is 15 minutes and six simple ingredients that you probably already have at home. The hardest part of this recipe is waiting until they set before eating them.peanut butter eggs layered in a bowl

I can't resist peanut butter treats, and these are at the top of my list in the spring along with coconut cake and carrot cake. Creamy peanut butter mixed together with some powdered sugar and butter makes the magic happen. No tempering is needed to coat the treats in melted chocolate.

Table of contents

  • Peanut Butter Egg Ingredients
  • Making Peanut Butter Chocolate Eggs
    • Making the Peanut Butter Filling
    • Preparing the Chocolate
    • Dipping the Peanut Butter Eggs
  • FAQ
  • More Recipes You'll Love

Peanut Butter Egg IngredientsBowls of ingredients for peanut butter eggs

Creamy peanut butter: I use smooth peanut butter because I want them to be as close to authentic Reese's peanut butter eggs as possible. You could use crunchy peanut butter if you prefer some crunch in your bite. Any brand of peanut butter will do, If you choose to use natural peanut butter, or unsweetened peanut butter it will take more effort to mix as those types are stiffer.

Butter: The addition of butter helps the filling create a smooth texture that melts in your mouth. Without the butter, it will really just have the consistency of straight peanut butter.

Powdered Sugar: This is a confection after all, so it needs to be sweet! The powdered sugar adds sweetness without the grit of granulated sugar.

Salt: Just a little pinch of salt really brings together the flavors. Super sweet treats can fall flat on flavor without some salt. Peanuts and salt are a match made in heaven.

Making Peanut Butter Chocolate Eggs

There are 4 easy steps to making this recipe, make the peanut butter filling, form it into egg shapes, chill them for 30 minutes, and dip them in chocolate. The trick is to work quickly with the peanut butter eggs after they're frozen, as they will dip easier when firm.

Making the Peanut Butter Filling

  1. Add the peanut butter and butter to a large bowl and heat in the microwave until melted. Make sure the butter is warm enough to mix easily into the peanut butter.
  2. Mix to combine peanut butter and butter until smooth. You can use a spatula, a whisk, or an electric hand mixer.
  3. Add the salt, vanilla, and powdered sugar one scoop at a time and mix it all together until combined. This will make sure it doesn't poof all over the kitchen. Hand adding a bowl of vanilla to apeanut butter mixture
  4. Scoop about 2 tablespoons in your hand and roll it into a ball. You could also roll out the mixture and use a cookie cutter to make the egg shapes.Hands rolling peanut butter filling mixture into a ball
  5. Next, shape it into an egg shape by flattening the ball and making it thinner at the top and thicker at the base. You could use a cookie scoop to ensure they are all evenly scooped. Pro-tip: wear gloves to keep the peanut butter mixture from sticking to your hands, as it melts pretty quickly while handling it.Hands laying a peanut butter egg on a sheet pan lined with parchment
  6. Lay the peanut butter eggs on a sheet pan lined with parchment paper or wax paper and place the sheet pan in the fridge or freezer for them to set up.Sheet pan lined with peanut butter eggs
  7. While the eggs are chilling, prepare your melted chocolate.

Preparing the Chocolate

  1. In a deep heatproof bowl, add the milk chocolate chips.
  2. Microwave the chocolate in 30-second increments, stirring between each to distribute the heat evenly as the chocolate begins to melt. This can also be done over a double boiler.Melted milk chocolate in a bowl with a blue spatula
  3. Once the chocolate is almost fully melted, stop microwaving it and stir slowly until the remaining chunks of chocolate have melted into a smooth and even consistency. Be careful not to burn the chocolate.Melted milk chocolate in a bowl

Dipping the Peanut Butter Eggs

  1. Once your chocolate is melted and warm, but not too hot, take out the cold peanut butter eggs.Hand picking up a cold peanut butter egg over a sheet pan
  2. Using a chocolate dipping utensil, a fork, or inserting a skewer into the base of the egg, coat the egg in chocolate, gently tap off the excess, and place it on a sheet pan lined with parchment.Dipping a peanut butter egg in chocolate with a skewer
  3. The chocolate in the bowl will cool as you continue to dip, so after a few eggs, warm the chocolate again and stir to continue dipping. This will keep it from getting too thick on the eggs. If your eggs begin to soften, place them back in the fridge to stiffen back up.Dipping a peanut butter egg in chocolate with a skewer
  4. Pour the extra chocolate into a piping bag, snip off the end, and drizzle across each egg for a textured design. This can be done with a Ziploc bag as well.Drizzling chocolate across chocolate eggs with a piping bag
  5. The copycat Reese's peanut butter eggs are ready to eat as soon as the chocolate has set up.Peanut butter chocolate eggs stacked on a blue towel
  6. Place the finished eggs in an airtight container or wrap them with plastic wrap and store them at room temperature, or in the freezer if you plan to save them longer than 5 days.

FAQ

Can I use different chocolate to coat the homemade Reese's eggs?

Yes, this is a simple process of melting chocolate and dipping, so you can use white chocolate or dark chocolate chips as well. White chocolate would be pretty for Easter, you could color some of the white chocolate or some candy melts to add spring designs to the top of the egg.

What if I don't like peanut butter?

You can swap out the peanut butter for any type of nut butter you prefer. Almond butter or cashew butter would be delicious. Just remember that the consistency of other nut butter will vary, which could change the final outcome of the egg. You may need to add more sugar, as some other nut butter comes unsweetened. Just taste as you go until you reach the perfect combo and texture.

What are the ingredients in peanut butter chocolate eggs?

This recipe only needs 6 simple ingredients, peanut butter, butter, powdered sugar, salt, vanilla, and milk chocolate.

More Recipes You'll Love

Lofthouse Copycat Cookies

Copycat Chocolate Chip Crumbl Cookies

Easy Chocolate Truffles

Kohakutou Crystal Gummy Candy

Chewy Peanut Butter Cookies

Recipe

peanut butter eggs layered in a bowl
Print Recipe
4.80 from 5 votes

Peanut Butter Egg Recipe

Soft and creamy Reese's peanut butter eggs coated with sweet milk chocolate are my favorite treats! These peanut butter eggs are as good as the real thing, and are the perfect treats in an Easter basket! They can also be formed into any shape or size to fit all special occasions!
Prep Time20 minutes mins
Chilling Time30 minutes mins
Total Time50 minutes mins
Course: Dessert
Cuisine: American
Servings: 12 eggs
Calories: 423kcal
Author: Liz Marek

Ingredients

  • 1 cup creamy peanut butter
  • ½ cup unsalted butter
  • 2 cups powdered sugar
  • ¼ teaspoon salt
  • 1 teaspoon vanilla extract
  • 2 cups milk chocolate for dipping
US Customary - Metric

Instructions

Making the Peanut Butter Filling

  • Add the peanut butter and butter to a large bowl and heat in the microwave until melted. Make sure the butter is warm enough to mix easily into the peanut butter.
  • Mix to combine peanut butter and butter until smooth. You can use a spatula, a whisk, or an electric hand mixer.
  • Add the salt, vanilla, and powdered sugar one scoop at a time and mix it all together until combined. This will make sure it doesn't poof all over the kitchen. 
  • Scoop about 2 tablespoons in your hand and roll it into a ball. You could also roll out the mixture and use a cookie cutter to make the egg shapes.
  • Next, shape it into an egg shape by flattening the ball and making it thinner at the top and thicker at the base. You could use a cookie scoop to ensure they are all evenly scooped. Pro-tip: wear gloves to keep the peanut butter mixture from sticking to your hands, as it melts pretty quickly while handling it.
  • Lay the peanut butter eggs on a sheet pan lined with parchment paper or wax paper and place the sheet pan in the fridge or freezer for them to set up.
  • While the eggs are chilling, prepare your melted chocolate.

Preparing the Chocolate

  • In a deep heatproof bowl, add the milk chocolate chips.
  • Microwave the chocolate in 30-second increments, stirring between each to distribute the heat evenly as the chocolate begins to melt. This can also be done over a double boiler.
  • Once the chocolate is almost fully melted, stop microwaving it and stir slowly until the remaining chunks of chocolate have melted into a smooth and even consistency. Be careful not to burn the chocolate.

Dipping the Peanut Butter Eggs

  • Once your chocolate is melted and warm, but not too hot, take out the cold peanut butter eggs.
  • Using a chocolate dipping utensil, a fork, or inserting a skewer into the base of the egg, coat the egg in chocolate, gently tap off the excess, and place it on a sheet pan lined with parchment.
  • The chocolate in the bowl will cool as you continue to dip, so after a few eggs, warm the chocolate again and stir to continue dipping. This will keep it from getting too thick on the eggs. If your eggs begin to soften, place them back in the fridge to stiffen back up.
  • Pour the extra chocolate into a piping bag, snip off the end, and drizzle across each egg for a textured design. This can be done with a Ziploc bag as well.
  • The copycat Reese's peanut butter eggs are ready to eat as soon as the chocolate has set up.
  • Place the finished eggs in an airtight container or wrap them with plastic wrap and store them at room temperature, or in the freezer if you plan to save them longer than 5 days.

Notes

  1. If your filling mixture is slightly lumpy when mixing it together, microwave it for another 10 seconds to get it melted enough to become smooth. 
  2. You can swap out the peanut butter for any type of nut butter you prefer. Almond butter or cashew butter would be delicious. Just remember that the consistency of other nut butter will vary, which could change the final outcome of the egg. You may need to add more sugar, as some other nut butter comes unsweetened. Just taste as you go until you reach the perfect combo and texture.
  3. You could use crunchy peanut butter if you prefer some crunch in your bite. Any brand of peanut butter will do. If you choose to use natural peanut butter, or unsweetened peanut butter it will take more effort to mix as those types are stiffer.

Nutrition

Serving: 1egg | Calories: 423kcal | Carbohydrates: 42g | Protein: 6g | Fat: 29g | Saturated Fat: 13g | Polyunsaturated Fat: 3g | Monounsaturated Fat: 11g | Trans Fat: 0.3g | Cholesterol: 20mg | Sodium: 147mg | Potassium: 209mg | Fiber: 3g | Sugar: 37g | Vitamin A: 236IU | Calcium: 20mg | Iron: 1mg
slice of coconut cake on a plate

March 22, 2023 Cake

Coconut Cake Recipe

This toasted coconut cake recipe is full of delicious coconut flavor thanks to thetoasted coconut and a dash of extract. Use buttermilk for a tang that pairs perfectly with cream cheese frosting!

coconut cake slice with coconut frosting on a white plate

Butter and coconut oil combine to make a super moist cake, and whipped egg whites keep it light and fluffy. A more traditional mixing method results in a coconut cake recipe that will become a family favorite! 

Table of contents

  • Coconut Cake Ingredients
  • How to Make a Coconut Cake
    • Making the Coconut Cake
    • Making Cream Cheese Frosting
    • Assembling the Coconut Cake
  • FAQ
  • Related Recipes

Coconut Cake Ingredientsbowls of ingredients for coconut cake on a table

Toasted Coconut: Toasting the coconut intensifies the natural nutty coconut flavor. Sweetened coconut shreds are slightly more tender than unsweetened coconut, but either will work great. 

Coconut oil: Coconut oil is great to bake with because it melts at body temperature, but is firm at room temperature. Similar to butter, it gives the cake some nice structure but literally melts in your mouth when you eat this cake. You can also use vegetable oil instead of coconut if you prefer.

Whipped egg whites: This cake has butter, oil, and chunks of coconut, so it could become very heavy. Whipping air into the egg whites adds air bubbles to the cake to keep it fluffy. 

Coconut extract: A little goes a long way with coconut extract. Too much can overpower this cake, but just the right amount intensifies the natural coconut flavor provided by the coconut oil and toasted coconut shreds. 

Cream cheese: Cream cheese frosting is the perfect pairing for this cake, but Swiss meringue buttercream, whipped cream, or ermine frosting would also be yummy.

How to Make a Coconut Cake

Before starting your cake, make sure that all of your wet ingredients (including the butter) are at room temperature or a little warm. Cold ingredients will prevent your cake batter from emulsifying, and your cake may not turn out right. Be sure to also weigh all of your ingredients with a food scale.

Making the Coconut Cake

Preheat your oven to 350ºF and prepare three 8" cake pans with cake goop or your preferred pan release.

  1. Place the egg whites into a large bowl, add the cream of tartar if using, and whip them to firm, moist peaks. They should look glossy and hold their shape without becoming dry or crumbly.
  1. In a mixer bowl, cream the butter until smooth. Gradually sprinkle in the sugar while mixing on low speed, then add the oil and continue mixing until the mixture becomes very white and fluffy.
  1. Add the egg yolks one at a time, mixing just until each yolk is incorporated before adding the next.
  1. In a separate bowl, whisk together the flour, salt, baking soda, and baking powder.
  1. In another container, combine the buttermilk, coconut extract, and vanilla extract.
  1. Add about one-third of the dry ingredients to the butter mixture and mix on low speed. Add some of the liquid mixture, then continue alternating the dry ingredients and liquids in two more additions until everything is combined. The finished batter should be thick.
  1. Add a couple of scoops of the whipped egg whites into the batter and gently fold them in to lighten the mixture.

    Continue folding in the remaining egg whites a little at a time, being careful not to deflate the batter.
  1. With the last addition of egg whites, add the toasted coconut and fold just until combined.
  1. Divide the batter evenly between three 8-inch cake pans. Spread the batter evenly in the pans.
  1. Bake the cakes at 350 degrees Fahrenheit for 25 to 30 minutes.
  1. Let the cakes cool in the pans for 10 minutes, then turn them out and allow them to cool completely before assembling.

Making Cream Cheese Frosting

  1. Make sure the butter and cream cheese are both slightly warm and at the same temperature. If one is colder than the other, they will not mix together properly and create lumps.
  2. Place softened butter in the bowl of your stand mixer with a whisk attachment and cream on low until smooth. Pro: Tip: Use an electric hand mixer to get extra smooth cream cheese frosting. 
  3. Place softened cream cheese in the bowl with the butter in small chunks and blend on low until smooth.
  4. Add in sifted powdered sugar one cup at a time until combined. 
  5. Add your vanilla extract and salt, and mix until combined. 
  6. Cover the frosting with plastic wrap and refrigerate until your cake is chilled and ready to frost. Refrigerate any remaining frosting, or keep in an airtight container and freeze for up to 3 months.

Assembling the Coconut Cake

  1. Trim the top of the cake layers so they are flat. 
  2. Place the first cake layer down on a cake board, spread a layer of cream cheese frosting evenly across the top and repeat this process with the remaining 2 layers. 
  3. Spread a thin layer of cream cheese frosting around the entire cake as a crumb coat and then refrigerate it for 15 minutes. Pro-Tip: Cream cheese frosting is stickier than buttercream, and can pull more crumbs off your cake. Working with a cold cake will be easier. 
  4. Once the crumb coat has set, apply another thicker layer of the frosting to the entire cake for its final coat. Pro tip: I chose to cover the exterior of this cake with coconut, but cream cheese frosting makes really pretty rustic swirls if you want a different look. 
  5. Place the cake on the board or plate you plan to serve on. 
  6. Gently press shredded coconut or large shaved coconut flakes onto the sides of the cake all the way around the exterior, keeping the top free of shreds.
  7. Use a star piping tip and pastry bag filled with cream cheese frosting to pipe swirls around the top edge of the cake. 
  8. To save this cake for later, apply plastic wrap around the cake and place it in the refrigerator. Cream cheese frosting can sit out at room temperature for about 4 hours maximum.

FAQ

Is this recipe good for cupcakes?

This recipe works great for cupcakes and is very light! This recipe makes approximately 24 cupcakes. Bake at 350 degrees for 15-18 minutes until set in the middle. It can be easy to burn these cupcakes because of the sugar content so watch them closely. If they are over-baked they can taste dry.

What if I don't have coconut oil?

Luckily coconut oil is becoming more common in your local grocery store, however, if you do not have any, vegetable oil will work just as well in this cake.

What can I substitute for buttermilk?

In this cake, you can substitute sour cream for buttermilk, or regular milk with a tablespoon of lemon juice. You could also use coconut milk with a tablespoon of lemon juice as well.

What is the best filling for coconut cake?

The best thing about coconut cake is that it pairs with so many different flavors. The traditional filling for coconut cake is something light and creamy like this coconut cream cheese frosting.If you're feeling adventurous you can fill your coconut cake with some coconut custard , lemon curd, or even raspberry filling.

Do I have to use coconut shreds? 

My kids don't care for the texture of coconut shreds, but still love the flavor. I pulse the coconut in a food processor a few times to chop up the shreds smaller. Once they are added to the cake the texture is almost unnoticeable. 

What type of coconut should I use?

On the baking aisle there will be a few choices for coconut. I am using sweetened coconut shreds because they are the most common to find at the grocery store. You can use unsweetened as well, or even macaroon coconut, which is a much finer shred. I chose to use the large coconut strips for the exterior decor because I think they are pretty, but any will do.

Related Recipes

Coconut Custard

Coconut Mousse

German Chocolate Cake

Carrot Cake with Pineapple and Coconut


Cake Batter and Frosting Calculator

Select an option below to calculate how much batter or frosting you need. Adjust the servings slider on the recipe card to change the amounts the recipe makes.

Choose a pan type

Choose a cake pan size
(based on 2" tall cake pan)

Choose a cake pan size
(based on 2" tall cake pan)

Choose a cake pan size
(based on 2" tall cake pan)

Cupcake Tin Size

Choose number of pans

Cups of Batter Needed

8 cups

Cups of Frosting Needed

5 cups

Note: measurements are estimated based off the vanilla cake recipe using standard US cake pans and sizes. Measurements used are for 2" tall cake pans only. Your results may vary. Do not overfill cake pans above manufacturer's recommended guidelines.

Recipe

coconut cake slice with coconut frosting on a white plate
Print Recipe
4.93 from 145 votes

Coconut Cake Recipe

Moist layers of fresh coconut cake filled with cream cheese frosting. This coconut cake has real coconut flavor built right into the cake with toasted coconut flakes, coconut oil, and a touch of coconut extract.
Prep Time20 minutes mins
Cook Time35 minutes mins
Total Time50 minutes mins
Course: Dessert
Cuisine: American
Servings: 10 cups
Calories: 1300kcal
Author: Liz Marek

Ingredients

Coconut Cake Ingredients

  • 11 ounces All purpose flour (2 cups)
  • 1 teaspoon baking powder
  • ½ teaspoon baking soda
  • ½ teaspoon salt
  • 4 ounces unsalted butter (½ cup) room temperature
  • 14 ounces granulated sugar (2 cups)
  • 4 ounces canola oil (½ cup) or vegetable oil
  • 5 large egg yolks room temperature
  • 5 large egg whites room temperature
  • ¼ teaspoon cream of tartar
  • 1 teaspoon vanilla extract
  • 2 teaspoons coconut extract
  • 8 ounces buttermilk (1 cup) room temperature
  • 6 ounces sweetened flaked coconut (2 cups) toasted until lightly browned
  • 1 ounce sweetened flaked coconut (½ cup) for garnish

Cream Cheese Frosting

  • 16 ounces cream cheese (2 cups) cut into cubes and softened
  • 8 ounces unsalted butter (1 cup) softened
  • 1 teaspoon coconut extract
  • ½ teaspoon salt
  • 36 ounces powdered sugar (8 cups) sifted
US Customary - Metric

Instructions

Making the Coconut Cake

  • Adjust an oven rack to the middle position and preheat to 350ºF/176ºC. Prepare three 8-inch round cake pans with cake goop, parchment paper, or another preferred pan release. Making sure to coat the bottom and sides of the pan.
  • Spread your coconut flakes evenly onto a cookie sheet pan.
  • Broil the coconut flakes on high for 2-3 minutes or until they just begin to turn brown around the edges. Stir the coconut and broil for 1-2 minutes more until lightly golden. Watch it closely because it can burn quickly.  Remove it from the oven and let it cool.
  • Whisk together the flour, baking powder, baking soda, and salt in a medium bowl. Set the dry ingredients aside. 
  • Heat the coconut oil in a small bowl in the microwave until it is very soft and beginning to melt, but not hot.
  • Add the coconut extract and vanilla extract to the room-temperature buttermilk. 
  • Add the butter and coconut oil to a stand mixer with the paddle attachment and beat at medium-high speed until smooth and shiny, about 30 seconds. 
  • Gradually sprinkle in the sugar, and beat until the mixture is light and fluffy, about 3-5 minutes.
  • Add the egg yolks one at a time to the mixture, combining after each. 
  • With the mixer on low speed, add about a third of the flour mixture to the batter, followed immediately by about a third of the milk, mix until the ingredients are almost incorporated into the batter. 
  • Repeat the process 2 more times. When the batter appears blended, stop the mixer and scrape the sides of the bowl.
  • Carefully fold in the toasted coconut until it's all combined.
  • Place the egg whites in a mixing bowl with the whip attachment. Whip on medium-high speed until it's foamy. 
  • Add in the cream of tartar and whip until semi stiff peaks form.
  • Fold in the whipped egg whites carefully into the cake batter, and try not to beat out too much of the volume in the egg whites. 
  • Divide the cake batter evenly between 3 6-inch cake pans or 2 8-inch pans.
  • Bake for 30-35 minutes until a skewer inserted comes out clean.
  • Transfer the pans to a wire rack and let them cool in the pans for 10 minutes. 
  • Invert the cakes onto a  cooling rack and cool completely before frosting. I like to flash freeze them for 30 minutes if I'm using them right away, or wrap them in plastic and freeze them overnight. Pro-Tip: Wrapping your cakes while warm and then freezing them will lock in the moisture.

Making Cream Cheese Frosting

  • Make sure the butter and cream cheese are both slightly warm and at the same temperature. If one is colder than the other, they will not mix together properly and create lumps.
  • Place softened butter in the bowl of your stand mixer with a whisk attachment and cream on low until smooth. Pro: Tip: Use an electric hand mixer to get extra smooth cream cheese frosting. 
  • Place softened cream cheese in the bowl with the butter in small chunks and blend on low until smooth.
  • Add sifted powdered sugar one cup at a time until combined. 
  • Add your vanilla extract and salt, and mix until combined. 
  • Cover the frosting with plastic wrap and refrigerate until your cake is chilled and ready to frost. Refrigerate any remaining frosting, or keep in an airtight container and freeze for up to 3 months.

Assembling the Coconut Cake

  • Trim the top of the cake layers so they are flat. 
  • Place the first cake layer down on a cake board, spread a layer of cream cheese frosting evenly across the top and repeat this process with the remaining 2 layers. 
  • Spread a thin layer of cream cheese frosting around the entire cake as a crumb coat and then refrigerate it for 15 minutes. Pro-Tip: Cream cheese frosting is stickier than buttercream, and can pull more crumbs off your cake. Working with a cold cake will be easier. 
  • Once the crumb coat has set, apply another thicker layer of the frosting to the entire cake for its final coat. Pro tip: I chose to cover the exterior of this cake with coconut, but cream cheese frosting makes really pretty rustic swirls if you want a different look. 
  • Place the cake on the board or plate you plan to serve on. 
  • Gently press shredded coconut or large shaved coconut flakes onto the sides of the cake all the way around the exterior, keeping the top free of shreds. 
  • Use a star piping tip and pastry bag filled with cream cheese frosting to pipe swirls around the top edge of the cake. 
  • To save this cake for later, apply plastic wrap around the cake and place it in the refrigerator. Cream cheese frosting can sit out at room temperature for about 4 hours maximum.

Video

Notes

Important Things To Note Before You Start
1. Bring all your ingredients to room temperature or even a little warm (eggs, buttermilk, butter, etc) to ensure your batter does not break or curdle. 
2. Use a scale to weigh your ingredients (including liquids) unless otherwise instructed (Tablespoons, teaspoons, pinch etc). Metric measurements are available in the recipe card. Scaled ingredients are much more accurate than using cups and help ensure the success of your recipe. 
3. Practice Mise en Place (everything in it's place). Measure out your ingredients ahead of time and have them ready before you start mixing to reduce the chances of accidentally leaving something out.
4. Chill your cakes before frosting and filling. You can cover a frosted and chilled cake in fondant if you wish. This cake is also great for stacking. I always keep my cakes chilled in the refrigerator before delivery for easy transporting. Learn more about decorating your first cake. 
 

Nutrition

Serving: 1serving | Calories: 1300kcal | Carbohydrates: 180g | Protein: 10g | Fat: 63g | Saturated Fat: 42g | Polyunsaturated Fat: 2g | Monounsaturated Fat: 13g | Trans Fat: 1g | Cholesterol: 195mg | Sodium: 543mg | Potassium: 291mg | Fiber: 3g | Sugar: 150g | Vitamin A: 1595IU | Calcium: 114mg | Iron: 2mg
lucky charms rice krispie treats lined up on a table

March 14, 2023 no bake

Lucky Charms Rice Krispie Treats

These Lucky Charms Rice Krispie Treats are surprisingly delicious and are a fun treat to make with kids. Combine Lucky Charms and gooey marshmallows to make treats perfect for birthday parties, St. Patrick's day, or a school snack. Add a cup of Rice Krispies in addition to the Lucky Charms cereal to fill in the holes and add texture.lucky charms rice krispie treats lined up on a table

I've always made cereal treats over the stove top and ended up with a big sticky mess. This easy recipe is great because all you need is one large bowl and a microwave. Adding Lucky Charms cereal and marshmallows is a fun way to elevate the classic Rice Krispie treat. You can also trade out the box of Lucky Charms or Rice Krispies for your favorite cereal, like Fruity Pebbles or Cocoa Puffs.

Lucky Charms Rice Krispie Treat Ingredientsingredients for lucky charm treats in bowls on a table

Butter is the ingredient that adds flavor to the Lucky Charm treats. I like to use unsalted butter and add my own salt because I can control the amount, but you can also use salted butter and leave out the salt.

Large or mini marshmallows will work for this recipe, just make sure that they are fresh, and not expired.

Rice Krispies are a fun twist to this recipe, as most Lucky Charms treats will only use that cereal. I like the extra rice krispies because they fill in the gaps between the lucky charms cereal and marshmallows. It only takes about a cup of cereal to fill in the gaps, but if you like firmer crispy treats, you can add more.

Lucky Charms cereal has fun, colorful marshmallows that take this gooey marshmallow treat up a notch. They do melt a little bit when you mix them in with the hot marshmallows, so be sure to reserve a few for topping the treats.

Making Lucky Charms Rice Krispie Treats

  1. Grease a 9" x 9" pan with butter or nonstick cooking spray. You can also line it with a piece of parchment paper if you're nervous about sticking. A square pan will make thick Rice Krispie treats, while a rectangle pan will make thinner treats.
    hand holding a bottle of pan spray over a metal pan
  2. Spray a large mixing bowl with cooking spray, add the marshmallows, and microwave in 30-second increments until they're melting and puffy. You can also heat them in a large saucepan over the stove.
    marshmallows pouring into a large glass bowl
  3. Grease your spatula with cooking spray or oil to help with the sticking and work quickly.
    spraying a spatula with pan spray
  4. Add the butter and salt to the marshmallows and mix them together until they are melted and combined.
    hands adding butter from a plate into a bowl of marshmallows
    melted marshmallows in a bowl
  5. Reserve a few of the colorful marshmallows for topping, then add the Lucky Charms and Rice Krispies, one cup at a time, to the melted marshmallows and stir it all together.
    adding cereal to a bowl of marshmallows
  6. Pour the cereal mixture into the prepared baking dish and press it into an even layer with a spatula. Pro-tip: Coat your clean hands in cooking spray and press it into the corners.
    a bowl of cereal treat mixture pouring into a baking dish
  7. Sprinkle the reserved Lucky Charms marshmallows on top while the treats are still warm, then let them rest in the pan until they come to room temperature, or freeze for 20 minutes to set up.
    hand adding a container of lucky charm marshmallows on top of rice krispie treats
  8. Release the edges of the treats with a knife, then remove them from the pan and cut them into 9 equal squares.
    knife cutting through rice krispie treats
  9. Store the Lucky Charms Rice Krispie treats in an airtight container, or wrap individual treats in plastic wrap. They can last at room temperature for up to 3 days. Pro-Tip: For best results, leave them out overnight so the marshmallows get a little bit soggy, the texture is amazing!
    hand holding a rice krispie treat with square treats around it
  10. For an extra optional design, drizzle or dip each treat in white chocolate.

FAQ

Is it ok to use old marshmallows for Rice Krispie treats?

Old marshmallows don't melt as well as fresh marshmallows because they develop a skin on the outside, so it's best to use a new bag for Krispie treats.

What happens if you put too much butter in Rice Krispie treats?

Adding too much butter and marshmallow to Rice Krispie treats can make them soggy, overly sticky, or even wet. Too little can make them dry and crumbly. If you like this recipe is a bit too gooey, add another ½ cup of Rice Krispies.

How many days ahead can you make Rice Krispie treats?

These treats are best served within 3 days. They can stay out at room temperature wrapped in plastic or wax paper, or stored in an airtight container. They will get hard if you refrigerate them.

Related Recipes

Lofthouse Cookies

Copycat Crumbl Cookies

Chewy Double Chocolate Chip Cookies

Irish Cream Cake

Recipe

lucky charms rice krispie treats lined up on a table
Print Recipe
4.84 from 6 votes

Lucky Charms Rice Krispie Treats

It only takes 6 simple ingredients to make gooey, rainbow Lucky Charms marshmallow treats. These nostalgic treats have extra marshmallows in them to give them a satisfying chew that will leave you wanting to eat the whole tray. These easy treats could be your new favorite no bake dessert!
Prep Time10 minutes mins
Resting Time20 minutes mins
Total Time30 minutes mins
Course: Dessert
Cuisine: American
Servings: 9 people
Calories: 355kcal
Author: Liz Marek

Equipment

  • 1 square pan

Ingredients

  • 16 ounces marshmallows large or small
  • ½ cup unsalted butter plus more for the pan, or spray
  • ½ teaspoon salt
  • 1 teaspoon vanilla extract
  • 1 cup Rice Krispies cereal
  • 6 cups Lucky Charms cereal

Instructions

  • Grease a 9" x 9" pan with butter or nonstick cooking spray. You can also line it with a piece of parchment paper if you're nervous about sticking. A square pan will make thick Rice Krispie treats, while a rectangle pan will make thinner treats.
  • Spray a large mixing bowl with cooking spray, add the marshmallows, and microwave in 30-second increments until they're melting and puffy. You can also heat them in a large saucepan over the stove.
  • Grease your spatula with cooking spray or oil to help with the sticking and work quickly.
  • Add the butter and salt to the marshmallows and mix them together until they are melted and combined. 
  • Reserve a few of the colorful marshmallows for topping, then add the Lucky Charms and Rice Krispies, one cup at a time, to the melted marshmallows and stir it all together.
  • Pour the cereal mixture into the prepared baking dish and press it into an even layer with a spatula. Pro-tip: Coat your clean hands in cooking spray and press it into the corners.
  • Sprinkle the reserved Lucky Charms marshmallows on top while the treats are still warm, then let them rest in the pan until they come to room temperature, or freeze for 20 minutes to set up.
  • Release the edges of the treats with a knife, then remove them from the pan and cut them into 9 equal squares.
  • Store the Lucky Charms Rice Krispie treats in an airtight container, or wrap individual treats in plastic wrap. They can last at room temperature for up to 3 days.
    Pro-Tip: For best results, leave them out overnight so the marshmallows get a little bit soggy, the texture is amazing!

Notes

  1. These treats are best served within 3 days. They can stay out at room temperature wrapped in plastic or wax paper, or stored in an airtight container. They will get hard if you refrigerate them.
  2. Butter is the ingredient that adds flavor to the Lucky Charm treats. I like to use unsalted butter and add my own salt because I can control the amount, but you can also use salted butter and leave out the salt.
  3. Large or mini marshmallows will work for this recipe, just make sure that they are fresh, and not expired.
  4. Although this recipe is in cups too, I HIGHLY recommend you measure your ingredients using a food scale. It makes baking so much easier and will lead to more successful recipes. Follow my tutorial to learn how to use a scale. 1 oz= 28 grams.

Nutrition

Serving: 1treat | Calories: 355kcal | Carbohydrates: 63g | Protein: 3g | Fat: 12g | Saturated Fat: 7g | Polyunsaturated Fat: 1g | Monounsaturated Fat: 3g | Trans Fat: 0.4g | Cholesterol: 27mg | Sodium: 343mg | Potassium: 63mg | Fiber: 1g | Sugar: 38g | Vitamin A: 1200IU | Vitamin C: 8mg | Calcium: 109mg | Iron: 6mg
slice of Guinness chocolate cake on a plate

March 13, 2023 Bundt Cakes

Chocolate Guinness Cake

Chocolate Guinness cake is a rich, ultra-moist chocolate cake made with Irish stout, and is a popular St. Patrick's Day dessert. It doesn't taste like beer at all. The stout simply deepens the chocolate flavor and gives the cake that dense, almost fudge-like texture that makes it completely irresistible. This bundt cake version is easier than my death by chocolate cake, which also uses Guinness but is more of a layer cake. slice of Guinness chocolate cake on a plate

This versatile recipe can be made in cake pans and layered with easy buttercream or cream cheese frosting as well! You could even make it into cupcakes.

🔍 Quick Look: How To Make Guinness Cake

  • ⏱️ Prep Time: 15 minutes
  • 🍳 Cook Time: 45 minutes
  • 🕒 Total Time: 60 minutes
  • 👥 Servings: 12
  • 📊 Calories: ~421 kcal per serving (based on nutrition panel)
  • 🔥 Cook Method: Bake Guinness cake batter in a bundt cake pan, then frost with a Guinness ganache drip.
  • 👩‍🍳 Flavor Profile: Rich, fudgy chocolate, and deep malty flavor with a very moist crumb.
  • ⭐ Difficulty: Easy, making it great for a fun St. Patrick's Day celebration.
[feast_advanced_jump_to]
Key Takeaways
Make a Checklist
Apply this to Me
Add us as a Google Trusted Source

Why This Recipe Works

There's a reason Guinness beer has been used in baking cakes for years. The roasted malt notes of Guinness, rich with hints of coffee, cocoa, and dark caramel, intensify the chocolate flavor and make it deeper and more complex without tasting like beer.

Its subtle bitterness balances the sweetness perfectly, while the stout's sugars and gentle acidity create an incredibly moist, tender crumb that stays soft for days. As it bakes, the flavors blend into something bold yet smooth, giving you a chocolate cake that feels comforting, sophisticated, and absolutely worth making.

R Smith says
5 stars
"Love this recipe! First of all it is very easy to pull together - no creaming butter and sugar, so alternating wet and dry ingredients to mix. It's quick and easy. Most importantly it is very flavorful and has a more delicate crumb than what a bundt cake normally produces. I will definitely be making this again."

Ingredients Needed

There's just something that works so well about pairing a dark stout with chocolate. The slight bitterness of the beer balances the sweetness perfectly, so it's rich without being overpowering.

ingredients for Guinness cake in bowls on a table

Guinness is an Irish dry stout beer. It has a malty sweetness and a hoppy bitterness with notes of chocolate and coffee, which is why it adds so much flavor to this delicious cake. The alcohol does bake out of the cake, so very few traces of alcohol are consumed while eating the cake. The alcohol actually tenderizes gluten, making the crumb of the cake more tender and dense, and adding moisture to the cake. You can replace Guinness beer with any kind of dark stout and get a similar flavor profile.

Sour cream adds moisture and tang to this cake; the acidic nature of sour cream reacts with the cocoa powder and baking soda to give us a dense, tender cake crumb like my WASC cake and Chocolate WASC cake. You can replace sour cream with Greek yogurt if you prefer.

White Chocolate - Used for the cake drip. It adds a beautiful sweetness to the cake. You could also use a water ganache drip, chocolate drip, or cream cheese frosting.

Natural Cocoa Powder - You want to use a natural cocoa powder like Hershey's cocoa powder, not Dutch-processed. The difference between Dutch-processed cocoa powder and natural cocoa powder is Dutched is alkalized so that it neutralizes the cocoa powder's acidity. In this case, we want the acidity because it reacts with the stout beer, creating that distinct flavor profile. To replace natural cocoa powder with Dutched cocoa powder, substitute it in a 1:1 ratio by volume, but adjust the leavening agents to account for the lack of acidity in the Dutch powder. Specifically, replace the baking soda in the recipe with double the amount of baking powder.

Baking Soda - Reacts with the natural cocoa powder and the stout beer, making the cake fluffier and enhances the flavor.

Step-By-Step Instructions

Baking this cake is so easy thanks to the bundt cake pan. Just bake, cool, frost, and enjoy!

close up of bundt cake being coated with pan release

Step 1: Preheat the oven to 350°F and prepare a Bundt pan with cake goop or other pan release spray. Make sure to coat the sides and center of the pan well.

mixing guinness and butter together in a measuring cup

Step 2: Add the butter and Guinness to a heat-proof container and heat it in the microwave until the butter is melted. Or, in a large saucepan, heat beer and butter until butter is melted, then remove from the heat and set it aside for now.

cocoa powder and flour in a glass bowl

Step 3: Combine the sugar and cocoa powder in the bowl of your stand mixer.

Adding beer mixture to cocoa powder mixture in a stand mixer

Step 4: Add the beer mixture to the cocoa mixture while mixing on low speed with the paddle attachment until combined. This can also easily be mixed with a hand mixer.

sour cream and egg mixture in a white bowl

Step 5: Combine the eggs, sour cream, and vanilla in a medium bowl. Then add the sour cream mixture to the cocoa mixture while mixing on low until it's combined.

adding flour mixture to cocoa mixture in a stand mixer

Step 6: Combine the flour and the baking soda. Mix the dry ingredients into the cocoa mixture until smooth. Make sure to scrape the bowl to incorporate all of the ingredients.

guinness cake batter being poured into a bundt cake pan

Step 7: Pour the cake batter into the prepared bundt pan

baking guinness cake in the oven

Step 8: Bake at 350ºF/175ºC for 45-50 minutes or until a toothpick inserted in the center comes out clean.

unmolding guinness cake onto a cooling rack

Step 9: Cool the cake in the pan for 10 minutes and flip the Guinness cake onto a cooling rack to cool fully.

Adding Guinness to melted white chocolate chips

Step 10: Make the ganache frosting by combining all the ingredients together in a heat-proof bowl and melting them in 30-second increments in the microwave. Whisk until smooth.

Guinness ganache covered with plastic wrap

Step 9: Cover the ganache with plastic wrap and set it aside until you are ready to pour it on top of the cake. You may need to slightly reheat the ganache if it cools too much before adding it to your cake.

drizzling Guinness ganache over the Guinness bundt cake

Step 10: Place the cooled cake on a serving plate and slowly pour the ganache around the top of the cake. The ganache should be at the temperature of a caramel sauce. 

Close up of a slice of Guinness cake being cut from the finished bundt cake

Expert Tips For Success

Here are some expert tips to make your Guinness chocolate cake exceptionally rich, moist, and flavorful.

  1. Bloom the Cocoa in Hot Guinness. Warm the Guinness with butter before adding cocoa powder. Whisking cocoa into hot liquid "blooms" it, intensifying the chocolate flavor and creating a smoother batter.
  2. Do Not Overmix. Once you add the flour, mix just until combined. Overmixing develops gluten and can make the cake dense instead of soft and tender.
  3. Let the Beer Rest Briefly. f your Guinness is very fizzy, let it sit for a few minutes after pouring. Too much carbonation can affect batter consistency and rise.
  4. Use Room Temperature Ingredients. Eggs, sour cream, and any dairy should be at room temperature. This helps create a smooth, emulsified batter and an even bake.
  5. Do Not Overbake. Stout cakes are meant to be moist. Start checking a few minutes early. A few moist crumbs on a tester are ideal.
  6. Let It Rest Overnight. Like many chocolate cakes, Guinness cake often tastes even better the next day. The roasted malt and chocolate flavors deepen as it sits. No need to refrigerate, which will just dry the cake out. Just cover in plastic wrap and set it aside at room temperature.

FAQ

Do I have to use Guinness beer?

No, not necessarily, you can swap out whatever dark beer you would like, the aspect of the Guinness stout is the chocolate flavor that deepens the flavor of the cake. You can leave the alcohol out altogether and use coffee, milk, or just water. For the ganache, I recommend swapping the beer for heavy cream. However, the beer does create a very moist chocolate cake.

Where can I find Guinness beer?

Most local grocery stores carry stout beer. Especially during the month of March for St. Patricks Day celebrations.

Can I bake this in regular cake pans?

Yes, This recipe will bake a nice layer cake, it will fill three, 6-inch cake pans or two, 8-inch pans.

What other frostings go well with Guinness chocolate cake?

Cake layers would pair really well with vanilla buttercream frosting, chocolate buttercream, or cream cheese frosting. This flavor also pairs great with baileys Irish cream, for a really St. Paddy's celebration.

What else can I garnish the cake with?

This bundt would be elegant with a dusting of confectioners' sugar or cocoa powder, as well as a dark chocolate ganache.

Related Recipes

  • slice of chocolate cake with white frosting and caramel drip on a dark plate
    Irish Cream Cake
  • sweet irish soda bread
    Grandma's sweet Irish soda bread recipe
  • irish soda bread on white fabric
    Traditional Irish Soda Bread Recipe
  • lucky charms rice krispie treats lined up on a table
    Lucky Charms Rice Krispie Treats

If you tried this Ribeye recipe or any other recipe on my blog, please leave a 🌟 star rating and let me know how it goes in the comments. I love hearing from you!

Recipe

slice of Guinness chocolate cake on a plate
Print Recipe
4.89 from 18 votes

Guinness Chocolate Cake

This delicious beer-infused chocolate cake makes a dense, moist crumb that has a hint of Guinness but still rocks your socks off with a strong chocolate flavor. The perfect cake for St. Patricks Day celebrations!
Prep Time15 minutes mins
Cook Time45 minutes mins
Total Time1 hour hr
Course: Dessert
Cuisine: American
Servings: 12 servings
Calories: 421kcal
Author: Liz Marek

Equipment

  • 1 bundt cake pan

Ingredients

Guinness Cake Ingredients

  • 1 ¾ cups all purpose flour
  • 2 cups granulated sugar
  • 1 teaspoon baking soda
  • ½ cup natural cocoa powder like Hershey's brand
  • ½ cup butter
  • 3 large eggs beaten
  • 1 cup Dark Guinness Beer
  • ¾ cup sour cream
  • 1 Tablespoon vanilla extract

Guinness Ganache Drip

  • 1 ounce Guinness beer
  • 1 ounce butter
  • 6 ounces white chocolate
US Customary - Metric

Instructions

Making Guinness Chocolate Cake

  • Preheat the oven to 350°F and prepare a Bundt pan with cake goop or pan release spray. Make sure to coat the sides of the pan well.
  • Add the butter and Guinness to a heat proof container and heat it in the microwave until the butter is melted. Or, In a large saucepan, heat beer and butter until butter is melted then remove from the heat.
  • Combine the sugar and cocoa powder in the bowl of your stand mixer.
  • Then mix in the butter and beer mixture on low speed with the paddle attachment until combined. This can also easily be mixed with a hand mixer.
  • Combine the eggs, sour cream, and vanilla in a medium bowl then add the wet ingredients to the beer mixture and mix until combined.
  • Combine the flour and the baking soda. Mix the dry ingredients into the beer mixture until smooth. Make sure to scrape the bowl to incorporate all of the ingredients.
  • Pour the cake batter into the prepared bundt pan.
  • Bake at 350ºF/175ºC for 45-50 minutes or until a toothpick inserted in the center comes out clean. 
  • Cool the cake in the pan for 10 minutes and flip the bundt onto a cooling rack to cool fully. The ganache can be prepared just prior to displaying or serving the cake.

Making Guinness White Chocolate Ganache

  • Add the white chocolate and the beer to a medium or large bowl.
  • Microwave the chocolate mixture for about 30 seconds until the chocolate begins to soften. It's best to do this in 10-second increments so that the chocolate does not overheat too quickly in one spot.
  • Let the chocolate sit for about 3 minutes and then add the butter and whisk until smooth. If the butter is not melting out, heat it in the microwave again for just a few seconds at a time.
  • Cover the ganache with plastic wrap and set it aside until you are ready to pour it on top of the cake. You may need to slightly reheat the ganache if it cools quickly. 
  • Place the cooled cake on a serving plate and slowly pour the ganache around the top of the cake. The ganache should be the temperature of a caramel sauce. 
  • To store the Bundt cake, keep it in an airtight container at room temperature for up to 4 days. It can be wrapped and frozen for up to a month.
    Pro-tip: Don't freeze the entire cake, wrap individual pieces in plastic wrap and freeze them. Then you will have a slice of cake anytime!

Video

Notes

This recipe can also be made in three 6" cake pans or two 8" cake pans.
Guinness is an Irish dry stout beer. It has a malty sweetness and a hoppy bitterness with notes of chocolate and coffee, which is why it adds so much flavor to this delicious cake. The alcohol does bake out of the cake so very few traces of alcohol are consumed while eating the cake. The alcohol actually tenderizes gluten, making the crumb of the cake more tender and dense, and adding moisture to the cake. 
Sour cream adds moisture and tang to this cake, the acidic nature of sour cream reacts with the cocoa powder and baking soda to give us a dense tender cake crumb.
 

Nutrition

Serving: 1serving | Calories: 421kcal | Carbohydrates: 59g | Protein: 6g | Fat: 19g | Saturated Fat: 11g | Polyunsaturated Fat: 1g | Monounsaturated Fat: 5g | Trans Fat: 0.4g | Cholesterol: 83mg | Sodium: 204mg | Potassium: 155mg | Fiber: 2g | Sugar: 42g | Vitamin A: 457IU | Vitamin C: 0.2mg | Calcium: 60mg | Iron: 2mg

rainbow cupcake with a bite taken out of it

March 9, 2023 Cupcakes

Rainbow Cupcakes

These Rainbow Cupcakes have layers of vibrant rainbow colors inside and are topped with a cloud-like swirl of vanilla buttercream. Made from a one-bowl doctored box mix recipe, they are incredibly easy to make. The perfect treat for St. Patrick's Day, Pride celebrations, birthday parties, or any occasion in need of a little color and a lot of flavors.rainbow cupcake with a bite taken out of it

Starting with a box cake mix creates a foolproof formula that allows extra time to color the batter, which requires a little extra mixing, but won't cause the batter to be over-mixed like some cake recipes. The end result is a fluffy cupcake with bright colors and a nostalgic vanilla flavor. The best part is the sour candy on top, but the versatility of the design is what makes these so fun. 

Table of contents

  • Rainbow Cupcake Ingredients
  • Making Rainbow Cupcakes
  • Making Easy Buttercream
  • Assembling the Cupcakes
  • FAQ
  • Related Recipes

Rainbow Cupcake Ingredientsingredients for rainbow cupcakes in bowls

Box Cake: A doctored box mix recipe makes a quick solution to a homemade cake. It really is foolproof, even if something is scaled incorrectly, the outcome is still a delicious cake. It's very stable and allows you to play with and alter the batter, like adding colors. 

Flour: Adding a little extra flour gives the box cake a little more structure, so it has a tighter crumb and can handle different kinds of frostings as well as stacking if you wish. 

Gel Colors: Using concentrated gel color reduces the amount of liquid you are adding to the batter, if all you have is a liquid color, that will work too, just try not to add more than 2 Tablespoons of liquid color to each bowl of batter. I like to use ChefMaster or Americolor for my gel colors, but there are many good brands that are easy to find. 

Easy Buttercream is a delicious, easy, and versatile frosting. You can color this as well if you would like. Cream cheese frosting, ermine buttercream, or even a whipped ganache will also pair well if you are feeling fancy! 

Making Rainbow Cupcakes

  1. Preheat the oven to 350° F and prepare 2 cupcake pans with paper cupcake liners.hands lining cupcake pans with liners
  2. Add the cake mix, flour, sugar, salt, sour cream, melted butter, eggs, and milk to the bowl of a stand mixer. You can also use a large bowl and a hand mixer. ingredients for cupcakes in a stand mixer bowl
  3. Combine all of the dry ingredients and the wet ingredients on low speed and then mix on medium speed for 2 minutes. mixed vanilla cupcake batter in a stand mixer bowl
  4. Divide the batter into 6 separate bowls. pouring cupcake batter from a large bowl into a smaller bowl
  5. Using your preferred food color, color each of the small bowls in red, orange, yellow, green, blue, and purple to your desired shade of cake. The color will be more vibrant when baked. Pro-Tip: Make sure to use gel food coloring like ChefMaster or Americolor instead of liquid for more vibrant colors. 6 bowls of cupcake batter colored in rainbow colors
  6. Starting with the purple batter, either pipe or spoon about 1-1.5 tablespoons of batter into each cupcake cup. Layer each colored batter on top of the last. Try to spread the batter to the edges so you can see the rainbow through the cupcake paper. dividing purple batter into cupcake trays with a cookie scoop
  7. Place the cupcakes into the oven and bake for about 15 minutes. Make sure the center of the cupcake is done so it doesn't sink when it cools. placing two cupcake trays filled with batter into the oven to bake
  8. Cool the cupcakes for 5 minutes in the pans, then remove and place them on a cooling rack to fully cool. This way the bottoms of the cupcake don't get wrinkly from the steam.

Making Easy Buttercream

  1. First, place the egg whites and the powdered sugar in a stand mixer bowl. Attach the whisk and combine the ingredients on low, and then whip them on high for 4 to 5 minutes (until shiny) to dissolve the powdered sugar.hand pouring a container of pasteurized egg whites into a glass stand mixer bowlstand mixer bowl filled with meringew
  2. Then, add the salt and the vanilla extract.hand adding vanilla to powdered sugar mixture in a mixing bowl.
  3. Next, add in your softened butter piece-by-piece, and whip it with the whisk attachment for 8 to 10 minutes until white and fluffy. When it no longer tastes buttery, it's done!hand adding chunks of butter into bowl
  4. Finally, switch to a paddle attachment and mix the buttercream on low speed for up to 15-20 minutes. This step is optional but if you want really creamy and bubble-free frosting, you don't want to skip it.smooth buttercream in a stand mixer bowl

Assembling the Cupcakes

  1. Prepare a pastry bag with easy buttercream and a large star tip. Pipe a swirl of vanilla buttercream frosting on top of each cupcake. Pro-tip: If you do not have a piping bag, you can use a Ziploc bag.piping buttercream on top of a rainbow cupcake with a piping bag
  2. Cut the rainbow strip candy into 3-inch portions. Place the rainbow on top of the cupcake in an arch.rainbow cupcake with a rainbow candy and buttercream on top
  3. Add gold or rainbow sprinkles in any design you desire to the top of each cupcake.rainbow cupcake with a rainbow candy and buttercream on top
  4. To store the cupcakes, place them in an airtight container and store them at room temperature for up to 4 days. You can freeze unfrosted cupcakes or frosted cupcakes for up to a month.rainbow cupcakes with vanilla buttercream

If you love fun, colorful baking, my baked donut recipe with colorful glaze is another great one for parties and celebrations.

FAQ

How do I keep my colors from mixing?

The less you touch the rainbow cupcake batter once it's in the cup the less likely it will mix with the surrounding colors. I found that piping the colors was easier to distribute the batter around the cup evenly. However, if you do want a tie-dye effect, you can drag a skewer through the layered colors for a very fun cupcake. 

Can I flavor the rainbow cupcakes?

Yes, we are using a vanilla box mix, and adding the food coloring doesn't change the flavor. This recipe doesn't call for extra vanilla extract because the box mix already has it included. You could enhance the base recipe with other flavors like lemon, coconut, almond, or clear food extract will work!

How to make rainbow buttercream?

Color the easy buttercream in red, orange, yellow, green, blue, and purple. Lay out a sheet of plastic wrap and pipe the first color in a long strip along the plastic. Repeat this with each color, placing them immediately next to each other. Roll the plastic up lengthwise and place the entire buttercream bullet inside a piping bag with a piping tip.

Related Recipes

Vanilla Cupcakes

Cream Cheese Frosting

Rainbow Cake

Funfetti Birthday Cake

Recipe

rainbow cupcake with a bite taken out of it
Print Recipe
4.75 from 4 votes

Rainbow Cupcakes

Light, buttery and moist rainbow cupcakes are six layers of color that bake up into a centerpiece-worthy treat. Top them off with fluffy white buttercream or tangy cream cheese frosting then complete your cupcake creations with a shower of rainbow sprinkles. There are so many cute rainbow candies, the decor options are endless!
Prep Time20 minutes mins
Cook Time15 minutes mins
Total Time35 minutes mins
Course: Dessert
Cuisine: American
Servings: 24 cupcakes
Calories: 524kcal
Author: Liz Marek

Equipment

  • 2 cupcake pans
  • 24 cupcake liners

Ingredients

Rainbow Cupcakes

  • 1 box white cake mix I like Duncan Hines
  • 1 cup all purpose flour
  • 1 cup granulated sugar
  • ¼ teaspoon salt
  • 1 cup sour cream room temperature
  • ½ cup unsalted butter melted
  • 1 cup milk room temperature
  • 3 large eggs room temperature
  • 6 bottles gel food coloring: red, orange, yellow, green, blue, purple 2-3 tsps of each color

Easy Vanilla Buttercream

  • 6 ounces pasteurized egg whites (from a box)
  • 24 ounces powdered sugar
  • 1 Tablespoon vanilla extract
  • ½ teaspoon salt
  • 24 ounces unsalted butter softened
US Customary - Metric

Instructions

Making Rainbow Cupcakes

  • Preheat the oven to 350° F and prepare 2 cupcake pans with paper cupcake liners.
  • Add the cake mix, flour, sugar, salt, sour cream, melted butter, eggs, and milk to the bowl of a stand mixer. You can also use a large bowl and a hand mixer. 
  • Combine all of the dry ingredients and the wet ingredients on low speed and then mix on medium speed for 2 minutes. 
  • Divide the batter into 6 separate bowls. 
  • Using your preferred food color, color each of the small bowls in red, orange, yellow, green, blue, and purple to your desired shade of cake. The color will be more vibrant when baked. Pro-Tip: Make sure to use gel food coloring like ChefMaster or Americolor instead of liquid for more vibrant colors. 
  • Starting with the purple batter, either pipe or spoon about 1-1.5 tablespoons of batter into each cupcake cup. Layer each colored batter on top of the last. Try to spread the batter to the edges so you can see the rainbow through the cupcake paper. 
  • Place the cupcakes into the oven and bake for about 15 minutes. Make sure the center of the cupcake is done so it doesn't sink when it cools. 
  • Cool the cupcakes for 5 minutes in the pans, then remove and place them on a cooling rack to fully cool. This way the bottoms of the cupcake don't get wrinkly from the steam.

Easy Vanilla Buttercream

  • First, place the egg whites and the powdered sugar in a stand mixer bowl. Attach the whisk and combine the ingredients on low, and then whip them on high for 4 to 5 minutes (until shiny) to dissolve the powdered sugar.
  • Then, add in the salt and the vanilla extract.
  • Next, add in your softened butter piece-by-piece, and whip it with the whisk attachment for 8 to 10 minutes until white and fluffy. When it no longer tastes buttery, it's done!
  • Finally, switch to a paddle attachment and mix the buttercream on low speed for up to 15-20 minutes. This step is optional but if you want really creamy and bubble-free frosting, you don't want to skip it.

Assembling the Cupcakes

  • Prepare a pastry bag with easy buttercream and a large star tip. Pipe a swirl of vanilla buttercream frosting on top of each cupcake. Pro-tip: If you do not have a piping bag, you can use a Ziploc bag.
  • Cut the rainbow strip candy into 3-inch portions. Place the rainbow on top of the cupcake in an arch.
  • Add gold or rainbow sprinkles in any design you desire to the top of each cupcake.
  • To store the cupcakes, place them in an airtight container and store them at room temperature for up to 4 days. You can freeze unfrosted cupcakes or frosted cupcakes for up to a month.

Notes

  1. For the best rise, fill your liners ⅔ with cupcake batter or 1 ½ ounces per cupcake
  2. Make sure all your ingredients are at room temperature before mixing your batter (milk, butter, eggs). 
  3. Use clear vanilla extract for that "classic grocery store cake" flavor. Use good quality vanilla extract, vanilla bean paste, or even a vanilla bean for true vanilla flavor. One vanilla bean = 2 teaspoons vanilla extract. 
  4. Preheat your oven to 350ºF for 30 minutes before baking to give your cupcakes a good rise and set the dome. 
  5. Baked cupcakes can be frozen for up to 6 months.
  6. If you don't have a paddle attachment, mix by hand with a spatula to avoid overmixing.

Nutrition

Serving: 1cupcake | Calories: 524kcal | Carbohydrates: 60g | Protein: 4g | Fat: 31g | Saturated Fat: 19g | Polyunsaturated Fat: 1g | Monounsaturated Fat: 8g | Trans Fat: 1g | Cholesterol: 102mg | Sodium: 260mg | Potassium: 80mg | Fiber: 0.4g | Sugar: 47g | Vitamin A: 1015IU | Vitamin C: 0.1mg | Calcium: 95mg | Iron: 1mg
close up of green velvet cake slice on a white plate

March 7, 2023 Cake

Green Velvet Cake

This green velvet cake with my easy vanilla buttercream frosting and a shiny gold drip is the perfect cake for St. Patrick's Day! The classic combo of buttermilk, a hint of cocoa and vinegar give this cake the same flavor depth and velvety color as red velvet. Being able to switch the colors out makes this cake recipe fun and versatile.

Quick Glance at the Recipe

  • Recipe Name: Green Velvet Cake
  • Why You'll Love It: Traditional red velvet cake, but green!
  • Time and Difficulty: 50 Minutes - Easy
  • Main Ingredients: Flour, Butter, Sugar, Eggs, Baking Soda, Oil, Cocoa Powder, Green Food Coloring
  • Method: Combine wet ingredients with dry ingredients, bake, and decorate!
  • Texture and Flavor: Moist, tender, fluffy, slightly tangy
  • Quick Tip: No buttermilk on hand? You can easily make your buttermilk substitute
ChatGPT
Google AI
Perplexity
Grok
Add us as a trusted site on Google

This is a festive treat for those who don't care for the typical St Patrick's day treats, like Guinness cake or Irish cream cake. There are so many ways to decorate this fun cake, let your inner leprechaun run wild! Maybe a pot of gold or green frosting. No matter what, everyone will feel lucky to get a slice!

Table of contents

  • Quick Glance at the Recipe
  • Green Velvet Cake Ingredients
  • How To Make The Cake Layers
  • Making Easy Buttercream Frosting
  • Assembling the Cake
  • Making The Gold Drip
  • FAQ

Green Velvet Cake Ingredients

Nothing too fancy here! Just classic cake ingredients that you can find at pretty much any grocery store.

bowls of ingredients for green velvet cake on a table

Buttermilk adds a tangy flavor to the cake, and it tenderizes the crumb. If you do not have buttermilk, you can substitute by adding a teaspoon of lemon juice to a cup of regular milk. Check out my buttermilk substitutes blog post for more recipes.

Cocoa Powder is the not-so-secret ingredient in velvet cakes. There isn't enough to make it taste like chocolate, but just enough to deepen the color of the batter and also tenderize the flour. 

Vinegar keeps this cake batter on the acid end of the scale, which is why we use only baking soda as a leavener; there is no need for the acid in baking powder to balance the recipe. The signature of a velvet cake is the "velvet" texture, meaning very moist and tender, due to the amount of acid in the batter. 

Gold Powder - I use a non-toxic gold dust from Truly Mad Plastics because it is ultra shiny, but you can use any kind of gold dust you prefer.

How To Make The Cake Layers

This mixing style is very easy. Just combine the liquids with the dry ingredients and mix until just combined. Avoid over-mixing.

hand pouring a bowl of melted butter into a measuring cup
  1. Preheat the oven to 350°F and prepare two 8-inch cake pans with cake goop, parchment paper, or preferred pan spray.
  2. Whisk the eggs with the oil, buttermilk, vinegar, and melted butter until combined and set aside.
dry ingredients for green velvet cake in a glass stand mixer bowl
  1. Place the flour, sugar, cocoa powder, salt, and baking soda into the bowl of your stand mixer and mix on low speed with the paddle attachment for a few seconds to combine.
hand pouring a container of wet ingredients into a stand mixer bowl
  1. Add the buttermilk mixture into the flour mixture and mix on medium-high for about a minute until combined.
hand adding green food coloring to a stand mixer bowl
  1. Add the food coloring and mix until combined.
green velvet batter in cake pans in an oven
  1. Pour the cake batter evenly into the cake pans and bake for about 30 minutes or until a toothpick comes out clean. 
baked green velvet cakes in pans
  1. Cool cakes for 10 minutes and then flip them out onto a wire rack to finish cooling. Place the cakes in the freezer for 30 minutes to chill quickly if you plan to frost them the same day. Wrap the cake layers in plastic wrap and freeze if you are baking ahead.

Making Easy Buttercream Frosting

My easy buttercream frosting is ultra smooth and not too sweet, and is the perfect addition to this green velvet cake. Or you can make cream cheese frosting!

whipped egg whites and sugar
  1. Place the egg whites and powdered sugar in the bowl of your stand mixer with the whisk attachment and whip on high speed for 3-5 minutes.
stand mixer whisking frosting
  1. Add the softened butter in small chunks, then vanilla and salt.
  2. Whip on high until light and fluffy and white, about 8 to 10 minutes.

Assembling the Cake

hand cutting off the top dome of a green velvet cake with a knife
  1. Trim the top domes off the cooled cake layers so they stack evenly.
hand spreading frosting on a green cake layer with a spatula
  1. Fill the center with the vanilla buttercream and spread evenly with an offset spatula. This cake would also pair well with homemade cream cheese frosting.
hands placing a second later of green cake on top of the first
  1. Place the remaining cake layer on top.
smoothing a crumb coat on a green velvet cake with a spatula
  1. Add a thin layer of buttercream (crumb coat) all over the entire cake to lock in crumbs.
  2. Then refrigerate the cake for 15 minutes.
smoothing buttercream on a cake
  1. Continue to frost the final layer of frosting onto the cake and smooth the sides with a bench scraper. Place it into the fridge to chill while you prepare the gold drip.

Making The Gold Drip

chocolate and water in a bowl
  1. Combine your water and chocolate together in a bowl. I'm using orange candy melts in this drip, but any kind of chocolate you have will work.
close up of water ganache in a bowl
  1. Microwave in 30 second incredments until the chocolate is soft.
  2. Whisk it together until smooth. Microwave it more if needed.
  3. Set your water ganache aside to cool to about 90ºF.
close up of gold dust and oil mixed together
  1. Combine your gold dust and oil together to make a thick paste. Adjust the amount of oil as needed.
close up of piping bag coated with gold mixture
  1. Using a paintbrush, coat the bottom few inches of a piping bag with your paste. Make it very thick.
gold drip on a white cake
  1. Pour your cooled water ganache into the piping bag.
  2. Snip off the tip and pipe your gold drip onto your chilled cake.
slice of green velvet cake lifting out of a full cake with a cake server
  1. Pipe dollops of buttercream around the top edge of the cake, and a scalloped border around the bottom edge.
  2. Finish the layer cake by filling the center with rainbow sprinkles.

FAQ

What does green velvet cake taste like?

Green velvet cake is actually just red velvet cake, the only difference is the color of the food coloring! The taste is sweet with a slightly tangy flavor from the buttermilk. There is cocoa powder in this recipe but the cake definitely doesn't taste like chocolate, the cocoa powder adds some depth and also tenderizes the crumb of the cake, and helps retain moisture.

What is the difference between regular cake and velvet cake?

There's more to velvet cake than just the added food coloring. Velvet is made with cocoa powder, vinegar, and buttermilk. The chemical reaction between these ingredients helps give the cake a deeper color that is often enhanced by the extra food coloring.

Can I make cupcakes?

Yes, this is an excellent recipe for cupcakes as well, making about 24 cupcakes.


  • gold drip on a white cake
    Gold Drip Tutorial
  • Pot Of Gold Cake
  • close up of green velvet cake slice on a white plate
    Green Velvet Cake
  • slice of rainbow cake on blue plate white background and whole cake in background
    Rainbow Cake

Cake Batter and Frosting Calculator

Select an option below to calculate how much batter or frosting you need. Adjust the servings slider on the recipe card to change the amounts the recipe makes.

Choose a pan type

Choose a cake pan size
(based on 2" tall cake pan)

Choose a cake pan size
(based on 2" tall cake pan)

Choose a cake pan size
(based on 2" tall cake pan)

Cupcake Tin Size

Choose number of pans

Cups of Batter Needed

8 cups

Cups of Frosting Needed

5 cups

Note: measurements are estimated based off the vanilla cake recipe using standard US cake pans and sizes. Measurements used are for 2" tall cake pans only. Your results may vary. Do not overfill cake pans above manufacturer's recommended guidelines.

Recipe

slice of green velvet cake being lifted
Print Recipe
5 from 7 votes

Green Velvet Cake Recipe

This green velvet cake is so fun to make for St. Patrick's Day or any other holiday where you need a pretty green cake that also tastes amazing! Adapted from my very popular traditional red velvet cake recipe, you can swap out the green for any color!
Prep Time20 minutes mins
Cook Time30 minutes mins
Total Time50 minutes mins
Course: Dessert
Cuisine: American
Servings: 12 servings
Calories: 1050kcal
Author: Liz Marek

Equipment

  • 2 8" x 2" cake pans

Ingredients

Cake Ingredients

  • 14 ounces All purpose flour
  • 14 ounces Granulated Sugar
  • 2 teaspoons natural (not dutched) cocoa powder I like Hershey's Special Dark
  • 1 teaspoon salt
  • 1 teaspoon baking soda
  • 2 large eggs
  • 4 ounces vegetable oil
  • 8 ounces buttermilk
  • 1 Tablespoon white vinegar
  • 4 ounces unsalted butter
  • 1 teaspoon vanilla
  • 1-2 teaspoons yellow food coloring
  • 1 teaspoon green food color

Easy Buttercream Frosting

  • 6 ounces pasteurized egg whites
  • 24 ounces powdered sugar
  • 24 ounces unsalted butter room temperature
  • 1 Tablespoon vanilla extract
  • ½ teaspoon salt

Gold Drip

  • 6 ounces chocolate
  • 1 ounce water
  • 1 teaspoons metallic gold powder
  • 1-2 drops neutral oil
US Customary - Metric

Instructions

Making Green Velvet Cake

  • Preheat the oven to 350°F and prepare two 8-inch cake pans with cake goop, parchment paper, or preferred pan spray. This recipe will also make three 6-inch cakes.
  • Whisk the eggs with the oil, buttermilk, vinegar, and melted butter until combined and set aside.
  • Place the flour, sugar, cocoa powder, salt, and baking soda into the bowl of your stand mixer and mix on low speed with the paddle attachment for a few seconds to combine.
  • Add the buttermilk mixture into the flour mixture and mix on medium-high for about a minute until combined.
  • Add the food coloring and mix until combined.
  • Pour the cake batter evenly into the cake pans and bake for about 30 minutes or until a toothpick comes out clean. 
  • Cool cakes for 10 minutes and then flip them out onto a wire rack to finish cooling. Place the cakes in the freezer for 30 minutes to chill quickly if you plan to frost them the same day. Wrap the cake layers in plastic wrap and freeze if you are baking ahead.

Making Easy Buttercream Frosting

  • Place the egg whites and powdered sugar in the bowl of your stand mixer with the whisk attachment and whip on high speed for 3-5 minutes.
  • Add the softened butter in small chunks then vanilla and salt. Whip on high until light and fluffy and white, about 8 to 10 minutes.
  • For the best results, switch to the paddle attachment and mix on low for 15-20 minutes until all air bubbles are gone. This is optional but makes for really smooth buttercream. 

Assembling the Cake

  • Trim the top dome off of the green velvet cake layers and place one layer onto an 8-inch cardboard cake round, top side down, this ensures an even surface. This is not necessary, but the layers look clean even when the cake is cut. I recommend using a cake turntable to make frosting easier.
  • Fill the center with the vanilla buttercream and spread evenly with an offset spatula. This cake would also pair well with homemade cream cheese frosting.
  • Place the remaining cake layer on top.
  • I like to begin by frosting the top of the cake and pushing the buttercream down the sides and then smoothing. Start with a thin layer of buttercream to create a smooth crumb coat around the whole cake and chill for 5 minutes for the buttercream to set up.
  • Continue to frost the final layer of frosting onto the cake and smooth it with a bench scraper.
  • Place the cake on the serving board and chill the cake while preparing the drip.

Decorating the Cake

  • Melt the water and chocolate together and whisk it until it's smooth
  • Set it aside to cool to 90ºF
  • Combine the oil and gold powder together to make a paste
  • Coat the bottom few inches of the inside of a piping bag with the gold paste using a paint brush
  • Pour the cooled ganache into the piping bag and snip off the tip
  • Pipe the gold drip onto the cake
  • Finish with dollops of buttercream and rainbow sprinkles

Notes

  1. The best investment you can make when you're getting started with baking is a digital kitchen scale! Weighing your ingredients will help you avoid cake failure. Using a kitchen scale for baking is super easy and gives you the best results every single time. 
  2. Practice Mise en Place (everything in its place). Measure out your ingredients ahead of time and have them ready before you start mixing to reduce the chances of accidentally leaving something out.
  3. Need more help with making your first cake? Check out my how to decorate your first cake blog post. 
  4. Make sure all of your cold ingredients (e.g. butter, eggs, milk) are at room temperature or a little warm. Why? Because we want to create an emulsion and allow the ingredients to fully mix together. 
  5. Make your own pan release (cake goop!) The best pan release ever! 
  6. Chill your cakes before frosting and filling. You can cover a frosted and chilled cake in fondant if you wish. This cake is also great for stacking!
  7. If you are using pasteurized egg whites from the fridge then you might notice this rim of cold butter forming. This is normal and can easily be fixed. Simply stop your mixer and remove about ⅓ cup of the buttercream. Melt this in the microwave for about 20 seconds or until it's just barely melted. You don't want it hot! Pour the mixture back into your whipping buttercream and the warmth from the melted buttercream will cause it all to come together and get creamy. This is honestly easier than taking out the egg whites ahead of time and trying to bring them to room temperature.

Nutrition

Serving: 1serving | Calories: 1050kcal | Carbohydrates: 125g | Protein: 8g | Fat: 60g | Saturated Fat: 38g | Polyunsaturated Fat: 2g | Monounsaturated Fat: 16g | Trans Fat: 2g | Cholesterol: 175mg | Sodium: 453mg | Potassium: 136mg | Fiber: 2g | Sugar: 97g | Vitamin A: 1853IU | Calcium: 52mg | Iron: 2mg

close up of ganache drizzling into a bowl

March 6, 2023 Blog

The Best Chocolate Ganache Recipe

Chocolate ganache is one of the easiest and most versatile recipes in baking. With just chocolate and cream, you can create smooth, shiny ganache for drip cakes, creamy frosting, decadent fillings, or rich chocolate truffles. In this guide, you'll learn how to make chocolate ganache step-by-step, the correct ganache ratios, and how to fix common ganache problems.

close up of ganache drizzling into a bowl

Quick Glance at the Recipe

  • Name: Chocolate Ganache
  • Why You'll Love It: Smooth, shiny ganache perfect for drips, frosting, fillings, and truffles.
  • Time: 10 minutes active time
  • Main Ingredients: Chocolate, heavy cream
  • Method: Heat, pour, emulsify
  • Texture: Creamy and glossy
  • Difficulty: Beginner
ChatGPT
Google AI
Perplexity
Grok
Add us as a trusted site on Google

Why This Chocolate Ganache Recipe Works

Most ganache recipes don't explain why things go wrong, and it can be really intimidating when you fail to mix just two ingredients together. This tutorial explains what chocolate ganache is, how to make it, the best ganache ratios, and how to fix common ganache problems.

  • Science: This recipe isn't just a list of ingredients; it's the explanation behind how ganache works.
  • Chocolate: The secret is, that not all chocolate is the same! Different brands of chocolate can change your ratio and sometimes lead to broken, oily, or hard ganache.
  • Ratios: This blog post covers how to make any kind of ganache using milk chocolate, dark chocolate, white chocolate, candy melts, chocolate chips, and even how to make water ganache with water.
[feast_advanced_jump_to]

Chocolate Ganache Ingredients

Ganache is really just made with two ingredients. Chocolate and cream. You can make ganache with dark chocolate, milk chocolate, or white chocolate. Just remember that the better the chocolate tastes, the better your ganache will taste. Chocolate bars that contain cocoa butter melt more smoothly than many chocolate chips.

  • Chocolate: I like to use milk chocolate for most of my ganache recipes, but you can use white or dark. See the recipe at the bottom of this post for the correct ganache ratios.
  • Heavy whipping cream: provides the liquid needed to melt the chocolate and form the ganache emulsion. You can replace cream with pretty much any type of liquid, including oat milk, water, coconut milk, etc.

INGREDIENTS TIP: You can infuse cream flavors by heating them with ingredients like rose petals, vanilla beans, or tea to give it flavor, which will then transfer to the finished ganache.

See the recipe card for the full list of ingredients with quantities.

What is Chocolate Ganache?

Chocolate ganache is a simple emulsion made from chocolate and hot cream or liquid. When the hot cream melts the chocolate and the two are whisked together, the fat and liquid combine to create a smooth, glossy mixture.

Ganache can be used in several ways, depending on the ratio of chocolate to cream. Thinner ganache creates glazes and drip cakes, while thicker ganache can be whipped into frosting, rolled into truffles, or used as a cake filling.

For a holiday twist, try the ganache glaze in my wine cake recipe, which swaps spiced red wine for some of the cream for a fruity, warming finish.

A 1:1 ratio of chocolate to cream is the exact ganache I pour over my boston cream cake for that glossy mirror finish that drips down the sides.

How to Make Chocolate Ganache Step-By-Step

The truth is, chocolate ganache is just an emulsion between the chocolate and a liquid. You can replace the liquid with pretty much anything. The key is making sure the liquid is hot or melt your chocolate first and then add in your hot liquid so that it mixes together properly. Look at the recipe card below for other ganache ratios for different types of ganache.

chopped dark chocolate in a glass bowl
  1. Place your chocolate into a heat-proof bowl. If it's in big pieces, it's better to chop them into smaller pieces for easier melting.
stirring hot heaving whipping cream with a whisk in a saucepan
  1. Heat the cream on the stovetop in a saucepan until steam just begins to rise from the surface. Whisk the cream occasionally to prevent burning. Don't walk away or your cream could boil over. 
whisk pushing down chocolate under cream
  1. Pour the hot cream over the chocolate and push the chocolate down so it's all under the surface of the cream. Let the mixture of chocolate and cream sit for 5 minutes so the hot cream can soften the chocolate.
close up of whisked chocolate ganache drizzling off of a whisk
  1. Whisk the cream and chocolate together until it's smooth. Start with small circles in the center until the chocolate and cream start creating an emulsion. Continue mixing until the ganache is smooth and glossy.

PRO TIP: You can add flavorings like extracts, salt, caramel, etc., once your chocolate ganache has been mixed to adjust the flavor.

close up of a bowl of ganache with plastic wrap on top
  1. Cover the ganache with plastic wrap so that it is touching the surface and set it aside to rest at room temperature for about 4 hours or overnight. No need to refrigerate. The ganache will harden as it cools.
close up of chocolate ganache frosting piped onto a cupcake
  1. Once your ganache has set up, remove the plastic wrap. Depending on the ratio you used, your ganache should be thick enough for frosting or piping.

Tips For Success

  • If you have lumps or unmelted chocolate, you can use an immersion blender to make your ganache super creamy and lump-free. 
  • Use the warm ganache (90ºF) for decorating a drip cake.
  • Cool your ganache faster by pouring it into a baking sheet pan. Spreading the ganache out gives it more surface area, allowing it to cool down faster.
  • Store leftover ganache at room temperature for up to 48 hours, in the fridge for up to 1 week, or seal it in an airtight container and freeze for 6 months.
  • If your ganache is too thick, you can re-melt it and add more cream so the final set is softer.
  • If your ganache is too thin, you can add more melted chocolate to the warm ganache so the final set is thicker.

6 Ways To Use Chocolate Ganache

close up of a yellow cake slice with ganache frosting on a white plate
yellow cake in chocolate frosting on a cake plate
chocolate drip on chocolate buttercream cake
close up of rose truffles on a white plate
close up of white chocolate bon bon filled with white chocolate ganache
strawberry dipped in ganache on top of a chocolate cupcake
chocolate bundt cake with fresh strawberries
ganache cake with dark, milk, and white chocolate on it
  1. Fill the layers of a freshly baked cake with the set ganache like I did with my easy yellow cake recipe.
  2. Frost the outside of a cake with set ganache at peanut butter consistency like I did with my buche de noel recipe.
  3. Place the ganache into a piping bag and create a drip cake.
  4. Dip cupcakes or strawberries in a bowl of soft ganache.
  5. Pipe dollops of ganache on top of a cake or cupcakes.
  6. Roll ganache into balls and decorate with various toppings for easy chocolate truffles.
  7. Use as a filling for a bonbon recipe.
  8. Pour it over my easy chocolate cake recipe for a show-stopping finish that takes less than 5 minutes to put together

For sculpted decorations, modeling chocolate is another great chocolate medium worth having in your toolkit.

Chocolate Ganache Ratios

Depending on which chocolate ganache recipe you are following, you might use more or less chocolate and cream. The "ratios" refer to the ratio of chocolate and cream that you use. The first number refers to the amount of chocolate, the second is the amount of cream. Different ratios will create a softer or firmer ganache.

chocolate ganache ratios infographic

PRO TIP: The brand of chocolate that you use matters, as each chocolate has a different amount of cocoa and cocoa butter inside. I'm using Guittard milk chocolate wafers for these ratios, but it may vary if you're using a different brand. If you have another favorite chocolate, start with these ratios and add more cream or chocolate as needed until you get your desired consistency.

How Temperature Affects Chocolate Ganache

Warm Ganache: The temperature of your chocolate ganache also matters. When your chocolate ganache is first made and still warm, it is very liquid. This is the ideal format for glazing chocolate bundt cakes, making chocolate drip cakes like my banana split cake, or using it as a topping for ice cream sundaes.

Cooled Ganache: Letting chocolate ganache sit at room temperature for a few hours allows the chocolate to cool down and become semi-solid once again. This sort of half-set stage is what I call the peanut butter consistency stage and is ideal for frosting, using it as a cake filling, or rolling into truffles. If your chocolate ganache is too cold, it can become too solid and difficult to spread. You can always microwave it for a few seconds to get it back to that peanut butter consistency. You can also make whipped chocolate ganache by mixing it with the whisk attachment to incorporate air.

Chocolate Ganache for Drip Cakes

The most common use for chocolate ganache is creating a drip cake. For a drip cake, you want a 1:1 ratio of chocolate to cream so the ganache stays fluid enough to run down the sides but thick enough to hold its shape. I tend to use a bit more chocolate for my chocolate drip ratios.

piping bag of ganache creating a drip on the sides and top of a cake

Here are exact ratios for making the perfect ganache drip with any kind of chocolate.

  • Dark or Semi-Sweet Chocolate (6 ounces) and Heavy Whipping Cream (4 ounces)
  • White or Milk Chocolate (6 ounces) and Heavy Whipping Cream (2 ounces)
  • Candy Melts (6 ounces) and Water (1 ounce).

Follow the same steps for making ganache above. For best results, let the ganache cool to about 90°F (32°C) before piping drips onto a chilled cake.

Tips for Perfect Chocolate Ganache

• Always chop chocolate finely so it melts evenly
• Let the hot cream sit on the chocolate before whisking
• Start whisking in small circles to create a stable emulsion
• Use a scale instead of measuring cups for accuracy
• Use an immersion blender for ultra-smooth ganache

Chocolate Ganache FAQs

How do I fix lumpy ganache?


Lumpy ganache usually means some of the chocolate didn't fully melt. The easiest fix is to gently reheat the mixture. Microwave the ganache in 15-30 second increments, stirring between each interval until it becomes smooth. You can also use an immersion blender to blend the ganache until it's completely creamy and lump-free.

How do I fix a broken ganache?


Broken ganache happens when the fat separates from the chocolate, leaving an oily texture. To fix it, whisk in 1 tablespoon of warm water or warm cream at a time while mixing continuously. The extra liquid helps bring the emulsion back together. Continue adding small amounts until the ganache becomes smooth again.

How do I fix grainy ganache?

Grainy ganache usually happens when the cream is too hot, or the mixture is whisked too aggressively before the chocolate has fully melted. Always let the hot cream sit on the chocolate for about 5 minutes before whisking. If your ganache becomes grainy, gently re-melt it over a double boiler and allow it to cool again to restore a smooth texture.

How do I fix runny ganache?

If your ganache is too thin, it likely needs more chocolate. Melt a small amount of chocolate separately and whisk it into the ganache until the consistency thickens. Start with about 2 ounces of chocolate and adjust as needed. If the ganache becomes too thick after adding chocolate, you can loosen it by whisking in a small amount of warm cream.

Is it safe to leave my ganache out overnight?

Ganache can be left at room temperature for 48 hours, refrigerated for 1 week, or frozen for 6 months. Warm the ganache up in the microwave in 15-second bursts or let it come to room temperature naturally. 

Can You Make Ganache With Chocolate Chips?

Yes, you can make ganache with chocolate chips, but they often contain stabilizers that help them keep their shape during baking. Because of this, chocolate chips may require slightly more cream to create a smooth ganache.

Final Thoughts

Chocolate ganache might seem intimidating at first, but once you understand the simple ratio of chocolate and cream, it becomes one of the most useful recipes in baking. Whether you're making a drip cake, frosting a layer cake, or rolling truffles, mastering ganache opens the door to countless desserts.

Related Recipes

  • chocolate fudge frosting on a cupcake
    Chocolate Fudge Frosting
  • chocolate glaze pouring from a container onto a chocolate bundt cake
    Chocolate Bundt Cake
  • Chocolate cupcake recipe with moist chocolate cake and smooth chocolate buttercream frosting, liner peeled back to show soft crumb
    Moist Chocolate Cupcake Recipe
  • Easy chocolate cake recipe slice on a white plate with cake in the background.
    Easy Chocolate Cake Recipe

Ganache Calculator

Use this ganache calculator to figure out how much ganache to make for a cake.

Pro Ganache Calculator

Pro Ganache Calculator

Perfect ratios for every cake

Baker's Tools

1 Cake Dimensions

2 Ingredients & Usage

Calculates ganache needed to cover the cake + selected layers of filling.

Your Recipe

Total Ganache Needed

0g

Dark Chocolate

High quality couverture

0g

Heavy Cream

Double cream (min 35% fat)

0g

Using a 2:1 ratio for dark chocolate. Calculations provide a generous coating thickness of ~0.25 inches.

If you made this recipe or any recipe on Sugar Geek Show, I'd love to hear how it turned out! Leave a rating and comment below - it helps other bakers, and it truly makes my day. ⭐⭐⭐⭐⭐

Recipe

close up of ganache drizzling into a bowl
Print Recipe
4.94 from 74 votes

The Best Chocolate Ganache Recipe

Traditional chocolate ganache is made by heating up cream and pouring it over chocolate, waiting for it to melt, adding flavoring, and stirring it together until smooth. Depending on the temperature, chocolate ganache can become a glaze, a drip, ganache frosting, or even truffles.
Prep Time10 minutes mins
Cook Time10 minutes mins
Total Time20 minutes mins
Course: Dessert
Cuisine: American
Servings: 24 ounces
Calories: 302kcal
Author: Liz Marek

Ingredients

Firm Setting Ganache 2:1

  • 16 ounces dark or semi-sweet chocolate
  • 8 ounces heavy whipping cream
  • ¼ teaspoons salt
  • 1 teaspoon vanilla extract or any other extract

Soft Ganache Frosting 1:1

  • 8 ounces 60% high quality chocolate Such as callebaut - about $8/lb
  • 8 ounces heavy whipping cream
  • ¼ teaspoon salt
  • ½ teaspoon vanilla extract

Soft White Chocolate Ganache 3:1

  • 18 ounces white chocolate
  • 6 ounces heavy whipping cream
  • ¼ teaspoon salt

Soft Milk Chocolate Ganache 2.5:1

  • 13 ounces milk chocolate
  • 5 ounces heavy whipping cream
  • ¼ teaspoon salt
US Customary - Metric

Instructions

  • IMPORTANT NOTES:
    Ganache ratios change depending on how you’re going to use them, and the type of chocolate you're using.
    I'm using Guittard chocolate for these ratios, if you’re using a different brand and it’s not as thick or thin as you want it, you may have to add more cream or chocolate. The darker the chocolate and the more cocoa %, the firmer it will set.
    Using a scale is recommended for accuracy and to ensure your ganache turns out.
  • Measure out the chocolate with a food scale and chop it into fine pieces so that it melts more easily. Place the chocolate in a medium heatproof bowl.

Making Chocolate Ganache

  • Heat the cream on the stovetop in a small saucepan until steam just begins to rise from the surface. Whisk occasionally to prevent burning and don't walk away or your cream could boil over. 
  • Pour the hot cream over the chopped chocolate and push the chocolate down so it's all under the surface of the cream. Let the mixture of chocolate and cream sit for 5 minutes. 
  • Whisk the cream and chocolate together until it's smooth. Start with small circles in the center until the chocolate and cream start creating an emulsion.
  • If you have lumps or un-melted chocolate you can use an immersion blender to make your ganache super creamy and lump-free. 
  • Use the warm ganache for piping and drizzling, or pour it into a baking sheet pan. I cool mine to 90ºF before doing the drip for a cake so it doesn't run too much down the size of the cake. For best results always drip on a cold cake.
  • Cover the ganache with plastic wrap touching the top and set it aside to rest at room temperature for about 4 hours or overnight. If you don't do this crusty film can form on the surface.
  • When the ganache reaches "peanut butter consistency" it is ready to use for frosting cakes, piping, or forming into truffles.
  • Store leftover ganache at room temperature for up to 48 hours, in the fridge for up to 1 week, or seal it in an airtight container and freeze for 6 months.

Video

Notes

Use good-quality chocolate. Chocolate bars that contain cocoa butter melt more smoothly than many chocolate chips, which often contain stabilizers that can make ganache thicker or grainy.
Always chop the chocolate finely. Smaller pieces melt more evenly when the hot cream is added, helping prevent lumps in your ganache.
Let the cream sit before whisking. After pouring the hot cream over the chocolate, let it sit for about 5 minutes before stirring. This gives the chocolate time to melt fully and helps create a smooth emulsion.
Different chocolates require different ratios. Dark, milk, and white chocolate all contain different amounts of cocoa butter and sugar. If your ganache is too thick or too thin, simply add more warm cream to loosen it or more melted chocolate to firm it up.
Use an immersion blender for ultra-smooth ganache. If your ganache looks slightly separated or has small lumps, blending it for a few seconds will bring it back together and create a glossy texture.
Ganache thickens as it cools. Warm ganache is perfect for drip cakes and glazing. As it cools to room temperature, it thickens to a spreadable frosting consistency.
Store properly. Ganache can be kept at room temperature for up to 48 hours, refrigerated for 1 week, or frozen for 6 months. Rewarm gently in the microwave in short bursts or allow it to come back to room temperature.

Nutrition

Serving: 2oz | Calories: 302kcal | Carbohydrates: 23g | Protein: 3g | Fat: 24g | Saturated Fat: 15g | Polyunsaturated Fat: 1g | Monounsaturated Fat: 7g | Cholesterol: 41mg | Sodium: 127mg | Potassium: 136mg | Fiber: 1g | Sugar: 21g | Vitamin A: 475IU | Vitamin C: 0.3mg | Calcium: 67mg | Iron: 1mg
Cake sculpted to look like a volcano

March 1, 2023 Course Preview

Volcano Cake Tutorial

Skill level: Intermediate

In this tutorial, you will learn how to create a realistic sculpted volcano cake, complete with special effects and a real smoke-like effect!

You will learn how to sculpt and create a realistic looking volcano mountain, how to create the glowing lava effect, how to work with isomalt and incorporate in LED lights, a realistic smoke-like effect and how to carve out the dinosaur cave.

40:43 Minutes of Instruction

What You Will Learn

  • How to create a realistic volcano cake
  • Learn how to work with isomalt and LED lights to create flowing lava
  • How to create a realistic smoke-like effect

Cake sculpted to look like a volcano

Tutorial Chapters

  1. Stacking The Cakes 0:24
  2. Carving The Cakes 4:43
  3. Crumb Coating And Sculpting 7:26
  4. Setting Up The Lights 14:19
  5. Covering The Cake In Chocolate 25:38
  6. Paneling The Cake 27:26
  7. Adding The Isomalt Lava 32:36
  8. Adding The Final Details 38:55

Downloads

Materials List

« Previous Page
Next Page »

Primary Sidebar

Hi, I'm Liz! I'm passionate about creating reliable, foolproof recipes that don't just tell you how to cook, but why things work - so you can skip the guesswork and confidently make the best sweet and savory dishes of your life.

More about me →

Our Cake Greatest Hits

Check out our best cake recipes

👨‍🍼 Celebrate Father's Day

  • Close up of three crispy baked chicken thighs on a plate.
    Crispy Baked Chicken Thighs
    Cook Time50 Minutes
  • close up of a sliced ribeye steak
    How To Cook A Ribeye
    Cook Time24 Hours 14 Minutes
  • close up of creamy mac and cheese on a serving spoon
    Creamy Baked Mac And Cheese
    Cook Time35 Minutes
  • close up of a keto smash burger
    Smash Burgers Recipe
    Cook Time25 Minutes
  • Hawaiian Mac Salad
    Cook Time2 Hours 20 Minutes
  • Smoked Beef Tenderloin
    Cook Time2 Hours 55 Minutes

Popular Recipes

  • close up of ganache drizzling into a bowl
    The Best Chocolate Ganache Recipe
    Cook Time20 Minutes
  • Piping easy buttercream rosettes onto a cake using a 1M star piping tip
    Easy Buttercream Frosting
    Cook Time25 Minutes
  • close up slice of marble cake
    Moist and Fluffy Marble Cake Recipe
    Cook Time40 Minutes
  • Slice of red velvet cake with cream cheese frosting on a white plate.
    Red Velvet Cake Recipe
    Cook Time1 Hours 40 Minutes

Footer

↑ back to top

About

  • Privacy Policy
  • Terms of Service

Newsletter

  • Sign Up! for emails and updates

Contact

  • Contact
  • About Us

Copyright © 2024 Sugar Geek Show, Inc. All Rights Reserved.

Rate This Recipe

Your vote:


A rating is required
A name is required
An email is required