If you've ever wondered how sourdough bakers get that beautiful open crumb without kneading the dough for 20 minutes, stretch and fold sourdough is the answer. It's a simple technique that builds gluten gradually during bulk fermentation, no aggressive kneading required. This guide walks you through the exact method I use for every loaf of sourdough bread on the site: 4 sets, 30 minutes apart, cardinal directions.
I have been baking bread professionally for years, and the stretch and fold method is genuinely my favorite technique to teach new sourdough bakers. It's gentler than kneading, doesn't require any special equipment, and it gives you a window into how your dough is developing in a way that traditional kneading doesn't. By the time you finish your fourth set, you can feel exactly how strong the dough is just by handling it. If you're new to sourdough, this technique pairs naturally with my sourdough starter for beginners guide and shows up in nearly every recipe in my sourdough cluster.
Quick Glance At The Guide: Stretch And Fold Sourdough
- Guide Name: Stretch And Fold Sourdough
- Why You'll Love It: A specific set of folds that are timed, requiring no effort, resulting in perfectly developed gluten.
- Time and Difficulty: 2 minutes per set, 4 sets, spaced 30 minutes apart. Total active time is about 8 minutes spread over 2 hours.
- What You'll Learn: What a stretch and fold actually does to the dough, when to use it (and when not to), the exact step-by-step technique, how to tell when the dough is developed enough, and how a stretch and fold compares to kneading and to coil folds.
- Method: During bulk fermentation, lift one side of the dough, stretch it up, and fold it back over itself. Rotate the bowl 90 degrees. Repeat 4 times (N, S, E, W). Rest 30 minutes. Repeat for a total of 4 sets.
- Best Audience: Anyone making sourdough bread, sandwich bread, focaccia, or any high-hydration yeasted dough where traditional kneading is messy or impractical.
- Quick Tip: Wet your hands lightly before each stretch and fold. The wet hand glides off the dough instead of sticking to it.
Jump to:
- Quick Glance At The Guide: Stretch And Fold Sourdough
- What Makes This Stretch And Fold Guide Different
- What A Stretch And Fold Actually Does
- How To Do A Stretch And Fold Step-By-Step
- How To Tell When You're Done (The Tight And Bouncy Dough Signal)
- Stretch And Fold Vs Kneading
- Stretch And Fold Vs Coil Fold
- Common Stretch And Fold Mistakes To Avoid
- Final Thoughts
- Stretch & Fold FAQs
- Some Yummy Sourdough Recipes To Try!
- Leave Me A Review⭐️⭐️⭐️⭐️⭐️
What Makes This Stretch And Fold Guide Different
This guide is built to give you one clear method instead of a buffet of options. Here's what's inside.
- My exact method with my exact timing. 4 sets, 30 minutes apart, cardinal directions. This is what I use on every loaf of sourdough I bake.
- The "tight dough" finish signal. Most stretch and fold guides tell you to do 4 sets and stop. I show you how to tell from the DOUGH itself when you've done enough, in case your dough needs 3 or 5 sets instead.
- The window pane test is confirmation. The same gluten development test from my bagels post applied to sourdough. Confirms you're actually done, not just guessing.
- Stretch and fold vs coil fold. When to swap one for the other based on dough hydration. Most guides only cover one or the other.
- What mistakes to avoid. Working the dough too aggressively, doing too many sets, doing too few, and mistiming the rest. We cover what each looks like.
What A Stretch And Fold Actually Does
A stretch and fold is a gentle dough-strengthening technique you perform during bulk fermentation. Each set takes about 2 minutes of active work. You're not aggressively working the dough the way kneading does. Instead, you're extending and strengthening the gluten network with a few stretches in cardinal directions, then letting the dough rest so the gluten can relax before the next round. Imagine a ball of yarn in a pile. Each stretch pulls the yarn and wraps it around the ball, making the network tighter and tighter. A tighter ball is able to trap more air and therefore make the bread rise.
Three things happen during each set:
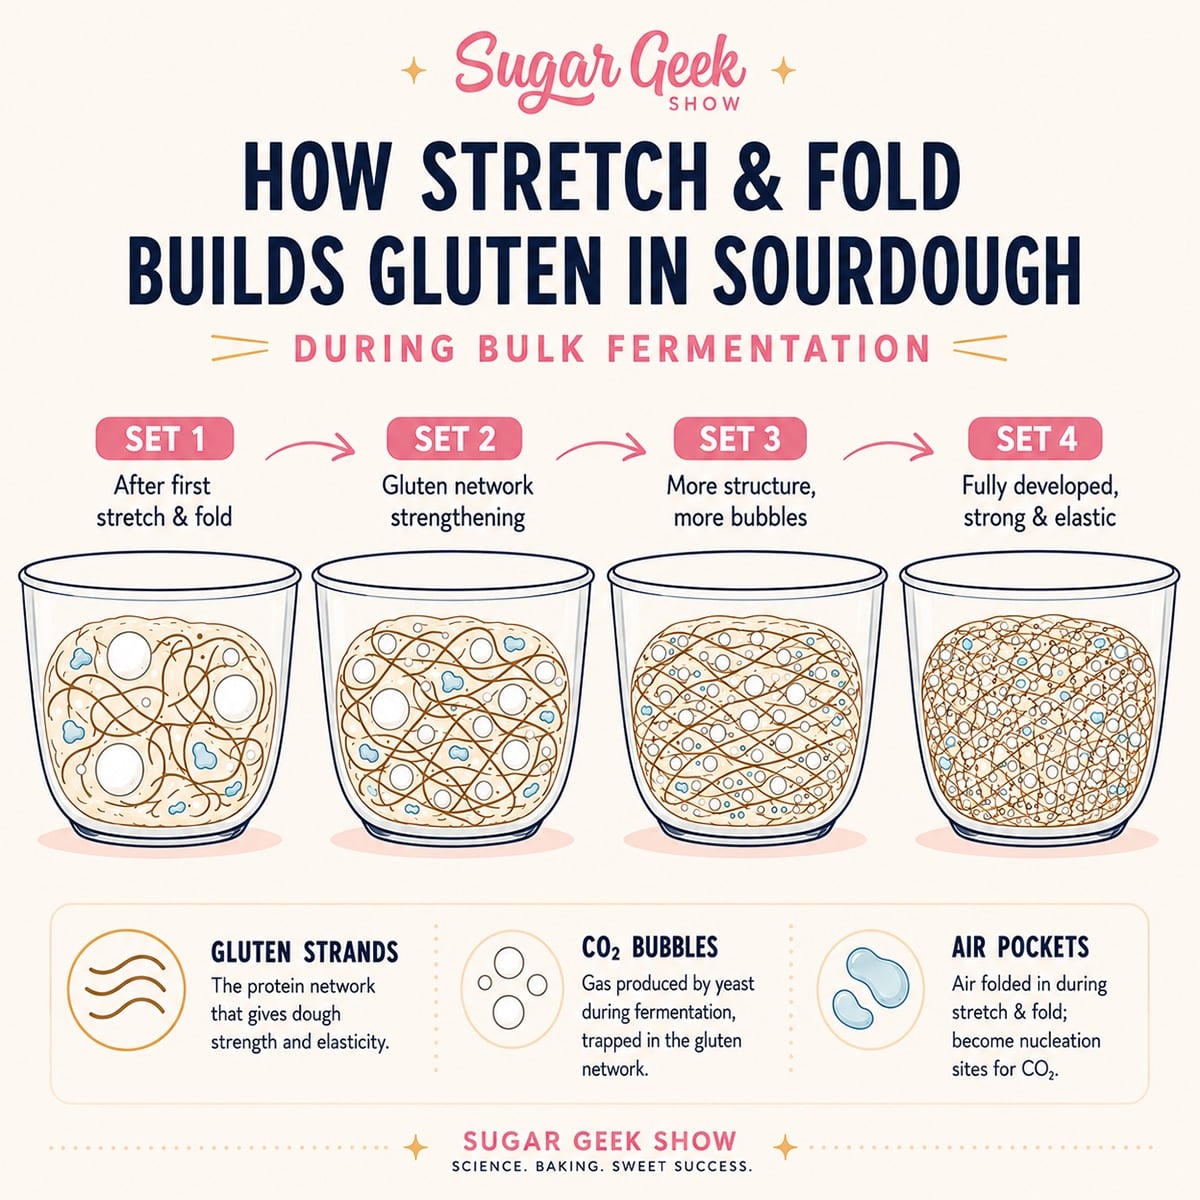
- The gluten network develops. Each stretch extends the gluten strands in one direction. As you rotate the bowl and repeat, you're working the network in all four directions. The strands extend, reorganize, and the overall gluten network gets stronger with each set.
- The dough strengthens visibly. As the gluten develops, the overall structure of the dough gets tighter. By the fourth set, the dough feels noticeably firmer and bouncier than at the first.
- Temperature equalizes, air gets folded in, and yeast gases get distributed gently. There are big and small bubbles developing as the yeast works. Folding distributes these pockets of gas more evenly and incorporates air into the dough. The air pockets become sites where more CO2 bubbles can form during fermentation, which is part of what gives sourdough its open crumb structure.
Four total sets are usually plenty for a standard sourdough bread dough.
How To Do A Stretch And Fold Step-By-Step
For each set, you'll do 4 stretches, one in each cardinal direction (North, South, East, West). The whole set takes about 2 minutes.
Before you start: lightly wet one hand. The wet hand glides off the dough instead of sticking. Have a small bowl of water nearby to re-wet between sets.
- Leave the dough in the bowl you bulk-fermented in. Don't transfer it to the counter. Stretch and folds happen in the bowl.
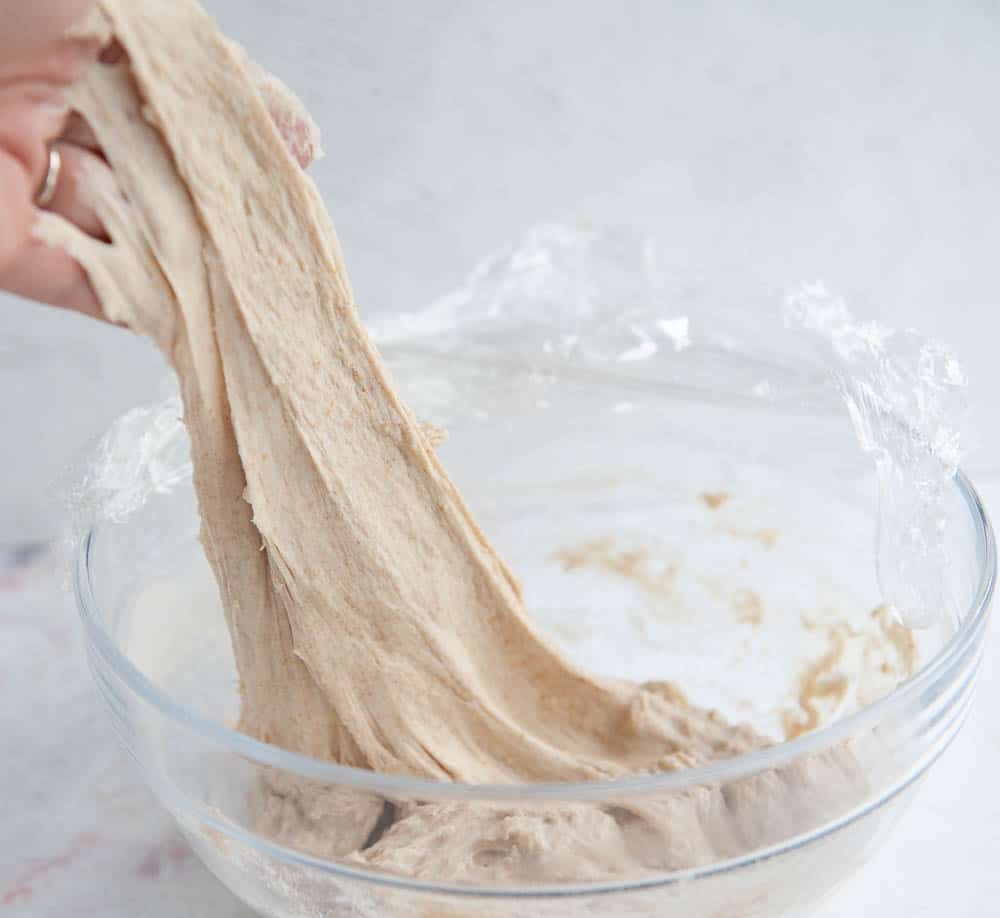
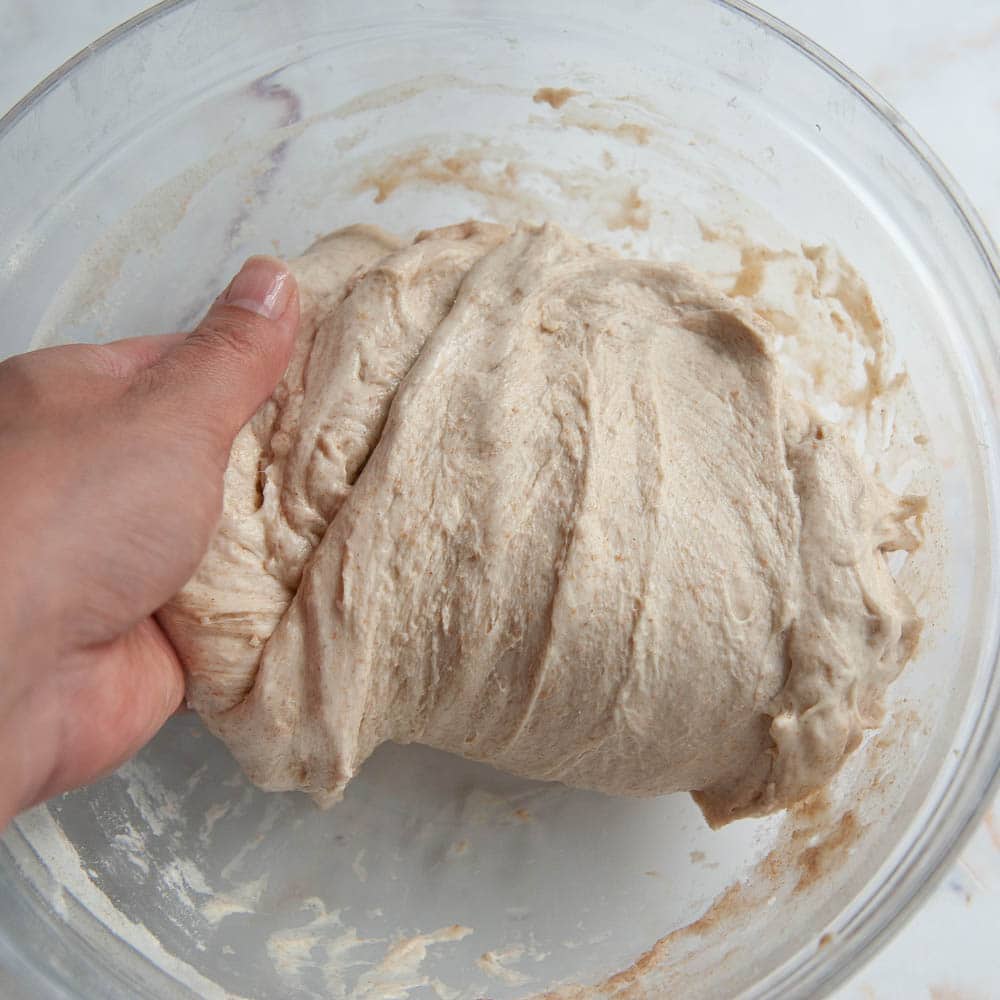
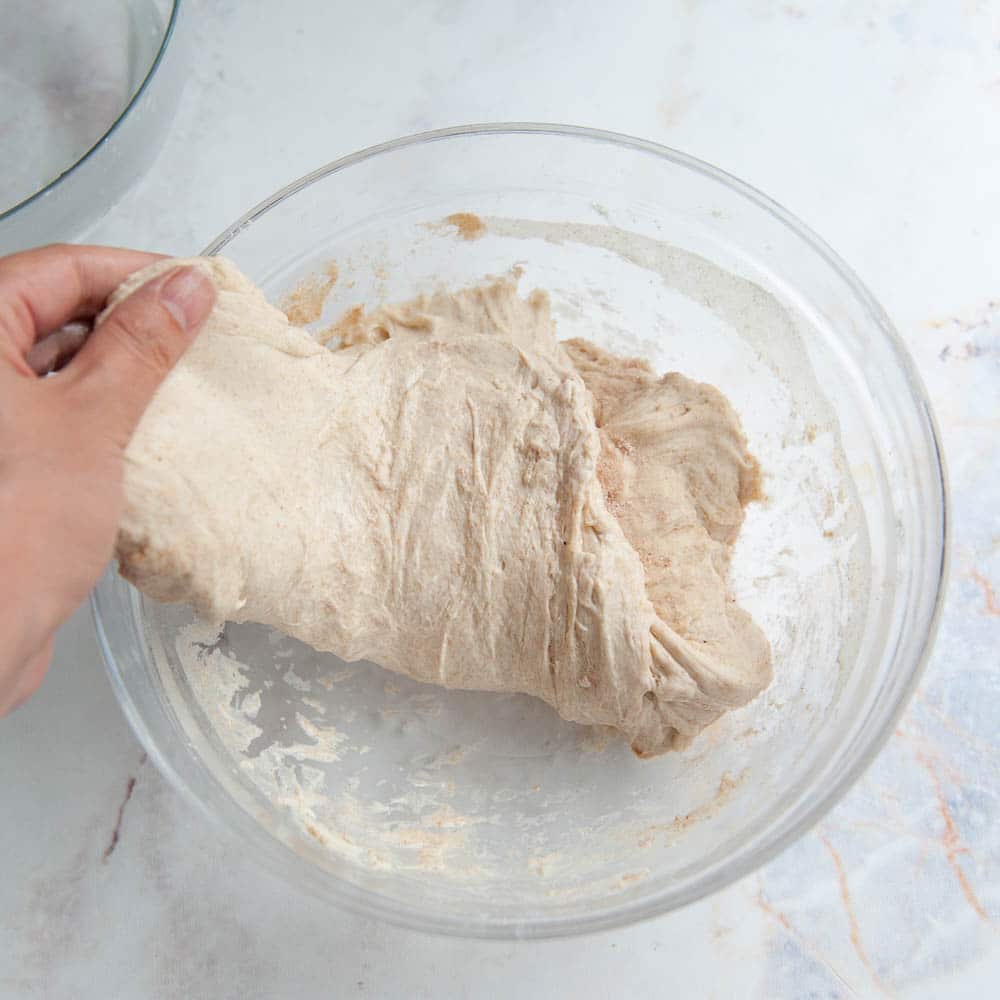
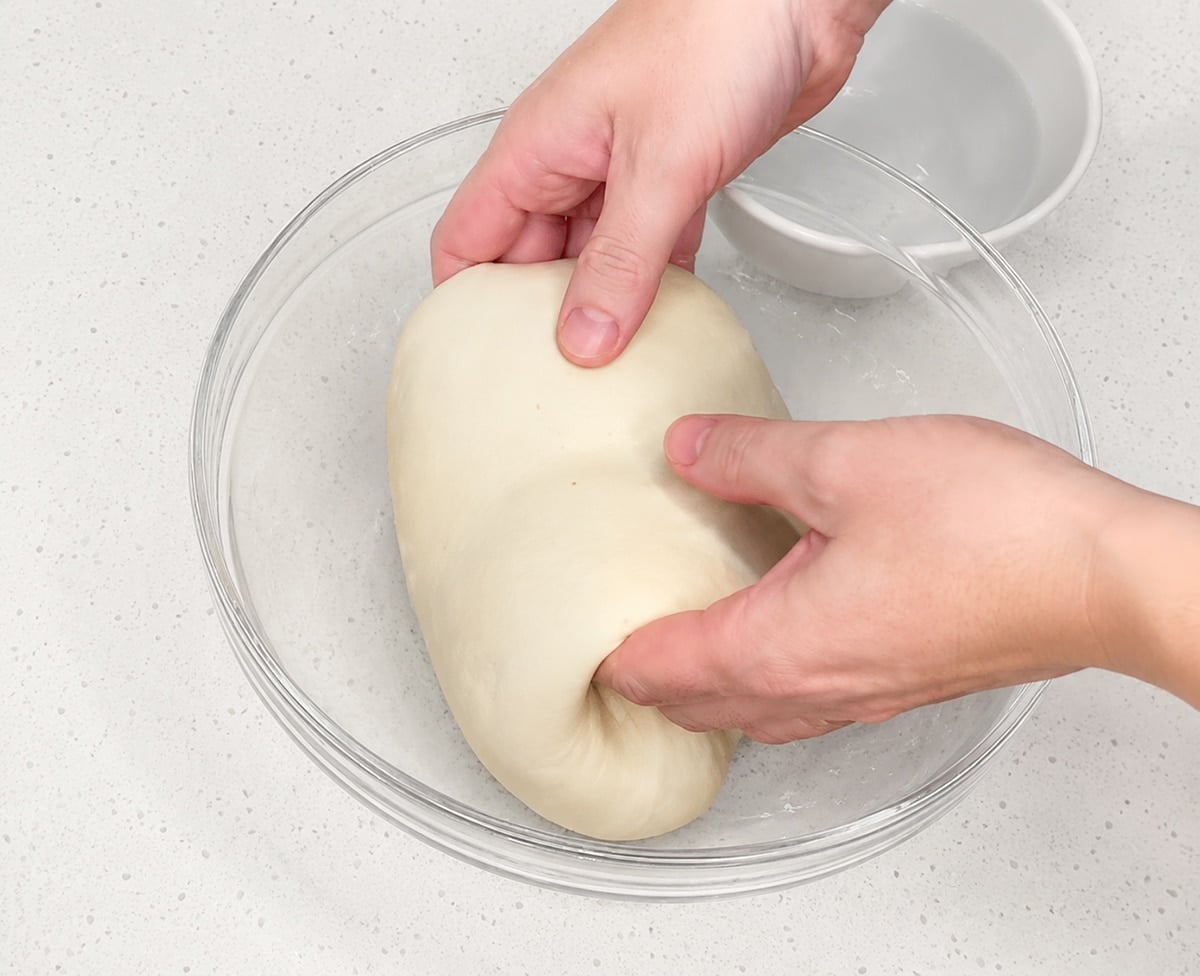
- Reach a wet hand under the dough on one side (let's call it North). Slide your hand down between the dough and the bowl, then lift the dough straight up. Stretch it as high as it will comfortably go without tearing.
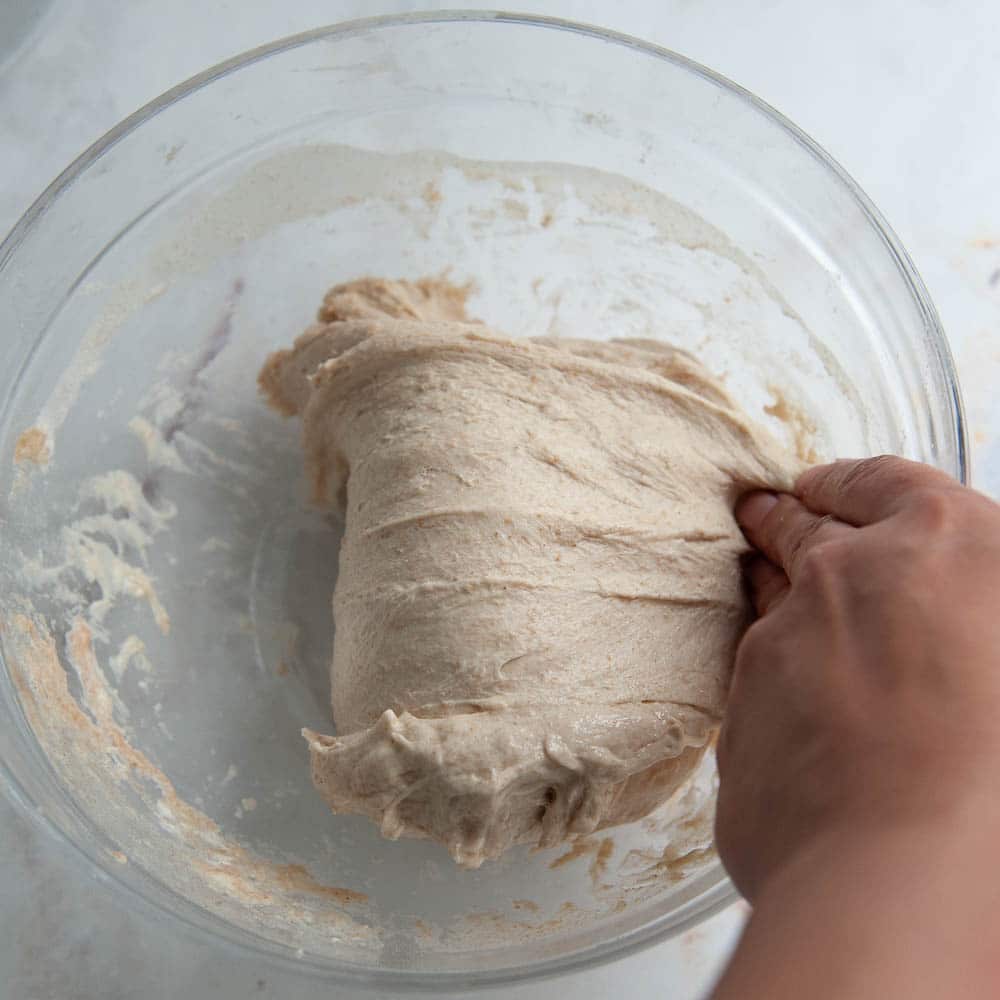
- Fold the stretched piece over the top of the dough, toward the opposite side (South). The piece you stretched lands on top of the dough mass, like folding a letter.

- Rotate the bowl 90 degrees (so the next side is now closest to you).
Repeat the stretch and fold from that side. That's stretch #2 (East).
- Rotate 90 degrees again, stretch and fold from the third side (South).

- Rotate one more time, stretch and fold from the fourth side (West).

- You've completed ONE set of 4 stretches. Cover the bowl. Set a timer for 30 minutes.
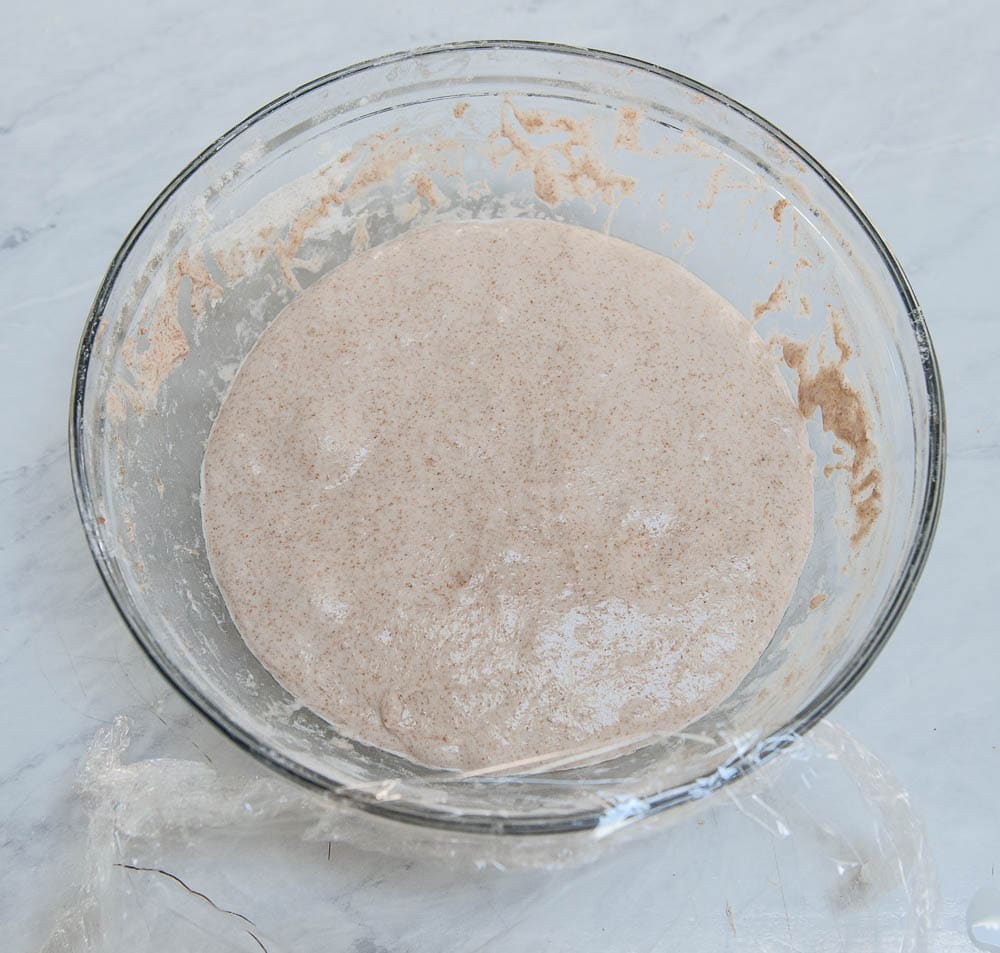
- After 30 minutes, your dough should look visibly relaxed again and ready to do another set of stretch and folds.
Continue until you've done 4 sets total, spaced 30 minutes apart.
The total active time is about 8 minutes (2 minutes per set × 4 sets). The total elapsed time is about 2 hours, but you're free during the 30-minute rests.
How To Tell When You're Done (The Tight And Bouncy Dough Signal)
If, after 30 minutes of rest, your dough feels like it doesn't have much stretch, has a kind of "bouncy" feel to it when you lightly tap it, and is holding its shape pretty well despite the rest, it doesn't need any more stretch and folds.
If, after 30 minutes, your dough is still able to be stretched easily and is very loose in the bowl, do another stretch and fold.
Go by how the dough feels, not exact steps.
Stretch And Fold Vs Kneading
The reason we perform stretch and folds instead of just kneading comes down to hydration, the water content in the dough. Sourdough usually has a water content of 75% or higher. That high hydration is part of what gives sourdough its open crumb and chewy interior.
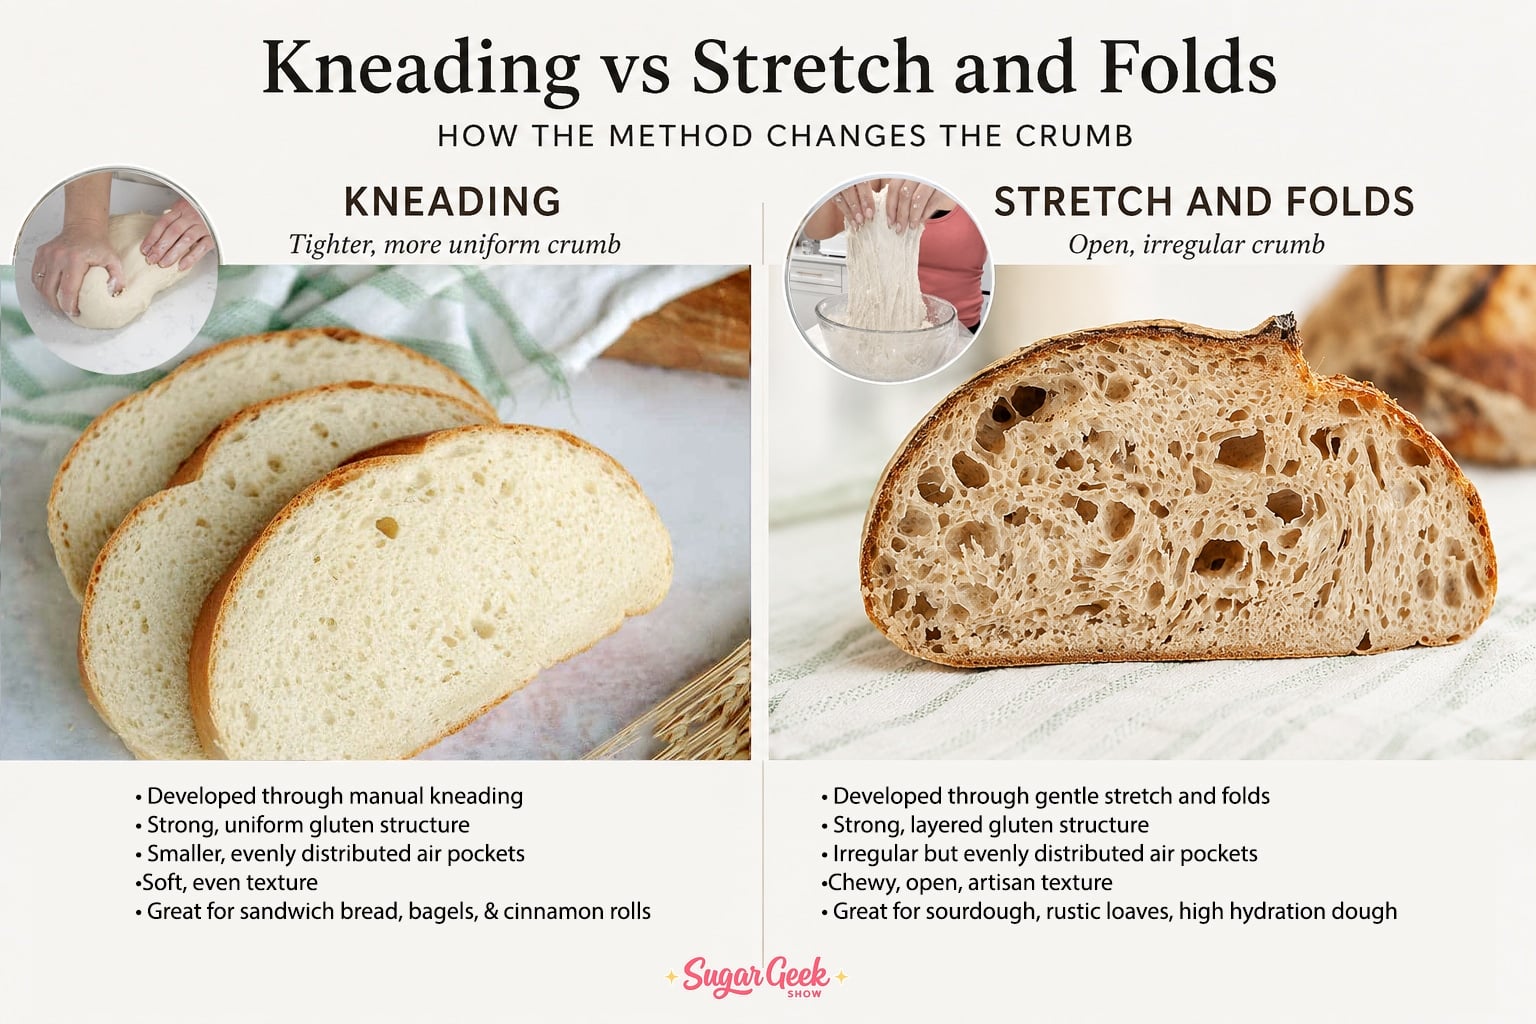
Kneading knocks the air pockets and CO2 gases created by the yeast out of the dough, which gives you more of a sandwich loaf texture. Stretching and folding layers the air and CO2 carefully so you end up with the even, open crumb that's characteristic of sourdough.
The resting in between stretch and folds is just as important as the stretching itself. Time is also a way in which gluten develops. When the dough rests, it kneads itself in a way. This is why you can make easy sourdough focaccia by mixing the dough, letting it rest overnight, and essentially just baking it up the next day. The gluten has developed all on its own overnight. The stretching and folding is really just the act of layering and arranging the bubbles of air and CO2 evenly throughout the dough without destroying them.
The only reason to knead instead of doing stretch and folds is if the hydration is too low to handle the wet-dough technique, or if you need the dough done faster. Kneading is much quicker than 2 hours of stretch and folds. But the end result of the crumb will be different.
Stretch And Fold Vs Coil Fold
A coil fold is a gentler alternative that works better for very high hydration doughs (75% and above). Here's how to choose.
Stretch and fold works for most standard sourdough hydrations (60% to 75%). The cardinal direction stretches are firm enough to develop gluten without being so aggressive that you tear a wet dough.
Coil fold is gentler than stretch and fold and works better when the dough is too wet to lift cleanly. Instead of stretching up and folding over, you lift the dough from underneath and let it fold under its own weight, then rotate and repeat. Used most commonly for 75% to 85% hydration sourdoughs.
For the typical sourdough recipe (around 70% hydration), stretch and fold is the right call. If you're making a very wet dough and finding that the stretch and fold tears the dough, switch to coil folds for the last 2 sets. Same timing, same number of sets.
Common Stretch And Fold Mistakes To Avoid
- Working the dough too aggressively. Stretch and fold is gentle. If you're tearing the dough on every stretch, you're either working too aggressively or the dough isn't relaxed enough. Wait the full 30 minutes between sets.
- Doing too many sets. More than 5 sets risks over-developing the gluten, which gives you a tight dense crumb. If your bread is consistently dense, try cutting back to 3 sets.
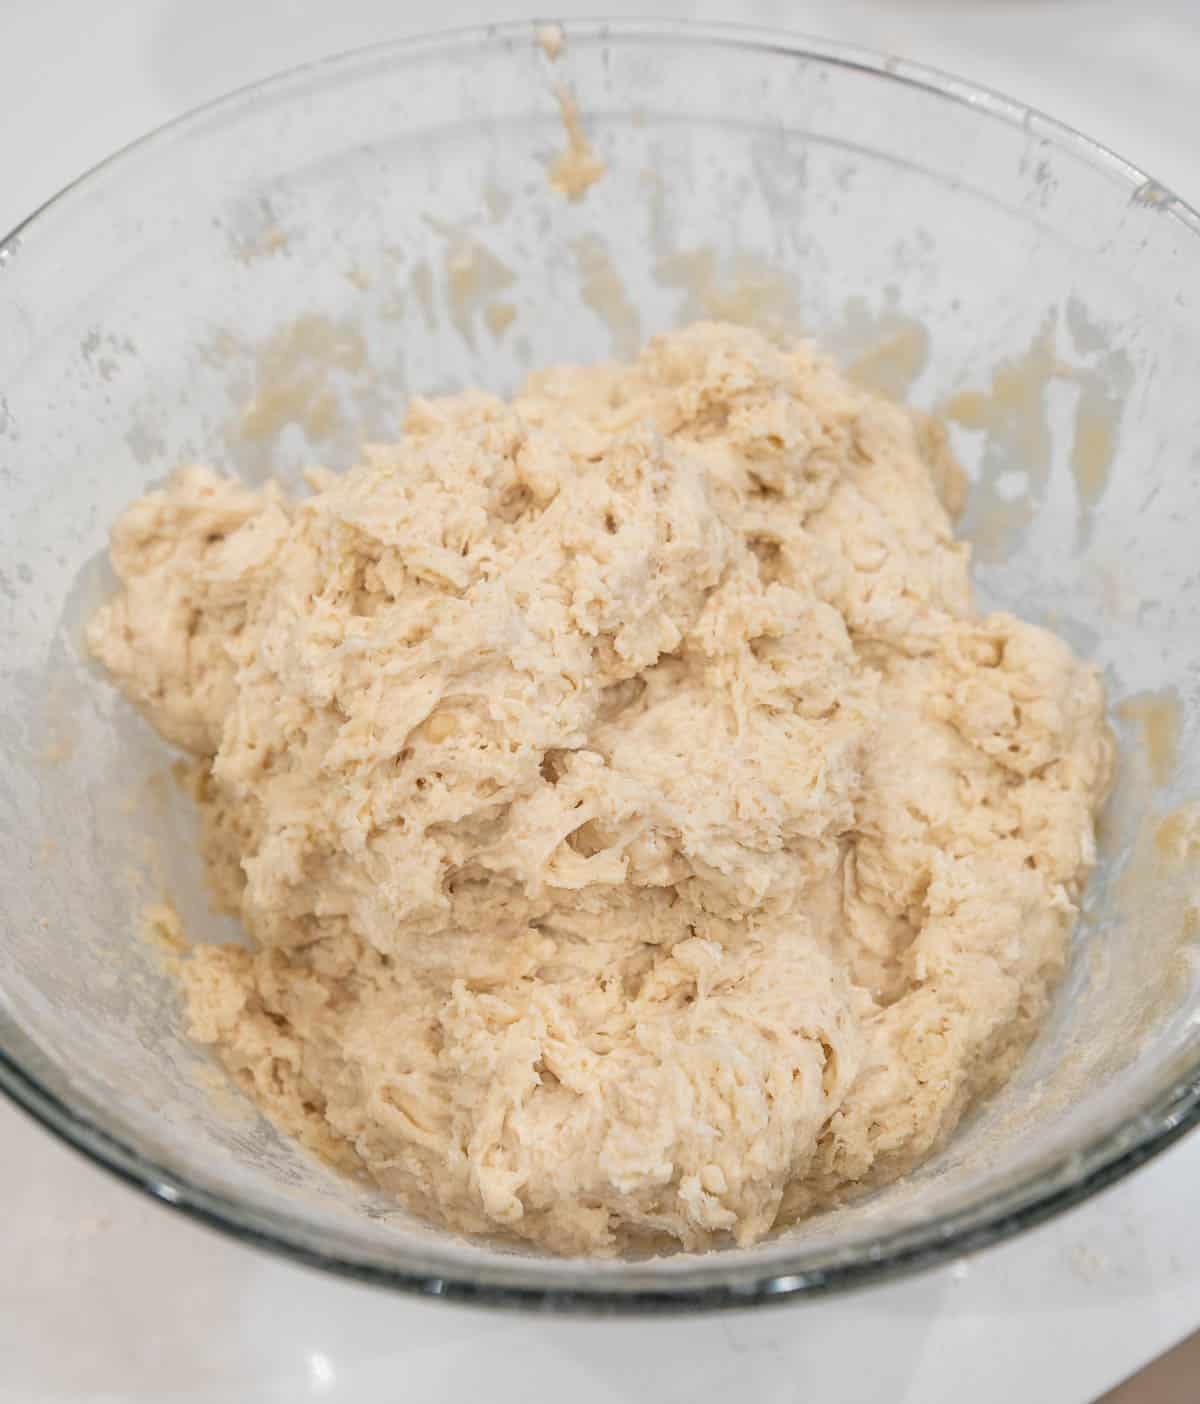
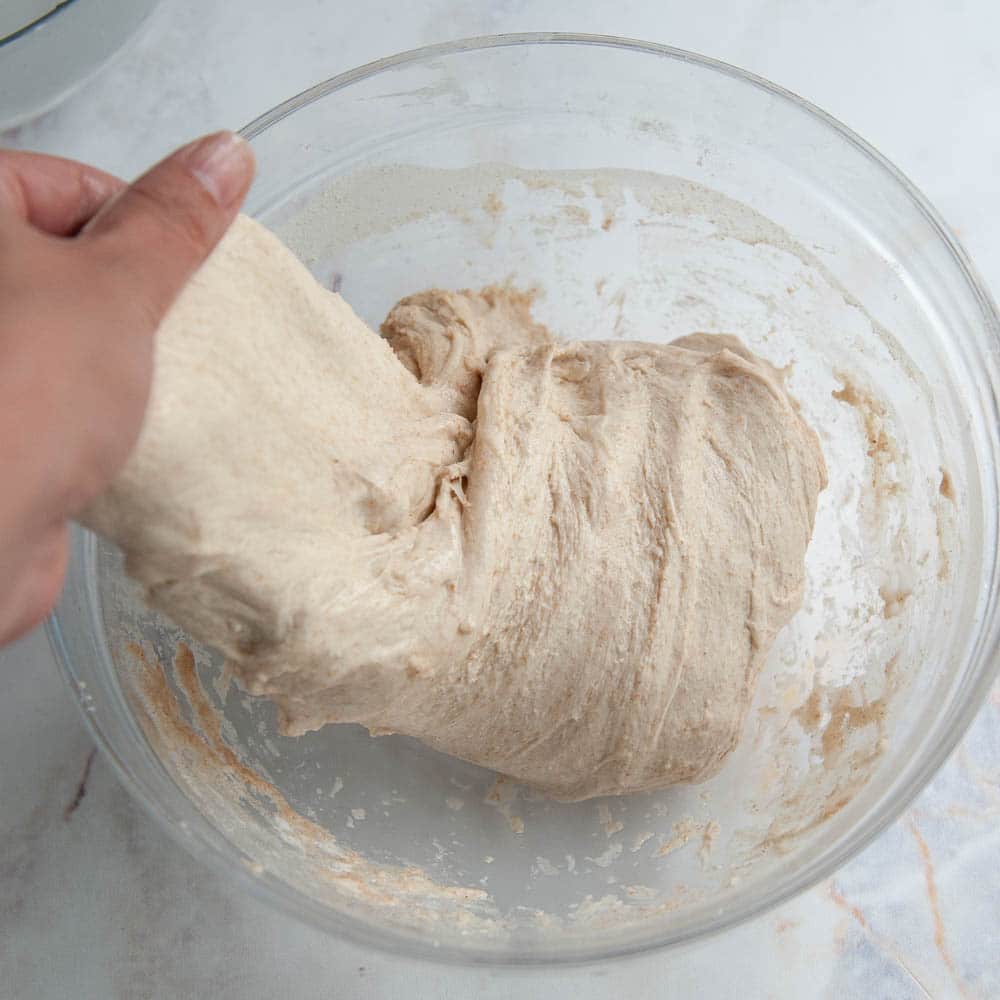
- Doing too few sets. Fewer than 3 sets often leaves the dough underdeveloped. The final loaf comes out flat, and the crumb is gummy. If you find your dough is a wet, sloppy mess in the bowl, you probably have not performed enough stretch and folds yet.
- Skipping the rest between sets. The 30-minute rest is when the gluten relaxes so the next stretch doesn't tear the network. Without the rest, each set fights the previous one.
- Stretching with dry hands. Dry hands stick to the dough and tear it. Lightly wet one hand before each set.
- Transferring the dough out of the bowl. Stretch and folds happen in the bowl. Moving the dough to the counter for stretching adds friction and loses dough.
- Doing folds outside of bulk fermentation. Stretch and fold belongs in the bulk ferment phase, NOT during shaping or after the final proof. Shaping has its own techniques (and they're not the same as folding).
- Forgetting to cover the bowl between sets. Uncovered dough develops a dry skin on top. Cover with plastic wrap or a damp tea towel.
Final Thoughts
The stretch and fold is the single most useful technique you'll learn in sourdough. Once it clicks, every bread recipe in my cluster becomes easier: sourdough bread, sourdough sandwich bread, sourdough rolls, sourdough focaccia, all of them.
If your starter is still struggling to rise and you're not ready to bake bread yet, my sourdough starter not rising guide walks you through the 5 most common causes. And if you've got plenty of starter discard piling up while you wait for your starter to be bake-ready, my sourdough discard recipes library has uses for every spoonful.
Stretch & Fold FAQs
You can, but expect a flatter loaf with a denser crumb. The 4-set, 30-minute-interval rhythm is what gives the gluten enough development for the open hole-y crumb that sourdough is known for. Cutting to 2 sets might still work for a quick weekday loaf but the crumb won't be as good. Cutting to 3 sets is the minimum I'd recommend for a real sourdough loaf.
Yes. Do your 4 sets at 30-minute intervals during the early bulk ferment, then transfer the dough to the fridge for an overnight cold ferment. In the morning, shape, proof at room temperature, and bake. The cold ferment deepens the flavor and gives you a more predictable bake schedule.
Two likely causes. Either you're working too aggressively (be gentler, stretch only as high as the dough wants to go) or the dough hasn't had enough rest between sets (wait the full 30 minutes). A torn dough mid-set isn't ruined, just keep going gently. The gluten will repair itself before the next set.
No. Discard recipes (pancakes, crackers, blueberry muffins, cinnamon rolls, cookies, etc.) don't use active starter for leavening, so they don't go through bulk fermentation. The stretch and fold technique only applies to recipes where you're trying to develop gluten in a long-fermented active-starter dough.
Default to stretch and fold for most sourdough recipes (60% to 75% hydration). Switch to coil fold if your dough is wetter than that (75% and above) and you find the stretches are tearing the dough. Same timing for both: 4 sets, 30 minutes apart.
Some Yummy Sourdough Recipes To Try!


Leave Me A Review
⭐️⭐️⭐️⭐️⭐️
If you tried this How To Stretch & Fold Guide or any other tutorial on my blog, please leave a 🌟 star rating and let me know how it goes in the comments. I love hearing from you!
Ingredients
- 1 batch high hydration sourdough dough
- 1 small bowl of water
- 1 piece plastic wrap
Instructions
- Before you begin: Have your dough already mixed and resting in its bulk fermentation bowl. Set a 30-minute timer from the time you finished mixing the dough.
- Lightly wet one hand in the bowl of water nearby. The wet hand glides off the dough instead of sticking.
- Reach the wet hand under the dough on one side (North). Slide your hand between the dough and the bowl, then lift the dough straight up. Stretch it as high as it will comfortably go without tearing.
- Fold the stretched piece over the top of the dough toward the opposite side (South). The piece lands on top, like folding a letter.
- Rotate the bowl 90 degrees.
- Repeat the stretch and fold from the second side (East). Stretch up, fold over.
- Rotate the bowl 90 degrees again. Repeat from the third side (South).
- Rotate one more time. Repeat from the fourth side (West).
- You've completed ONE set of 4 stretches. Cover the bowl with plastic wrap or a damp tea towel. Set the timer for 30 minutes.
- After 30 minutes, repeat the 4-stretch set above for Set 2. Continue until you've completed 4 total sets, spaced 30 minutes apart.
- After Set 4, lightly tap the dough. If it has a bouncy feel, doesn't stretch easily, and is holding its shape, you're done with folds.If the dough is still loose and stretchy and not holding its shape, do one more set and check again 30 minutes later.
- Once the dough passes the doneness test, continue bulk fermentation without any more folds.Let the dough rise 50% to 75% in volume. It should feel light, jiggly, and full of trapped gas. This typically takes another 1 to 4 hours depending on kitchen temperature. Then shape and proof per your recipe.
Notes
- Lightly tap the dough after 30 minutes of rest. Bouncy feel, doesn't stretch easily, holds its shape = done with folds.
- Still loose and stretchy = do another set, check again in 30 minutes.
- Warm kitchens (75º F and above): you might only need 3 sets.
- Cool kitchens (below 70º F): you may need 5 sets.
- Trust the dough signal over the count.
- Don't tear the dough. Tearing means you're working too aggressively OR the dough didn't get enough rest.
- Wet hand for every set. Dry hands stick to the dough and tear it.
- Stay in the bowl. Don't transfer the dough to the counter for the folds.
- Cover between sets to prevent a dry skin from forming on the surface.
- If the stretches start tearing the dough, switch to coil folds for the last 2 sets. Same timing, same number of sets, gentler handling.
- Don't skip the 30-minute rest between sets. The rest is when the gluten relaxes.
- Don't transfer the dough out of the bowl for stretches.
- Don't continue folding past the doneness signal - over-folded dough gives you a tight crumb instead of the open one sourdough is known for.