
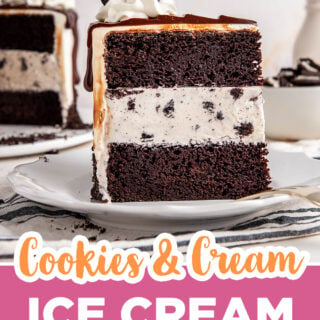
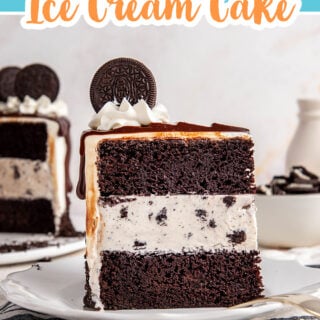
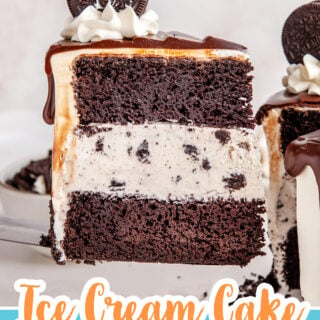
You can easily make your own ice cream cake at home with your favorite ice cream, homemade chocolate cake, and stabilized whipped cream. This recipe is just like the Dairy Queen Oreo Blizzard cakes you loved when you were a kid!
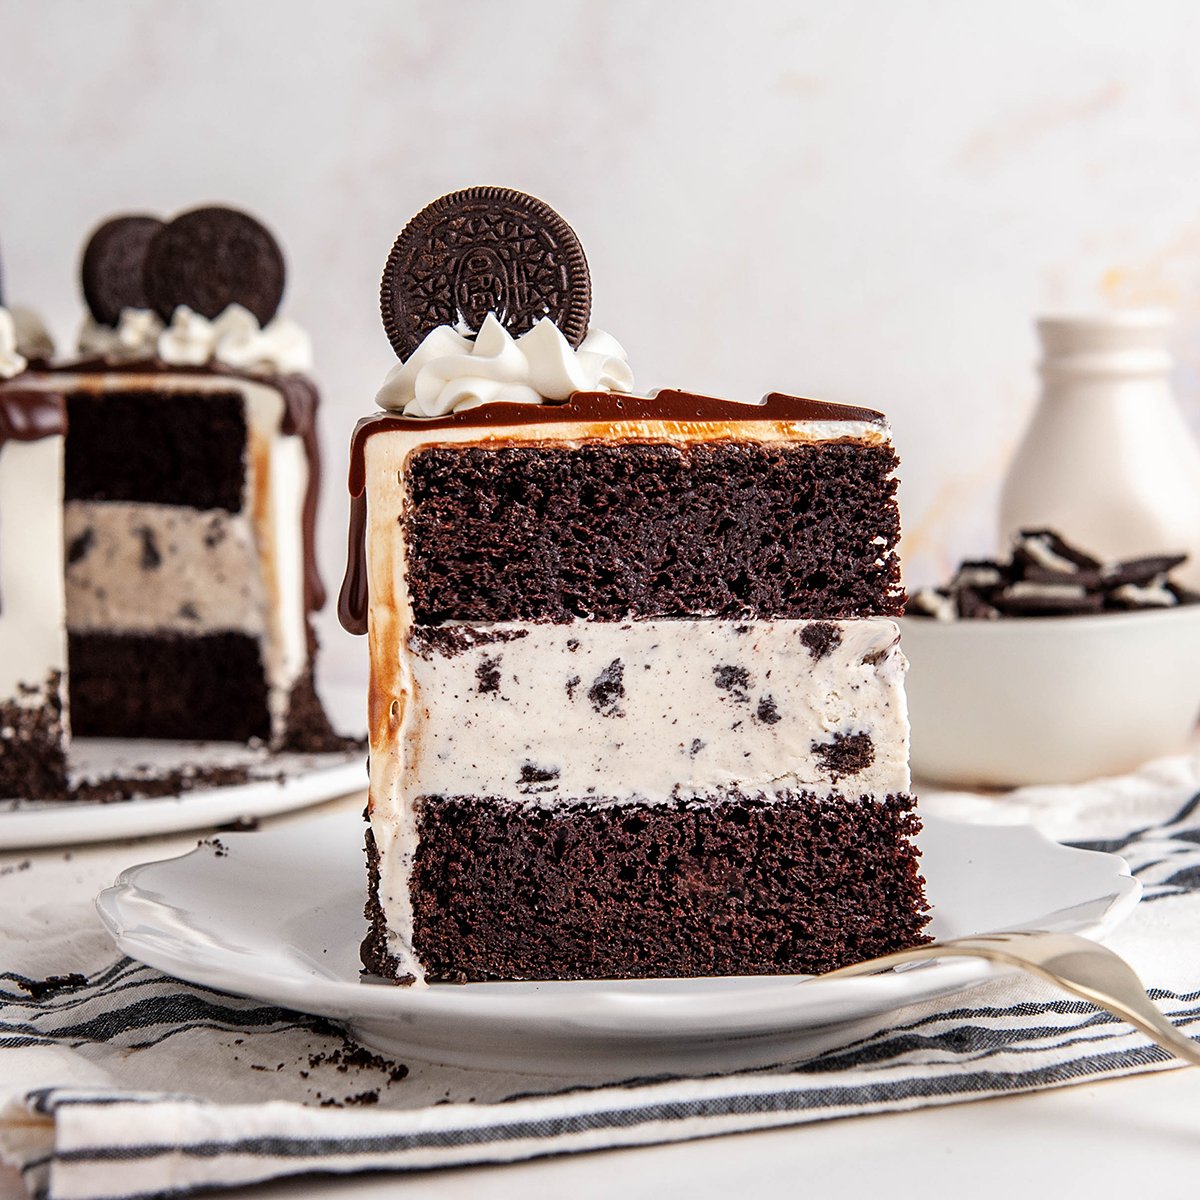
Table of contents
What Makes This Tutorial Great
ANYONE can do this, I promise. No fancy mixing method for the cake, store-bought ice cream, and easy homemade whipped cream icing, but you could easily use something like cool-whip if you wanted to.
Making an ice cream cake at home is pretty easy but keep in mind that freezing takes time. It's easiest if you make your cake and ice cream layer ahead of time (the day before) and keep them frozen until you need them. It only takes about 20 minutes to actually assemble the cake once everything is frozen.
Ice cream cake ingredients
I decided to go with cookies and cream ice cream from Tillamook which is a local brand here in Oregon. I love Tillamook ice cream because it's made with just pure and natural ingredients and tastes absolutely incredible! This post isn't sponsored, I just love their products and if you're ever in Oregon, you should definitely check out the Tillamook Creamery and take a tour! 
For Avalon's birthday back in 2019, we spent the weekend on the Oregon coast and then took a tour on our way back home with all the cousins. They had so much fun eating learning about how cheese is made and of course, eating tons of ice cream.
Baking the cake layers
- Make your cake batter (recipe below). I'm using easy chocolate cake but you can use any cake flavor you want, even boxed mix.

- Two 8"x2" cake pans are the perfect size for this cake. I prepare my cake pans with cake goop (homemade pan release) to prevent sticking. Pro-tip - You can make an ice cream cake with any size of cake pan, but keep in mind that they don't like to be tall and skinny, so I wouldn't recommend going any smaller than an 8".

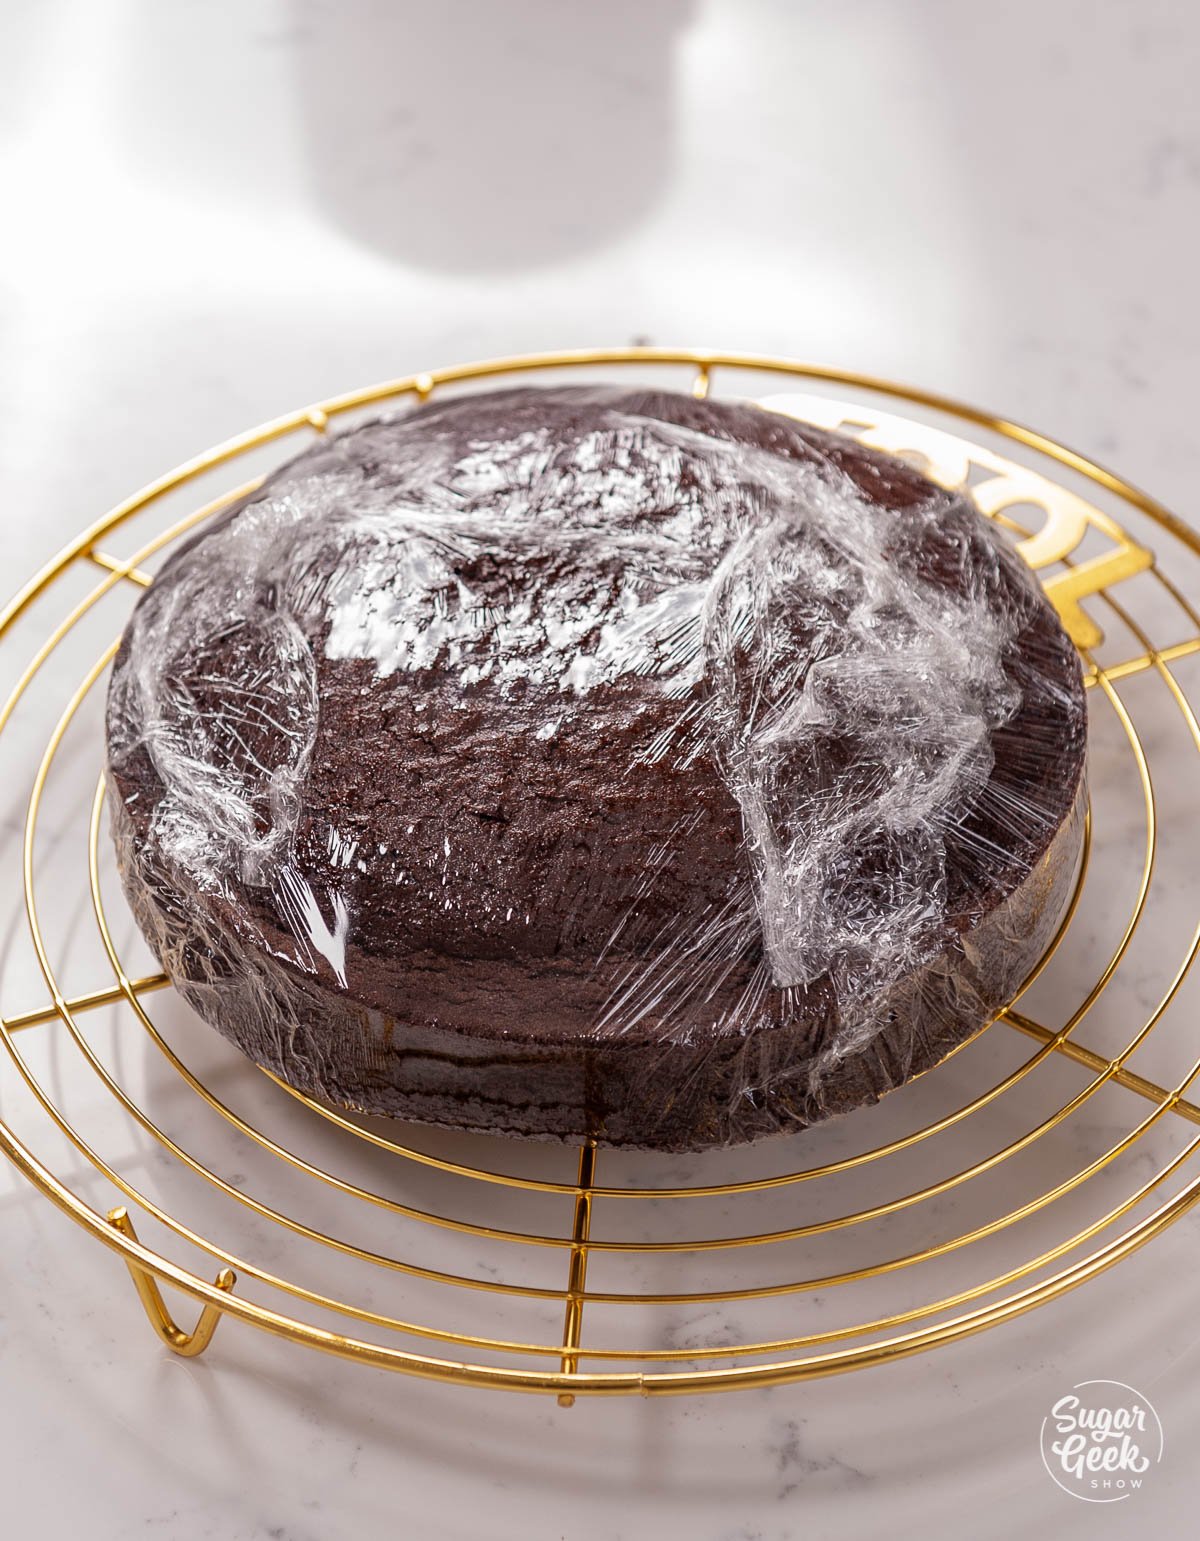
- After the cakes have cooled for about 15 minutes, flip them out onto a cooling rack and let them cool fully. Slice the dome off the top to level the cake and then wrap the cakes in plastic wrap and freeze them overnight or a minimum of 6 hours.

How to prepare the ice cream layer
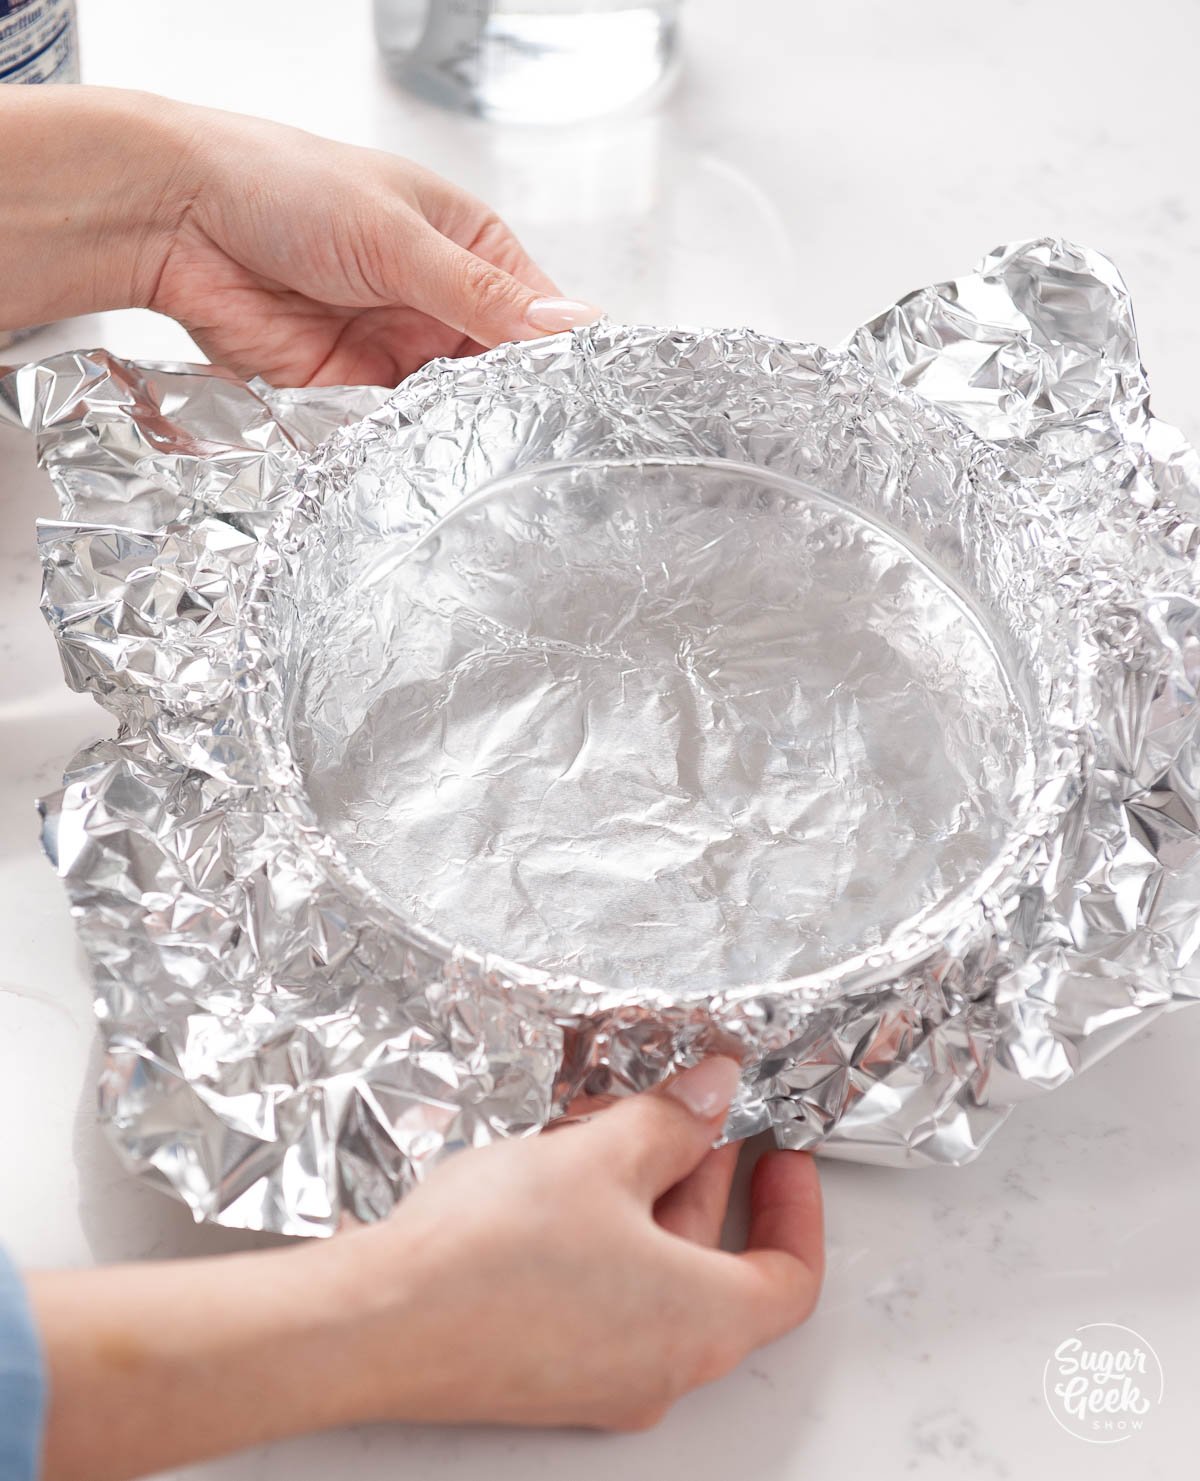
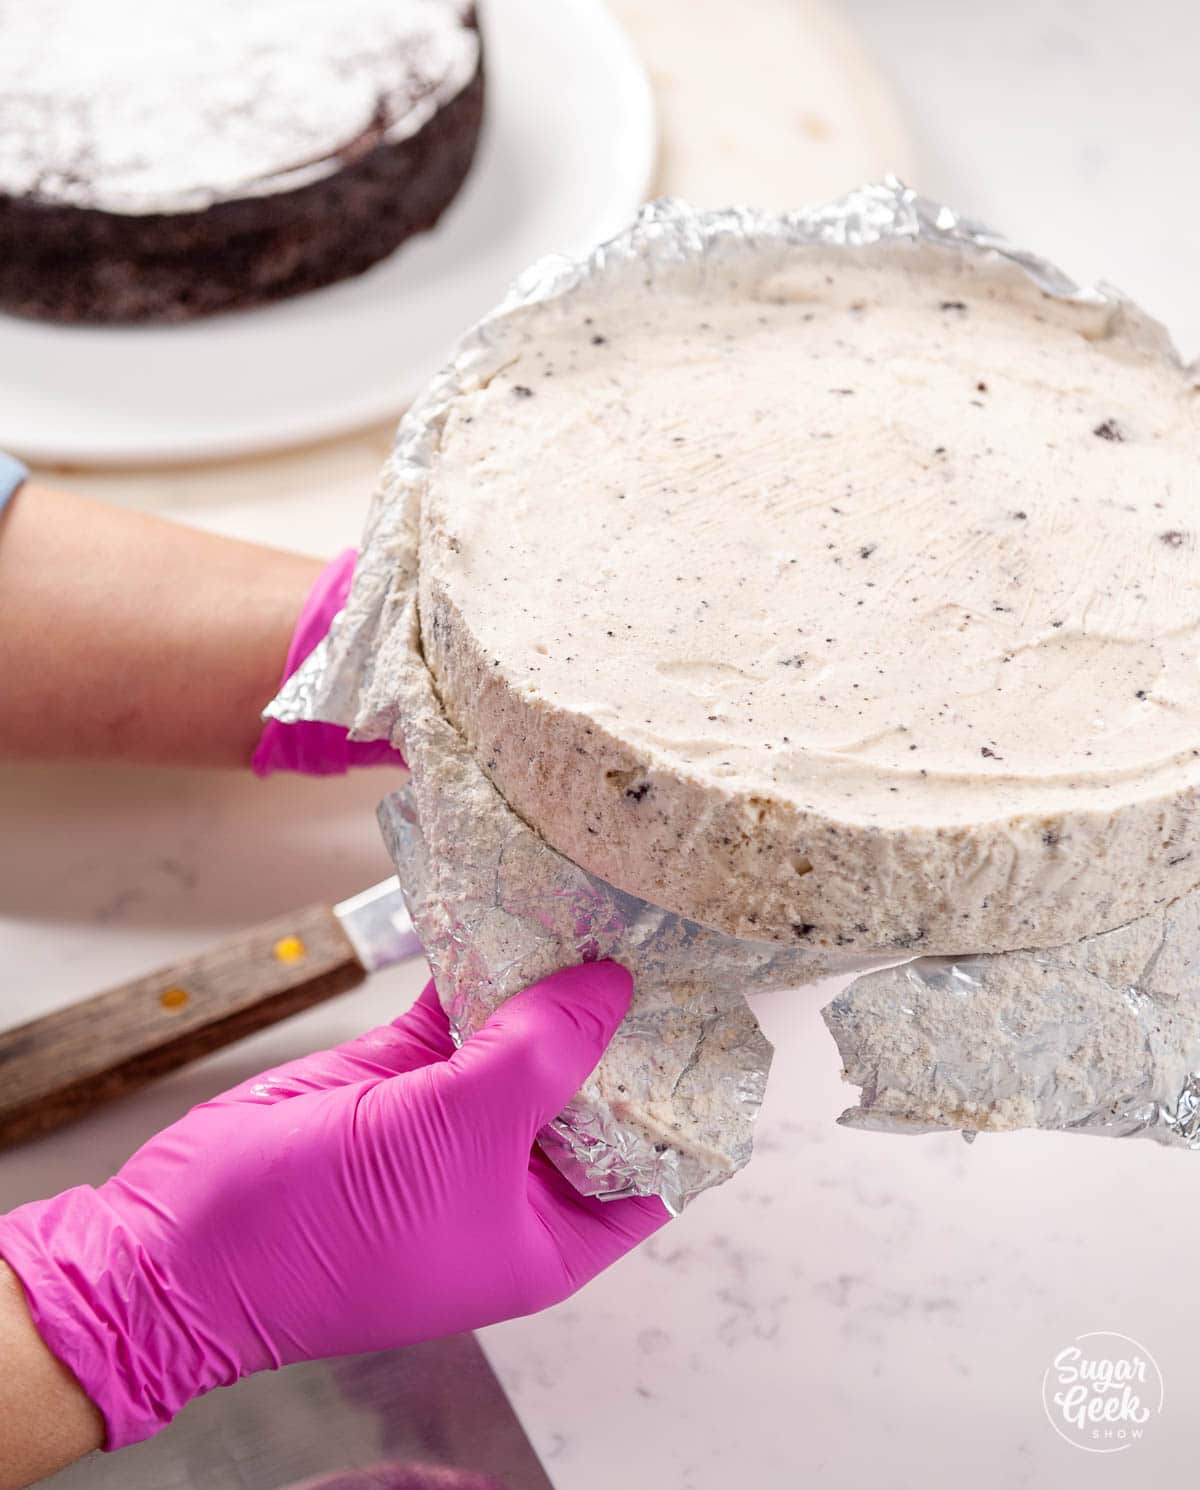
- Wash your cake pan then line it with some aluminum foil or plastic wrap. Foil is a little easier to work with because it doesn't lift up when you add the ice cream. I like just one layer, but you could do multiple ice cream layers with different flavors if you'd like!

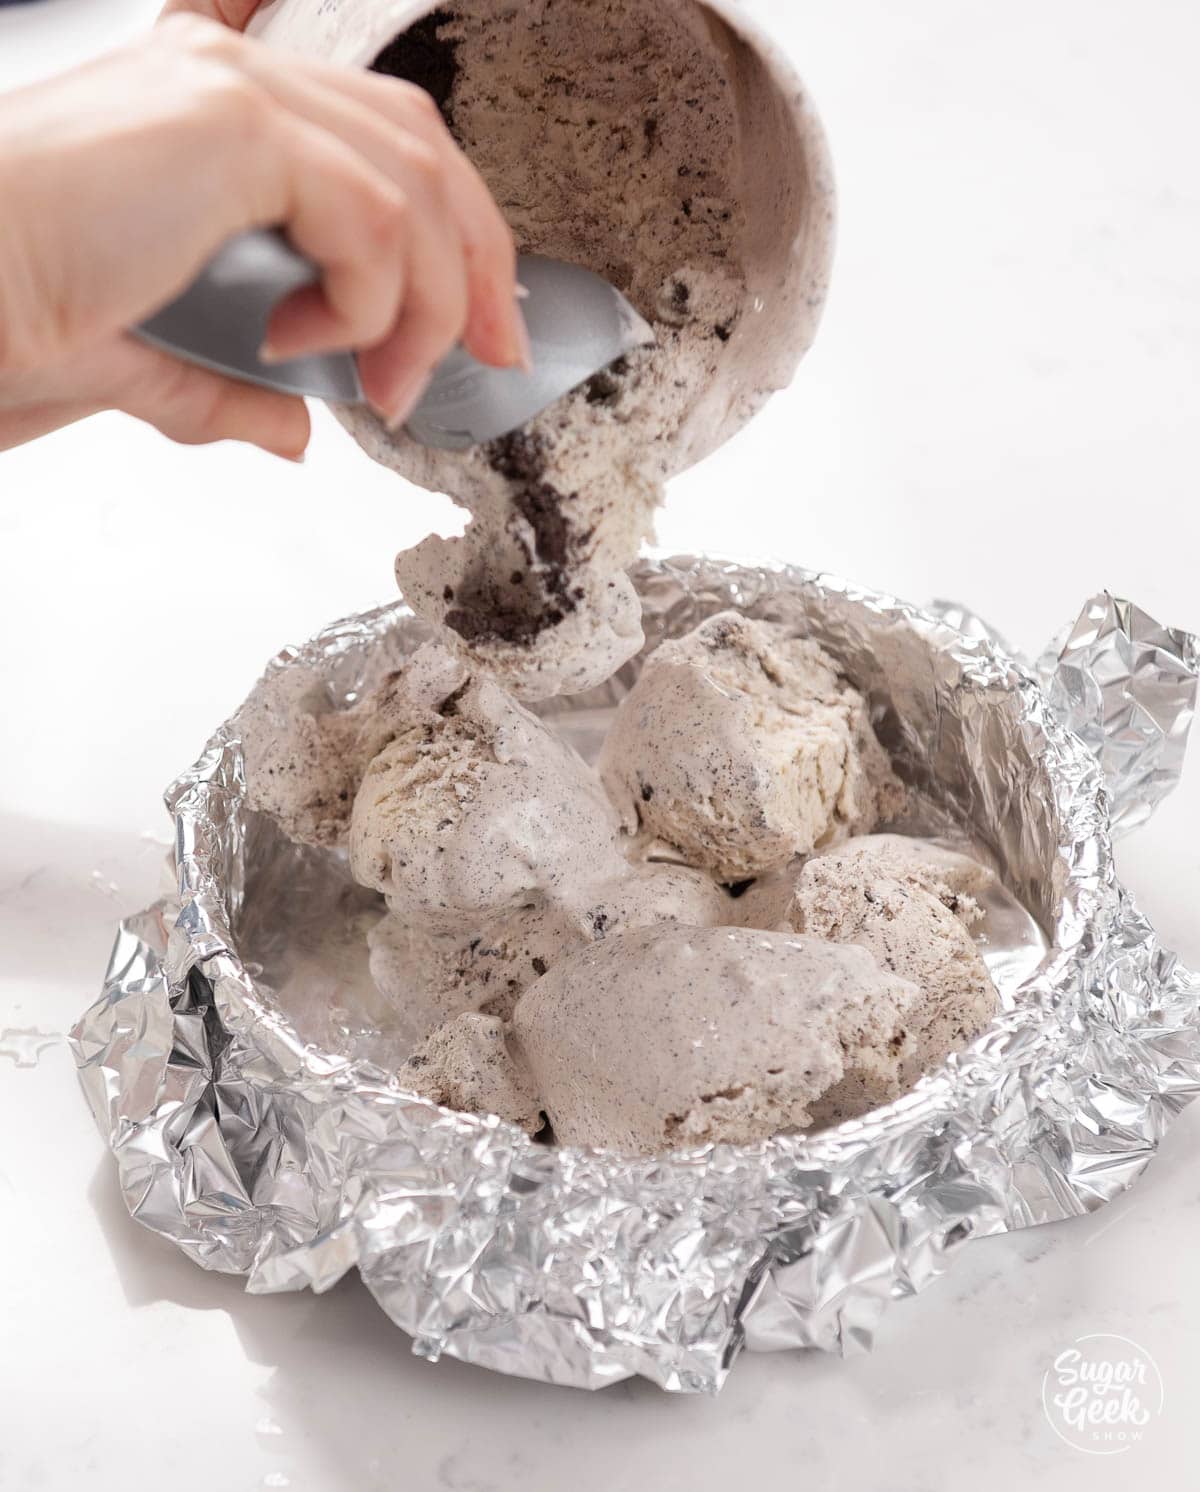
- Now we are going to empty the ENTIRE container into this cake pan and smooth it out. 1.5 quarts is exactly the right amount of ice cream to completely fill an 8" cake pan.

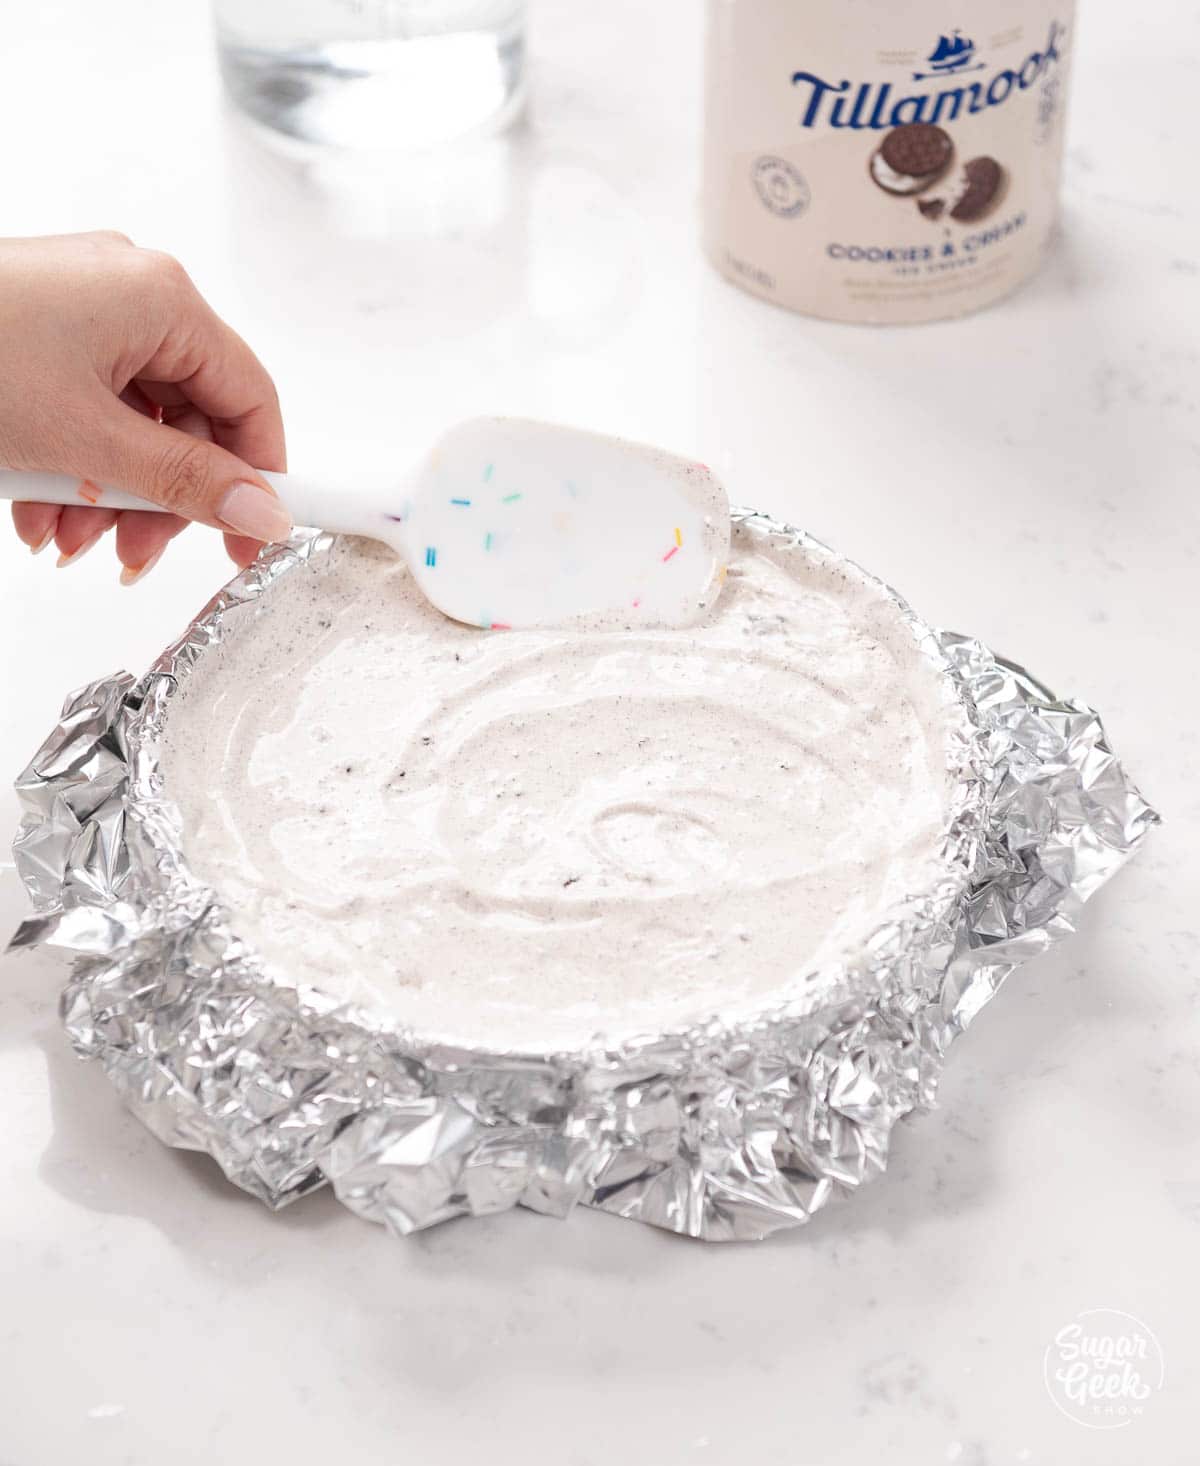
- Smooth out the top and freeze the ice cream overnight or a minimum of 6 hours.

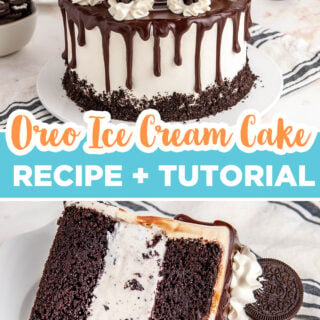
How to assemble the ice cream cake
- First things first, make sure you have enough room in your freezer for your assembled cake! There's nothing worse than beautifully frosting your whole cake and scrambling to make room in your freezer as it's melting.
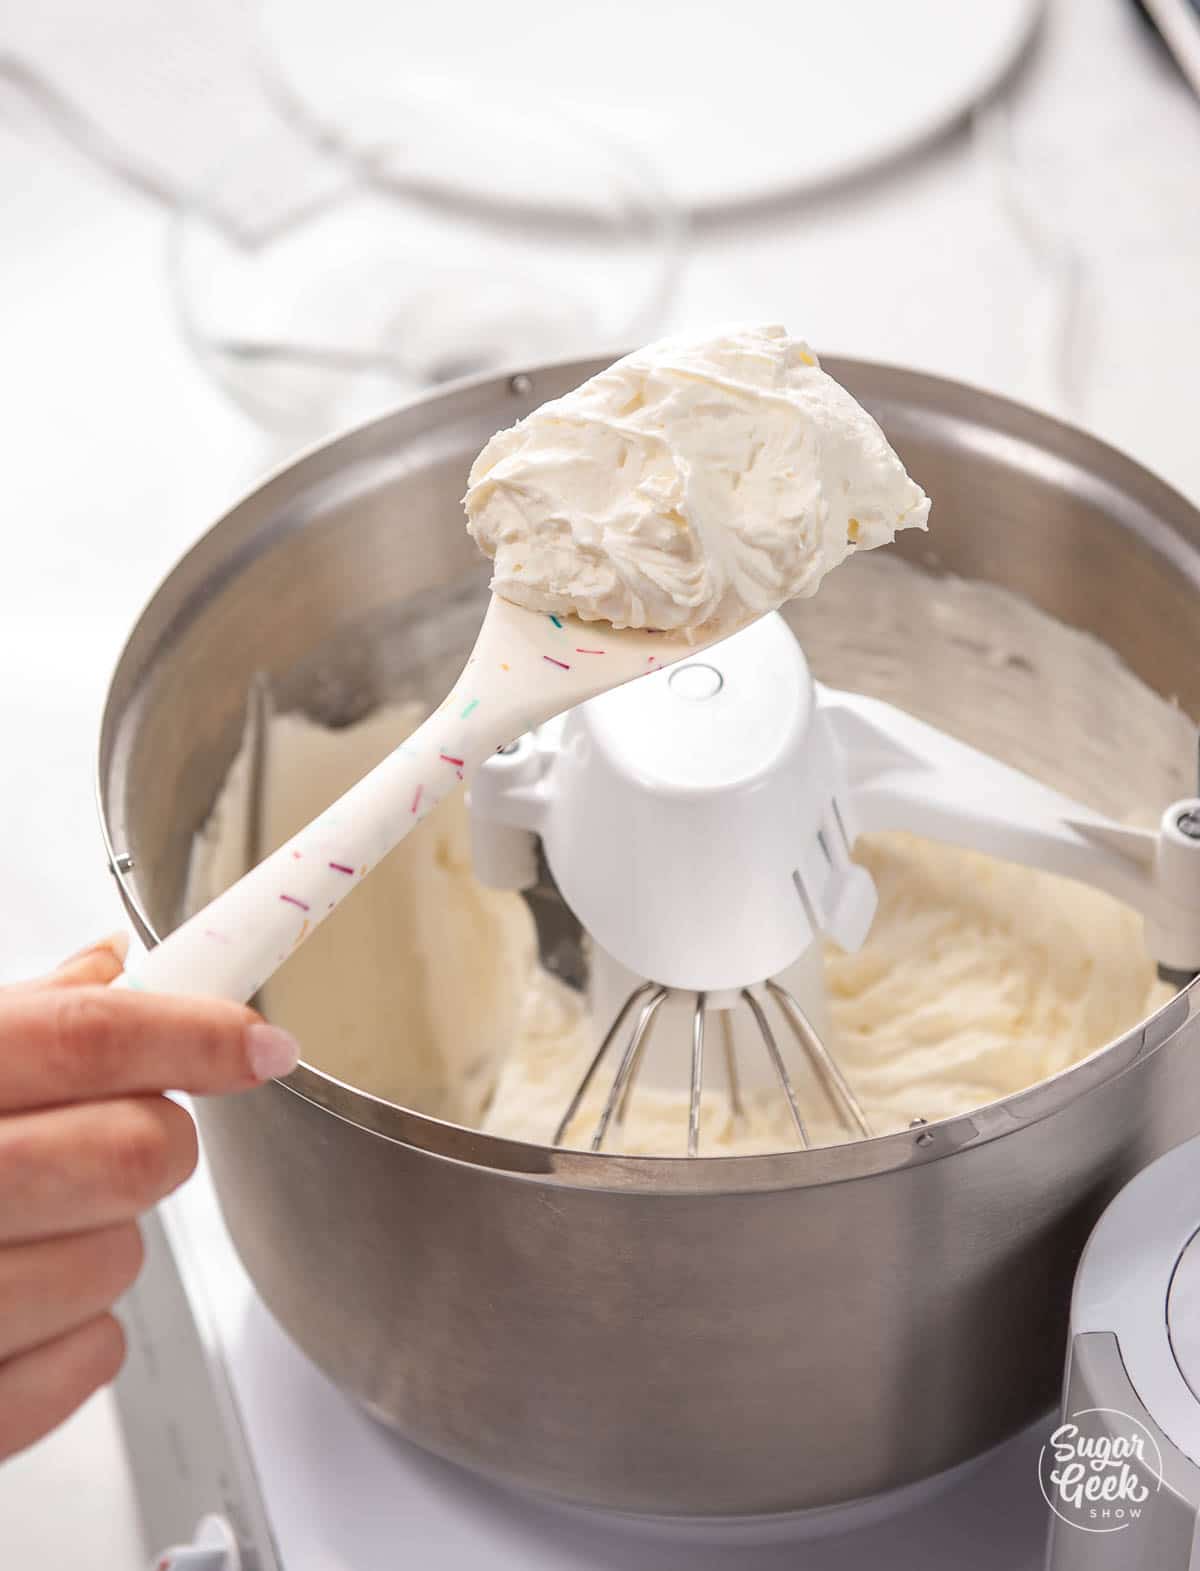
- When you're ready to start assembling the cake, now is the time to make your stabilized whipped cream (recipe below). The added gelatin keeps this whipped cream from melting too quickly. Check out the stabilized whipped cream blog post for more stabilizing options besides gelatin.

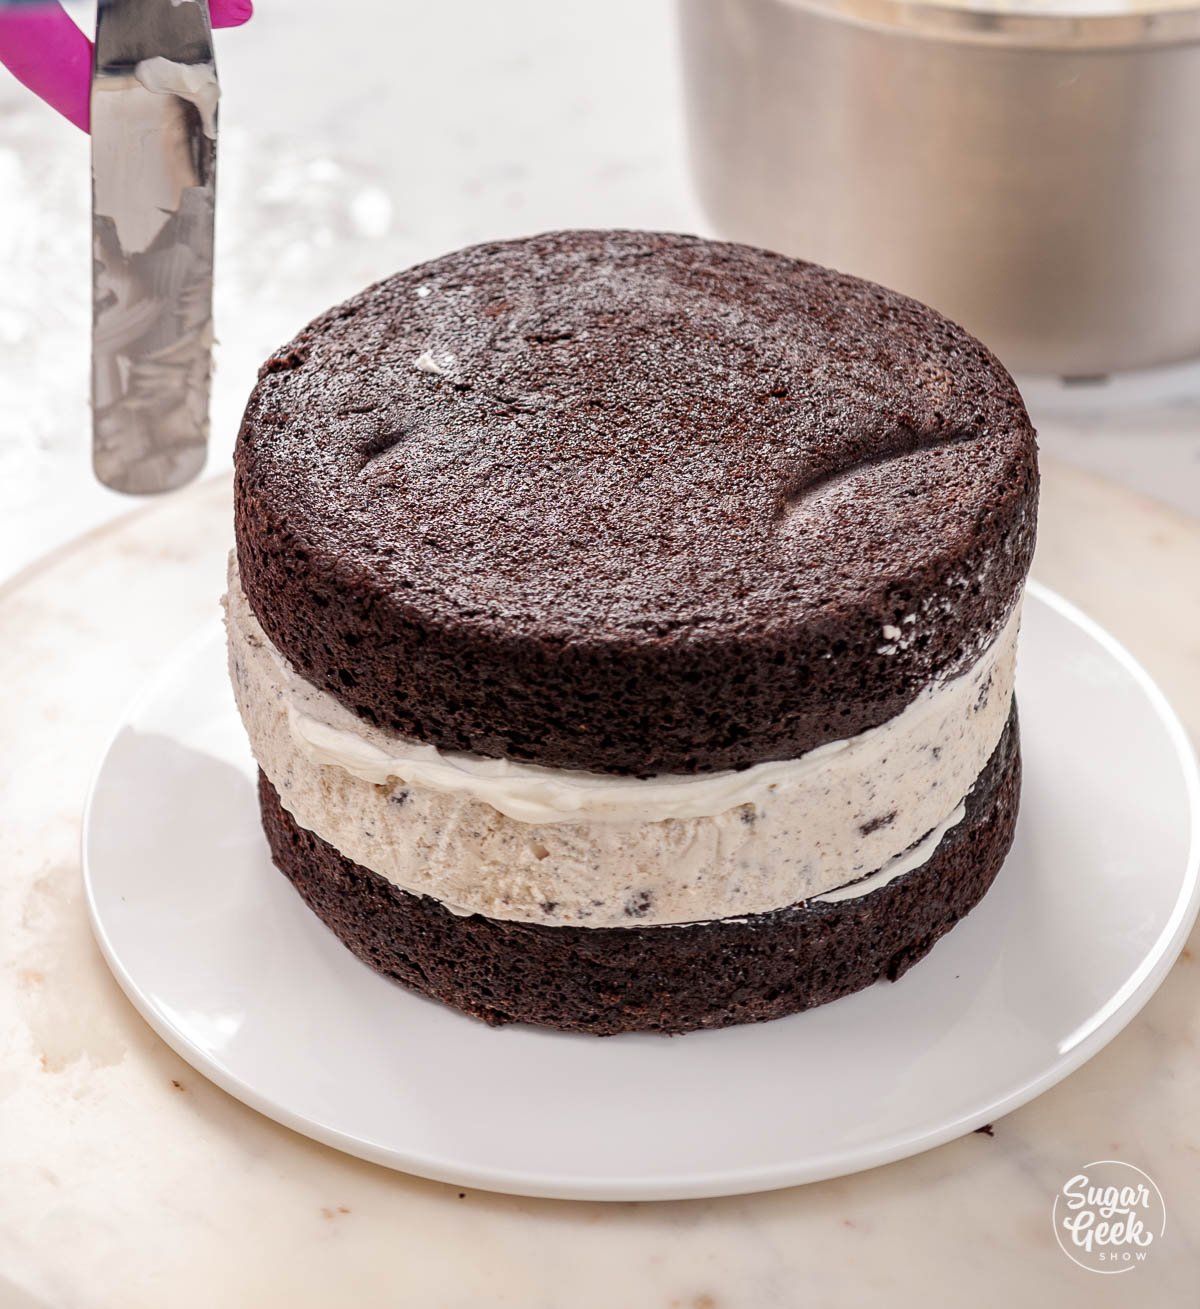
- Place your first cake layer on top of your cake platter.
- Add a thin layer of whipped cream to the top of your cake layer. This is just to fill any gaps or air pockets.
- Remove the frozen ice cream from the foil and place it on top of the cake.


- Add another thin layer of whipped cream and then your final cake layer.

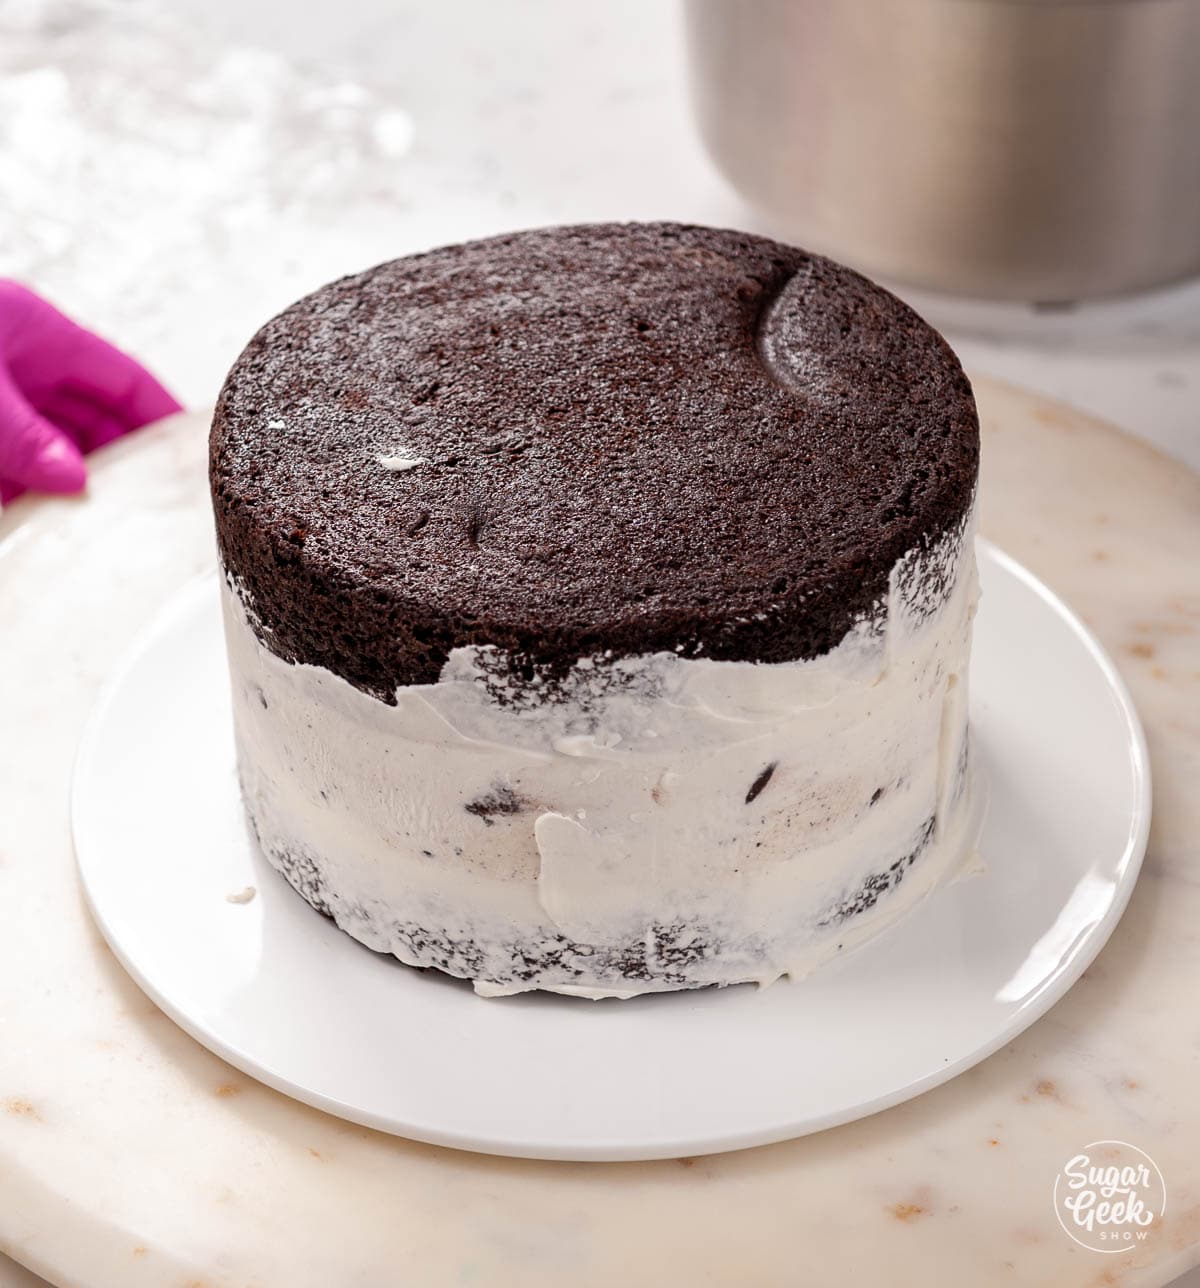
- Cover the whole cake with a thin layer of whipped cream to fill any gaps or holes.

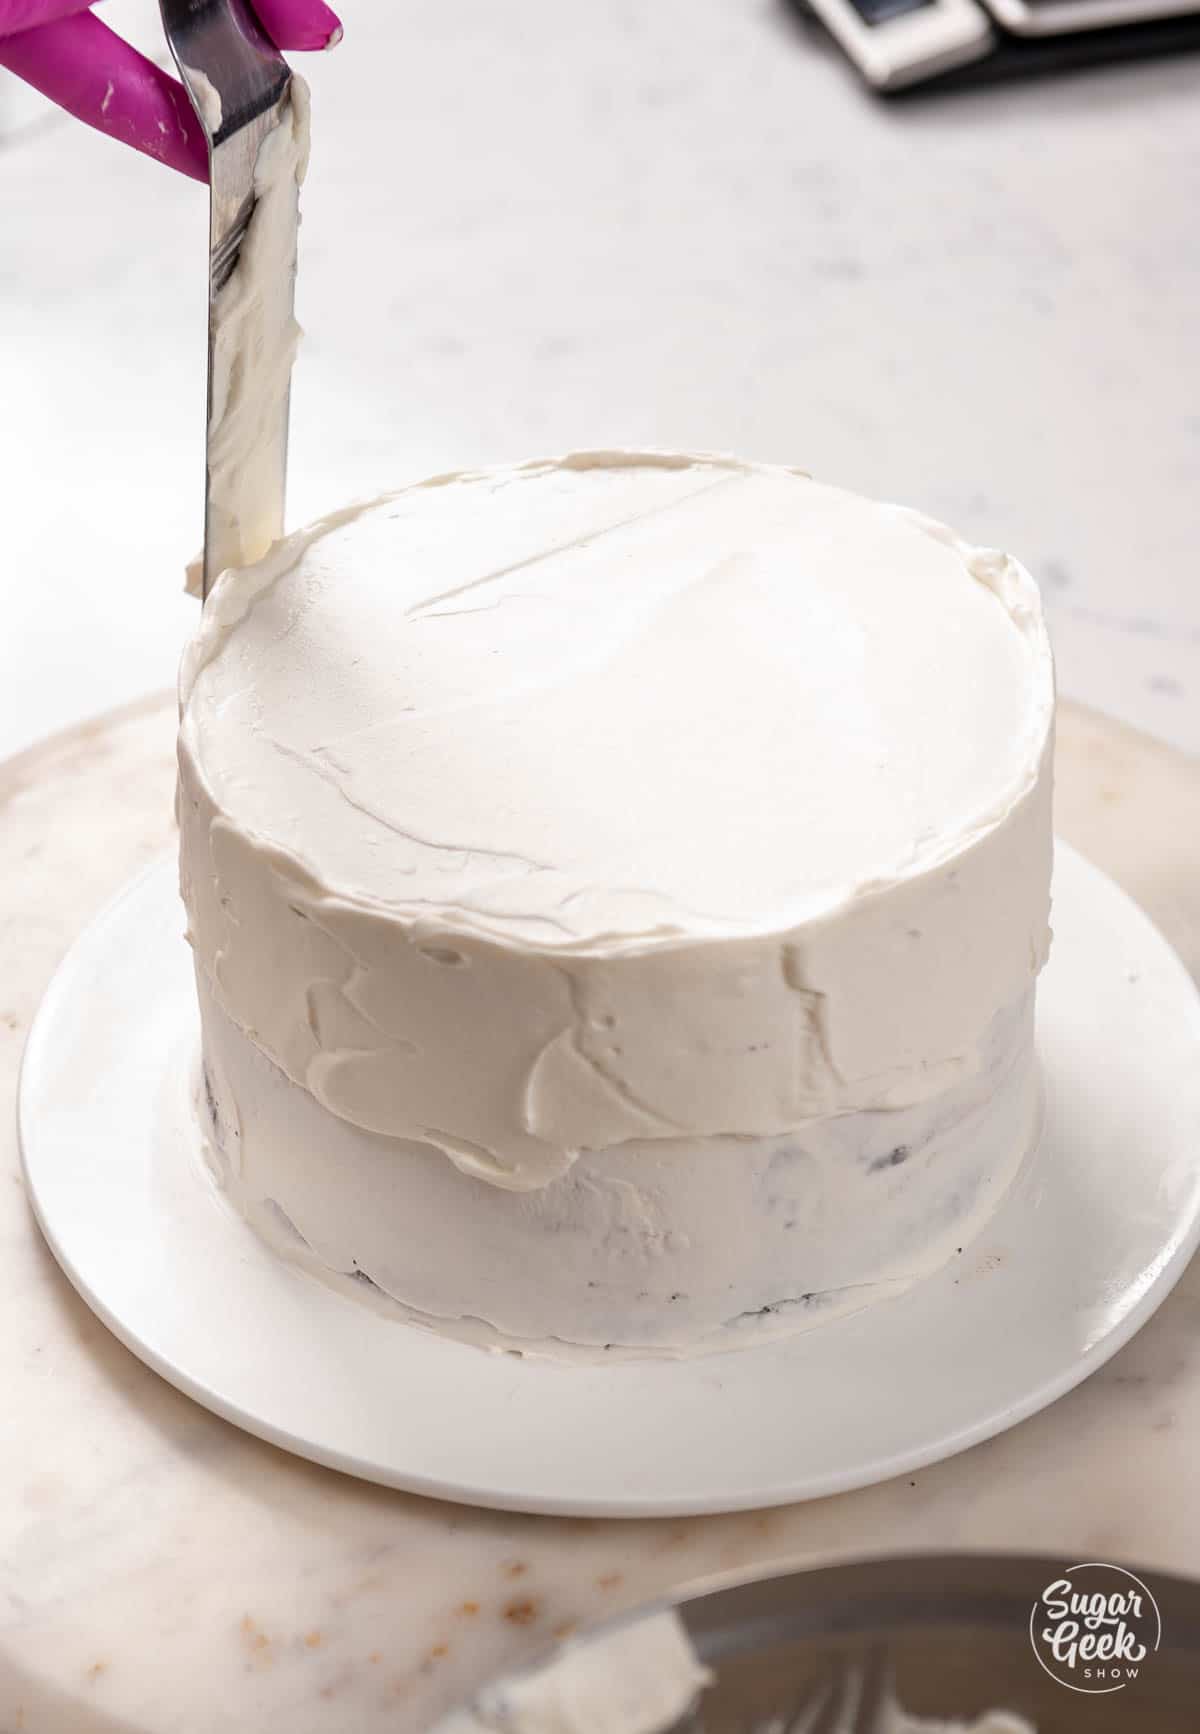
- Then apply your final coat of whipped cream.

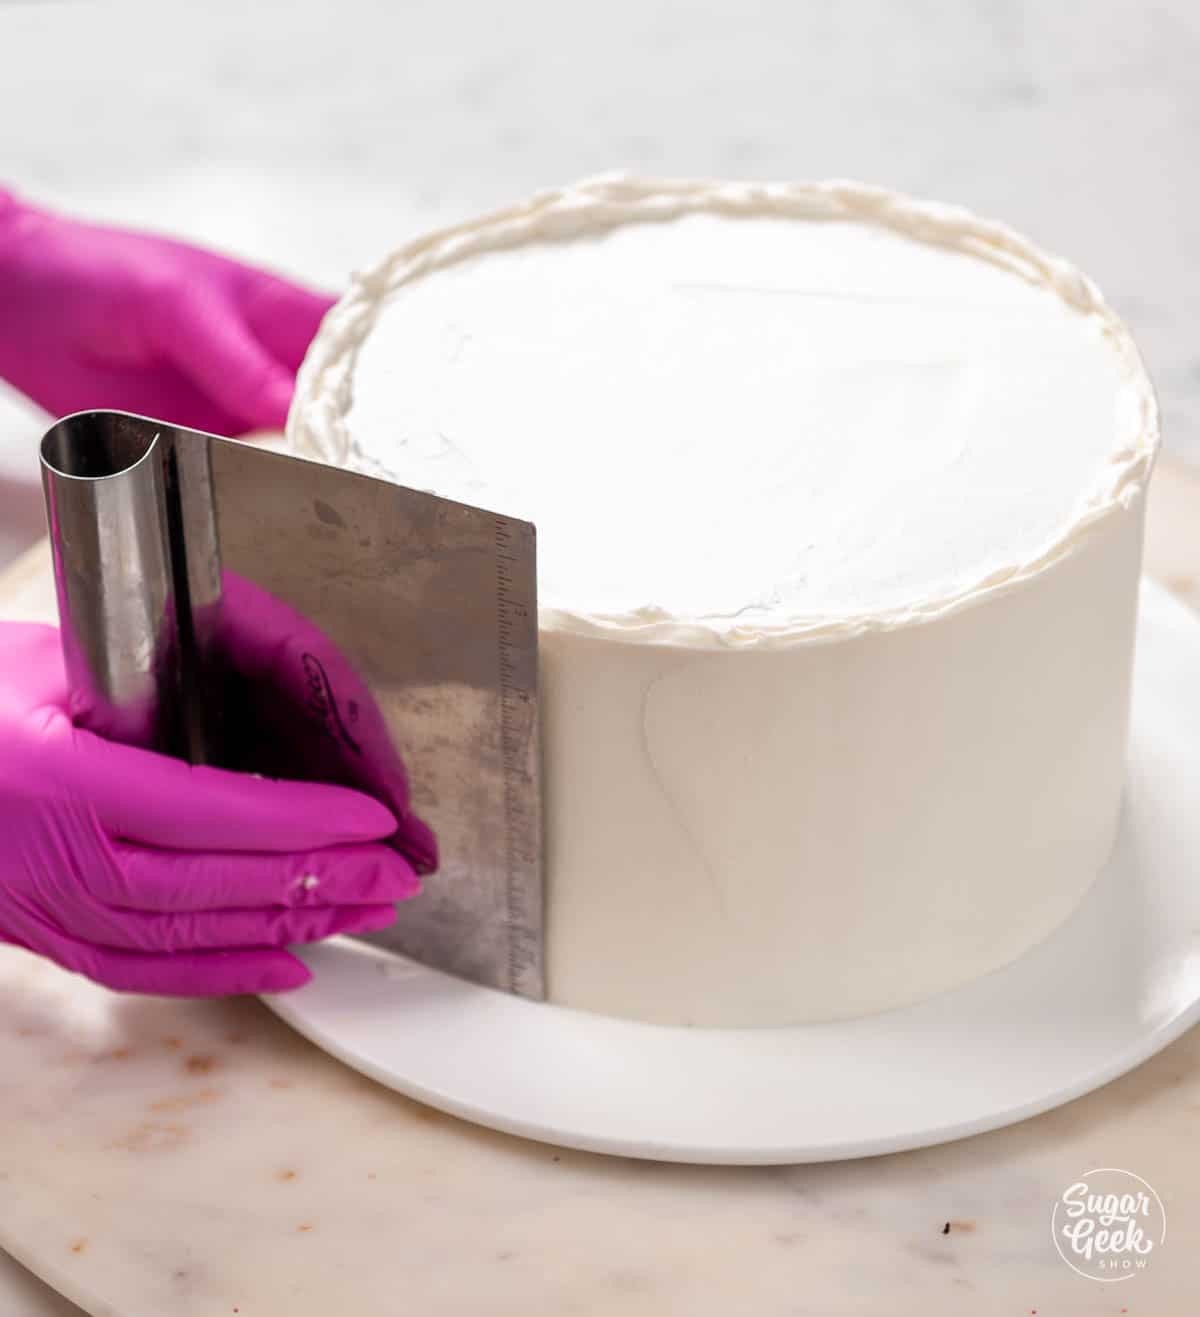
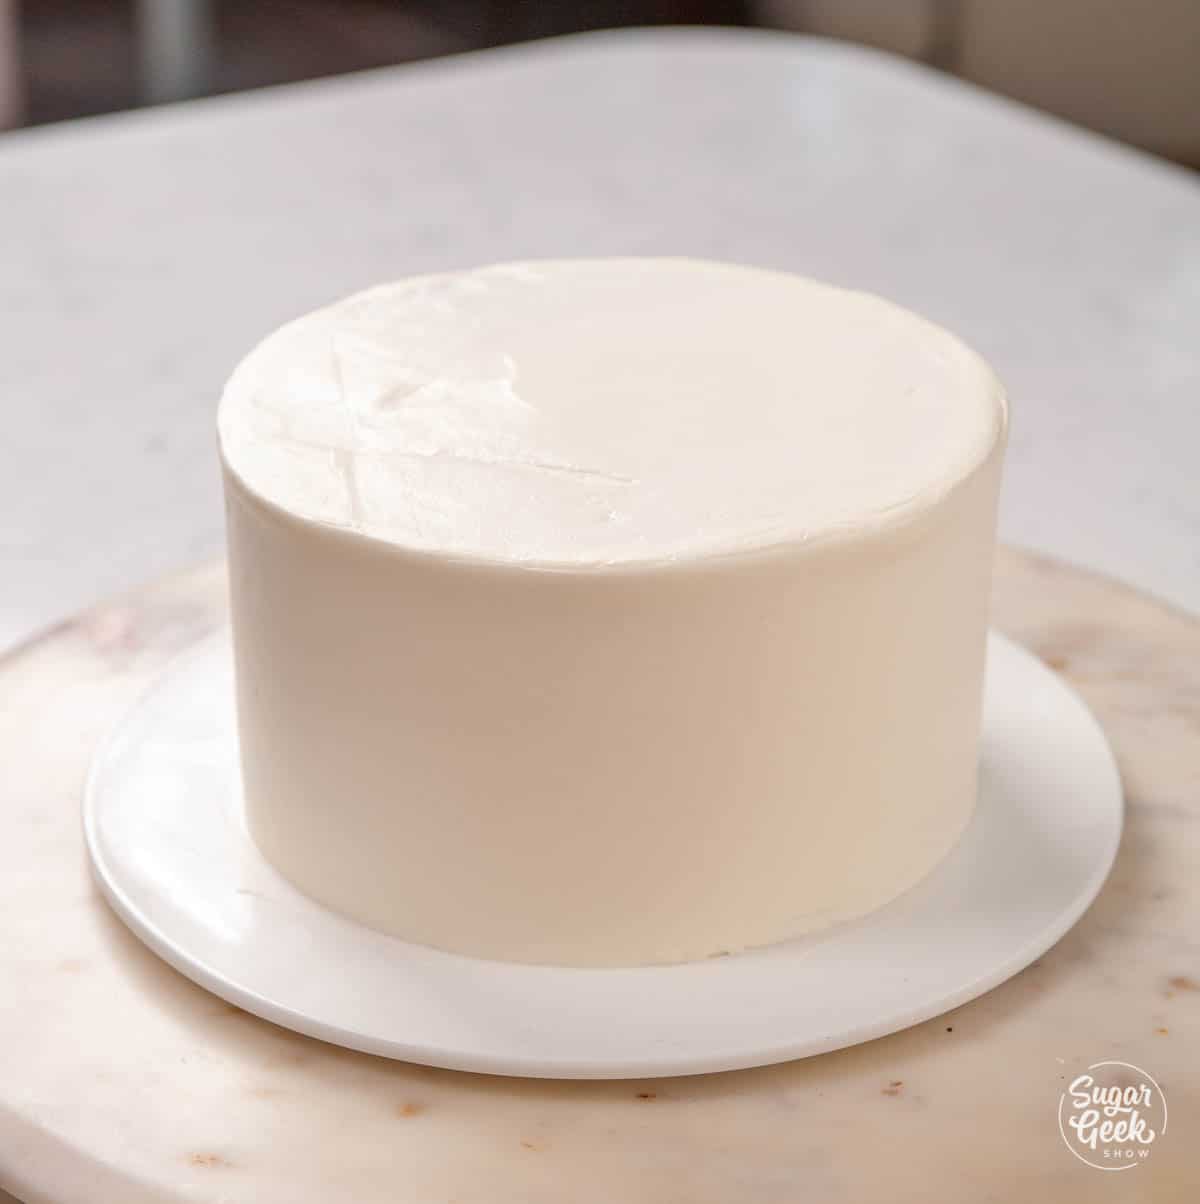
- Smooth the sides with a bench scraper or offset spatula and then smooth the top.

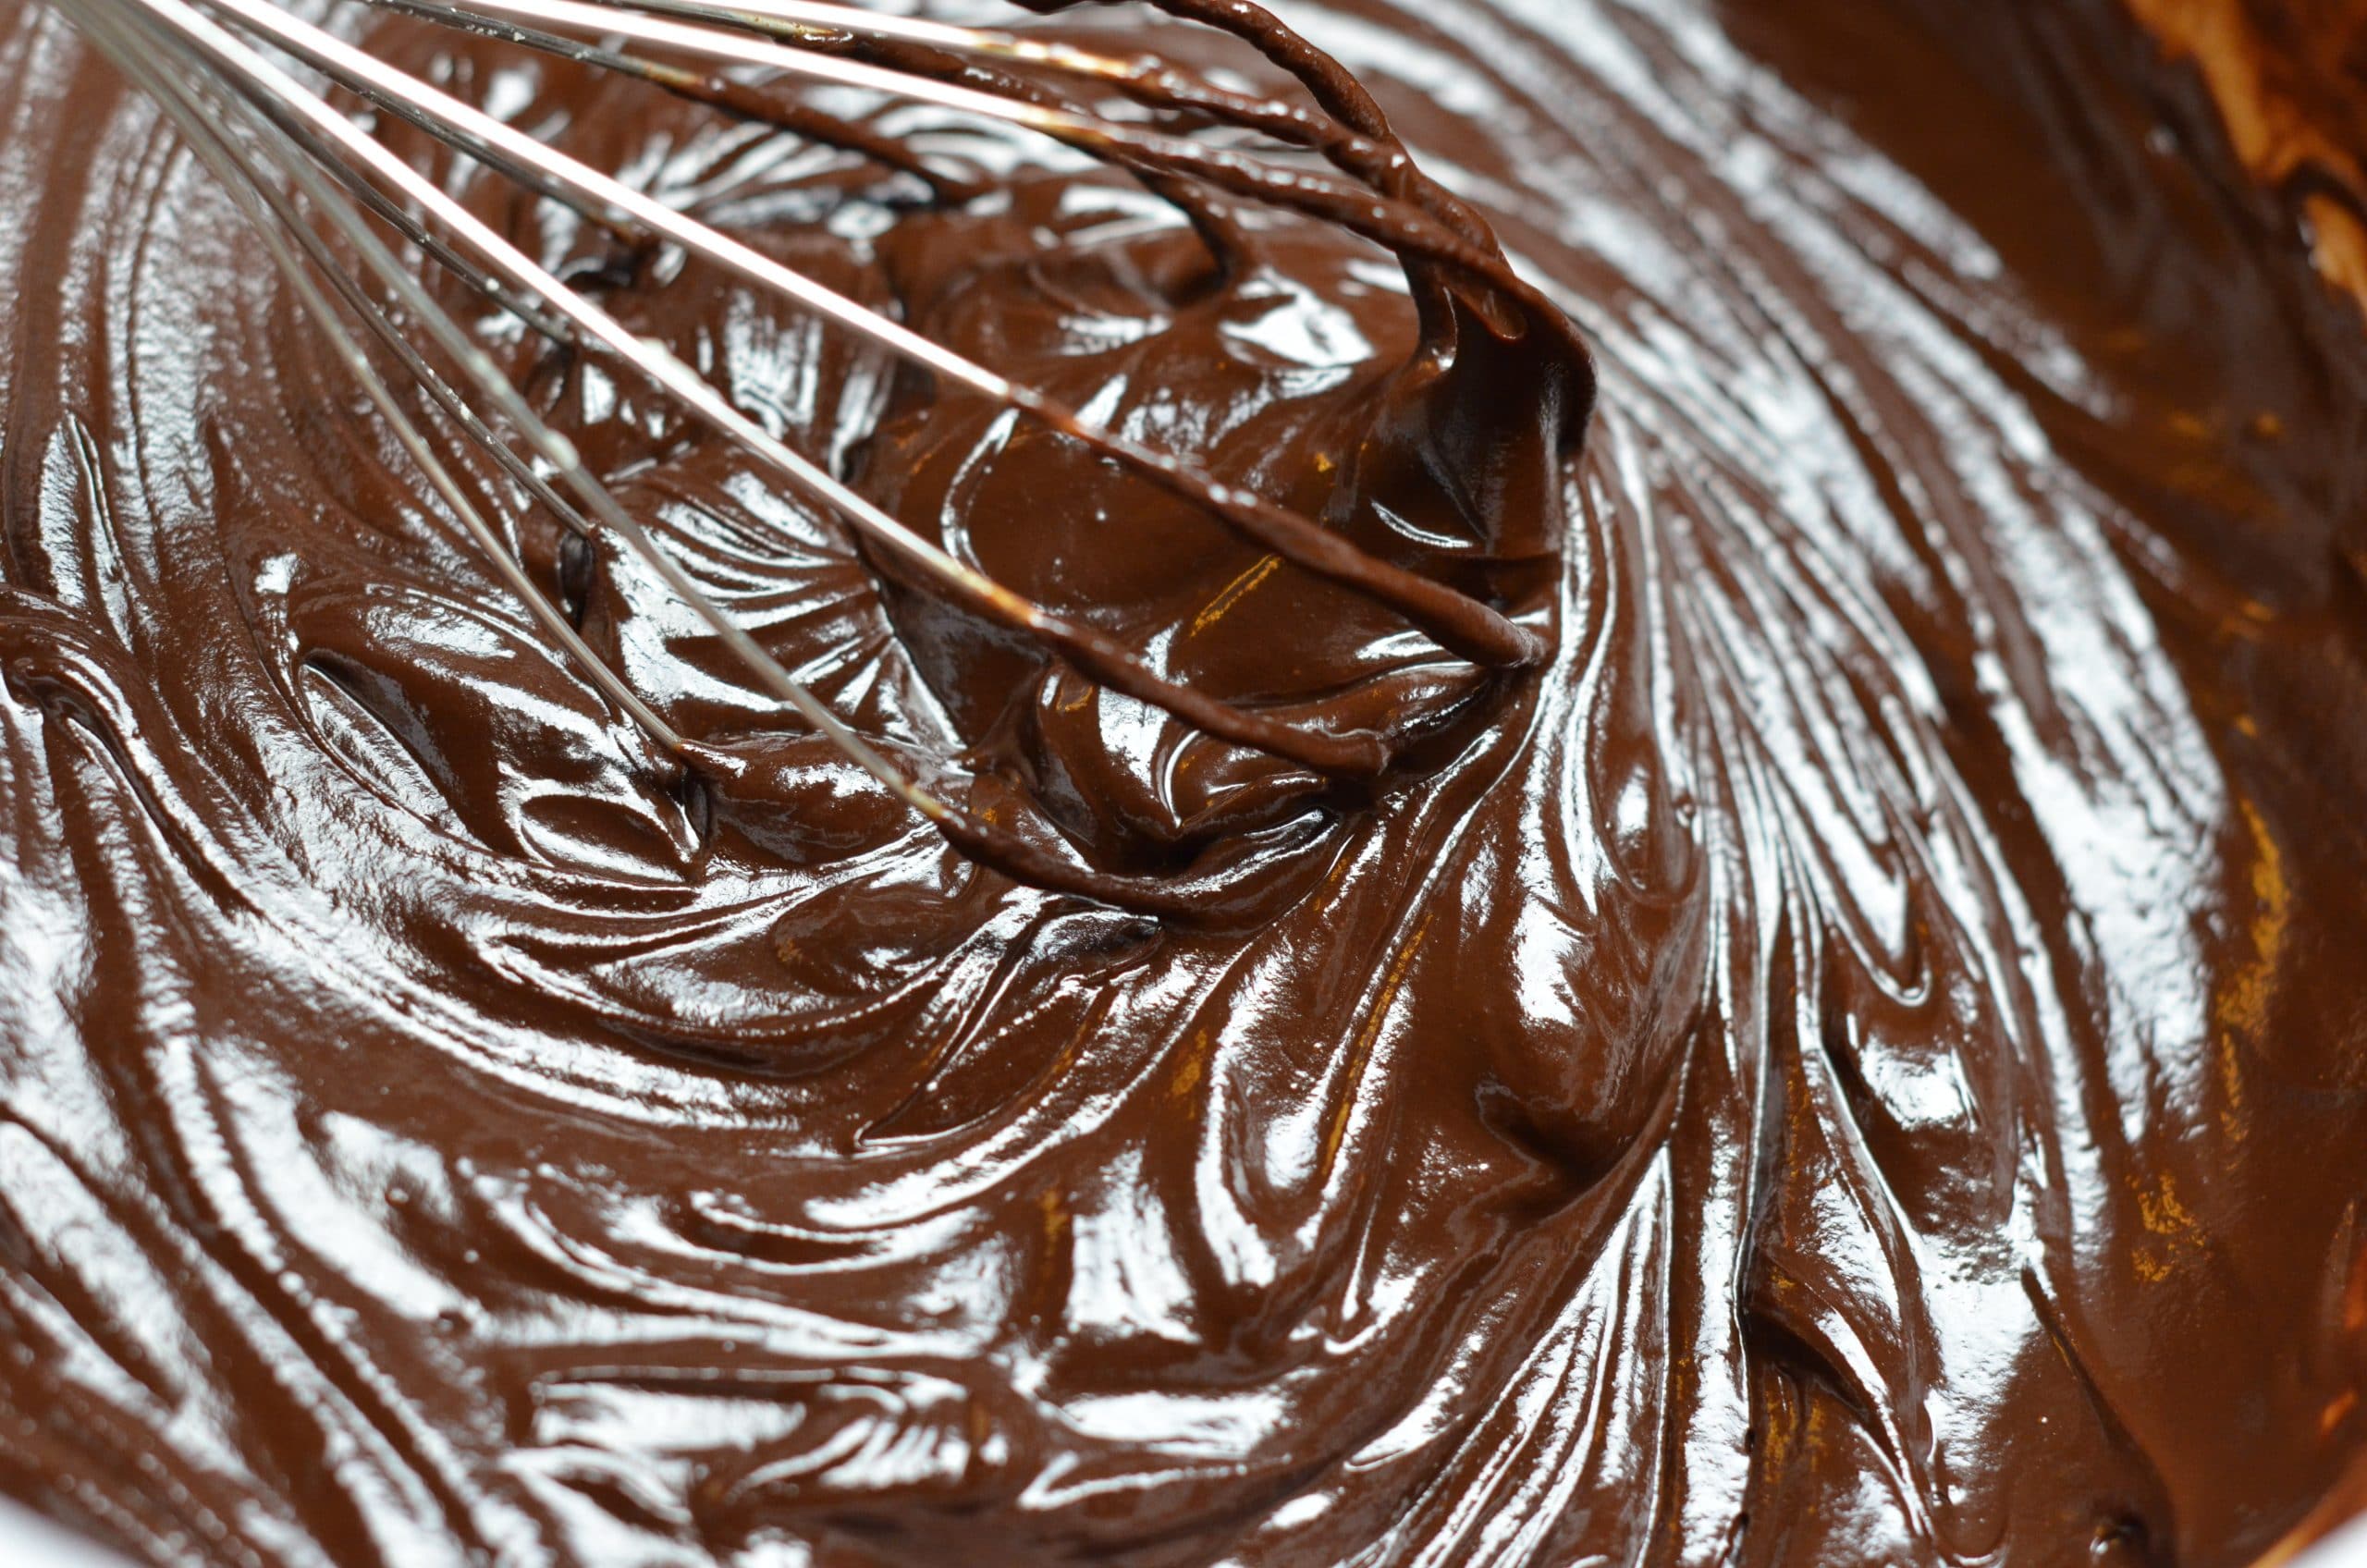
- Place the whole cake back into the freezer while you make your chocolate drip. This drip is so easy to make, but you could also use store-bought hot fudge sauce.

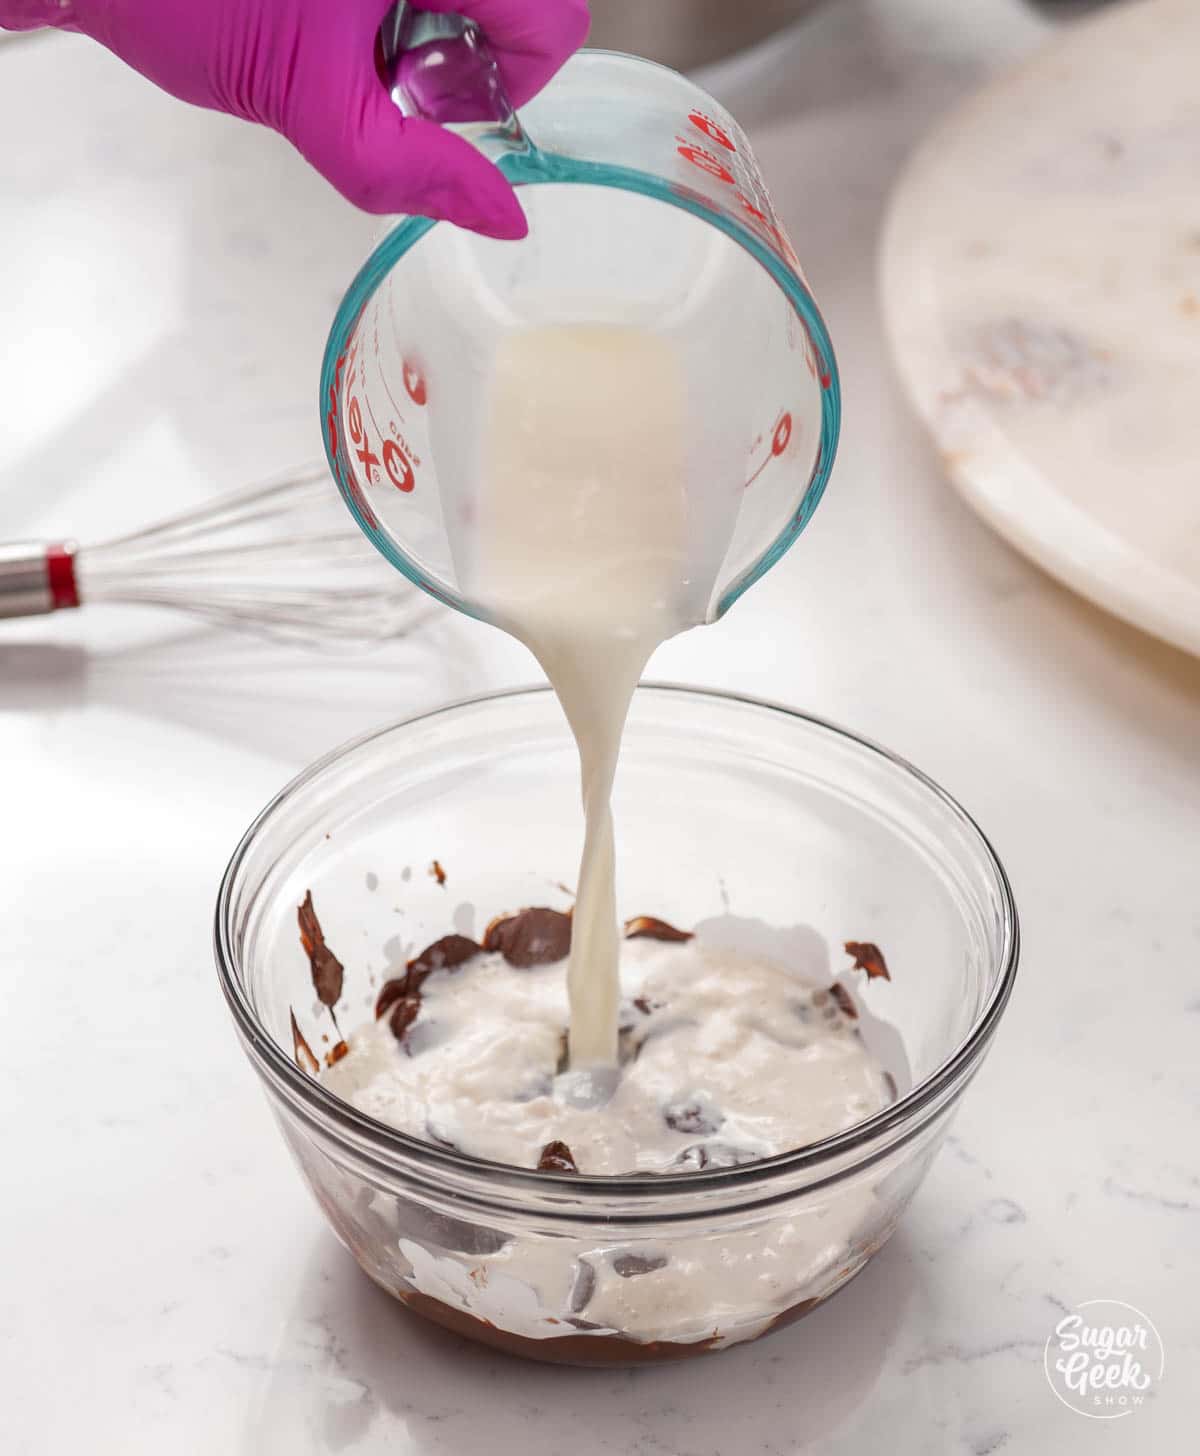
- Microwave the chocolate for 1 minute, then add the cream. Microwave for one more minute then let it sit for 5 minutes.

- Whisk until smooth then cool to 90ºF before you use it on the cake.

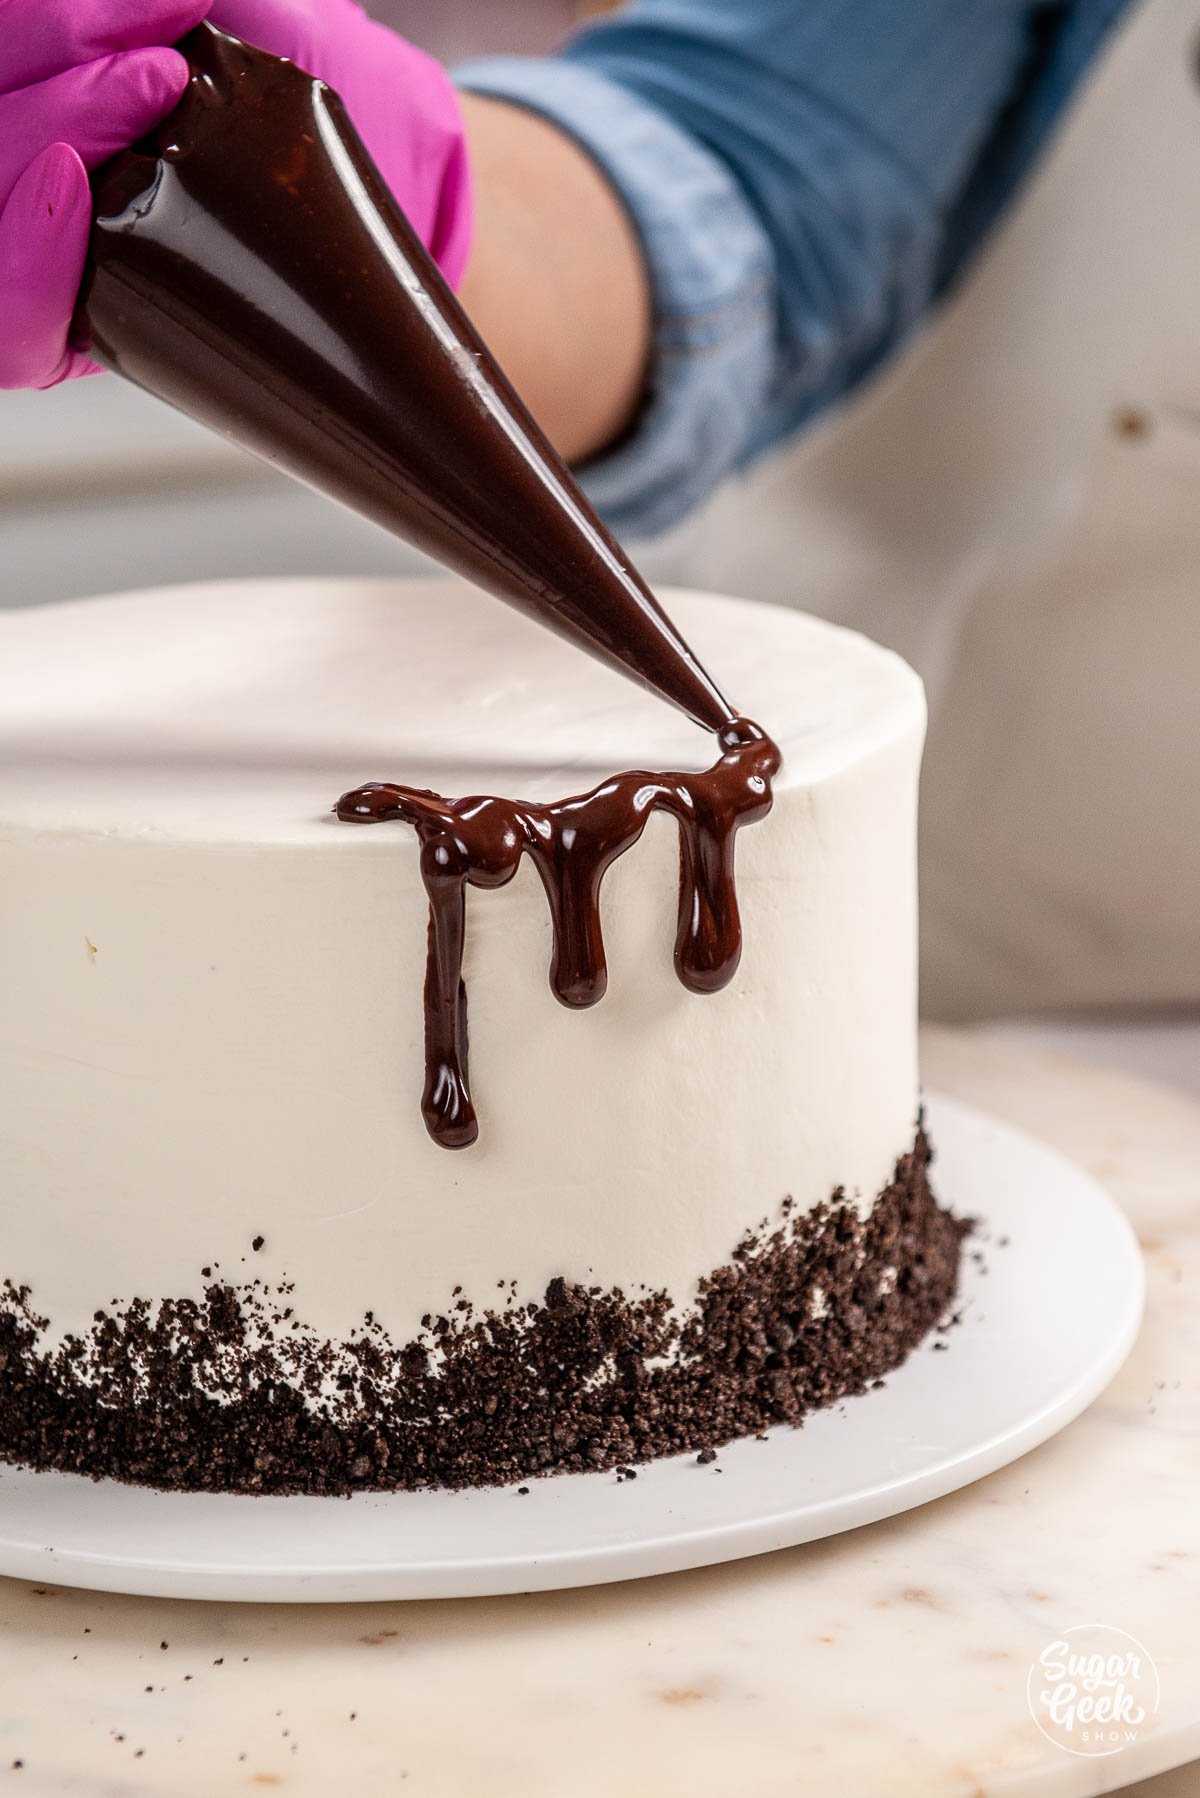
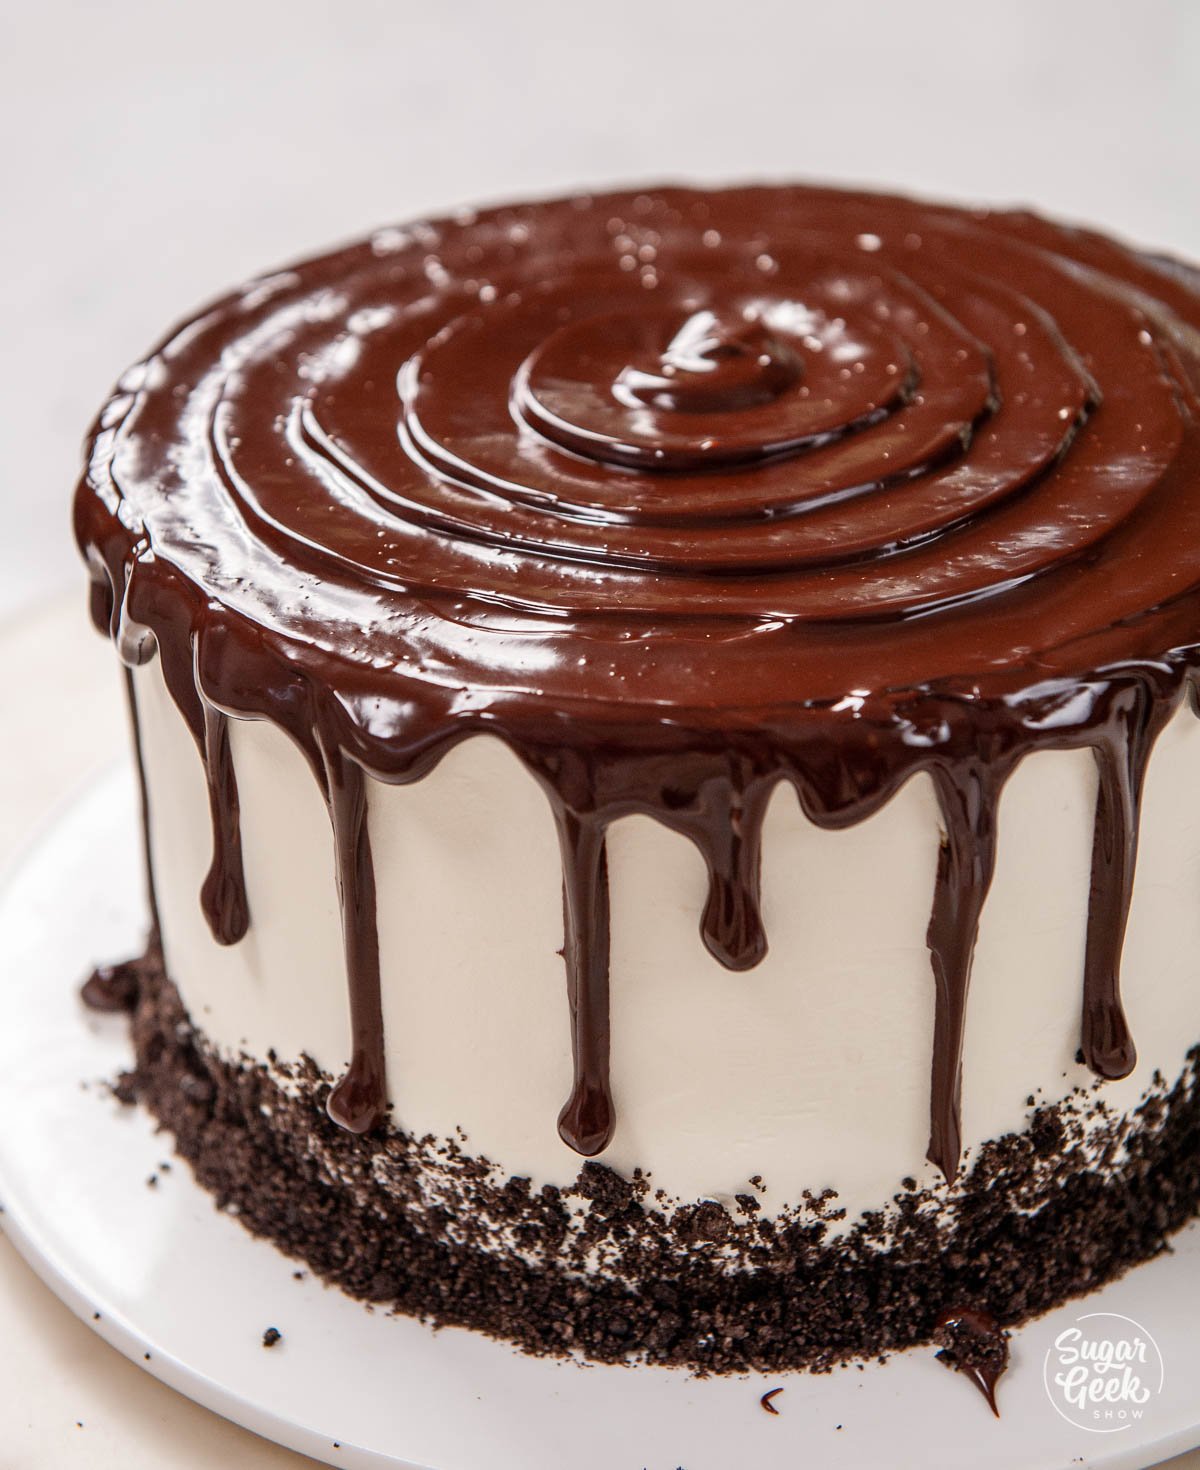
- Pipe the chocolate drip onto the sides of your frozen cake.

- Add the leftover to the top and smooth it all out with a spatula.

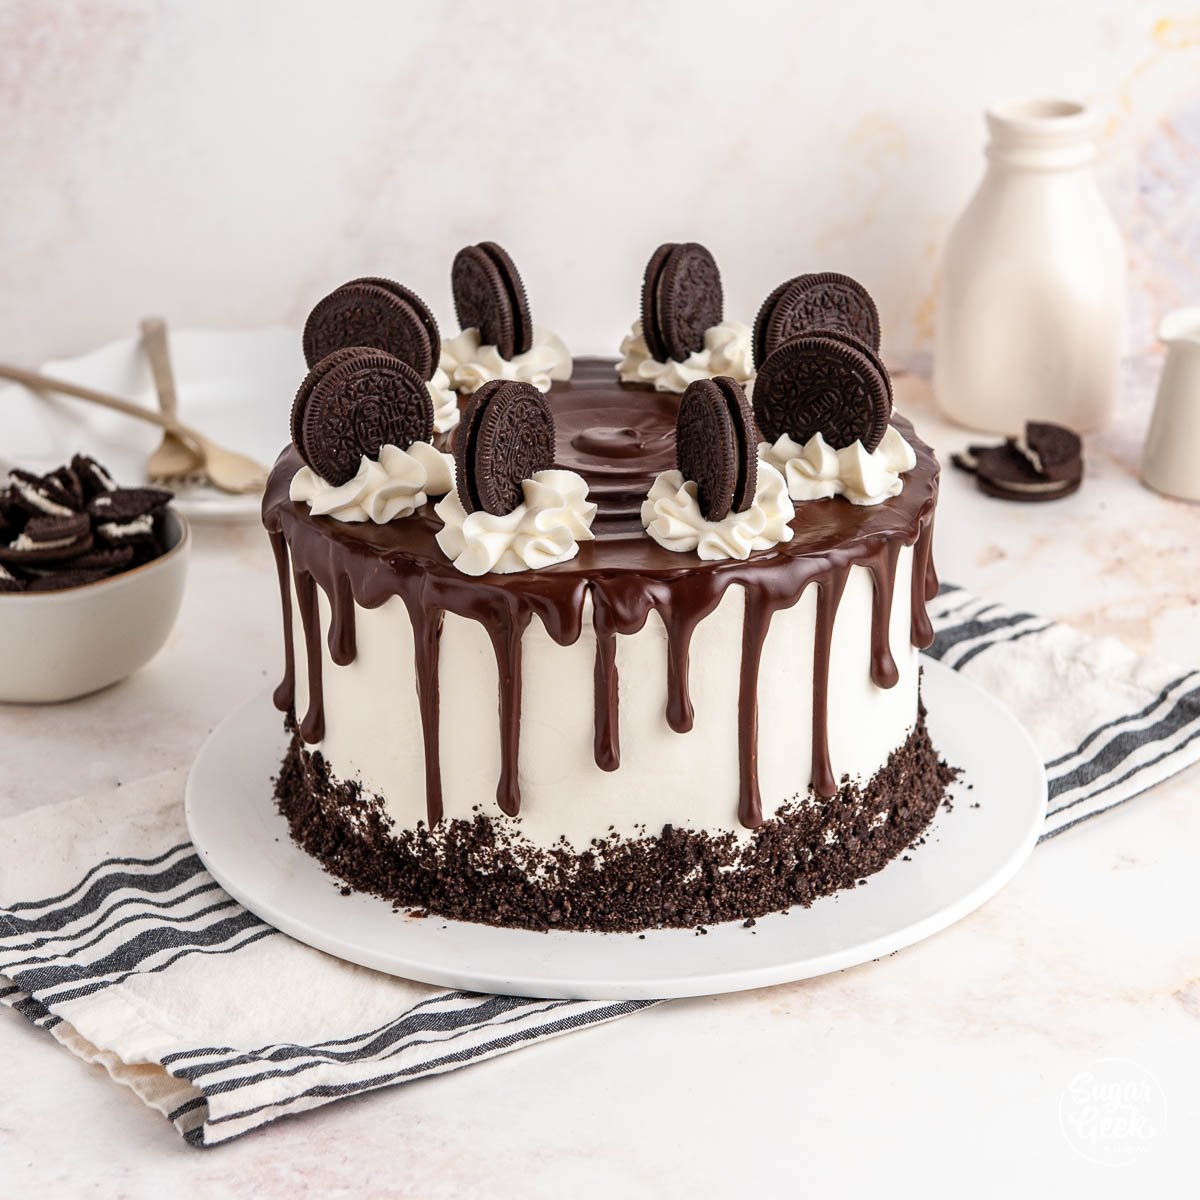
- Add some dollops of whipped cream on top, garnish with Oreos and Oreo crumbs around the base of the cake.


More Flavor Ideas
Honestly, I can't even believe how easy this cake was to make. I can't wait to try out even more flavors this summer! Let me know in the comments what your favorite ice cream flavor is or what combo you'd like to see!
- Red velvet cake with cheesecake ice cream
- Funfetti cake with birthday cake ice cream
- Brown butter cake with chocolate chip cookie ice cream
- Triple chocolate cake with peanut butter cup ice cream
- Vanilla cake with strawberry puree and strawberry icecream
- White cake with chocolate ice cream and strawberry ice cream for a Neapolitan flavor combo.
FAQ
Work very quickly! Have your frosting ready to use. Place your cake back into the freezer in between steps if needed. Make your room as cold as possible.
The best frosting to use on an ice cream cake is stabilized whipped cream or another type of whipped cream topping because it has the same consistency as ice cream and will come to room temperature at the same rate as ice cream. You can use buttercream but the butter will stay very hard even as the ice cream is melting.
You can move your cake from the freezer to the fridge 30 minutes before you are ready to serve it. Your cake should not be permanently stored in the fridge or it will melt.
You can make any of my cake recipes gluten-free by replacing the flour with Bob's Red Mill gluten-free baking mix or another kind of gluten-free flour like Cup4Cup. Make sure your ice cream is also gluten-free (check the ingredients) because sometimes ice cream contains wheat.
Take the cake out of the freezer and place it into the fridge or let it sit at room temperature for 30 minutes before cutting. Do not place it in the sun.
Use a knife dipped in hot water before slicing.
I'm using stabilized whipped cream for this recipe because it will soften at the same rate as the ice cream filling. Any type of whipped-topping like CoolWhip or Bettercreme is going to work well. If you're traveling a long distance with your cake, use a more stable buttercream like easy buttercream or American buttercream. Then store the cake in a cooler with dry ice to keep everything from melting, especially during warmer weather.
Recipe
Equipment
- Two 8"x2" cake pans
- Bench scraper (optional)
- Offset spatula (optional)
- 1M piping tip and piping bag (optional)
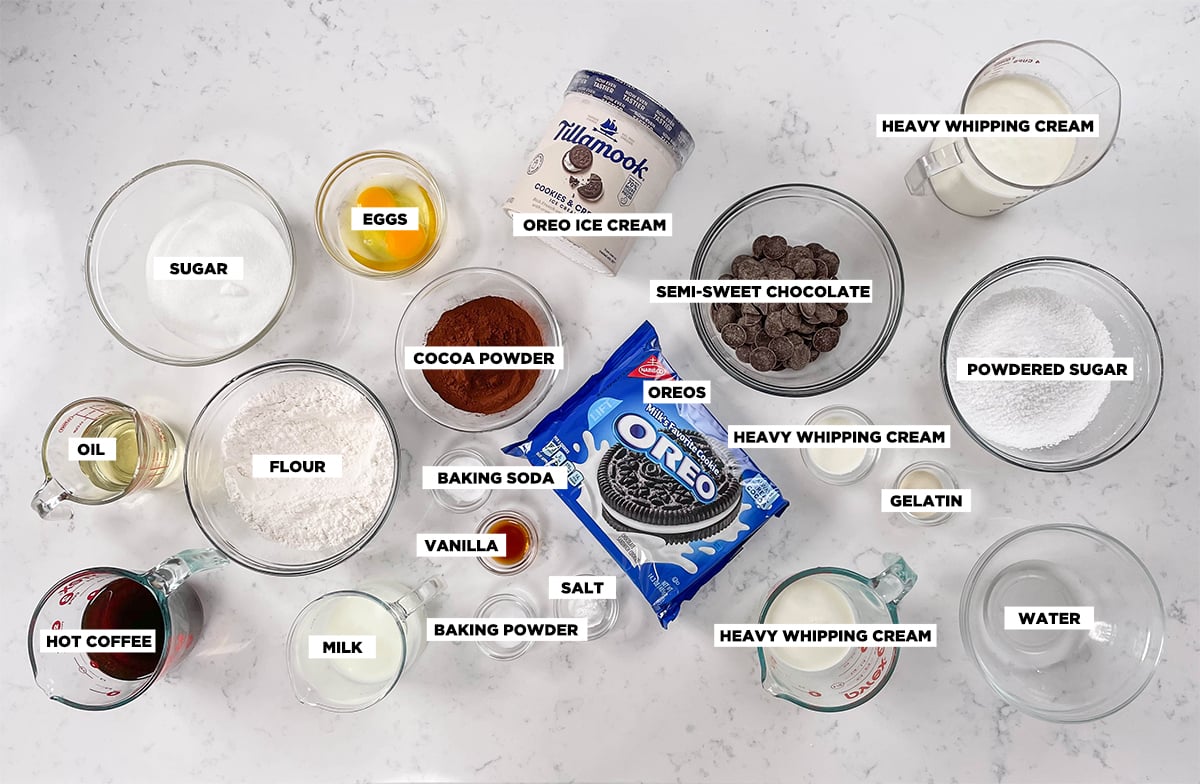
Ingredients
Easy Chocolate Cake
- 10 ounces All-Purpose Flour 2 cups spooned in and leveled
- 14 ounces Granulated Sugar 2 cups
- 4 ounces Cocoa Powder 1 cup
- 1 ½ teaspoons Baking Powder
- 2 teaspoons Baking Soda
- 1 teaspoon Salt
- 2 large Eggs room temperature
- 8 ounces Buttermilk 1 cup
- 8 ounces Hot Coffee (or hot water) 1 cup
- 4 ounces Vegetable Oil ½ cup
- 2 teaspoons Vanilla Extract
Stabilized Whipped Cream
- 16 ounces Heavy Whipping Cream 3 cups
- 3 ounces Powdered Sugar ¾ cup
- 1 ½ teaspoons Vanilla Extract
- 1 ½ teaspoons Powdered Gelatin KNOX or something similar
- 2 Tablespoons Cool Water
- 1 ½ teaspoons Heavy Whipping Cream
Ganche Drip
- 6 ounces Semi-Sweet Chocolate 1 cup
- 4 ounces Heavy Whipping Cream ½ cup
Ice Cream Layer
- 48 ounces Cookies and Cream Ice Cream 1.5 quarts
Instructions
For the chocolate cake
- Heat oven to 335ºF and prepare two 8" cake pans with cake goop or another preferred pan release.
- Combine the flour, sugar, cocoa powder, baking powder, baking soda, and salt in the bowl of your stand mixer with the paddle attachment. Mix on low 5 seconds just until combined.
- Add in the eggs, buttermilk, oil and vanilla and mix on medium speed for 2 minutes. Scrape the bowl.
- Turn the mixer down to low and add in the hot coffee and mix until just its just combined.
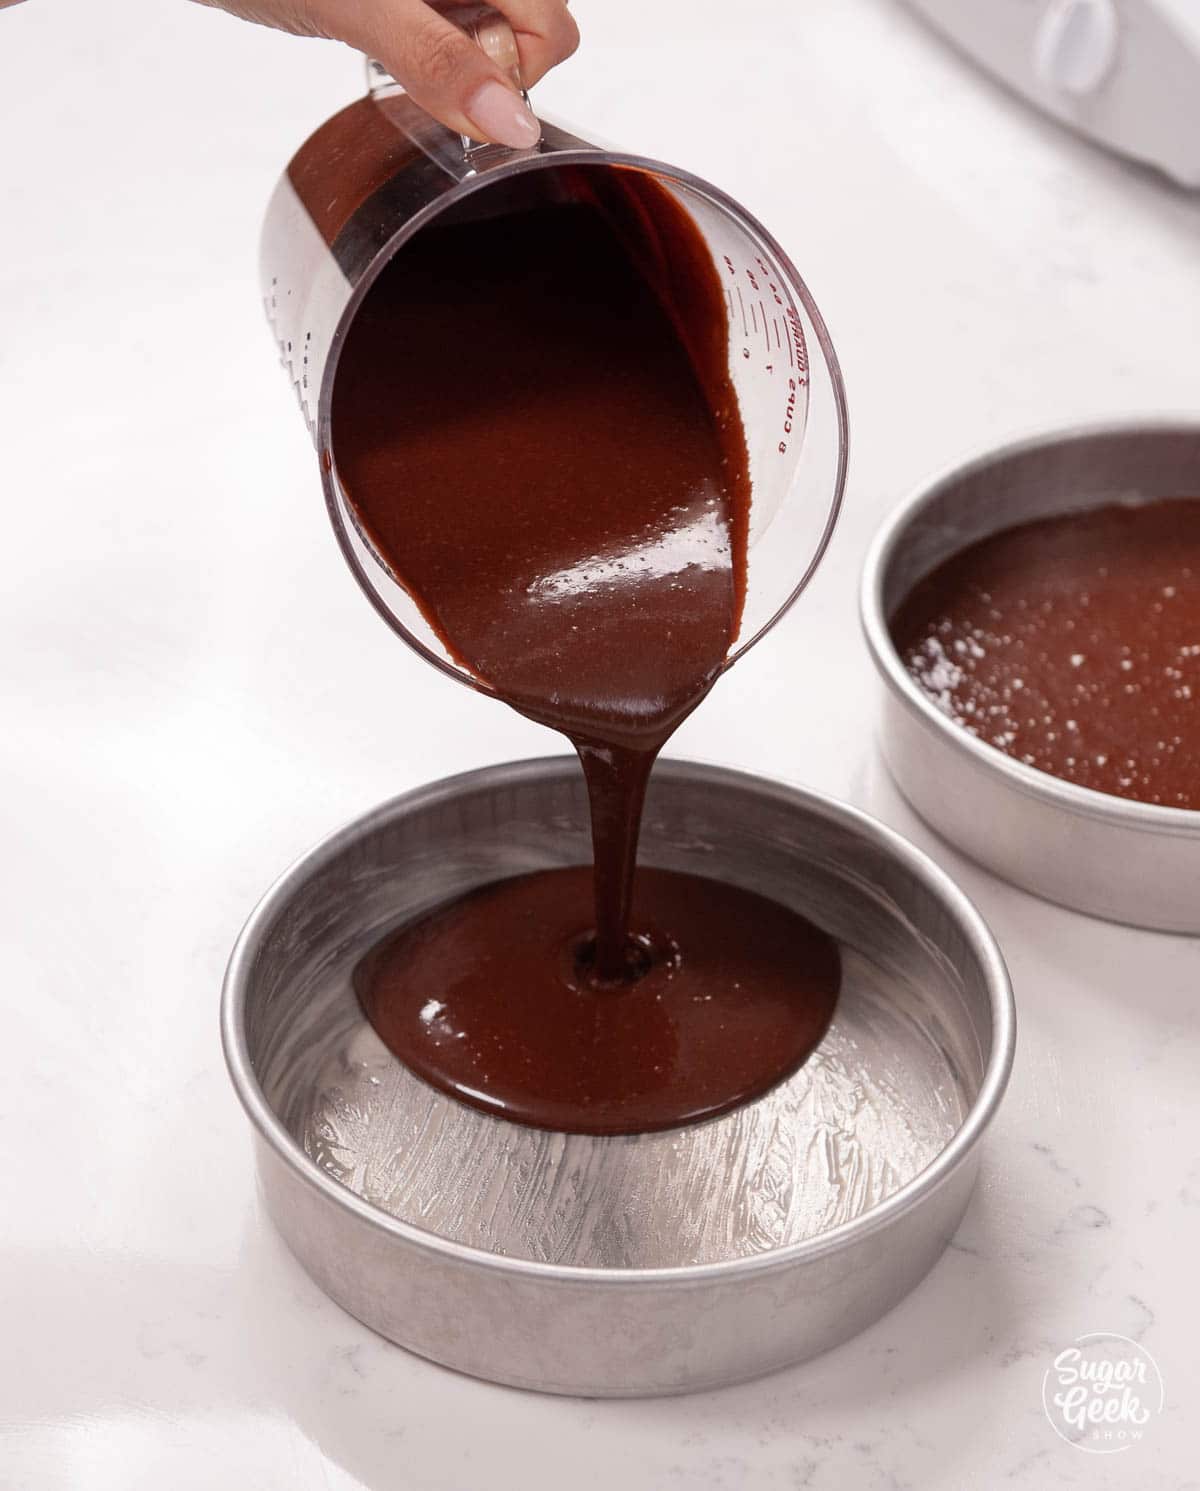
- Divide the cake batter into your prepared cake pans.
- Bake the cakes for 30-40 minutes or until a toothpick inserted into the center comes out clean.
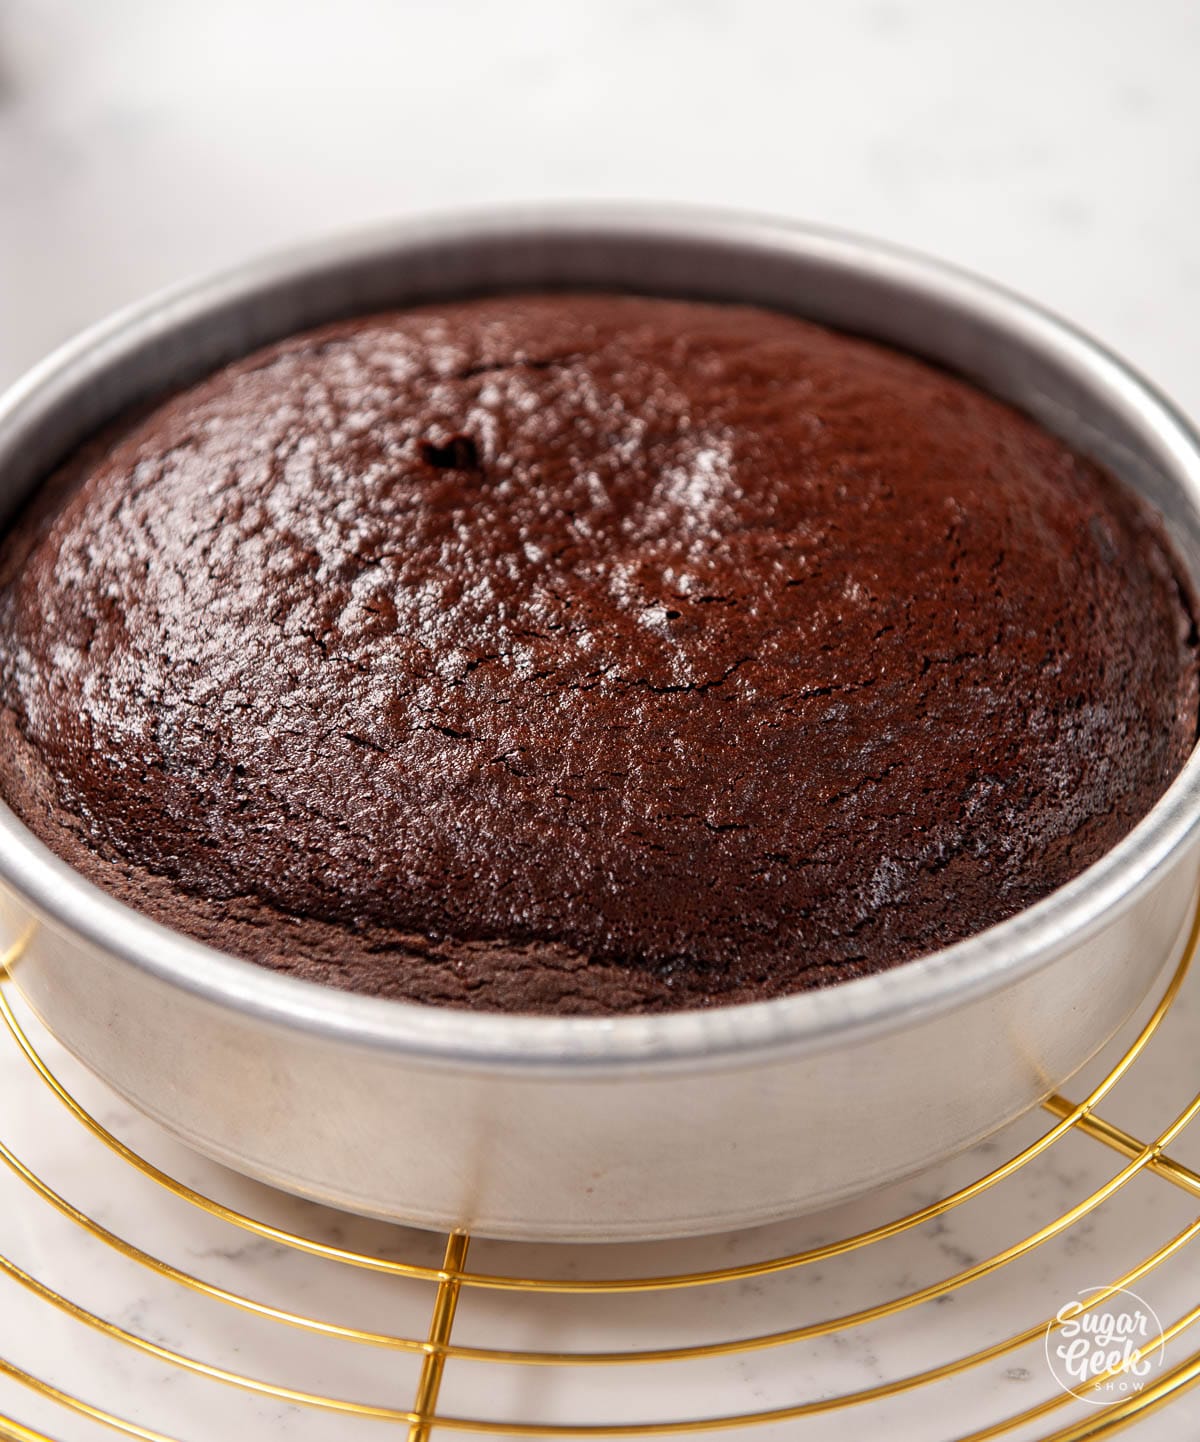
- Let the cakes cool in the pan for 10-15 minutes or until the pan is barely warm to the touch then flip them out onto a cooling rack to cool fully.
- Slice the dome off the top of the cake to make them flat, then wrap them in plastic wrap and place them into the freezer to freeze overnight or a minimum of 6 hours.
For the ice cream layer
- Take the ice cream out of the freezer 30 minutes before you need to use it to allow it to soften.
- Cover the inside of an 8" cake pan in aluminum foil
- Spread the softened ice cream into the cake pan evenly and smooth out the top
- Place it back into the freezer overnight or a minimum of 6 hours
Stabilized whipped cream
- Remember not to make your whipped cream until your layers are frozen and you are ready to assemble the cake.
- Sprinkle your gelatin over the water and let bloom for 5 minutes.
- Melt gelatin for 5 seconds in the microwave. If not fully melted do another 3 seconds. You can tell gelatin is melted when there are no granules of unmelted gelatin visible.
- After dissolving your gelatin, add in 1 ½ teaspoon of heavy cream and mix. If your gelatin is too cold, heat again until it's melted (5 seconds).
- In a cold mixing bowl, whip your heavy for 15 seconds on medium speed until it's foamy.
- Add in your powdered sugar and vanilla and continue mixing on medium speed until you reach very soft peaks, barely holding their shape.Optional: Add a few drops of liquid food coloring to color your whipped cream.
- Turn your mixer down to low and drizzle in your gelatin. Continue mixing on medium speed until your peaks are firm and holding their shape but don't over-mix to the point when your whipped cream starts to look chunky or begins turning into butter. Use within 1 hour.
Assembling the ice cream cake
- Before assembling your cake, make sure there is enough room in your freezer!
- Place your first cake layer on top of your cake platter. Add a thin layer of whipped cream to the top of your cake layer. This is just to fill any gaps or air pockets. Add your ice cream layer, another thin layer of whipped cream, and your second cake layer.
- Cover the whole cake with a thin layer of whipped cream to fill any gaps or holes. Then apply your final coat of whipped cream. Smooth the sides with a bench scraper or offset spatula and then smooth the top.
- Add crushed Oreo crumbs around the base of the cake.
- Place the whole cake back into the freezer while you make your chocolate drip. (See below)Pipe the chocolate drip onto the sides of your frozen cake. Add the leftover to the top and smooth it all out with a spatula.
- With a star tip, add some dollops of whipped cream on top, garnish with Oreos.
- Serve immediately or freeze. Take the cake out of the freezer and place it into the fridge or let it sit at room temperature for 30 minutes before cutting. Use a knife dipped in hot water before slicing.
Ganache Drip
- This ganache drip is very easy to make, but you can also use store-bought hot fudge sauce if you'd prefer.
- Microwave your chocolate for one minute or melt your chocolate over a double boiler.
- Microwave the cream for 1 minute or heat it in a saucepan over medium-hight heat until it's steaming (not boiling) and then pour it over the chocolate.
- Let the mixture sit for 5 minutes then whisk it until it's smooth.
- Let the ganache drip cool to 90ºF before piping it onto your ice cream cake.
Video
Notes
Tips For Success
- It's easiest if you make your cake and ice cream layer ahead of time (the day before) and keep them frozen until you need them. It only takes about 20 minutes to actually assemble the cake once everything is frozen.
- If you want your cakes to be super moist, you can add an extra ounce of oil.
- To make your easy chocolate cake recipe egg-free, use a commercial egg replacer like King Arthur egg replacer or sugar-free applesauce instead of the eggs.
- Before assembling your cake, make sure there is enough room in your freezer!
- Any type of whipped-topping like stabilized whipped cream, CoolWhip or Bettercreme is going to work well with ice cream cake. If you're traveling a long distance with your cake, use a more stable buttercream like easy buttercream or American buttercream.
- Whipped cream whips better if your bowl is cold and the whipping cream is straight from the fridge.
- Don't over-mix your whipped cream. I like to finish whipping mine by hand so it stays nice and creamy
- You cannot re-use leftover stabilized whipped cream or make it ahead of time. It needs to be used right away before the gelatin sets.
- You can make stabilized whipped cream by hand using a whisk and some elbow grease! Just follow the same steps, it will just take a bit longer.
- If you're making your own ice cream for this cake, the softened stage right after it's done mixing is the perfect time to put it into your foil-lined pan.

Nancy says
Would it also work without the ice cream or is it just good for a frozen cake??
I made the ice cream cake and it was sooo good.
Liz Marek says
yes you can
CeeCee says
Hi Liz. Can I use your Oreo Cake Recipe to make this Ice Cream Cake? Thank You!
Elizabeth Marek says
absolutely
Maggie says
This was the perfect chocolate cake ice cream cake. The cake was perfectly rich and moist. The whipped cream icing paired wonderfully. The dripping ganache was divine. This is a keeper! My cake layers pulled away from the side of the pans slightly causing the ice cream layer to stick out. Maybe if I had more patience it would have smoothed out perfectly as it melted slightly. But it did bulge a little making icing more difficult. As a result, it wasn’t quite as pretty as yours. But it had a lot of compliments! Definitely making this again.
Danielle F says
5 stars for taste! Everyone raved appt the flavor of this cake. Thank you for the recipe!
My only complaint was that it was very messy using my stand mixer. Even turning it on low (both for mixing the powder and the coffee) resulted in some spilling of ingredients, but it was not substantial.
Cassandra says
Do you have a receipt for all vanilla ice cream cake
Sugar Geek Show says
Yes! I just came out with one using my white velvet recipe: https://sugargeekshow.com/red-white-and-blue-ice-cream-cake/
Abbey says
This cake is AMAZING!! It is sooo good. The cake is moist and the ice cream tastes great. Thanks!
Sasha says
Hi, Liz. I wonder if I can use milk+vinegar for the buttermilk.
Elizabeth Marek says
Yes you sure can
Patricia says
Wow! This recipe is amazing, thank you for breaking down every detail. Ice cream cake always seemed so intimidating, but I'm totally going to try this now. Thank you thank you thank you!