
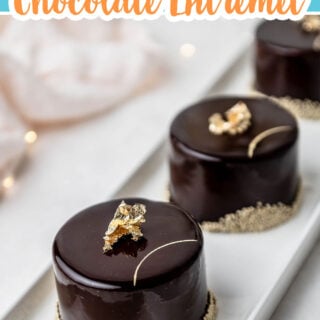
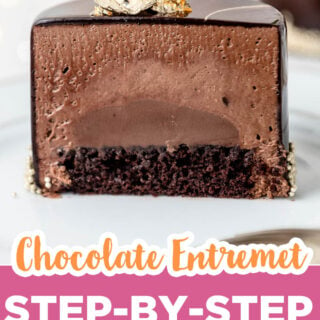
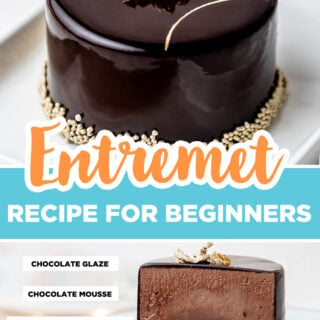


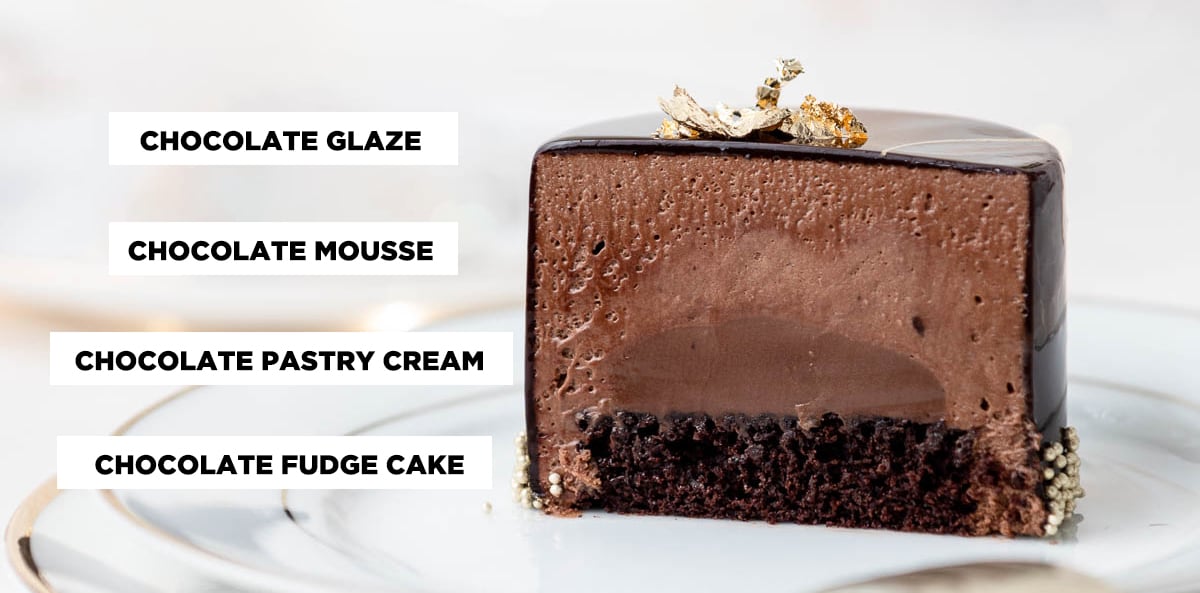
Learn how to make a gorgeous dark chocolate entremet cake that looks like it came straight out of the finest French bakeries. This multi-layered dessert is built with a chocolate sponge cake, silky ganache, a perfect chocolate mousse, a shiny chocolate mirror glaze, and all the mouthfeel of each layer that makes an entremet such a towering treat. Designed by pastry chefs but absolutely achievable at home, this sophisticated dessert proves that even technical skills become manageable when you break them down step by step.
This chocolate mousse cake is elegant, impressive, and surprisingly doable for home cooks who aren't afraid of a little challenge. Whether this is your first entremet or you've dabbled in French pastries before, you'll learn exactly how to build the entire thing from the base to the entremet inserts to the final tower of glossy finish. HUGE thank you to my friend Chef Christophe Rull for teaching us everything we need to know.
What's In This Blog Post
- Entremet Ingredients & Components
- Chocolate Fudge Cake Ingredients
- Dark Chocolate Ganache Ingredients
- Chocolate Mirror Glaze Ingredients
- Making the Chocolate Fudge Cake
- Preparing the Ganache
- Making the Chocolate Mousse
- Assembling the Entremet Layers
- Chocolate Mirror Glaze
- Pouring the Glaze and Final Assembly
- Frequently Asked Questions
- More Recipes You'll Love
It is a two-day culinary adventure, so treat it as a labor of love. But the moment you slice into this mousse-filled mold, the whole thing becomes so worth it-one of the best sweet treats you'll ever create in your own kitchen.
This recipe makes six entremets so you'll have plenty to share or you can freeze them and enjoy them later!
Entremet Ingredients & Components
The number of ingredients might look long, but each part of the entremet plays a crucial role in the stability of the entremet, full flavor, and aesthetic appeal. For a full list of ingredients for each component, be sure to review the recipe card below.
Every entremet cake combines multiple recipes to create distinct textures-creamy, light, crunchy, chewy-so each bite feels intentional. It's a multi-layered dessert that pulls inspiration from pastry creams, crispy cookies, fragrant fruit filling, and airy mousse layers. The importance of its taste comes from how every component works together, and this original iteration focuses on classic dark chocolate.
Chocolate Fudge Cake Ingredients
This sponge cake layer forms the core of your entremet. Moist, rich, and sturdy enough to be part of the entremet without falling apart, it sets the foundation for the hot mixture of ganache that will eventually sit on top. You can switch the chocolate cake out for any cake recipe like vanilla cake, strawberry cake, or even lemon cake!
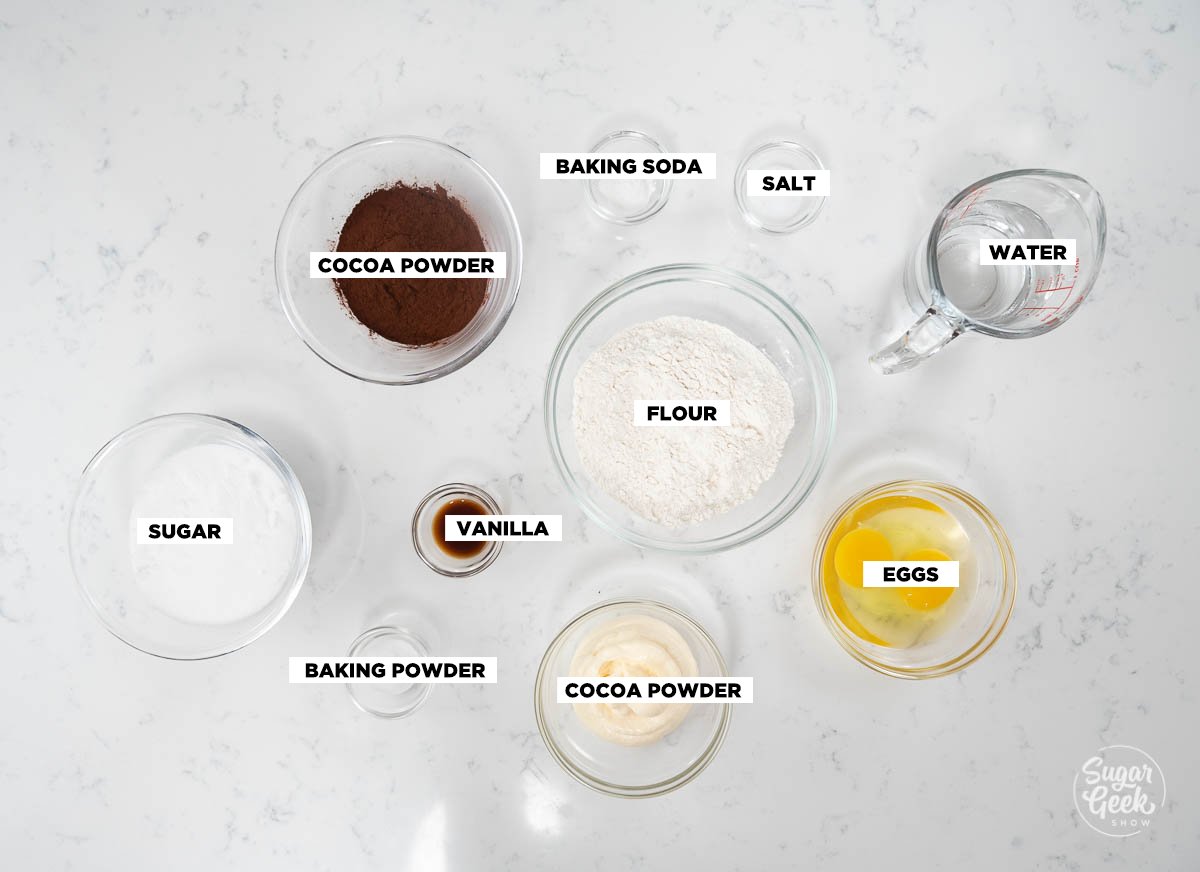
- Eggs - Add structure and richness so the sponge cake holds up inside the entremet. You can swap for carton liquid eggs if that's what you have on hand.
- Granulated sugar - Sweetens the cake while helping keep the crumb tender. Caster sugar works just as well.
- Vanilla extract - Rounds out all the chocolate notes and adds warmth. Almond extract or coffee extract can replace it.
- Mayonnaise - My secret trick for an ultra-moist, fudgy sponge that never turns dry. Sour cream or Greek yogurt works, just expect a slightly thicker texture.
- All-purpose flour - Gives the cake structure. Cake flour is a good substitute if you want a softer crumb.
- Cocoa powder - Adds deep chocolate flavor. Dutch-process cocoa makes it smoother and richer.
- Baking soda - Helps the sponge rise and react with the cocoa. Baking powder can be used in a pinch.
- Baking powder - Adds a little extra lift. If you don't have any, increase the baking soda slightly.
- Salt - Balances the sweetness and boosts the chocolate flavor. Sea salt or kosher salt both work.
- Water - Loosens the batter and keeps the sponge moist. Hot brewed coffee is a fantastic substitution if you want to intensify the chocolate.
Dark Chocolate Ganache Ingredients
This ganache becomes the center of the mousse-filled mold. Glucose or corn syrup gives the chocolate mixture stability at room temperature, helping it stay smooth and glossy. You can also use white chocolate ganache.
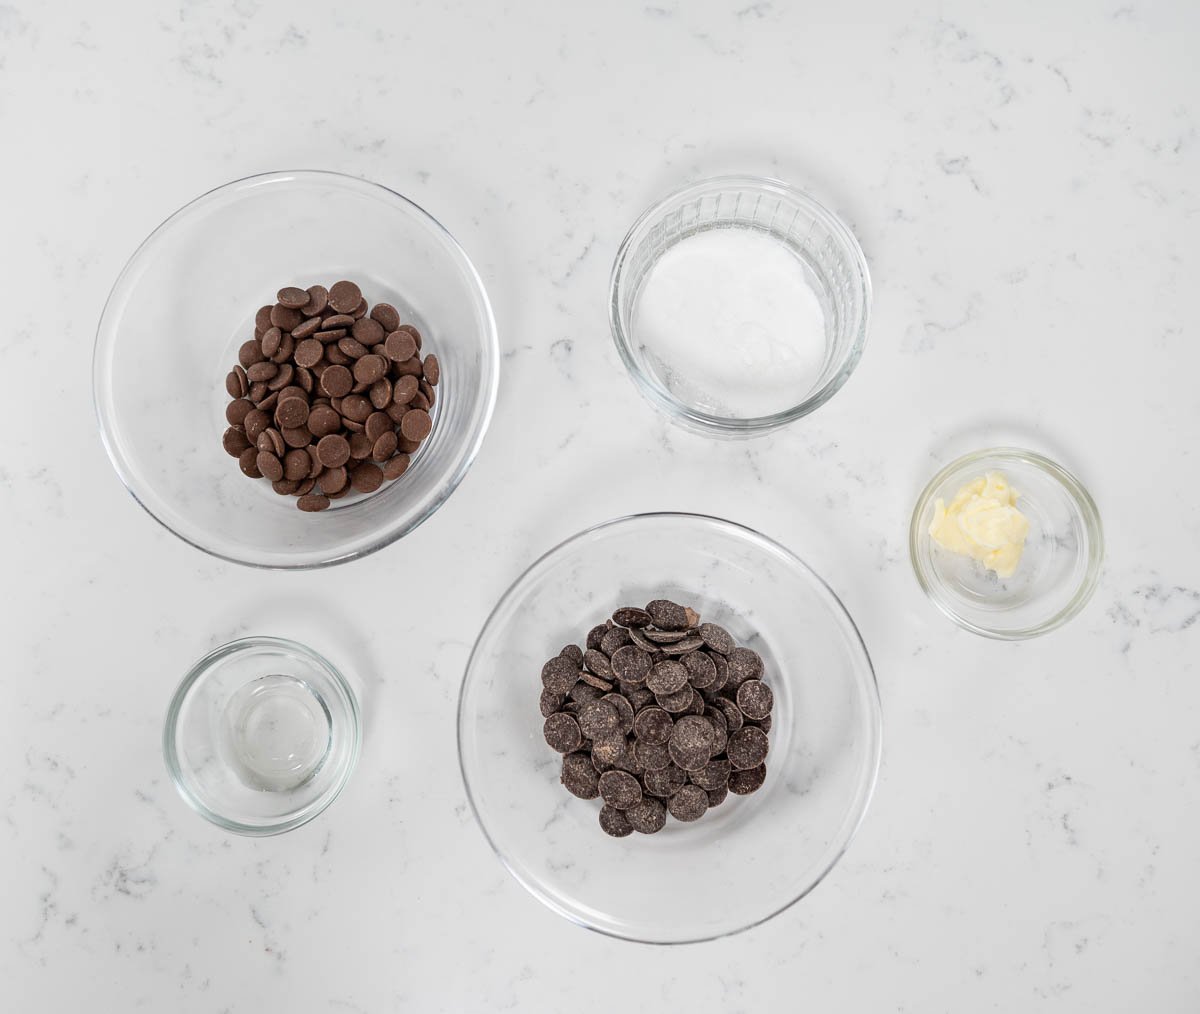
- Granulated sugar - Adds sweetness and keeps the texture smooth. Brown sugar can deepen the flavor.
- Glucose - Gives the ganache stability and a silky finish. Corn syrup or honey can be used instead.
- Heavy whipping cream - Creates the creamy ganache base. Coconut cream works for a dairy-free option.
- Dark chocolate - Provides rich, intense chocolate flavor. Any real chocolate between 60-70% cocoa will work.
- Milk chocolate - Softens the dark chocolate and creates a super smooth center. You can replace it with more dark chocolate if you prefer less sweetness.
- Unsalted butter - Adds shine and a luxurious mouthfeel. European butter like Plugra gives the best texture, but any unsalted butter is fine.
Chocolate Mirror Glaze Ingredients
The shiny mirror glaze is what gives the final tower its stunning presentation. Gelatin, or agar-agar if needed, transforms the hot cream mixture into that flawless, glossy finish you see on professional chocolate cherry bombes and other French desserts. You can also use regular mirror glaze.
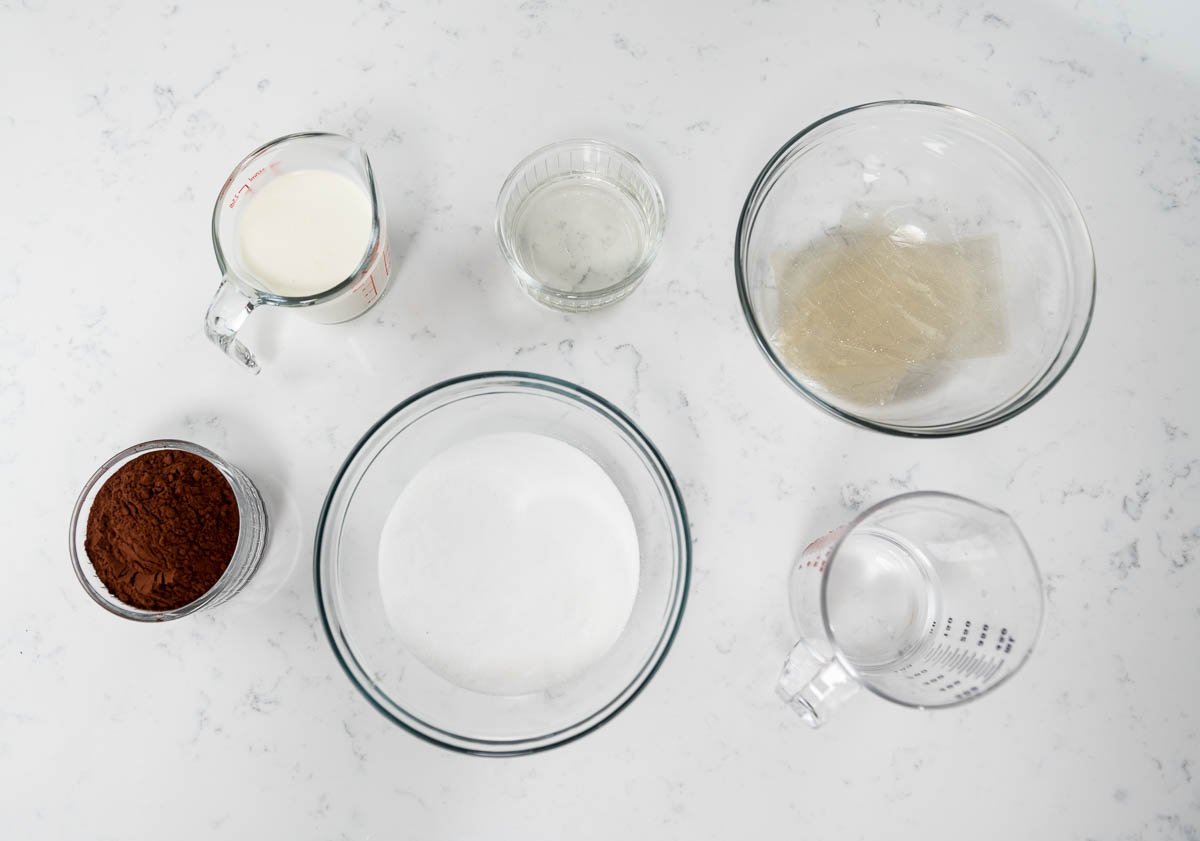
- Water - Helps dissolve the sugar and bloom the gelatin. Coffee can be used to deepen the flavor and color.
- Granulated sugar - Creates the shiny mirror glaze and keeps it stable. Caster sugar is a great substitute.
- Red food coloring - Just a couple drops deepen the chocolate color and enhance the shine. You can skip it or use orange coloring instead.
- Heavy whipping cream - Adds richness and helps emulsify the cocoa powder. Coconut cream can be used for dairy-free glazing.
- Glucose - Helps the glaze achieve that flawless, bubble-free finish. Corn syrup is an easy swap.
- Cocoa powder - Gives the glaze its dark chocolate flavor and glossy appearance. Dutch-process cocoa gives an even smoother finish.
- Gelatin sheets - Set the glaze so it flows beautifully over the frozen entremet. Powdered gelatin works when bloomed in cold water first.
Chocolate Mousse
Chef Christophe Rull uses 64% dark chocolate, but you can use any real chocolate-milk chocolate or white chocolate-as long as it contains cocoa butter. The whipped cream component acts as the airy ingredient, the pâte à bombe creates structure, and the ganache adds full flavor to the mass of mousse. If you want an easier version, my easy chocolate honey mousse would also work.
- Heavy whipping cream - Whipped to soft peaks to lighten the mousse and make it airy. Coconut cream is the best dairy-free alternative.
- Dark chocolate (64%) - The base flavor of your mousse. Any real chocolate between 60-70% cocoa works beautifully.
- Egg yolks - Used to make the pâte à bombe, which gives the mousse its structure and velvety texture. Pasteurized yolks are a safer and easier swap.
- Granulated sugar - Sweetens and stabilizes the pâte à bombe. Caster sugar also works well.
- Water - Used to cook the sugar syrup for the pâte à bombe. Coffee or espresso can be used instead for a deeper chocolate flavor.
- Whipped cream - Folded in at the end to create the light, airy texture that makes mousse so irresistible. Stabilized whipped cream works too if you need extra firmness.
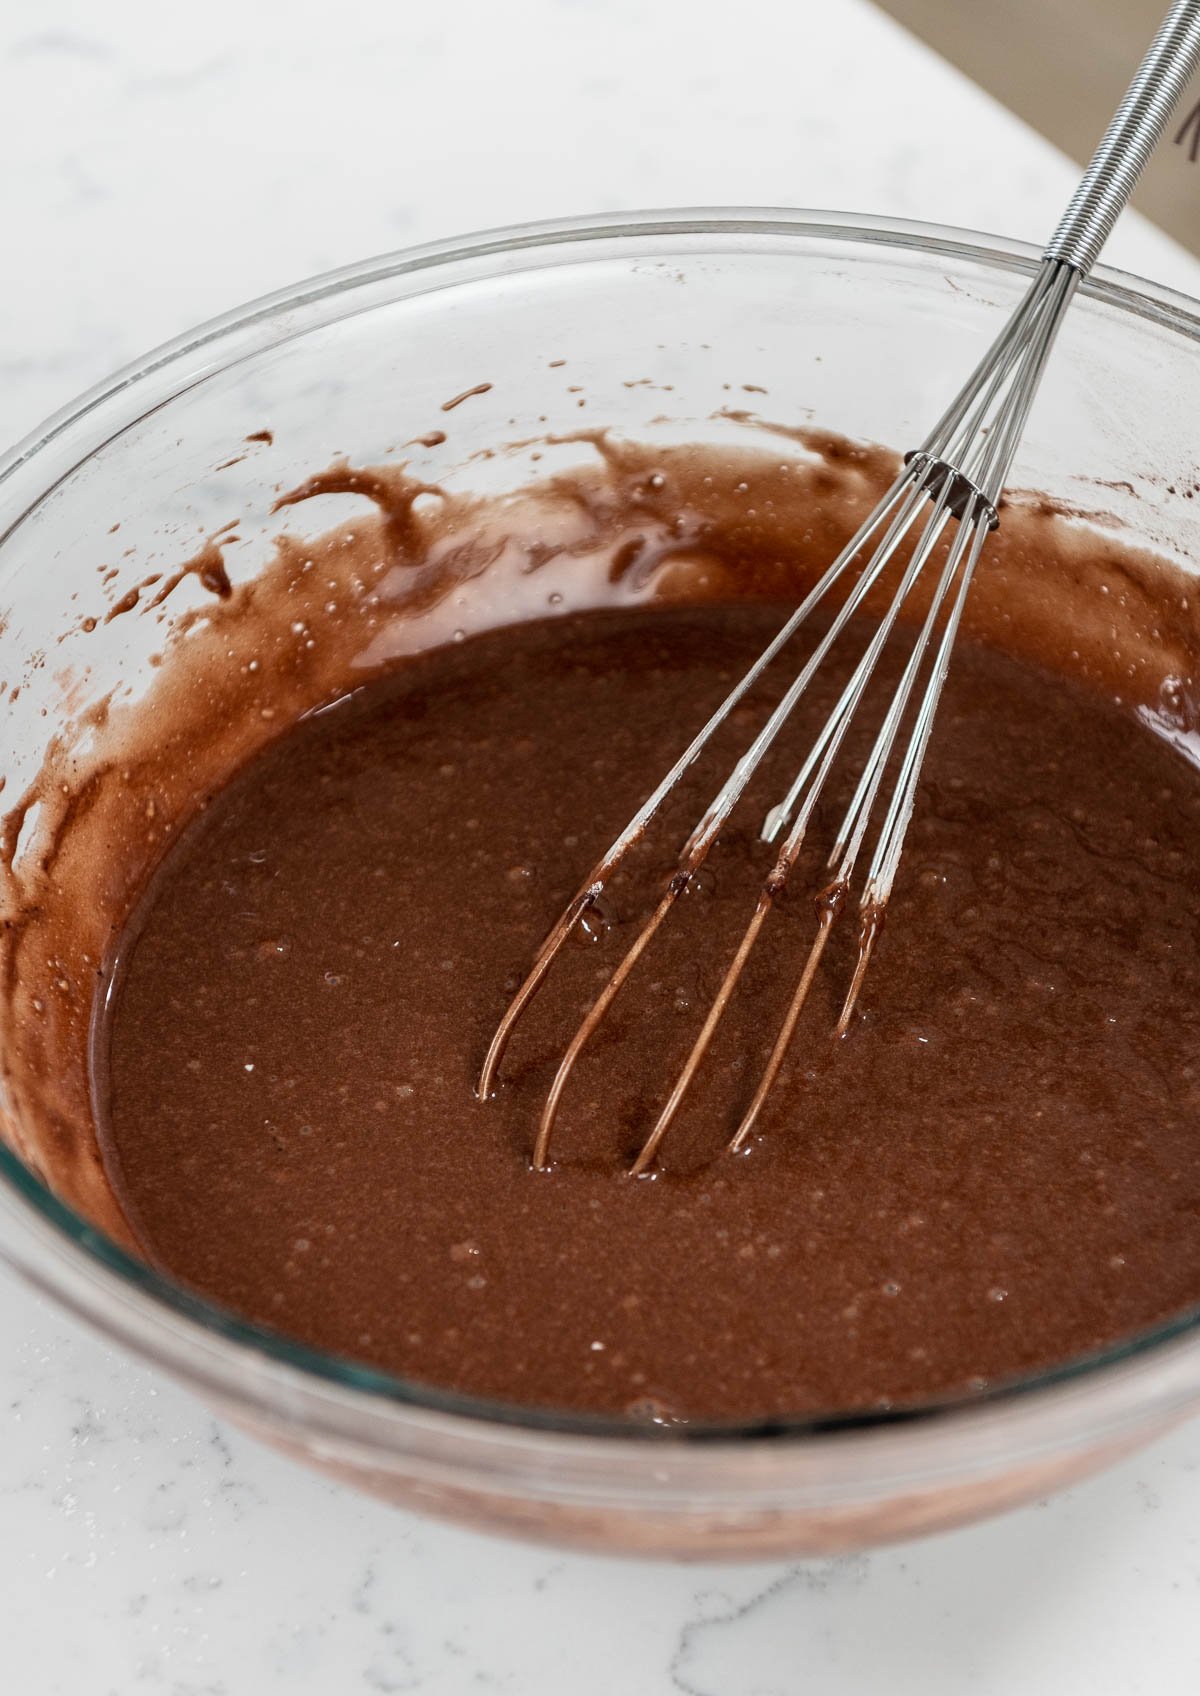
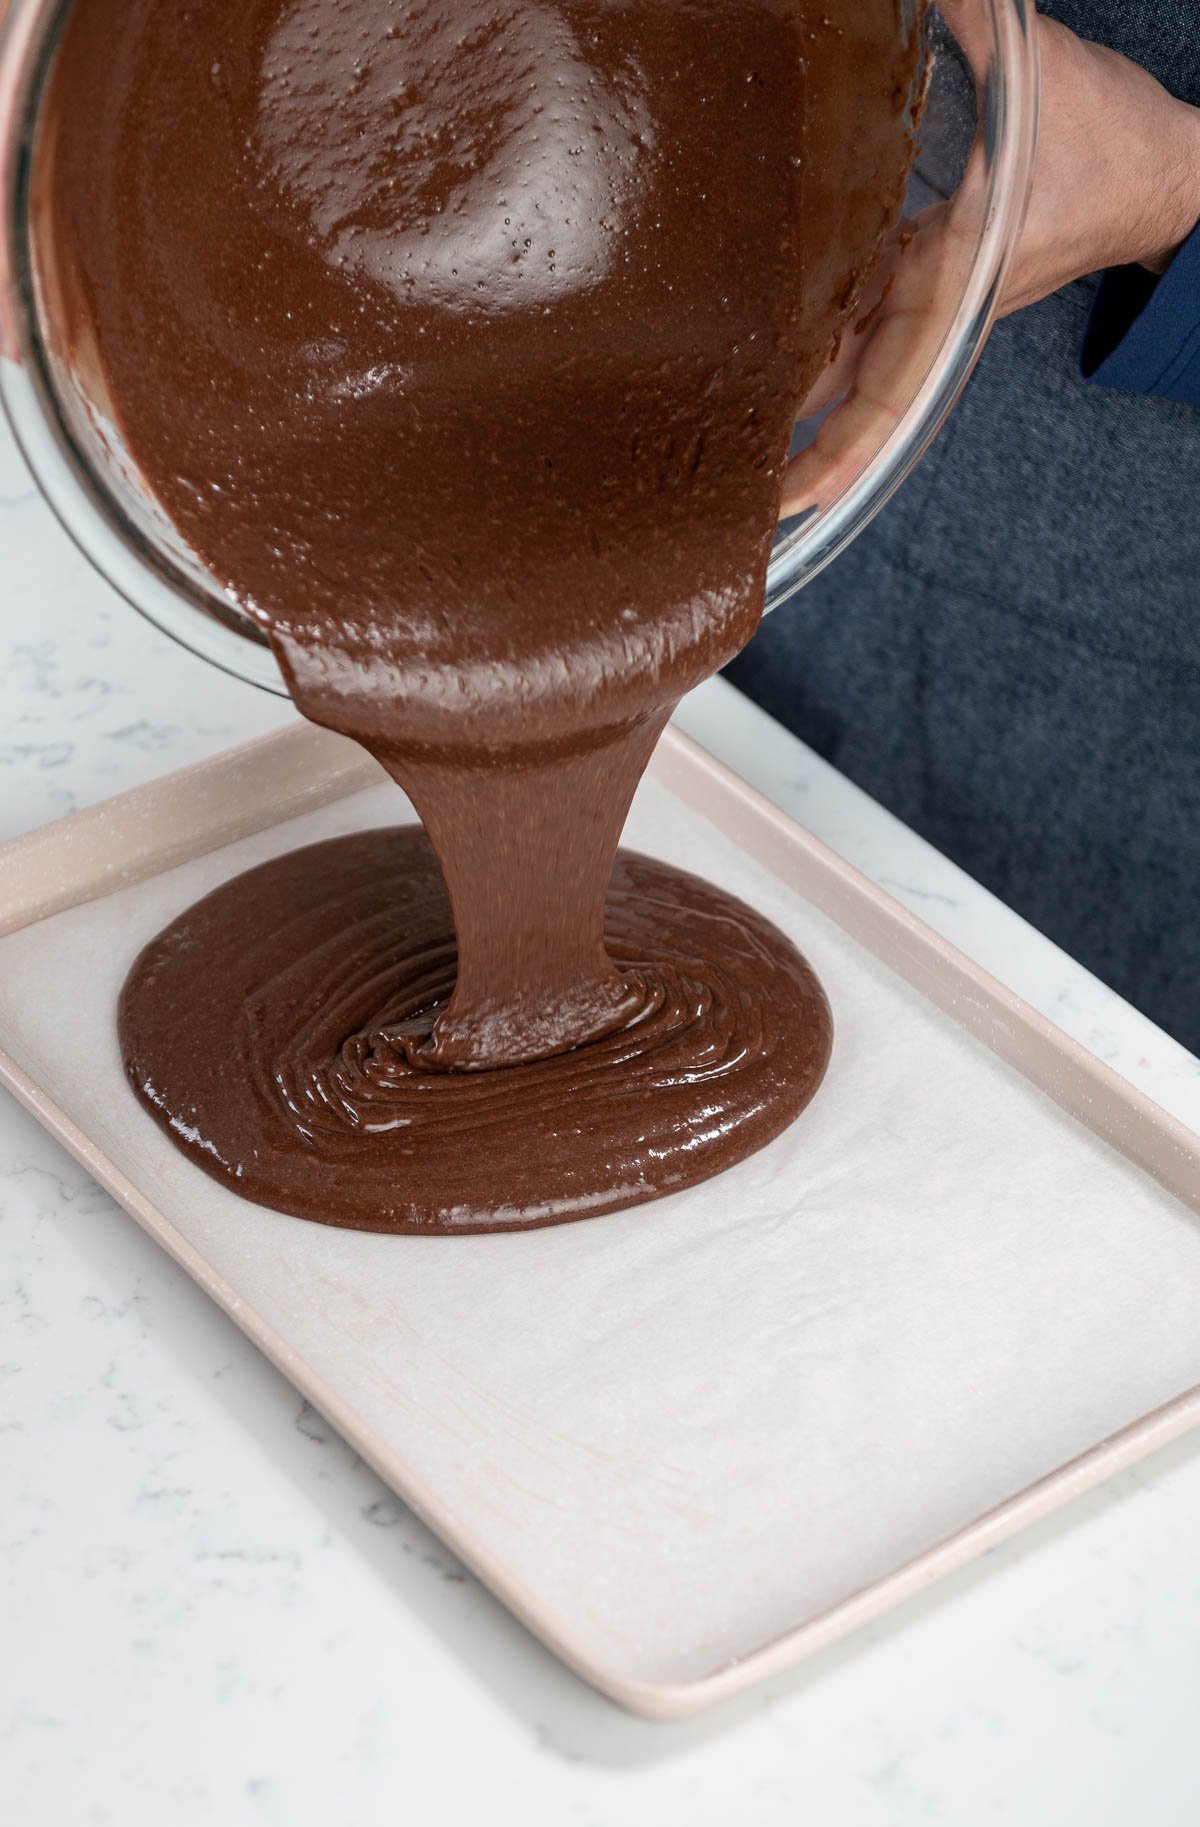
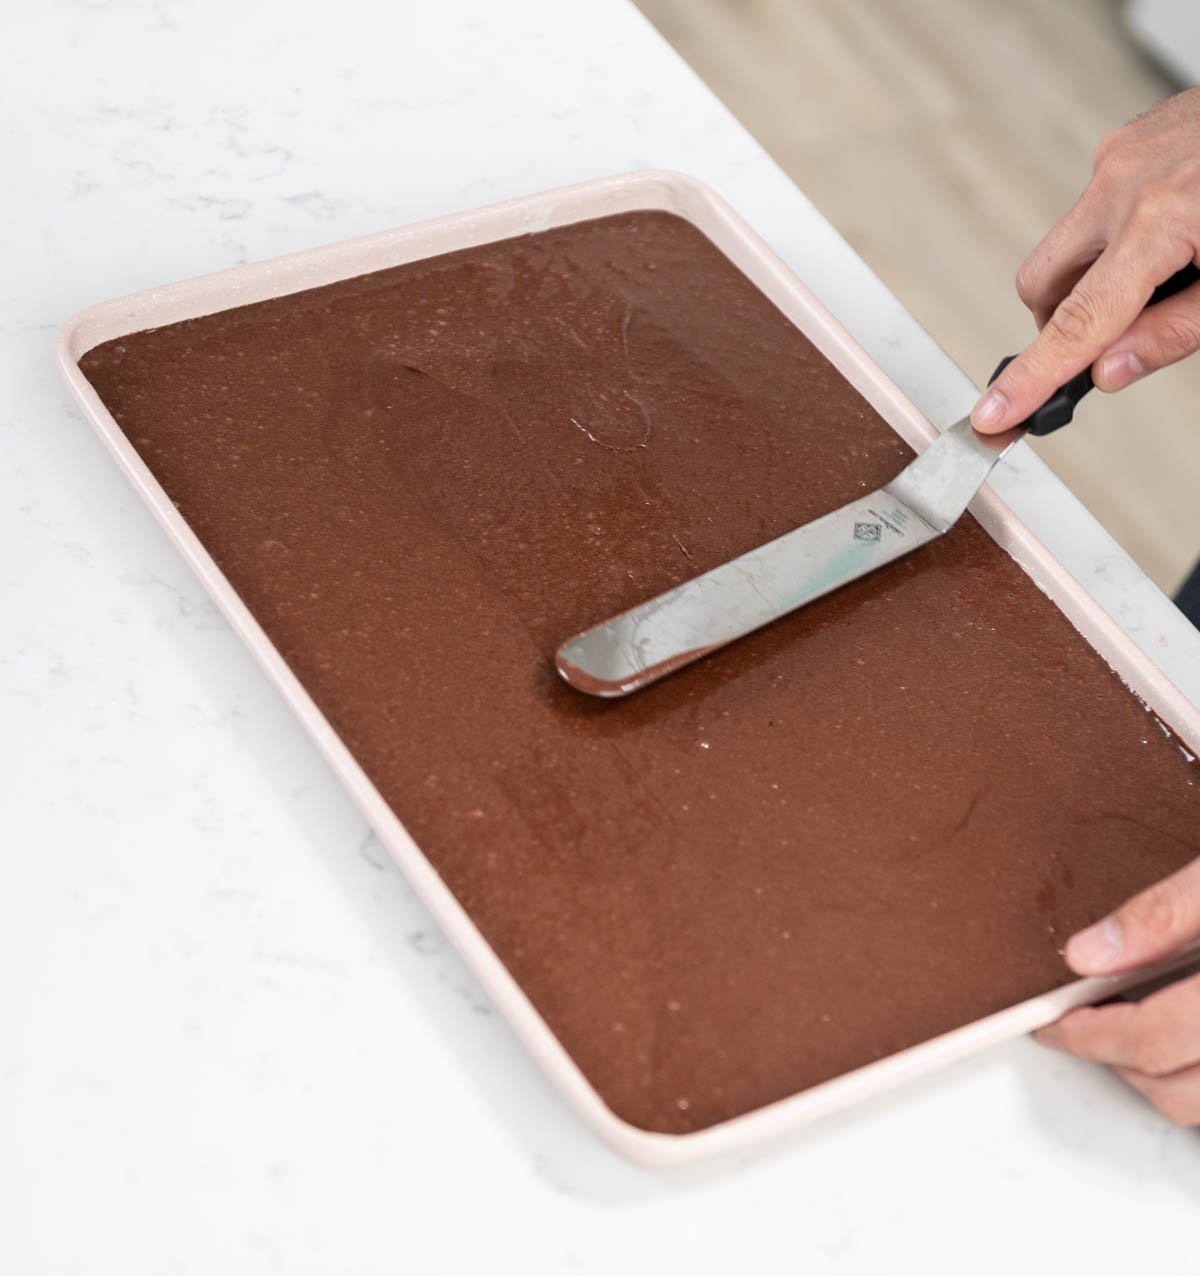
Making the Chocolate Fudge Cake
This fudgy cake comes together quickly and easily and is the perfect base for your entremet! You can switch the cake out with other flavors like vanilla cake, strawberry cake or even lemon cake!
- Line a ¼ sheet pan (9"x13") with parchment paper and preheat your oven to 350°F.
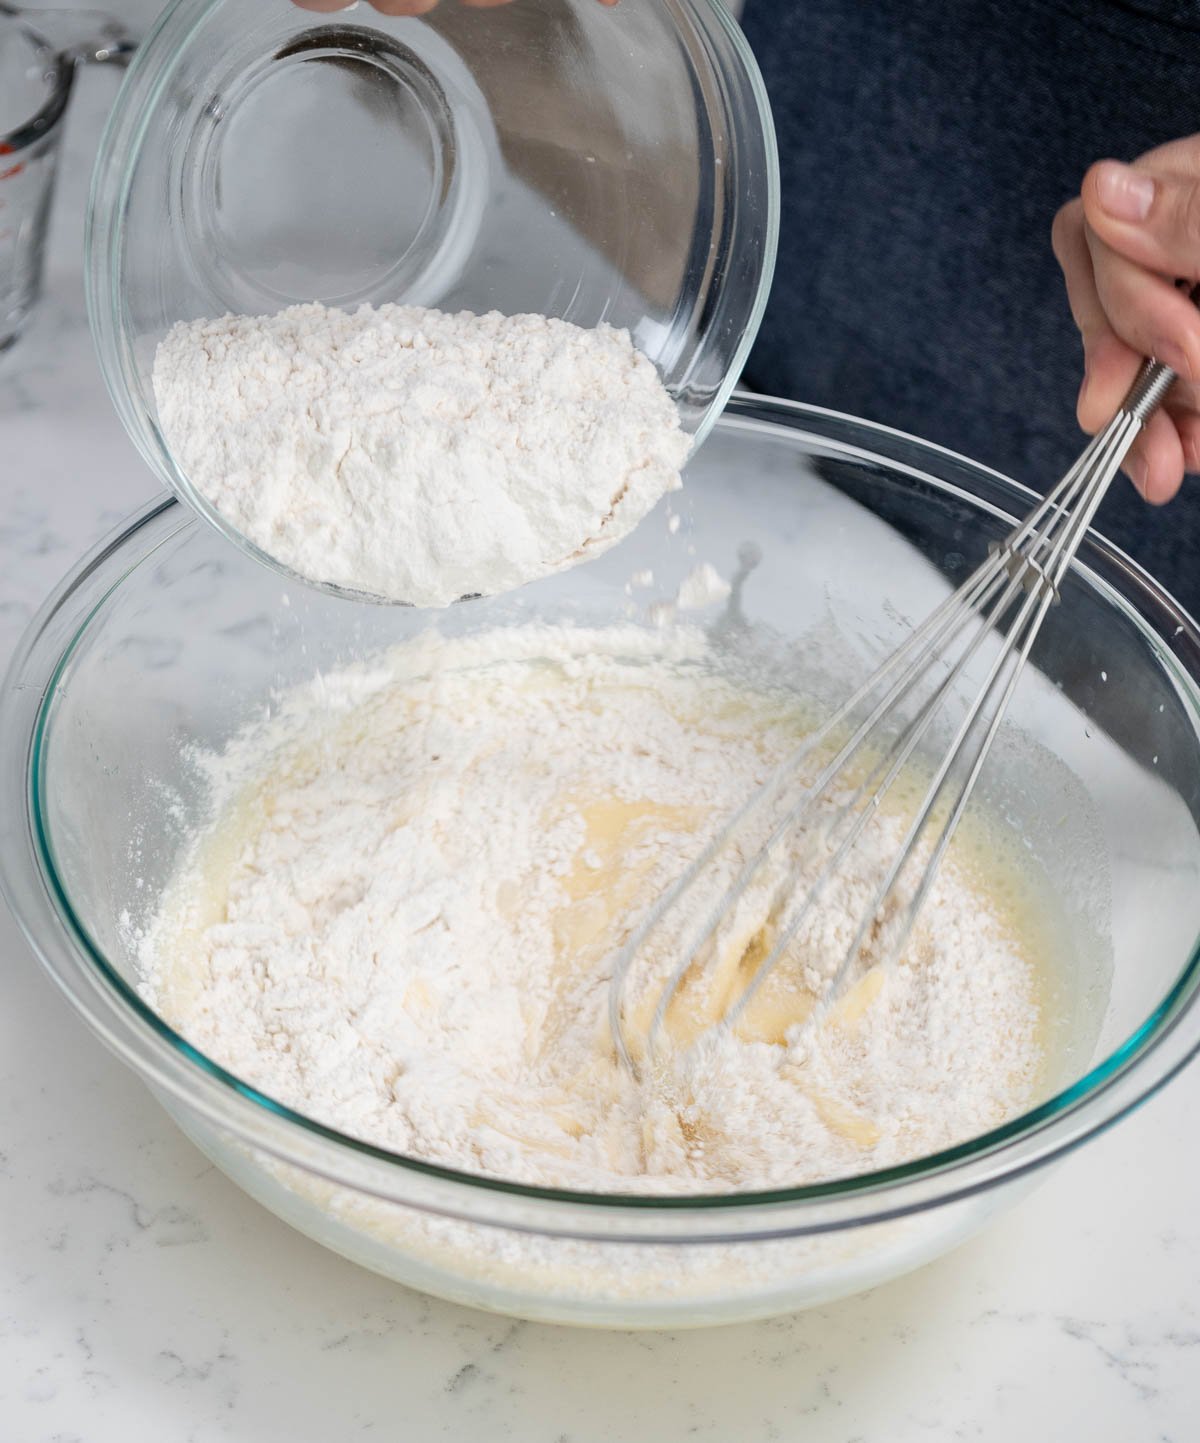
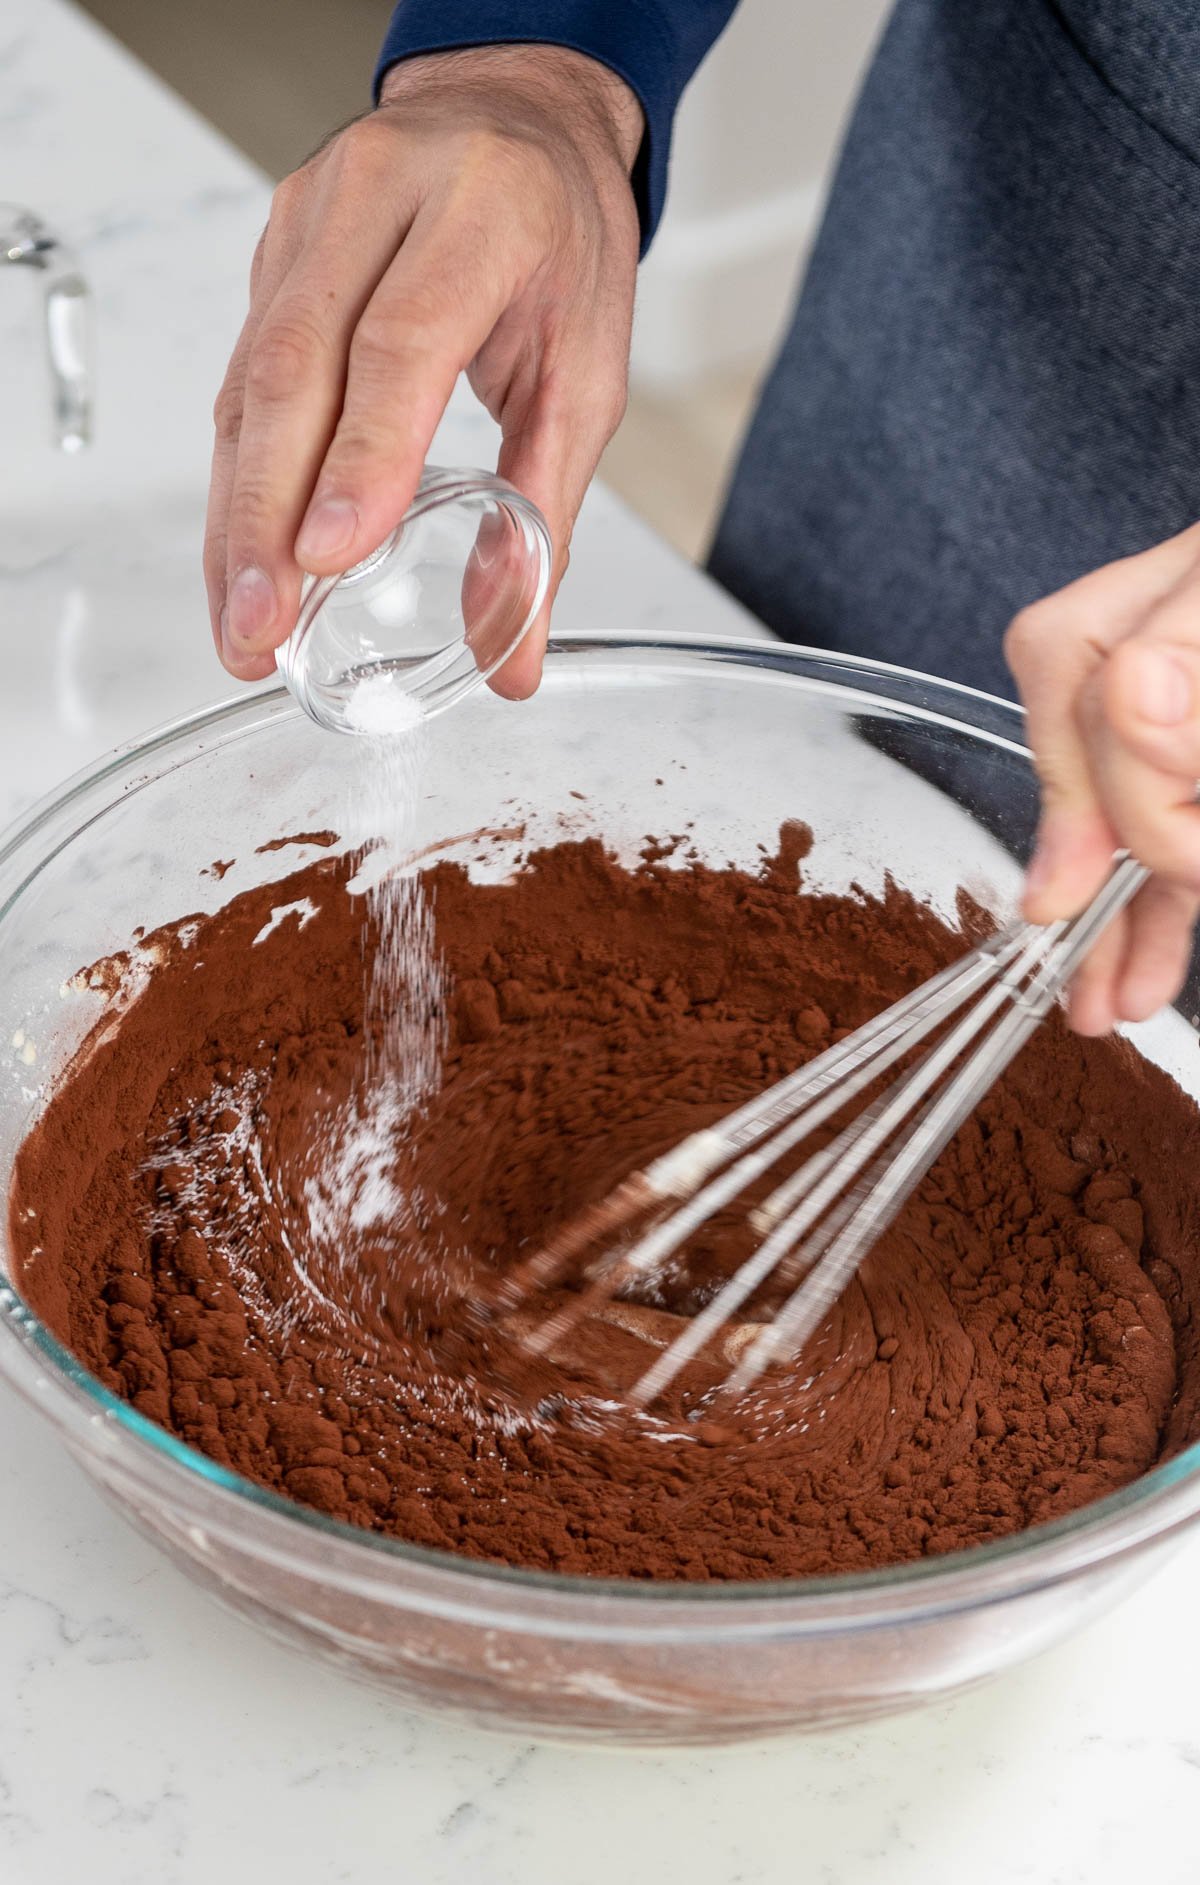
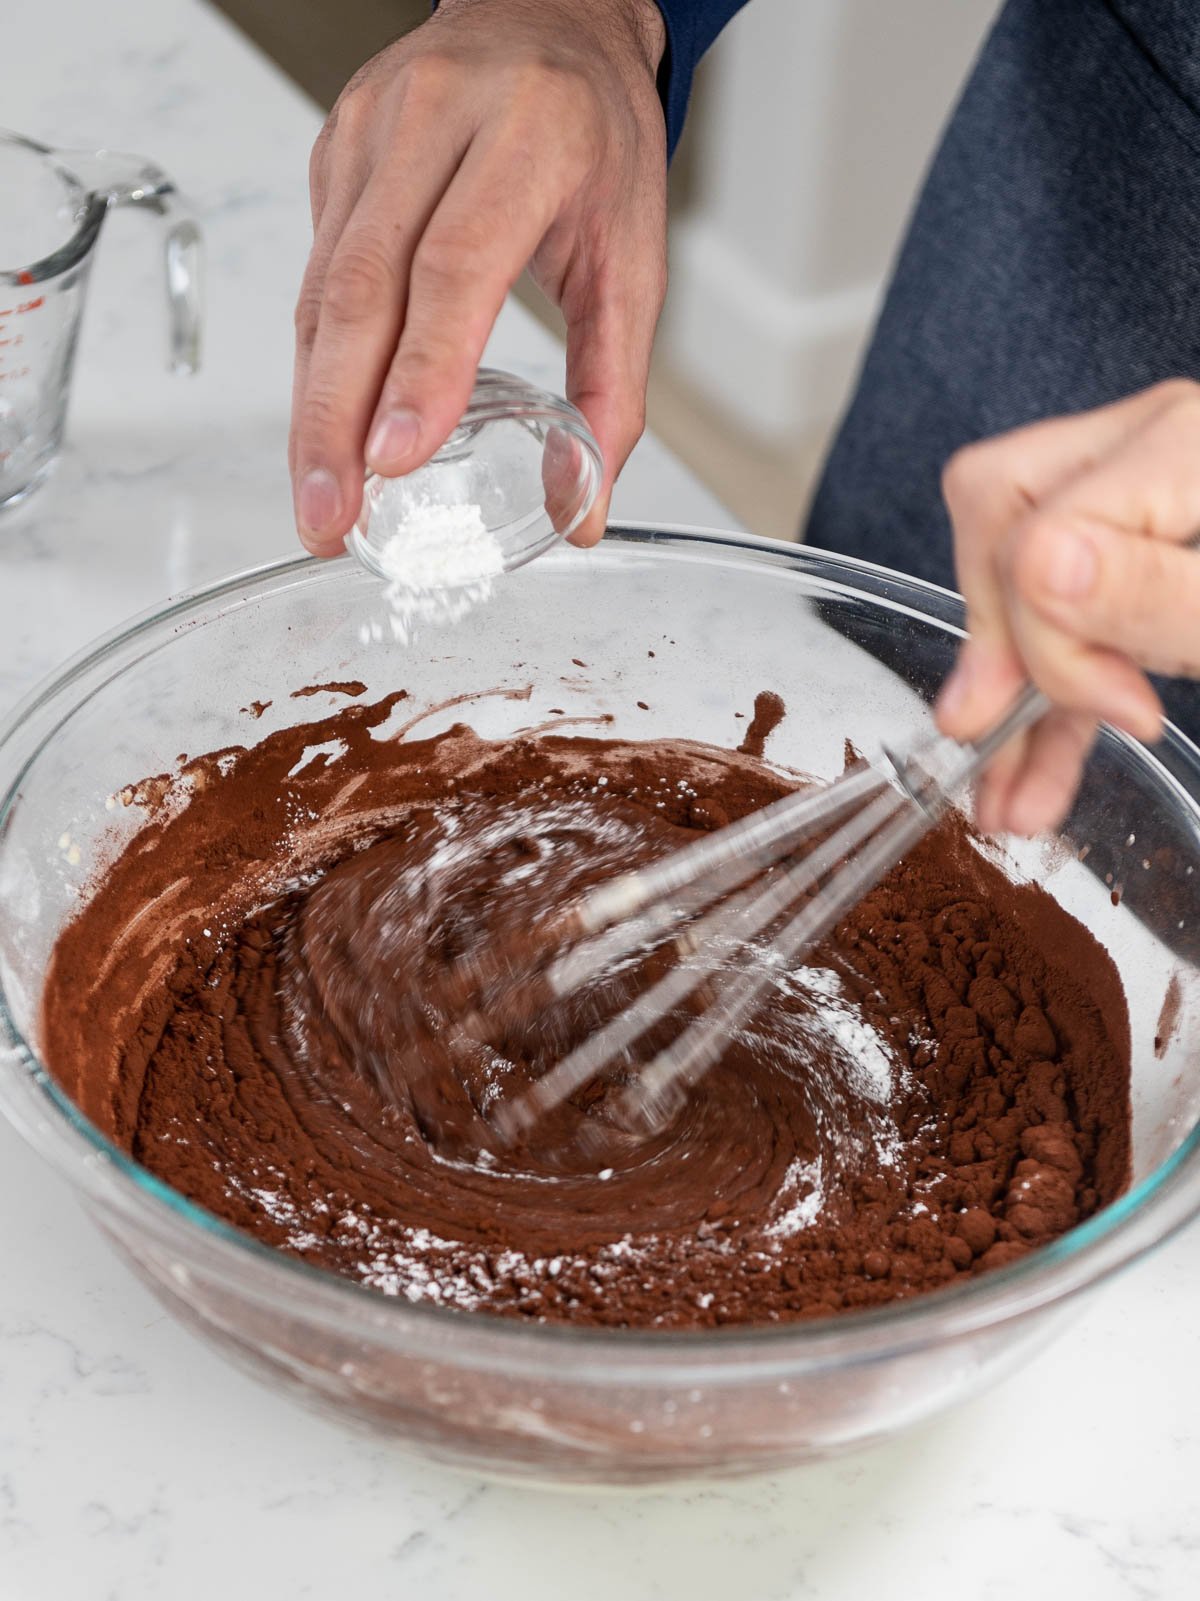
- In the bowl of your stand mixer fitted with the whisk attachment, combine sugar, flour, cocoa powder, baking soda, baking powder, and salt.
- In a separate bowl, whisk eggs, mayonnaise, water, and vanilla until smooth.
- Pour the egg mixture into the dry ingredients on low speed, then increase to high speed to combine fully.
- Spread the batter evenly across the prepared pan.
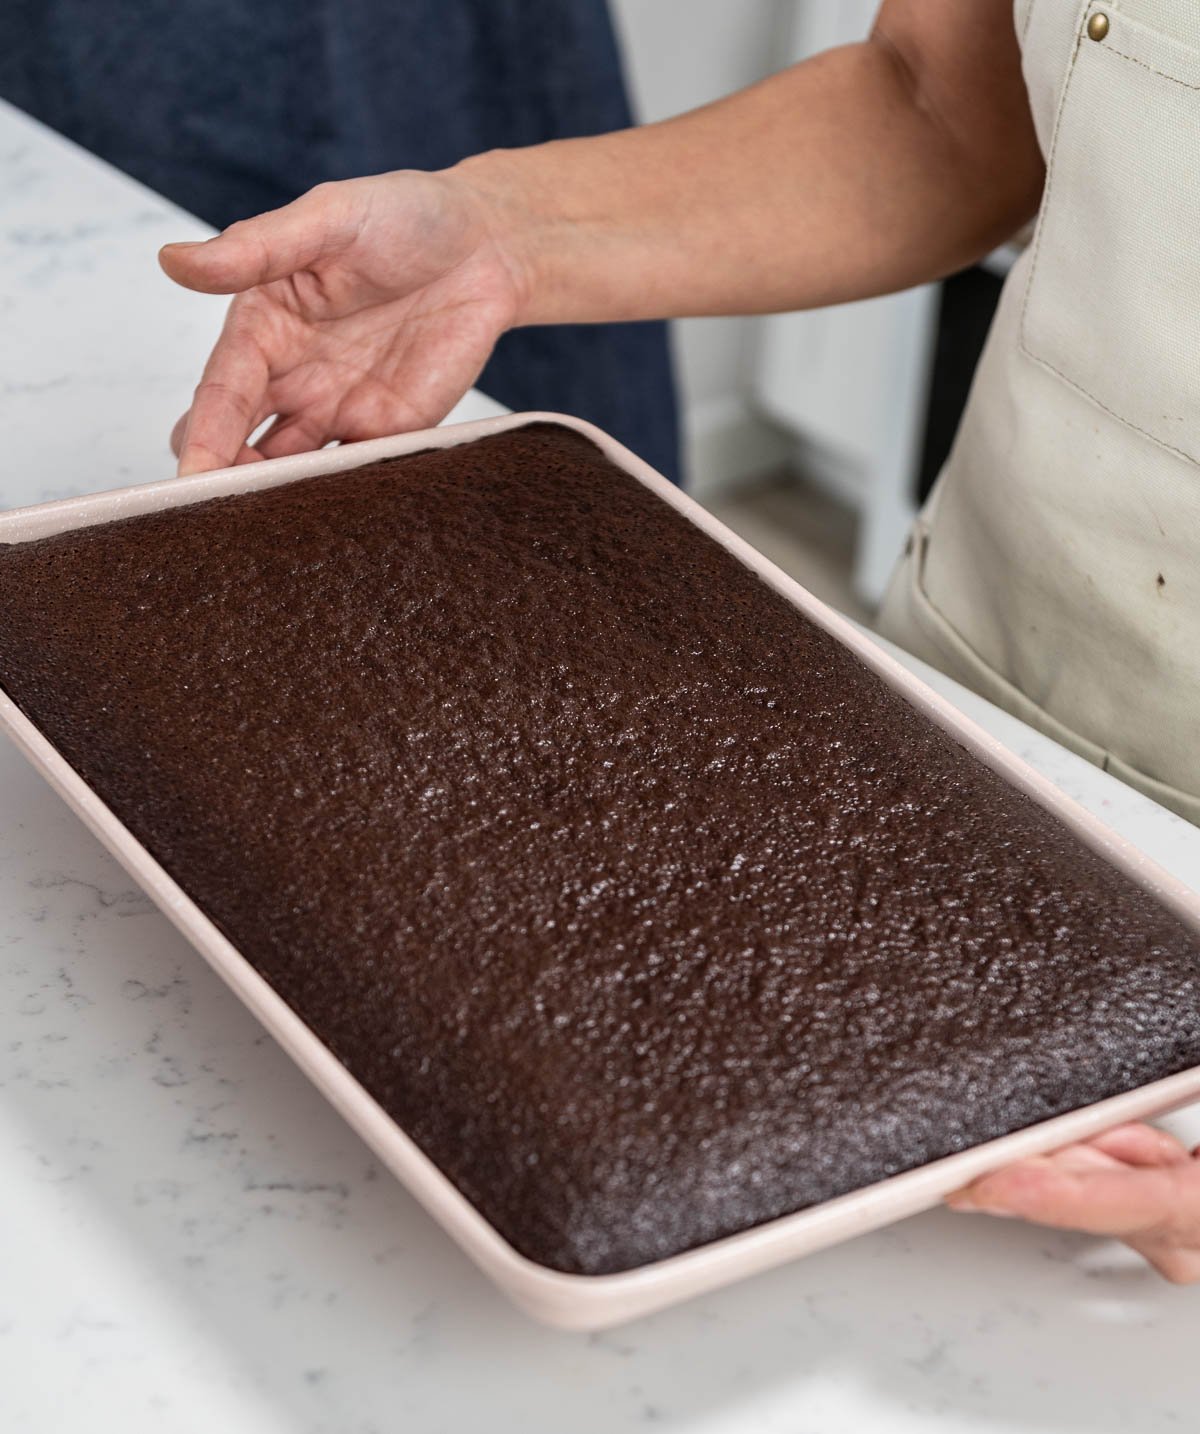
- Bake the cake for 15-20 minutes or until the center is set.
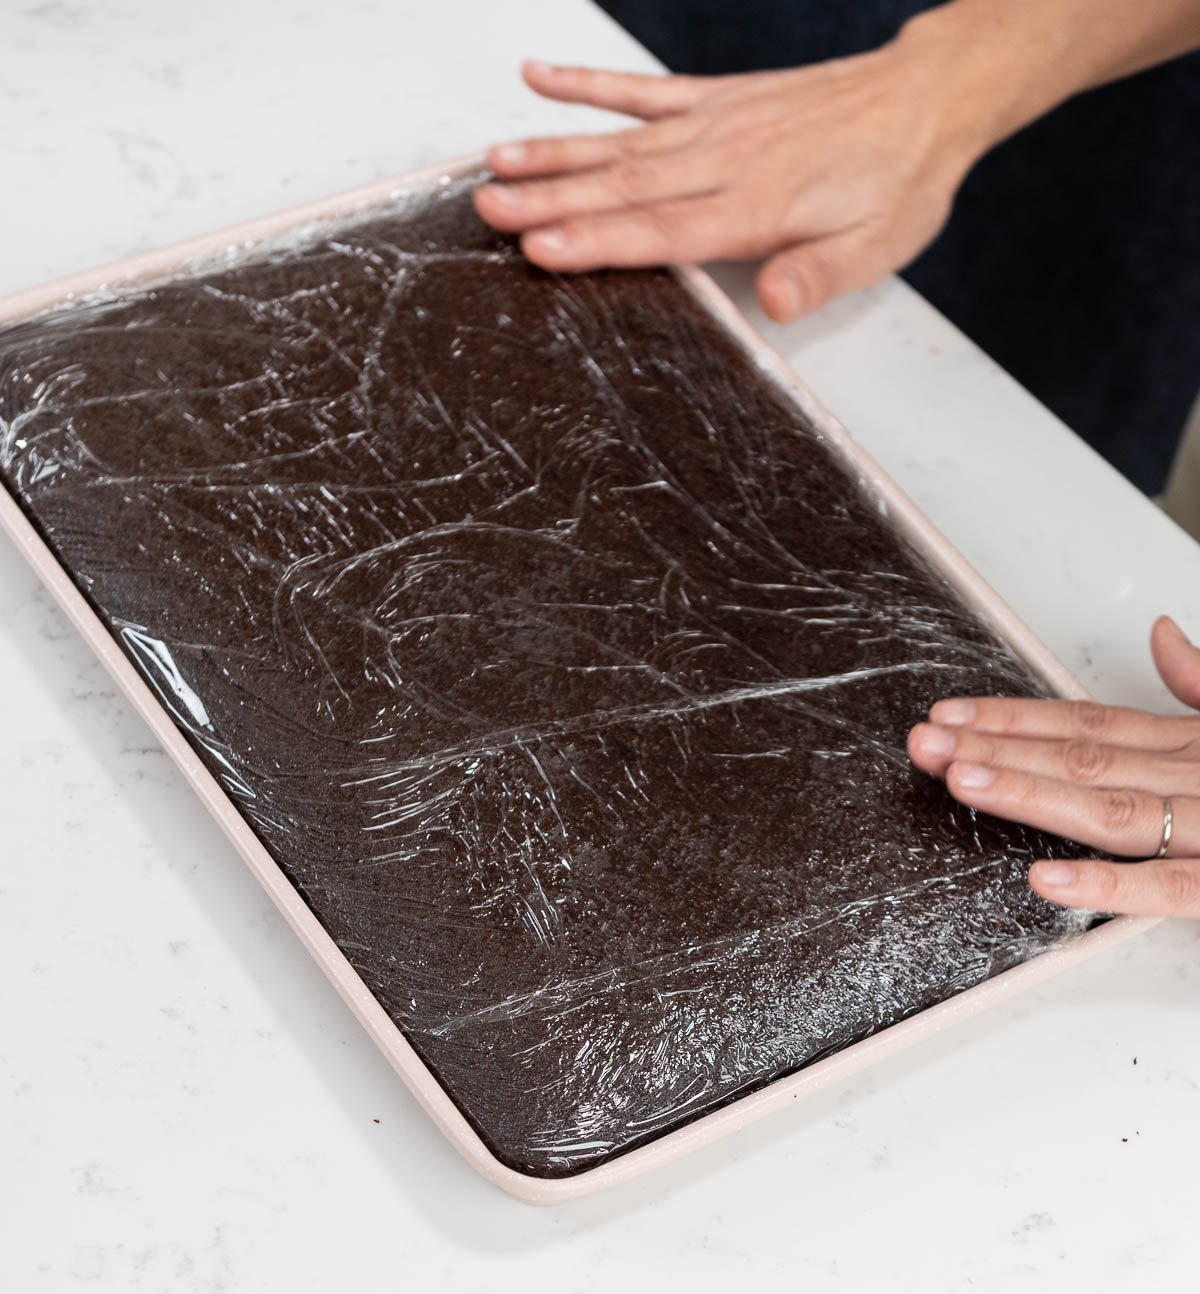
- Cool the cake for 15 minutes, then remove the cake from the pan to cool fully.
- Use cling wrap or plastic wrap to cover once baked and cooled, then freeze so it's easier to trim later with a cookie cutter.
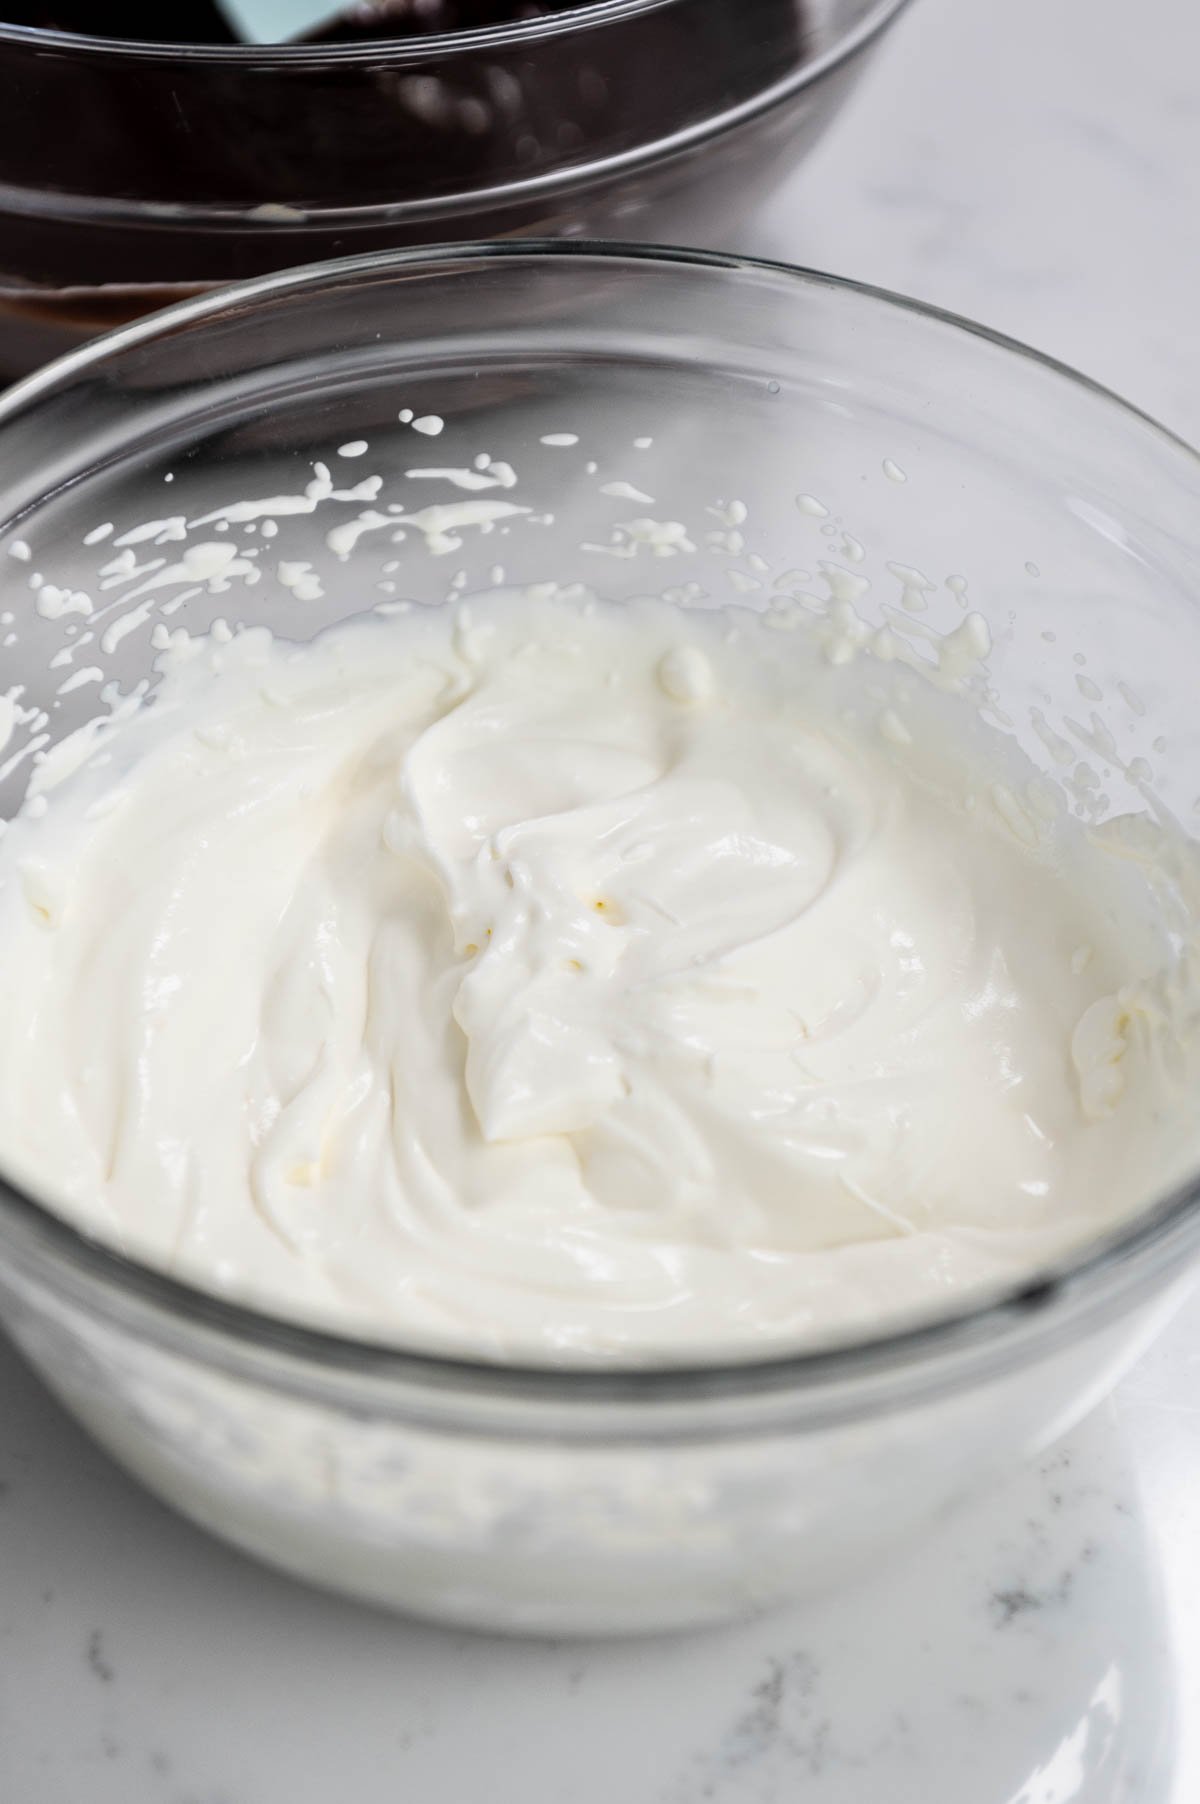
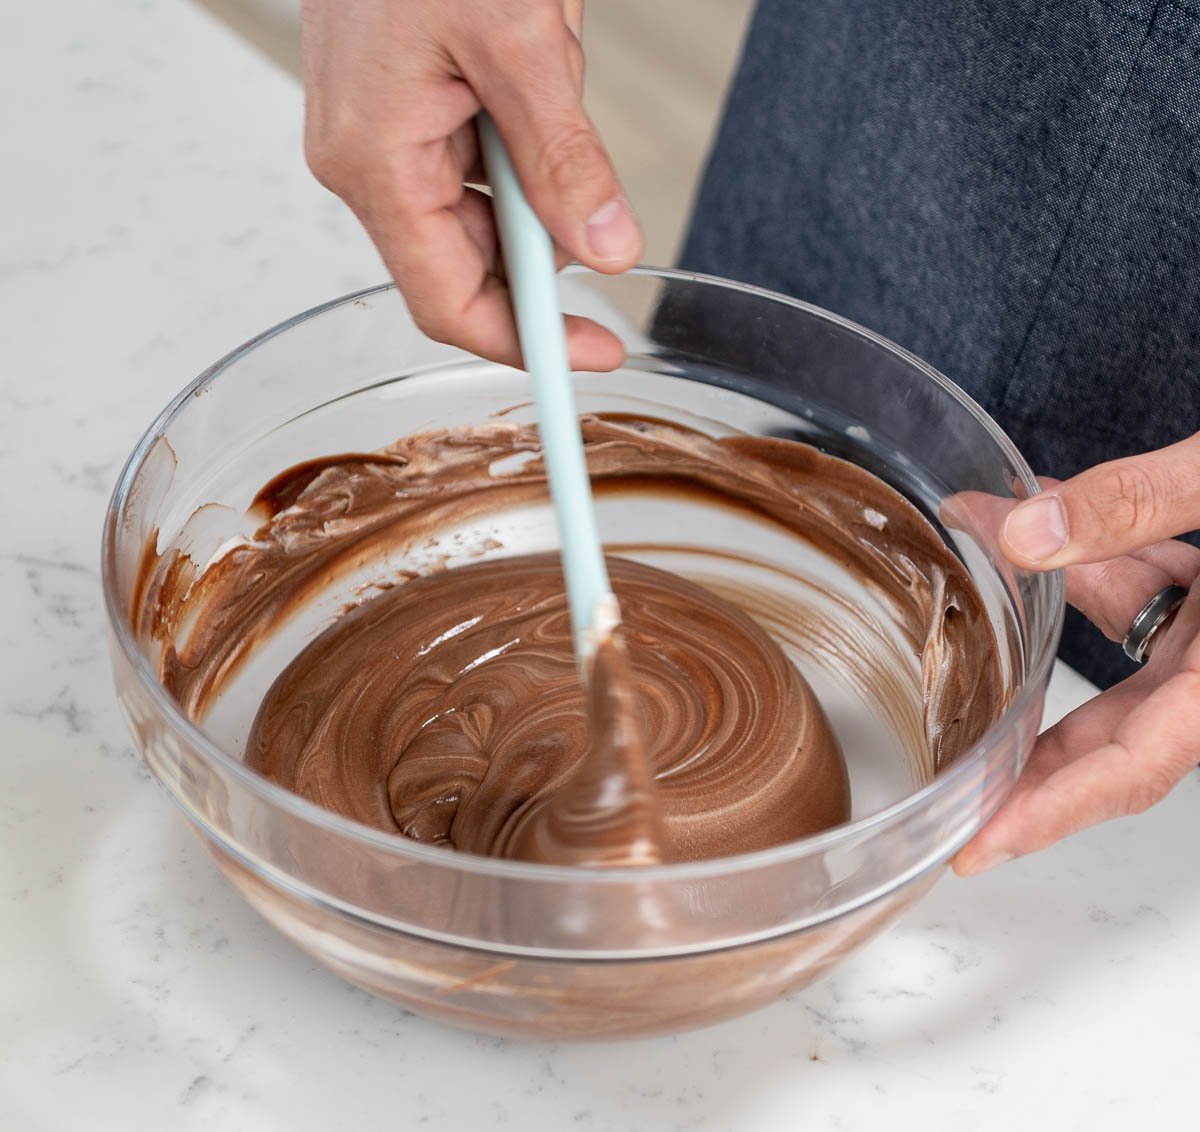
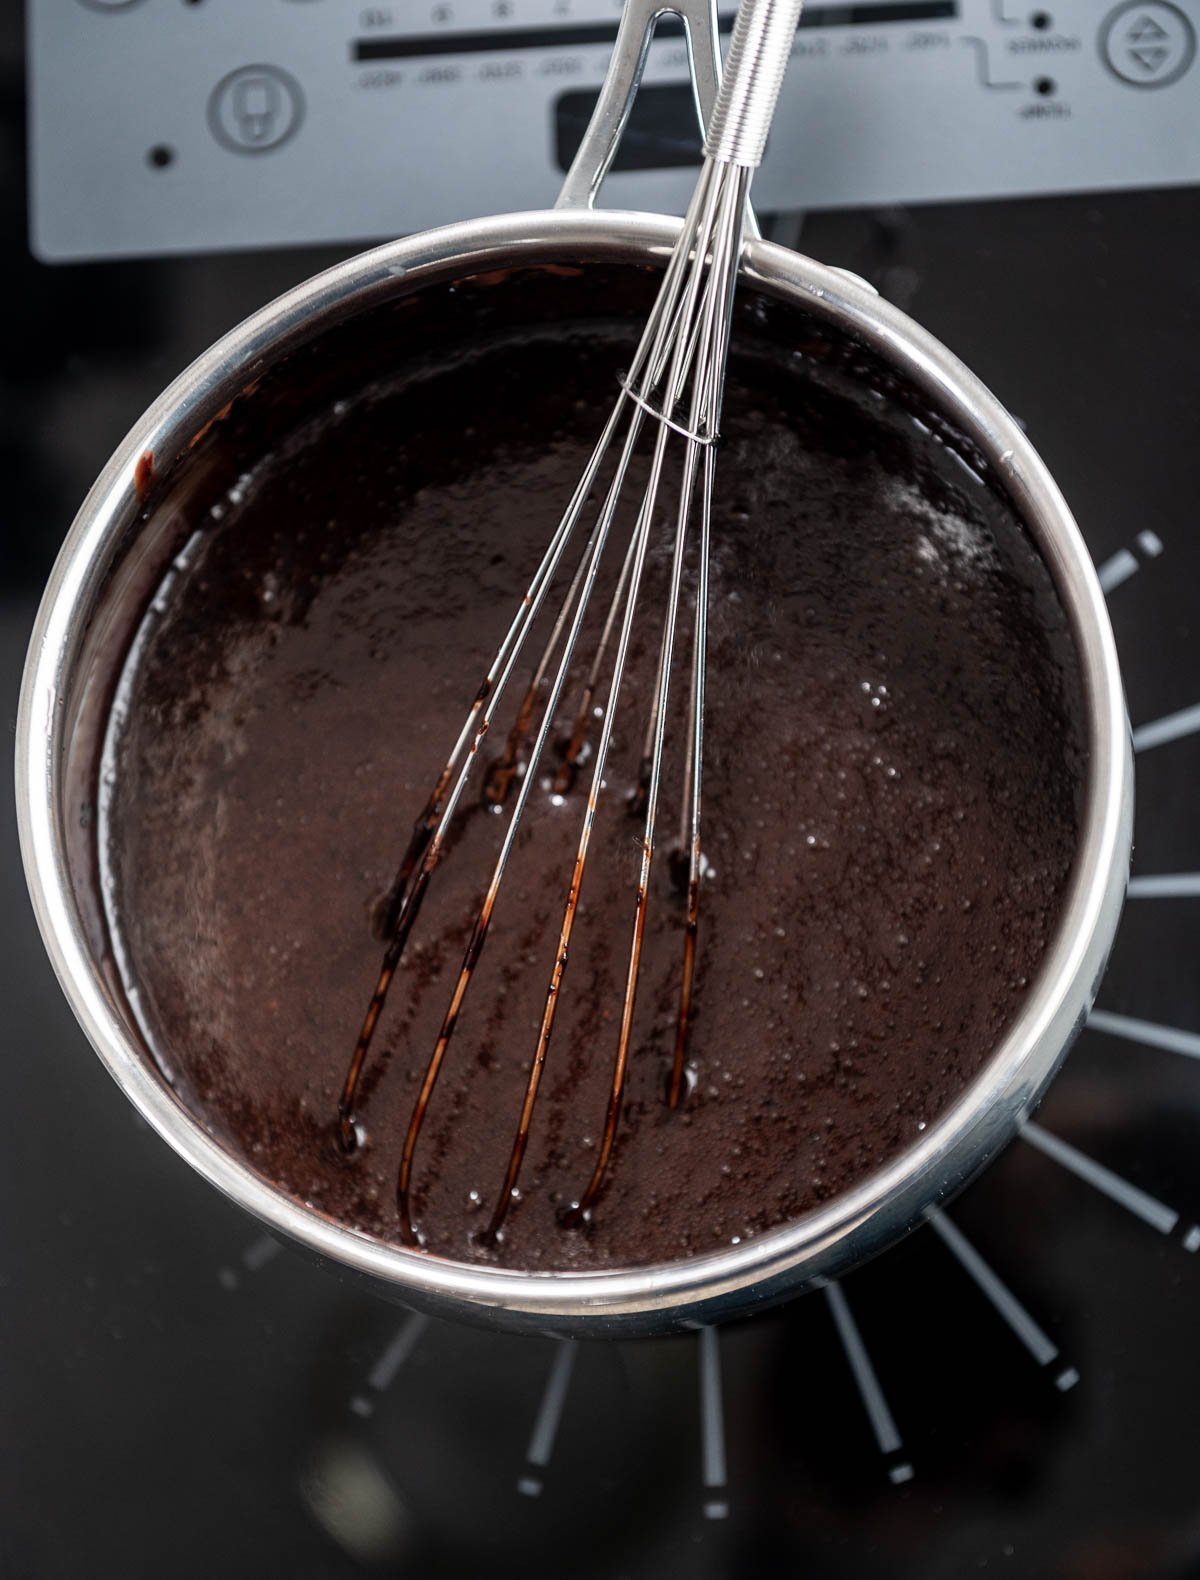
Preparing the Ganache
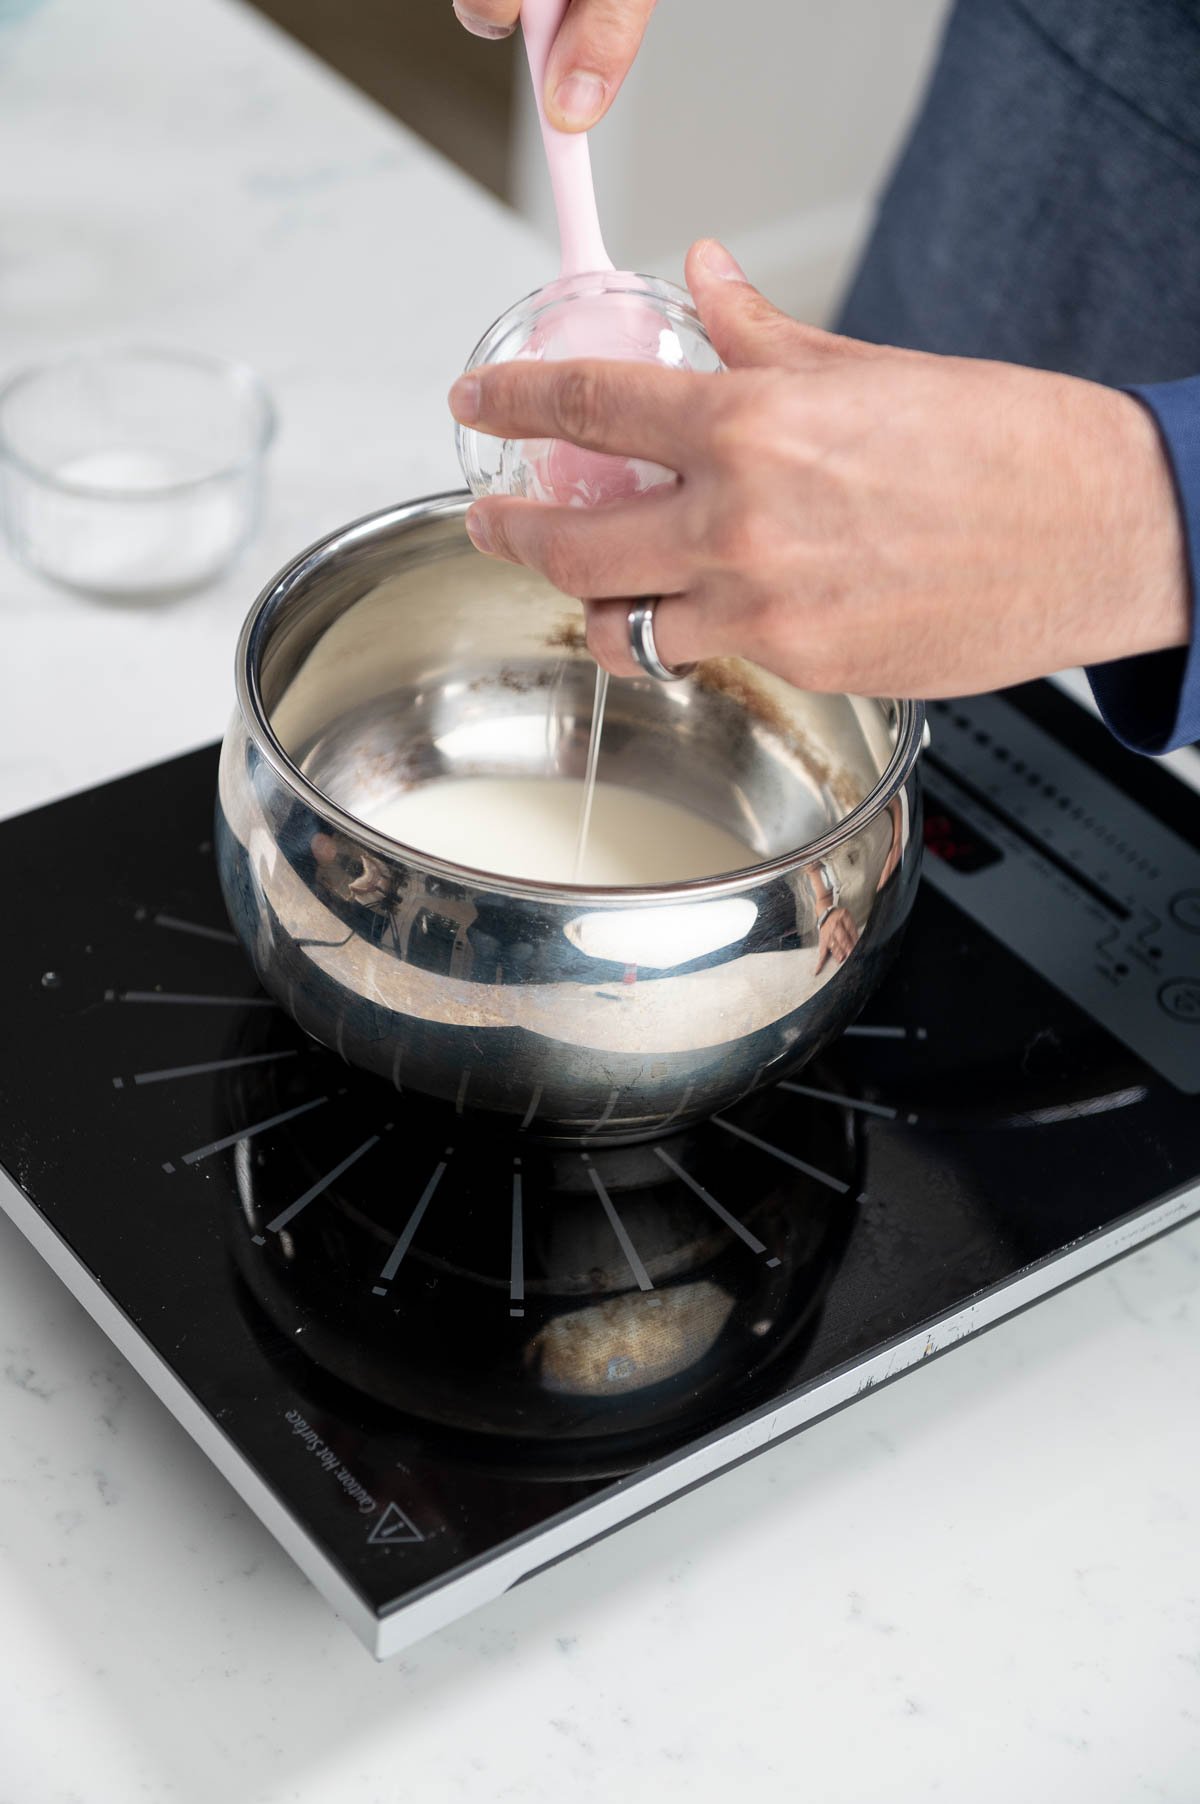
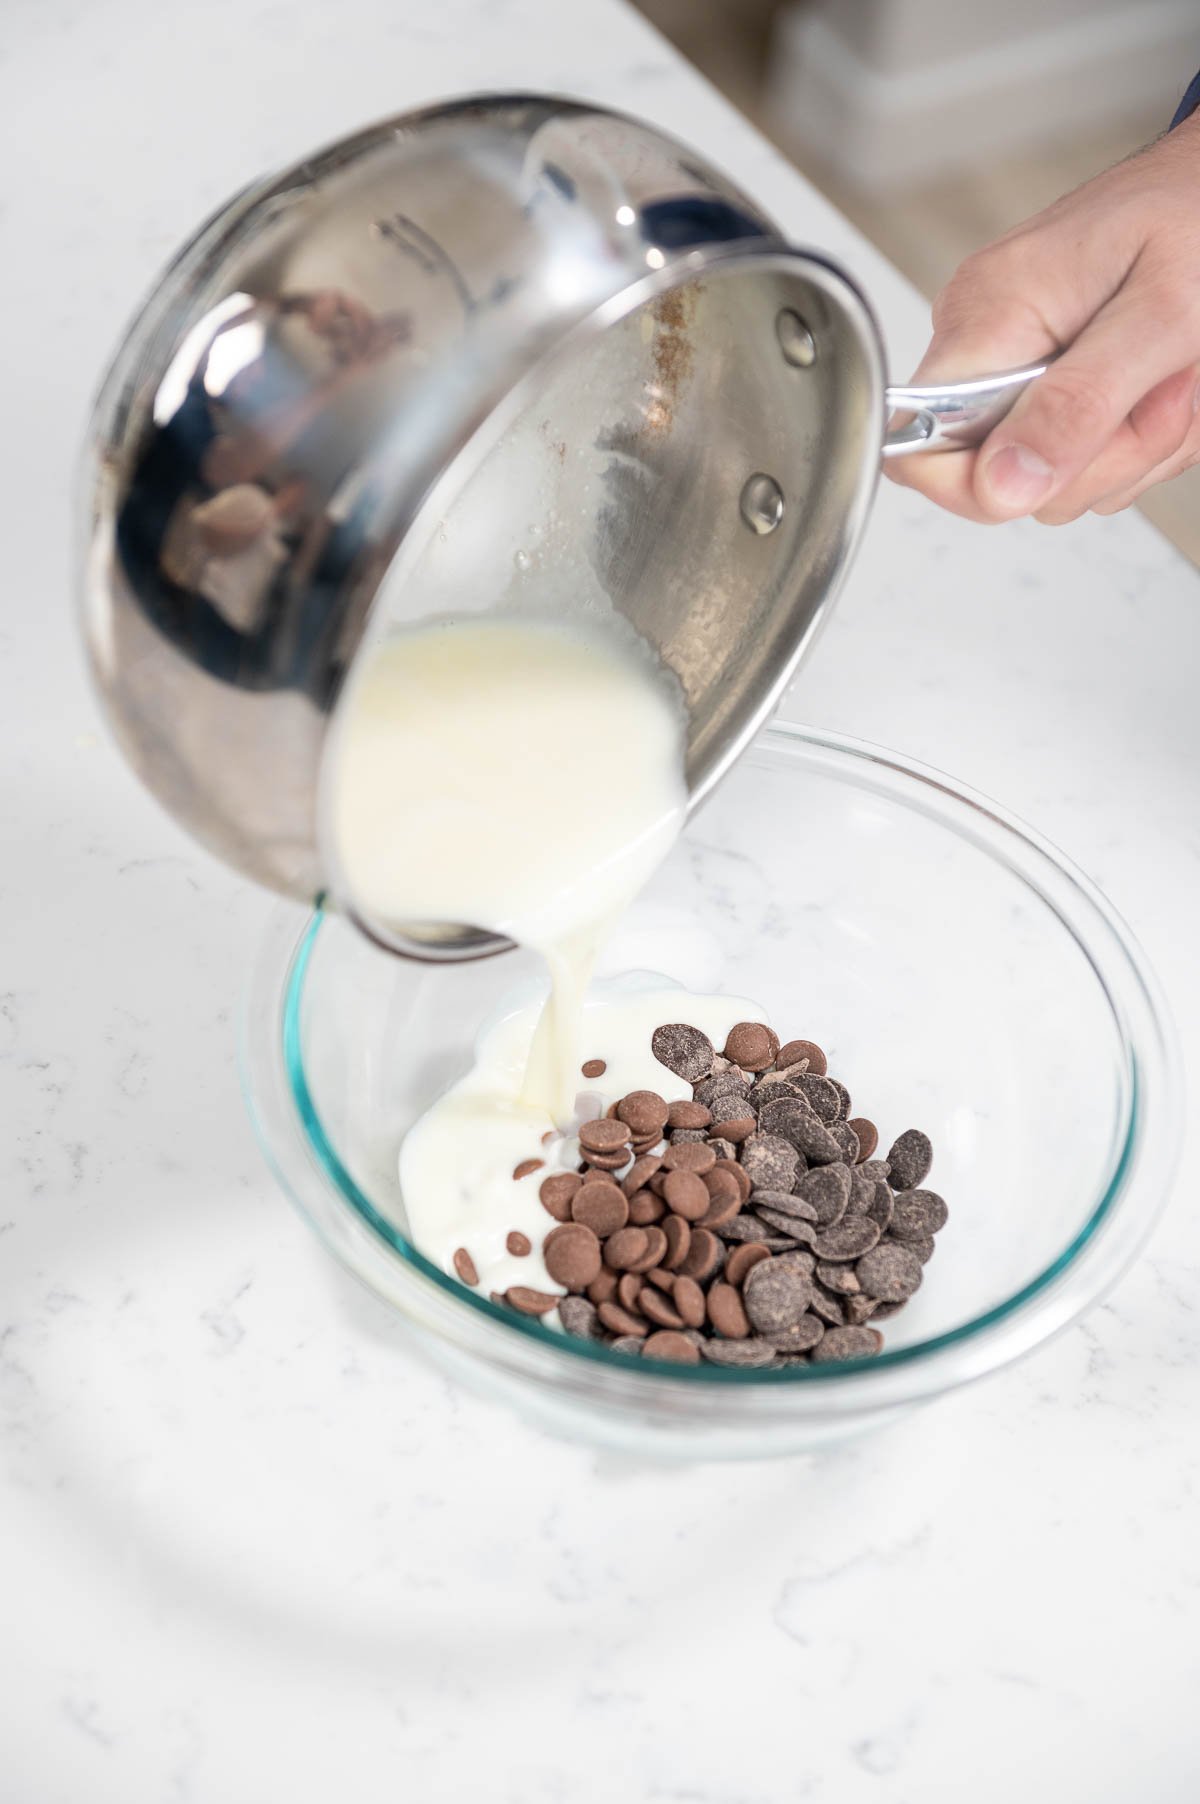
- Combine your glucose, granulated sugar, and cream together and bring the pan to a boil in a medium-sized saucepan.
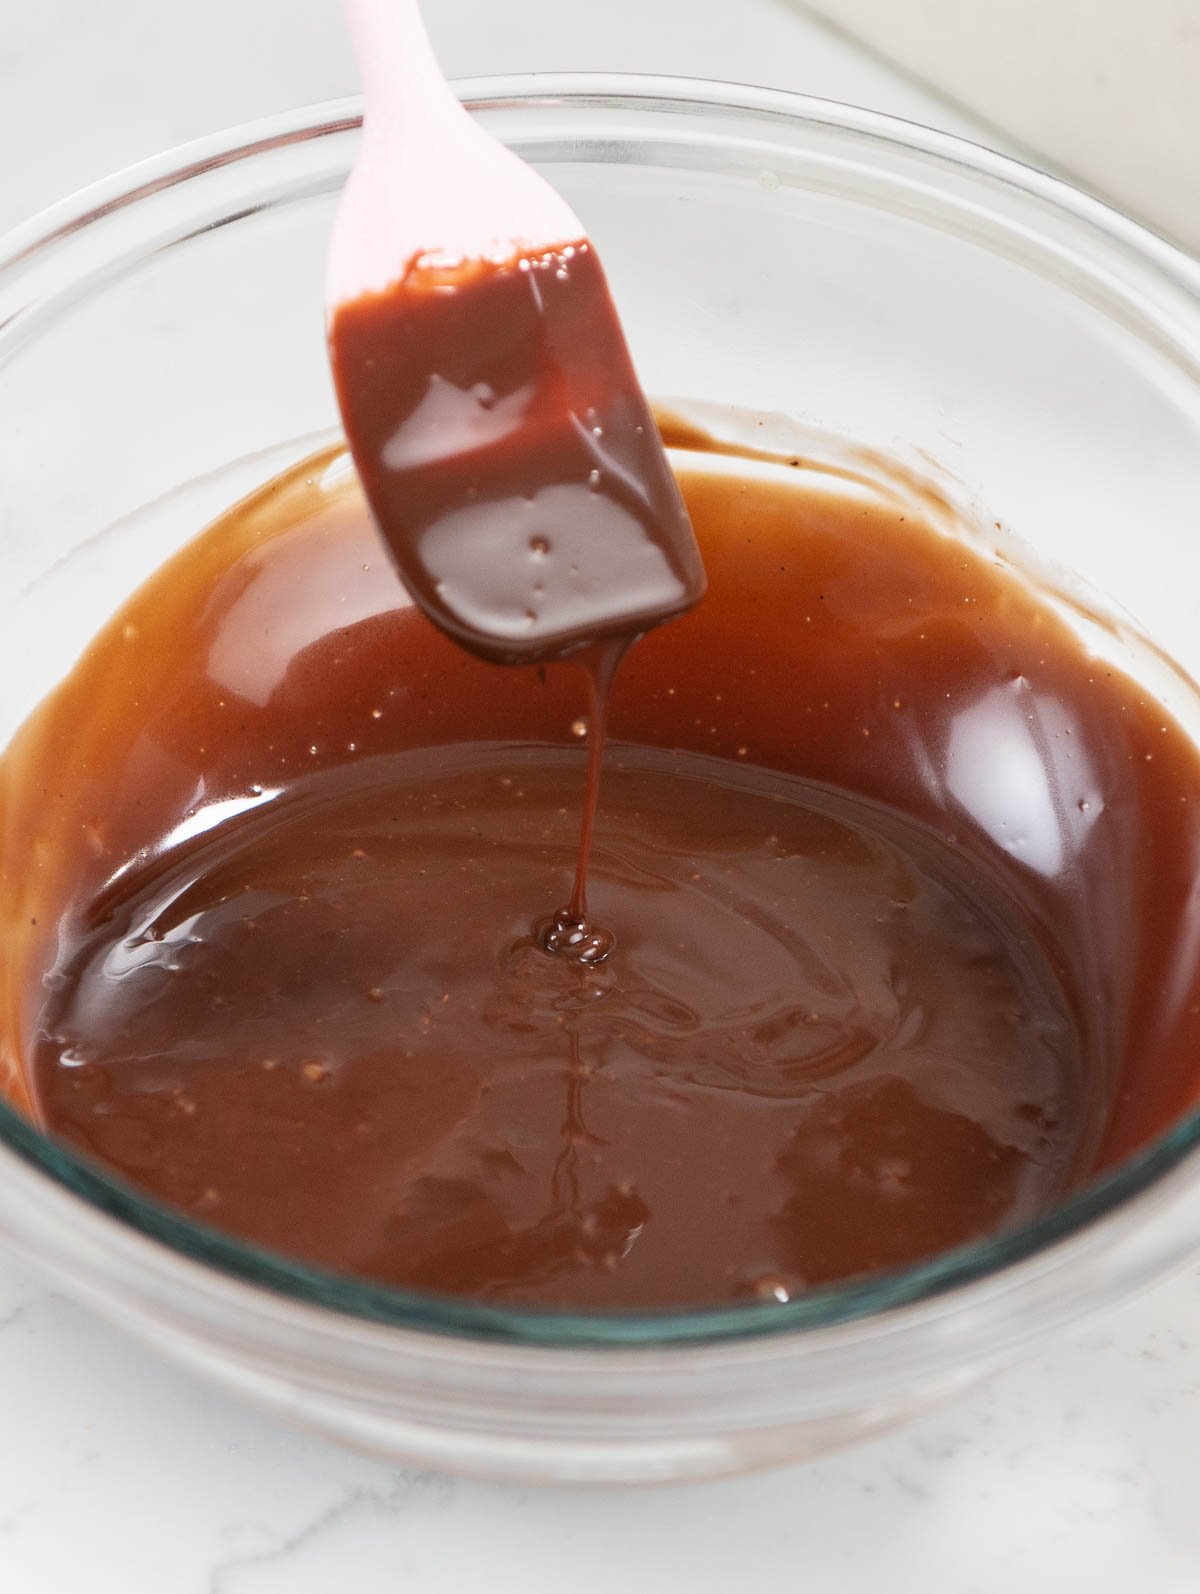
- Then, in a heat-proof or glass bowl, pour in about ⅓ of your boiling mixture over your chocolate and mix them together until you reach a shiny and smooth consistency. Then, repeat this step in thirds until you've added all your cream. If you put all of your cream in at once, then your ganache may separate.
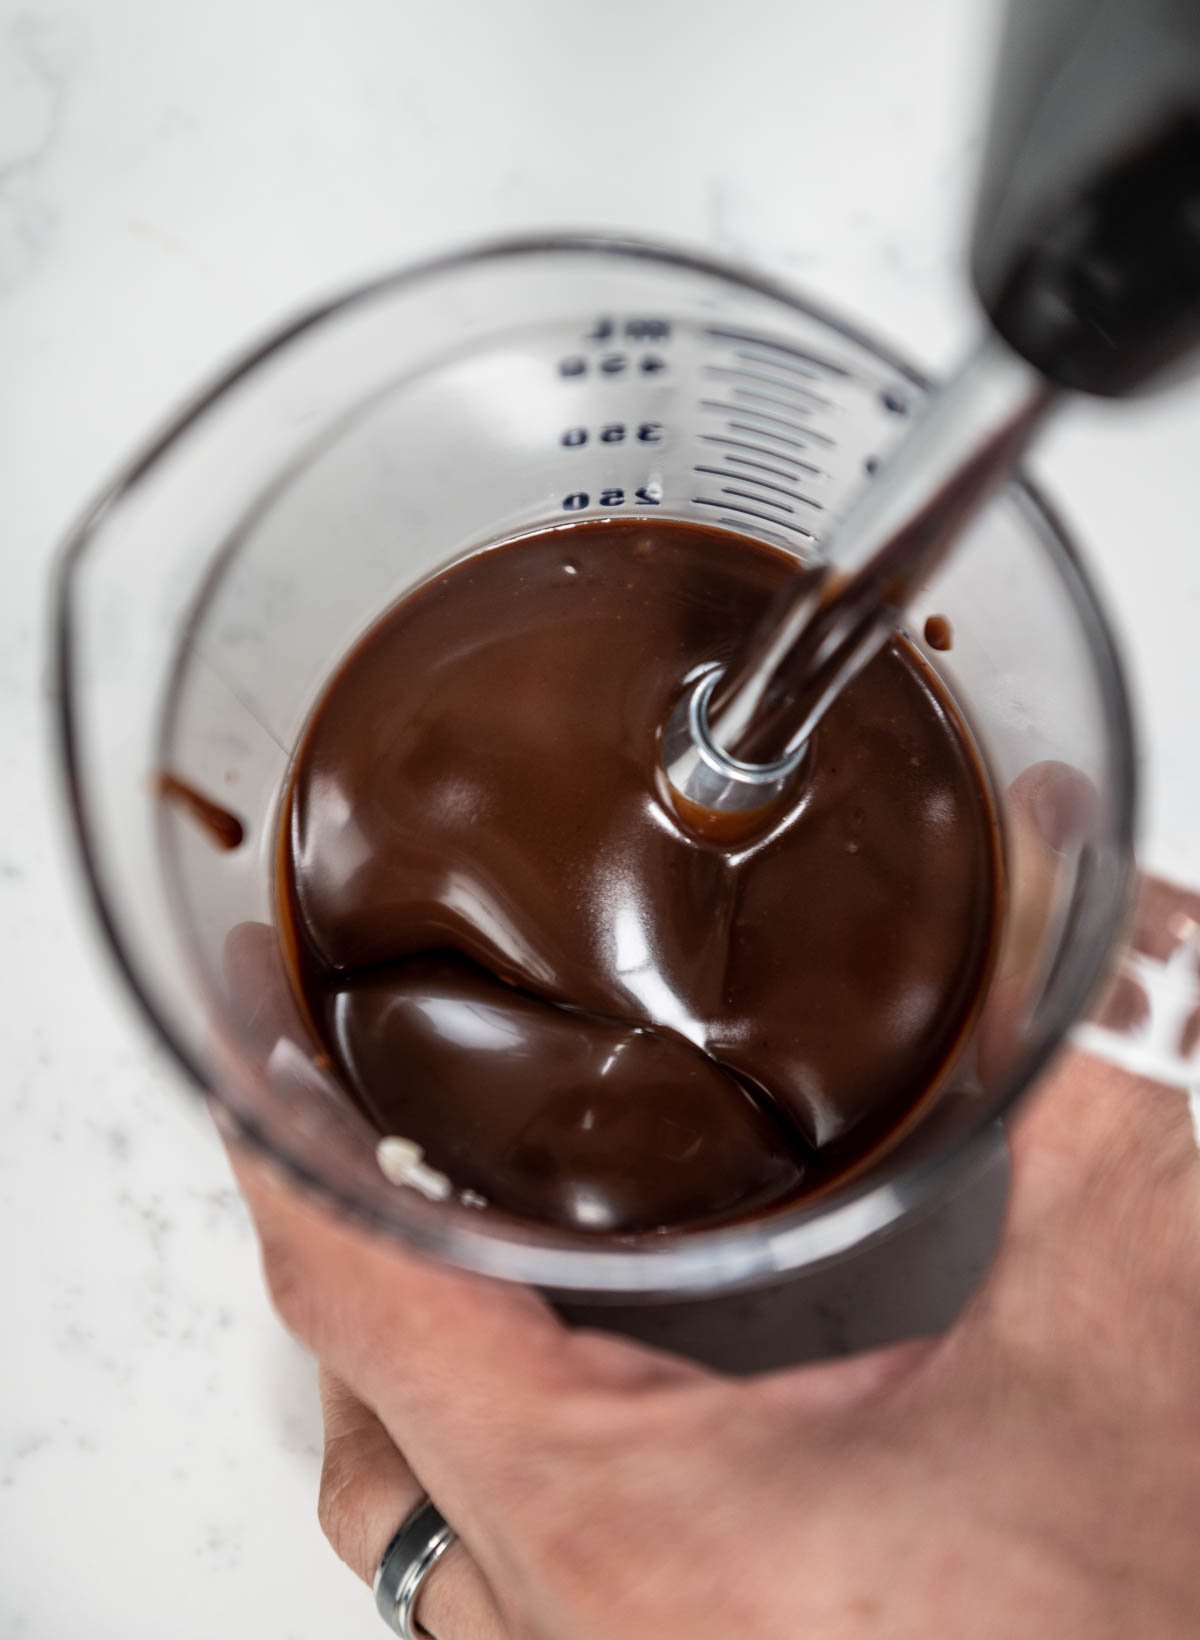
- Next, place your butter into a tall container, and then pour the melted chocolate into the pitcher over the butter.
- Then, using an immersion blender, mix the chocolate and the butter together until it is shiny. PRO TIP: Hold the mixer at a slight angle to prevent incorporating air into the ganache.
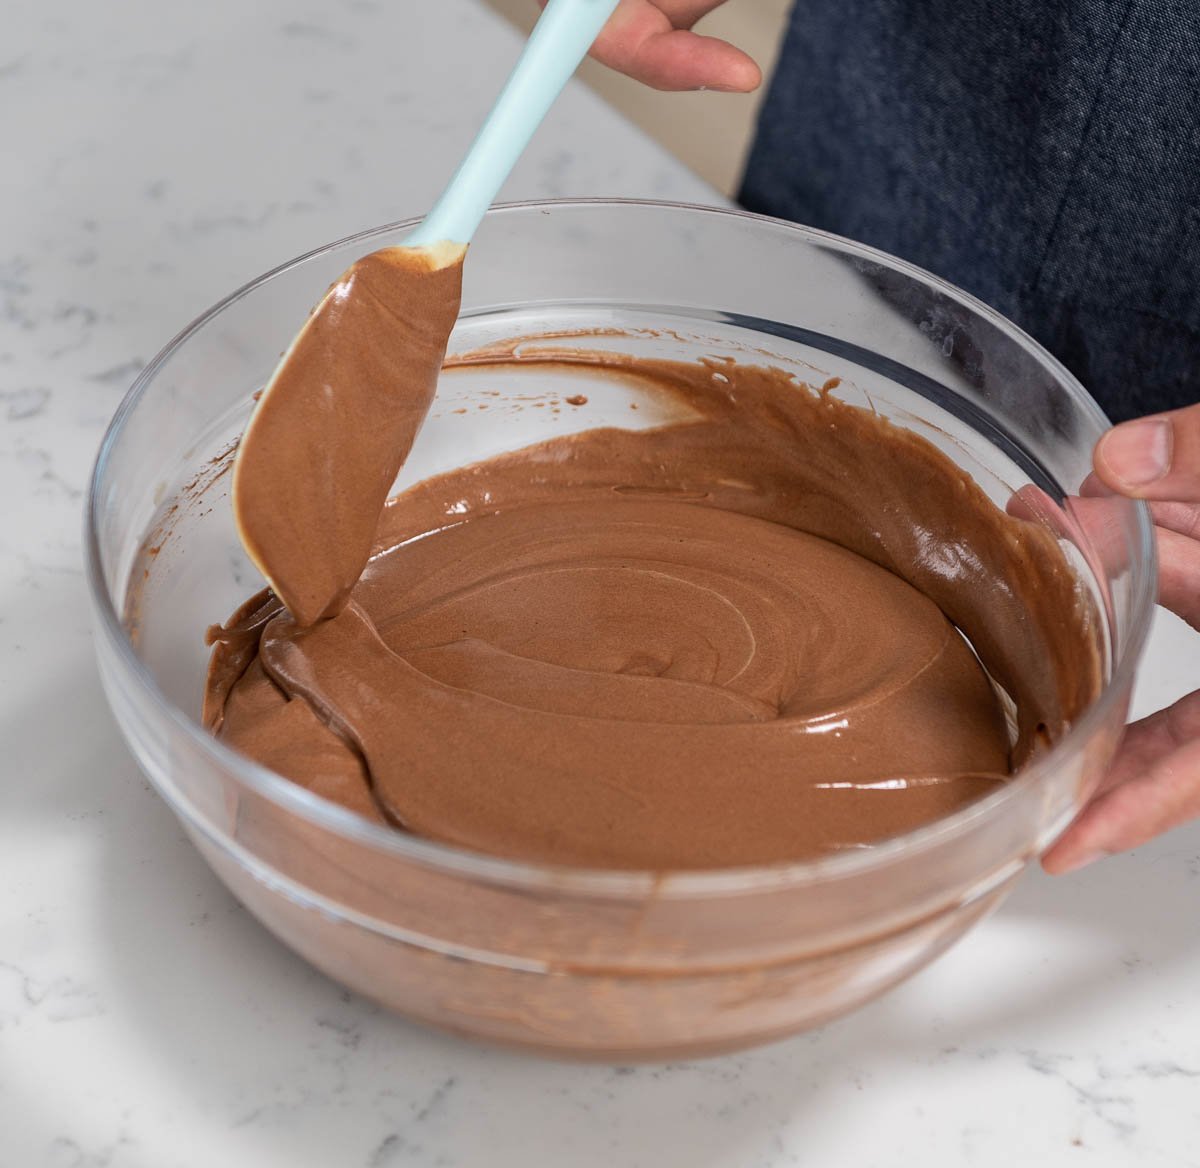
- Cover the ganache with plastic wrap. Do this by pressing the plastic wrap right up against the surface of the ganache. This step will prevent any water in the air from being added to the ganache.
- Finally, let the ganache set. Set it aside for at least 5-6 hours at room temperature (or you can put it in the refrigerator and cut the time in half). The texture is smoother if you leave it at room temperature.
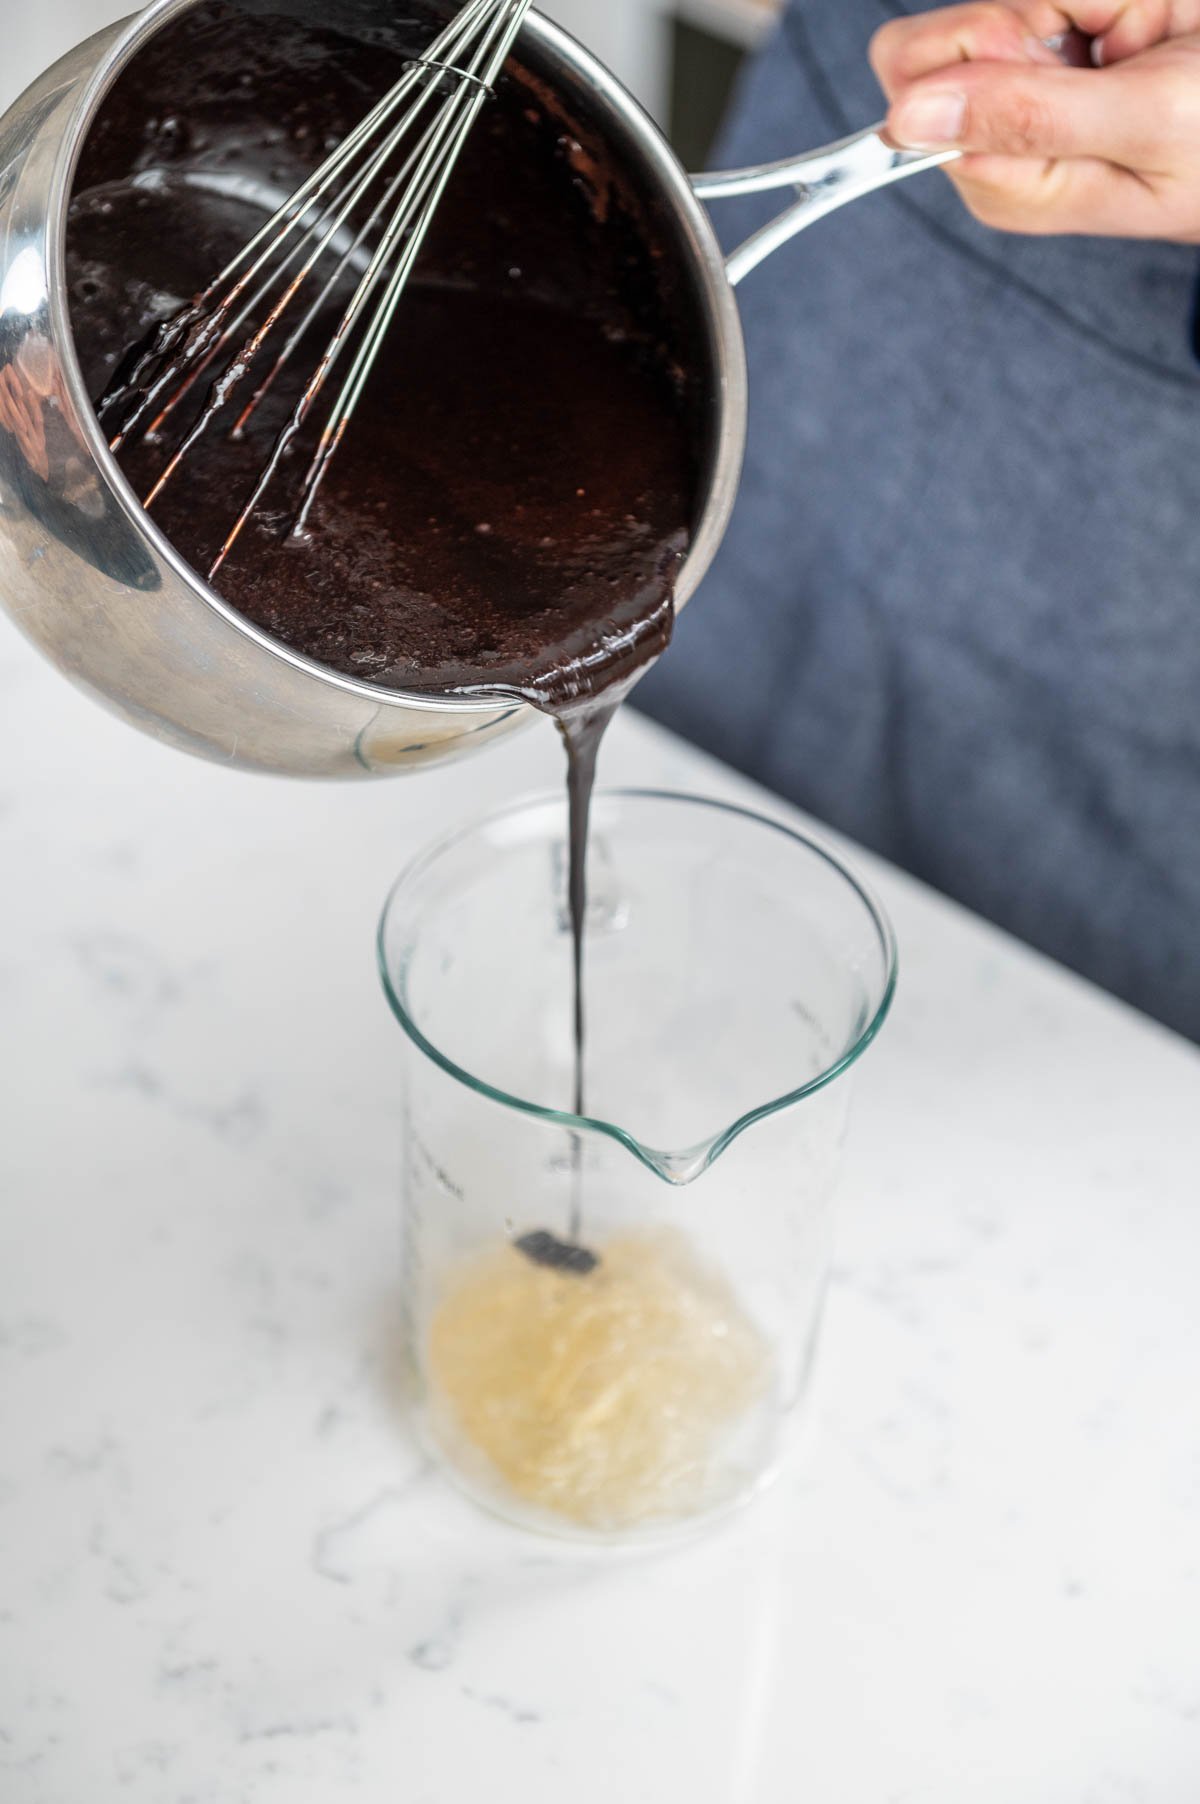
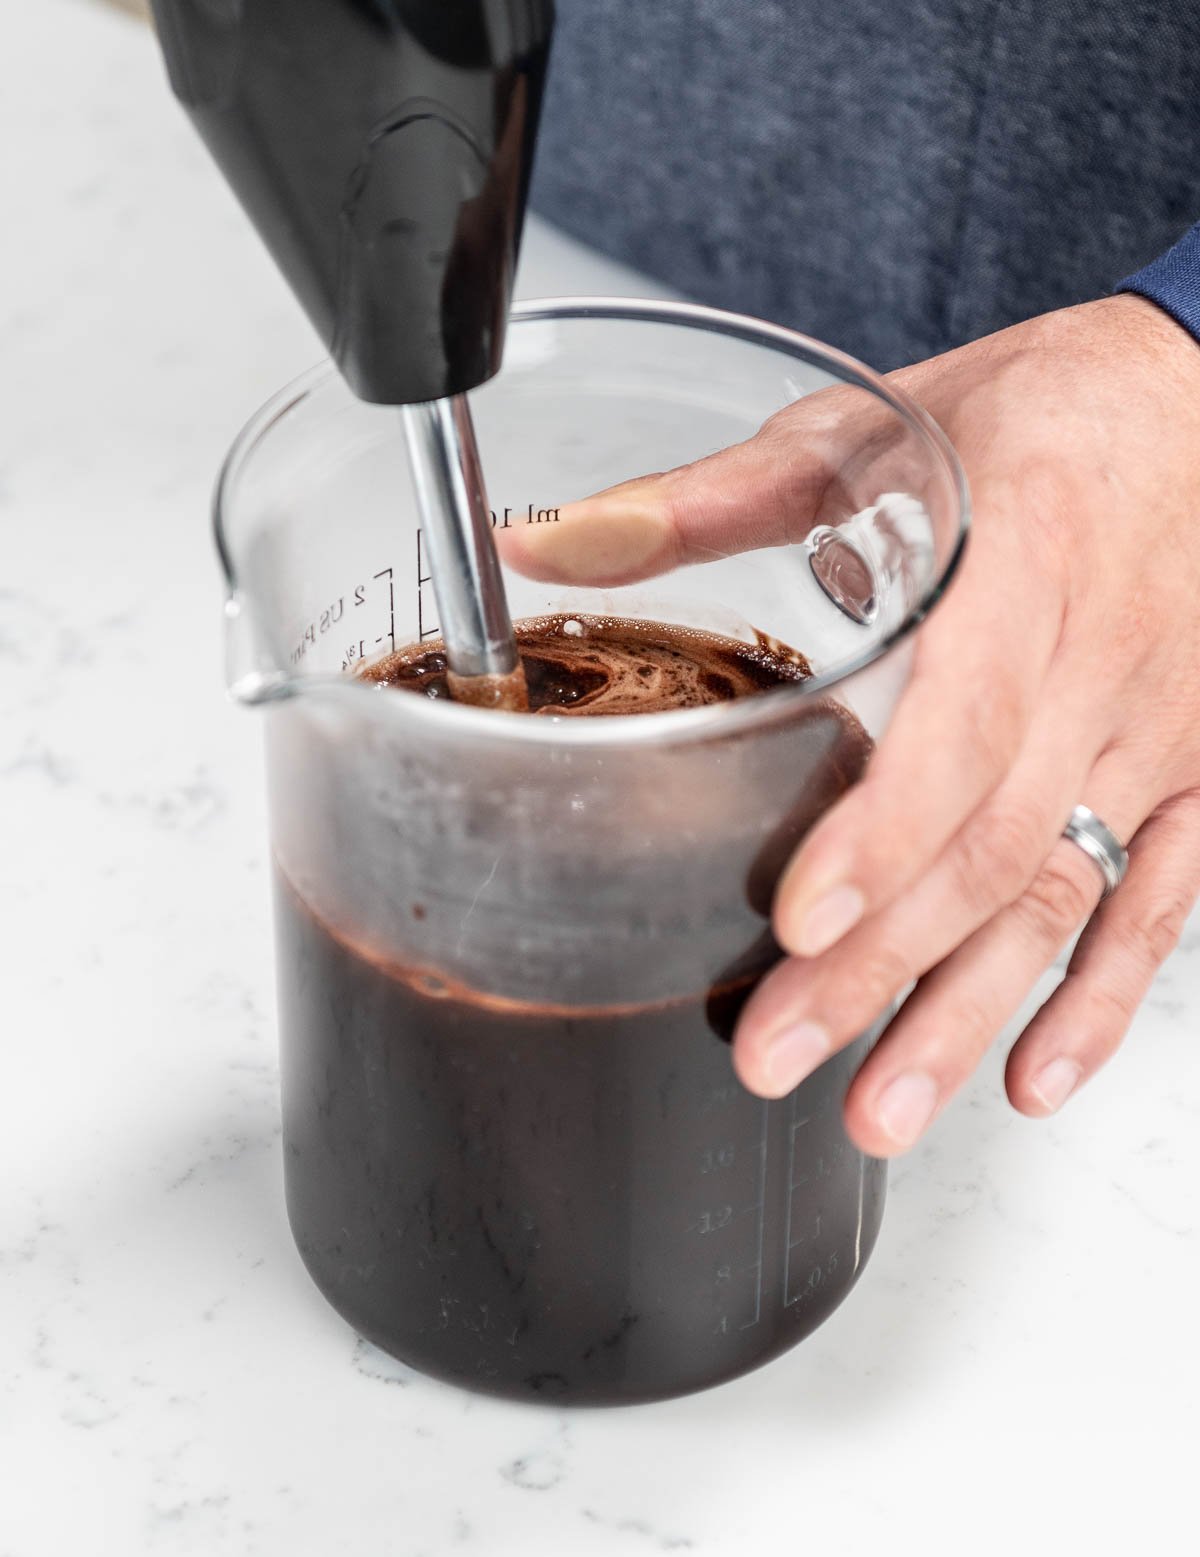
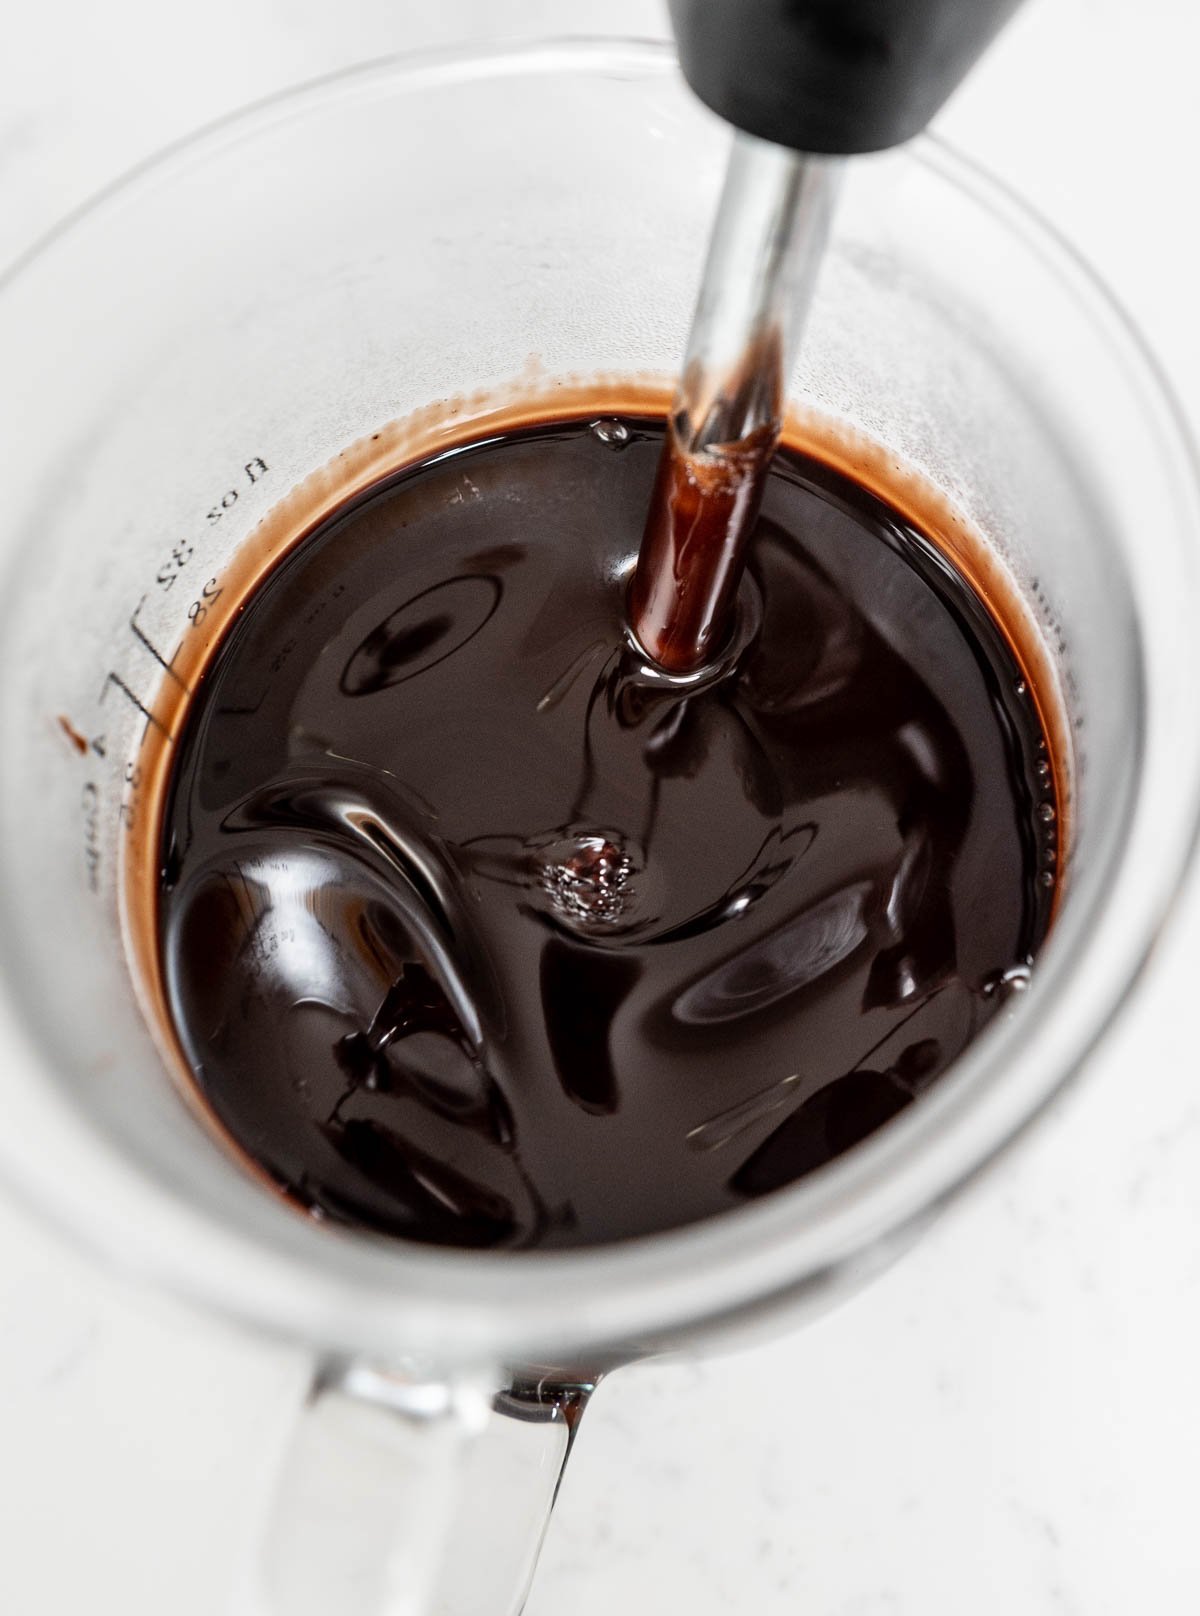
Making the Chocolate Mousse
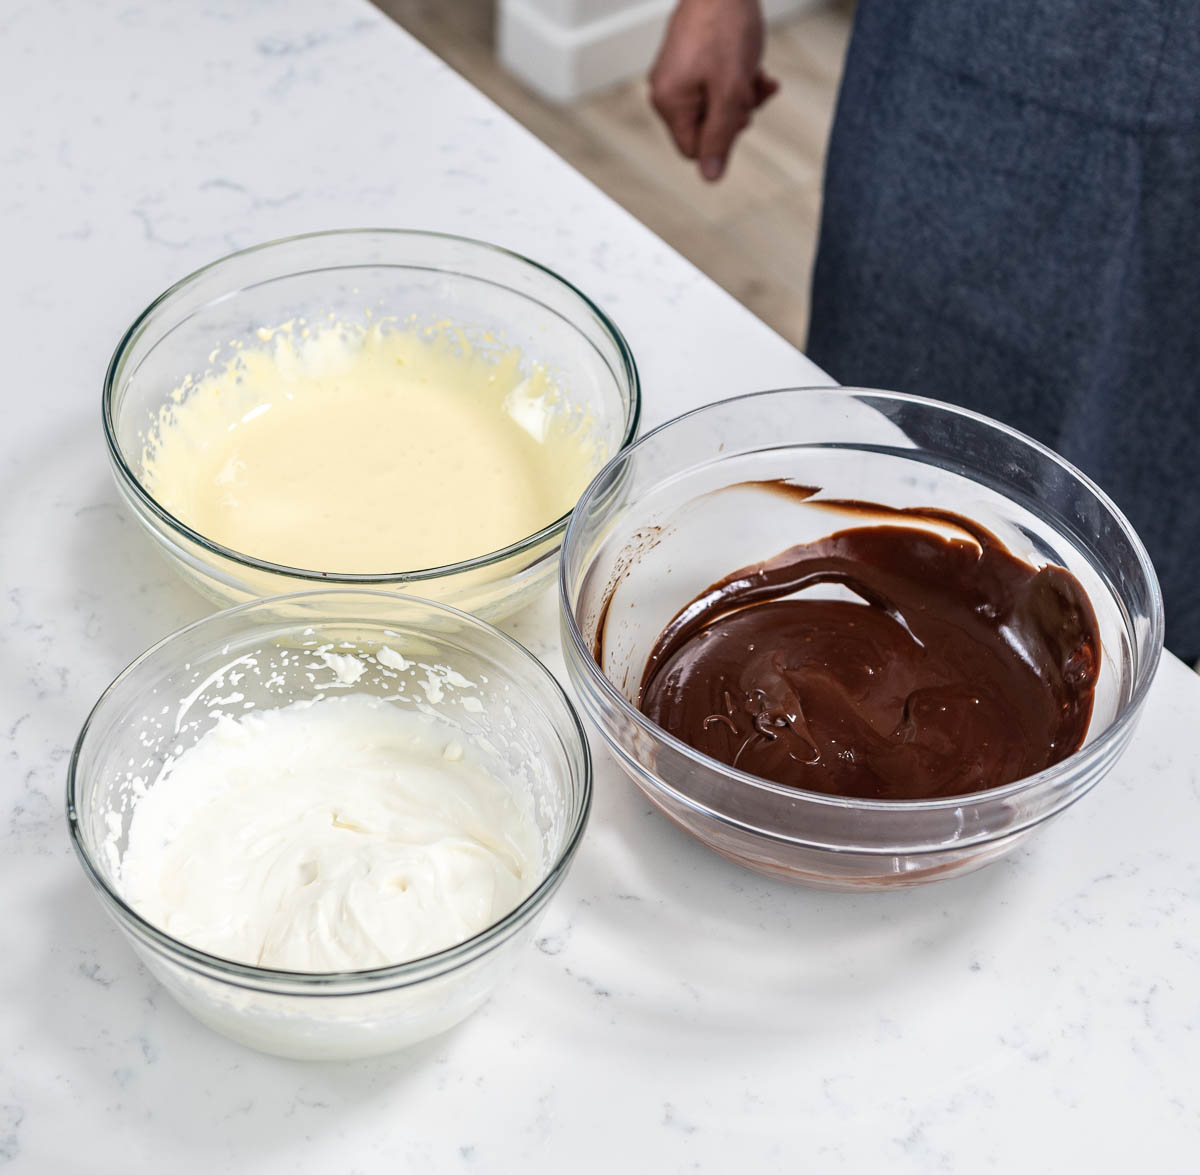
This chocolate mousse is made up of three components: pâte à bombe, ganache, and whipped cream. I will walk you through how to make each of them.
Whipped cream adds a lightness and airiness to the mousse.
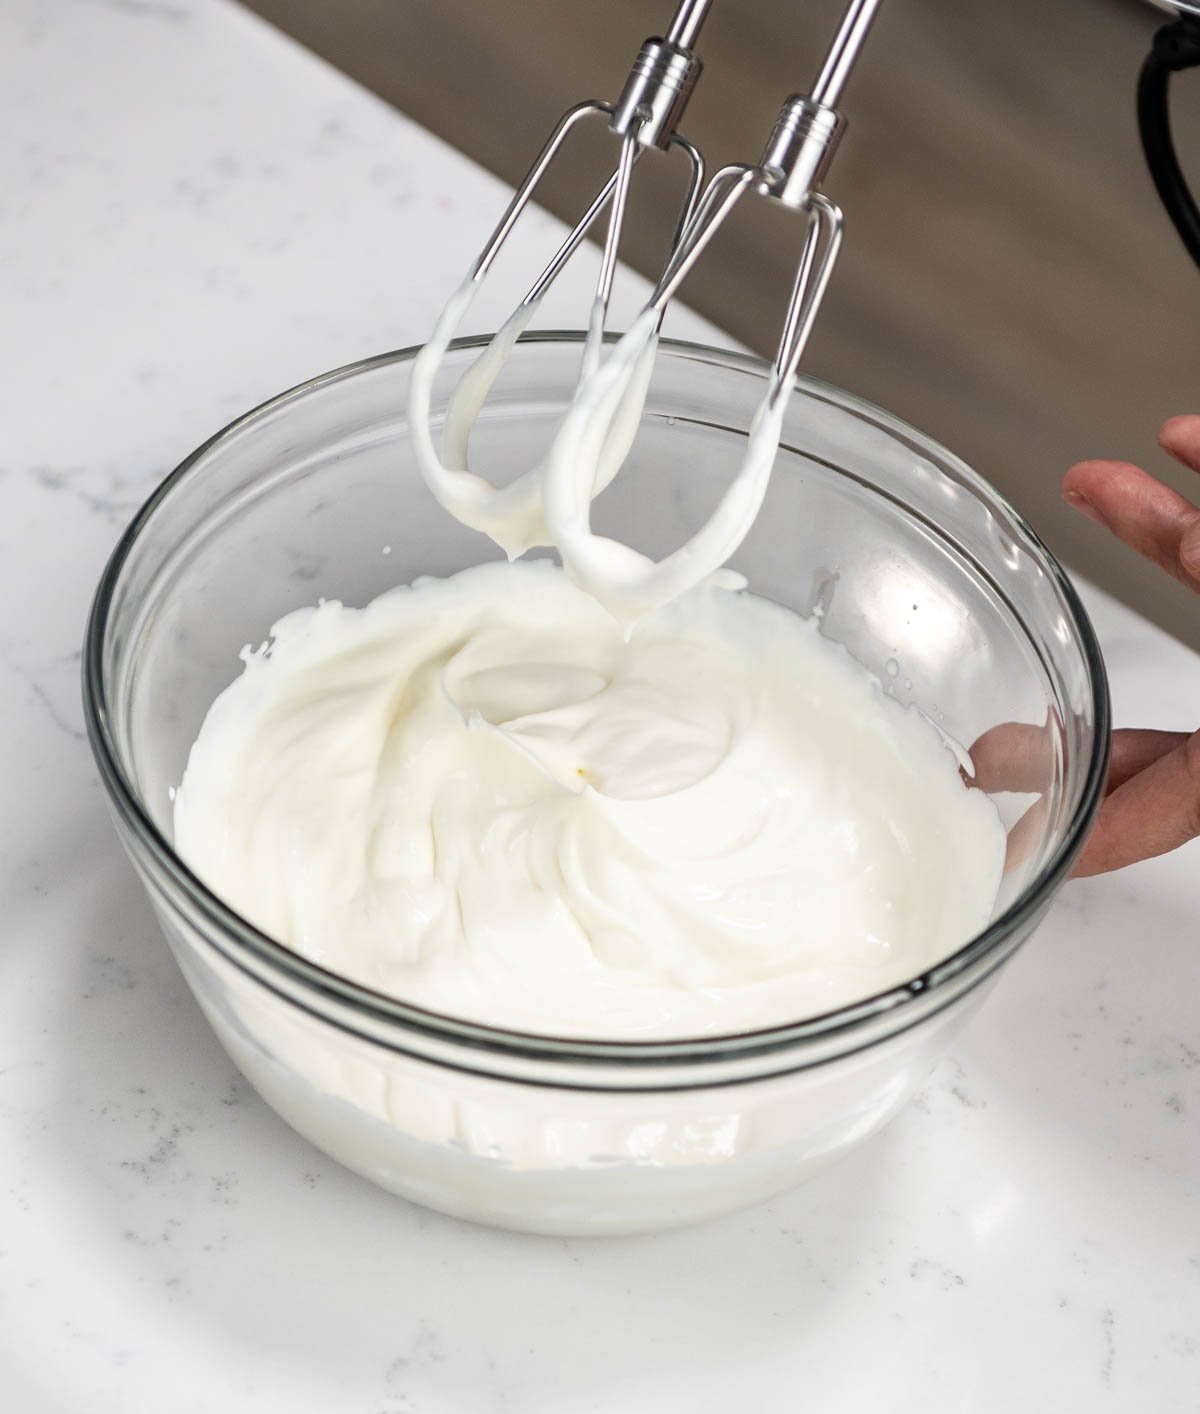
- Whip the heavy cream in a large bowl until soft peaks form.
- Set it aside.
Ganache adds flavor and structure to the mousse.
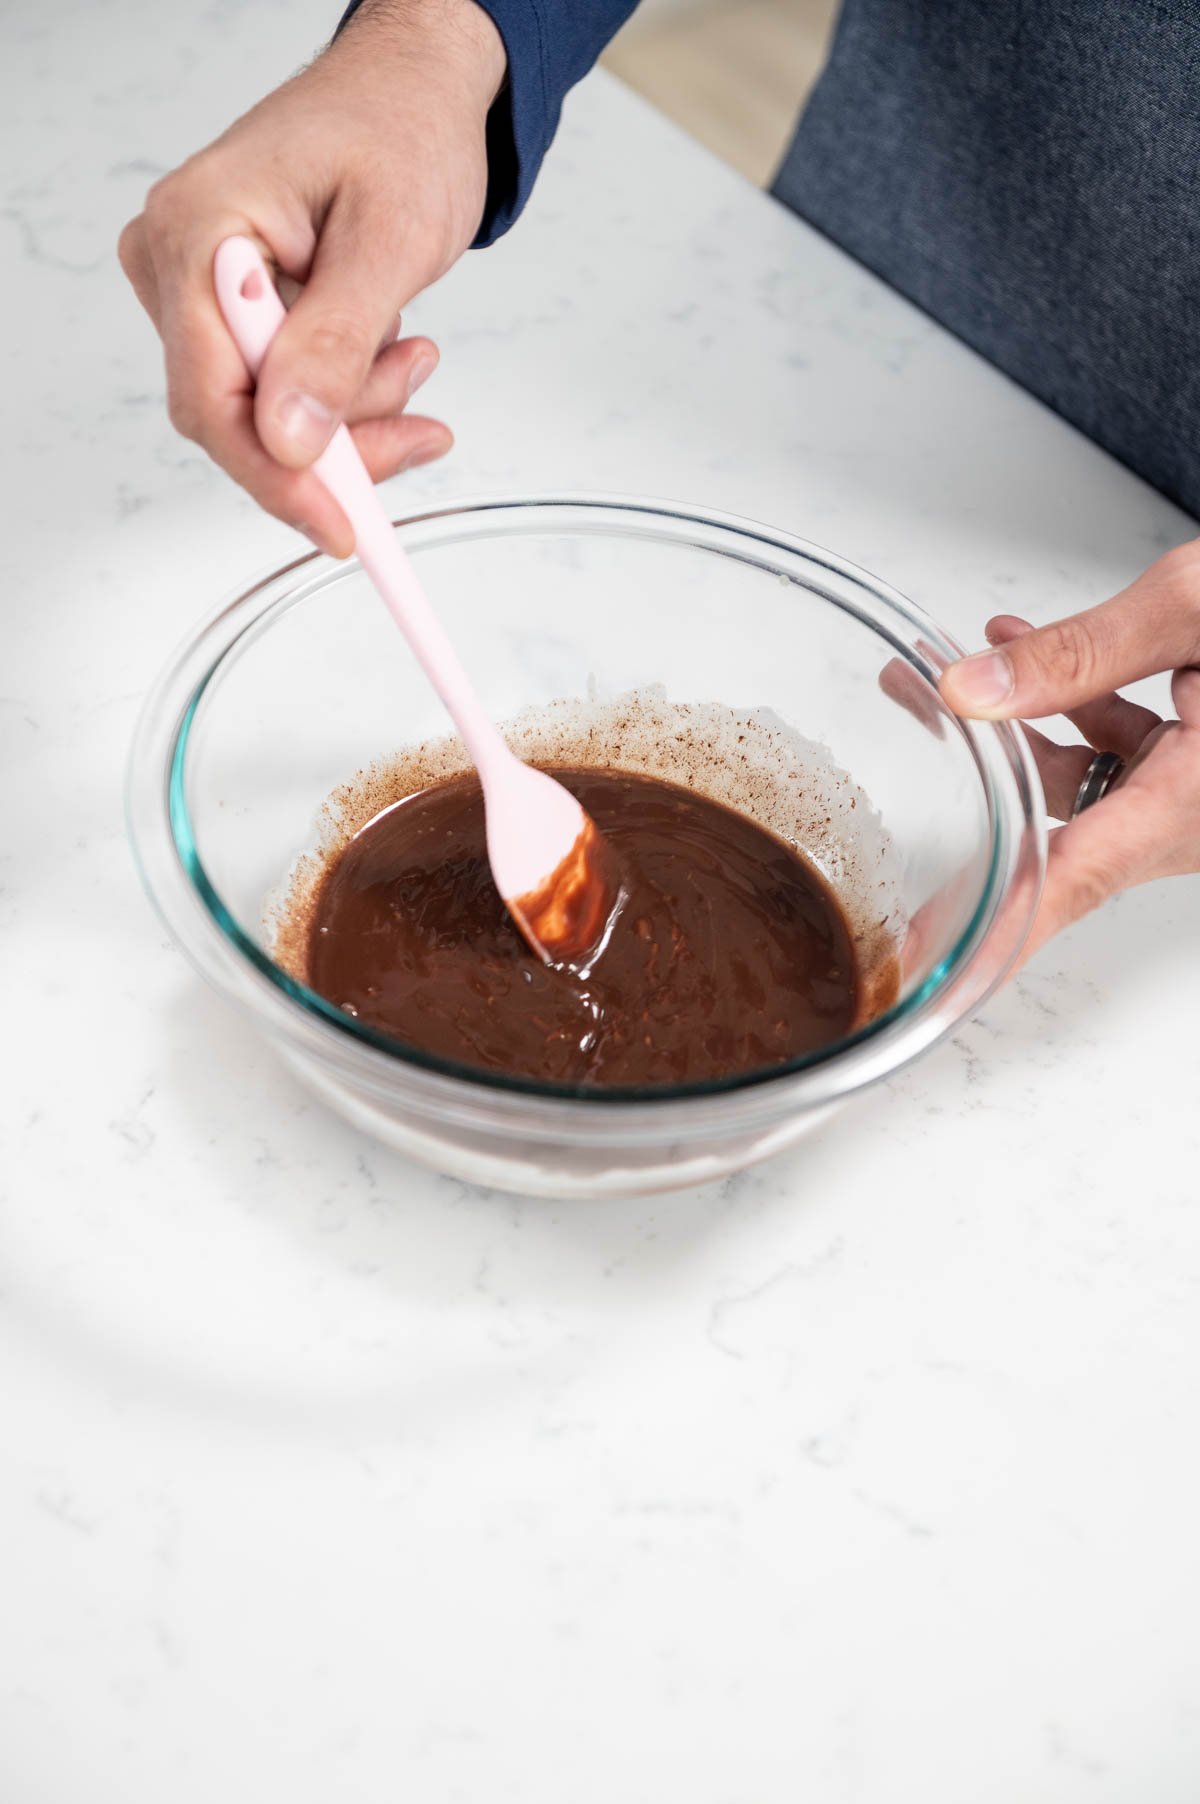
- Bring the heavy cream to JUST boiling and then pour it over the chocolate.
- Allow it to sit for 5 minutes, then whisk until smooth.
- Set it aside.
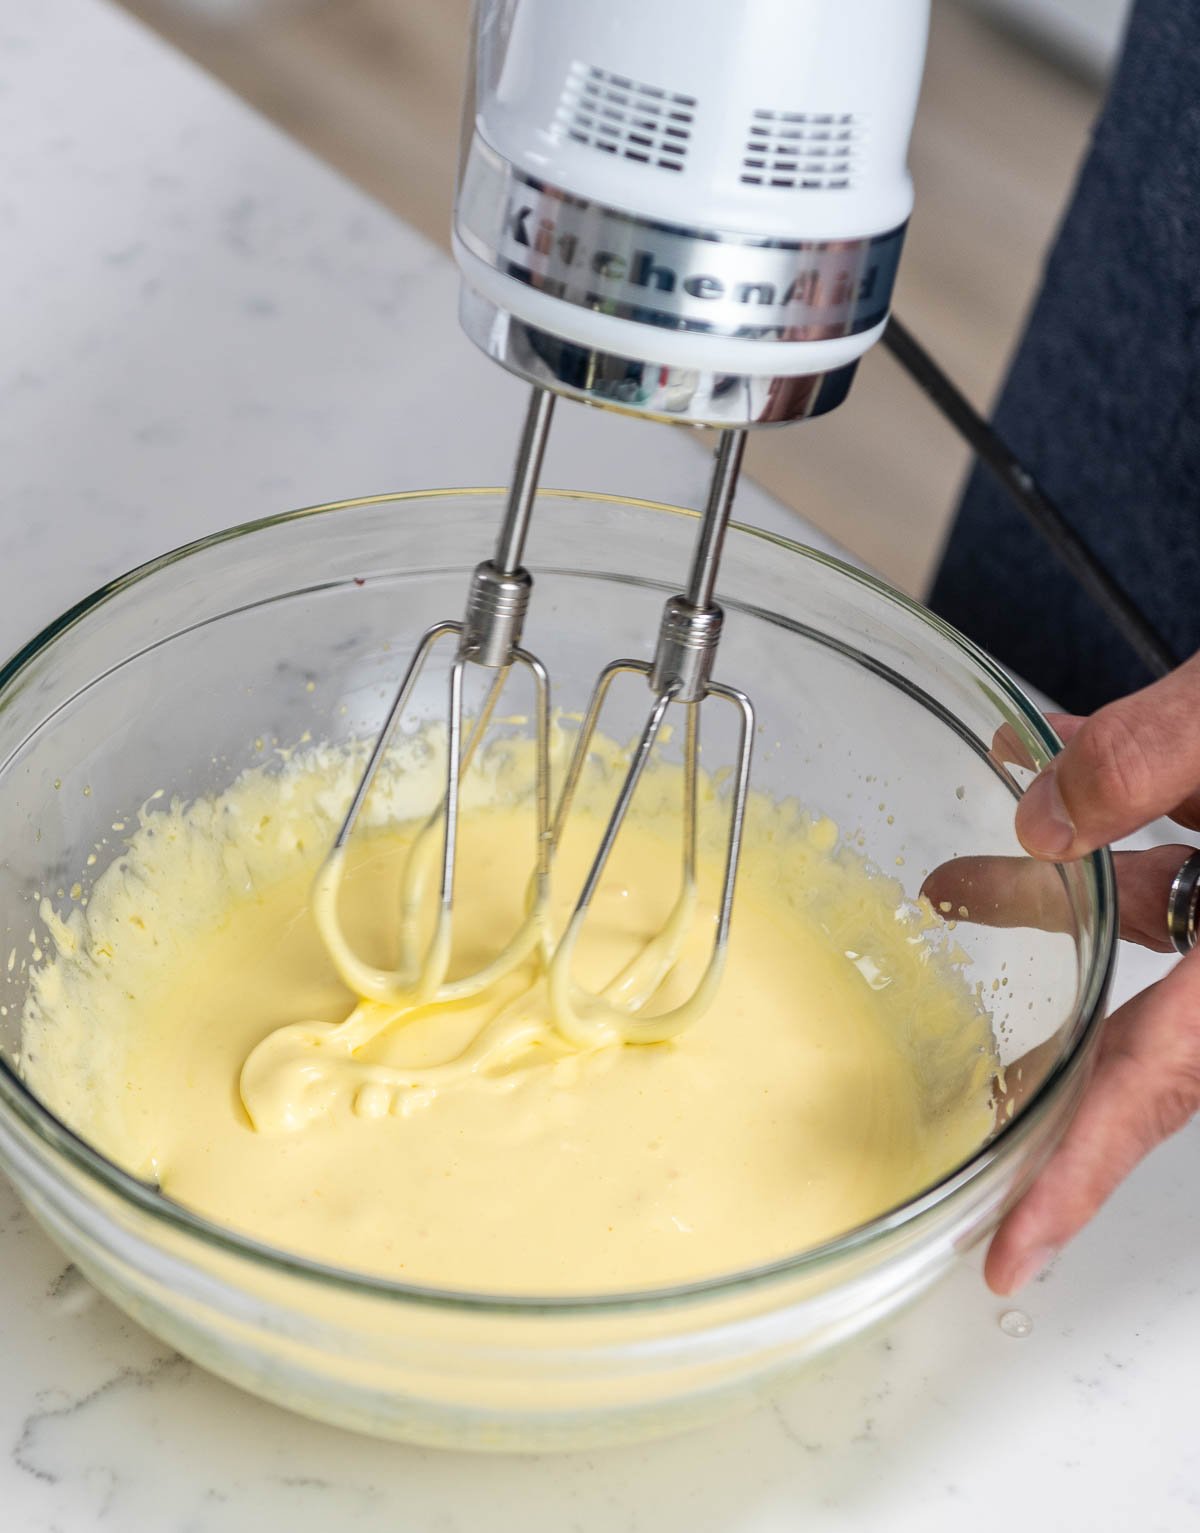
Pâte à bombe is a light, creamy base made with cooked sugar syrup and egg yolks, similar to Italian meringue but using yolks instead of egg whites.
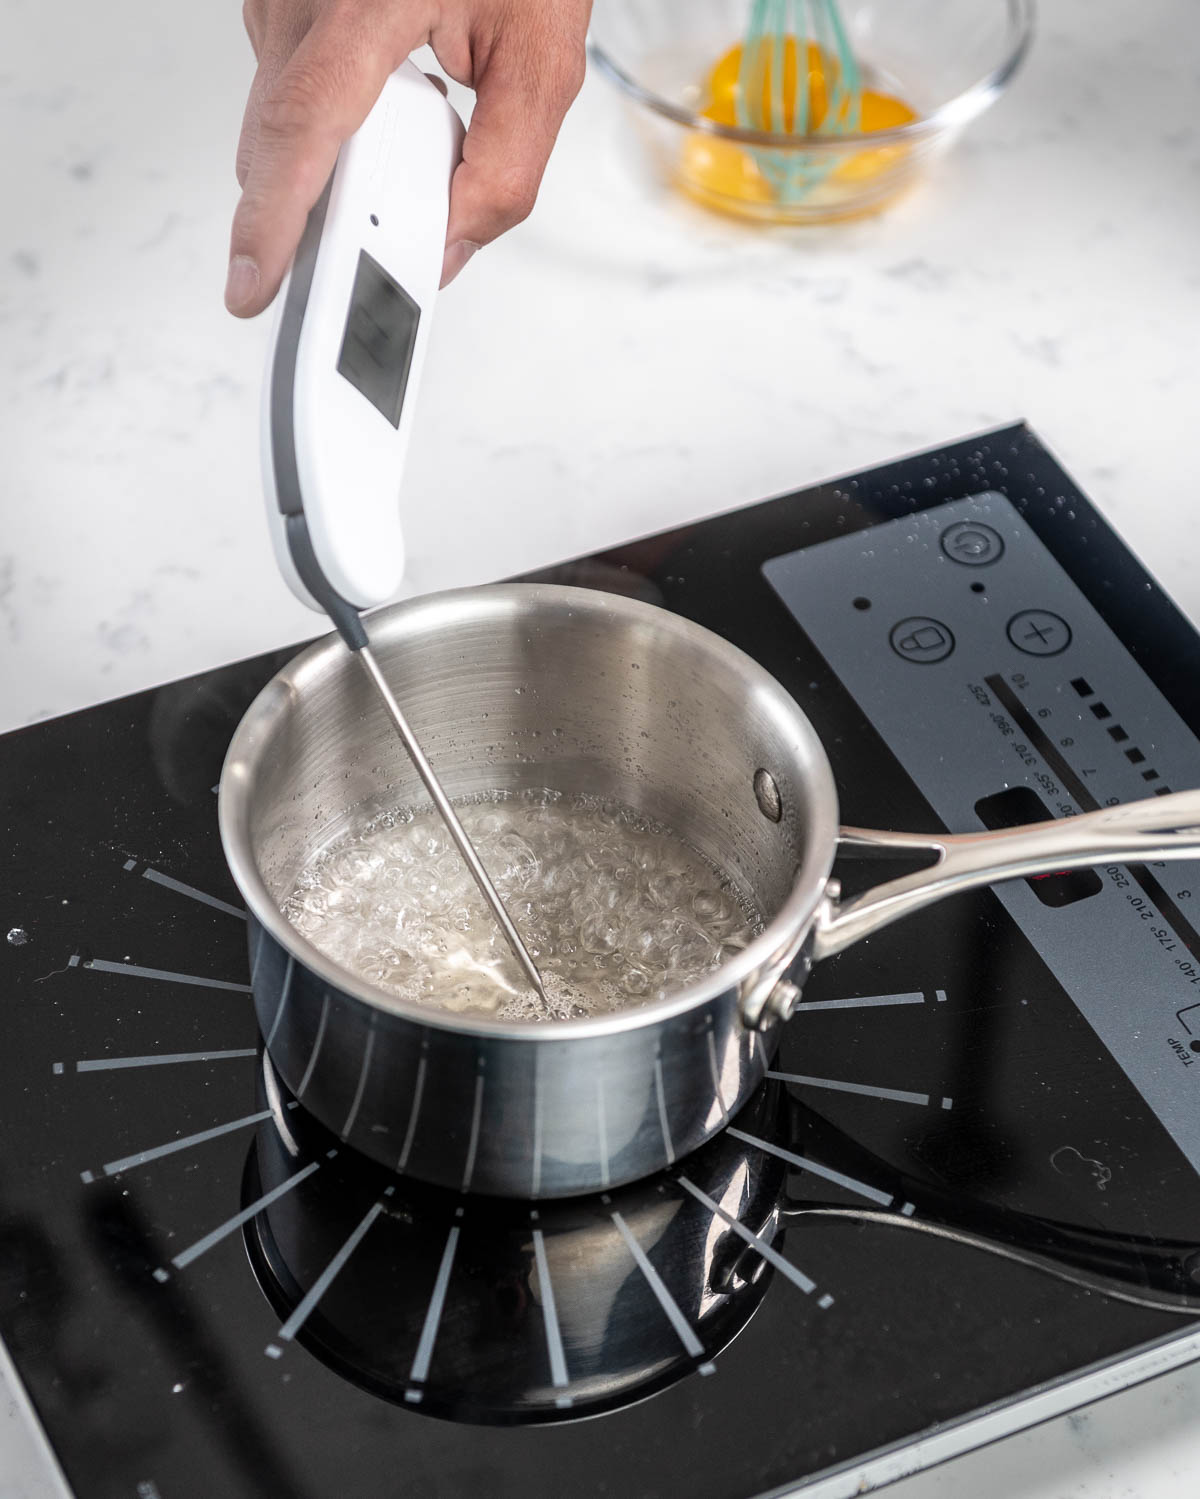
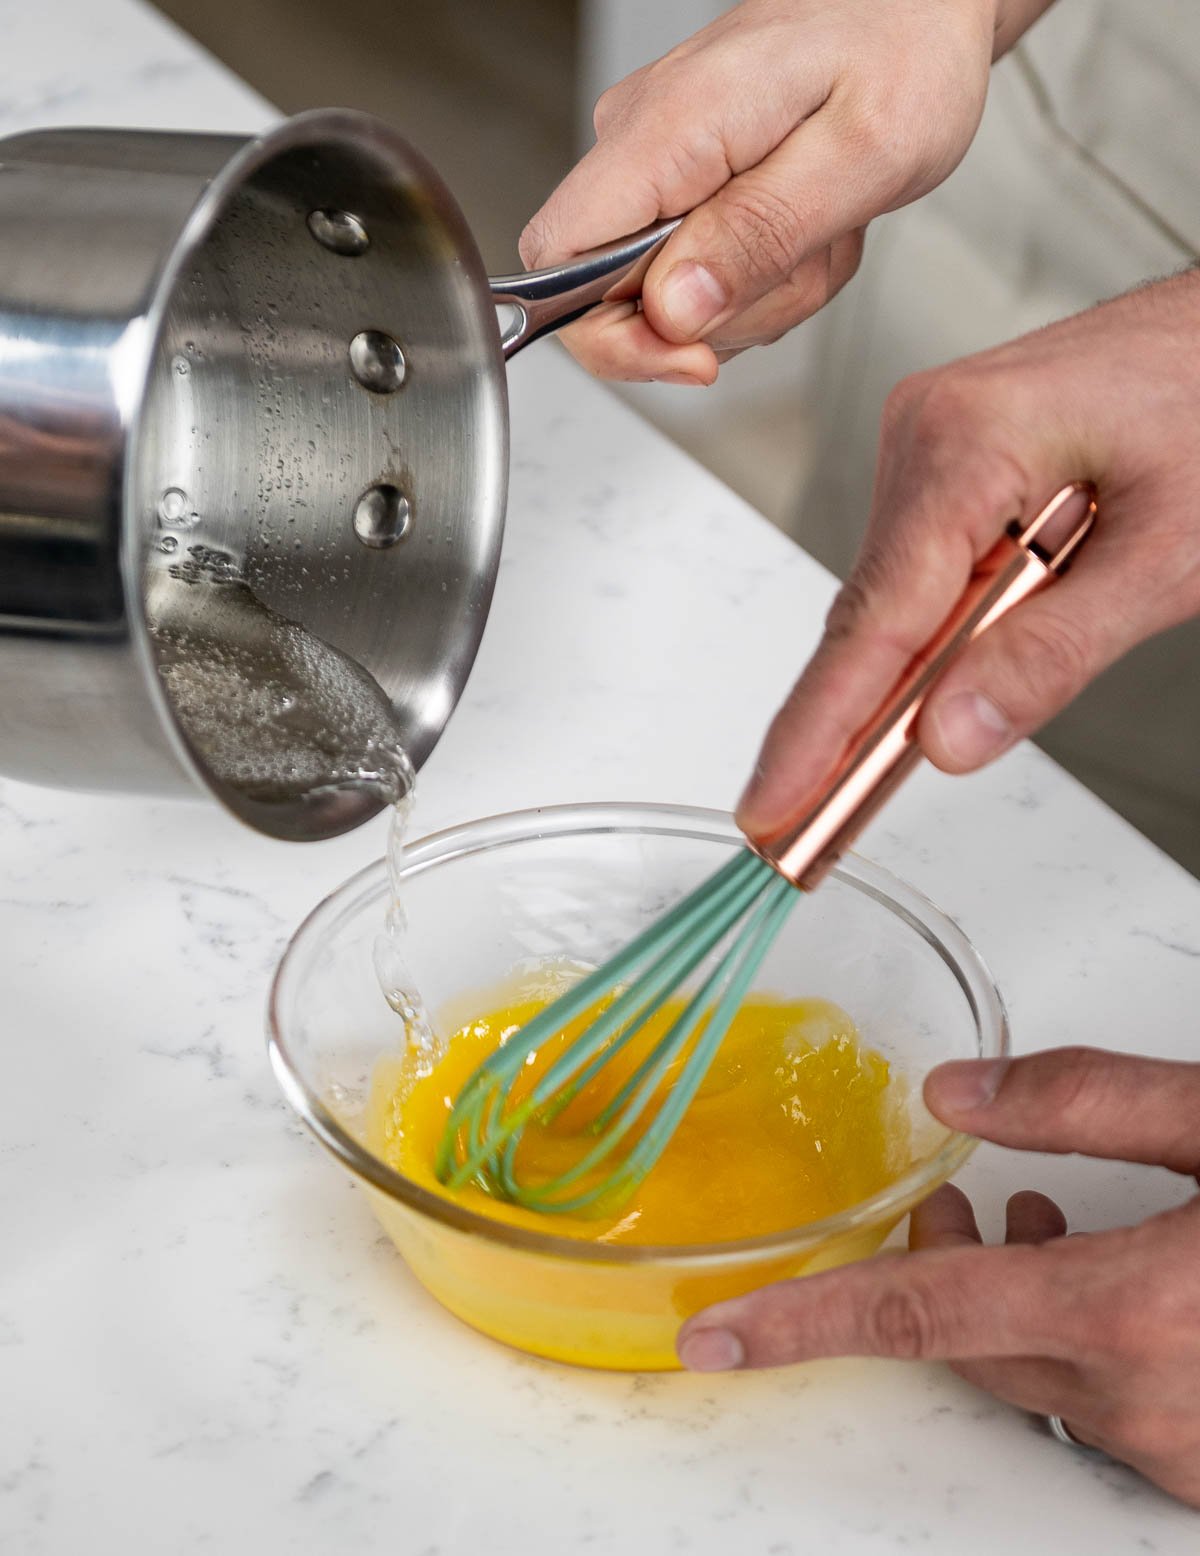
- Begin by cooking the sugar and water in a saucepan over medium-high heat to 244°F.
- Place the egg yolks into the bowl of your stand mixer with the whisk attachment attached.
- While mixing on medium speed, slowly pour the sugar mixture into the stand mixer.
- Whisk until the egg yolk mixture reaches ribbon stage.
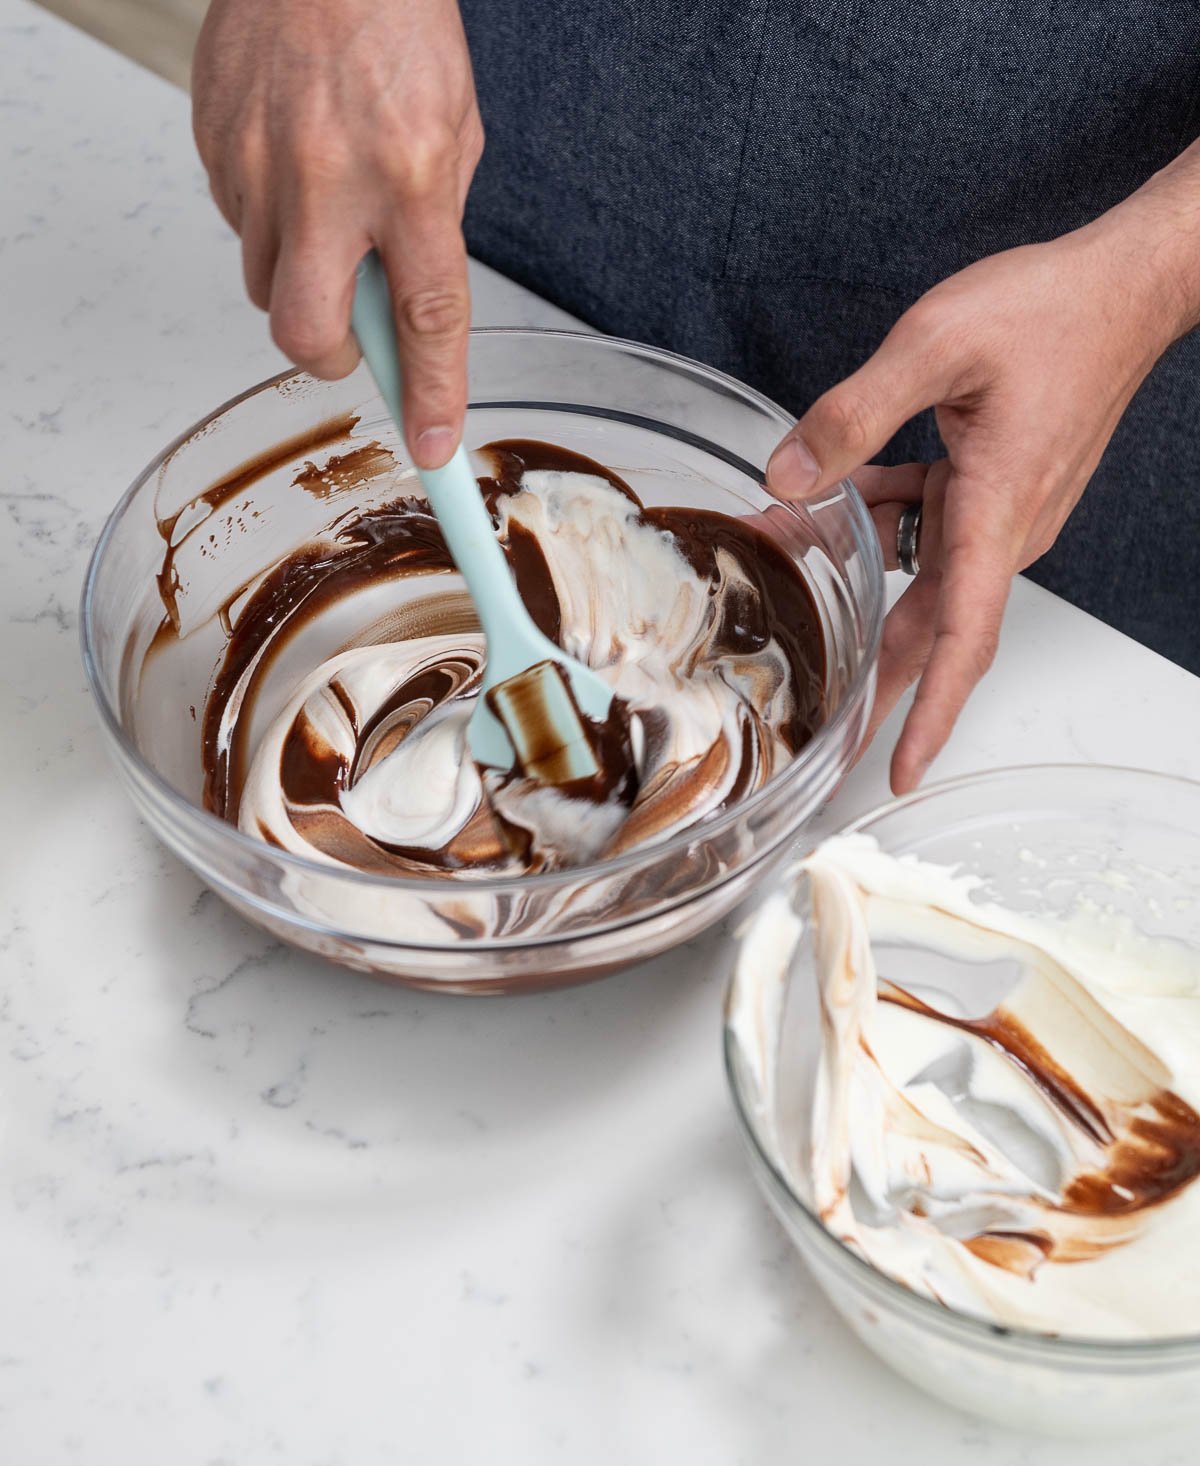
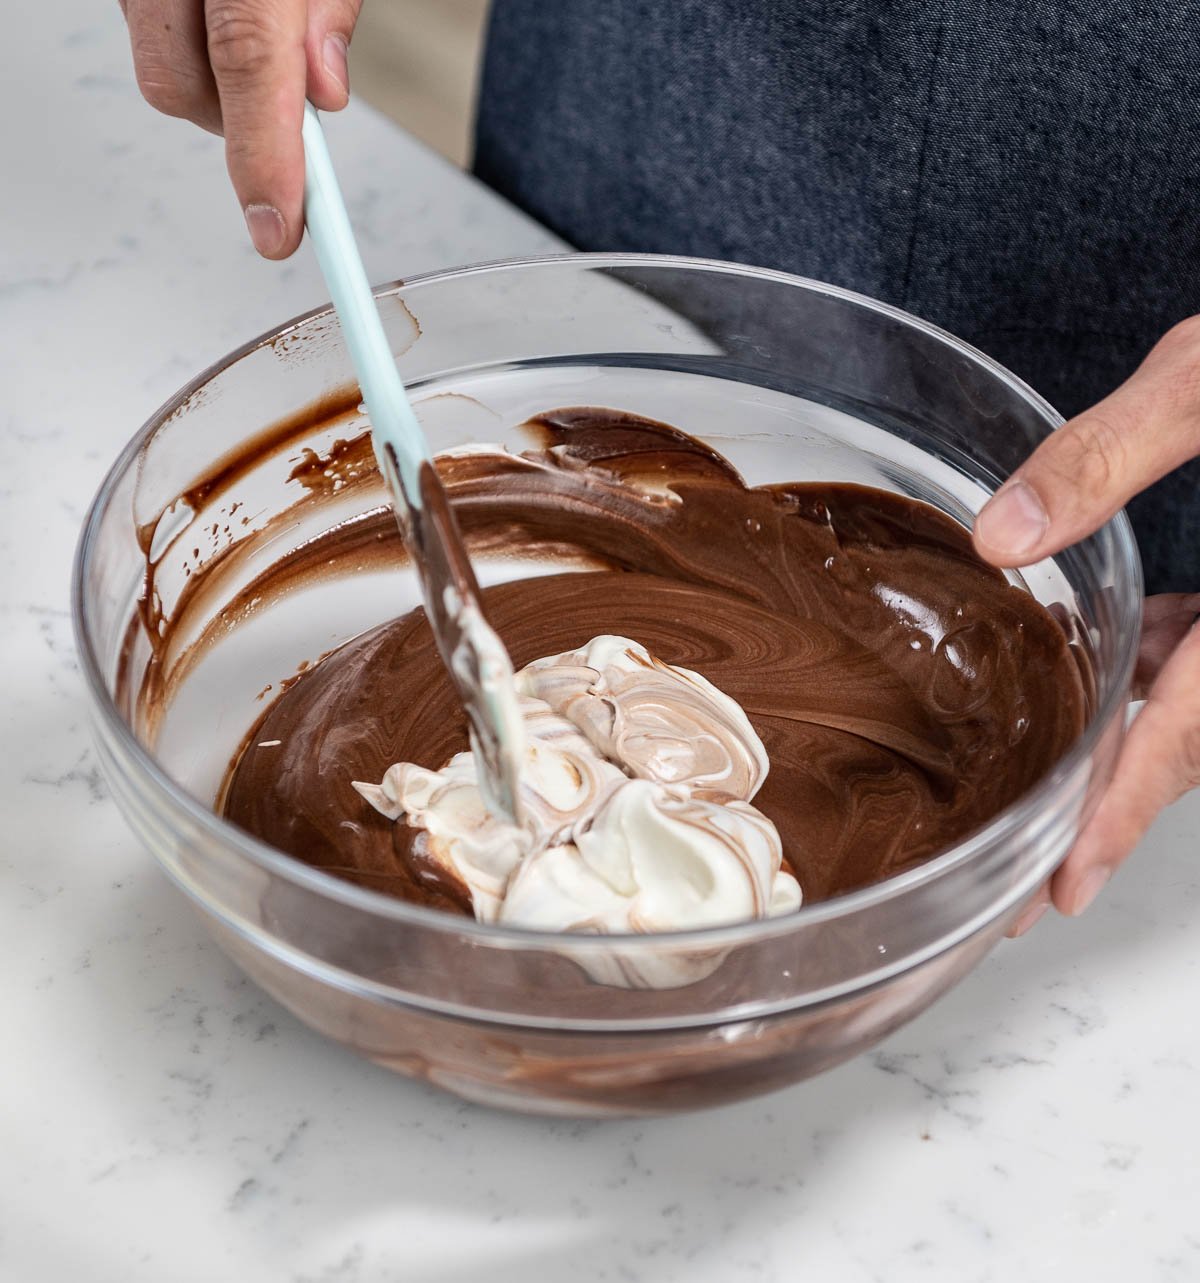
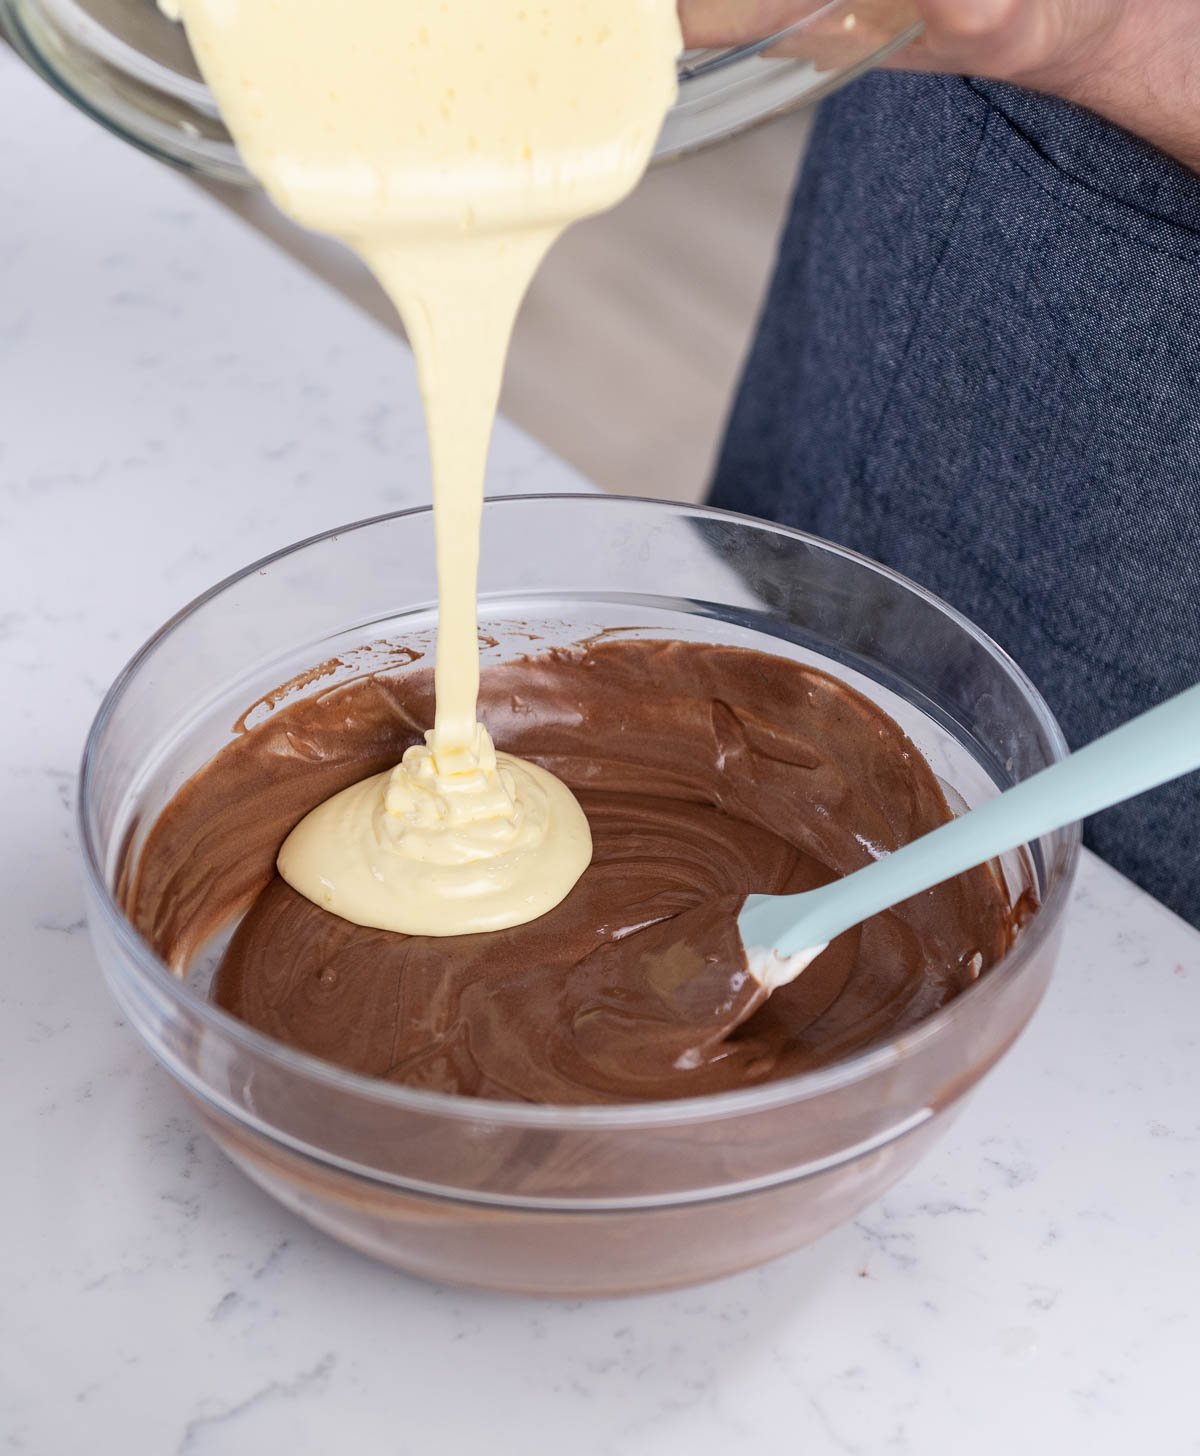
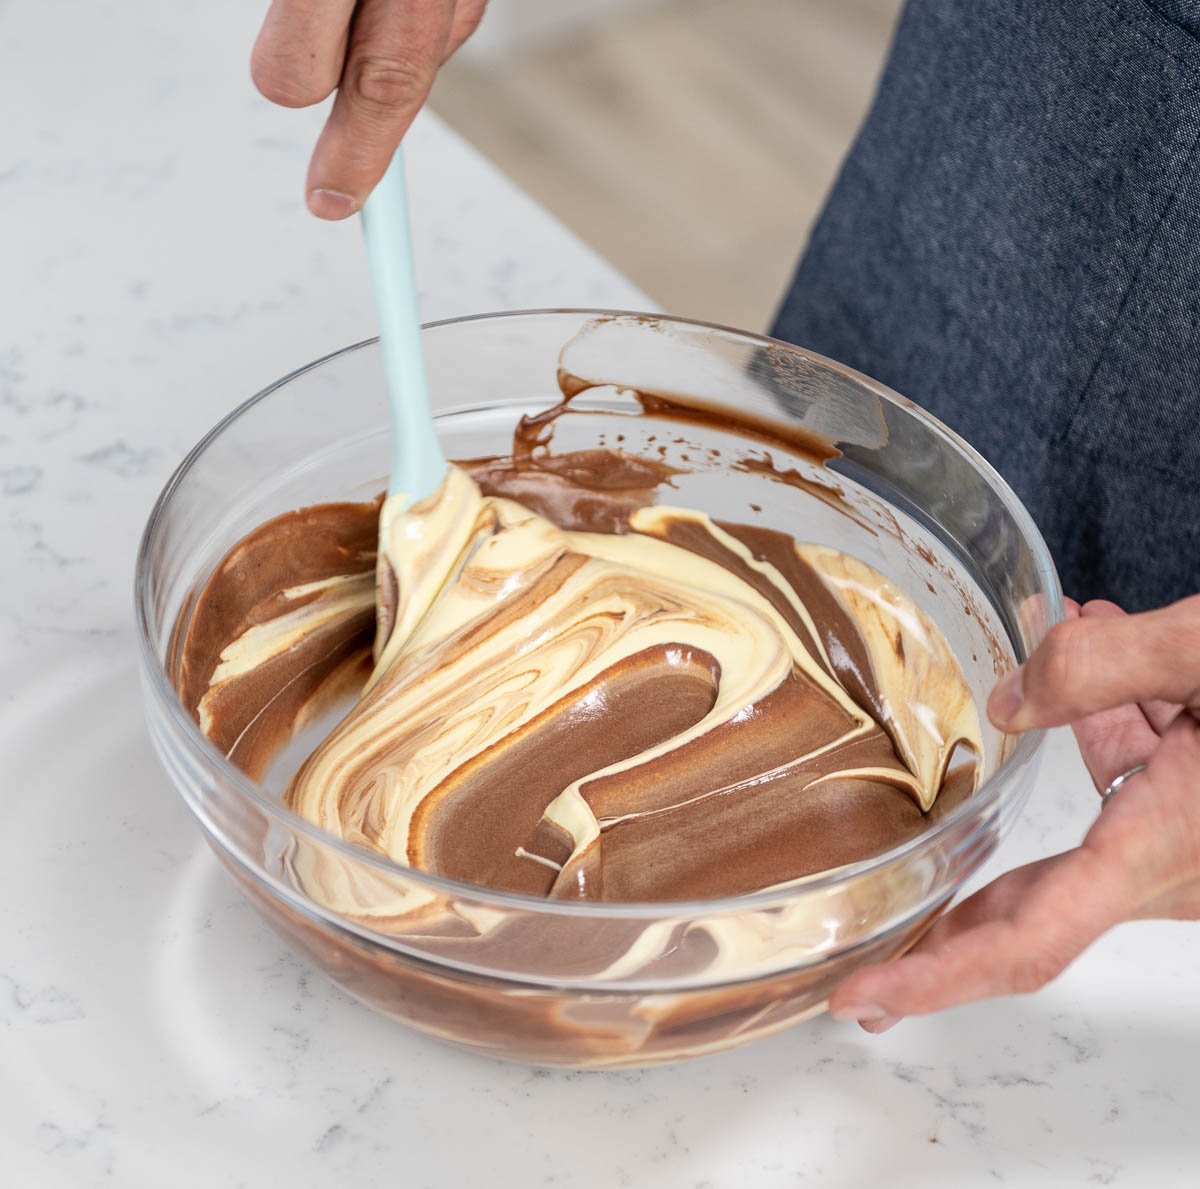
- To build the chocolate mousse, fold ½ of the whipped cream into the ganache to lighten it.
- Then add in the rest of the whipped cream by folding gently.
- Then fold in the pâte à bombe to create the perfect mousse for the entremet.
Assembling the Entremet Layers
Now it's time to bring it all together!
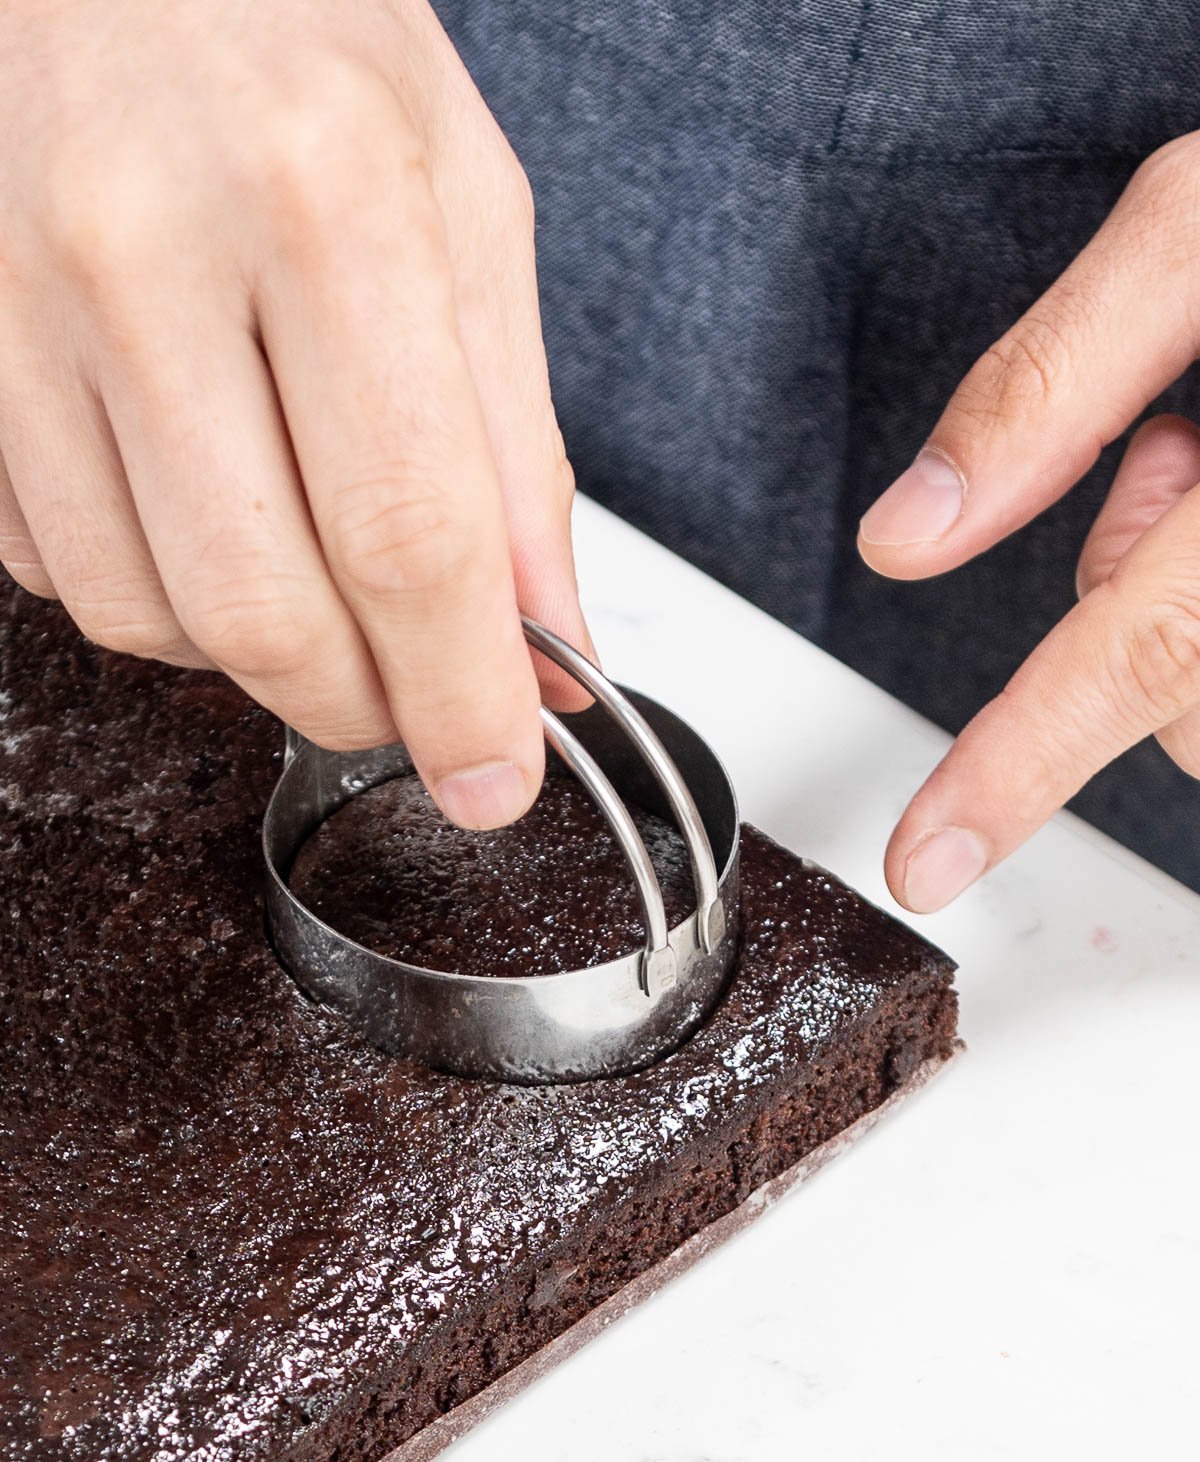


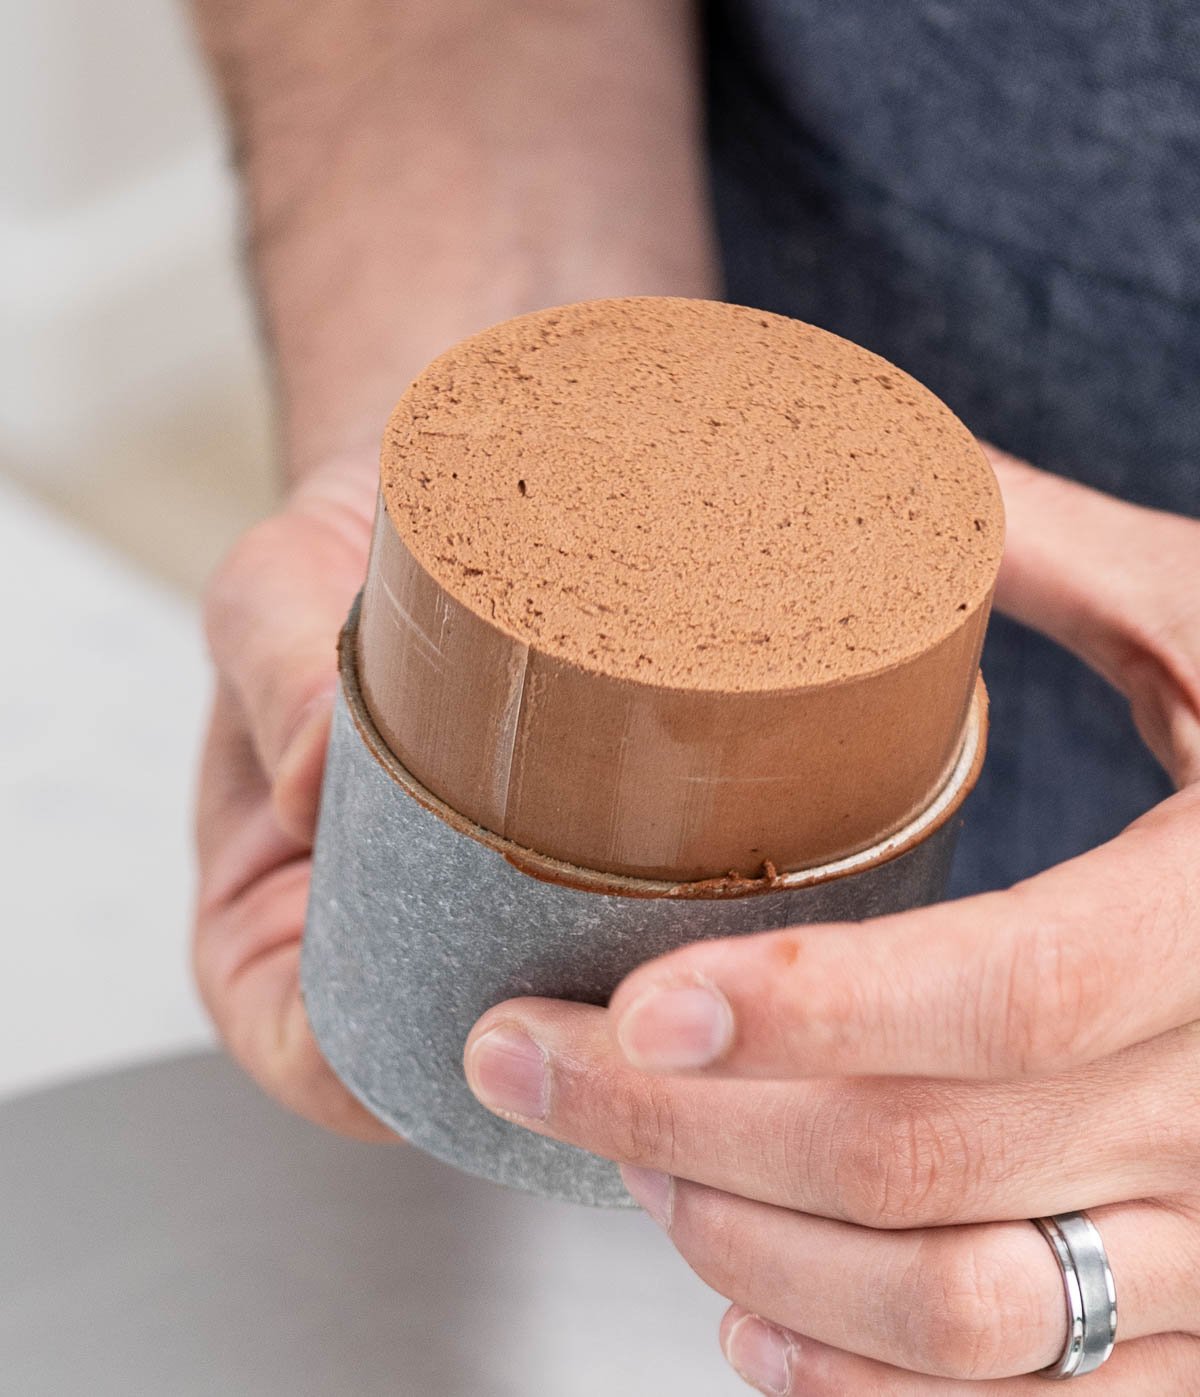
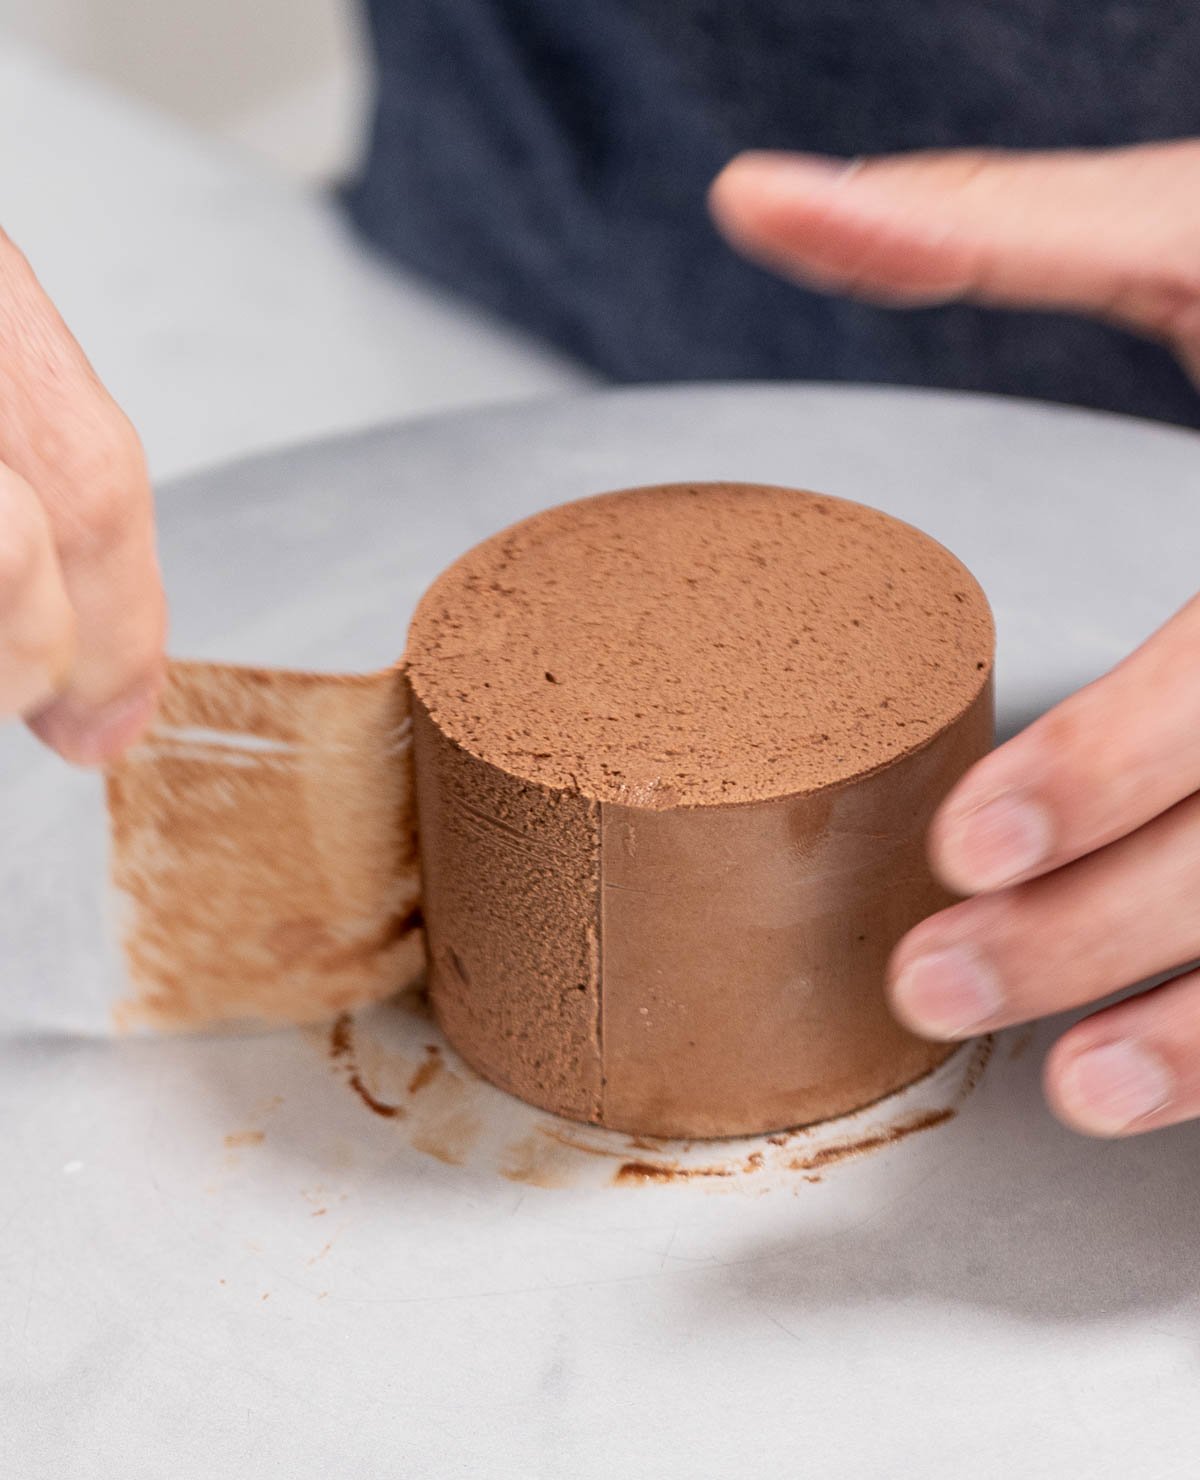
- First, remove the plastic wrap from the frozen cake.
- Next, use a 3" cake cutter to create small cake rounds.
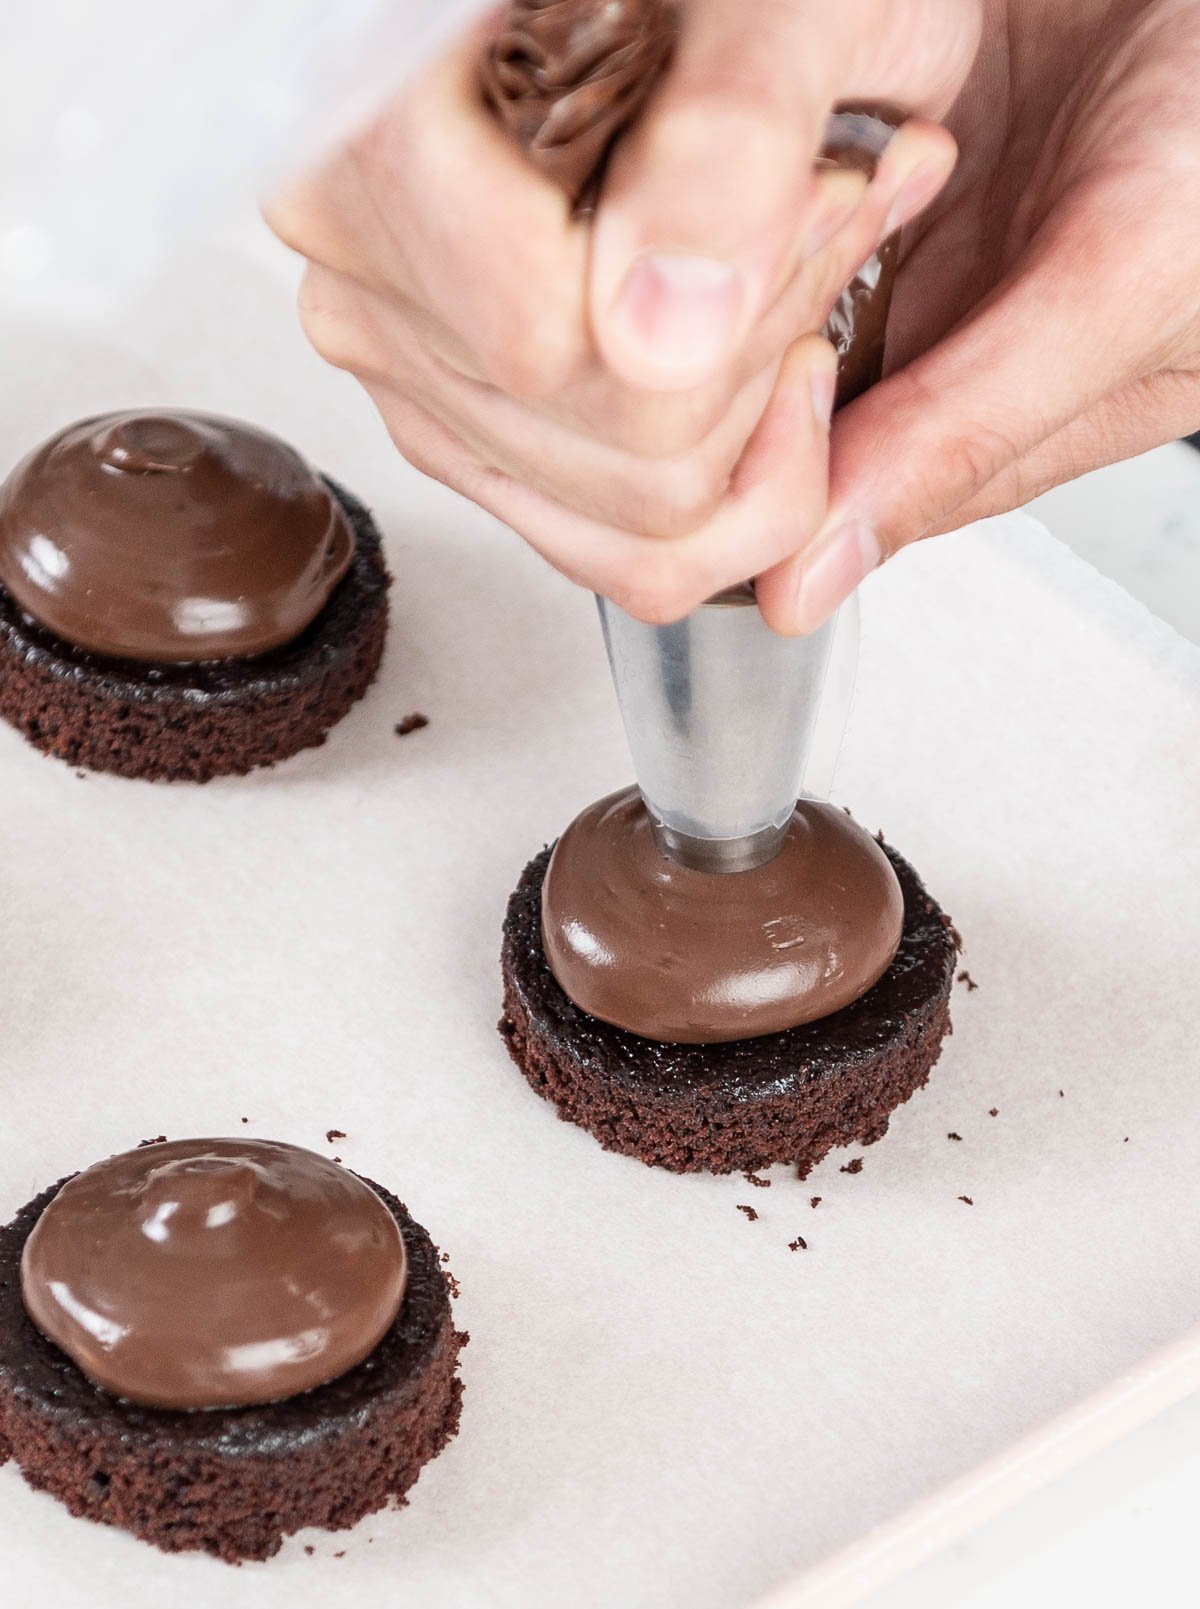
- Prepare a piping bag with a large round tip (an 8 or 9 tip) and fill it with your chocolate ganache.
- Then, pipe your chocolate ganache on top of the center of your cake rounds.
- Freeze the cake rounds with ganache on top for 1 hour or until they are set.
- While the cake rounds with ganache are in the freezer, prepare your 4" cake rings/entremet mold for assembly.
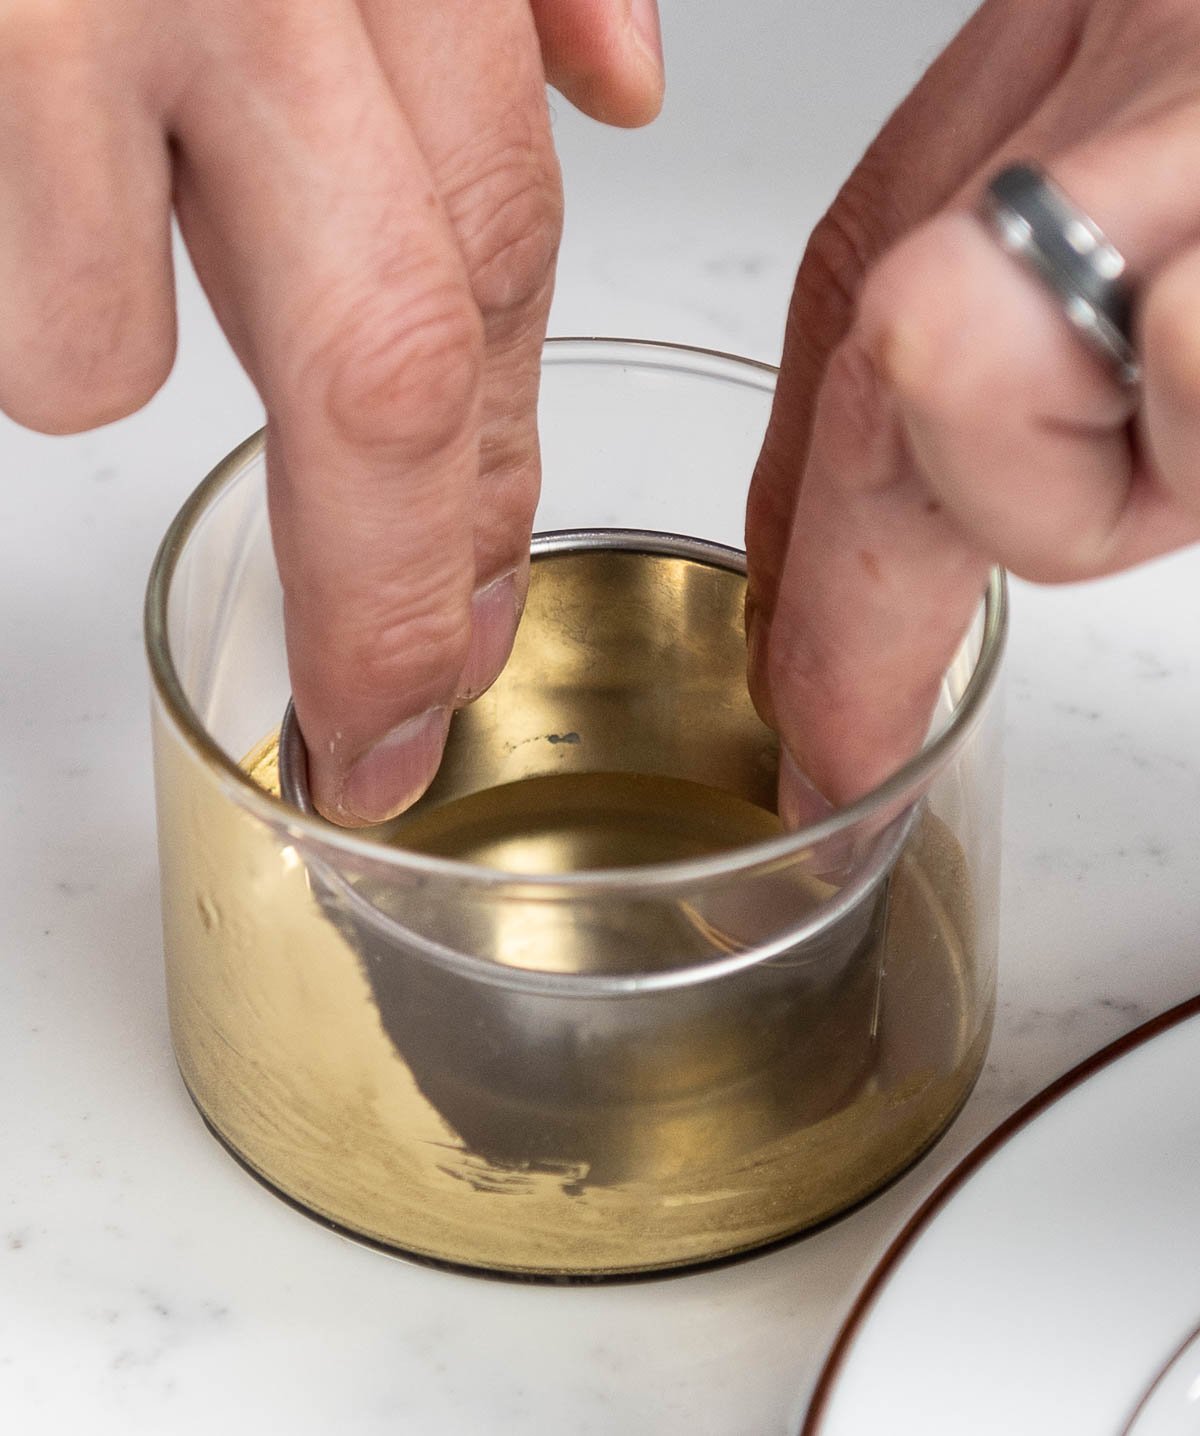
- You will start by coating the inside of the cake rings with cooking spray.
- Cut your acetate sheets to 2" x 9.25", and cut out squares of acetate that will cover the entire bottom of the cake rings.
- Then, line the inside of your non-stick cake rings with acetate sheets. Next, place a square sheet of acetate on a baking sheet. Then, place your cake ring that is lined with acetate on top of the square.
- Once the cake rounds with ganache have set in the freezer for 1 hour, remove them from the freezer.
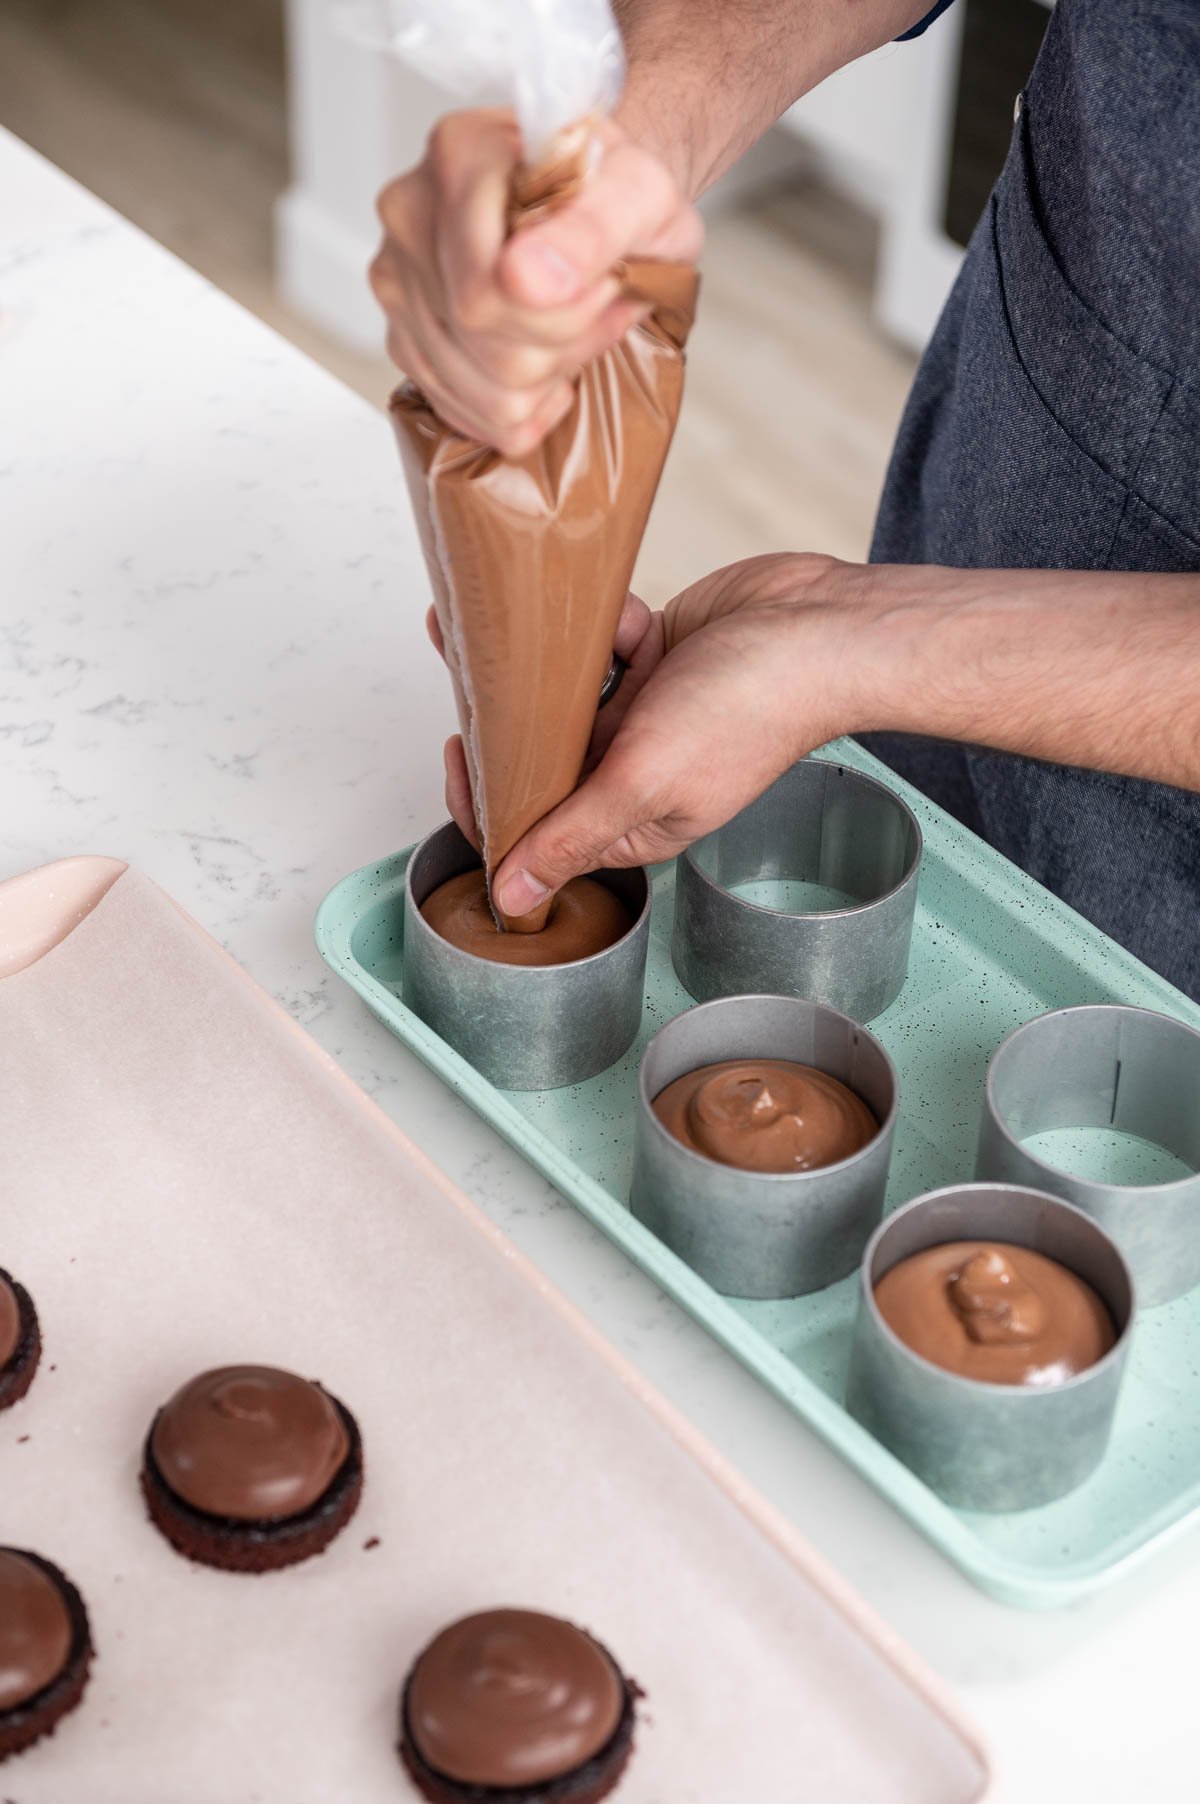
- Prepare a piping bag and fill it with your chocolate mousse.
- Now it is time to assemble the entremet. PRO TIP: Before you begin piping your mousse ensure that the acetate squares on the bottom are in place so none of the mousse will escape.
- Start by piping chocolate mousse into the acetate-lined cake rings about ¾ of the way to the top of the cake rings.
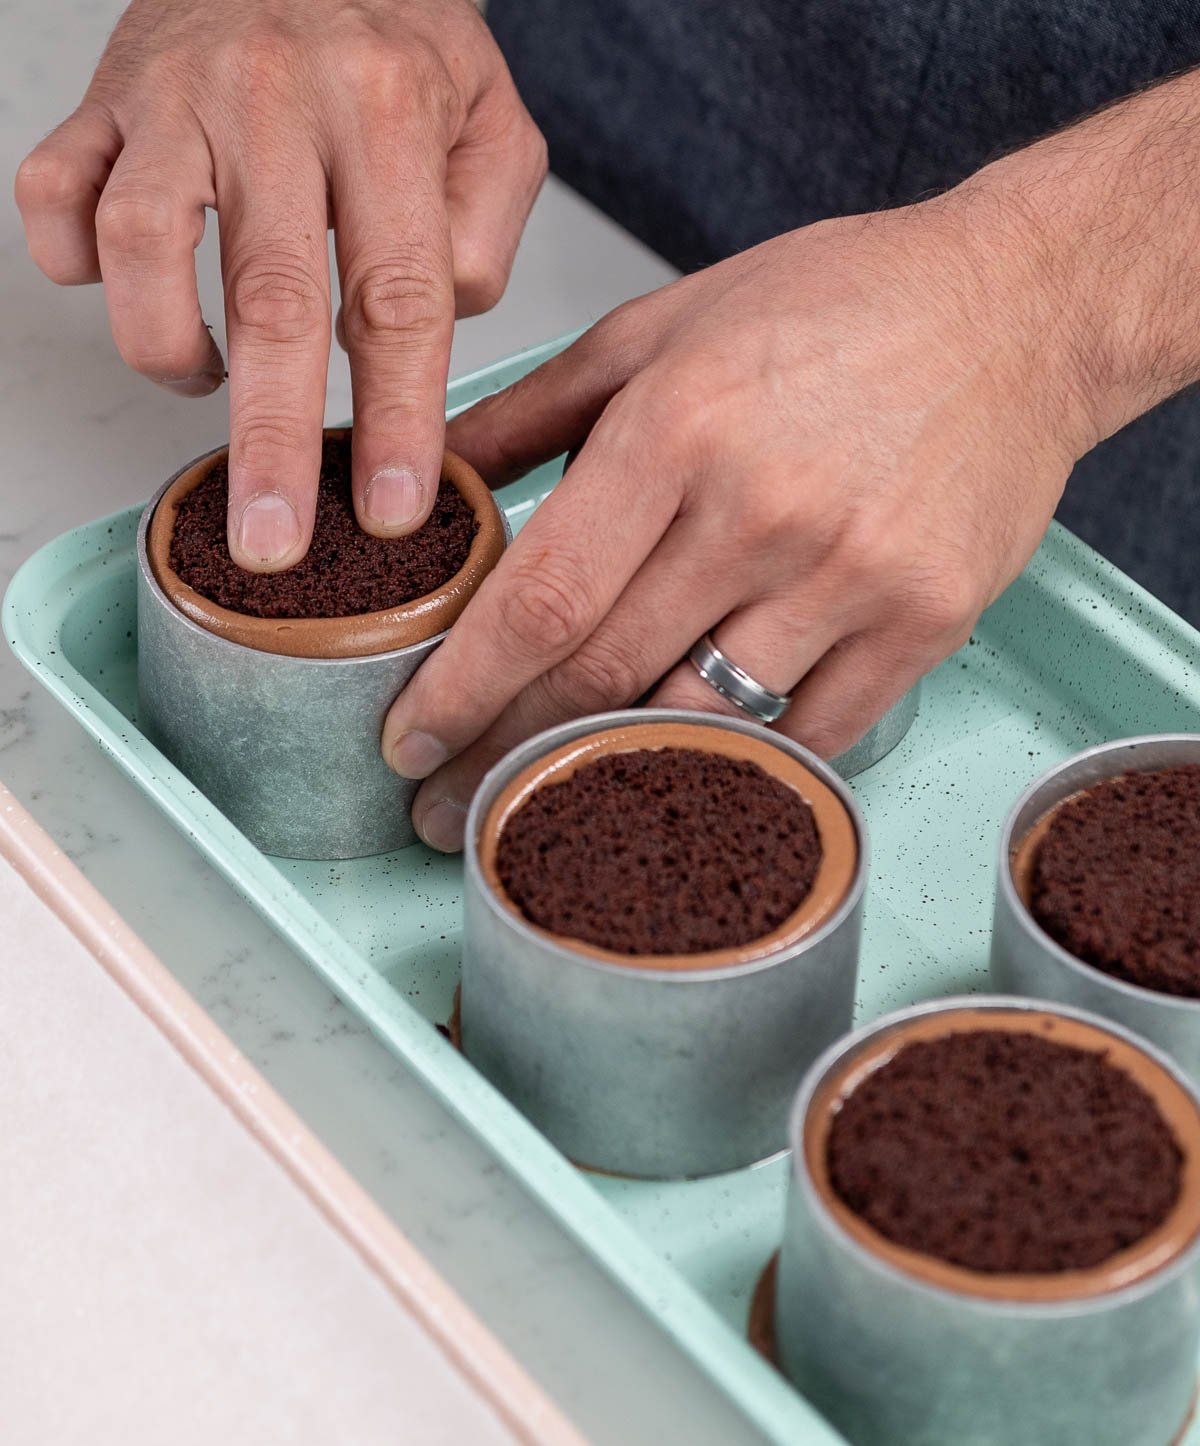
- Next, hold the cake round topped with ganache and place it mousse side down into the center of the ganache (cake side should be on top). Gently press the cake round into the mousse until the mousse moves up to the top. You will see a ring of mousse form around the cake and that is when you know the mousse is filled on the sides.
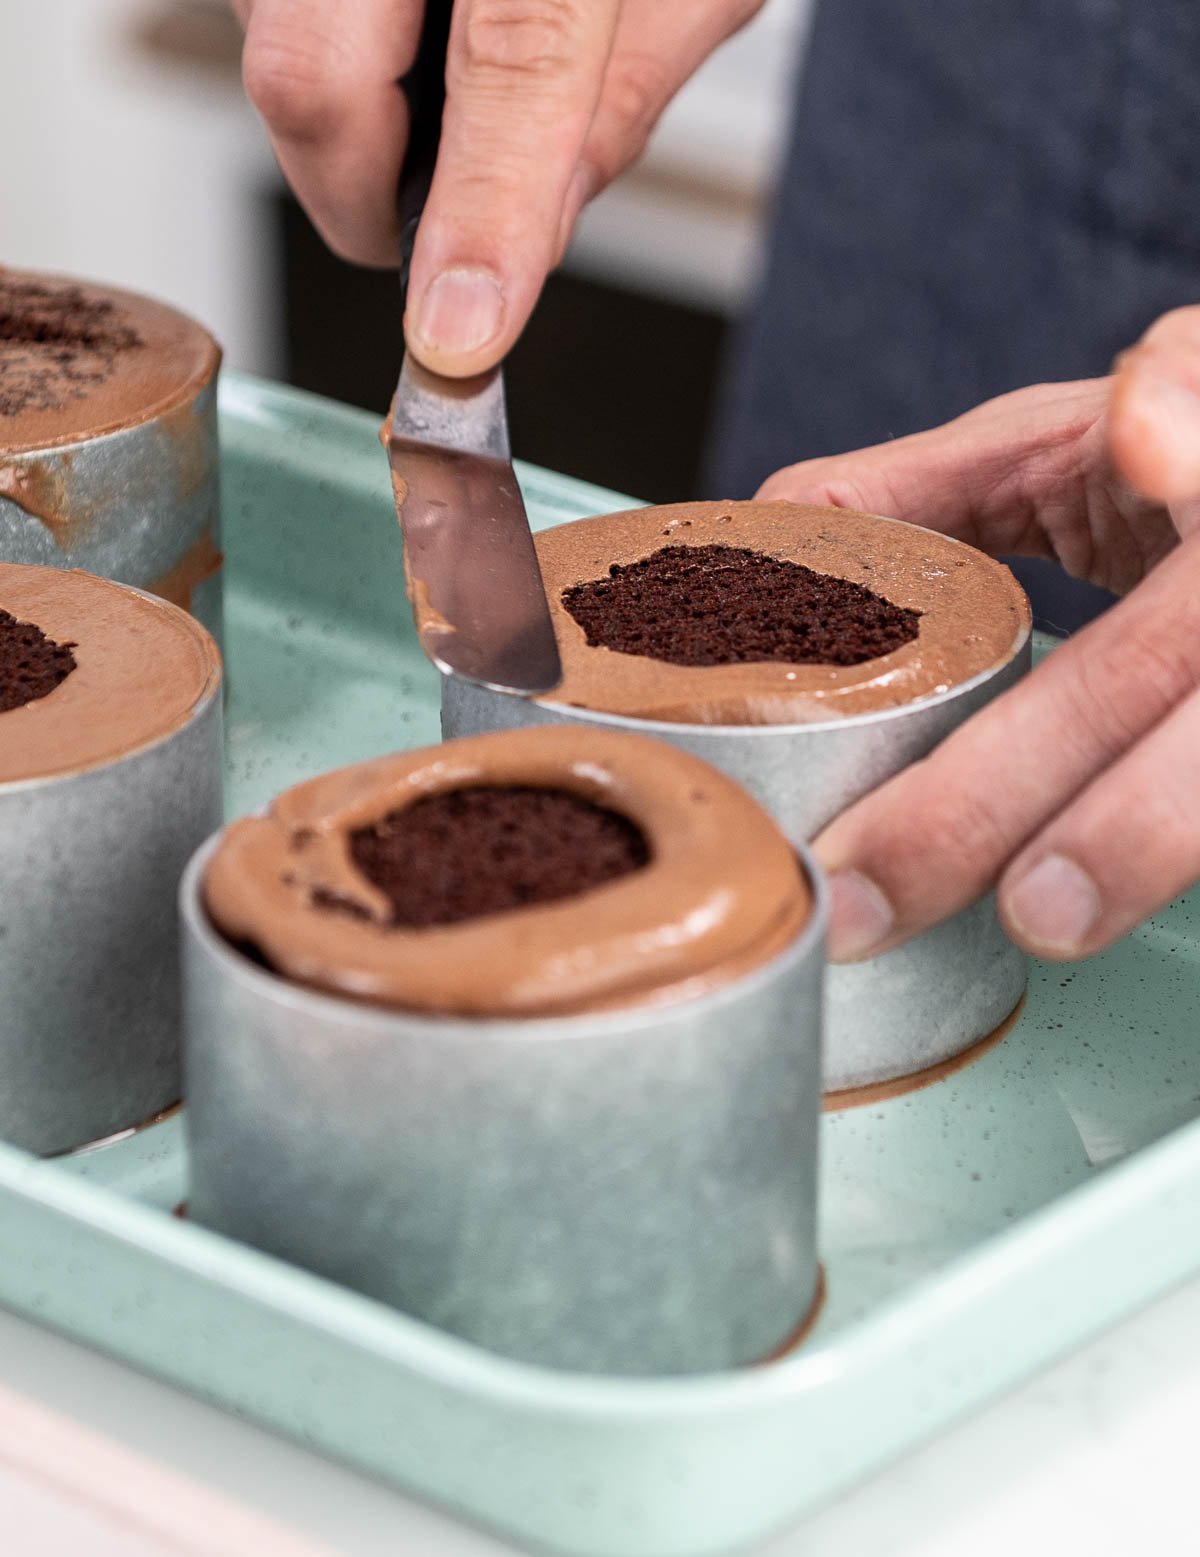
- Then, flatten out the mousse and scrape off any excess from the cake ring so that it's level.
- Freeze the entremets for a minimum of 3 hours. Chef Christophe recommends freezing them overnight. This will allow all of the layers to fully set in place.
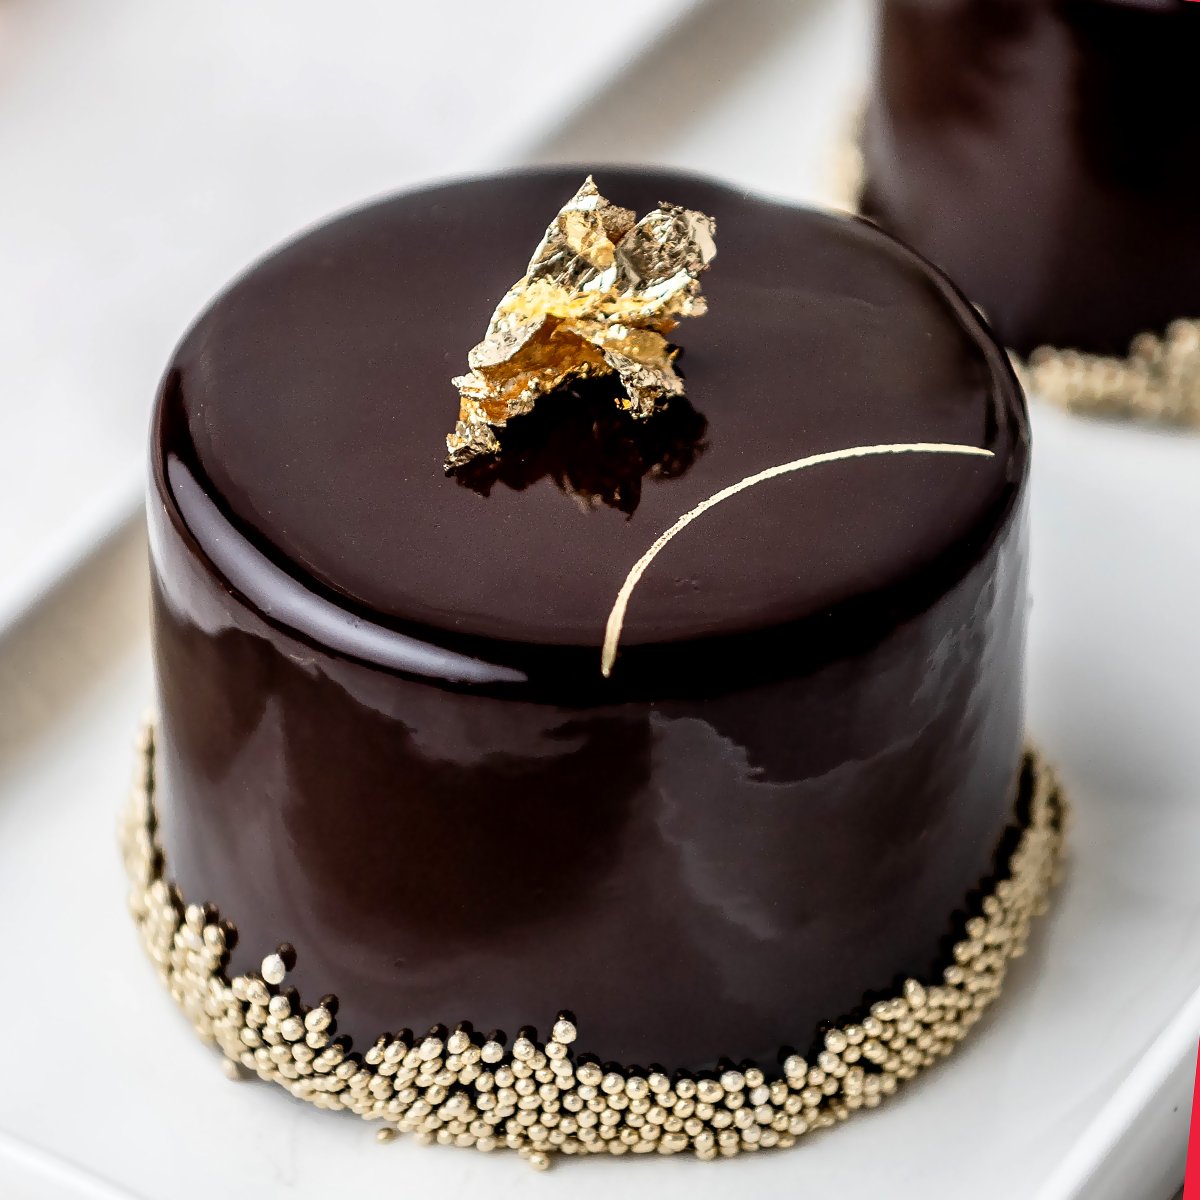
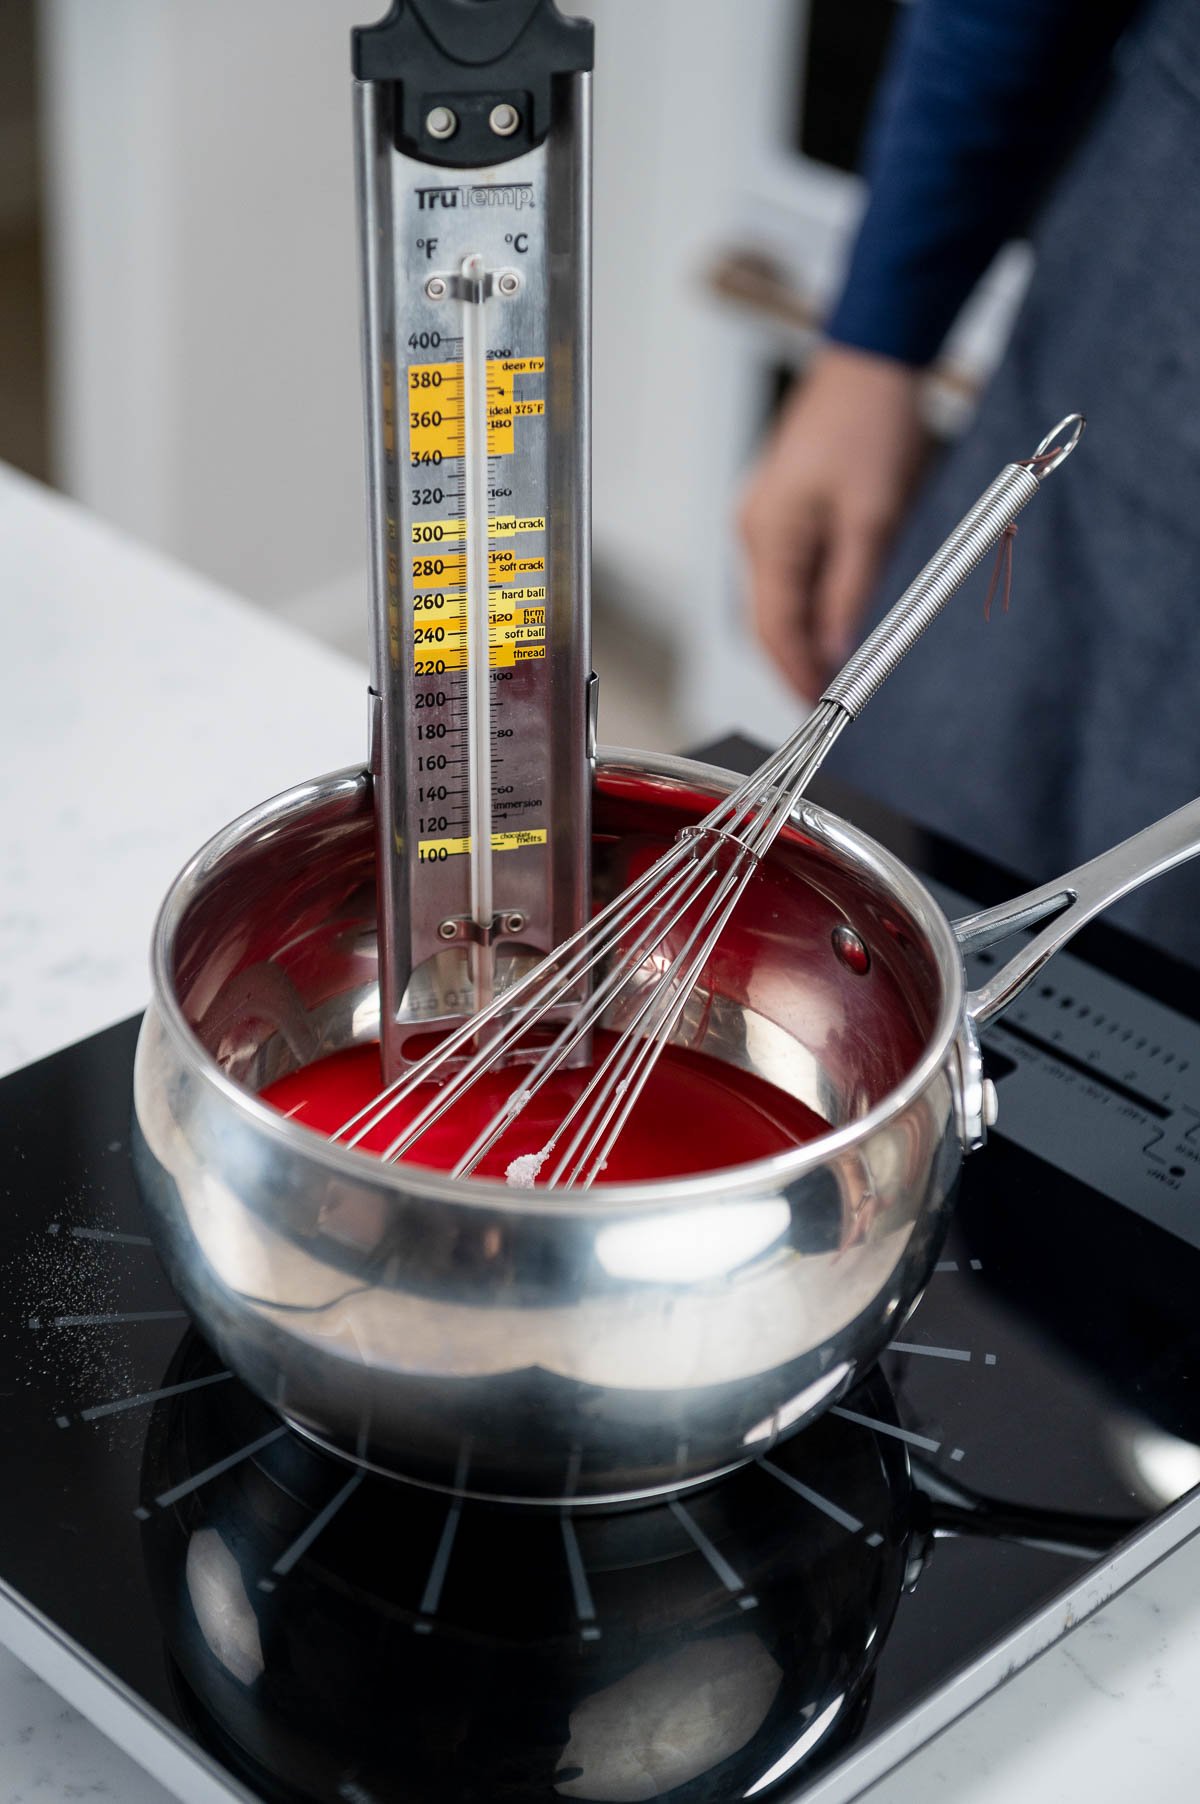
Chocolate Mirror Glaze
This mirror glaze is super shiny, smooth, and sets the perfect finish for our entremet.
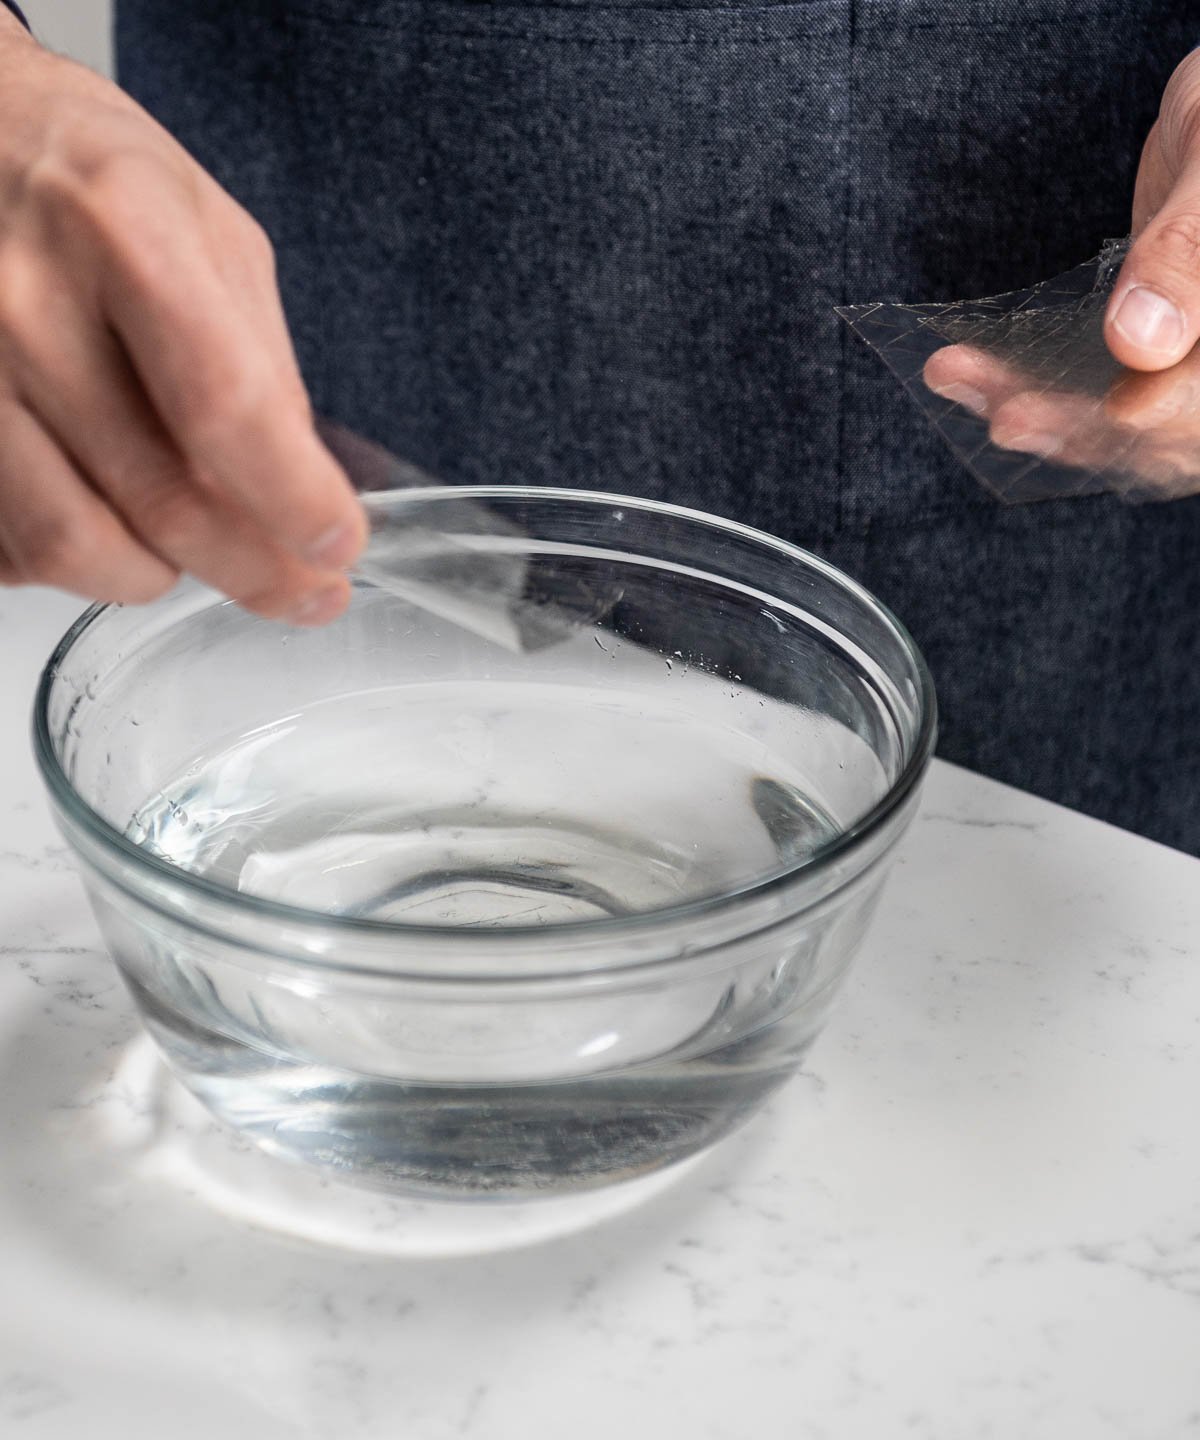
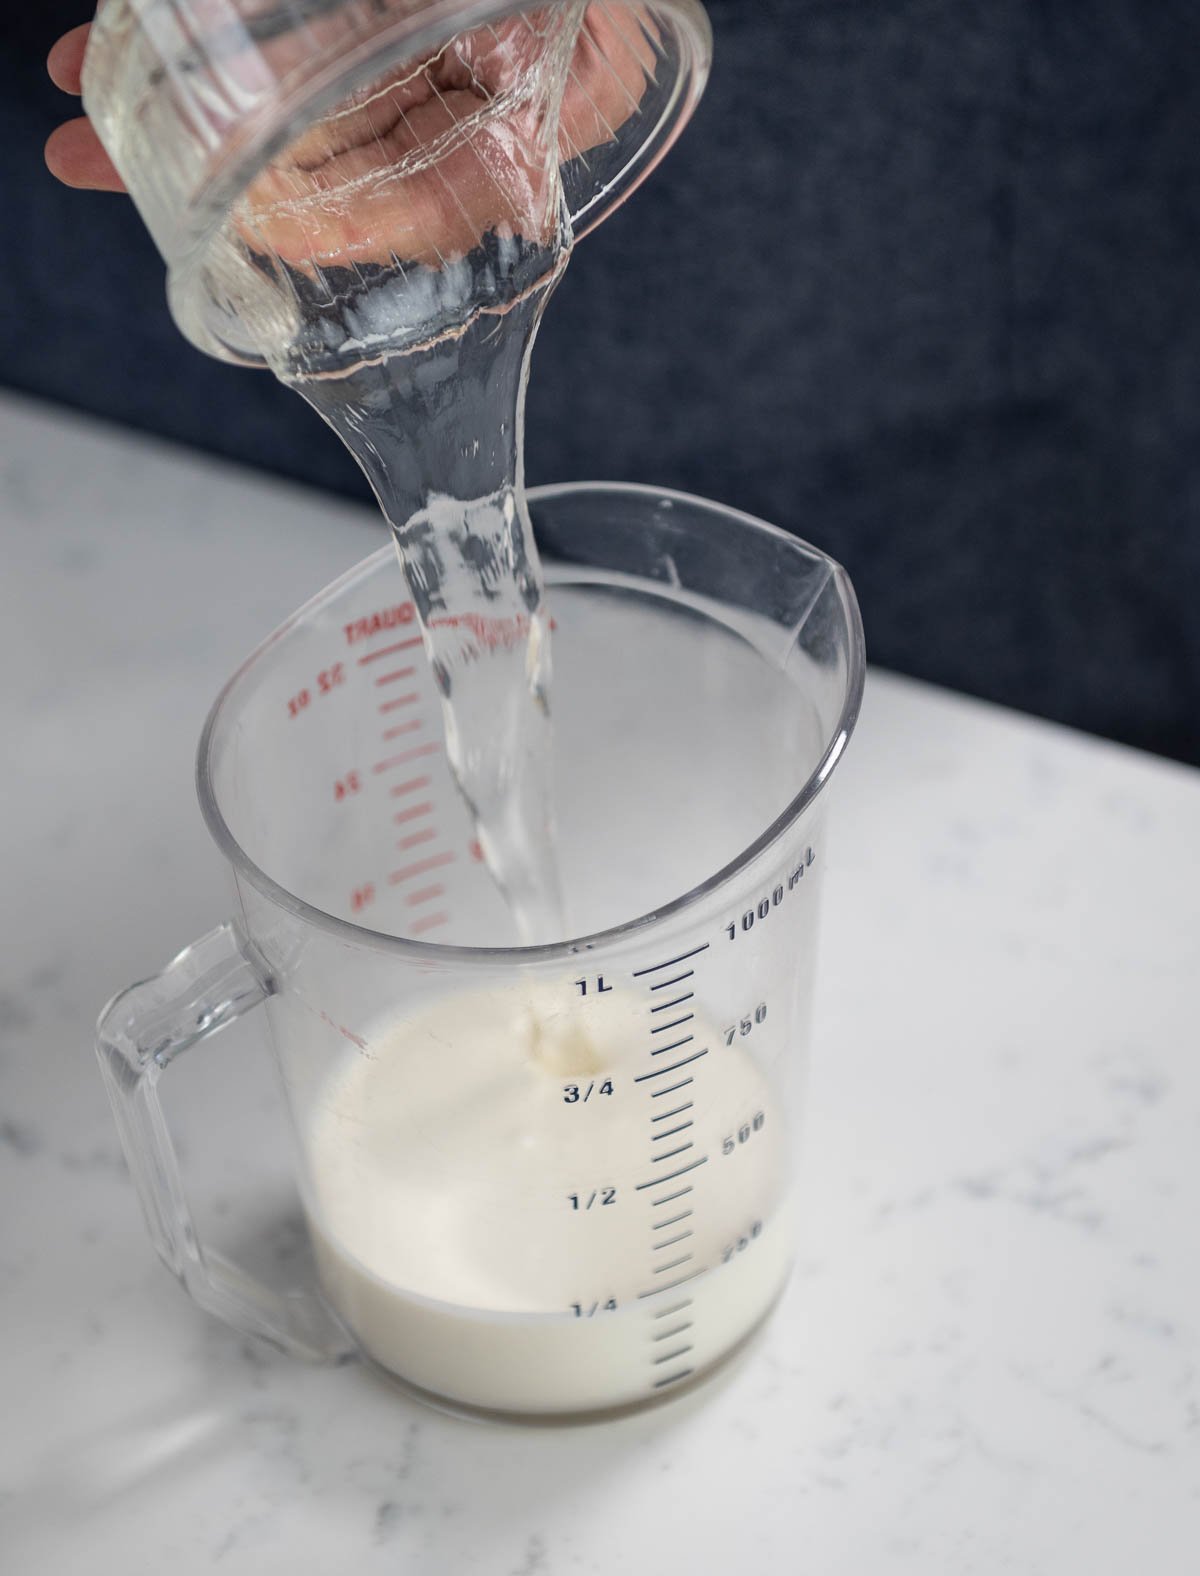
- Bloom gelatin sheets in cold water.
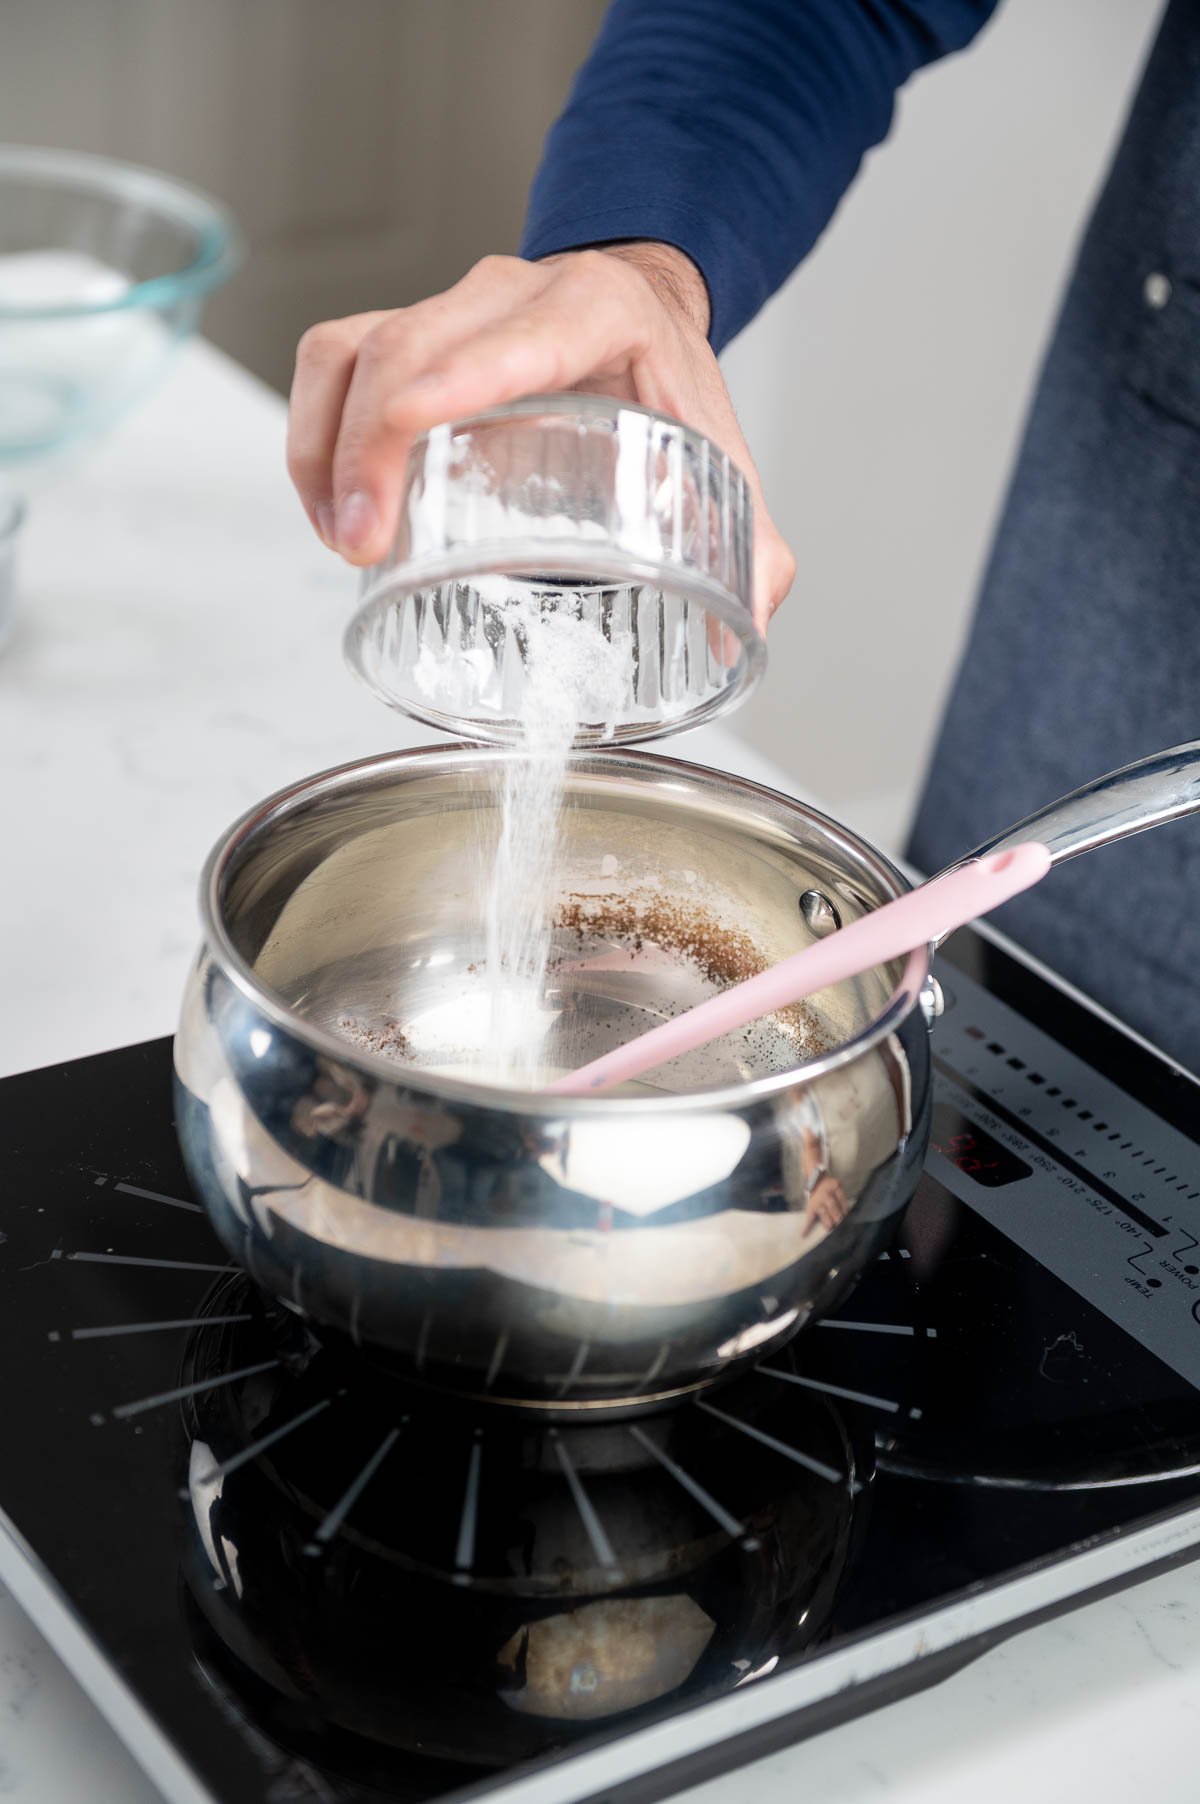
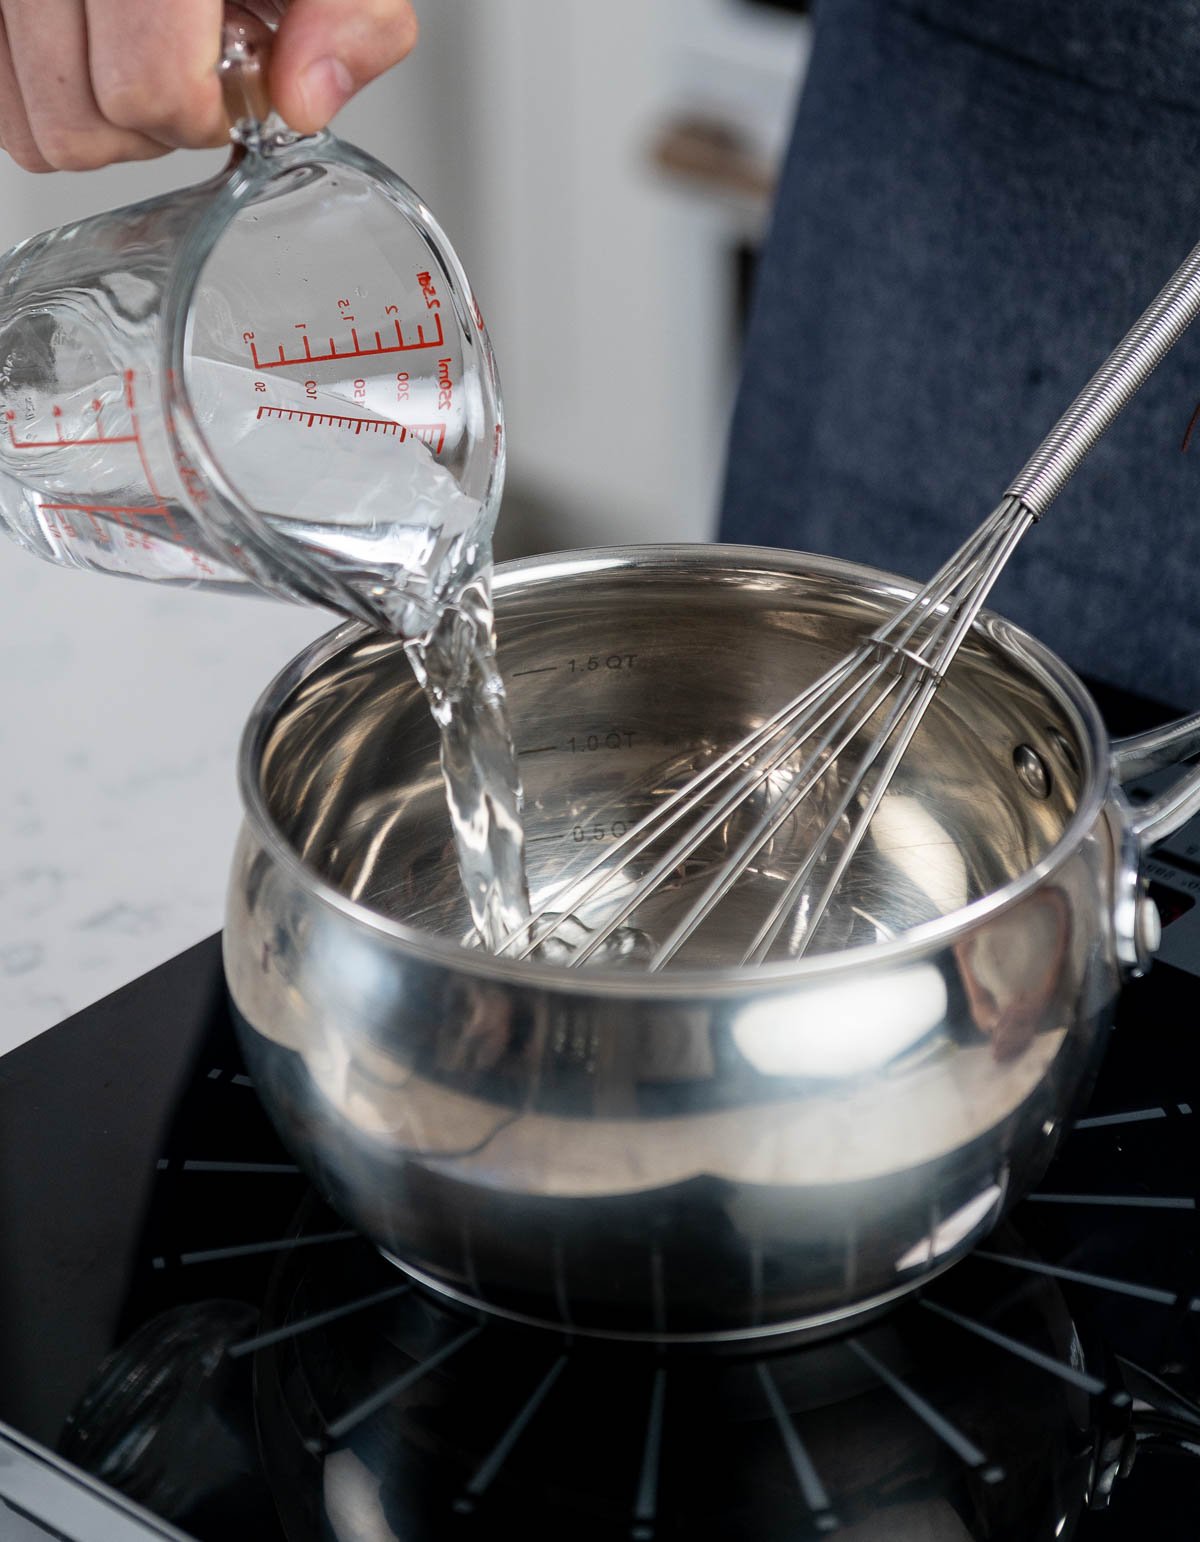
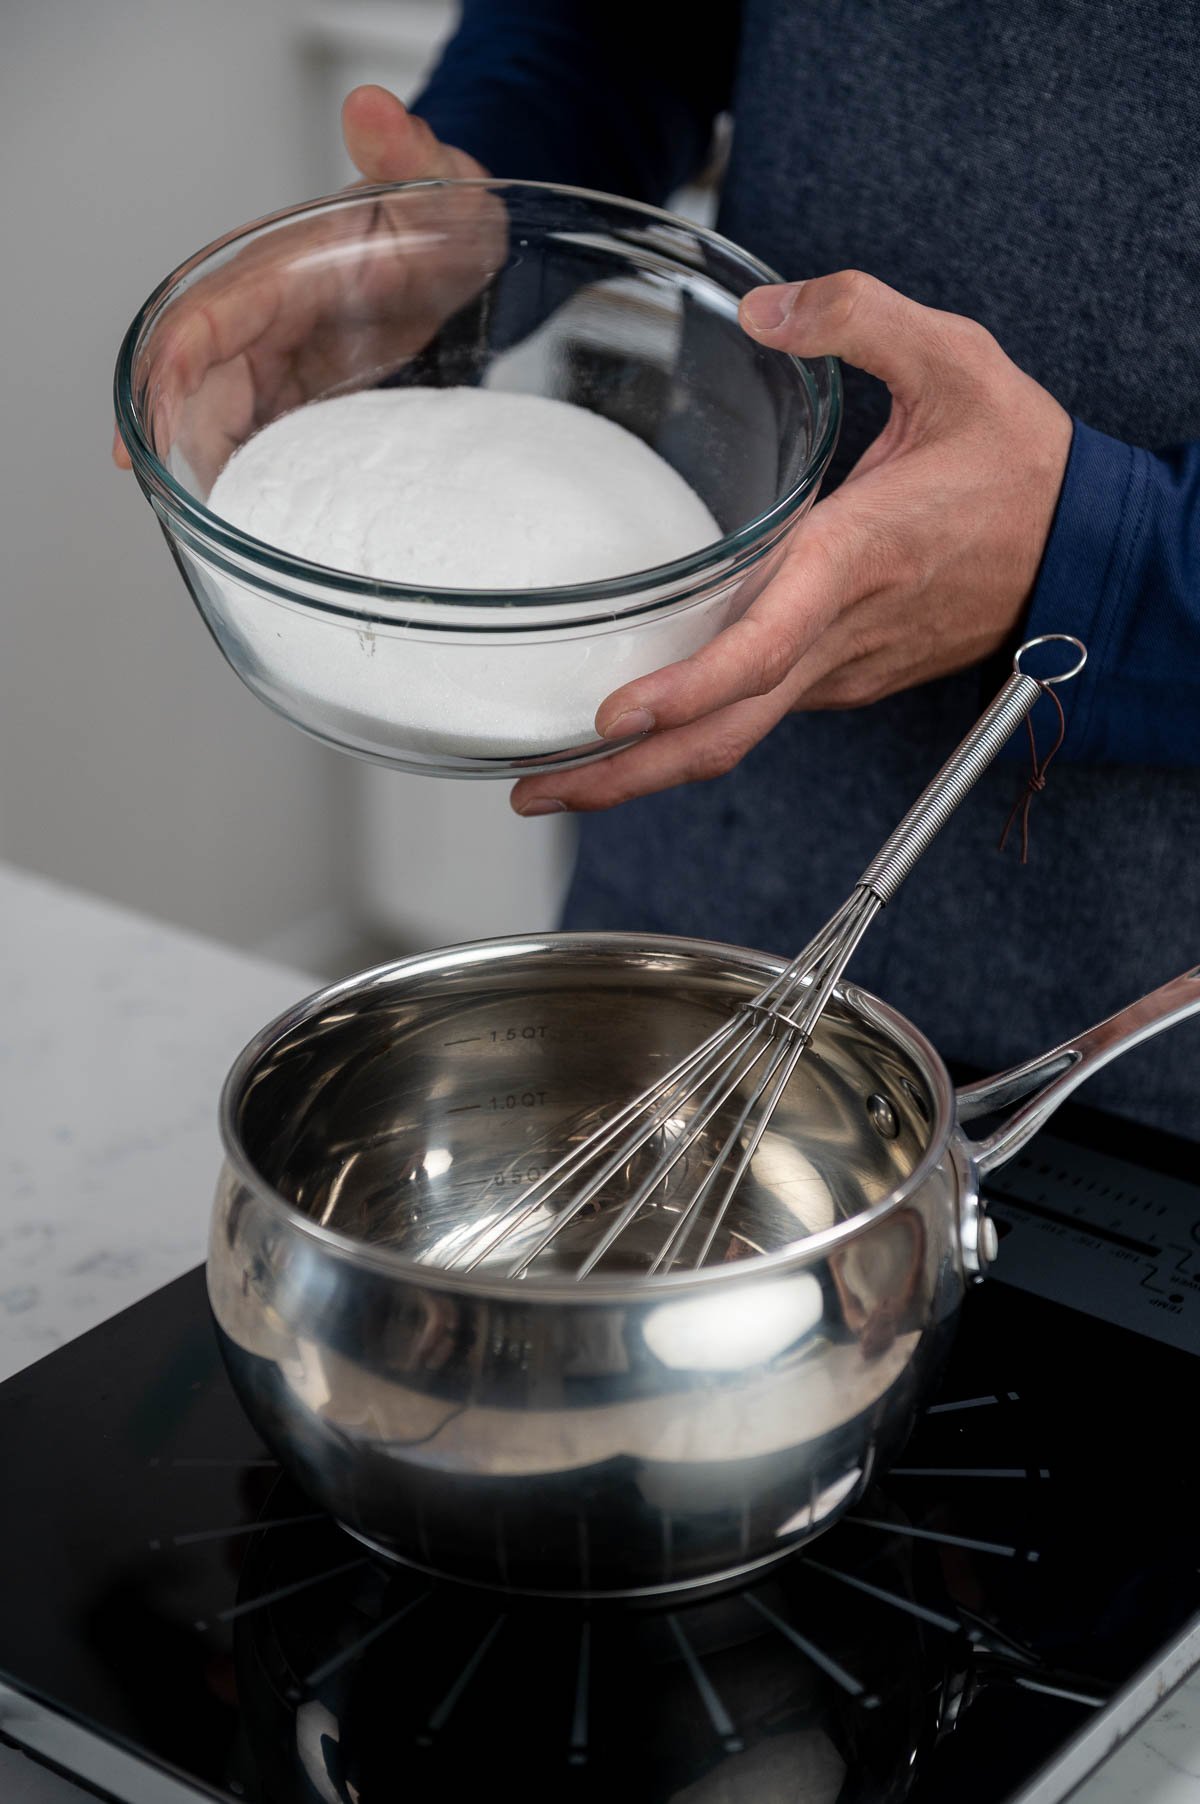
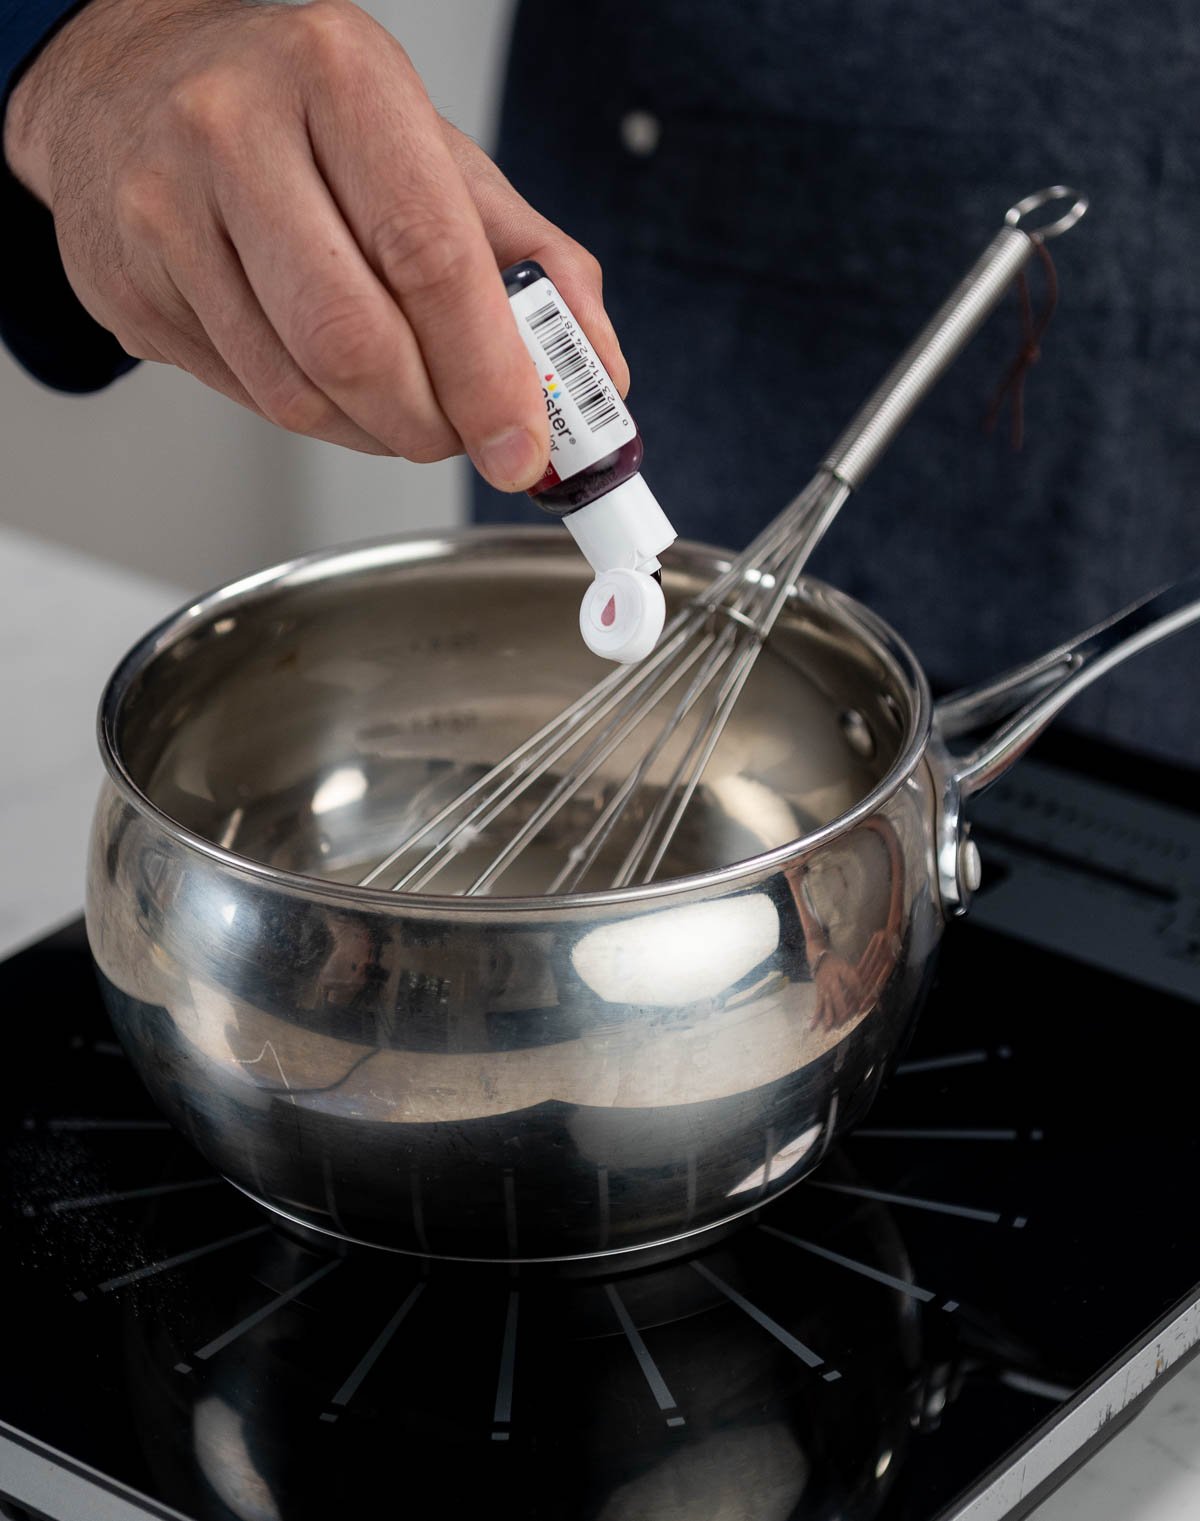
- Cook sugar, water, and optional food coloring to 222°F. Food coloring adds depth of color to the final mirror glaze.
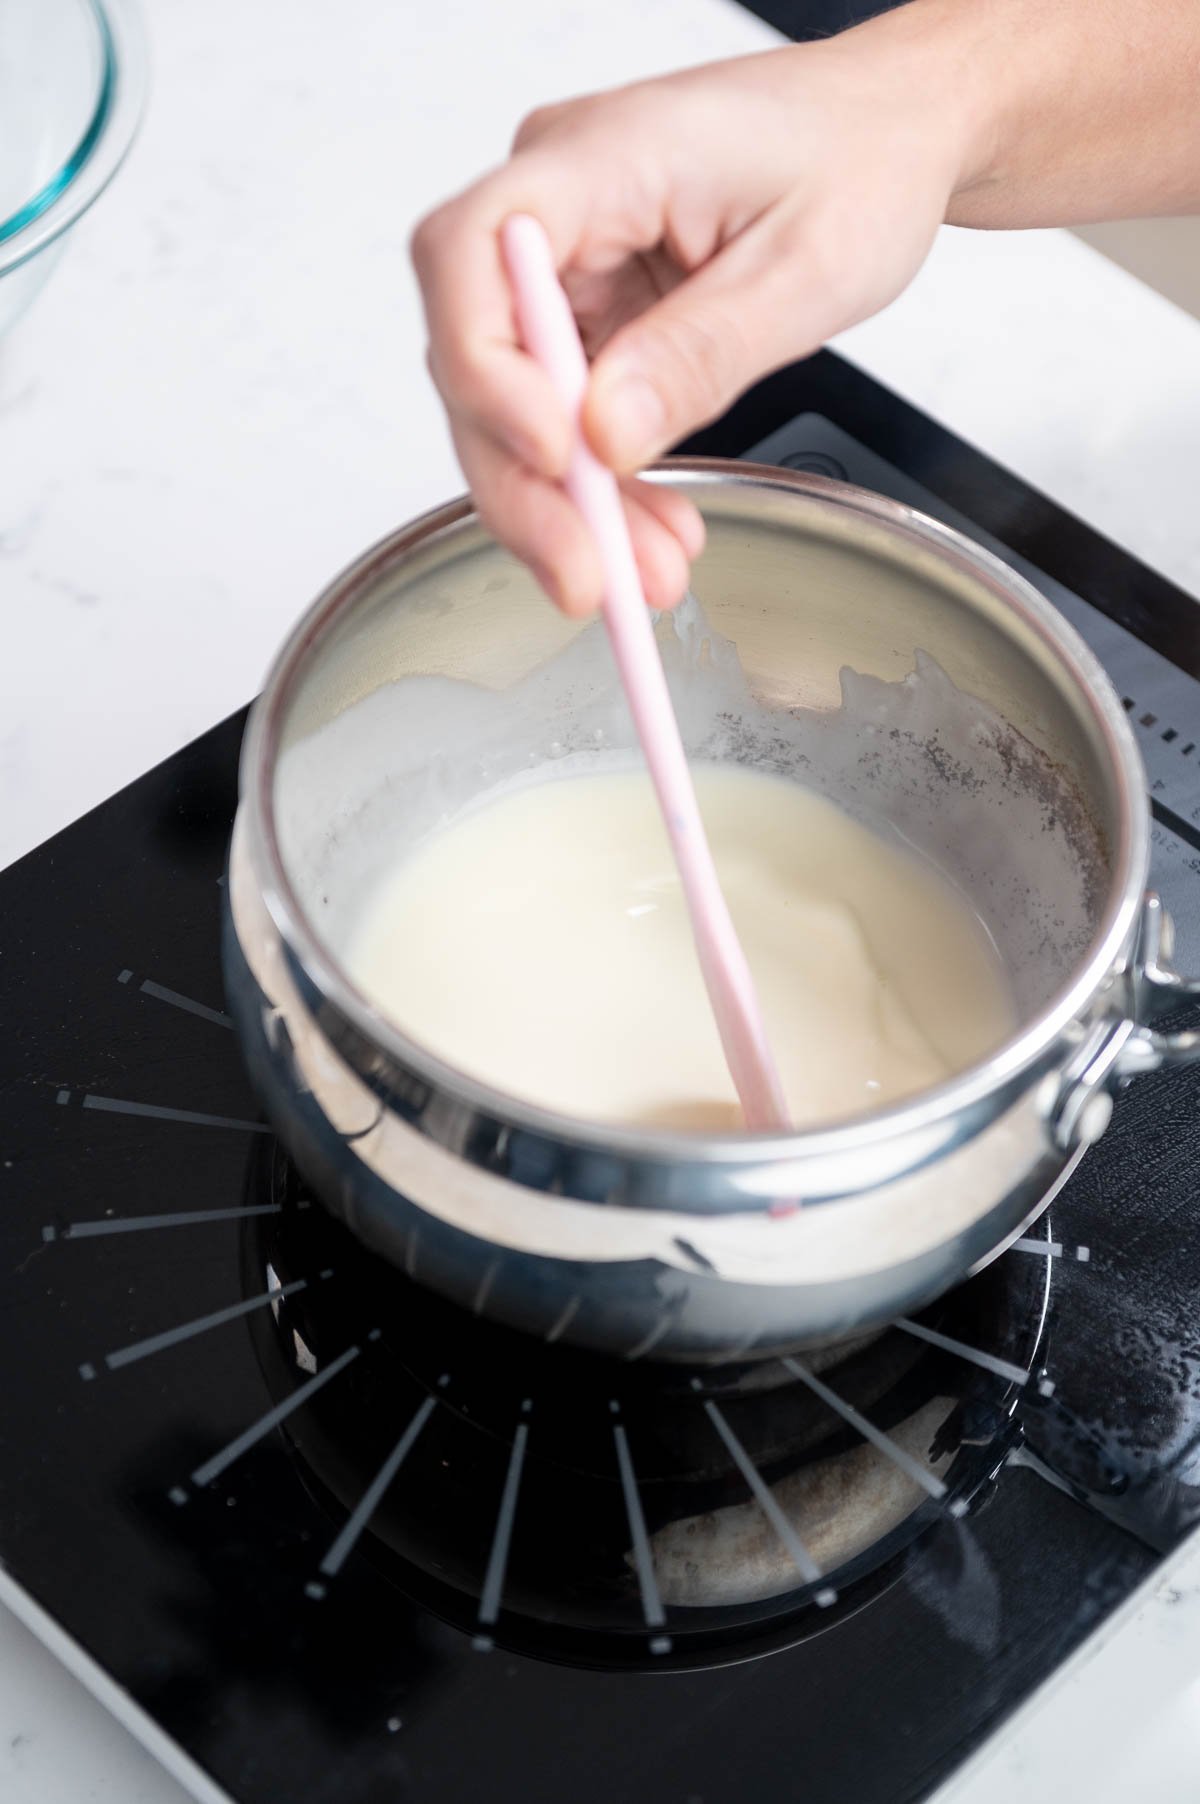
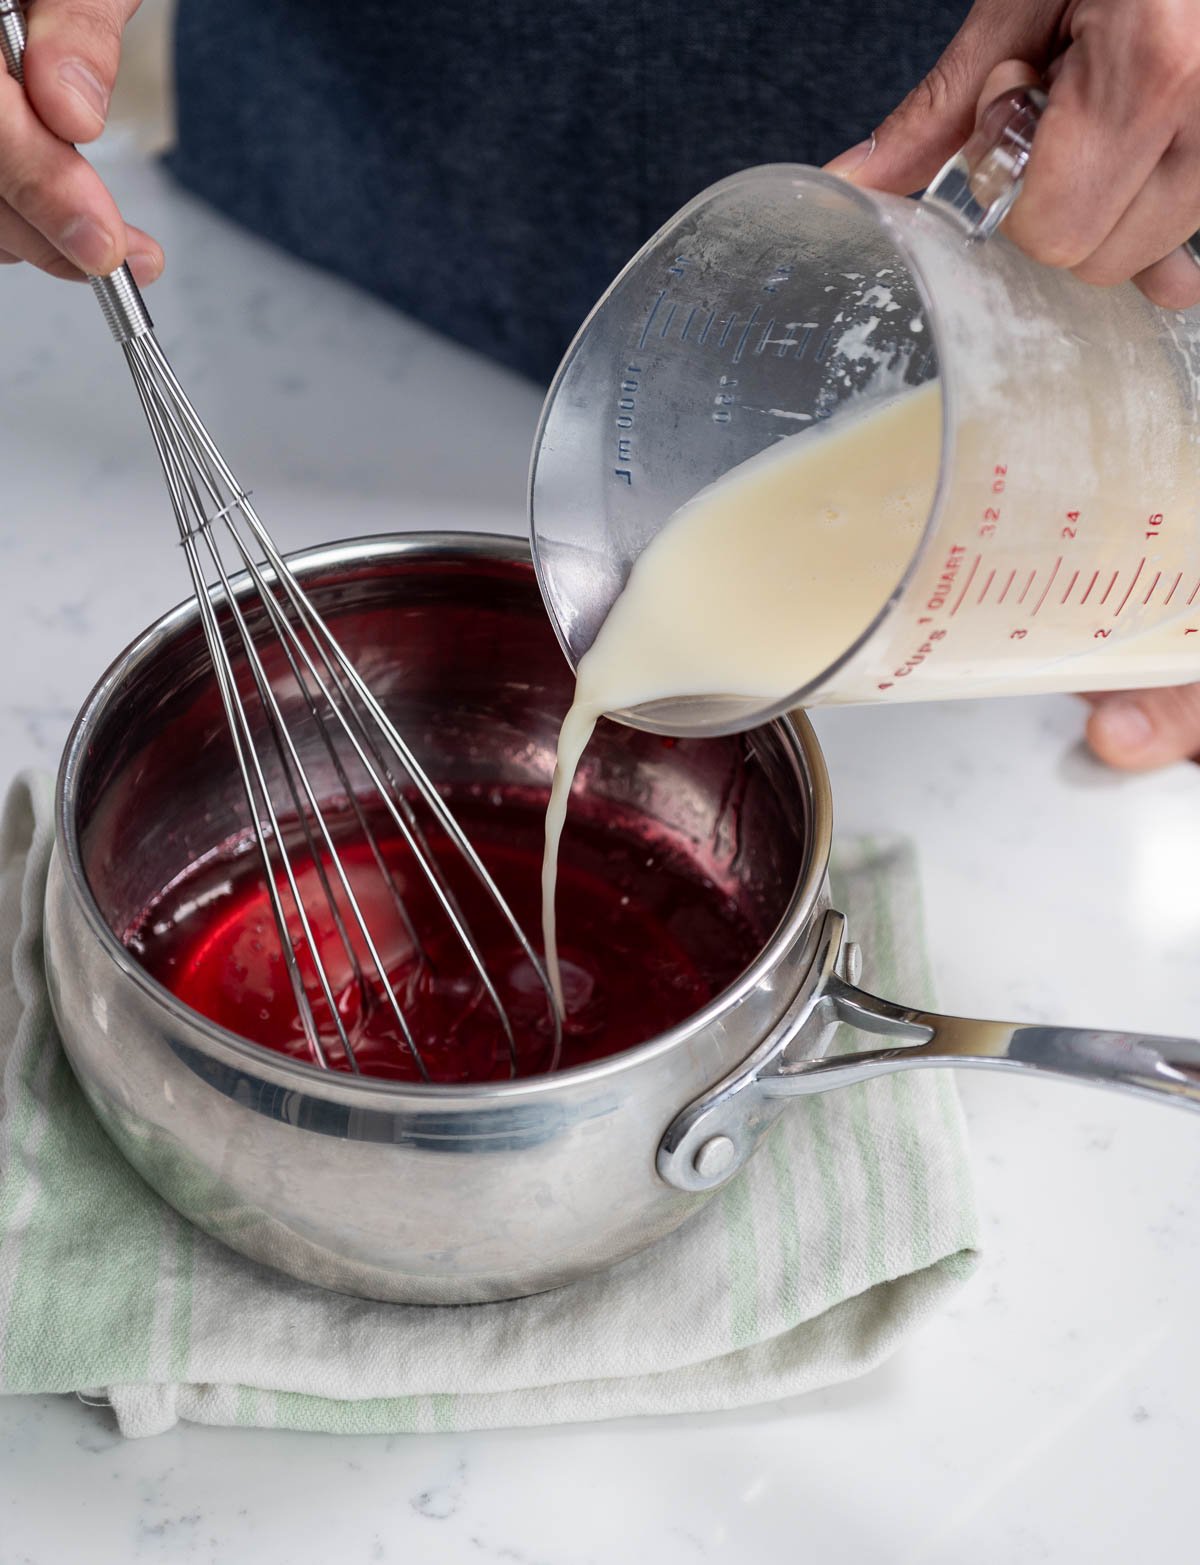
- Separately warm the glucose and cream, then combine with the sugar syrup.
- Slowly pour the warmed glucose and cream mixture into the large saucepan of your sugar and water while whisking continuously to combine.
- Then, bring the mixture to a boil.
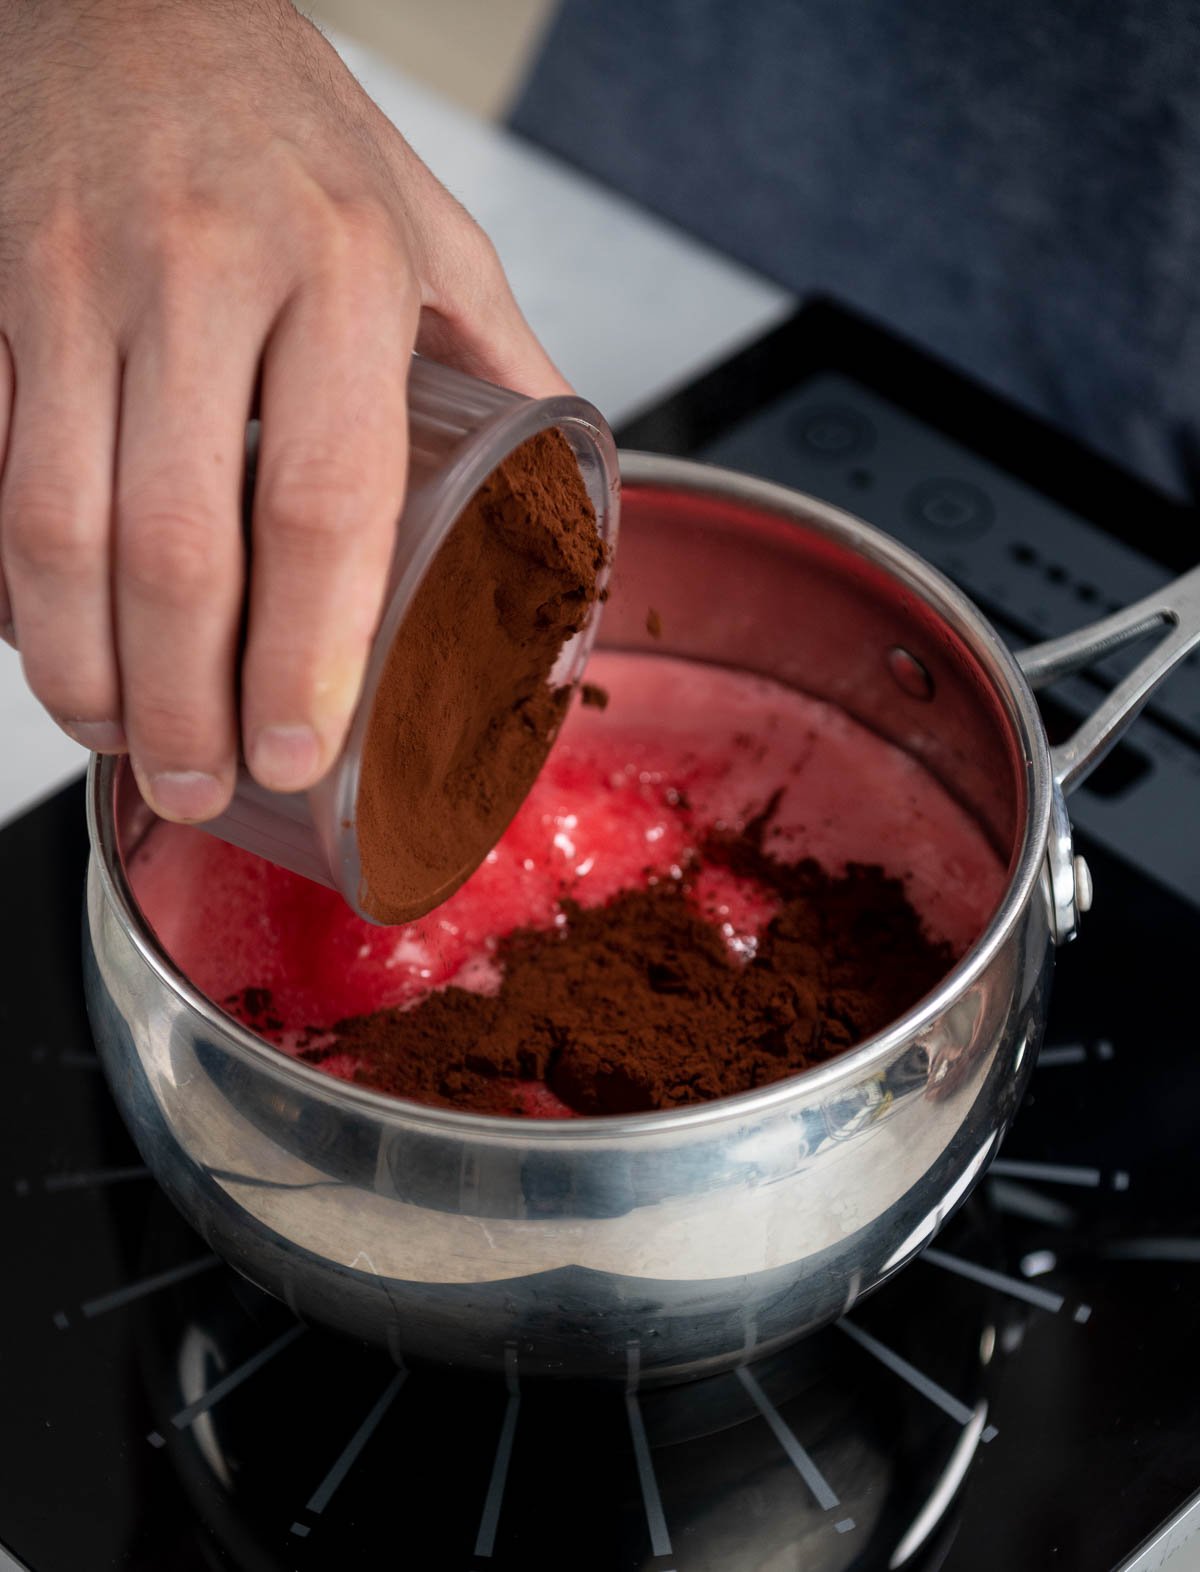
- Add the cocoa powder, turn off the heat, and mix until smooth.
- Pour over the bloomed gelatin and blend with an immersion blender until fully emulsified and free of bubbles.
- Cool the glaze to 104°F before using.
Pouring the Glaze and Final Assembly
Congratulations! It's time to glaze and finish your gorgeous entremet!

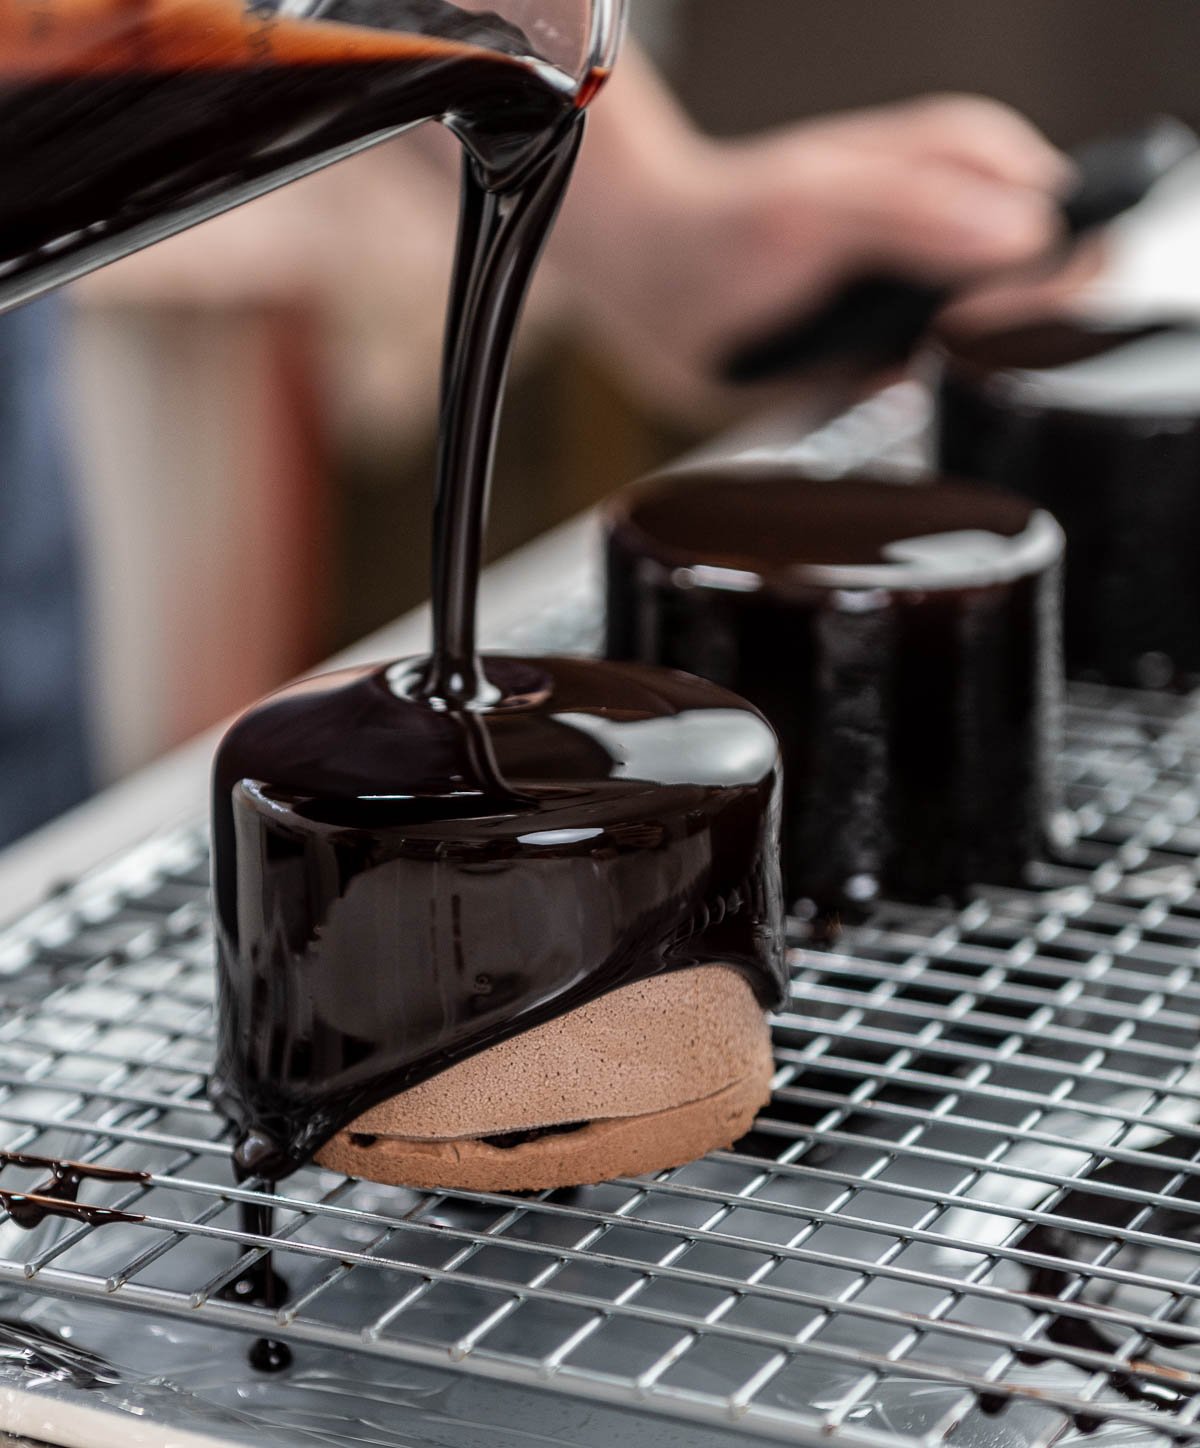
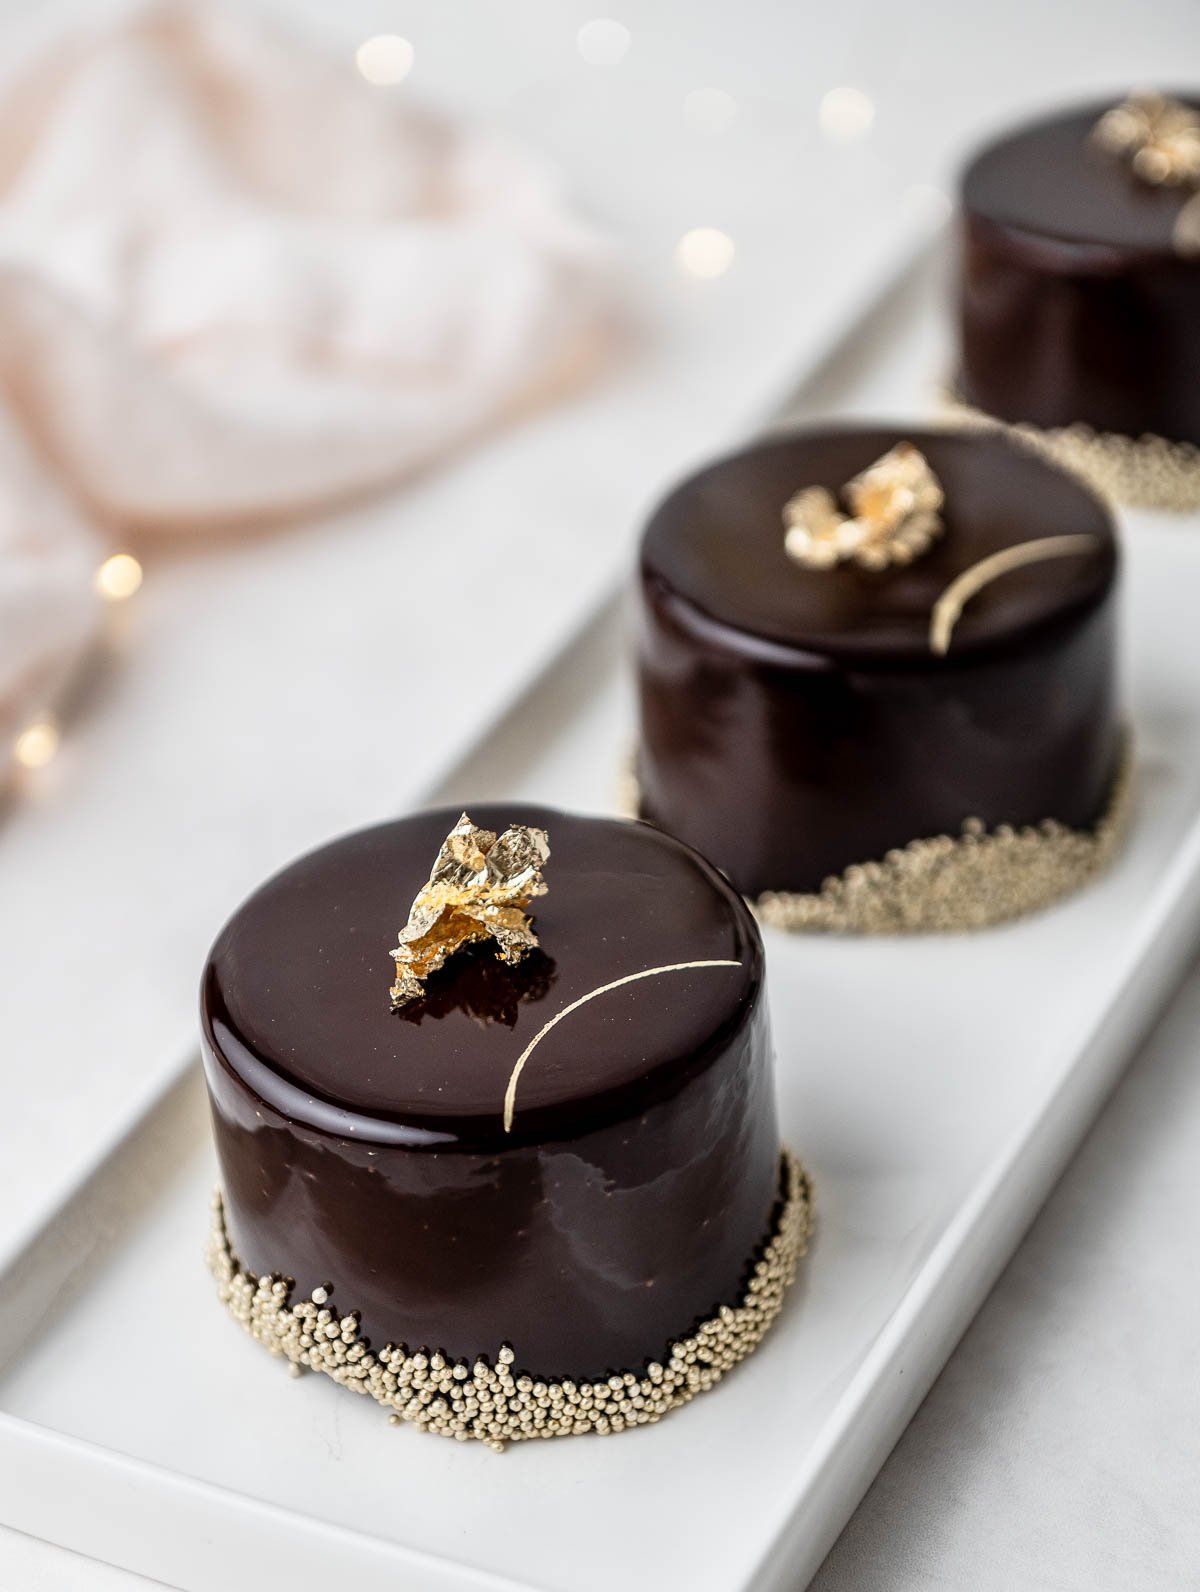
- Unmold the frozen entremets using a heat gun, peel away acetate, and set each one on a cooling rack over a baking sheet lined with plastic wrap to catch excess glaze.
- Pour glaze over the top of the cake and along the sides for full coverage.
- After it sets, pour a second layer for a truly flawless finish.
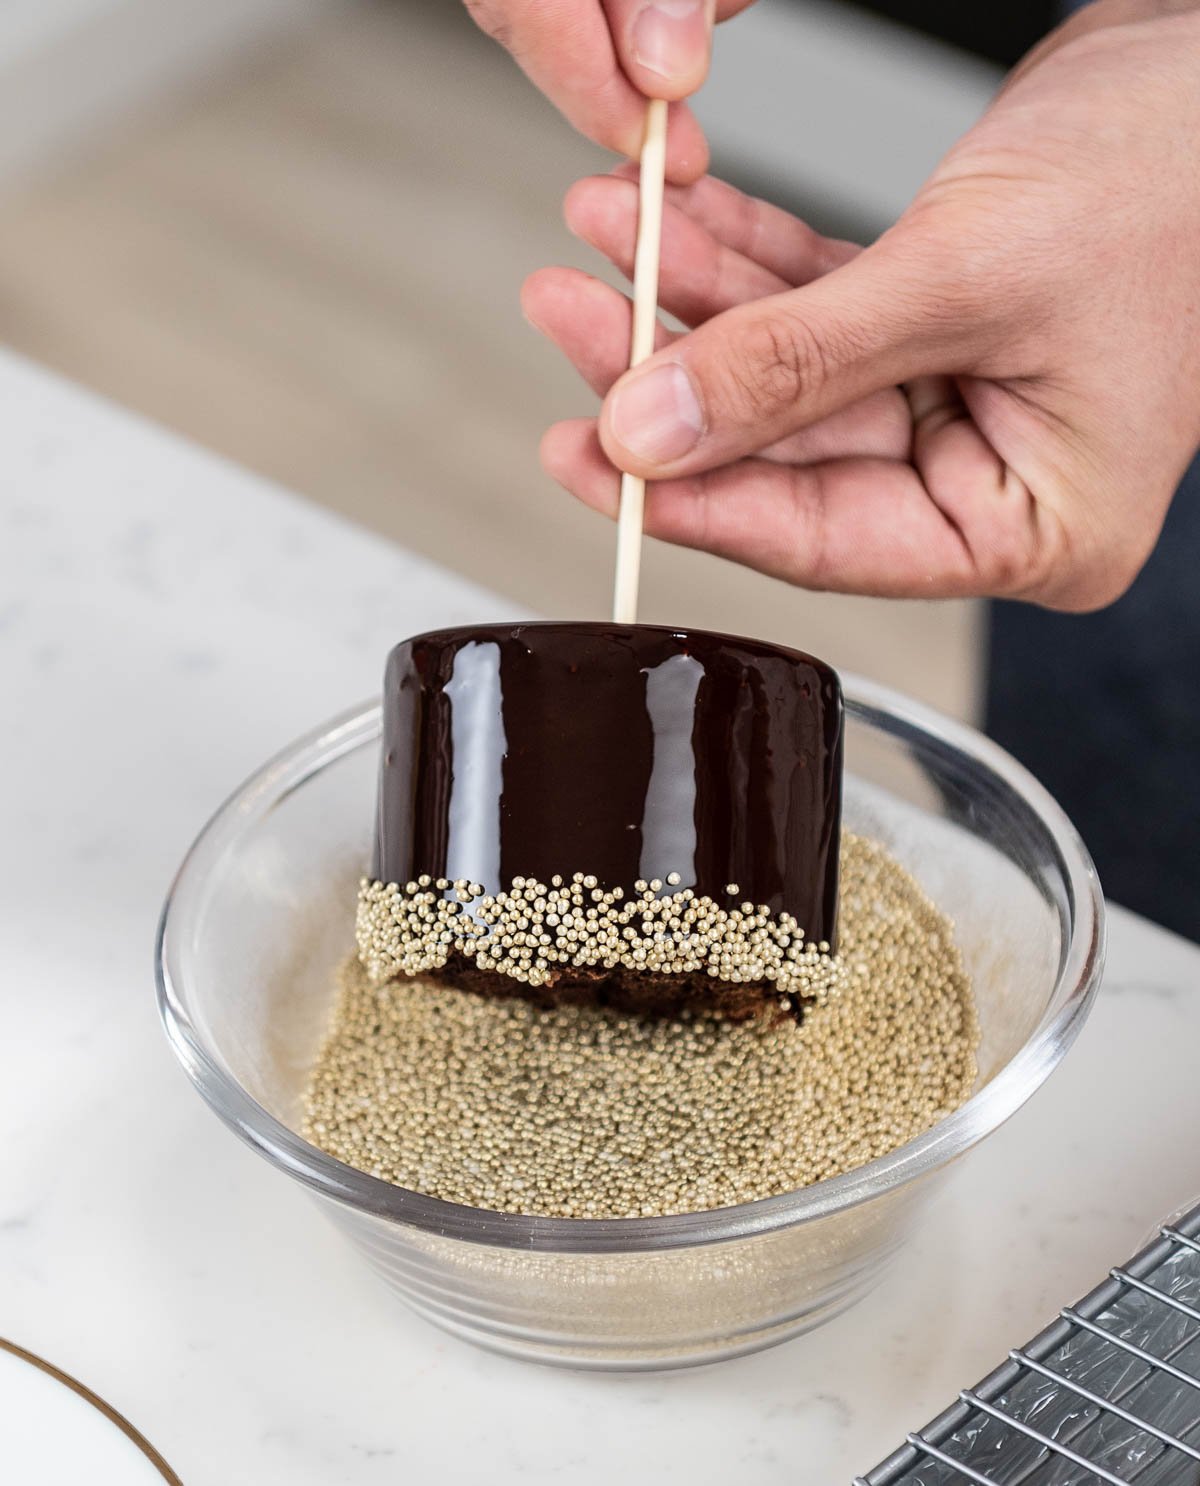
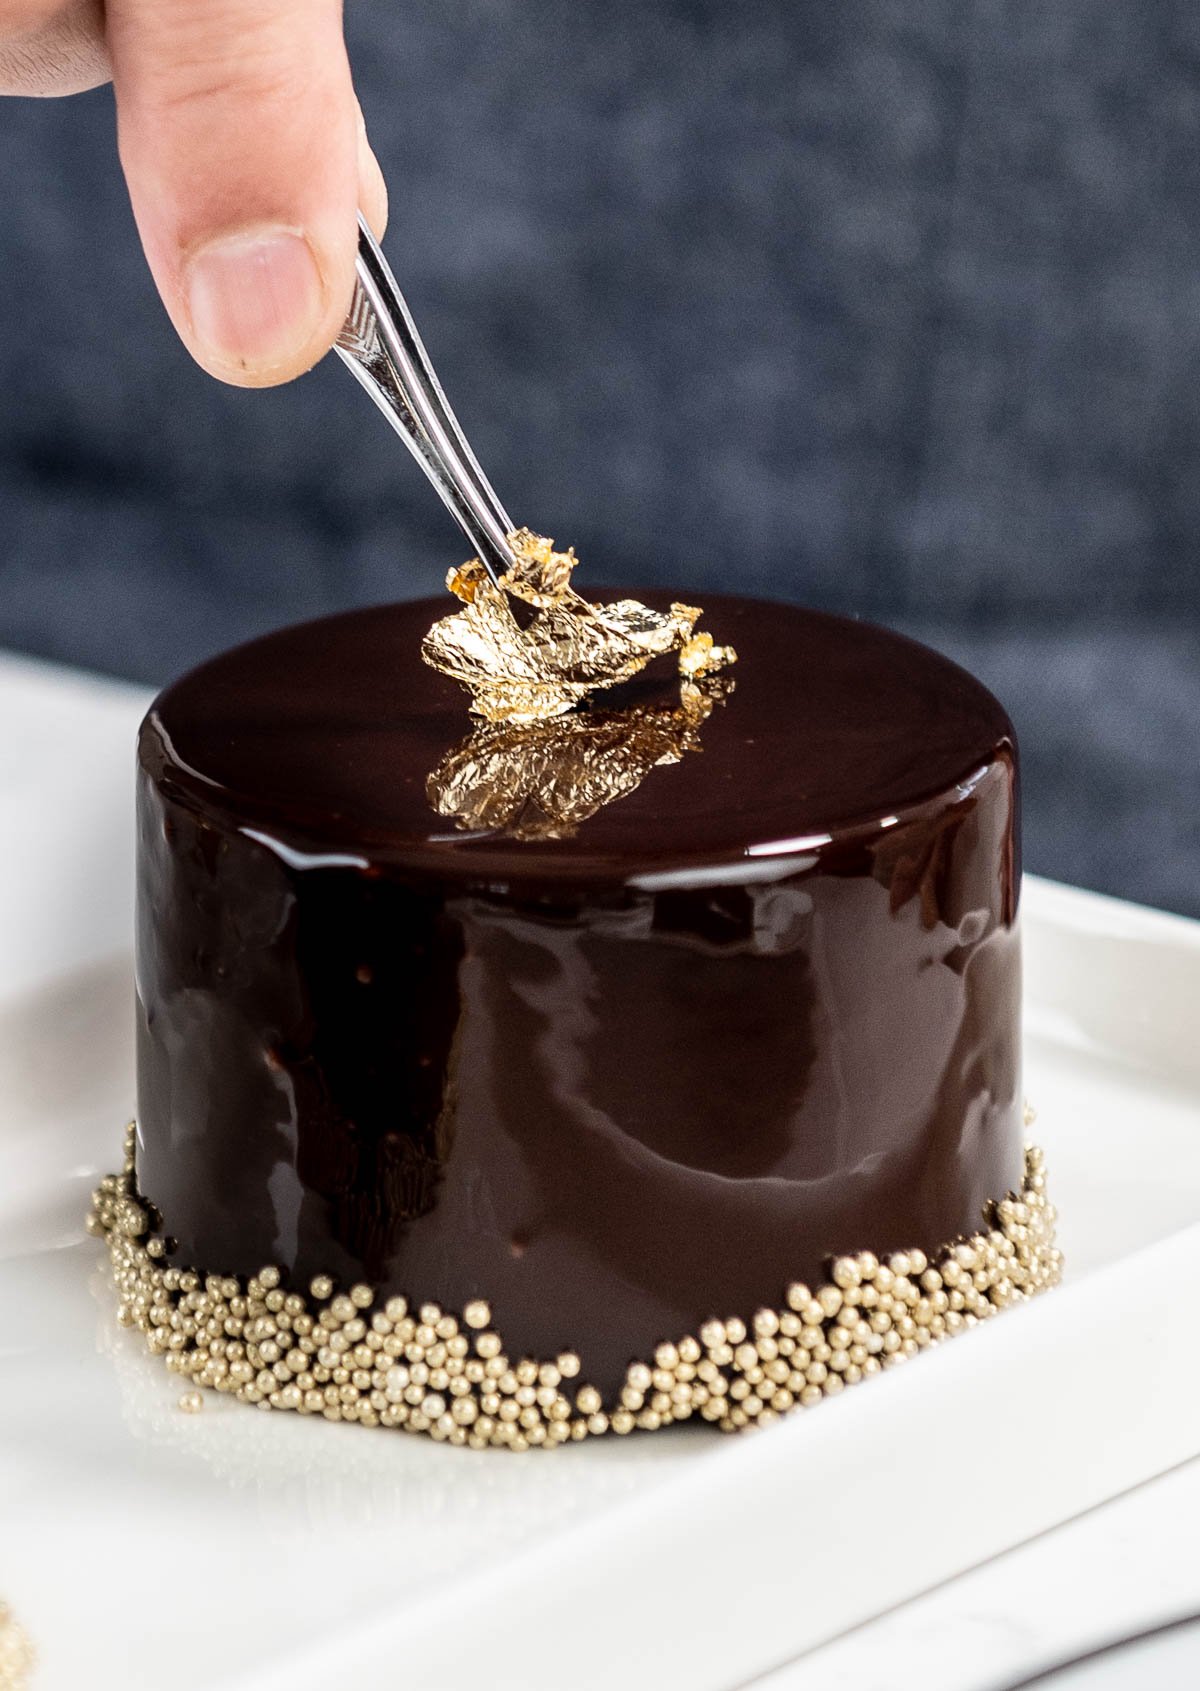
- Decorate with gold leaf, chocolate shards, nuts, or crispy cookies.
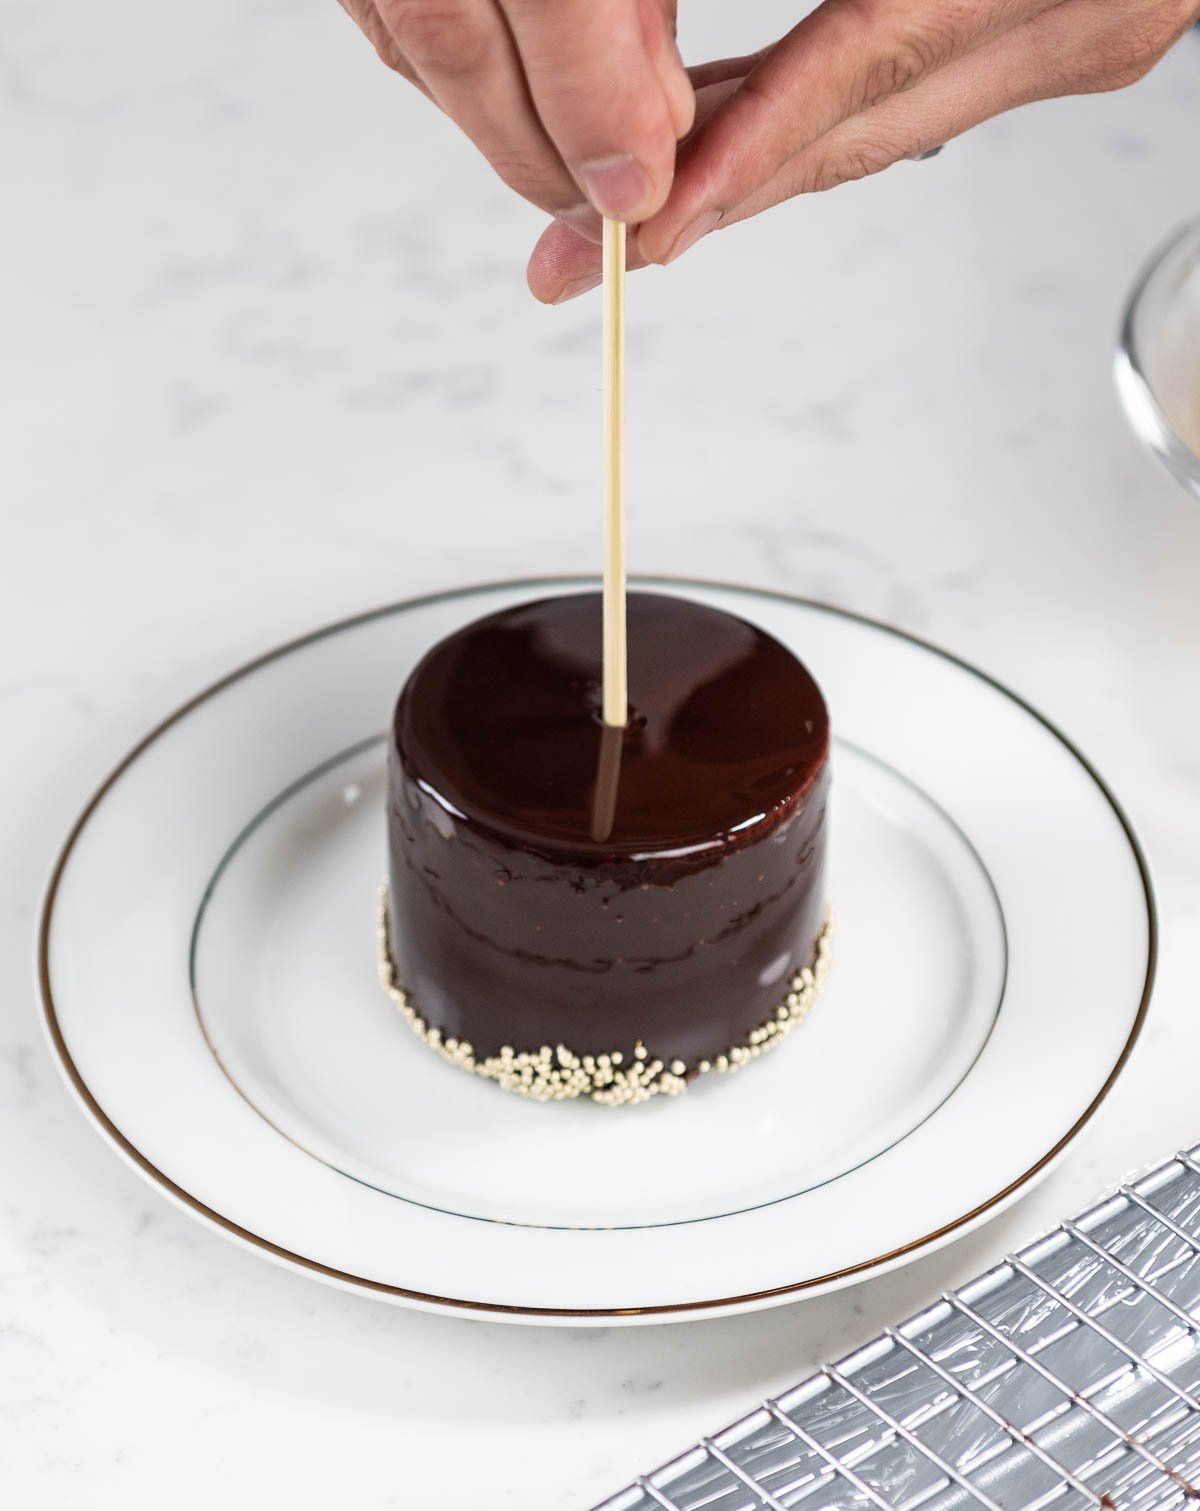
- Transfer the finished dessert using a skewer inserted in the center, then twist it out and cover the hole with gold leaf or another decoration for a delicious display that rivals the nation's culinary standards.
Frequently Asked Questions
An entremet is a dessert that is made up of multiple layers with different combinations of different textures used to enhance a certain flavor profile-like chocolate!
Entremet is composed of multiple layers of dessert, including layers of cake, mousse, ganache, etc. Unlike cake, entremets come in all kinds of textures and contain several components to them making them a more advanced dessert than your average cake.
If you do not have glucose, you can use honey or corn syrup.
For this recipe, yes. You can put this ganache in the refrigerator to speed up the setting time. You will just want to allow yourself time to let it warm back up again because it will be difficult to pipe if the ganache is hard. PRO TIP: The best temperature to pipe chocolate ganache is 72ºF (22ºC).
If you are making a chocolate ganache for another recipe like Chef Christophe's chocolate raspberry galaxy bonbons, you may not be able to put ganache in the fridge to speed up the setting process. Why? Because putting ganache in the refrigerator will add moisture to it and that can interfere with some desserts such as bonbons. Always check the recipe instructions before you assume all ganaches can be refrigerated.
Yes! Replace the gelatin sheet with an equal amount of powdered gelatin. Simply sprinkle the gelatin over the water and let it absorb for 5 minutes.
Yes, you can use agar-agar. Keep in mind, if you use agar-agar as a substitute you will have slightly different (firmer) results.
More Recipes You'll Love
Recipe
Equipment
- Thermometer
- Stand mixer or hand mixer
- Baking sheet
- 3" x 2" cake rings/entremet mold
- 2.5" cake cutter cake cutter should be slightly smaller than cake ring/entremet mold
- acetate sheets
- Wire cooling rack
- plastic wrap
- skewer
- pitcher or large measuring cup
- immersion blender or burr mixer
- white nonpareil sprinkles (optional)
- edible gold powder (optional)
- edible gold leaf (optional)
Ingredients
Chocolate Fudge Cake
- 100 grams eggs room temperature
- 220 grams granulated sugar
- 4 grams vanilla extract
- 160 grams Mayonaise room temperature
- 180 grams all purpose flour
- 50 grams cocoa powder
- 4 grams baking soda
- 2 grams baking powder
- 2 grams salt
- 180 grams water
Dark Chocolate Ganache
- 15 grams granulated sugar
- 10 grams glucose
- 110 grams heavy whipping cream
- 50 grams dark chocolate
- 40 grams milk chocolate
- 10 grams unsalted butter European butter or "Plugra" works best
Chocolate Glaze
- 100 grams water
- 340 grams granulated sugar
- 2 drops red food coloring I use chef master
- 220 grams heavy whipping cream
- 120 grams glucose
- 130 grams cocoa powder
- 16 grams gelatin sheets For powdered gelatin, bloom 16g of gelatin with 80g of water.
Chocolate Mousse
- 200 grams heavy whipping cream
- 200 grams 64% dark chocolate
- 60 grams egg yolks
- 60 grams granulated sugar
- 60 grams water
- 200 grams whipped cream
Instructions
Making the Chocolate Fudge Cake
- Prepare a ¼" sheet pan (9"x13") with parchment paper and preheat your oven to 350ºF (180ºC).
- In the bowl of your stand mixer with the whisk attachment, combine the sugar, flour, cocoa powder, baking soda, baking powder, and salt. Stir to combine.
- Then, in a separate bowl, combine the eggs, mayonnaise, water, and vanilla and whisk them to combine.
- While the mixer is turning on low, gradually add the wet ingredients into the dry ingredients. Then, increase the mixer speed to 2 and continue to mix for about 1 minute or until the batter is fully combined and smooth. Remember to scrape the bowl to ensure all of the ingredients are incorporated.
- Next, spread the cake batter evenly on a parchment lined ¼ sheet baking pan. PRO TIP: I also use cake goop around the edges to make the cake release easier.
- Bake the cake at 350°F (182°C) for 15-20 minutes, or until the cake is finished baking and the center of the cake is set.
- Finally, after the cake has been removed from the oven and cooled for about 15 minutes, remove the cake from the pan and wrap it in plastic wrap. Then, place the wrapped cake in the freezer until you are ready to start assembling the entremet. Chef Christophe recommends freezing the cake for at least 2-3 hours.
Preparing the Dark Chocolate Ganache
- Combine your glucose, granulated sugar, and cream together and bring the pan to a boil in a medium sized saucepan.
- Then, in a heat-proof or glass bowl, pour in about ⅓ of your boiling mixture over your chocolate and mix them together until you reach a shiny and smooth consistency. Then, repeat this step in thirds until you've added all your cream. If you put all of your cream in at once, then your ganache may separate.
- Next, place your butter into a tall container, and then pour the melted chocolate into the pitcher over the butter.
- Then, using an immersion blender, mix the chocolate and the butter together until it is shiny. PRO TIP: Hold the mixer at a slight angle to prevent incorporating air into the ganache.
- Cover the ganache with plastic wrap. Do this by pressing the plastic wrap right up against the surface of the ganache. This step will prevent any water in the air from being added to the ganache.
- Finally, let the ganache set. Set it aside for at least 5-6 hours at room temperature (or you can put it in the refrigerator and cut the time in half). The texture is smoother if you leave it at room temperature.
How to Make the Chocolate Mousse (Pâte à bombe, Ganache, and Whipped Cream)
- This chocolate mousse is made up of three components: pâte à bombe, ganache, and whipped cream. I will walk you through how to make each of them.
- First, in a large mixing bowl, prepare your whipped cream. Use a hand mixer to whip your heavy cream. You do not need stiff peaks, but the whipped cream should be stable. Once you have soft peaks, set it aside.
- Next, fill a heatproof bowl with your chocolate.
- Then, in a saucepan, bring your heavy cream to a boil in a saucepan and then pour about ⅓ of the boiling cream over your chocolate. Mix it until all of the chocolate is melted.
- Pour ⅓ more of the boiling cream into the chocolate and mix until it is combined. Repeat this process once more with the remaining ⅓ of the hot heavy cream and mix it into the chocolate ganache. Then, set it aside.
- Next, prepare the pâte à bombe. Start by filling a large saucepan with water and sugar mixed together. Then, place your egg yolks in a heatproof bowl.
- Heat the water and sugar in the stovetop pan to 244°F (118°C) using a thermometer.
- Once the pâte à bombe reaches 244°F (118°C), slowly pour it into the bowl with the egg yolks while whisking continuously (similar to how you would make an Italian meringue).
- Whip the egg yolks until they reach the ribbon stage (this is when the texture has thickened, the volume has doubled, and will be lighter in color/appear pale yellow). Once you've reached the ribbon stage, your pâte à bombe is ready.
- Now you will combine your three elements (pâte à bombe, chocolate ganache, and whipped cream) to make your mousse. Begin by transferring the whipped cream into the bowl of the chocolate ganache, and then mix to combine. The reason you will mix the whipped cream into the chocolate ganache first is to lighten up the ganache texture so that it is more airy and will mix easier with the pâte à bombe.
- Then, pour the pâte à bombe into the bowl of the mixed chocolate ganache and whipped cream, and fold it in until it is fully combined.
Assembling the Cake, Ganache, and Mousse Layers
- First, remove the plastic wrap from the frozen cake.
- Next, use a 3" cake cutter to create small cake rounds. The height of the cake should be about ¼ of the height of the cake ring/entremet mold you are using. Trim the cakes to 0.5" tall.
- Prepare a piping bag with a large round tip (an 8 or 9 tip) and fill it with your chocolate ganache.
- Then, pipe your chocolate ganache on top of the center of your cake rounds.
- Freeze the cake rounds with ganache on top for 1 hour or until they are set.
- While the cake rounds with ganache are in the freezer, prepare your 4" cake rings/entremet mold for assembly.
- You will start by coating the inside of the cake rings with cooking spray.
- Cut your acetate sheets to 2" x 9.25", and cut out squares of acetate that will cover the entire bottom of the cake rings.
- Then, line the inside of your non-stick cake rings with acetate sheets. Next, place a square sheet of acetate on a baking sheet. Then, place your cake ring that is lined with acetate on top of the square.
- Once the cake rounds with ganache have set in the freezer for 1 hour, remove them from the freezer.
- Prepare a piping bag and fill it with your chocolate mousse.
- Now it is time to assemble the entremet. PRO TIP: Before you begin piping your mousse ensure that the acetate squares on the bottom are in place so none of the mousse will escape.
- Start by piping chocolate mousse into the acetate-lined cake rings about ¾ of the way to the top of the cake rings.
- Next, hold the cake round topped with ganache and place it mousse side down into the center of the ganache (cake side should be on top). Gently press the cake round into the mousse until the mousse moves up to the top. You will see a ring of mousse form around the cake and that is when you know the mousse is filled on the sides.
- Then, flatten out the mousse and scrape off any excess from the cake ring so that it's level.
- Freeze the entremets for a minimum of 3 hours. Chef Christophe recommends freezing them overnight. This will allow all of the layers to fully set in place.
Chocolate Glaze Instructions
- First, fill a bowl with cold water and place your gelatin sheets in the bowl one at a time to prevent clumping. This will allow your gelatin sheets to bloom and absorb the water. Set aside for about 5 minutes.
- In a large saucepan, combine the water, sugar, and a few drops of red or orange food coloring. Adding the food coloring is entirely optional. This is a professional pastry chef. PRO TIP: When you add red food coloring, it will intensify the color and shine of your finished chocolate glaze.
- Then, stir to combine everything and bring the mixture to 222°F (106°C).
- Next in a separate container, mix your glucose with your cream. Then, warm it up in the microwave for 1 minute and whisk to mix them together.
- Slowly pour the warmed glucose and cream mixture into the large saucepan of your sugar and water while whisking continuously to combine.
- Then, bring the mixture to a boil.
- Add the cocoa powder. Turn off the heat and continue to mix until combined.
- Next, squeeze out the excess water from your bloomed gelatin sheets and then add the gelatin to a pitcher (or large measuring cup).
- Pour the cocoa mixture on top of the gelatin, and mix the glaze using an immersion blender. Mix until all of the bubbles are gone. PRO TIP: Hold the immersion blender at a slight angle to avoid adding any air bubbles into the glaze. The smoother and bubble free the glaze is, the better the shine.
- Finally, place your pitcher (or large measuring cup) filled with your glaze into an ice bath and cool it 104°F (40°C). Then, set it aside until you are ready to pour the glaze over your entremet.
Adding the Glaze and Final Assembly Instructions
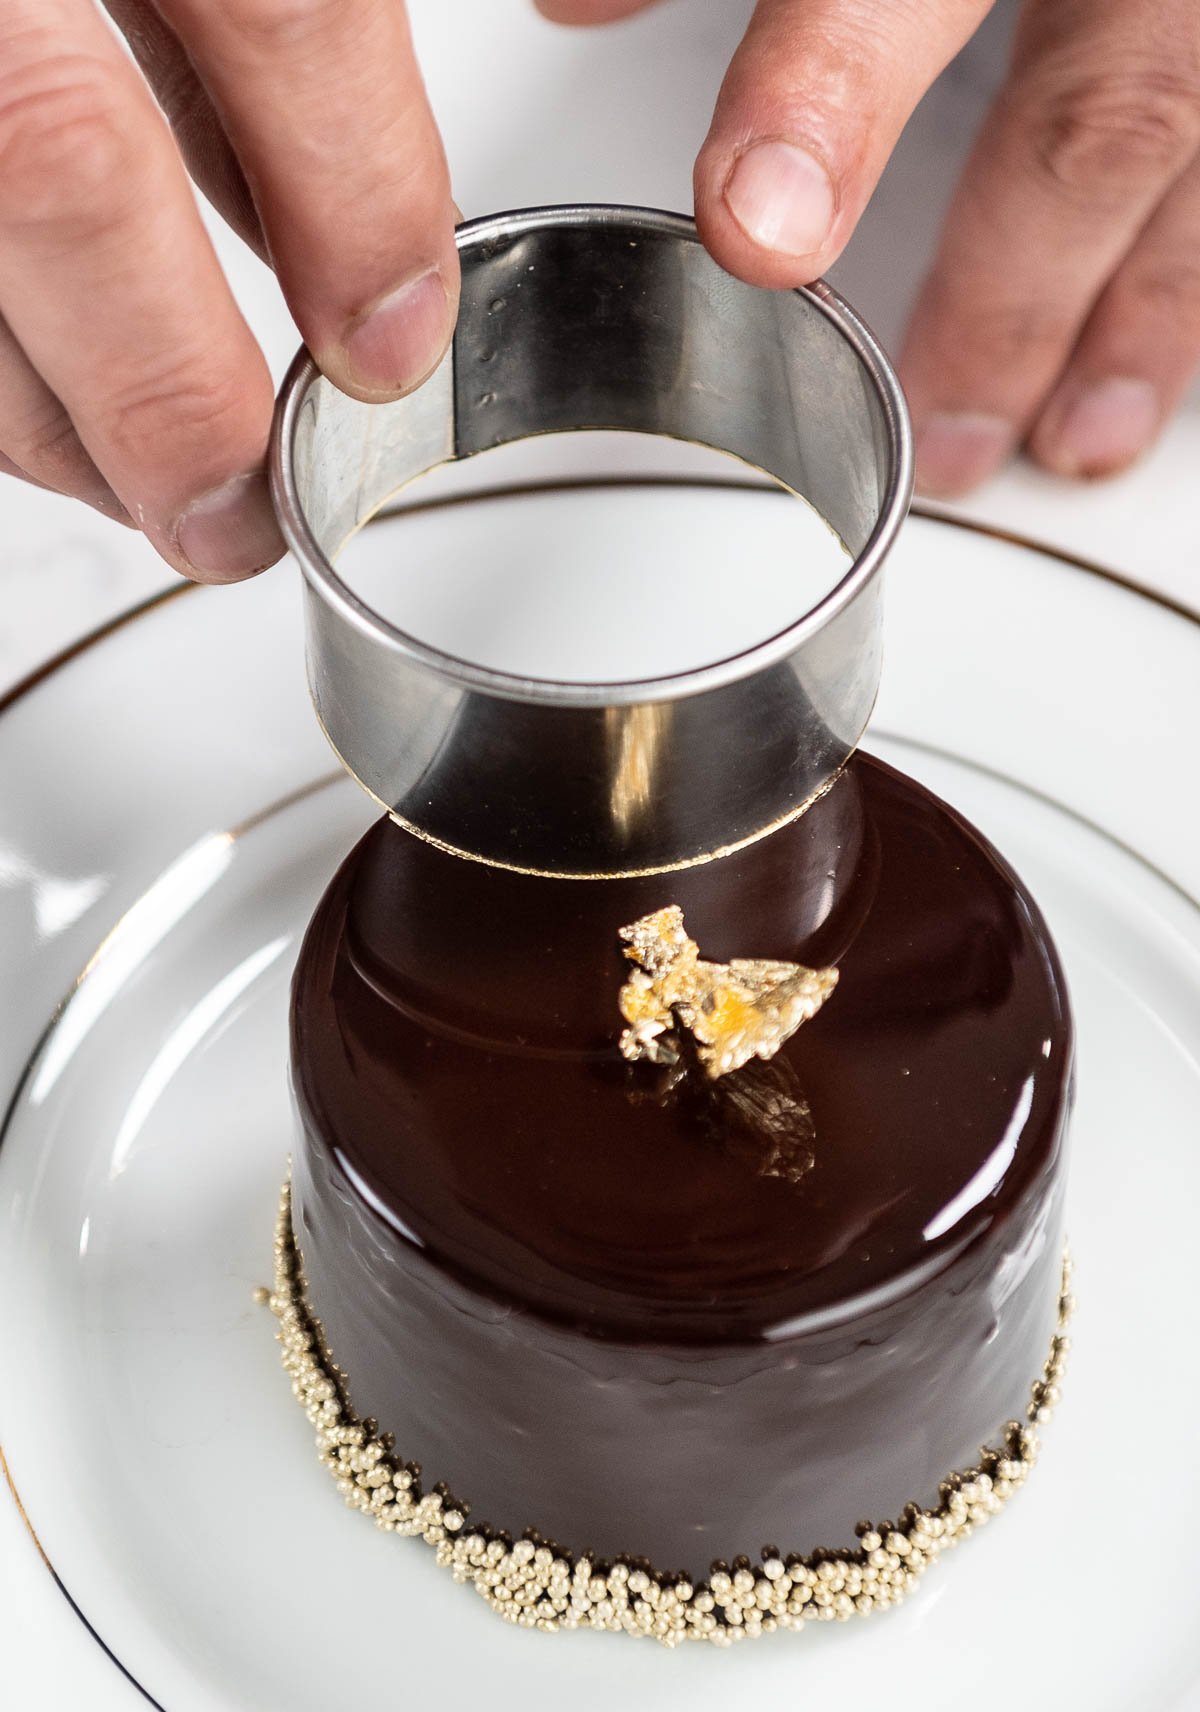
- First, you will unmold the frozen entremets. Heat up the side of the frozen cake ring using a heat gun (or if you don't have a heat gun you could use a hair dryer). Gently use your finger to push the entremet out of the cake ring.
- Then, peel off the acetate sheet.
- Next, place your entremets on a cooling rack. Chef Christophe prepared a baking sheet with plastic wrap and topped it with a cooling rack. Why? Because the plastic wrap will catch any leftover glaze so that you can reuse it!
- Your glaze should be 104°F (40°C).
- Pour your chocolate glaze over your entremets so that it covers it all along the top and the sides.
- Using a flat spatula to gently scrape across the top of the entremets so that they are level and doing so will remove any excess glaze. PRO TIP: Chef Christophe recommends glazing your entremets in 2 layers. Start by pouring the glaze over the entremet and then put it in the freezer for 1 hour to allow it to set. After 1 hour has passed, pour a 2nd layer of glaze on top of your entremets. Ultimately, the first layer will cover any air bubbles and the 2nd layer will be shiny.
- Then, prepare your decorations for your entremet! Chef Christophe mixed small white nonpareil sprinkles with some gold powder in a bowl. If you don't want to use sprinkles you could use streusel, nuts, toasted coconut flakes, chocolate cookie crumbs, or anything you desire! The possibilities are endless!
- Next, pick up and transfer the chocolate entremets by sticking a skewer into the center to gently lift it up off the cooling rack.
- (Optional) Now it's time to decorate! While lifting it up by the skewer, carefully roll the entremet into the sprinkles so they stick along the bottom of the entremet.
- Transfer the entremet to your plate.
- Remove the toothpick by twisting it and pulling it out at the same time.
- Finally, place gold leaf in the center to cover the hole. Mix a little gold dust with grand marnier and decorate the top of the entremet.
Video
Notes
- This is a 2-day dessert! On day 1, you will prepare the cake, ganache, mousse, and assemble the entremets. On day 2, you will prepare the glaze and finish the entremet.
- The chocolate you use matters! Avoid using chocolate chips from the grocery store. Why? Because they contain thickeners that stop the chocolate from melting smoothly. Chef Christophe recommends using Cacao Barry Extra-Bitter Guayaquil. Ideally, you need to use a "real chocolate" that is derived from a cocoa pod and contains cocoa butter ( with real chocolate that is at least 60-70% cocoa content).
- Weigh your ingredients to avoid failure. Using a kitchen scale for baking is super easy and gives you the best results every single time.
- Make sure all your cold ingredients are room temperature or slightly warm (butter, milk, eggs, to create a cohesive batter. Curdled batter causes cakes to collapse.
- Practice Mise en Place (everything in its place). Measure out your ingredients ahead of time and have them ready before you start mixing to reduce the chances of accidentally leaving something out.


Quazi Banna says
Excellent