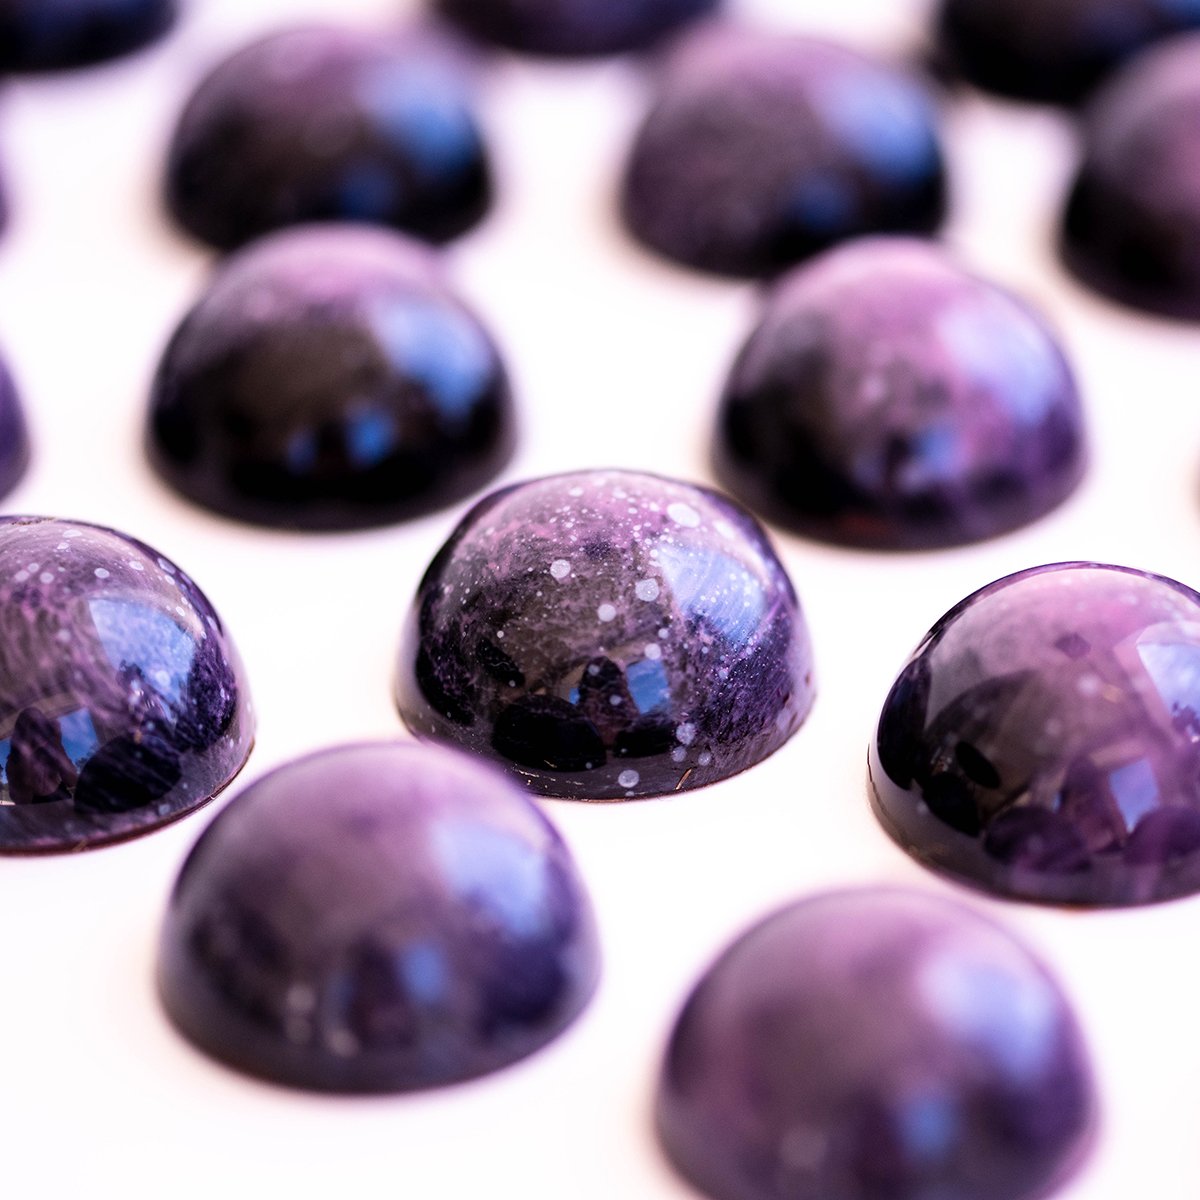
Chef Christophe Rull shows us how to create these shiny, chocolate galaxy bonbons filled with a smooth raspberry puree filling and decadent chocolate ganache. Learn how to make tempered cocoa butter colors from scratch, airbrush a unique galaxy pattern, and fill and close your bonbons.

What's In This Blog Post
- Chocolate Raspberry Galaxy Bonbon Ingredients
- Tools and Equipment
- Before you begin
- How to make the raspberry filling
- How to make the ganache filling
- How to make cocoa butter colors
- How to make airbrush the bonbon shells
- How to make the bonbon shell
- How to fill and close the bonbons
- More chocolate recipes & tutorials
Chocolate Raspberry Galaxy Bonbon Ingredients
Tools and Equipment
Every chocolatier is going to be familiar with these tools but if you're new to chocolate work, make sure you get these basic chocolate-making supplies before you attempt to make molded chocolates.
Before you begin
You must have properly tempered chocolate before you begin the bonbon process. If you need to learn how to temper chocolate you can watch Chef Christophe's previous video on tempering chocolate using the EZ Temper Machine or you can use my easy chocolate tempering method.
You also want to have a clean mold! I'm using a polycarbonate mold from Cacao Barry.
How to make the raspberry filling
- Pour the raspberry puree into a medium saucepan over medium heat.
- In a separate bowl, mix the sugar and NH Pectin together.
- Bring the raspberry puree to a boil, then slowly whisk in the sugar and pectin together. Mix thoroughly to ensure you do not have any lumps.
- Boil for a few minutes to activate the NH Pectin (this will allow the raspberry puree to solidify and be ready to use in our bonbons).
- Turn off the heat and transfer the filling to separate container
- Put a sheet of plastic wrap on top so it's touching the surface and cool completely. Store this raspberry mixture somewhere that's room temperature (you don't want it to be too warm otherwise it will not firm up, and you don't want it to be too cold otherwise it may be too difficult to create your bonbons).
How to make the ganache filling
- Add your chocolate to a heat-safe container.
- Heat up the glucose in the microwave for about 10 seconds.
- Add the heavy whipping cream and glucose into a sauce pan.
- Bring it to a simmer over medium heat (stirring occasionally). Be careful not to boil or burn the cream.
- Carefully pour the hot mixture over your chocolate. Mix together.
- Add in your butter in chunks.
- Use an immersion blender to mix the butter with the ganache. Hold the immersion blender at a slight angle under the surface of the ganache to blend. Do not incorporate any air.
- Fill a large piping bag with your ganache filling and twist the top closed so the filling doesn’t spill out.
- Cool the ganache in the piping bag to below 86ºF (30ºC). Pro-Tip: place your piping bag onto the counter to cool the ganache faster.
How to make cocoa butter colors
- Melt the cocoa butter and white chocolate in the microwave in 30 second increments to prevent burning.
- Bring the temperature down to 91ºF (33ºC) and add 1% of cocoa butter paste (See Christophe's tempering chocolate recipe) to temper the cocoa butter. This will make the bonbons shinier!
- Cool the cocoa butter down to 86ºF (30ºC).
- To color your own cocoa butter, stir in your cocoa butter flowers. Using Power Flowers is a great way to get really vibrant chocolate colors. (Our raspberry color- red 4 pieces of red, 4 pieces of white.) (Our purple color- 1 ¼ red, ¾ blue, and 2 ½ white)
- Store this cocoa butter mixture at 86ºF (30ºC) until you're ready to use it. (it is not needed but you can easily achieve this using a Waring Chocolate Warmer.)
- Repeat this process for any additional colors you want to use to create your galaxy bonbons.
- For the black cocoa butter, I prefer the pre-made "Abyss" from Chef Rubber. Make sure to temper it by adding 1% of cocoa butter paste at 91ºF (33ºC) and cooling to 86ºF (30ºC) as well.
- Pour the colored cocoa butters into new bowls over a cheese cloth which will strain any lumps and gritty pieces to give you smooth, cocoa butters that are ready to create chocolate bonbon shells!
How to make airbrush the bonbon shells
- Place some parchment paper onto your work surface to catch the chocolate and get your bench scraper ready.
- Dip a brush into one of your cocoa butter colors, and then flick the brush using your finger to create paint-like splatter across each and every one of the bonbon cavities. This will create the top layer of the speckles on your galaxy bonbon (I would recommend you use white cocoa butter for this step).
- Once you are happy with your speckles, turn the bonbon tray upside down and wipe it across a paper towel to clean the excess cocoa butter.
- Refrigerate the bonbon tray for about 5 minutes to allow it to set before you add in more colors.
- When you're ready to add your second color (we used purple), use a spoon to add a small drop into each bonbon cavity.
- Once you've added your second color to each cavity, use a cotton ball, a paintbrush, or your finger to wipe and swirl the color around. It does not need to be perfect but what you do not want is a thick layer of purple (otherwise you won't see the other colors).
- When you're happy with your second layer of color, turn the bonbon tray upside down and wipe it across a paper towel to clean the excess cocoa butter.
- Add your next colored cocoa butter (we used red) to an air gun. Be sure to check the temperature of the cocoa butter you are putting into the air gun and it should be about 86ºF (30ºC). If it is a little cold, you can heat it up in the microwave in 5 second increments until it reaches the desired temperature.
- Airbrush the black cocoa butter on lightly to each and every bonbon cavity. Once you're happy with your third colored cocoa butter and are satisfied with the airbrushing, turn the bonbon tray upside down and wipe it across a paper towel to clean the excess cocoa butter. If you wish to add airbrush more color in, be sure to wipe the bonbon tray each time you add more color and clean it.
- If you are working with one air gun, empty the air gun and add in your next color (for this step we used black cocoa butter). It's important to check the temperature of the cocoa butter you are putting into the air gun and it should be about 86ºF (30ºC).
- Use a large airbrush to spray the black cocoa butter generously across the bonbon mold to fill each and every bonbon cavity (the larger airbrush will make this process go faster, but if you only have a small airbrush that is okay it may just take a little bit longer).
- Turn the bonbon tray upside down and wipe it across a paper towel to clean the excess black cocoa butter from the mold.
- Stand the bonbon mold tray on its side to allow the chocolate to crystallize for about 10 minutes.
How to make the bonbon shell
You must have properly tempered chocolate before you begin the bonbon process. If you need to learn how to temper chocolate you can watch Chef Christophe's previous video on tempering chocolate using the EZ Temper Machine or you can use my easy chocolate tempering method.
- Place some parchment paper onto your work surface to catch the chocolate and get your bench scraper ready.
- Melt your dark chocolate either in the microwave or on a double boiler.
- Add in a few handfuls of tempered (chocolate comes tempered) chocolate to bring the temperature down. Stirring occasionally, cool your chocolate to 95ºF (35ºC).
- Add in the cocoa butter and mix.
- When you're ready to fill the bonbon mold with your filling, pour the chocolate into a piping bag and then cut a small hole in the piping bag (⅛") in the tip.
- Once each cavity has been filled with filling, pick the mold up by holding the edges and try not to put your hands agains the cavities directly or the heat from your hands can ruin the temper of the chocolate shells. Tap the edge of the mold with your bench scraper to release any air bubbles.
- Turn the mold over and tap out the excess chocolate to create a nice thin shell.
- Scrape off the excess chocolate from the surface of the mold with your bench scraper.
- Set your mold on its side for five minutes to help the chocolate to set evenly. You can see in this photo how even the chocolate is on all sides.
How to fill and close the bonbons
- Check the temperature of your dark chocolate ganache filling inside the piping bag (ideally you want it to be between 77-84ºF (25-29ºC).
- Pipe the dark chocolate ganache filling into each cavity about half way.
- Refrigerator for 10 minutes to set.
- Using a mixer, add the set raspberry jelly and mix it so that it is creamier in texture so that it is easier to pipe.
- Fill a large piping bag with the raspberry filling, and then cut a small hole in the piping bag (⅛") in the tip.
- Pipe the raspberry filling into each cavity in a tight, spiral motion on top of the chocolate ganache. The mold cavities should be almost full but not quite 100% full (there needs to be a little bit of room in order to close the bonbons).
- Gently and carefully tap the bonbon mold on the counter to get rid of any air bubbles.
- Let is set at room temperature for about 30 minutes. It helps if your room is colder than 70ºF. You can put the bonbons in the fridge but you can risk adding condensation to the ganache which can compromise the integrity of the bonbon and mold can grow.
- When you are ready to close your bonbons, pipe tempered chocolate onto the back of the bonbon until it's halfway covered using the pinching technique.
- Place your acetate onto the back of the mold and use the bench scraper to scrape away the excess chocolate.
- Place the bonbons into the fridge for 30 minutes to 1 hour (Christophe prefers to allow them to crystallize for up to 24 hours).
- De-mold your bonbons by quickly turning the mold over onto parchment paper to release them from the mold. Twist the mold back and forth to allow the bonbons to release from the mold and then tap the mold onto parchment paper again if they did not come out of the mold on the first try.
More chocolate recipes & tutorials
White chocolate bonbons with vanilla bean ganache
How to temper chocolate in the microwave
Recipe

Equipment
- bonbon mold
- heatgun
- acetate sheets
- fine mesh strainer
- infrared thermometer
Ingredients
Raspberry Filling
- 250 grams raspberry puree Or make your own (see notes below)
- 25 grams granulated sugar
- 2.5 grams pectin NH
Dark Chocolate Ganache
- 440 grams heavy whipping cream
- 60 grams glucose or corn syrup
- 300 grams dark chocolate I use 64% extra bitter Guayaquil by Cacao Barry
- 120 grams unsalted butter (cut into chunks) 80% butter fat works best (Plugra, or European butter)
Chocolate Shells
- 1000 grams couverture dark chocolate
- 10 grams pre-tempered cocoa butter (optional) see blog post
Galaxy Design
- 100 grams cocoa butter
- 100 grams white chocolate I use Zéphyr 34% white chocolate by Cacao Barry
- colored cocoa butter or color your own using Flower Power cocoa butter colors
Instructions
Making the shell
- Before you start anything, make sure to CLEAN YOUR MOLDS! Polycarbonate molds work best to make the shiniest bonbons, but you have to temper your chocoalte and cocoa butter correctly. If your chocolate isn't tempered, the bonbons won't come out of the mold.
The raspberry filling
- Pour the raspberry puree into a medium saucepan over medium heat.
- In a separate bowl, mix the sugar and NH Pectin together.
- Bring the raspberry puree to a boil, then slowly whisk in the sugar and pectin together. Mix thoroughly to ensure you do not have any lumps.
- Boil for a few minutes to activate the NH Pectin (this will allow the raspberry puree to solidify and be ready to use in our bonbons).
- Turn off the heat and transfer the filling to a separate container.
- Put a sheet of plastic wrap on top so it's touching the surface and cool completely to room temperature.
The dark chocolate ganache
- Add your chocolate to a heat-safe container.
- Heat up the glucose in the microwave for about 10 seconds.
- Add the heavy whipping cream and glucose into a sauce pan.
- Bring it to a simmer over medium heat (stirring occasionally). Be careful not to boil or burn the cream.
- Carefully pour the hot mixture over your chocolate. Mix together.
- Add in your butter in chunks.
- Use an immersion blender to mix the butter with the ganache. Hold the immersion blender at a slight angle under the surface of the ganache to blend. Do not incorporate any air.
- Fill a large piping bag with your ganache filling and twist the top closed so the filling doesn’t spill out.
- Cool the ganache in the piping bag to below 86ºF (30ºC). Pro-Tip: place your piping bag onto the counter to cool the ganache faster.
Making cocoa butter colors
- Melt the cocoa butter and white chocolate in the microwave in 30-second increments to prevent burning.
- Bring the temperature down to 91ºF (33ºC) and add 1% of cocoa butter paste (See Christophe's tempering chocolate recipe) to temper the cocoa butter. This will make the bonbons shinier!
- Cool the cocoa butter down to 86ºF (30ºC).
- To color your own cocoa butter, stir in your cocoa butter flowers. Using Power Flowers is a great way to get really vibrant chocolate colors. (Our raspberry color- red 4 pieces of red, 4 pieces of white.) (Our purple color- 1 ¼ red, ¾ blue, and 2 ½ white)
- Store this cocoa butter mixture at 86ºF (30ºC) until you're ready to use it. (it is not needed but you can easily achieve this using a Waring Chocolate Warmer.)
- Repeat this process for any additional colors you want to use to create your galaxy bonbons.
- For the black cocoa butter, I prefer the pre-made "Abyss" from Chef Rubber. Make sure to temper it by adding 1% of cocoa butter paste at 91ºF (33ºC) and cooling to 86ºF (30ºC) as well.
- Pour the colored cocoa butters into new bowls over a cheese cloth which will strain any lumps and gritty pieces to give you smooth, cocoa butters that are ready to create chocolate bonbon shells!
Video
Notes
- Raspberry puree: If you don't have premade raspberry puree, make your own by mixing together 250 grams of raspberries, 25 grams of simple syrup, cooking that down, mixing it with an immersion blender, and then cooking it down with the pectin.
- If you haven’t watched Christophe’s video on how to temper chocolate with the EZ Temper machine, you’ll want to watch that first.
- Also learn how to make beautiful chocolate decorations like curls, squares, discs, and a tiara in Christophe’s easy decorations tutorial.
- No tempering machine? No problem! You can temper your chocolate in the microwave or use the traditional seeding method to get your chocolate tempered.


Leave a Reply