
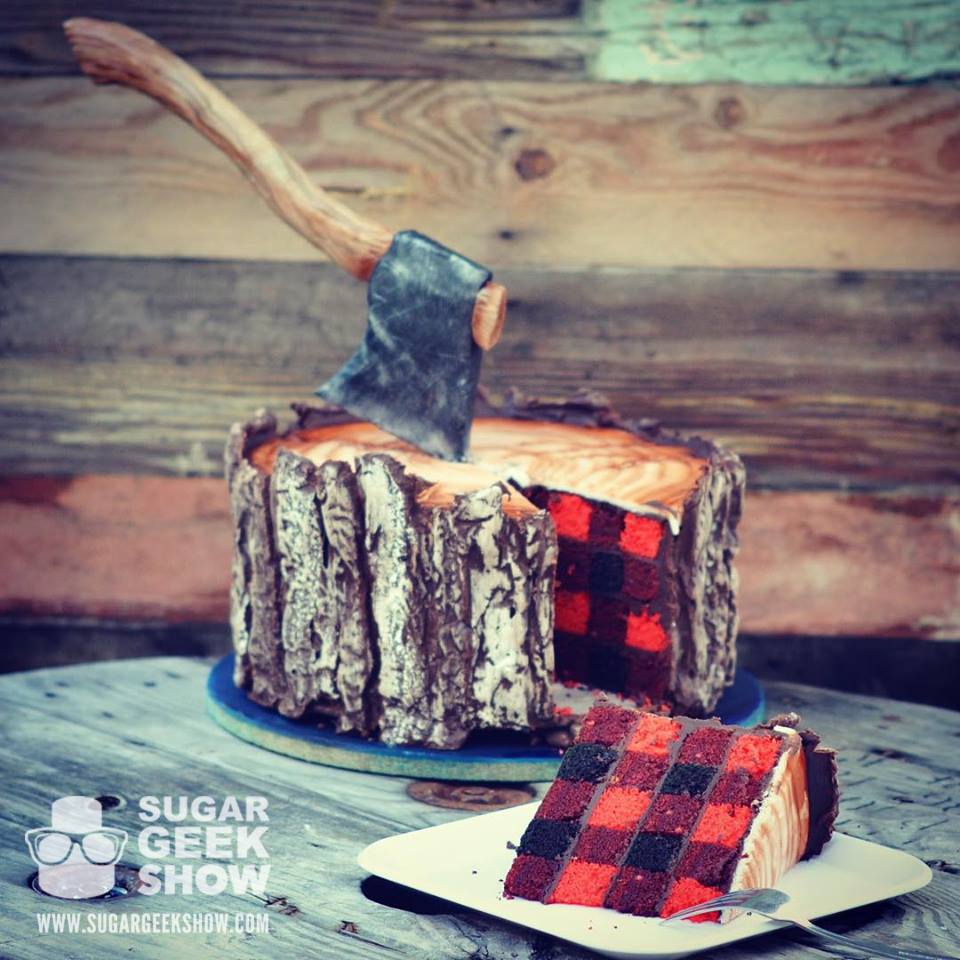
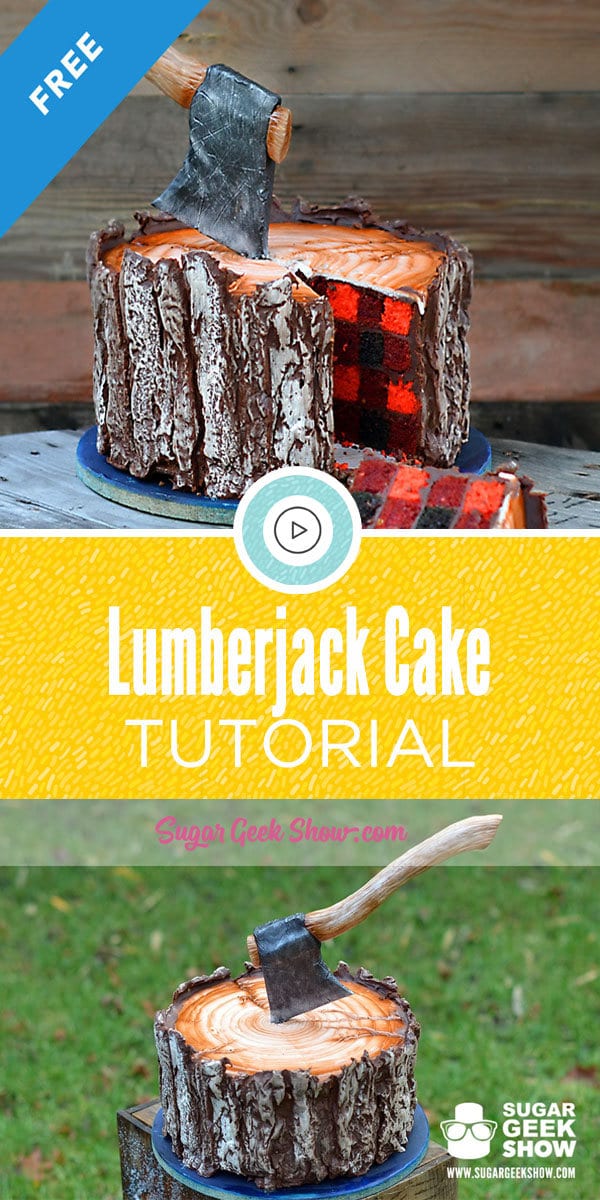
How To Make A Lumberjack Cake With Buffalo Plaid Cake Inside And A Gravity Defying Chocolate Axe On Top!
The lumberjack cake is probably my favorite cake of all time. What happened to be a random experiment to see if I could make a buffalo plaid pattern inside a cake became a viral sensation! Three years later, it's still my most popular tutorial and now you can learn how to make it for free!
This tutorial is an updated version because I felt like I could improve upon the original design but you can watch the original lumberjack cake tutorial for free too!
If I HAD known this cake was going to go viral, I definitely would have taken the time to finish my board *cringes). My video quality at the time was a GoPro and some of the techniques where a little fussy. Since then, I have made dozens of lumberjack cakes and have streamlined the process to what I feel is a pretty simple and fun cake to make. I also have three new recipes for you that I like to call the "Sculpted cake recipes series" which are cakes that still have a lot of great flavor but are a little bit sturdier for using in carved cakes like this one. My original cake tutorial used box mix which is really tender and breaks pretty easily.
Since then, this cake has been made and re-made by some huge pages including tastemade which used to bother me but now I just know it's part of this business. But the thing that REALLY get's me is that the plaid is never true plaid in any of these other videos. It's my inner OCD going nuts.
Check out these "not buffalo plaid" cakes
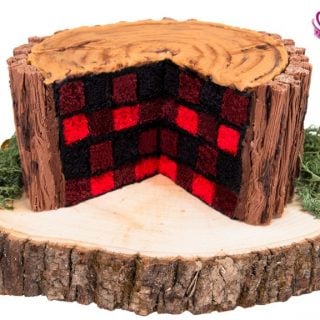
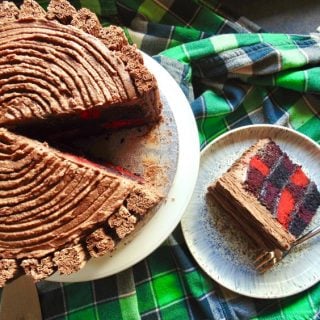
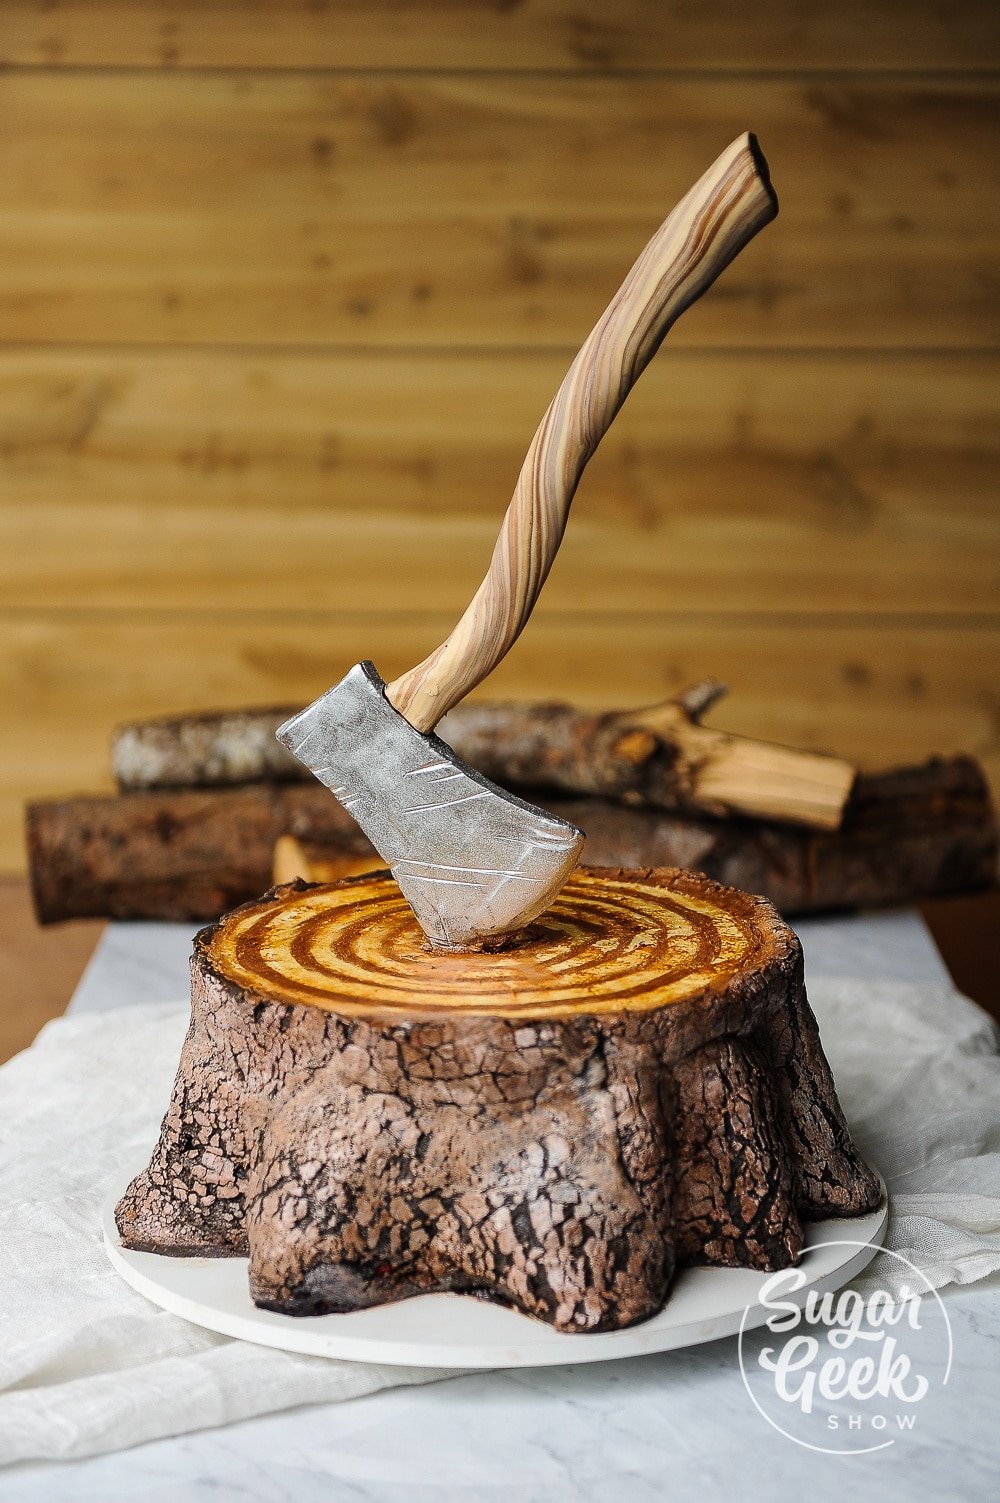
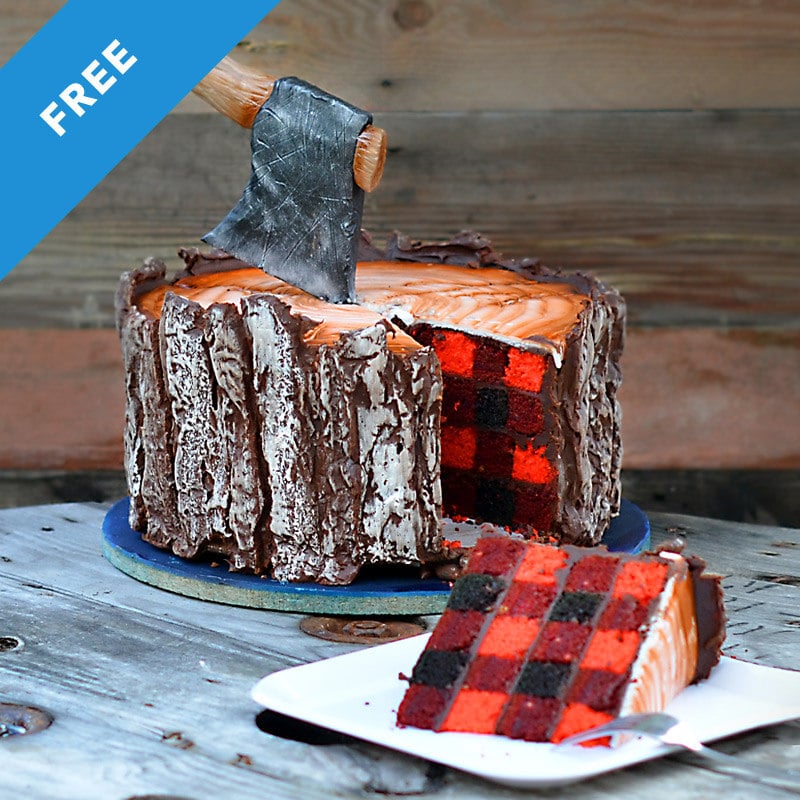
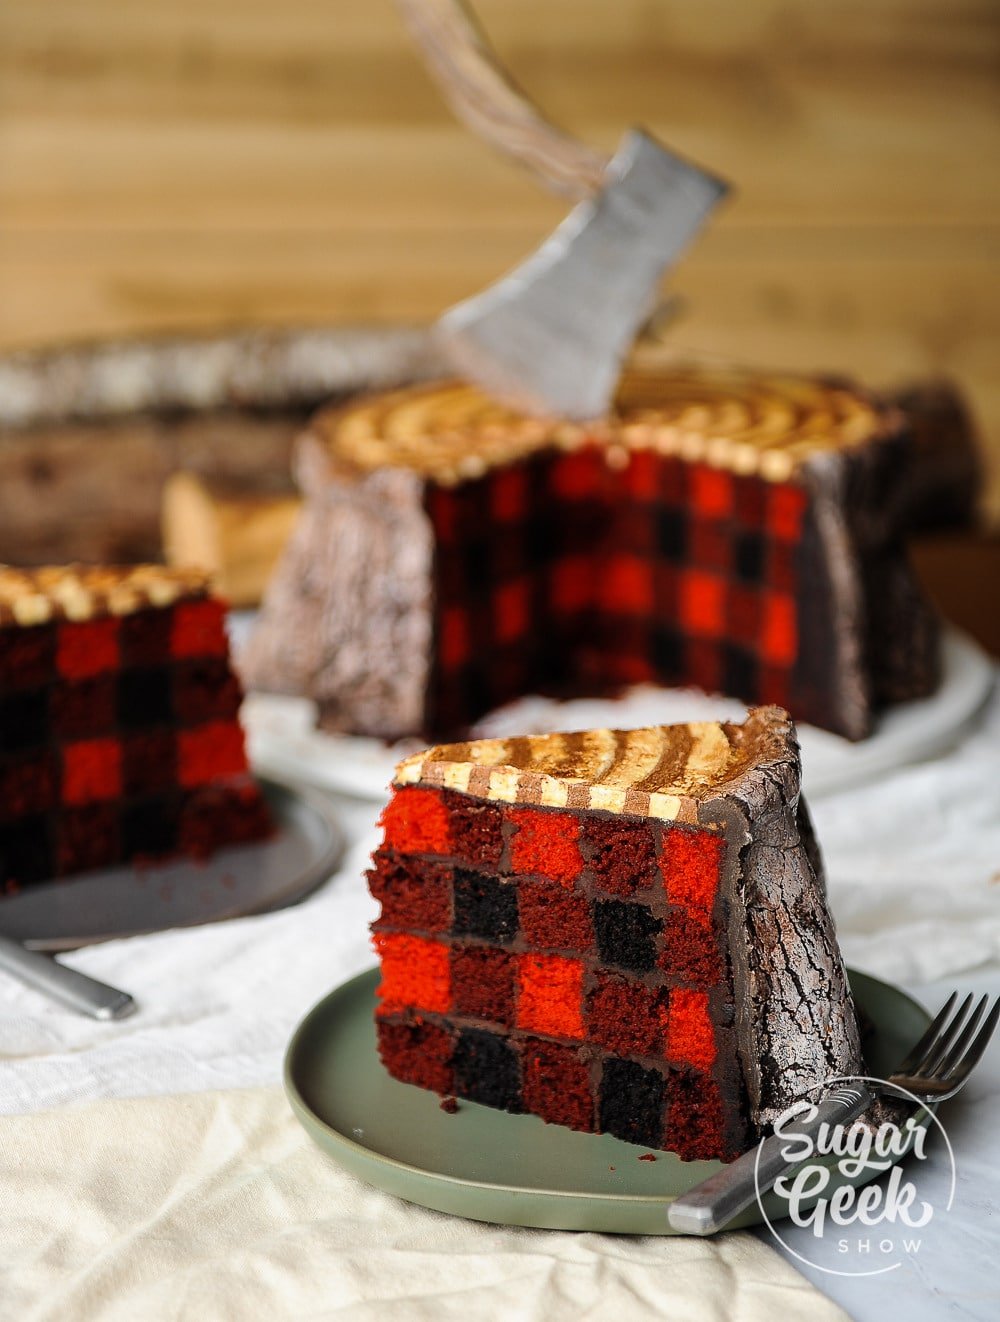
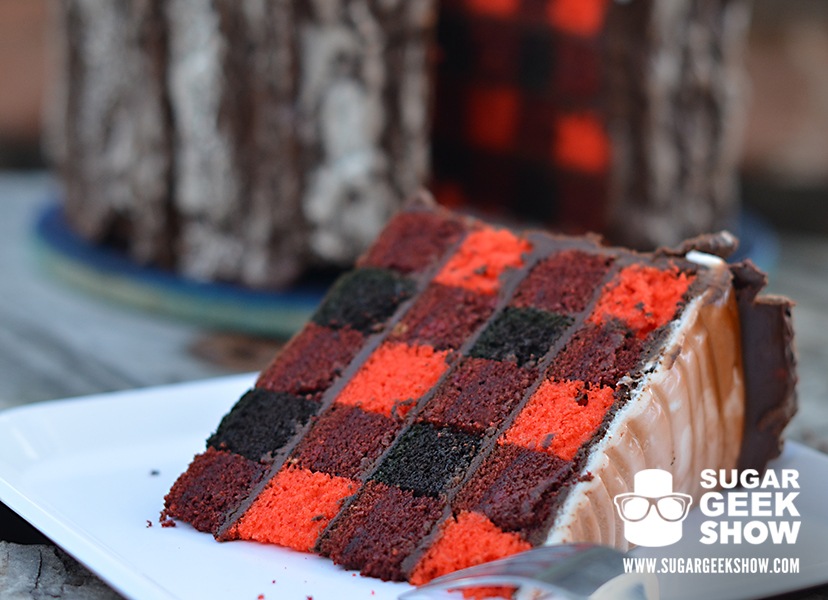
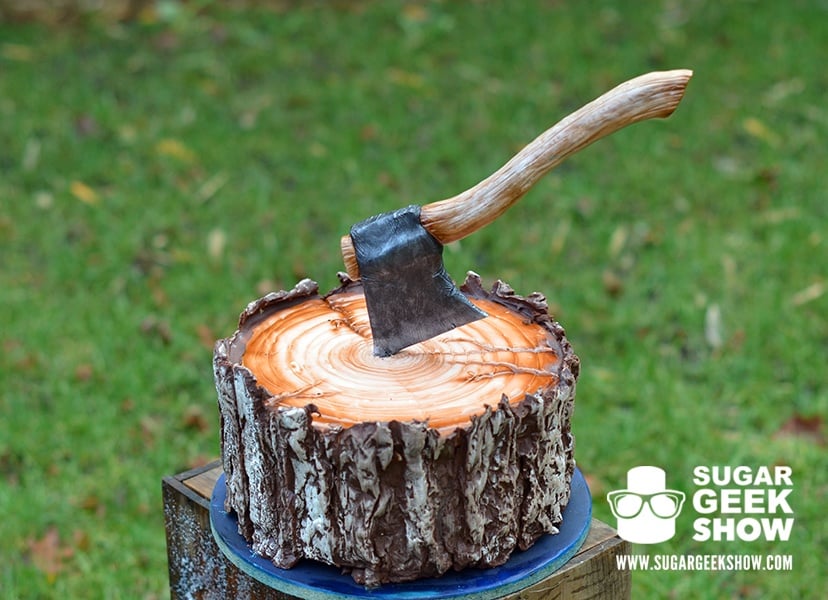
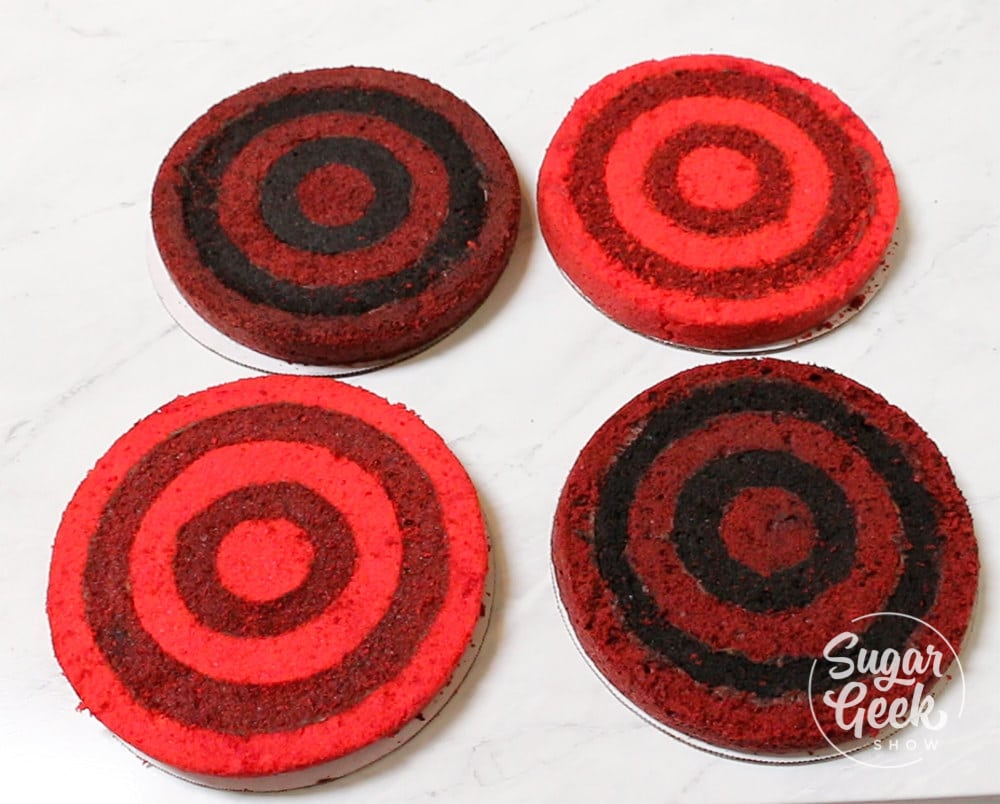
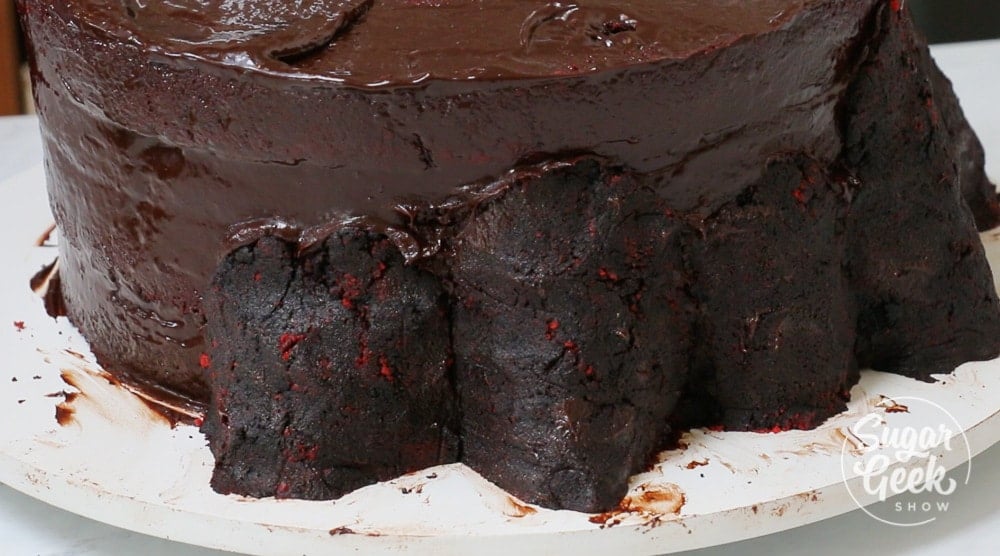
To create the plaid texture in this cake, you have to make two 10" red velvet cakes for carving, two 8" chocolate cakes for carving and two 10" yellow cakes for carving (dyed red). You will have a little cake leftover after stacking. I HATE wasting cake so I added some roots to the design that uses up the excess cake and I think gives it a fun tree stump look. You can see the layer of yummy cake clay around the outside edge which tastes a lot like fudge! Yum!
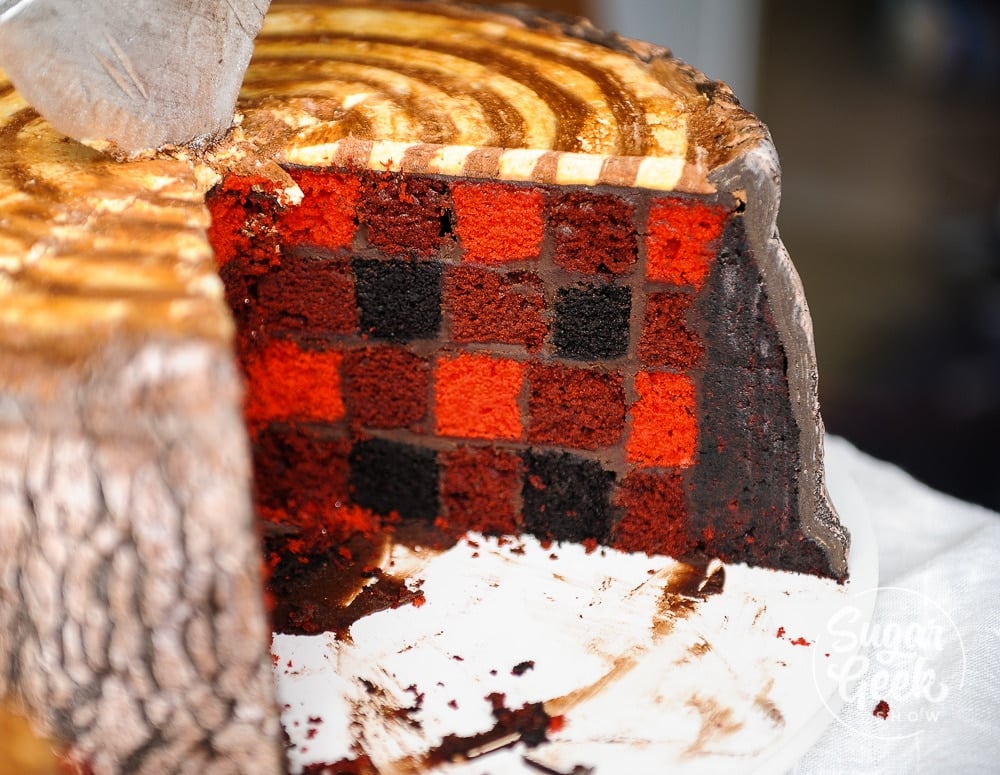
Now that's some real buffalo plaid 😀
So after much discussion with my husband, we have decided to not only release the original lumberjack tutorial to be a free video, we have also made a NEW updated version with a different style of bark texture that I think is a lot more realistic, simpler way of making the edible axe using my modeling chocolate recipe and even a simpler way of making the wood rings on top using buttercream instead of fondant. You can use the old bark texture if you like or the new one depending on how much you enjoy working with fire haha.

The new bark texture is created using my LMF fondant recipe and my crackled fondant technique with the addition of some granulated sugar for extra crunchy texture. I get asked a lot of the fondant has a "burnt" taste because of the torching and the answer is no. We're only caramelizing the sugar like you would a s'more since the fondant is made mostly of marshmallows. The crunchy outer layer of sugar combined with the marshmallow fondant and the ganache underneath results in a cake that tastes literally like campfire marshmallows. How freaking lumberjack is that??
I hope you enjoy this new version of the lumberjack cake and a HUGE thank you to all the support over the years that I have received from fellow cake decorators, friends, family and straight up strangers who always tag me in their lumberjack cake creations, shared my tutorial and just overall kept me from becoming horribly bitter lol. I'm happy to release this tutorial into the wild 😀
Read more about the original lumberjack tutorial below
Originally published December 10, 2015
It's here, my lumberjack cake! Ohhhh I'm a lumberjack and I'm ok...
Seriously though, I might not be okay. I have a slight addiction. Well, slight would be an understatement really. Is there a word for a plaid obsession? I think it's taking over my life!
Plaid themed Christmas cards. I get bonus points for getting the dog and the baby to look at the camera.
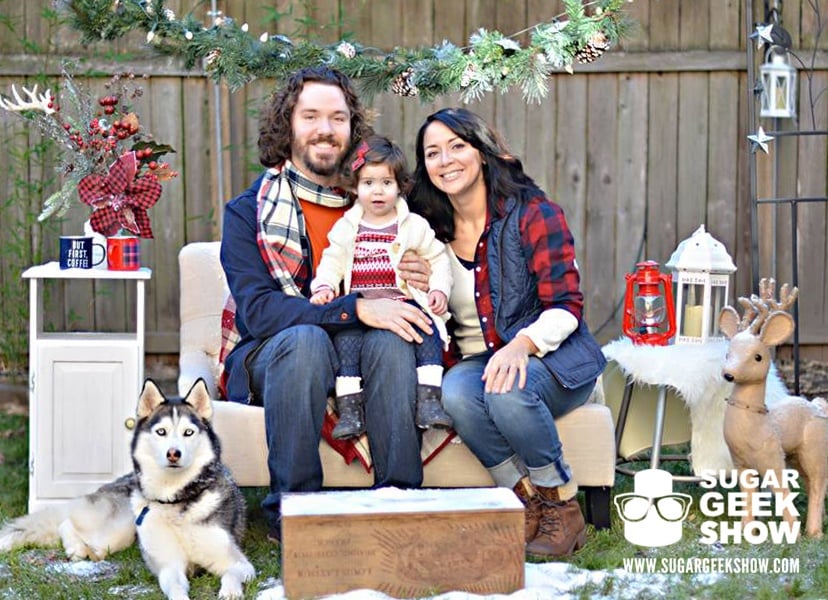
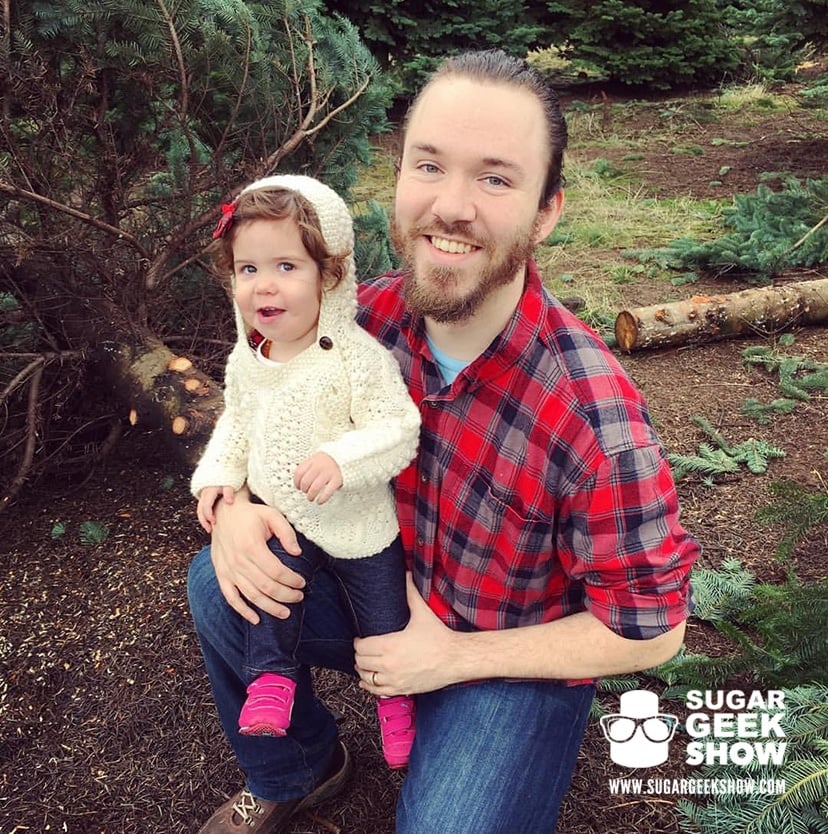
My hubs might very well be a lumberjack... oh my. I mean he DID technically chop down that Christmas tree. That counts right??
What is a lumberjack cake?
A lumberjack cake could be many things, if you search pinterest you'll find a whole plethora of lumberjack cake versions ranging from cute stacks of pancakes to beards, bears and suspenders. My version of the lumberjack cake was actually a very quick experiment that I didn't really think anyone would think was that interesting.
I kept seeing plaid everywhere and I couldn't help but think... could you make a cake plaid on the inside?
*This photo has been shared over a million times on social media in less than 48 hours! Crazy! People love lumberjacks LOL
It's all About the Plaid Cake
Maybe it's because I'm an Oregonian.
Maybe because it's the hottest trend on Pinterest right now.
It could be because I have a crush on #FashionSanta and I know his favorite color is plaid.
Or maybe it's because I'm a child of the 90's and if I start wearing mauve lipstick and JNCO jeans, someone please send help.
When hubs chopped down that Christmas tree all lumberjack like, my obsession with plaid became clear. I'm in love with lumberjacks. It makes sense: I love trees, I love beards, and I love plaid.
This lumberjack cake is a culmination of almost all my obsessions. If I could have worked in a mermaid I would have.
Lumberjack Cakes with Plaid Inside: It Needed to Happen
The latest tutorial coming to the Sugar Geek Show! Chocolate-y log with edible axe and a BIG OL' SLICE of lumberjack cake awesomeness in the middle! That's right, plaid cake. (you may faint now)
I would like to say this pattern was super simple to make but well... let's just say a lot of cake and a lot of scribbled notes ended up in the trash. Damn you maths! Why must you confuse me so?!
Ever measured a piece of cake with a ruler and a compass? Neither have I... Only crazy obsessed weirdos would go to such extremes to perfect the perfect plaid cake masterpiece!
Lumberjack Cake Bark
I know that plaid is kind of the show-stopper but f'real, this tutorial is the real deal. I got all kinds of cool stuff packed in here: airbrushing, modeling chocolate, fondant, hand-detailing and of course, crazy realistic textures! It's kinda my thing. This chocolate bark on the outside of the lumberjack cake is one of the easiest and most realistic textures I have made, not to mention tasty!
Yes, that's edible. I know you where thinking it and It's ok.
Is there a magical plaid pattern cake pan?
Be aware, there are many copycats out there who claim to have the right pans or easy ways of making this plaid pattern but I dunno about you but random squares of colors on the inside of a cake does not make plaid. Trust me, it took way too many brain hours to figure out exactly how to make this plaid pattern work so that when you cut into it, it really would be plaid!
There are cake pans out there made for making a checkerboard pattern on the inside of cakes but these may not work the way you want for making a true plaid pattern. The reason is there aren't enough rings to make the full pattern.
How to make a lumberjack cake
First you'll want to bake up your cakes. You'll need two 10" red velvet cakes, two 10" Bright red cakes and two 8" chocolate cakes (recipes below). You only need your layers to be an 1" tall so I fill my 2" tall cake pans with batter about half way then trim after baking. I prefer these recipes because they hold their shape when you carve. After baking I wrap them in plastic wrap and chill them in the fridge overnight before carving.
- After you bake your cakes, you'll want to make your ganache and your marshmallow fondant (LMF) or you can use any brand of fondant you prefer. I like to make my own so that I can color it a nice dark brown. I use the same technique as I do in my black fondant tutorial but use brown food coloring instead of black.
- You'll need an 8", 6", 4" and 2" round template. I used a mixture of cake boards, pans and cutters that I just had handy. Cut out your circles with a utility knife, making sure you cut straight down so your cake layers have straight sides. You'll need two sets of red velvet/chocolate cake and two sets of bright red/red velvet cake. Make sure you glue your layers together with ganache or they will fall apart when you cut into them. Buttercream doesn't seem to hold as well as ganache.
- Stack your layers starting with the red velvet/chocolate layer on top of a 14" cake board. I like the boards from cake boards avare because you can clean the surface as you work. More ganache in between then give it all a good crumb coat and put it in to the fridge to firm up. While it's chilling, go ahead and make your modeling chocolate axe.
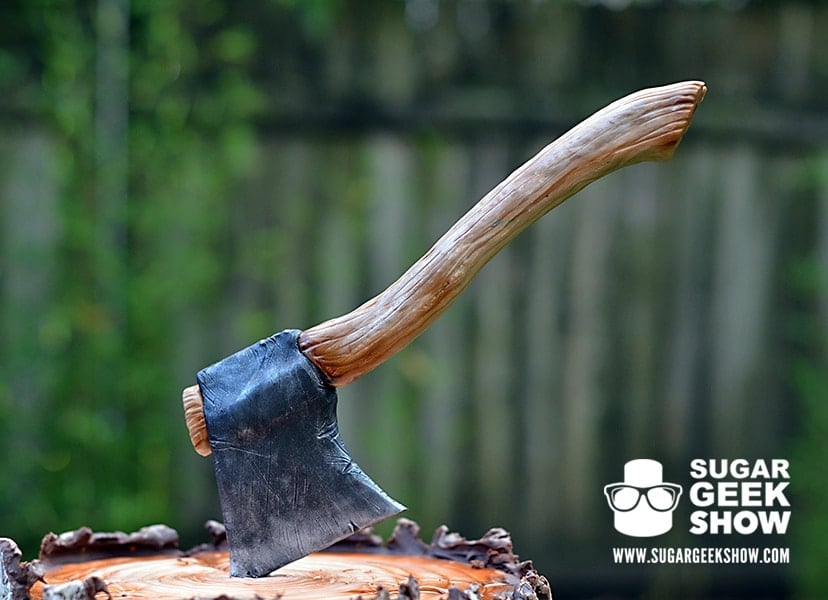
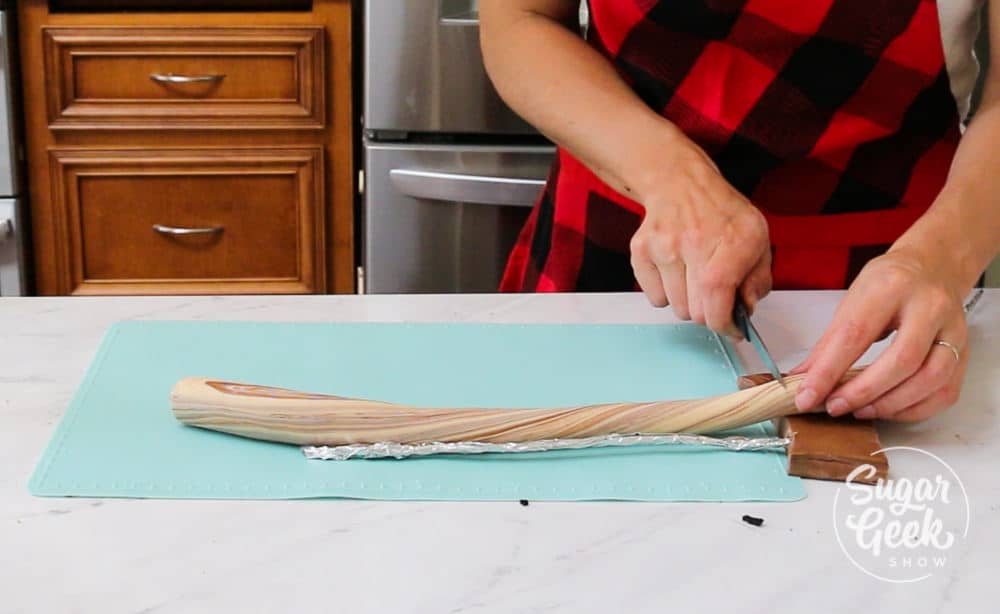
How to make a modeling chocolate axe
First you'll want to make your modeling chocolate. I made a batch of ivory and a batch of dark brown. For the support, I'm using ⅛" armature wire which you can buy in our shop. This is the same wire sculptors use for making clay sculptures so it's flexible but strong. You'll also want some aluminum foil tape to cover the wire and make it food safe. I buy mine from home depot but you can also get it online. Some silver dust to paint the chocolate works great too.
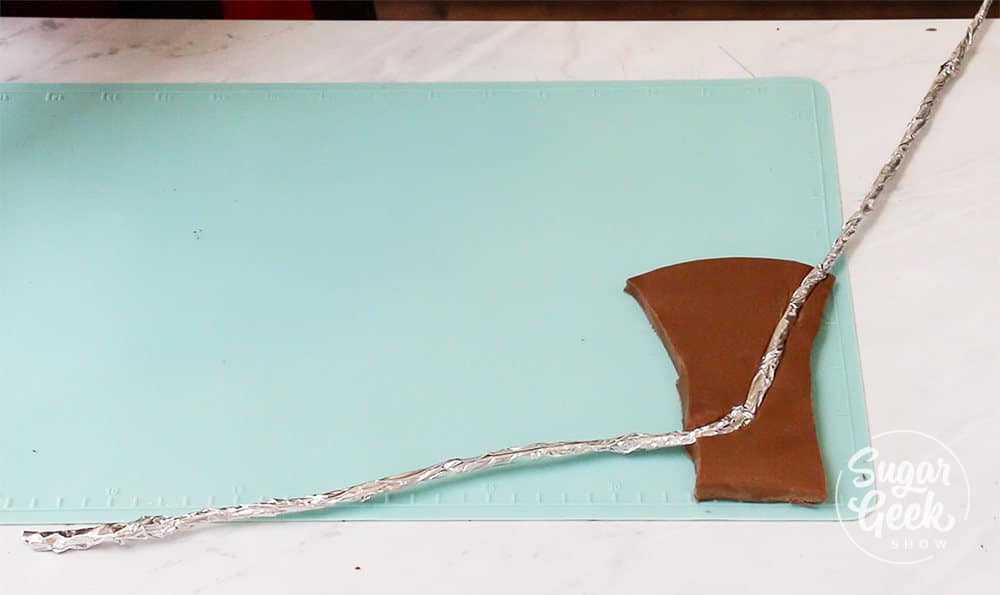
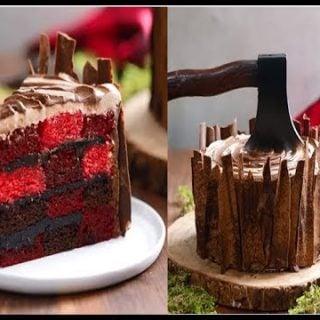
- First roll out your brown modeling chocolate into a wedge. Cut into an axe shape.Cover the wire in aluminum foil tape. Bend your wire so that it has a long part that comes out to form the handle and the other part goes through the front edge of the blade. This is where the wire is going to come out and then go into the cake to make it look like it's stuck in the cake.
- Cover the other side of the wire with a thin layer of modeling chocolate and cut off the excess. Take your ivory and leftover brown modeling chocolate and marble. Roll into a snake and then cut a line down the center. Place the wire in the cut then fold the modeling chocolate round the wire and smooth the seam. Place into the fridge to chill until firm.
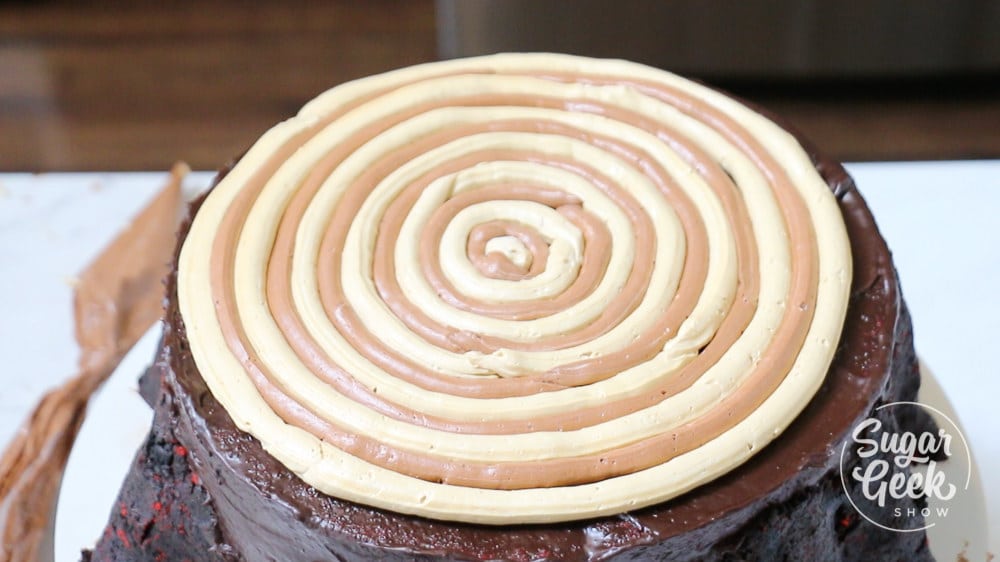
 How to make the tree stump look
After the cake is chilled, I make the tree rings on top using some easy buttercream colored ivory and brown. I used two separate piping bags and pipe alternating rings on top until I reach the edge. Then I smooth out the top with an offset spatula.
For the roots, I take the leftover red and chocolate cake that we didn't use for the plaid inside and crumble it up with some ganache to make cake clay. I form that into the roots and attach to the sides of the cake. Back into the fridge to chill
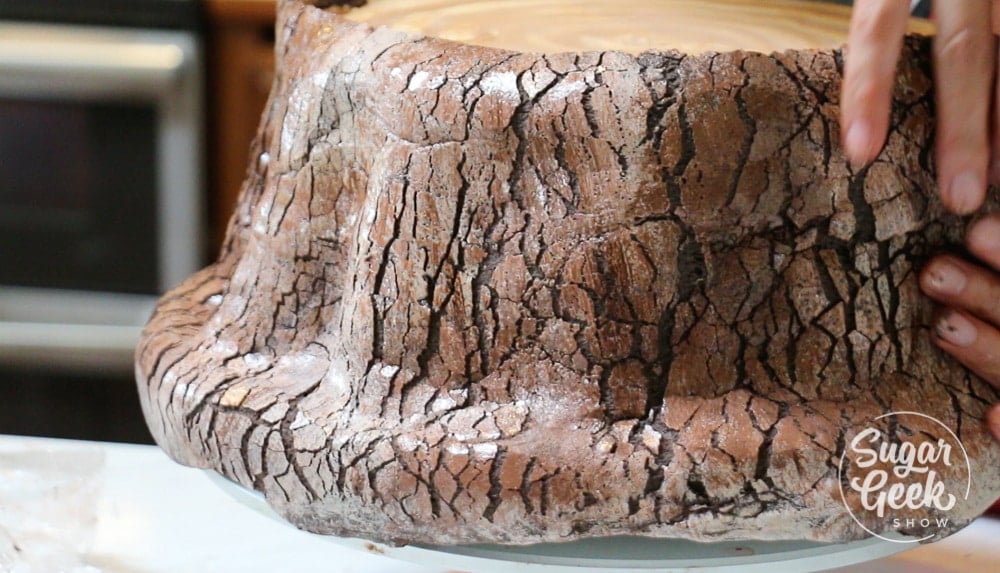
 How to make the lumberjack cake bark texture
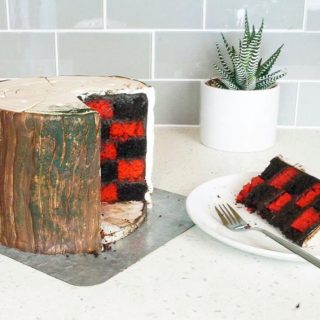
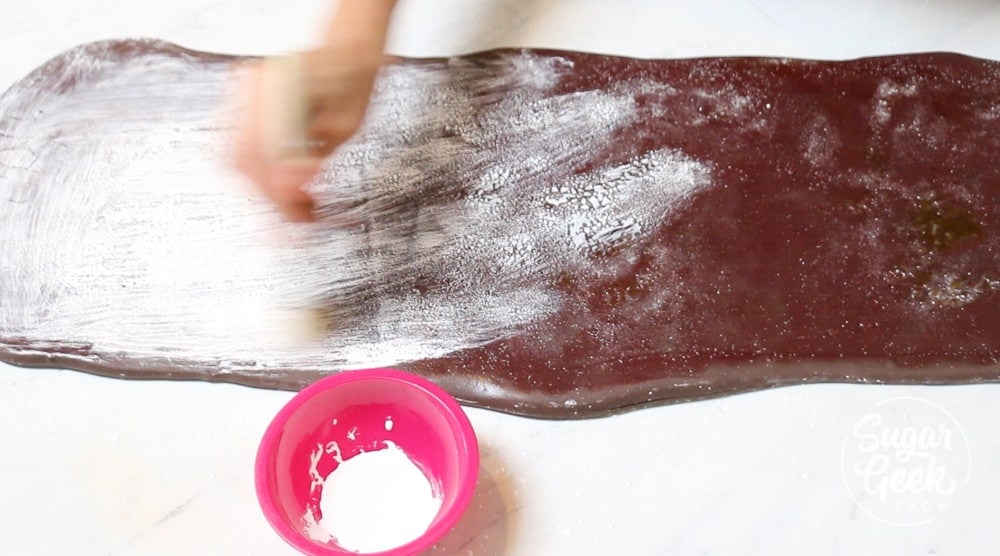
Originally I made the bark texture by placing ganache onto some crumpled tinfoil that is sprayed with vegetable oil and then wrap it onto the cake, freeze and pull off the foil but I decided to try out a new technique using my crackled fondant tutorial for a more realistic bark texture.
- First I roll out my brown fondant into a piece that is almost as tall as my cake and about 25" long and ½" thick. I torch the surface with my blow torch then add some granulated sugar and torch that. I let the whole thing cool.
- Then I paint the surface of the fondant with some white food coloring and then some ivory to give is some variation. Let it cool fully. Cover the top of the fondant with some plastic wrap and roll it up.
- Spray your ganache with some water to make it sticky and then wrap your fondant around the cake. Lifting the fondant to make it "crack. If you get a rip or tear don't worry, it's bark! You can't mess it up. Just fix any holes and push it into place. Trim off the excess around the roots and at the top.
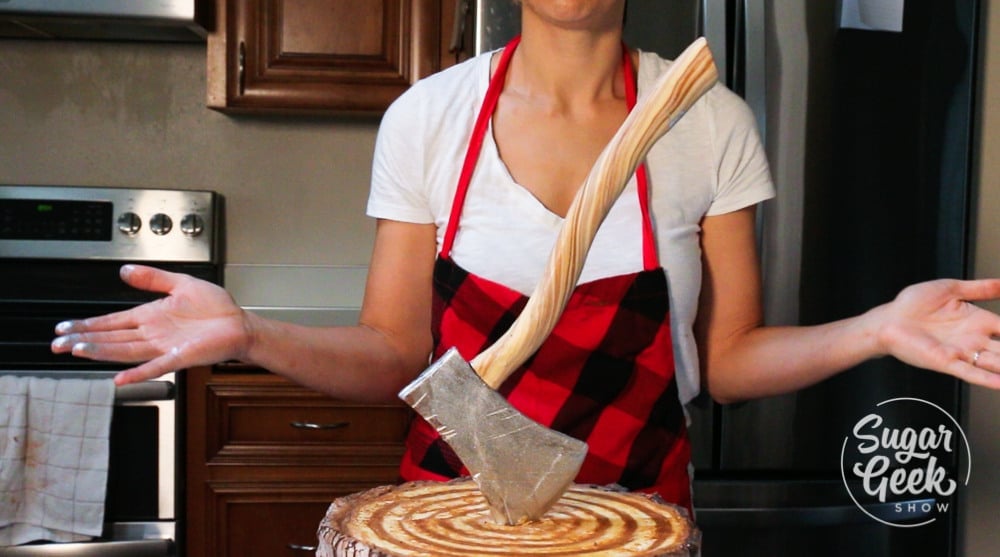
Finishing the lumberjack cake
The only thing left to do is place the axe! If you're delivering this cake or traveling, don't put the axe in the cake until you arrive. *tip: the more the handle is straight up and down, the more balanced it will be and be less prone to tipping over.
That's it! I hope you guys enjoyed this free lumberjack cake tutorial. If you make this cake, I'd love to see your version in the comments. Let me know what you think of it and if you have any issues, you can always ask me there.
Thanks guys!
xoxo- Liz
Watch the lumberjack cake tutorial at the bottom of the recipe!
Recipe

Ingredients
Bright Red Cake Layers
- 12 oz unsalted butter room temperature
- 19 oz sugar
- 6 large eggs room temperature
- 19 oz all purpose flour
- 4 teaspoon baking powder
- 1 teaspoon salt
- 12 oz milk
- 1 tablespoon vanilla extract
- 2 oz vegetable oil
- 2 teaspoon yellow food coloring
- 1 tablespoon red food coloring
Red Velvet Cake Layers
- 9 oz unsalted butter room temperature
- 22 oz sugar
- 22 oz All purpose flour
- 2 ½ teaspoon baking soda
- 1 teaspoon salt
- 3 tablespoon cocoa powder
- 5 large eggs room temperature
- 20 oz buttermilk room temperature
- 1 tablespoon vanilla extract
- 3 oz vegetable oil
- 2 ½ teaspoon apple cider vinegar
- 1 teaspoon yellow food coloring
- 2 tablespoon super red food coloring
Chocolate Cake Layers
- 8 oz unsalted butter room temperature
- 14 oz sugar
- 15 oz All purpose flour
- ½ teaspoon baking powder
- 2 ½ teaspoon baking soda
- 4 oz dutched cocoa powder
- 1 teaspoon salt
- 2 teaspoon vanilla extract
- 4 large eggs room temperature
- 16 oz water or strong coffee room temperature
- 2 oz vegetable oil
Chocolate Ganache
- 16 oz semi sweet chocolate
- 8 oz heavy whipping cream
- ¼ teaspoon salt
Instructions
- Heat oven to 335º F/168º C.
- NOTE: It is SUPER IMPORTANT that all the room temperature ingredients listed above are room temperature and not cold so that the ingredients mix and incorporate correctly.
Bright Red Cake Instructions
- Add butter to stand mixer and beat at medium-high speed until smooth and shiny, about 30 seconds. Gradually sprinkle in the sugar, beat until mixture is fluffy and almost white, about 3-5 minutes.
- Add eggs one at a time, fully combining each egg before adding the next. Add in your yellow and red food color and combine until color is evenly mixed through.
- Combine dry ingredients and whisk together. Set asideCombine wet ingredients and set aside
- With the mixer at the lowest speed, add about a third of the dry ingredients to the batter, followed immediately by about a third of the milk mixture, mix until ingredients are almost incorporated into the batter. Repeat the process 2 more times. When the batter appears blended, stop the mixer and scrape the sides of the bowl with a rubber spatula.
- Divide the batter evenly between the prepared pans. Smooth the tops with a rubber spatula. Bake cakes until they feel firm in the center and a toothpick comes out clean or with just a few crumbs on it, about 35-40 minutes. Chill cakes until firm before torting.
Red Velvet Cake Instructions
- Add butter to stand mixer and beat at medium-high speed until smooth and shiny, about 30 seconds. Gradually sprinkle in the sugar, beat until mixture is fluffy and almost white, about 3-5 minutes.
- Add eggs one at a time, fully combining each egg before adding the next. Add in your food coloring to the egg/butter/sugar mixtureMix dry ingredients in a medium bowl and whisk to combine and set asideCombine wet ingredients and set aside
- With the mixer at the lowest speed, add about a third of the dry ingredients to the batter, followed immediately by about a third of the milk mixture, mix until ingredients are almost incorporated into the batter. Repeat the process 2 more times. When the batter appears blended, stop the mixer and scrape the sides of the bowl with a rubber spatula. Bake for 30-40 minutes until a toothpick comes out clean. Wrap and chill until firm before torting.
Chocolate Cake Instructions
- Add dry ingredients (flour, baking powder, baking soda, salt and cocoa powder) together in a bowl, whisk to combine and set aside
- Combine wet ingredients in a bowl and set aside
- Add butter to stand mixer and beat at medium-high speed until smooth and shiny, about 30 seconds. Gradually sprinkle in the sugar, beat until mixture is fluffy and almost white, about 3-5 minutes.
- Add eggs one at a time, fully combining each egg before adding the next.
- With the mixer at the lowest speed, add about a third of the dry ingredients to the batter, followed immediately by about a third of the water mixture, mix until ingredients are almost incorporated into the batter. Repeat the process 2 more times. When the batter appears blended, stop the mixer and scrape the sides of the bowl with a rubber spatula.
- Divide the batter evenly between the prepared pans. Smooth the tops with a rubber spatula. Bake cakes until they feel firm in the center and a toothpick comes out clean or with just a few crumbs on it, about 35-40 minutes. Wrap and chill until firm before torting
Chocolate Ganache
- Heat your cream to a simmer and pour over your chocolate. Let set 5 minutes and then whisk until smooth. If you have some unmelted chocolate, you can heat further in the microwave or over a bane marie until fully melted. Let mixture cool at room temperature until ganache is at the consistency of peanut butter.
Video
Notes
Nutrition

Jenna says
I can only find Wilton icing coloring gel. Will that work? And same quantity?
The Sugar Geek Show says
Yes those work just fine
Aime says
I'm making this tonight, and I'm wondering how sturdy the one single wire is to hold the axe in the cake. I am worried about transporting it! Does it seem to stay up well?
The Sugar Geek Show says
You can leave it out of the cake until you deliver 🙂
Chris says
Why do you have everything listed in ounces? Gosh, I'm going to have to transcribe it all. However, in excited to make this.
The Sugar Geek Show says
If you try to convert to cups you'll have a bad time making this recipe. We only use weight in the recipes posted on this site for accuracy and to insure you don't waste expensive ingredients. Cheap kitchen scales can be found at the same place you buy a measuring cup and will be a huge benefit to you in the kitchen ?
Erin says
I am looking at baking this for Christmas, however members of the family do not like chocolate ?
What do you suggest for the cake color/flavor considering the chocolate helps the color more than white cake?
The Sugar Geek Show says
I would tell them tough! lol! You can color the batter with brown food coloring but it's not going to taste very good 🙁
Erin says
Thank you!! I am thinking they will have to tough it out haha. Unfortunately, I married a man who dislikes the things \I love (chocolate, avocados, and tacos)!
I am so excited to make this. Thank you
Fred says
Est ce que le gateau une fois fait peut etre congelé
Jeanne Tellier says
Thank you, thank you, thank you! I took your tutorial of the lumberjack cake & I did! Big years and compliments. Amazing!
The Sugar Geek Show says
Yay I love to hear that!
Crystal says
I am wanting to make this pattern in a smash cake size only. How would suggest the sizes for that and cake mixes???
The Sugar Geek Show says
Just use the same pattern but use a 6" cake pan. The plaid will be much smaller inside
Mink K. says
Your tutorials never cease to amaze! You are an incredible artist! I want to attempt to make this cake for my cousin and I just wanted to know if it would be ok to substitute the ganache with buttercream. I've never had much luck at making ganache and feel more comfortable with making buttercream.
The Sugar Geek Show says
Totally ok! Some yummy chocolate buttercream would be great
Melissa Calkins says
Looks amazing!! I can’t wait to try it, thank you for sharing your tutorial!
Laura says
I can't find the bright red color for the cake. Is Christmas red comparable or not???
The Sugar Geek Show says
Christmas red will be a bit on the pink side.
S.M says
Can I please ask what brand of colours did you use?
Thanks!
The Sugar Geek Show says
I use americolor gels
S.M says
Hi There, Can I use your mayo chocolate cake recipe for this? Would that be sturdy enough ?
Thanks!
The Sugar Geek Show says
Yes you can, just make sure it's chilled
Courtenay says
Made this cake and it was a hit! Thanks for the tutorial (mine was definitely not as clean looking as yours but people were still impressed ?)
The Sugar Geek Show says
That's great and as long as people enjoyed it, that's all that matters 😀
rymar2@hotmail.com says
I love this cake, and appreciate that it is an actual plaid pattern on the inside. I appreciate you making the tutorial free. My daughter is having a red and black plaid themed 17th birthday party this fall, and I intend to attempt your wonderful creation with the original ganache bark. Is it possible to make this a day before an occasion, and if so, how and where should it be stored overnight? I have read a lot of reviews, but I haven't seen much about storage once the cake is complete. Retaining the cakes appearance is important to me, so I want to do this right. Thank you.
The Sugar Geek Show says
I store all my cakes in the fridge and always finish them a day early just in case.
Olamide says
I love the tutorials....pls I want to join
The Sugar Geek Show says
Great! You can sign up for the free trial here 🙂 https://sugargeekshow.com/elite-plans/