
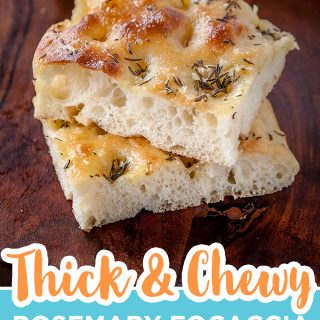
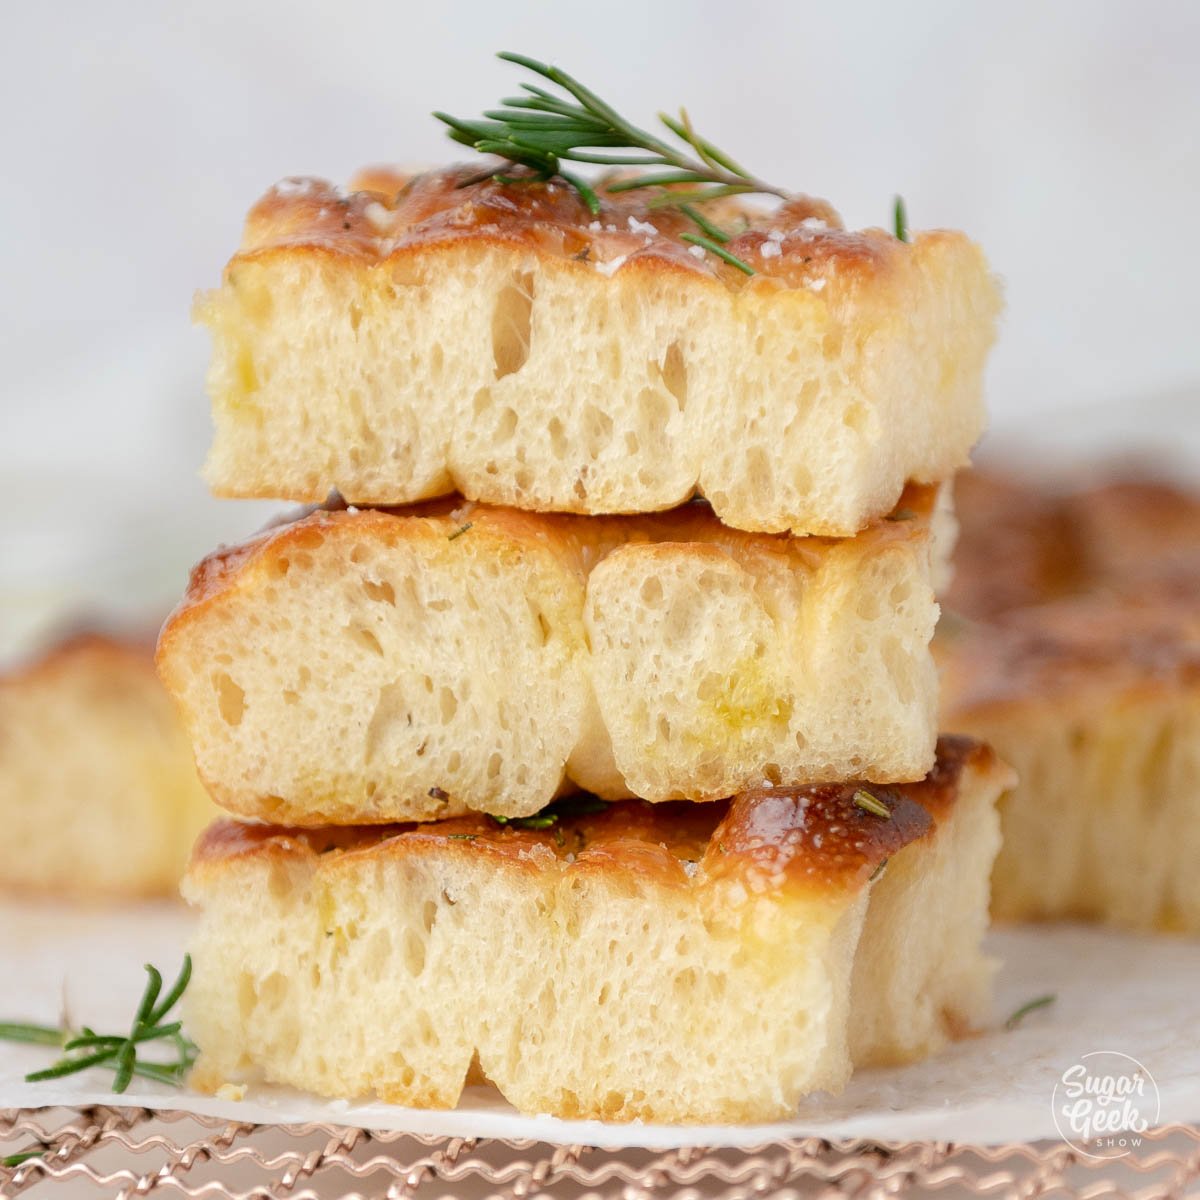
This focaccia recipe is ultra-soft and chewy and my favorite bread to make as an appetizer or side dish for dinner. Making focaccia is super easy, only requires a few steps, and you can even turn this delicious recipe into edible focaccia bread art! The most important thing to have when it comes to making focaccia is patience. Don't rush yourself and you'll be very happy with the results!
In my house, we eat focaccia at least once a week. We typically buy it from a local bakery that is literally the only place within 20 miles that sells it. They sell out quickly so you have to arrive really early to make sure you get some. Sometimes they wouldn't even make it because the person who usually makes it isn't there. Talk about disappointment!
So I decided to make my own easy focaccia recipe that comes together quickly! Most of the time needed for this recipe is spent just waiting for the yeast to do its thing and create all that yummy flavor.
If you love baking bread from scratch, my easy homemade bagel recipe is another great one to add to your rotation.
My overnight sourdough focaccia uses the same dimpling-and-olive-oil technique but trades instant yeast for a 12 hour fermentation that builds bigger flavor.
What's In This Blog Post
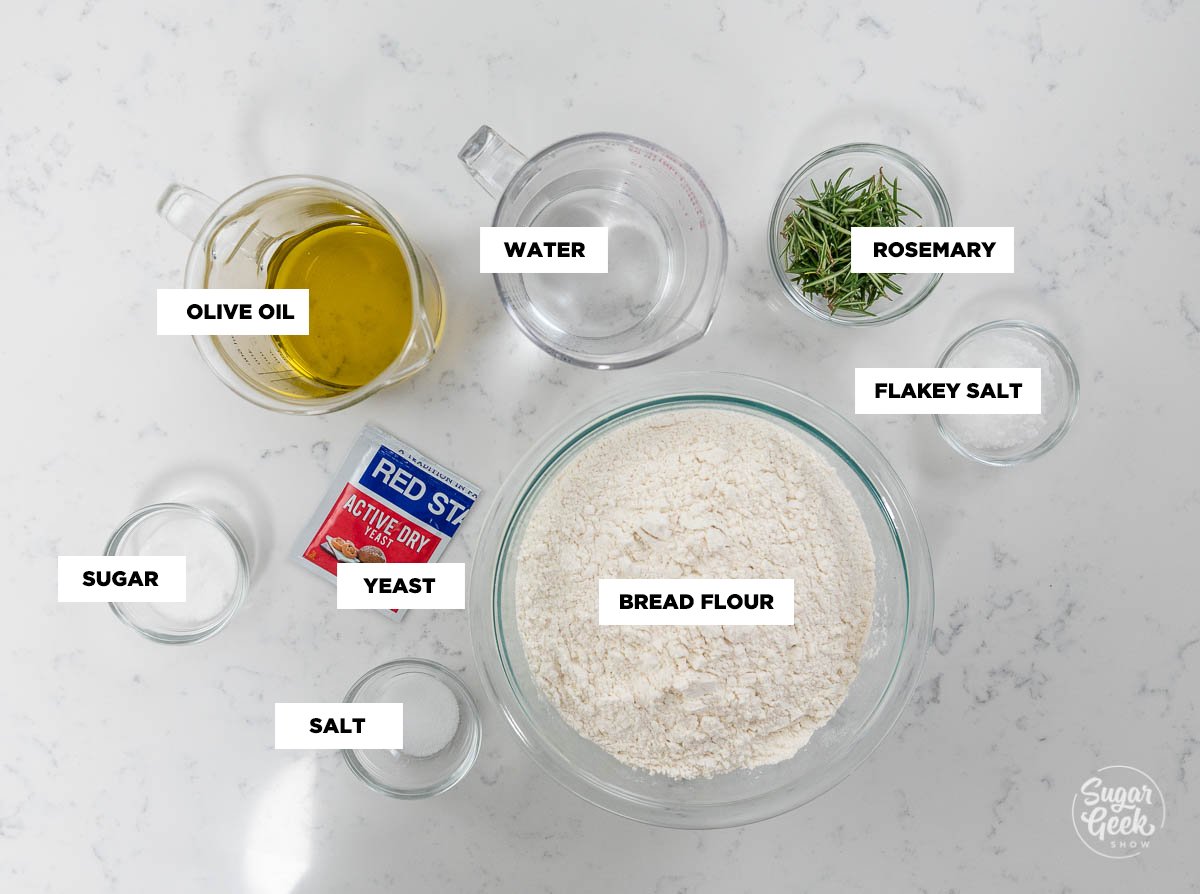
Focaccia Recipe Ingredients
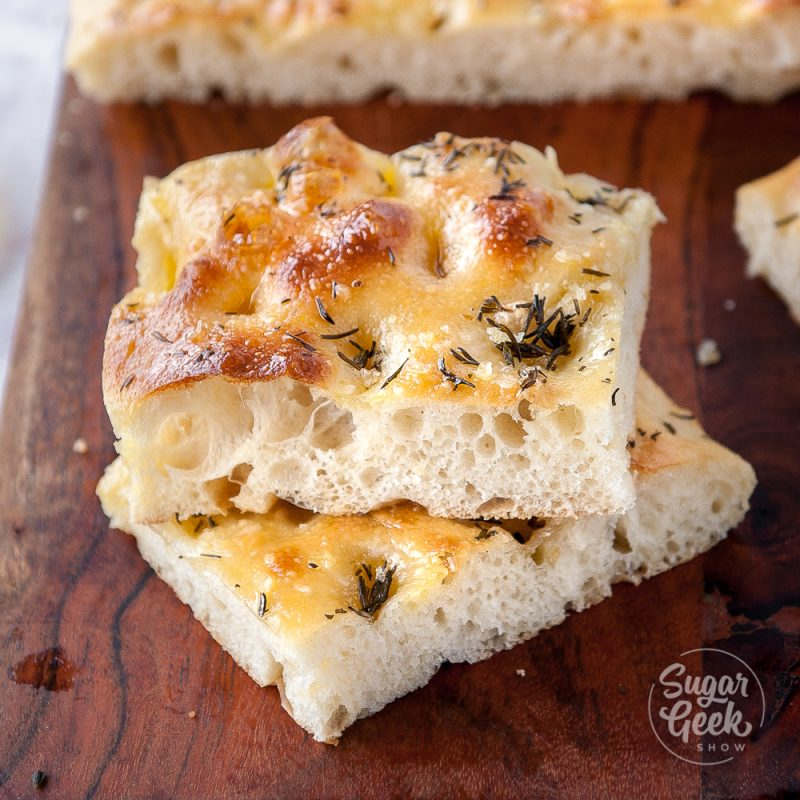
Focaccia has a very specific texture. It's got a crisp outer layer and a soft and chewy interior with lots of flavor. I've had some really bad focaccia in my day, so I know what to avoid when it comes to focaccia recipes.
Bread flour - Bread flour is going to give you focaccia that has the best chewy texture and biggest bubbles, but you can use all-purpose flour if that's all you have. Bread flour has the highest protein content which results in more gluten development and a chewier bread.
Olive oil - Olive oil is arguably the most important ingredient you'll need other than yeast. Olive oil gives the focaccia that crispy outer texture, moisture, and flavor. You might think that there is too much olive oil in this recipe. But you have to trust me, you need it!
Toppings - I'm using rosemary on top of my focaccia, but you can use any fresh herb that you like along with your preferred cheeses, meats, or vegetables. The options truly are endless. Get creative!
Flake Salt - I love the texture and taste of flake salt which is a type of finishing salt but if you only have table salt then skip this step to avoid making the focaccia too salty.
How to Make Focaccia Step-by-Step
- Combine 8 ounces of your warm water (110ºF or 43ºC), yeast, and sugar and set it aside for 5 minutes or until it's foamy. If your yeast does not start growing it may be dead so make sure you have fresh yeast before starting.

- Put your yeast mixture and one cup of flour into the bowl of your Bosch stand mixer with the dough hook attached. Mix to combine. You can use a bowl and a spoon and then knead it by hand if you want to, but it will just take longer.
- Next add in the rest of your water, the olive oil, and the salt, and mix to combine.

- Then, keep adding in the rest of your flour while mixing on low until your dough starts pulling away from the sides of the bowl.
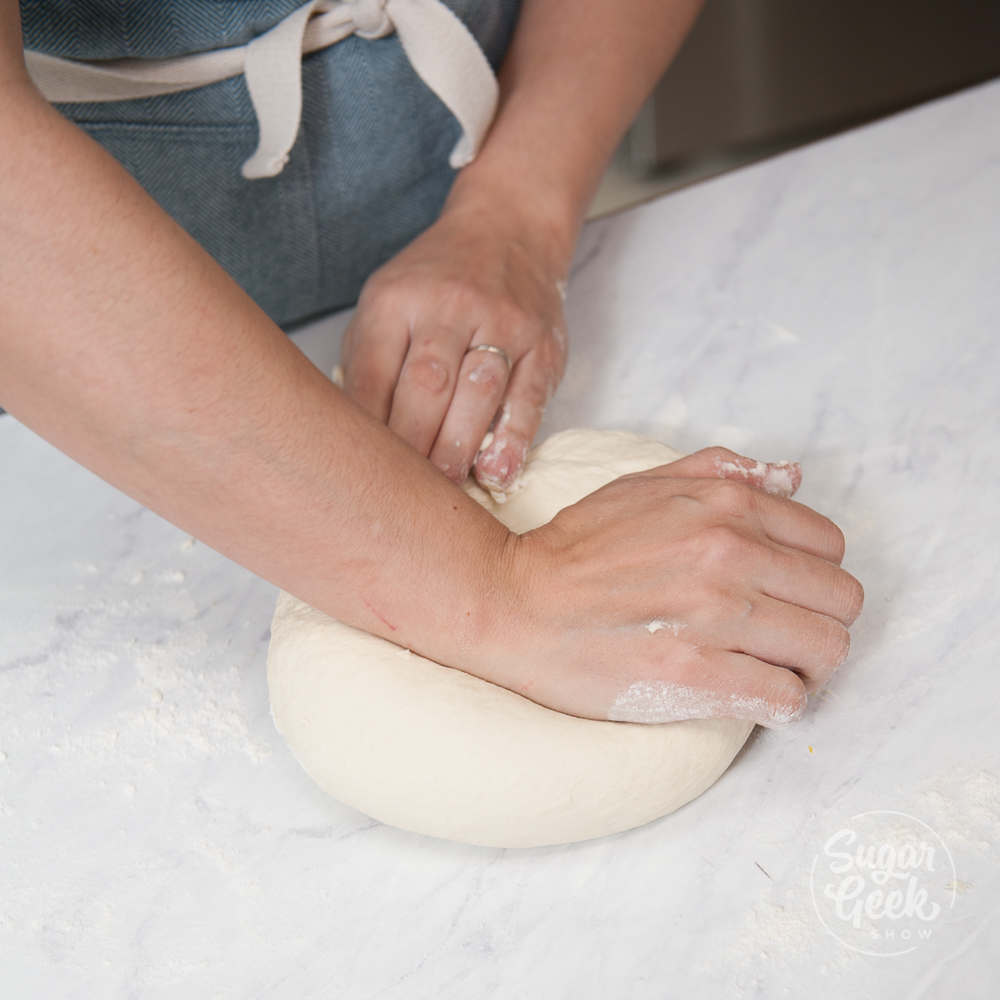
- Take the sticky dough out of the bowl and finish kneading it on the table with a tiny bit of flour until the dough looks smooth and bounces back when you touch it with your finger.

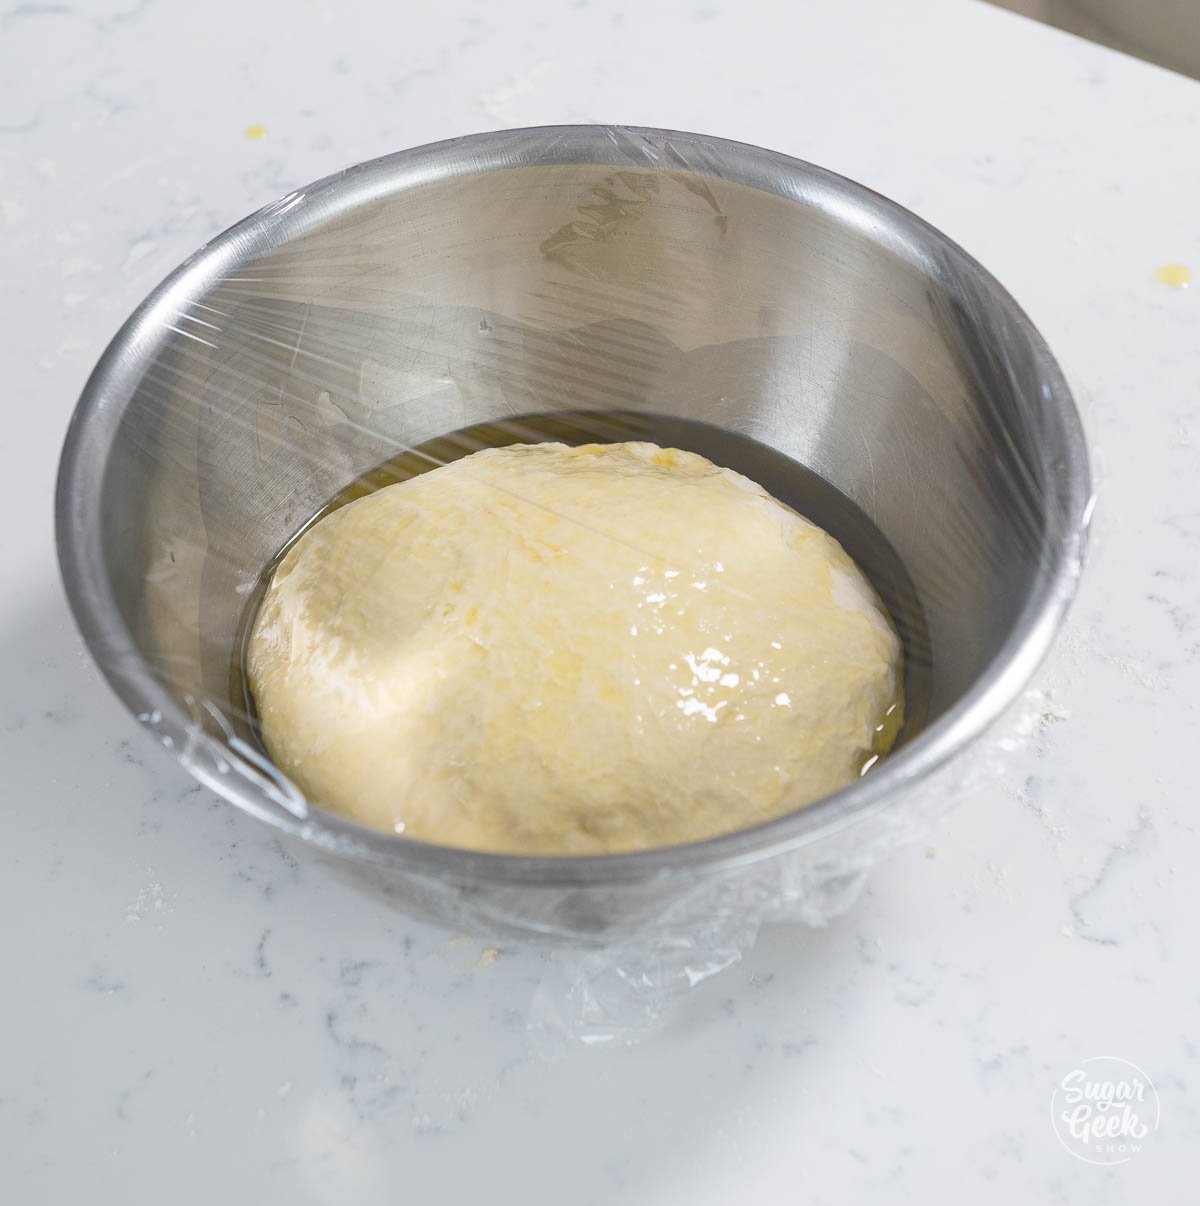
- Next, put the dough into a bowl greased with olive oil.
- Cover the bowl with plastic wrap, and place the covered bowl in a warm area for 1-2 hours or until the dough has doubled in size. I put my bread in my oven turned OFF with just the light on to proof my bread, or in a proofing drawer.

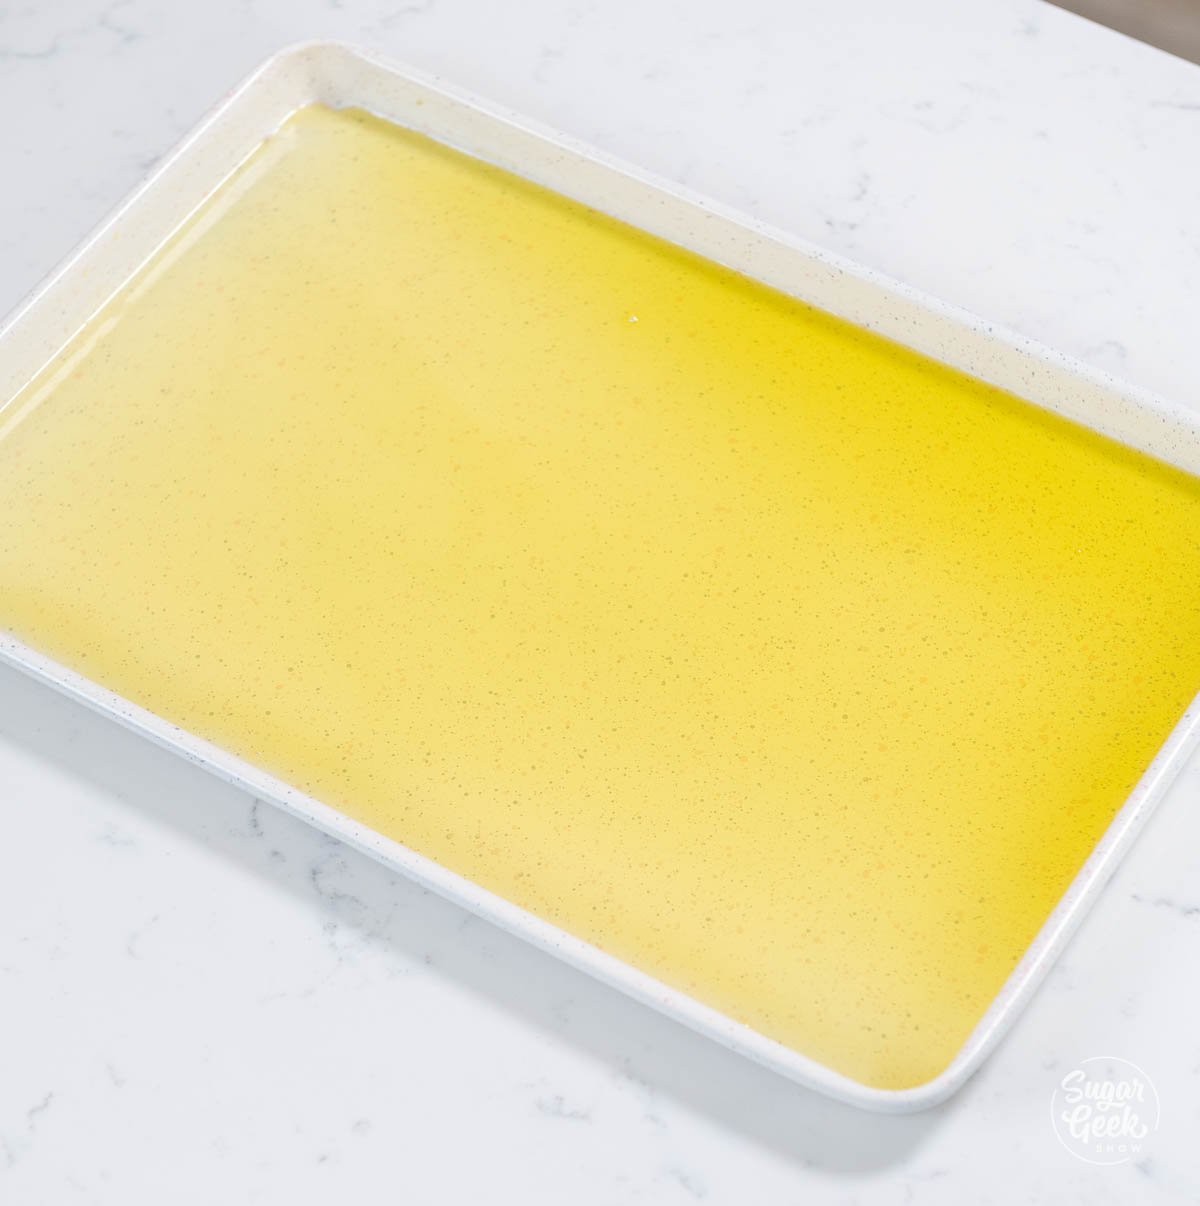
- Then, prepare your baking pan by covering the bottom of the pan with a thin layer of olive oil. I know this looks like a lot but trust me, you need it. You want it to be a swimming pool of oil!
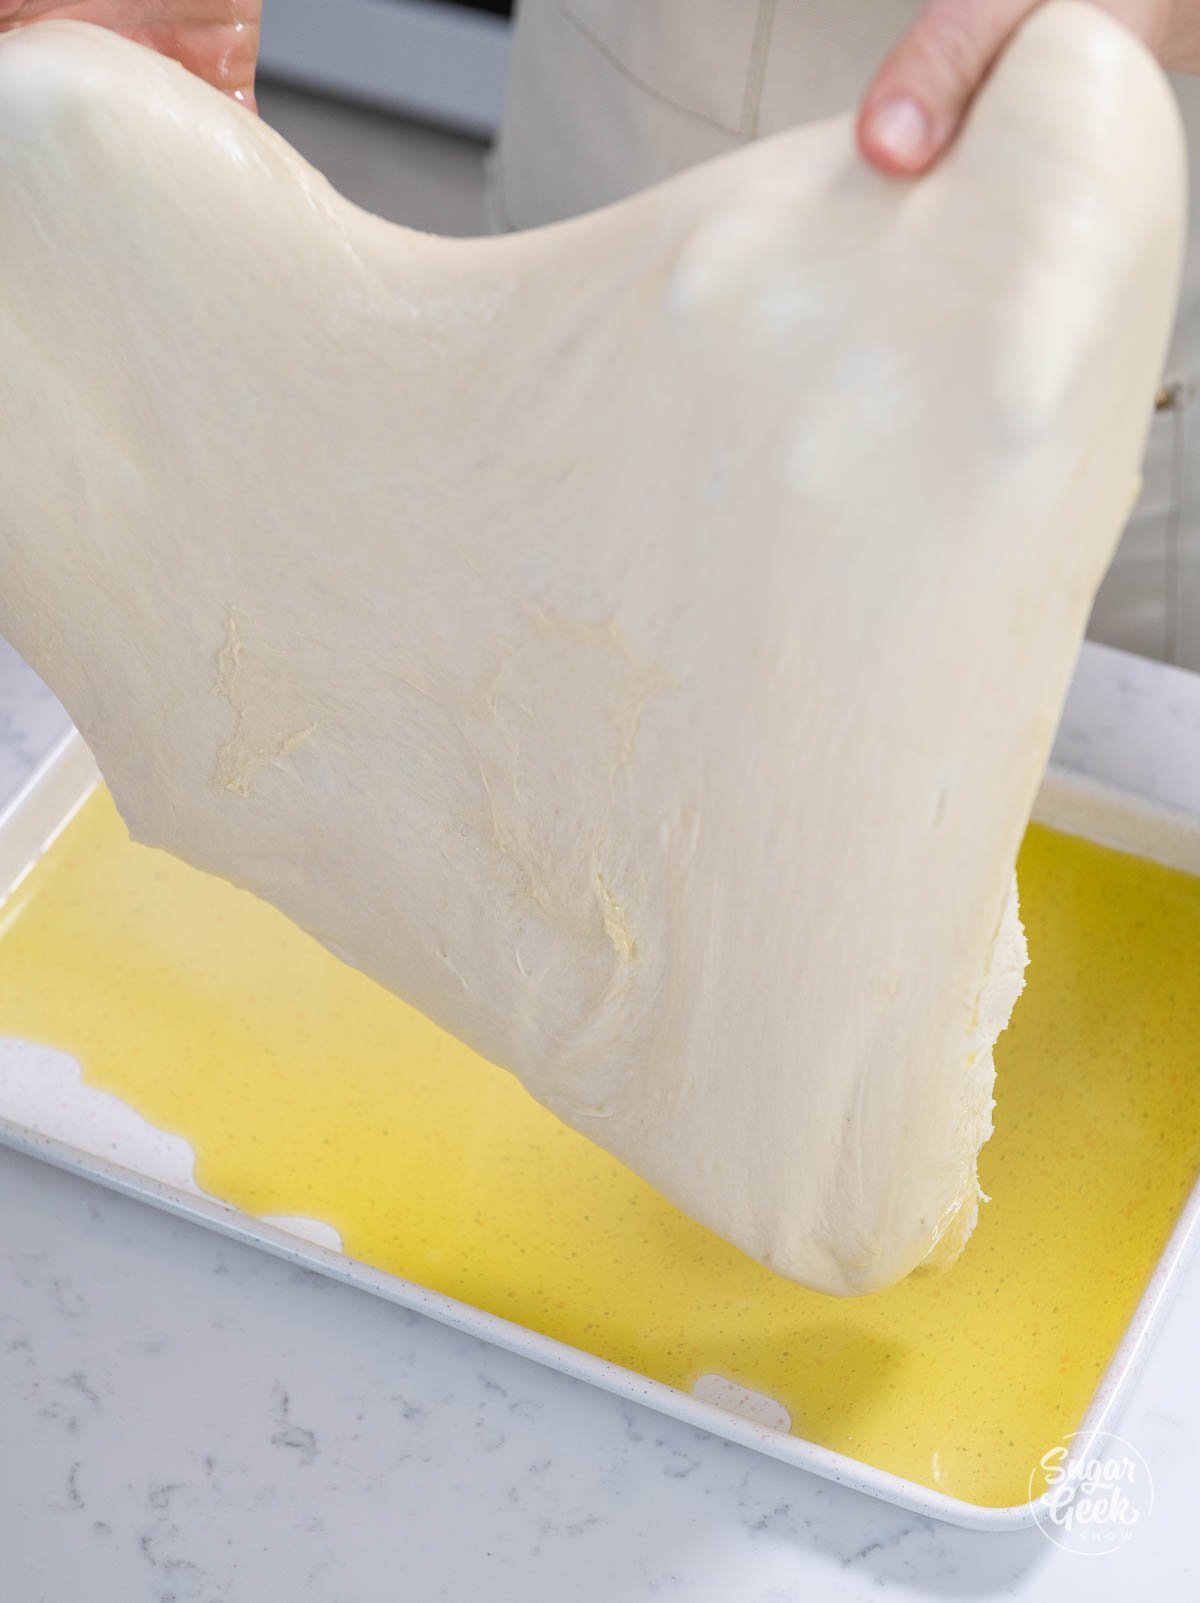
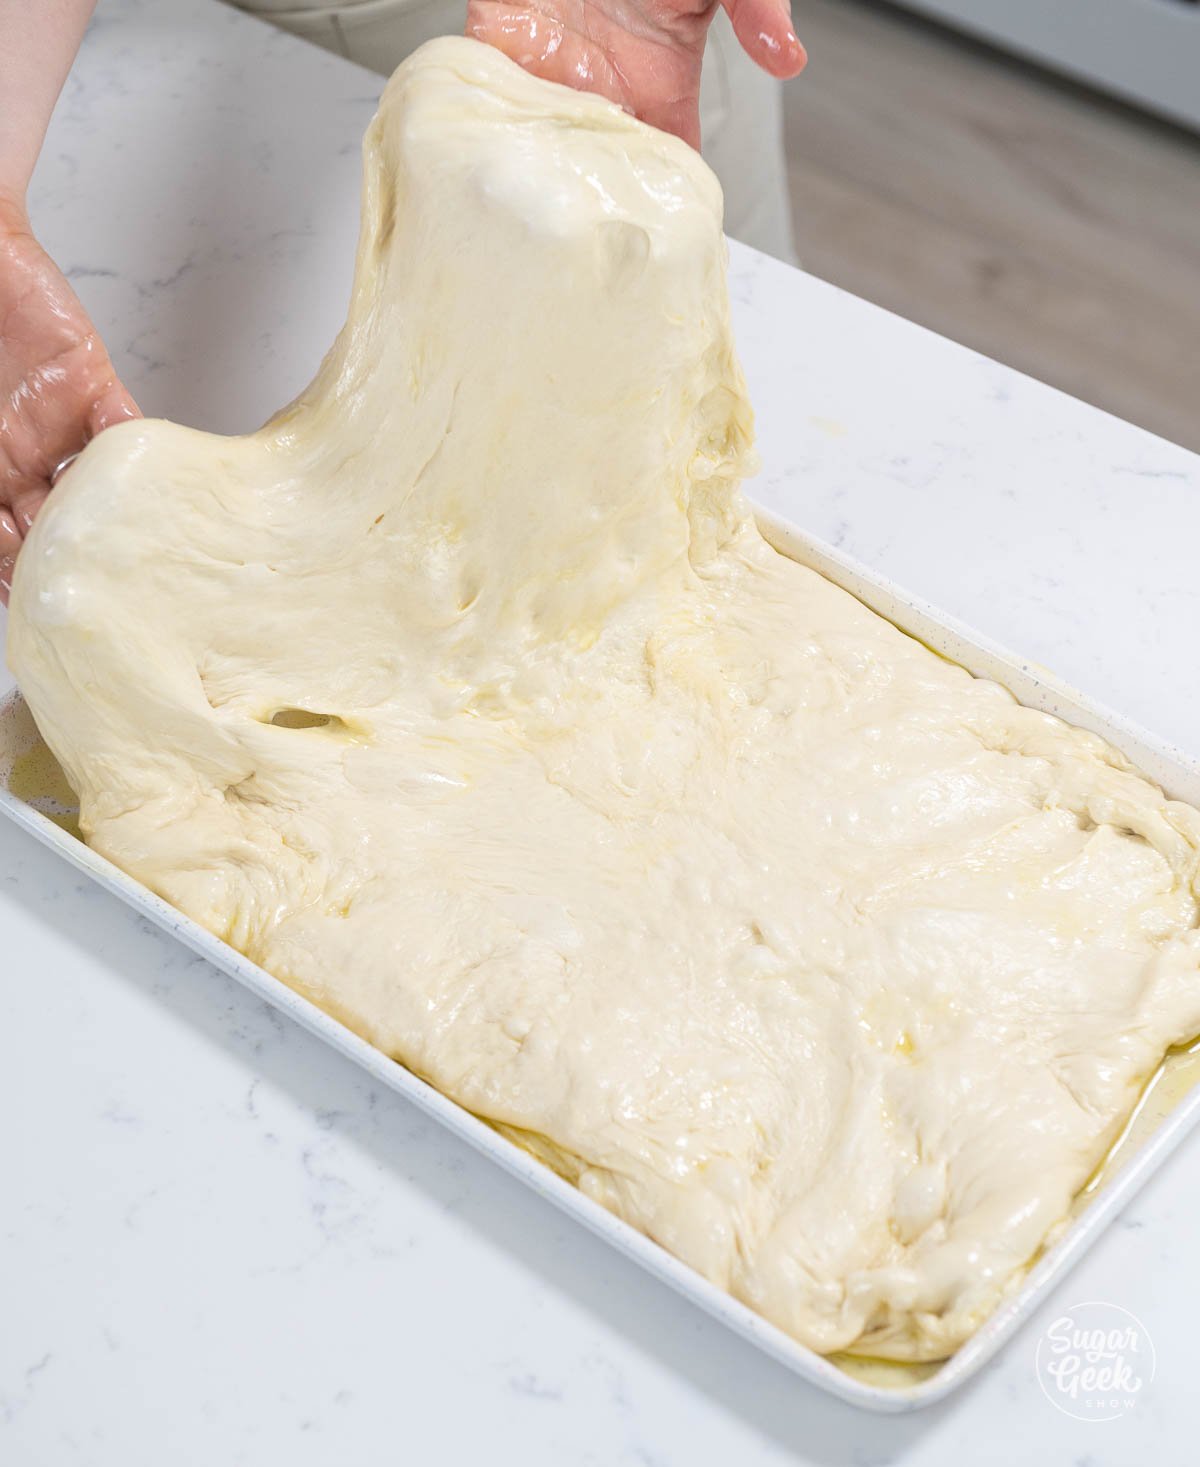
- Take your very soft dough out of the bowl and stretch it with your hands to make it longer.

- Next, place it into the pan with the oil and use your hands to stretch it out to the edges.
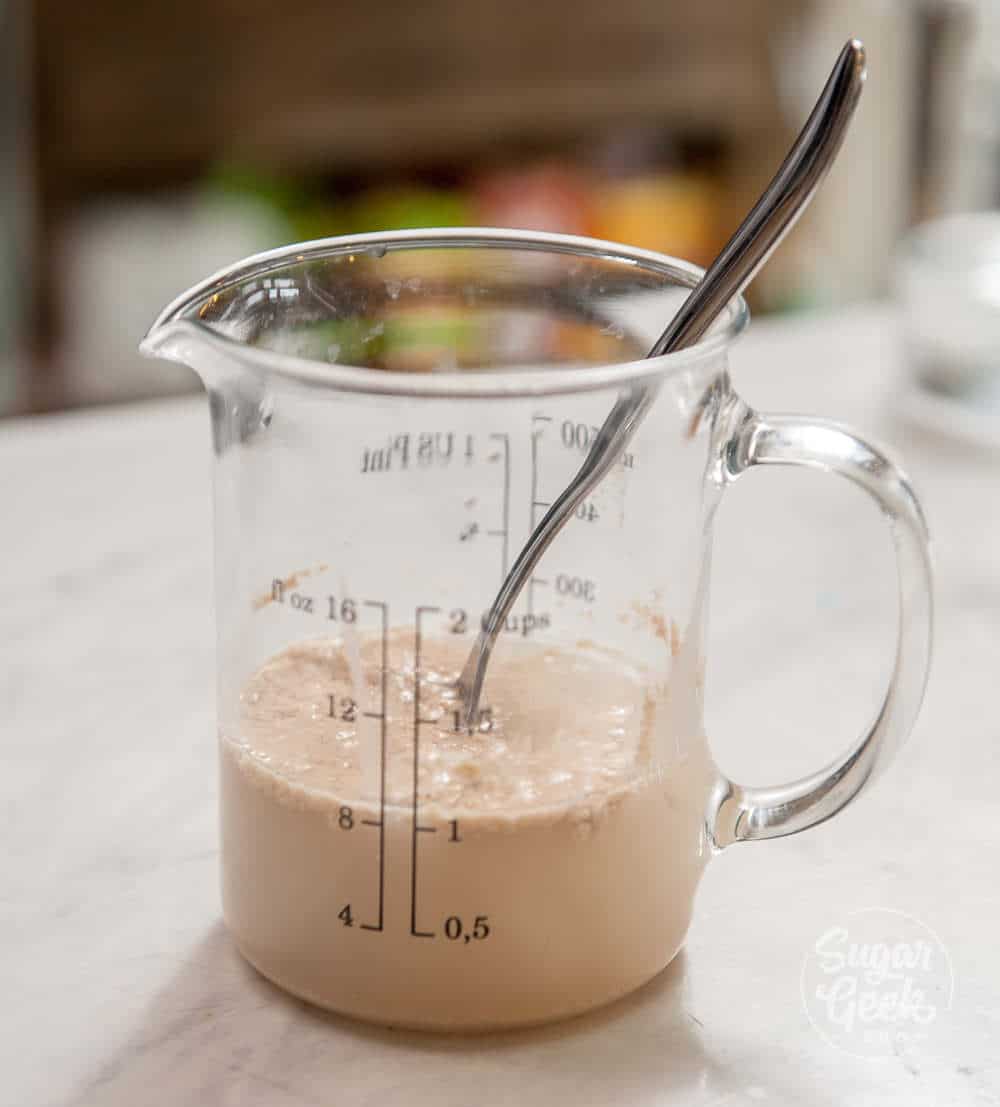

- Combine 8 ounces of your warm water (110ºF or 43ºC), yeast, and sugar and set it aside for 5 minutes or until it's foamy. If your yeast does not start growing it may be dead so make sure you have fresh yeast before starting.
- Put your yeast mixture and one cup of flour into the bowl of your Bosch stand mixer with the dough hook attached. Mix to combine. You can use a bowl and a spoon and then knead it by hand if you want to, but it will just take longer.
- Next add in the rest of your water, the olive oil, and the salt, and mix to combine.
- Then, keep adding in the rest of your flour while mixing on low until your dough starts pulling away from the sides of the bowl.
- Take the sticky dough out of the bowl and finish kneading it on the table with a tiny bit of flour until the dough looks smooth and bounces back when you touch it with your finger.
- Next, put the dough into a bowl greased with olive oil.
- Cover the bowl with plastic wrap, and place the covered bowl in a warm area for 1-2 hours or until the dough has doubled in size. I put my bread in my oven turned OFF with just the light on to proof my bread, or in a proofing drawer.
- Then, prepare your baking pan by covering the bottom of the pan with a thin layer of olive oil. I know this looks like a lot but trust me, you need it. You want it to be a swimming pool of oil!
- Take your very soft dough out of the bowl and stretch it with your hands to make it longer.
- Next, place it into the pan with the oil and use your hands to stretch it out to the edges. If the dough shrinks back, let the dough rest for 20 minutes then come back and stretch it some more. Letting the dough rest relaxes the gluten and keeps it from shrinking. Keep doing this until you can get the dough all the way to the edges of the pan.

- Cover the pan with some plastic wrap and put it in the fridge overnight. The yeast will continue eating those sugars and rise very slowly. The next day, you should have some nice bubbles on top of the dough.

- Preheat your oven to 450ºF (232ºC) and take your dough out of the fridge.
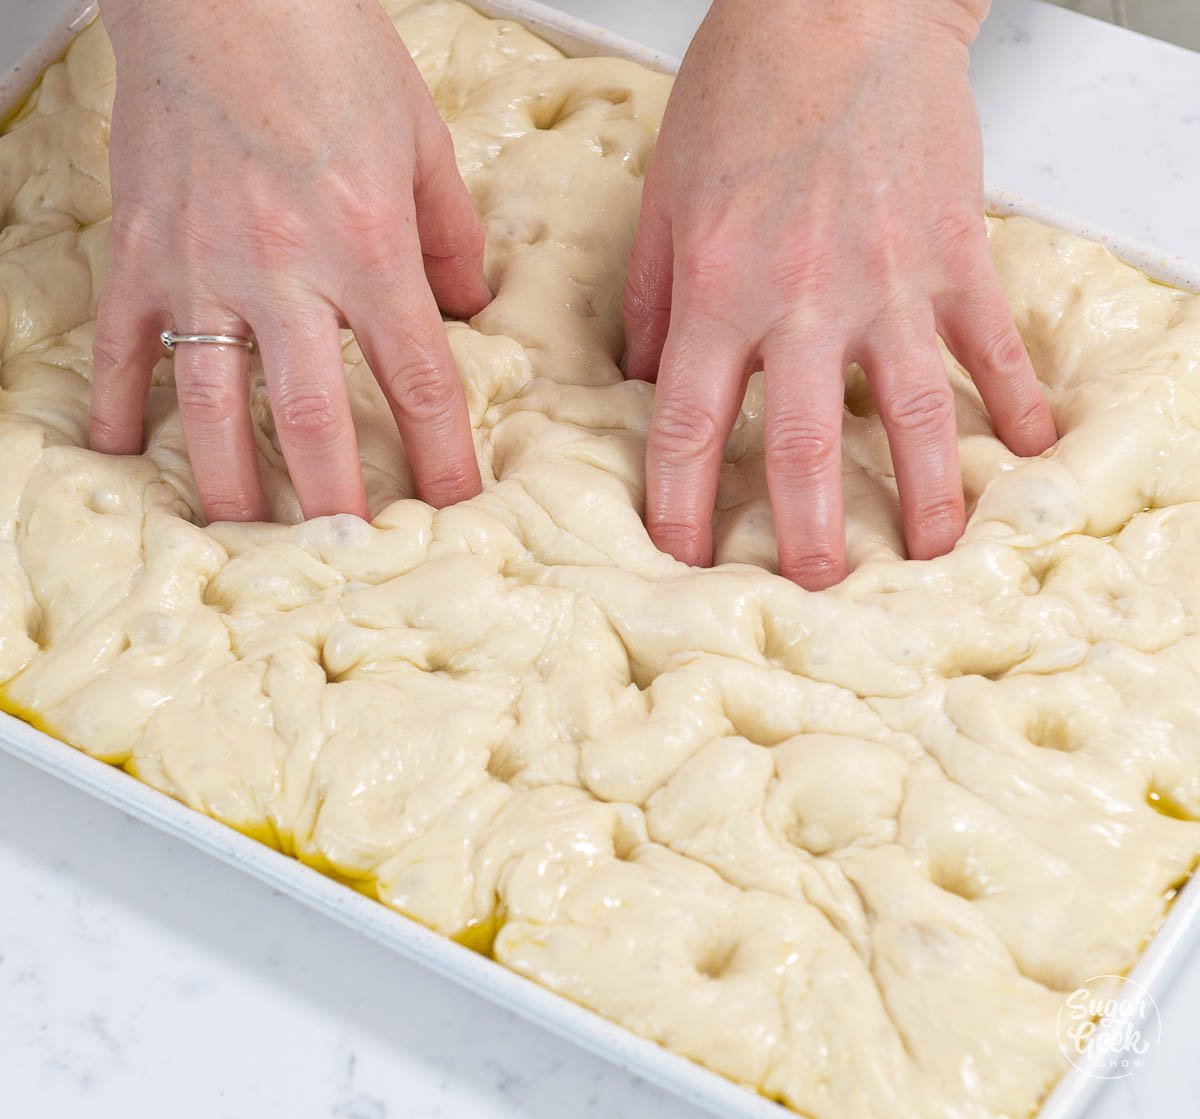
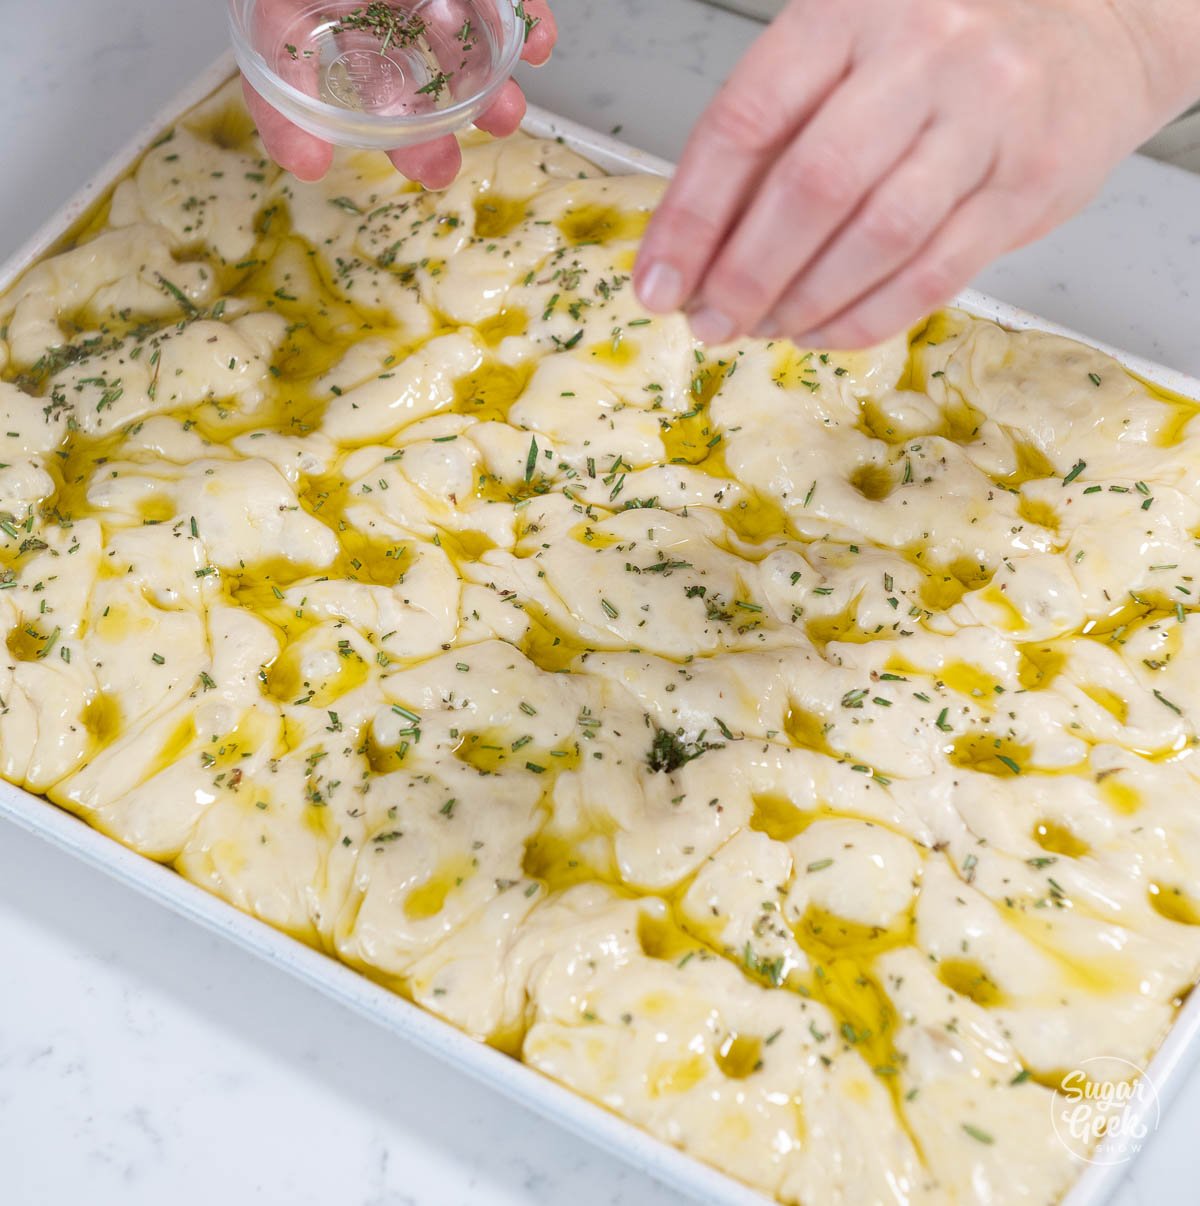
- Use your fingers to pop the big bubbles and press dimples into the surface of the dough.

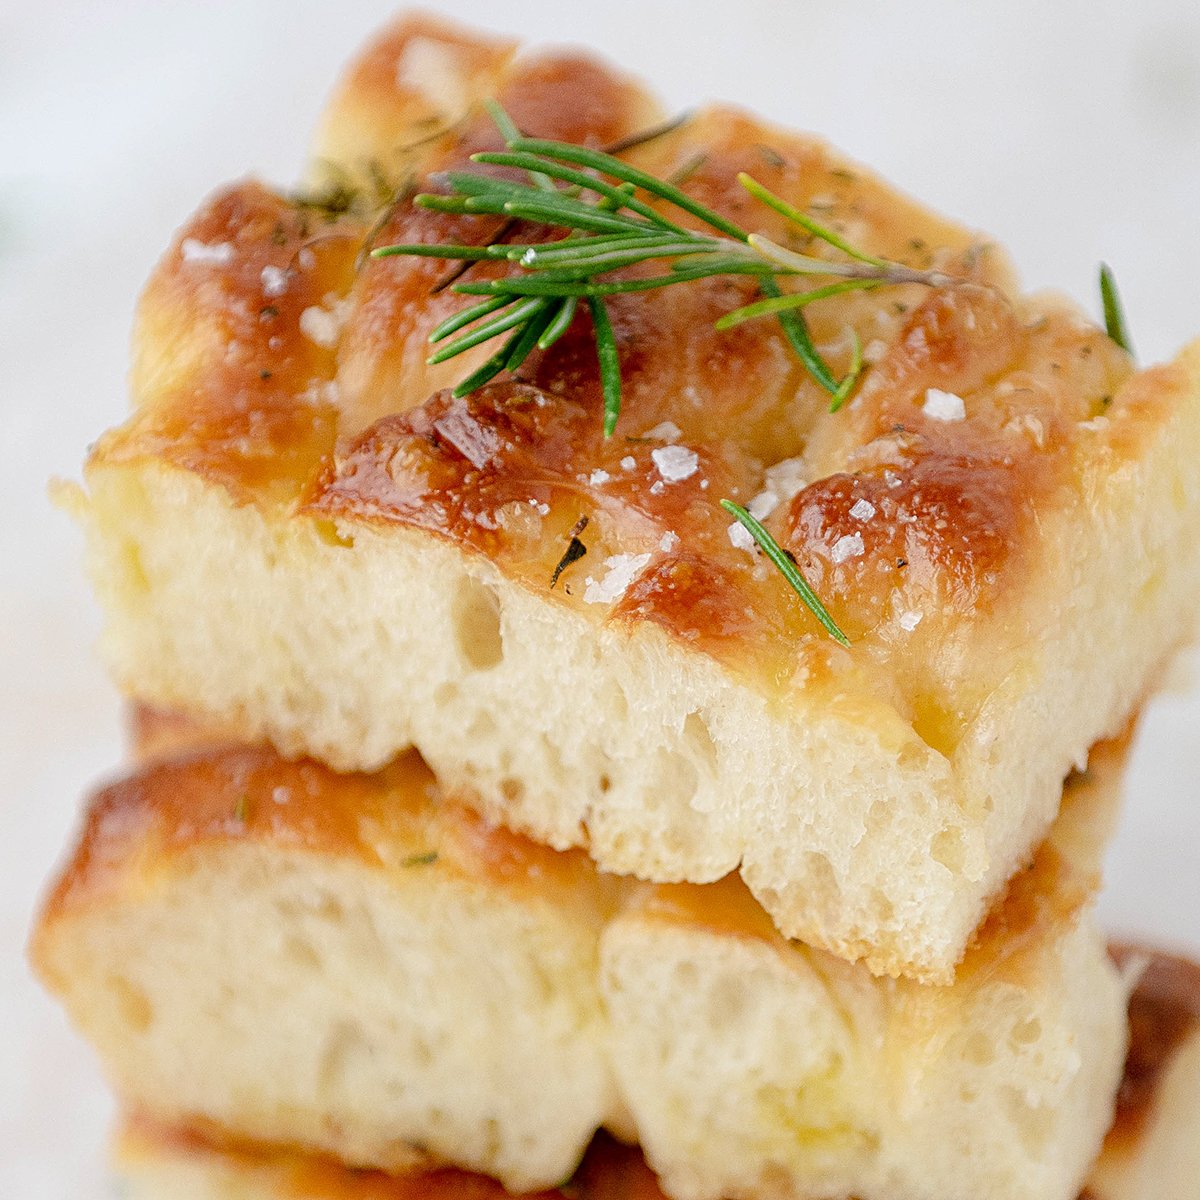
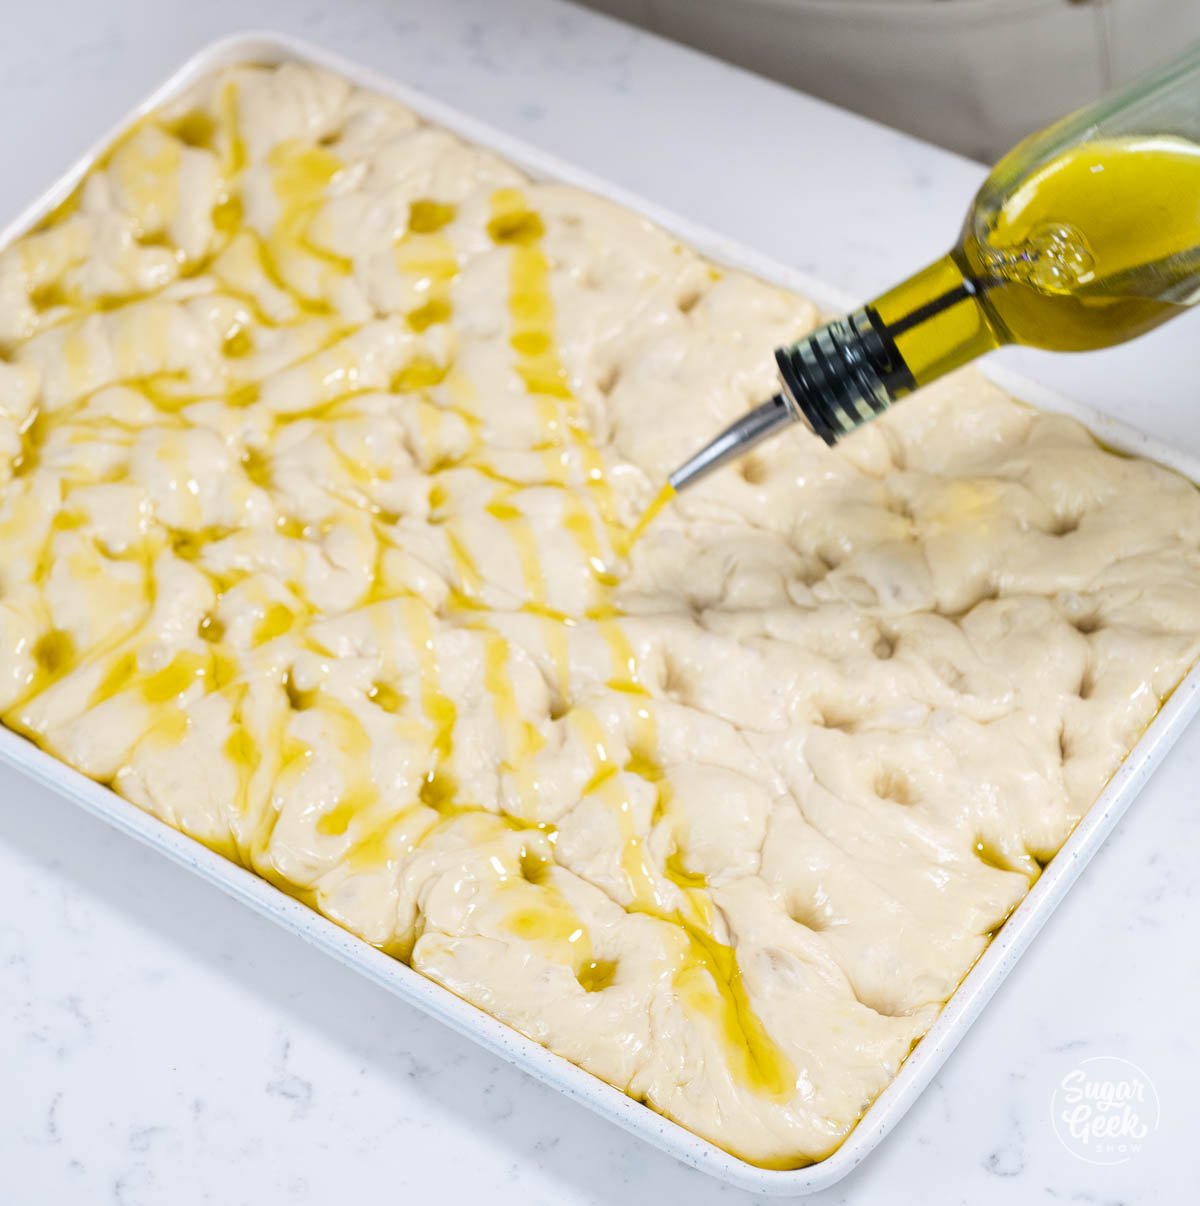
- Drizzle olive oil onto the top of the dough so that it settles in those dimples.
- Sprinkle a healthy amount of flakey sea salt and chopped rosemary on top of the dough.
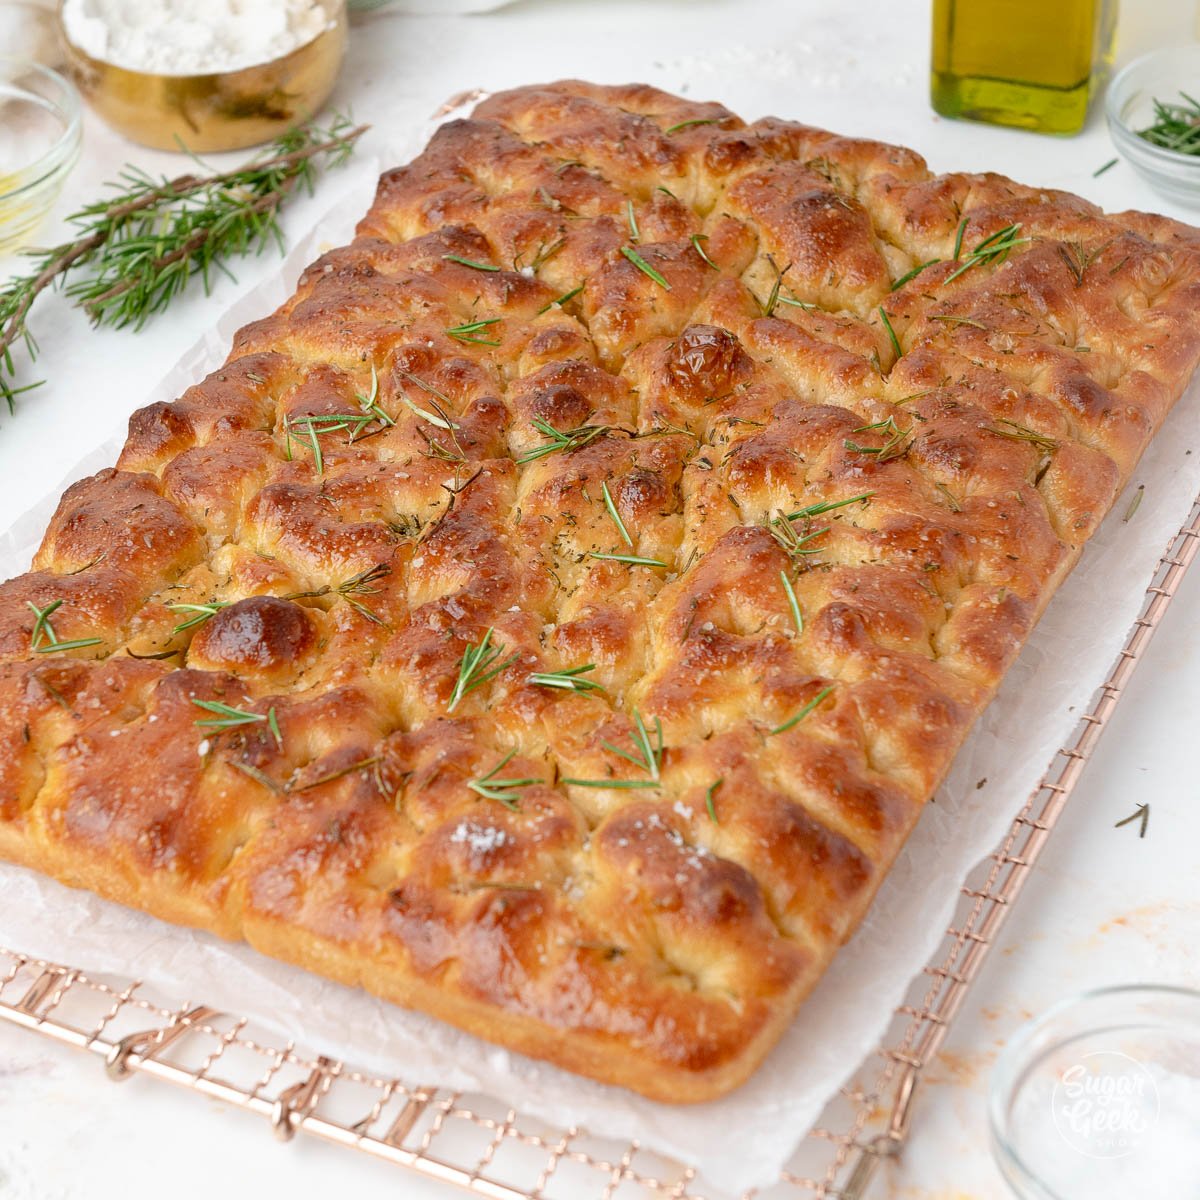
- Bake the dough in a preheated oven (450ºF or 232ºC) on the middle rack for 25 minutes or until it's golden brown!
- Finally, brush the baked focaccia with more olive oil before serving.

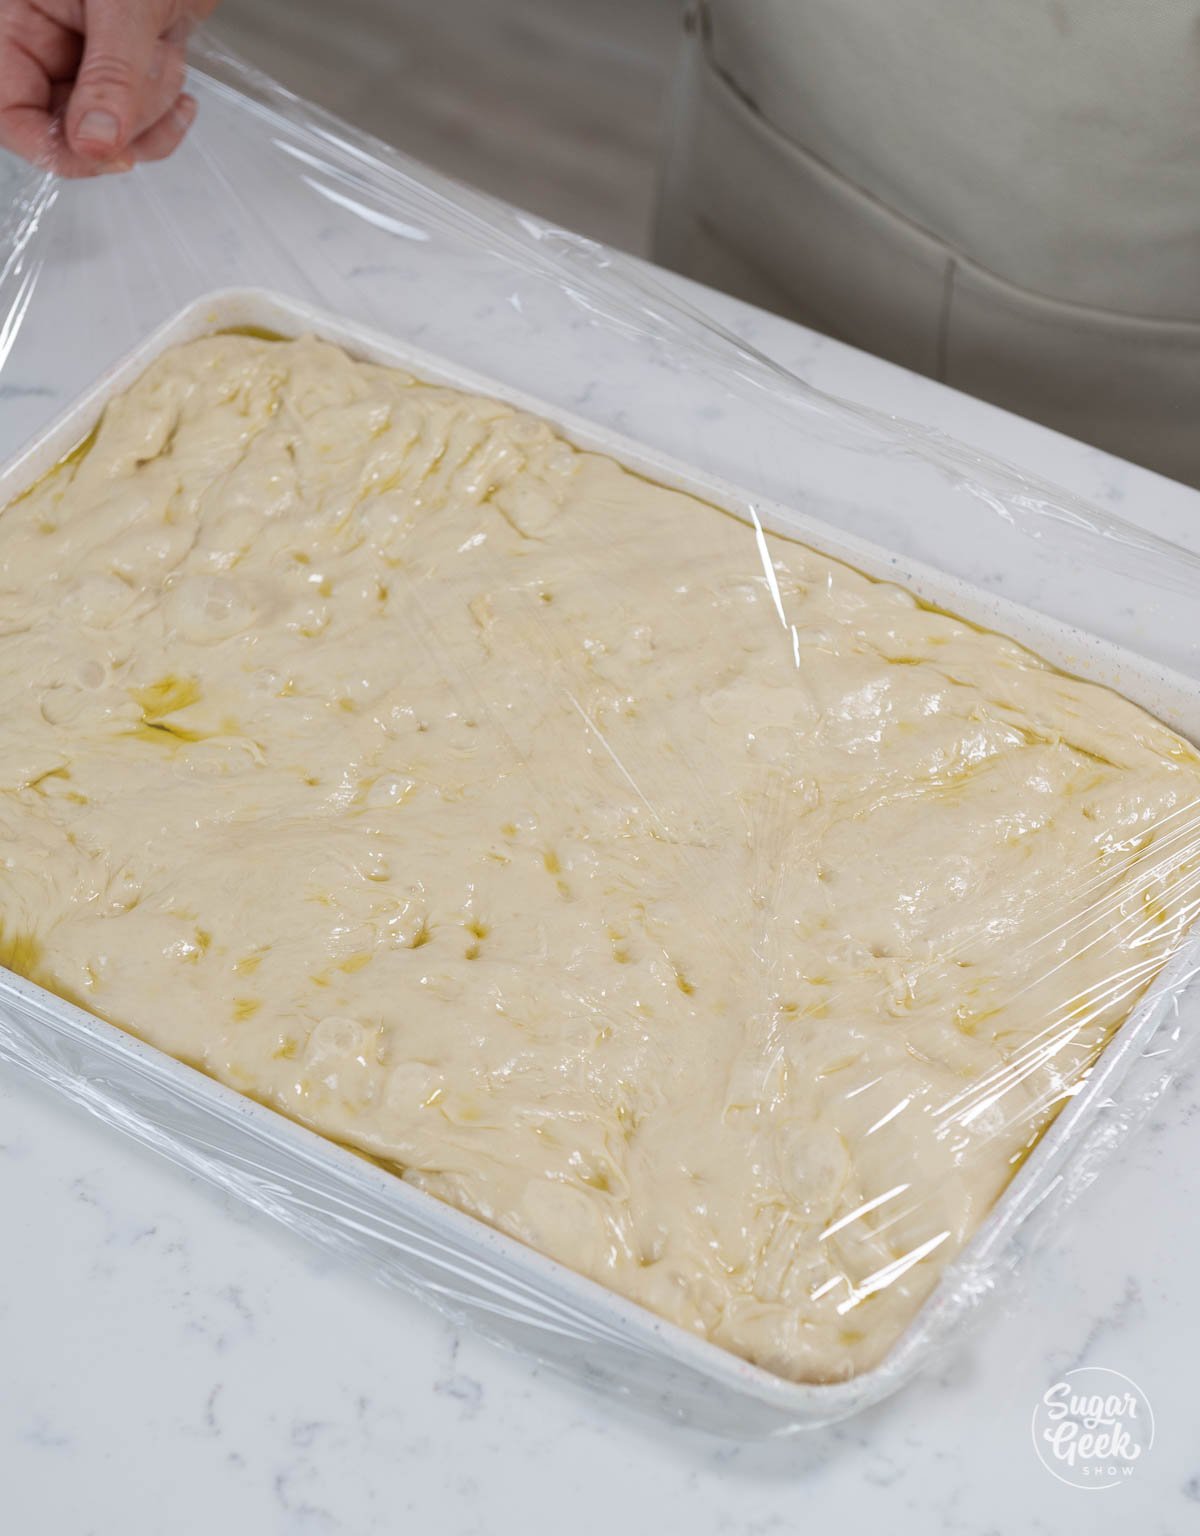

- Cover the pan with some plastic wrap and put it in the fridge overnight. The yeast will continue eating those sugars and rise very slowly. The next day, you should have some nice bubbles on top of the dough.
- Preheat your oven to 450ºF (232ºC) and take your dough out of the fridge.
- Use your fingers to pop the big bubbles and press dimples into the surface of the dough.
- Drizzle olive oil onto the top of the dough so that it settles in those dimples.
- Sprinkle a healthy amount of flakey sea salt and chopped rosemary on top of the dough.
- Bake the dough in a preheated oven (450ºF or 232ºC) on the middle rack for 25 minutes or until it's golden brown!
- Finally, brush the baked focaccia with more olive oil before serving.
Focaccia Recipe Variations
Focaccia is an Italian-style flatbread that is very chewy and similar in texture to pizza dough. There are many ways to customize your focaccia recipe which is probably why it's so popular! Here are some flavor variations, including the one I am making today which is Focaccia al rosmarino.
- Focaccia al rosmarino - Focaccia bread covered in olive oil, freshly chopped rosemary, and flakey sea salt (or kosher salt).
- Focaccia alla salvia - Focaccia bread baked in olive oil and topped with freshly chopped sage and flakey salt.
- Rosemary garlic focaccia - Top your focaccia with olive oil, chopped rosemary, garlic, and thyme.
- Cheesy focaccia - Cover your focaccia in olive oil, garlic salt, and a good amount of Italian cheese like pecorino romano, parmesan or asiago. Sprinkle with freshly chopped parsley fresh out of the oven, and serve with marinara sauce.
- Focaccia pizza - The options here are endless. Add marinara sauce, pepperoni, and mozzarella cheese or any pizza toppings you like!

FAQ
Yes, you can. For this recipe, use one small cake (0.6 ounce) of compressed fresh yeast in lieu of 1 packet (.25 ounces) of active dry yeast.
Wrap it tightly in plastic wrap and store it at room temperature. It should stay fresh for about 2 days.
You can also refrigerate your focaccia and keep it fresh for about 4 days if you wrap it tightly in plastic wrap.
Focaccia is excellent sandwich bread because it is thick enough that it can be sliced in half horizontally and still maintain its shape.
It also goes really well with soup, salad, or anything that compliments the flavors you put into your dough (e.g. if you went heavy on the Italian seasonings, pair it with Italian dishes). But in reality, the possibilities are endless!
Focaccia is soft, light, and chewy, but it should also have a crisp and salty crust.
It could be the type of flour you used. The best flour to use to make focaccia bread is bread flour which gives you fluffy baked bread. Or, it could also be because you did not knead the dough enough for the gluten to form a structure which can result in flat or dense bread.
Check the expiration date on your yeast. Has it expired? Expired yeast is dead yeast that will not release carbon dioxide (which is what makes the bread dough rise).
If your focaccia is flat and dense, you likely did not knead the dough enough before you baked it. The kneading process is what develops the gluten structure and what makes your baked bread lighter in texture.
Make sure you keep kneading the dough until it looks smooth and bounces back when you touch it with your finger.
Understanding How Yeast Works
The basics of making a yeast-risen dough like this easy focaccia recipe are all the same, but different recipes may have slightly varied steps. This guide can help you understand how yeast-risen doughs work if you're not familiar.
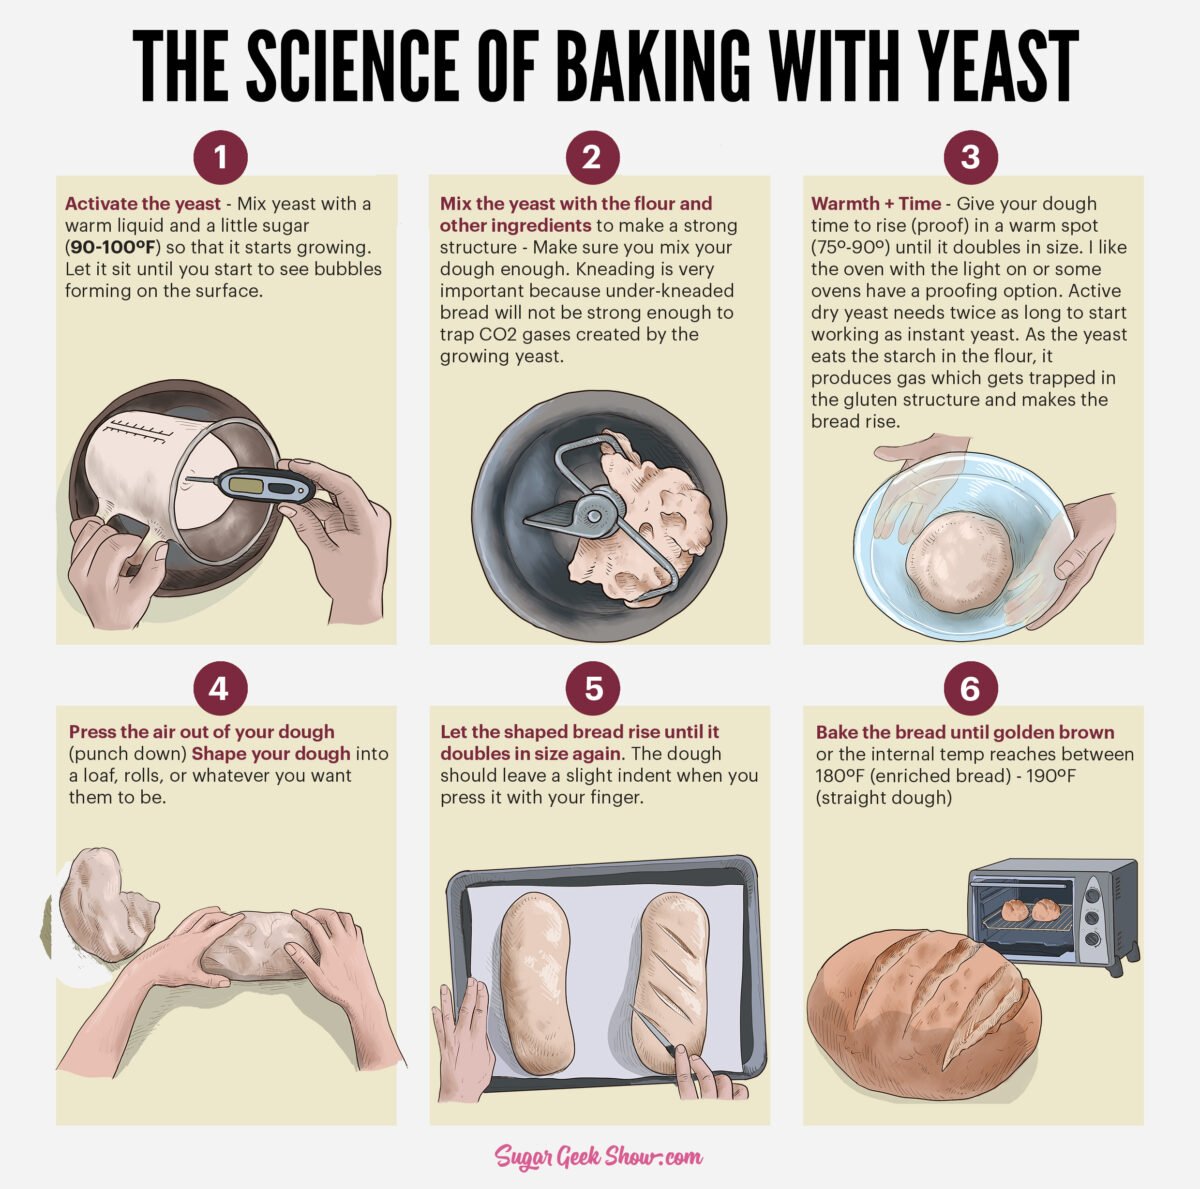
Here you'll see an infographic showing you the steps of baking bread using yeast. While this graphic is not specific to this focaccia recipe, it gives you a general idea of the steps needed to use yeast leading up to when it's time to bake your bread.
- Activate the yeast - Mix yeast with a warm liquid (90ºF-100ºF) so that it starts growing.
- Develop a strong gluten structure - Make sure you mix your dough enough. It should look like a smooth ball and pass the windowpane test. Kneading is very important because under-kneaded bread will not be strong enough to trap CO2 gases created by the growing yeas and therefore will not rise.
- Warmth + Time - Give your dough time to rise (proof) in a warm spot (80º-90º) until it doubles in size. I like the oven with the light on or some ovens have a proofing option. If you're using instant yeast, the rising will happen a lot faster if you are using regular active yeast it will take longer. Cold environments will also stunt your yeast and your dough will take a lot longer to rise.
- Shape your dough to prepare your focaccia (jump to the recipe to see the additional steps).
- Let it rise until it doubles in size again and then bake!
When you add yeast to the flour and add in warmth and a little bit of moisture, the yeast begins to eat the starch in the flour. As it eats the sugar, it produces CO2 (yes, bread is made of tiny yeast farts). Then that CO2 gets trapped in the gluten we developed during the mixing stage and expands, giving rise to your bread. If you're missing one of these steps, your focaccia won't turn out.
More Recipes You'll Love
Recipe
Equipment
- Stand mixer with a dough hook
- 9" x 13" sheet pan
Ingredients
- 16 ounces warm water (110ºF) divided into two bowls 2 cups
- 1 Tablespoon granulated sugar
- 7 grams active dry yeast (2 ½ teaspoons)
- 2 ounces olive oil ¼ cup
- 1 teaspoon salt
- 1 Tablespoon flakey salt
- 24 ounces bread flour or all-purpose flour (5 cups spooned and leveled)
- 4 ounces olive oil for the pan and for drizzling on top of the focaccia after rising (½ cup)
- 2 Tablespoons fresh rosemary chopped
Instructions
Easy Focaccia Recipe Instructions
- Combine 8 ounces of your warm water (110ºF or 43ºC), yeast, and sugar and set it aside for 5 minutes or until it's foamy.
- Put your yeast mixture and one cup of flour into the bowl of your Bosch stand mixer with the dough hook attached. Mix to combine. You can use a bowl and a spoon and then knead it by hand if you want to, but it will just take longer.
- Next add in the rest of your water, the olive oil, and the salt, and mix to combine.
- Then, keep adding in the rest of your flour while mixing on low until your dough starts pulling away from the sides of the bowl.
- Take the sticky dough out of the bowl and finish kneading it on the table with a tiny bit of flour until the dough looks smooth and bounces back when you touch it with your finger.
- Next, put the dough into a bowl greased with olive oil.
- Cover the bowl with plastic wrap, and place the covered bowl in a warm area for 1-2 hours or until the dough has doubled in size. I put my bread in my oven turned OFF with just the light on to proof my bread, or in a proofing drawer.
- Then, prepare your baking pan by covering the bottom of the pan with a thin layer of olive oil. I know this looks like a lot but trust me, you need it. You want it to be a swimming pool of oil!
- Take your very soft dough out of the bowl and stretch it with your hands to make it longer.
- Next, place it into the pan with the oil and use your hands to stretch it out to the edges. If the dough shrinks back, let the dough rest for 20 minutes then come back and stretch it some more. Letting the dough rest relaxes the gluten and keeps it from shrinking. Keep doing this until you can get the dough all the way to the edges of the pan.
- Cover the pan with some plastic wrap and put it in the fridge overnight. The yeast will continue eating those sugars and rise very slowly. The next day, you should have some nice bubbles on top of the dough.
- Preheat your oven to 450ºF (232ºC) and take your dough out of the fridge.
- Use your fingers to pop the big bubbles and press dimples into the surface of the dough.
- Drizzle olive oil onto the top of the dough so that it settles in those dimples.
- Sprinkle a healthy amount of flakey sea salt and chopped rosemary on top of the dough.
- Bake the dough in a preheated oven (450ºF or 232ºC) on the middle rack for 25 minutes or until it's golden brown!
- Finally, brush the baked focaccia with more olive oil before serving.
Video
Notes
- Use a scale to weigh your ingredients (including liquids) unless otherwise instructed (Tablespoons, teaspoons, pinch etc). Metric measurements are available in the recipe card. Scaled ingredients are much more accurate than using cups and help ensure the success of your recipe.
- Practice Mise en Place (everything in it's place). Measure out your ingredients ahead of time and have them ready before you start mixing to reduce the chances of accidentally leaving something out.
- I place my dough near my oven set to 170ºF (77ºC) to help the dough rise. Mine usually only takes about 1 hour if my room is warm.
- If your yeast does not start growing it may be dead so make sure you have fresh yeast before starting.
- I put my bread in my oven turned OFF with just the light on to proof my bread, or in a proofing drawer.
- If your yeast does not start growing it may be dead so make sure you have fresh yeast before starting
- I put my bread in my oven turned OFF with just the light on to proof my bread, or in a proofing drawer.
- If the dough shrinks back, let the dough rest for 20 minutes then come back and stretch it some more. Letting the dough rest relaxes the gluten and keeps it from shrinking. Keep doing this until you can get the dough all the way to the edges of the pan


jen houston says
This has become a regular go to recipe at my place, especially for brunch. Folks are always so impressed and delighted.
Thanks Liz, as always.
Elizabeth Marek says
Thank you so much
Ksenia Shamray says
I followed the recipe and used active dry yeast, however didn’t have time to leave the dough rest overnight and baked it in about 1 hour after stretching it. OMG!!! The bread turned out beyond delicious! It was supposed to be served as a “side dish” but instead we ate half of it before dinner just dipping it into extra virgin olive oil and balsamic. Thank you for the great recipe!!!
lauren says
Hi liz ..i have instant yeast. Is there a different method in the recipe as instead of the water just mixing it into the flour??
Elizabeth Marek says
For instant yeast, the first rise will be much faster, between 30-45 minutes at most then you can stretch it out into the pan and let it double again before baking or put it in the fridge to bake the next day.
Chuck says
Thanks Liz, for the mixer link.
Chuck says
I would like to try this recipe. What is the brand of the mixer you are using? I found one that looks like it but the attachment looks like it is plastic on top instead of the metal one in your video. Thanks.
Sugar Geek Show says
Hi! This is a bosch universal plus, they have stainless steel bowls, metal attachments and plastic bowl options available. Here's my review that has a direct link if you're interested: https://sugargeekshow.com/bosch-mixer-review/
Cinderella says
I made this today first time for any breads and it came out perfect! 😊
Sheri says
Super Awesome Focaccia! - Made this last night and my husband requested one for tomorrow because he ate it already ...lol.. I reduced my baking time to 18 minutes as my oven runs a bit hot.
Lana says
I had a great success with this recipe and it will be my go to for focaccia from now on. My first batch got way overcooked so I shortened the baking time to 18 mins and it was perfect.
Thank you for this wonderful recipe
Anna says
Hi Liz. I’m thinking about making this focaccia this Sunday for my parents. But I will have to drive about 1.5 hours to get there early in the morning. Would you recommend baking the focaccia already on Saturday or will it dry out easily? How long can it be stored?
Elizabeth Marek says
Oh you can definitely bake it and then just wrap it in plastic wrap for the drive 🙂
Seema says
Thanks liz
Seema says
Hi liz....can v use fresh yeast instead of instant yeast...if yes then in what quantity...thanks
The Sugar Geek Show says
Oh good question, use one small cake (0.6 ounce) of compressed fresh yeast in lieu of 1 packet (. 25 ounces) of active dry yeast.
Lorraine Castle says
Liz I just found your focaccia recipe and want to make it but I am wondering if 7 grams of yeast is correct. If so what is that in oz. I can weight the yeast but it is a very small amount. It looked like you had more yeast in the video. When I look at other recipes they use a lot more yeast. Thanks
The Sugar Geek Show says
Hi Lorrai, yes it is the correct amount. Its about 2 1/2 teaspoons.
Salma says
This focaccia is very delicious and fluffy. The smell it gives off while baking is OUT OF THIS WORLD!!
The Sugar Geek Show says
Thank you so much
Juliet says
I just have to give this a try.I have one by Bruno Albouze that requires the use of semolina so i always thought the semolina helped create the chewy texture.
The Sugar Geek Show says
Give it a try! It's sooo delish!
Nancy L says
Over the years I'd tried many a focaccia recipe, but had never found one that produced a focaccia like I find in Italy...until now! Thank you, Liz, for this recipe. This is the real deal! The texture, the taste, the smell, oh my! This will be my go-to recipe forever!
The Sugar Geek Show says
Wow thank you so much! Such a compliment! <3