This is the best sourdough bread recipe for the absolute beginner. You don't need to know anything about making sourdough to follow this guide. You will need a mature sourdough starter for this recipe which takes about 7 days to be ready or you can get some mature sourdough starter from a friend and make some sourdough bread today!
Sourdough Bread WorkBook
Sourdough Starter Workbook
One important thing you need to know is that making sourdough bread is a two-day process BUT it's not a lot of work. Most of the time is spent letting the dough rest and rise.
Sourdough needs a lot of time for flavor to develop, gluten to develop, and for the sourdough starter to ferment. As they say "we make sourdough today so we can eat tomorrow". If you need bread NOW, you can't go wrong with my fast bread recipe!
Read on for all my tips on how to make your first loaf of sourdough bread with a nice open crumb and lots of lift!
A few months ago I knew nothing about making sourdough. I only knew that I liked to eat it and that I wanted to make it from home. At first, I was horribly overwhelmed by words like "hydration" and "levain". I got a migraine the first day I tried to make sense of a recipe.
But like most things, once I actually MADE the sourdough bread, I found the steps to be pretty simple and pretty flexible. So just follow along with me and download my sourdough starter workflow pdf to keep you on track.
So I have taken everything I learned about making sourdough bread from a homemade starter (if you don't have one, learn to make your own sourdough starter here.
Like most recipes, there are a million different ways you can do something and the one that works for you is the best way. So I hope this recipe works as well for you as it does for me! Please feel free to leave me a comment if you have a question or need clarity on something.
What Ingredients Do You Need To Make Sourdough Bread?
Making sourdough bread is deceptively easy. The ingredients are not complicated. Just flour, water, salt and an active starter. Like most delicious recipes, the confusion comes from the WAY the recipe is prepared. The difference between sourdough yeast and regular yeast is sourdough is made from a natural yeast that takes time to rise and warmth to be active. You cannot rush it. Read on for a step-by-step tutorial on how to make your own sourdough bread from scratch.
Tools & Equipment
When I was learning how to make sourdough bread (I still am learning with every loaf) I used what I had on hand. A simple glass bowl, tea towel, cast iron dutch oven, and razor blade for scoring. That worked well for my first ten loaves. So you don't need to order any fancy tools but if you want to see what sourdough tools (affiliate links) I use, you can.
The bowl and tea towel or napkin are used to hold your dough in a nice shape overnight in the fridge. While your dough is in the fridge, it rises very little (if at all). The fridge is a great place to keep your dough after it has finished rising and shaping until you are ready to bake it. Cold dough is also easier to score than warm dough.
A sharp knife is needed to score the dough so it can rise! If you don't score deep enough, your bread will not be able to rise or it will split.
Parchment paper (not wax paper) so you can lift your loaf into the dutch oven easily.
The dutch oven is great because it traps moisture in the pot which helps the sourdough bread to rise taller. After 30 minutes, you take off the lid so that the loaf can brown.
Sourdough bread banneton - Basically a fancy basket with a liner for proofing sourdough bread in the fridge.
Lame (pronounced lahm) - Sharp, thin razor blade with a handle for easy scoring. I love my lame for scoring delicate wheat patterns into the dough.
An Overview Of Sourdough Terms
Making sourdough bread can be broken down into steps. I will go over these steps in detail below but let's define some words that can sound confusing.
Sourdough Starter - Made from naturally occurring yeasts, water, and flour that is left to ferment over a period of time in a warm environment (75º-90F). As the yeast ferments, it produces sugar alcohol and gas which causes bread to rise. The starter can have a mild/sweet flavor or it can be very sour and tangy depending on how much time it ferments.
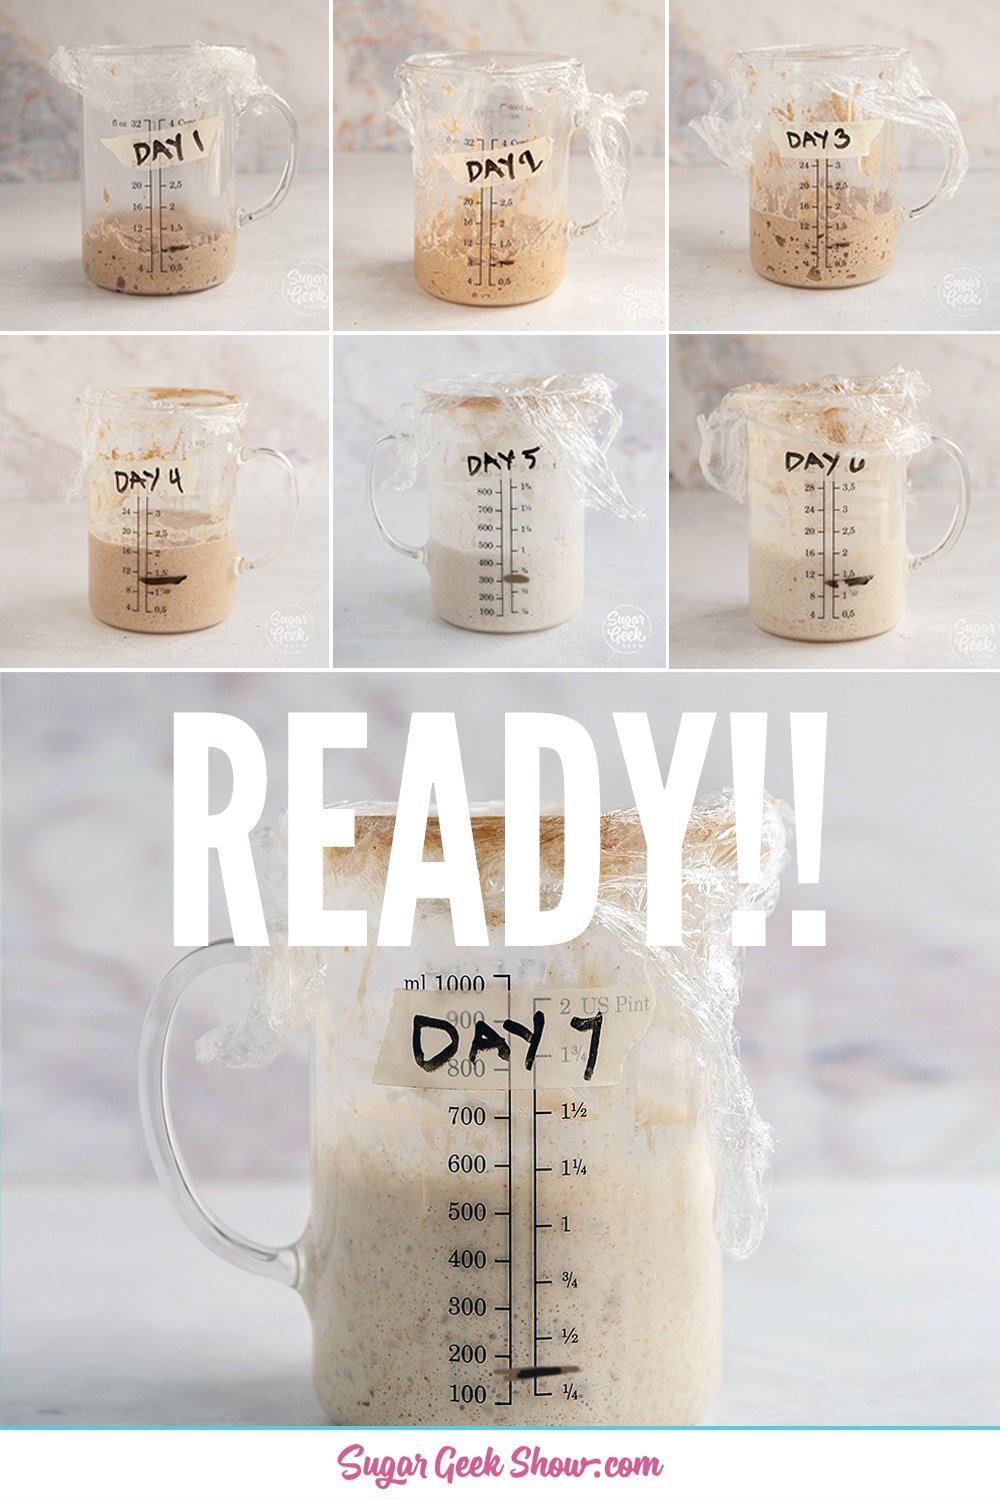
Sourdough starter cannot be used until it is at least 7 days old, and is doubling in size regularly.
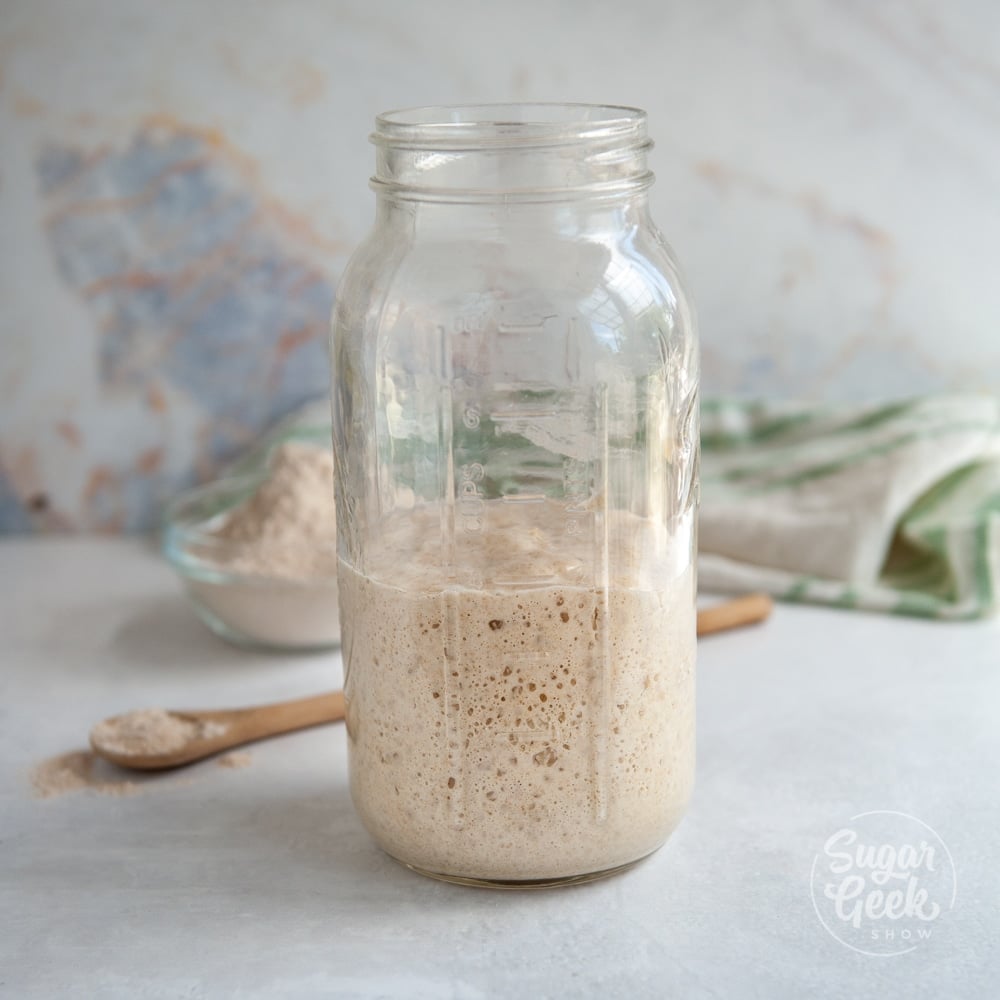
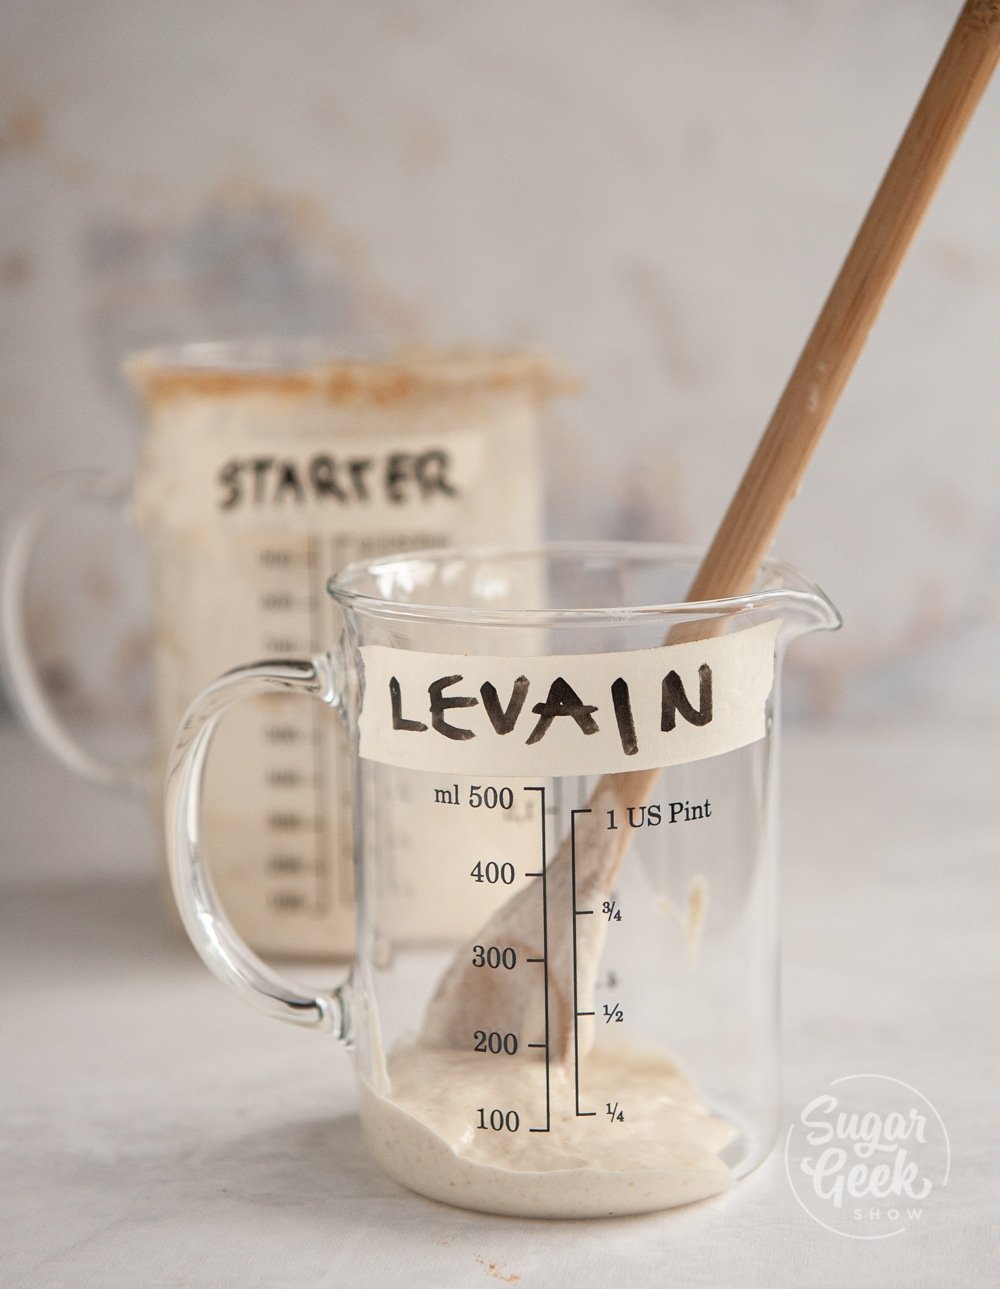
Levain - Technically sourdough starter is a levain but that can be confusing. For the purposes of this recipe, when we refer to a levain we mean sourdough starter that is mixed with fresh flour and water and used at the peak of rising.
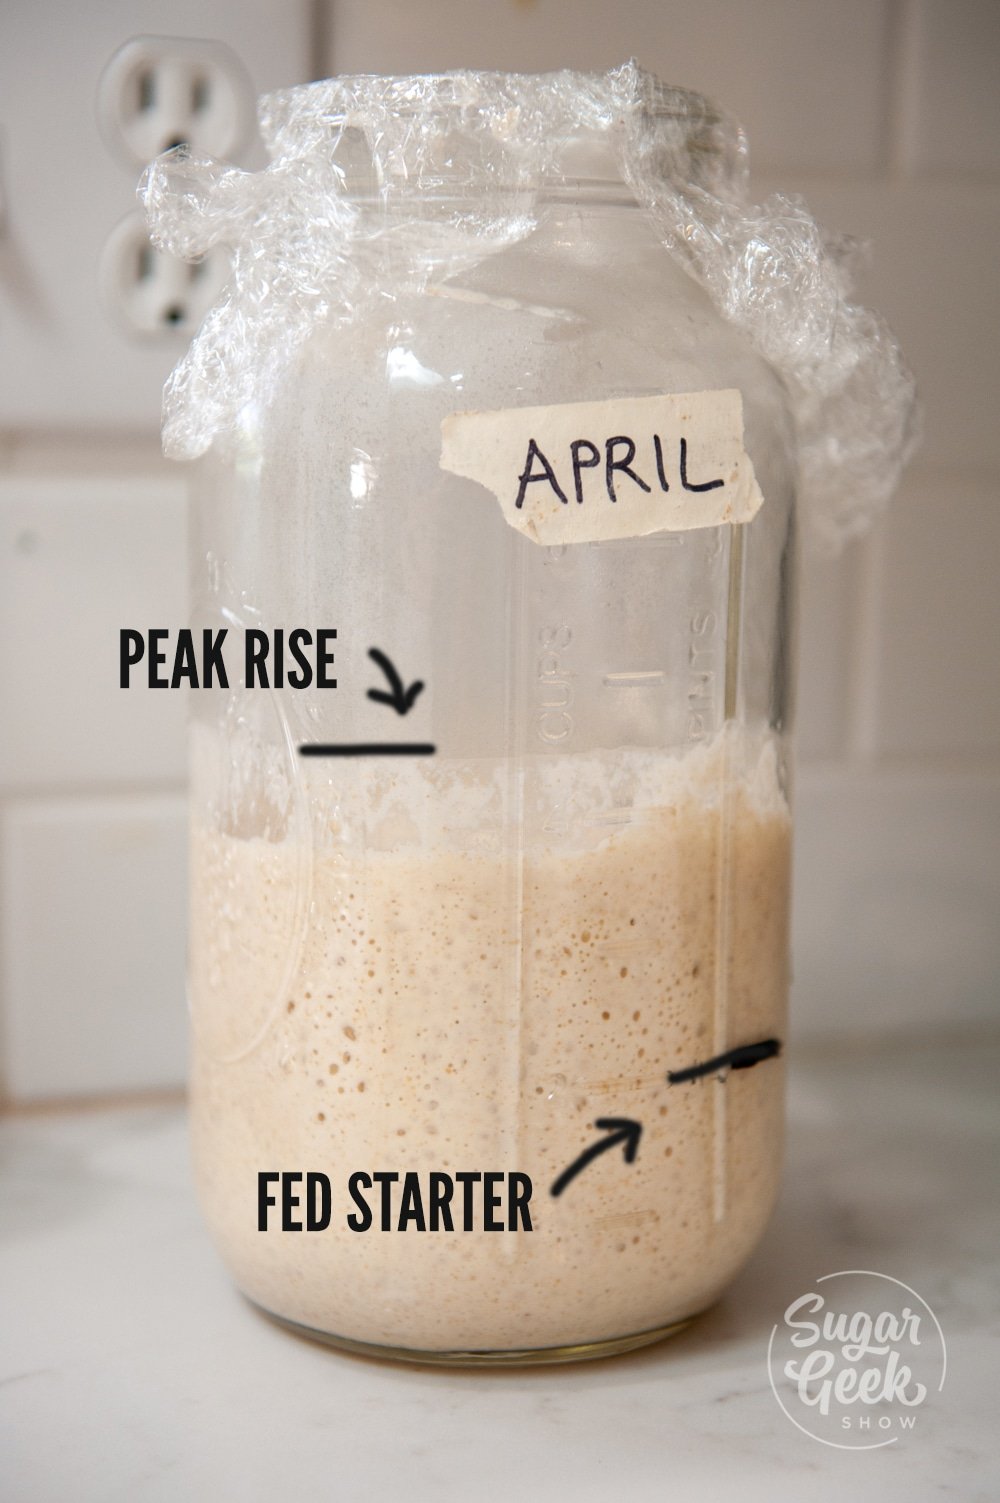
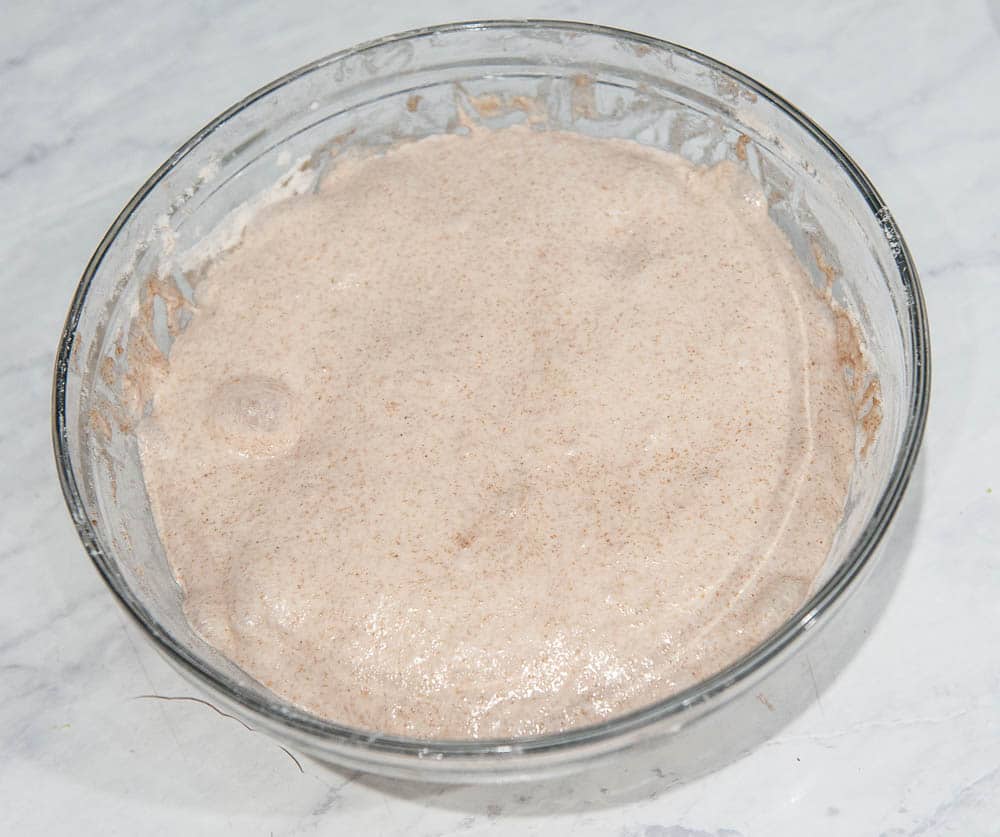
Peak - When we say let the levain rise to its peak, we mean don't use the levain until it rises to its highest point and then begins to fall. This is when the yeast is its strongest and is ready to use in dough.
This can take as little as two hours or up to 8 or more if the room is very cold. Ideally, you would make a levain right before you make your bread and put it in a nice warm spot so it rises quickly. I put mine in the oven with the oven light on and the door cracked or on top of the counter with the dishwasher running.
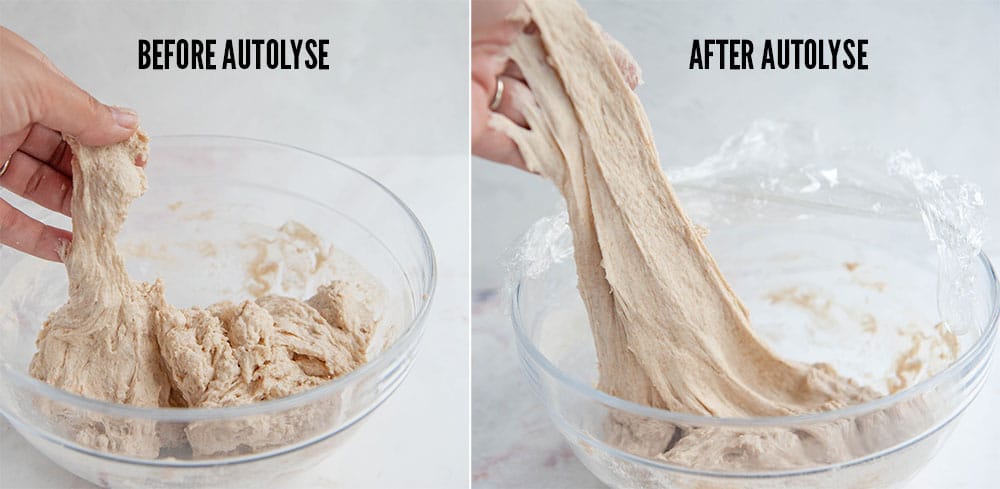
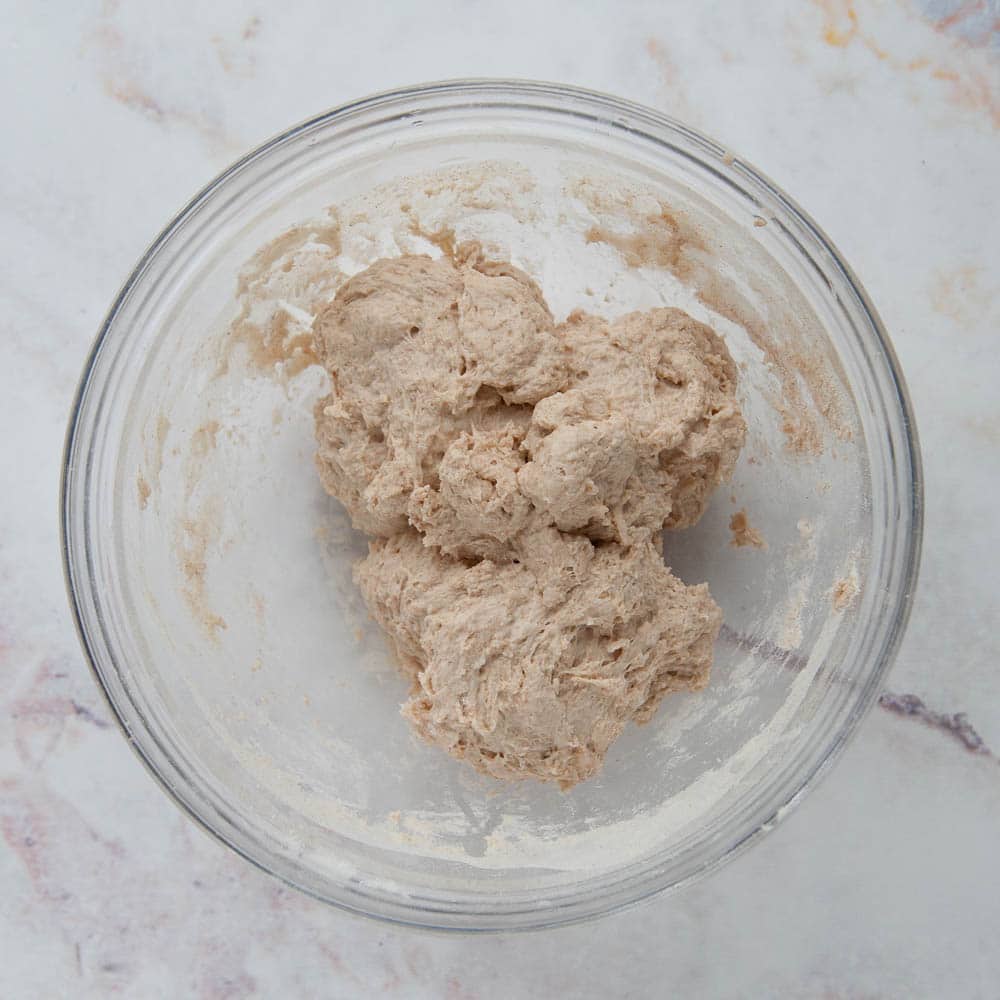
Autolyse - This refers to the process of combining flour and water together, and giving the water time to absorb into the dough so it becomes flexible. When you first add water to flour to make your dough, it will be very dry, "shaggy" and tear easily.
After a mere 30 minutes, the water will have hydrated the flour and you will now be able to stretch the dough and start making "folds" which create the gluten in our dough. We do not knead sourdough as you would knead a traditional dough.
Float Test - There is some discussion as to how reliable a float test really is but I do it so I will include it in this post. After your levain has reached its peak, remove 1 teaspoon of levain and drop it into a glass of water. Does it float? Then it's ready to use. If it sinks, your levain may not be ready and give it more time to rise.
Hydration - This refers to how much water is in the dough in relation to the flour. I'm really bad at math so I have to break it down like this. If you have 1000 grams of flour and 800 grams of water, that is 80% hydration.
My recipe is 500 grams of flour and 400 grams of water so it's roughly 80% hydration. That's pretty high for a beginner loaf but I have tried to use less water and I find it difficult to do the stretch and folds so I have kept the water at 400 grams.
Remember, if you change the flour at all, your dough will not be the same consistency as mine. Different flours absorb water in different ways so when you start tweaking this recipe to make it your own, you will undoubtedly have to adjust the water levels.
If you are shooting for a specific hydration level (most use around 75% hydration) then this is a handy sourdough hydration calculator to figure out if your ratios are on track.
Stretch & Fold - This is how we create the gluten in our dough. Because our dough has so much water, you can't knead it or it will get gummy and tough.
So we use the method of pulling the dough after autolyse to the point of almost tearing and folding it over onto itself to stretch the gluten and create structure without kneading.
Protip - Whenever you handle the dough, always use wet hands. Water keeps the dough from sticking!
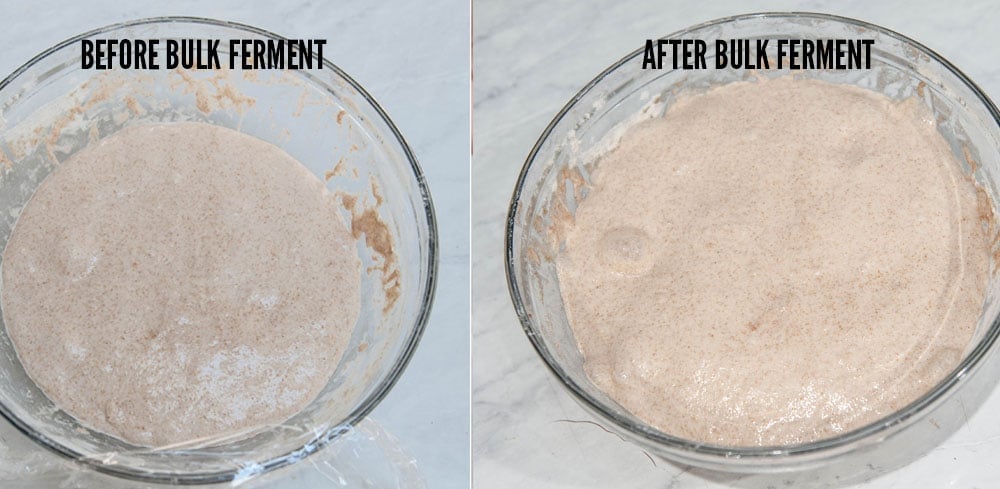
Bulk Ferment - This refers to the time that we allow the yeast to devour those starches and begin producing gas (aka bubbles!), causing the dough to rise (usually until it has doubled in size).
The amount of time you allow your dough to bulk ferment really depends on the loaf but I'll give you guidelines as we go. Usually between 3-5 hours in a warm room but it depends on the strength of your starter! You can't rush the rising.
Shaping - After we do our stretch and folds and bulk ferment, we will pre-shape our sourdough loaf to evenly distribute the bubbles and create strength in our loaf.
This involves doing a few easy folds. One is called a "simple book-fold" which is similar to how you fold butter into the dough when you're making a croissant.
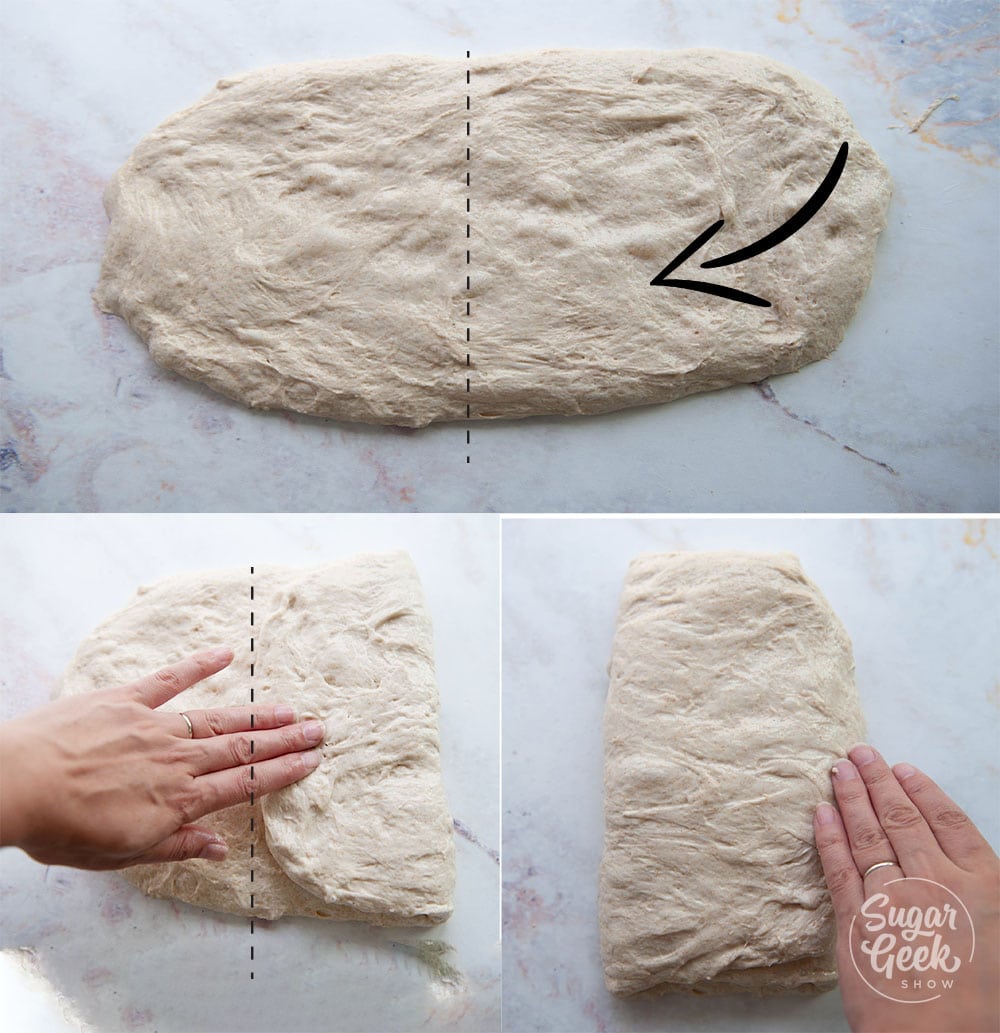
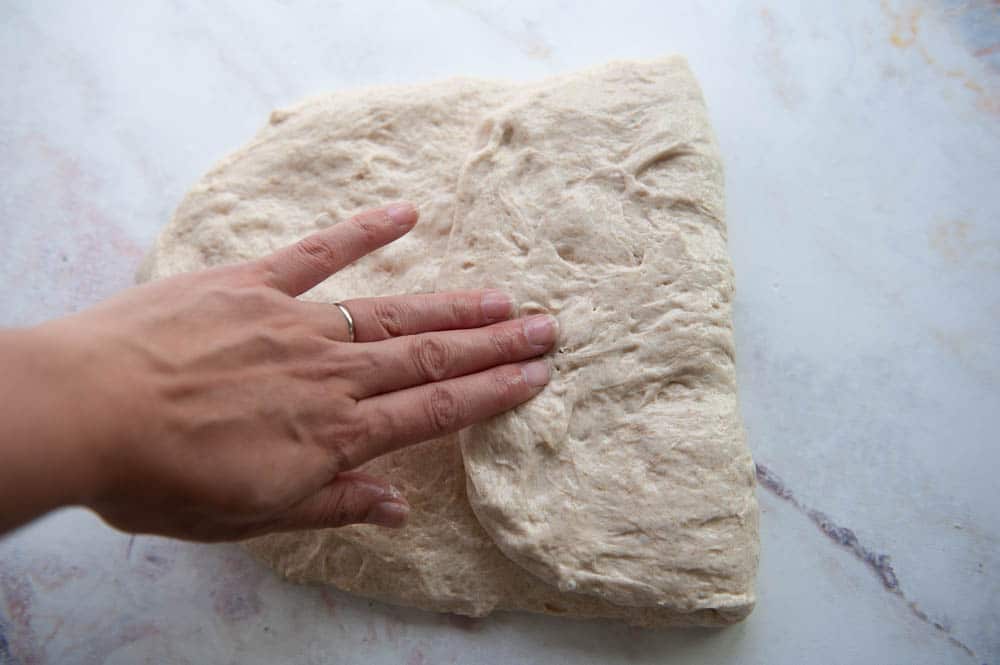
Basically you shape the dough into a rectangle after mixing the dough and letting it rest 30 minutes.
Then you fold one side of the rectangle over itself so the right edge meets the center line.
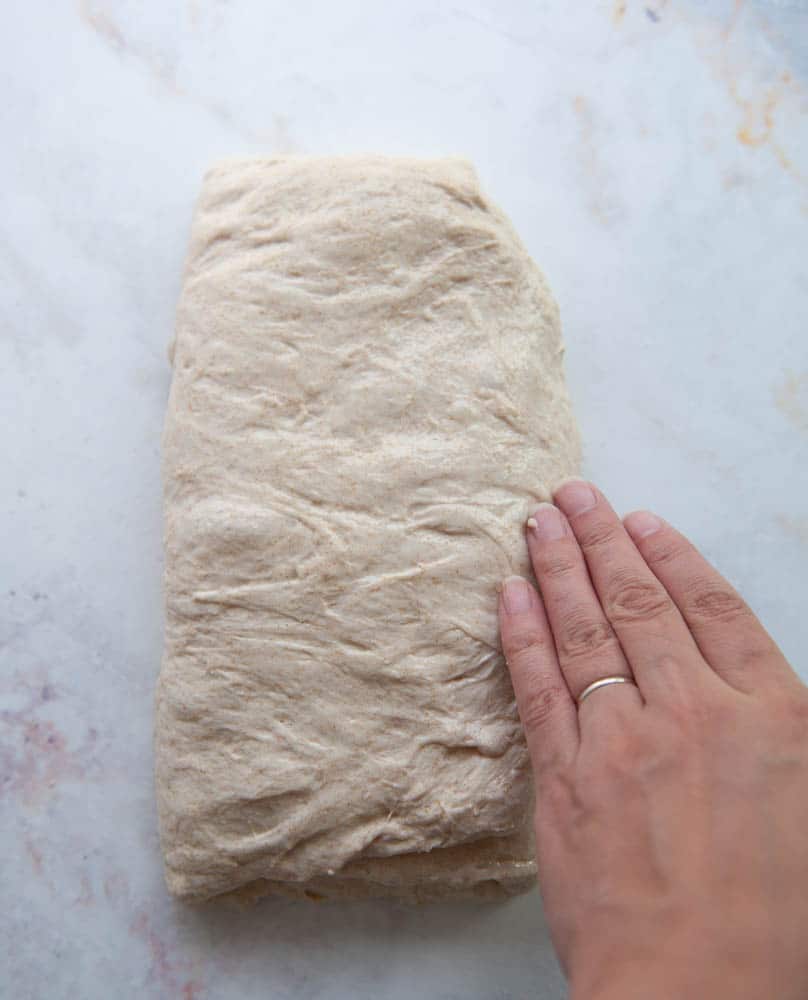
Repeat with the left side.
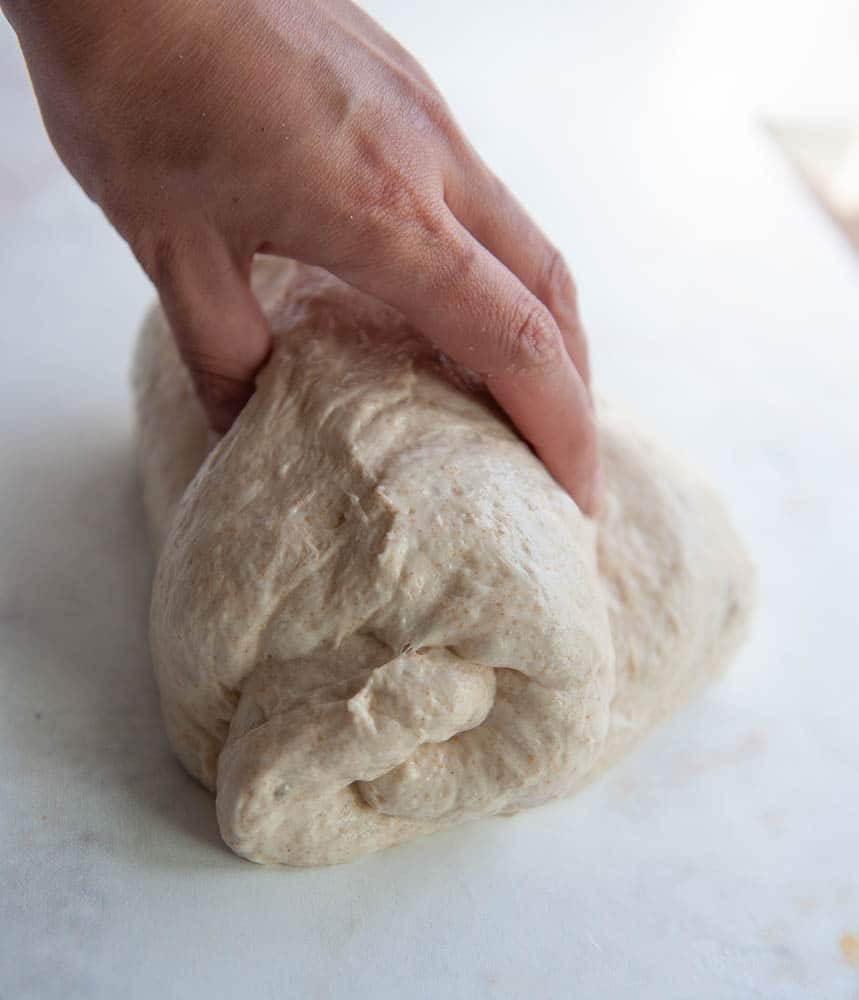
Secondly, we will roll the dough up like a spiral and tuck the edges underneath to make the top of the dough skin "tight". The tighter you can make the dough and the better it holds its shape, the taller your loaf will rise.
Cold Ferment - After we shape our loaf, we will put it into a bowl with a flour-dusted tea towel or a banneton if you've got one. Then the loaf takes a nice long nap in the fridge and will be ready to bake the next day. The loaf will barely rise at all in the fridge so it is important to put the loaf in the fridge when it's doubled in size and is ready to bake.
Scoring - If you're artistic like me, you will really enjoy scoring! Scoring is simply cutting into the surface of the loaf to allow the bread to rise in the hot oven. If you don't want to score, you can bake your bread with the seam side up and it will split naturally. I use a Lame that I found on amazon but you can use a simple sharp knife and cut an X if you want. You don' have to get fancy. But it is fun!
Dutch Oven - I am glad that I did a lot of research before I baked my first loaf because I discovered that baking in a dutch oven is PERFECT for nice loaves of sourdough bread. The small space keeps the moisture around the bread for longer, allowing it to rise taller. Similar to using an oven with steam injection.
If you don't have a dutch oven you can bake on a pizza stone or on a cookie sheet. Remember, we aren't striving for perfection, we're just trying to make a nice loaf that tastes delicious.
I prefer to preheat my oven and my dutch oven all together so that I get as much rise as possible but if you're worried about burns, you can start with a cold dutch oven but make sure your oven has been pre-heated for at least 30 minutes.
How To Make Sourdough Step-By-Step
Before you begin, you should download my FREE sourdough workbook so you can keep track of your steps and make notes.
Day 1 - 10:00 AM Make The Levain - Make sure you are starting with an active starter that is rising to at least double and is nice and active. In the morning, before you feed your starter, remove 50 grams, and place it into another container. Add 50 grams whole wheat flour and 50 grams warm (90ºF) bottled or filtered water and stir until all the flour is gone.
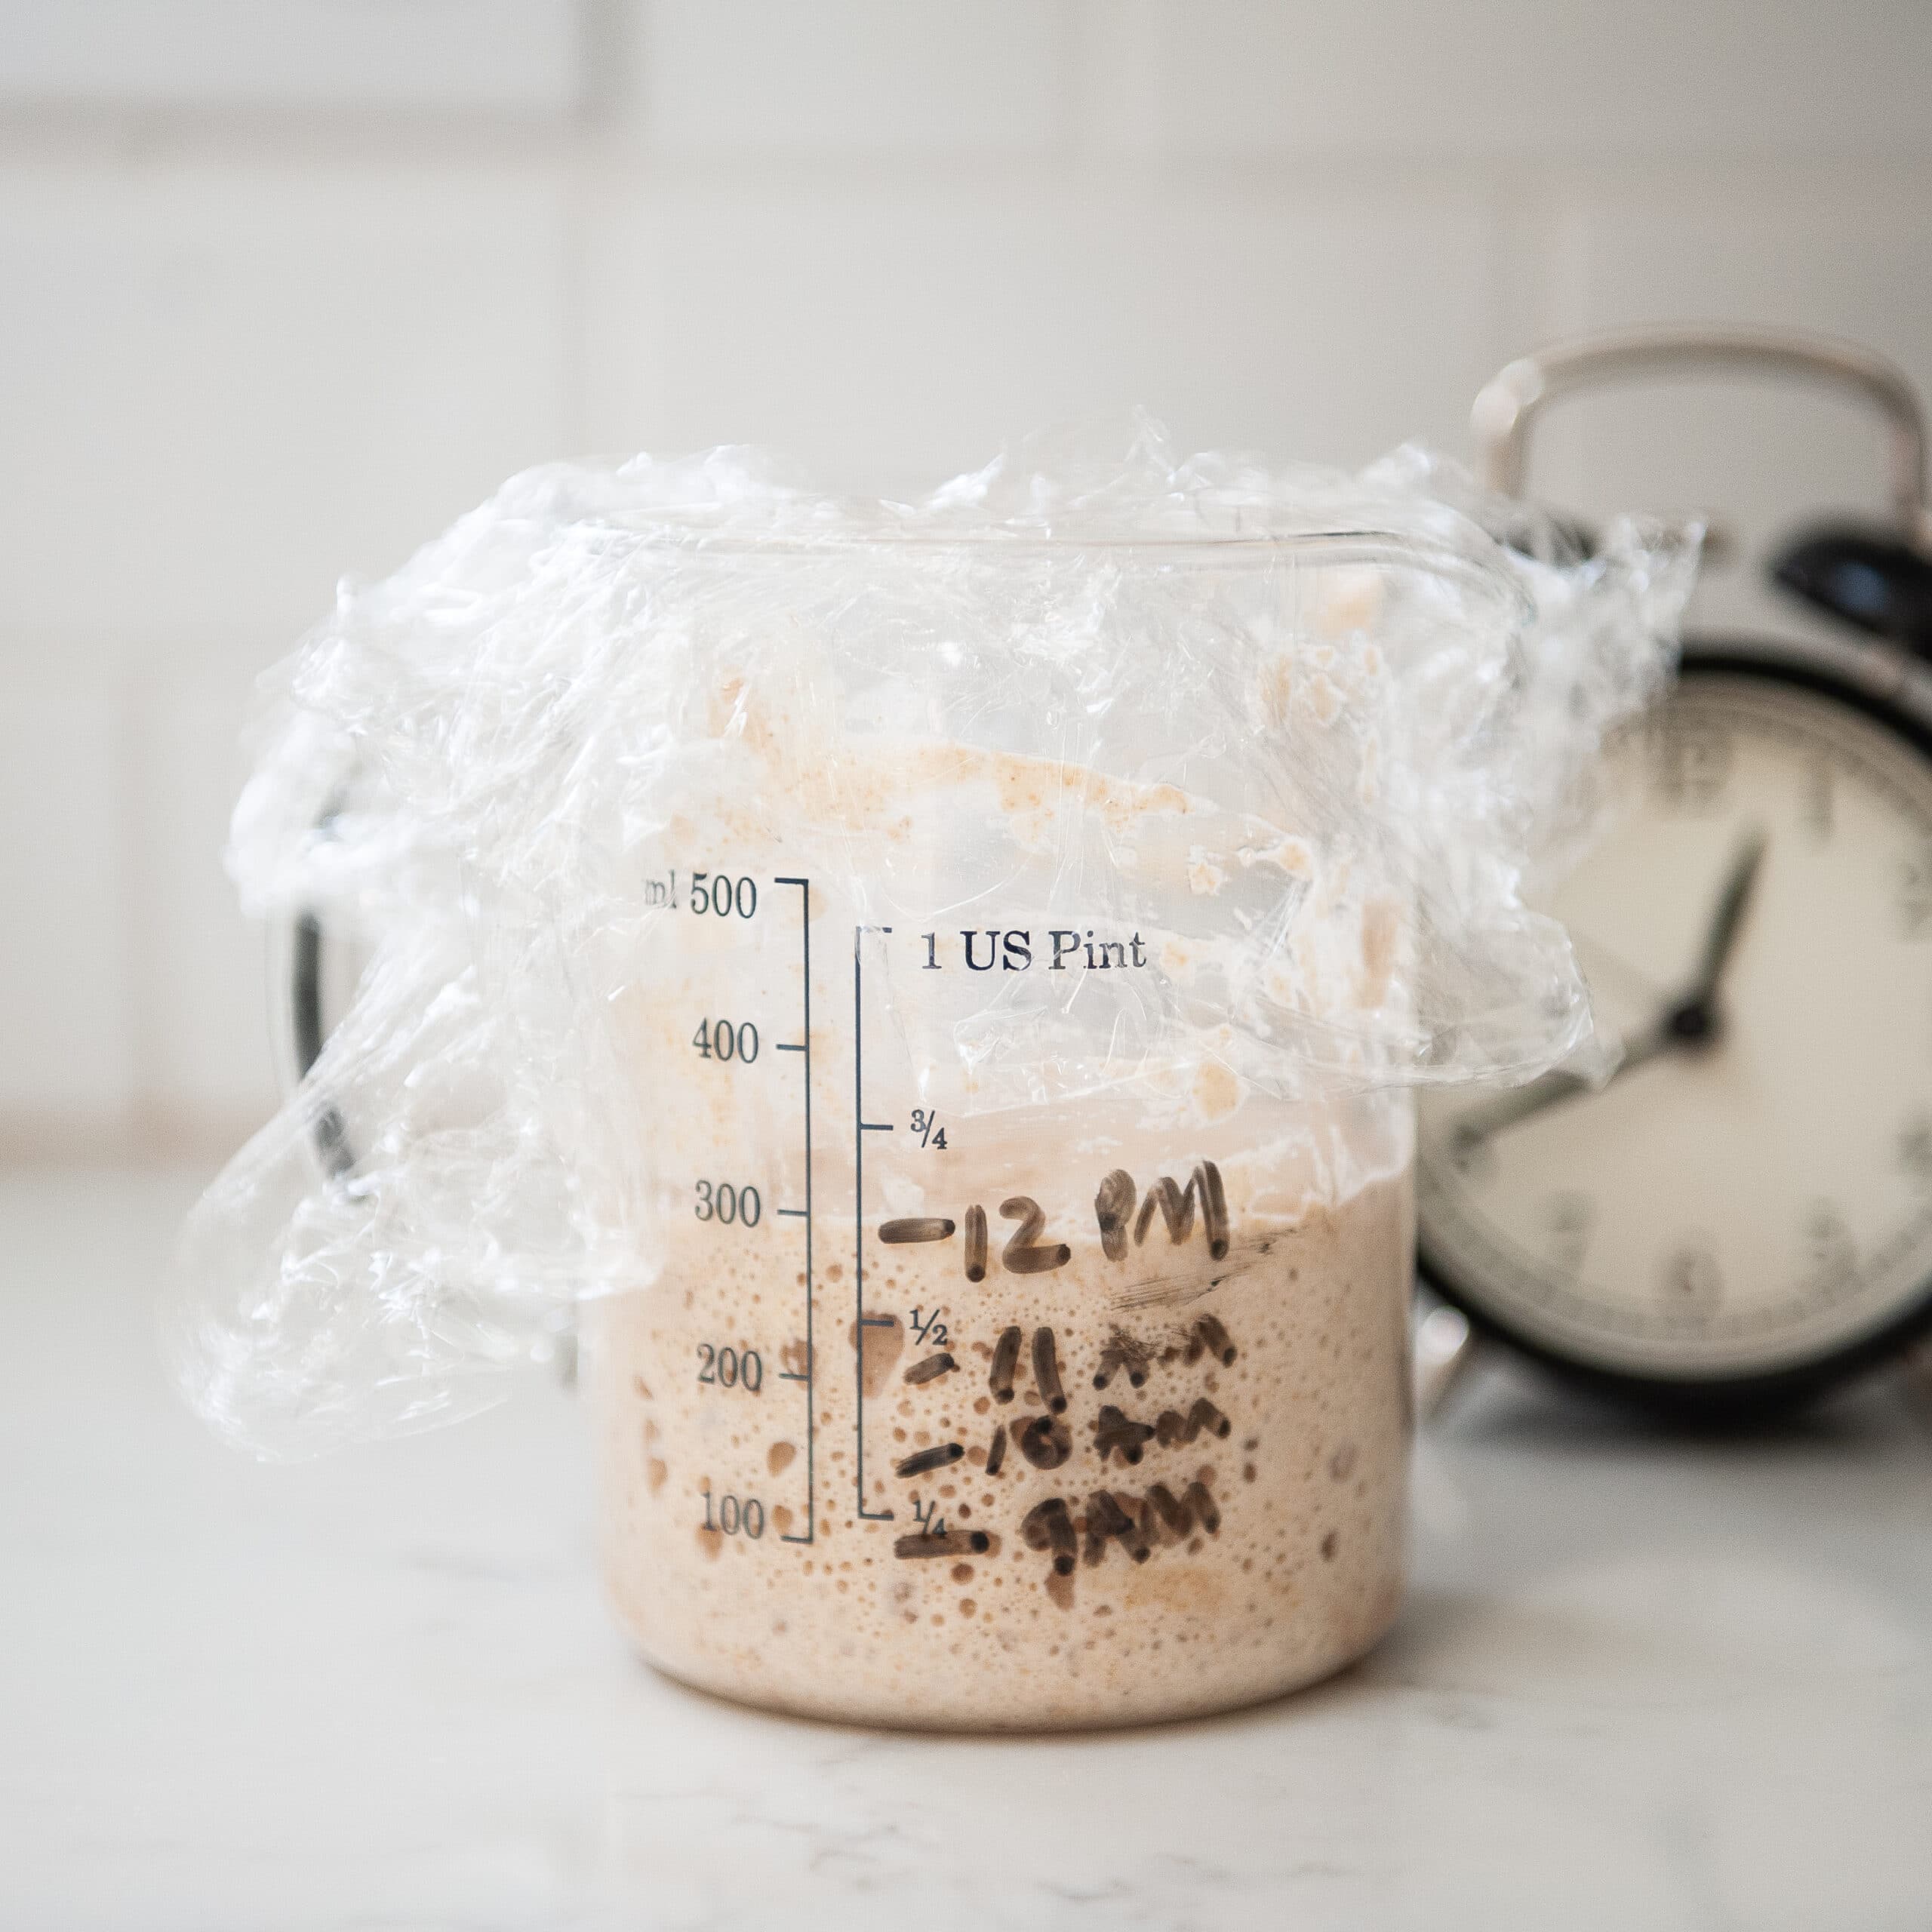
Place the levain in a nice warm area to rise until it doubles in size. I put mine on the countertop while the dishwasher is running and it rises to its peak in about 3 hours.
Protip - Don't worry about exact timing, I started my levain at 9am in this photo but sometimes I start it later or earlier. All these times are just a guide.
Protip - After feeding your starter, use the discard to make delicious sourdough pancakes or pikelets! A great way to start the morning and to minimize food waste.
10:15 AM - Autolyse - I like to make the autolyse right after I make the levain so I don't forget about it. Combine 300 grams of bread flour, 100 grams unbleached all-purpose flour and 100 grams whole wheat flour with the 400 grams of water. (room temp is fine).
You can play around with these ratios later! That's part of the fun! Sometimes I use all bread flour and leave out the all-purpose flour but I always include a little whole wheat flour because I like the taste.
Mix the flour and water together with your hands until no dry flour remains anywhere. Very important! Cover the bowl with plastic wrap and let it absorb for the next few hours while your levain rises. It will look really dry and shaggy.
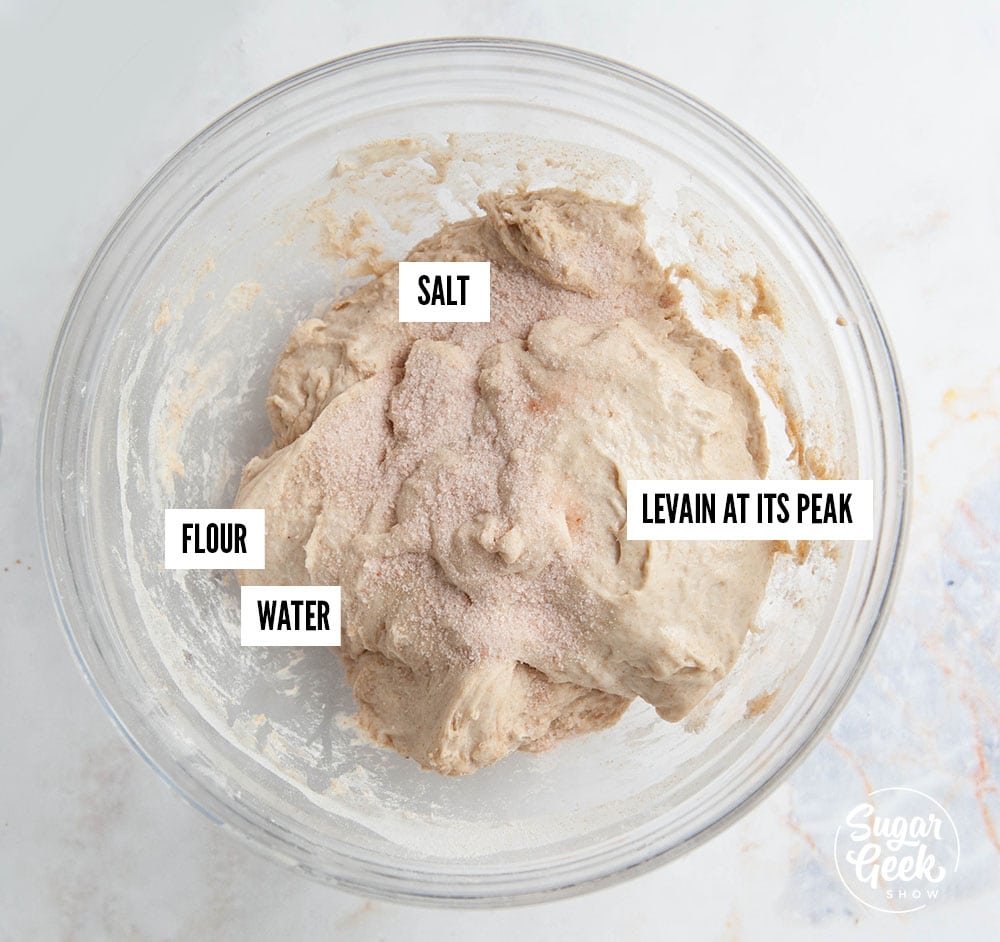
1:00 PM - Make The Dough - When the levain has doubled and passes the float test, time to add it to the dough! I just add the whole container into the bowl. We need 140 grams and there are 150 grams in the jar. It's almost impossible to get every bit out of the jar so it works out perfectly to just scoop out most of it and call it good.
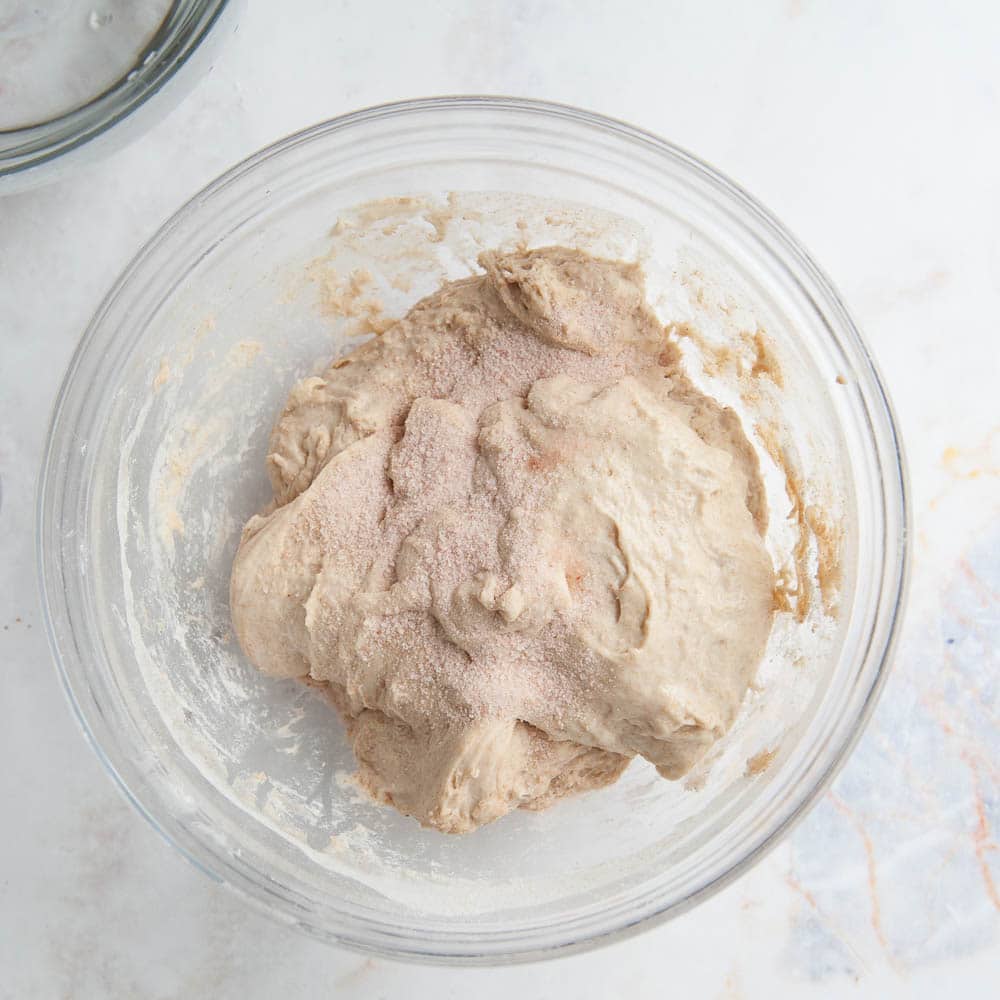
Now sprinkle in your salt. I use pink Himalayan sea salt because I like the flavor.
Protip - If you want to add in herbs, cheese or spices, add it in with the salt so it gets mixed in evenly.
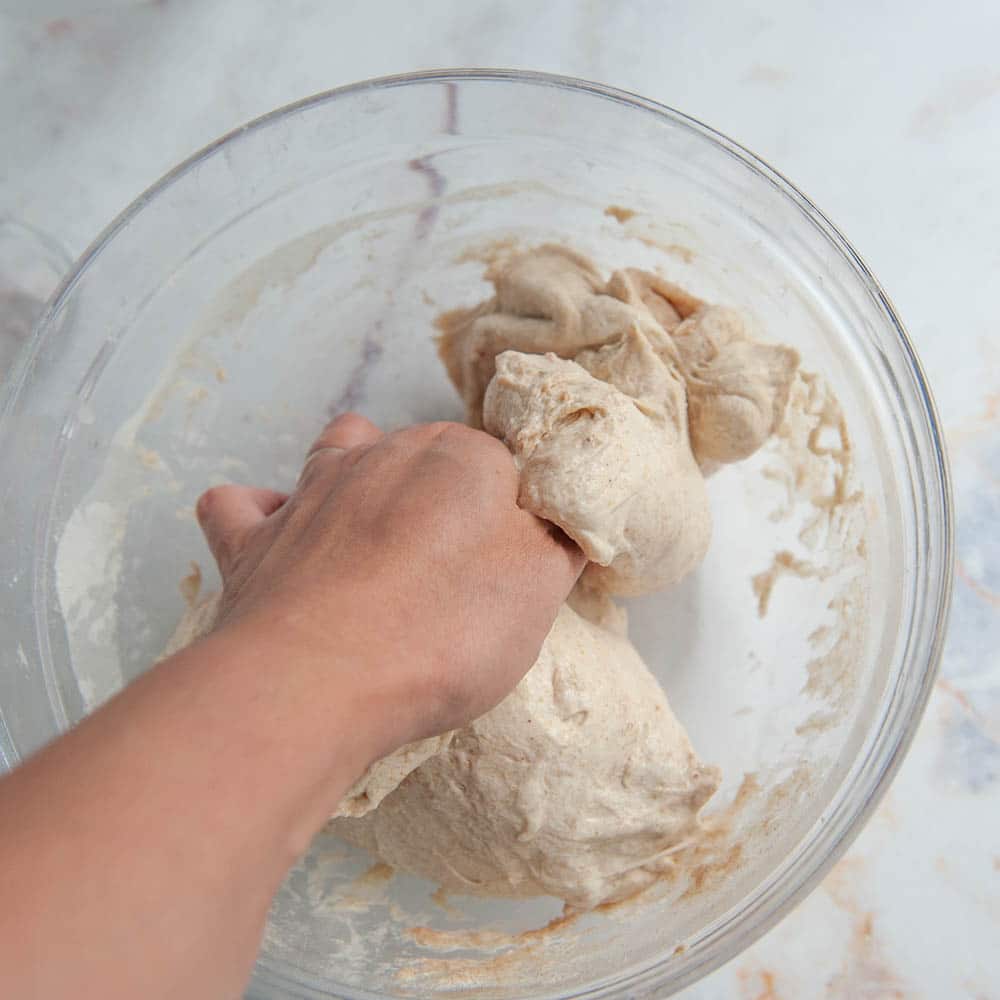
Fold the dough onto the levain and salt and then poke it with your wet fingers to incorporate the levain and salt. Squeeze it with your hands (really take out your stress doing this). Squish and squeeze until everything is mixed together and then re-cover the dough. Let it rest for 30 minutes.
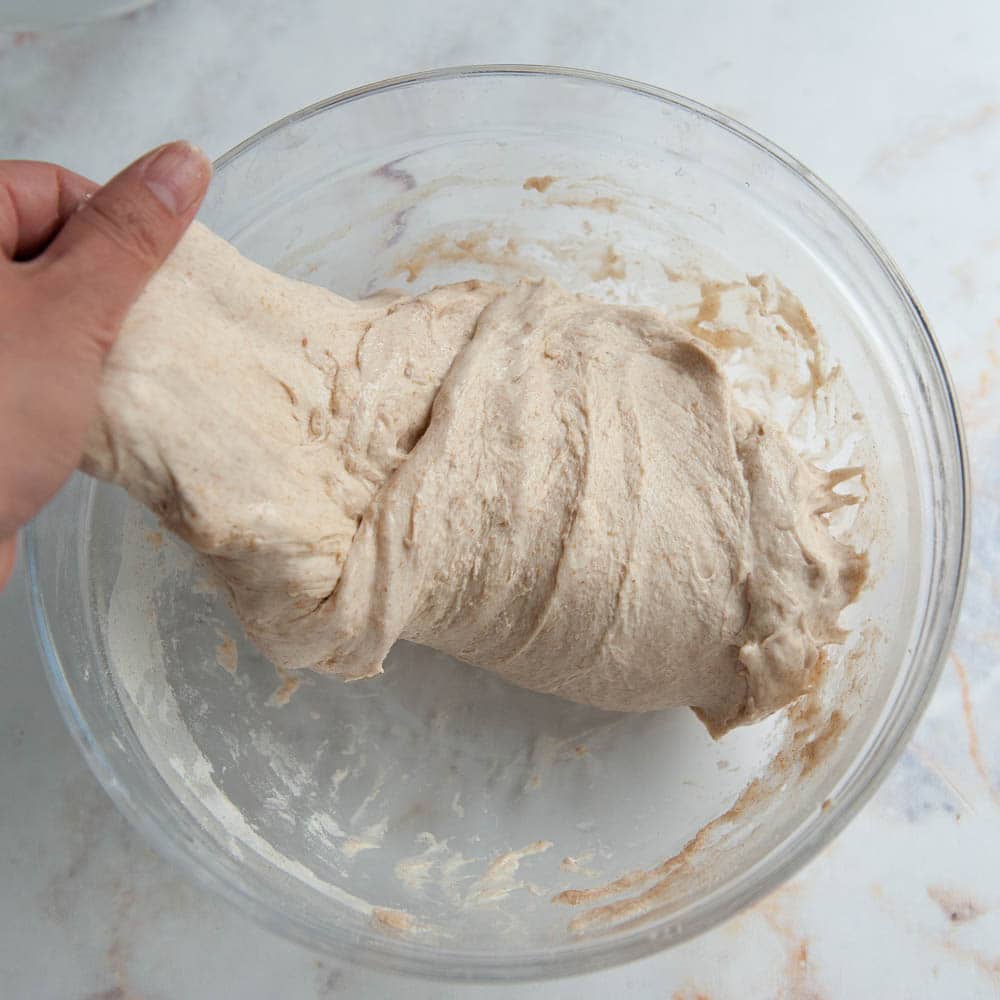
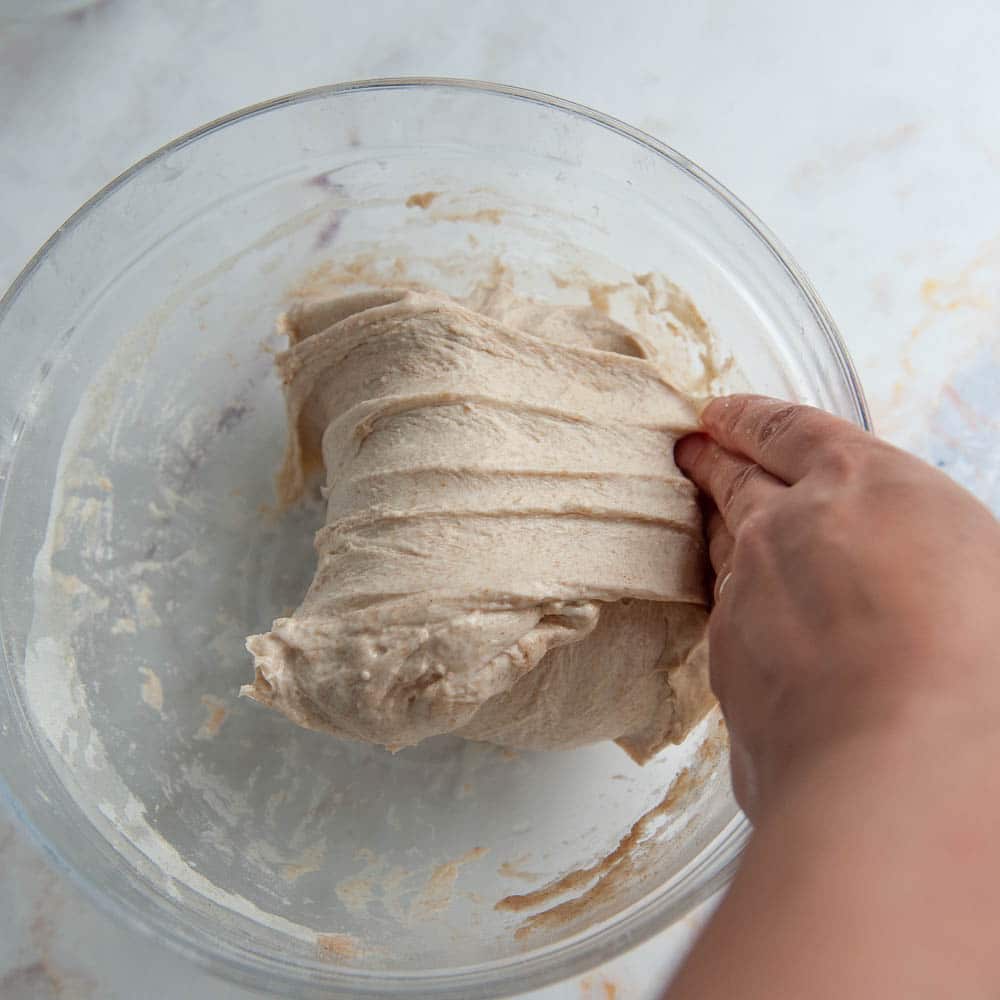
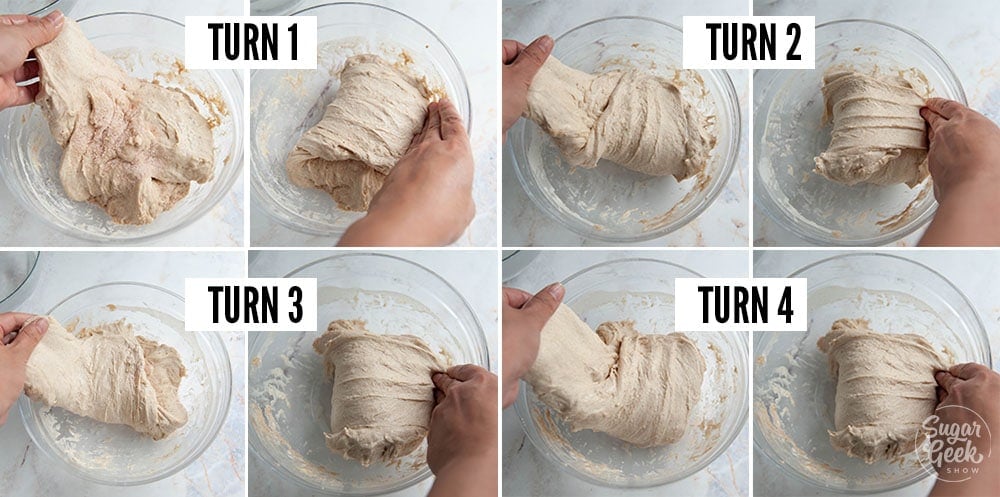
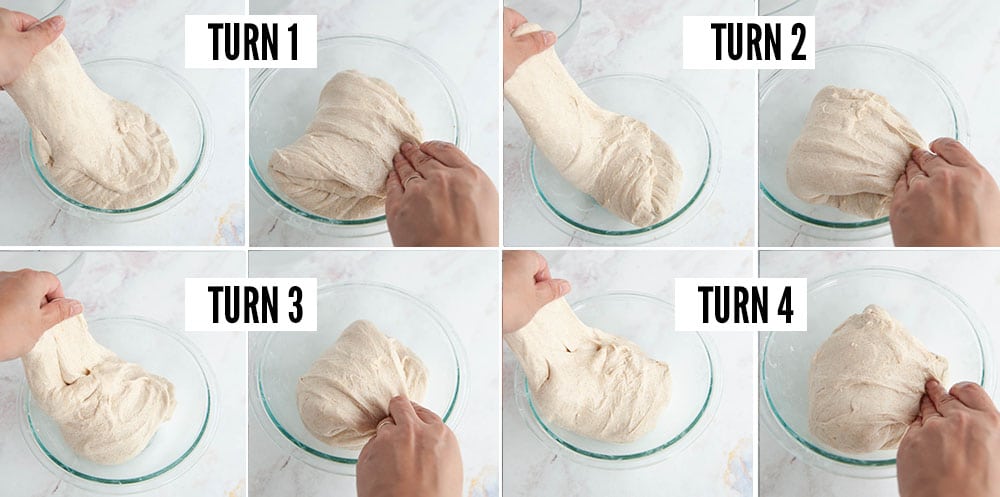
1:30 PM - Stretch & Fold - Now we begin developing the bread's strength by stretching the dough and folding it onto itself. Imagine the dough is a big pile of unraveled yarn. Each time we stretch the dough and fold it, it's like winding the yarn back into a ball. When it's strong enough to hold its shape, the loaf will bake up taller and have a better structure.
- Wet your hands. Wet hands keep the dough from sticking to you
- Pull one side of the dough up until it can't stretch anymore
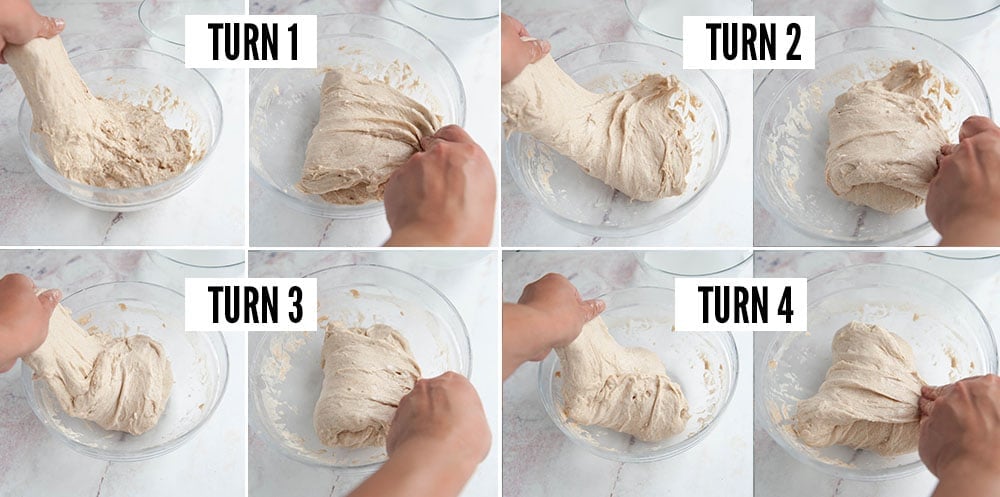
- Fold it over itself until the edge reaches the other side. This is called a "turn". There are four turns in each stretch and fold.
- Rotate the bowl 45º so that the top is now the side and repeat the stretch and fold.
- Repeat this for a total of 4 turns so all sides of the dough have been stretched and folded over.
As you move around the bowl, the dough will become harder and harder to stretch. Don't tear the dough or force it. The dough should look a bit like a ball and the top of the dough will look smoother than it was.
Allow the dough to rest for 60 minutes covered with plastic wrap to prevent it from drying out.
This is stretch and fold #1
Stretch and fold #2 - When you come back, the dough will look relaxed again and you can repeat the process of stretching and folding 4 times. This is the second stretch and fold. You will notice the dough is getting smoother.
Watch the video below for a demonstration on how to do these stretch and folds.
Stretch and fold #3 - Repeat the stretch and fold process a third time
I repeat these stretch and folds 3-4 times with an hour rest in between depending on how the dough is looking. The dough should be smoother on the surface and bubbles starting to form from the levain working. It will be harder to pull the dough to do the stretch and the surface will be quite smooth.
4:30 PM - Bulk Ferment - I allow the dough to rise for one or two more hours or until it looks jiggly and bubbly and has definitely doubled in size. Judging this part is the hardest for me.
I tend to let it go too long so just know that you'll get better with experience how long to let it bulk ferment. Keep notes! The one time you don't keep notes of what you did, it will definitely be the best loaf you ever baked and you'll have no idea why.
Did You Know? Sourdough bread is easier to digest than bread made with commercial yeast? Yep, it's true! Because the starch in the bread is already broken down by the natural yeast, your body can process it more easily. Some people with gluten intolerance can eat sourdough bread with no pain.
6:00 PM - Simple book-fold and cinnamon roll shaping
Now it's time to do some folds to redistribute the bubbles that have been developing so that they aren't all at the top or bottom of your loaf when you bake it. We also want to strengthen that gluten again before resting overnight.
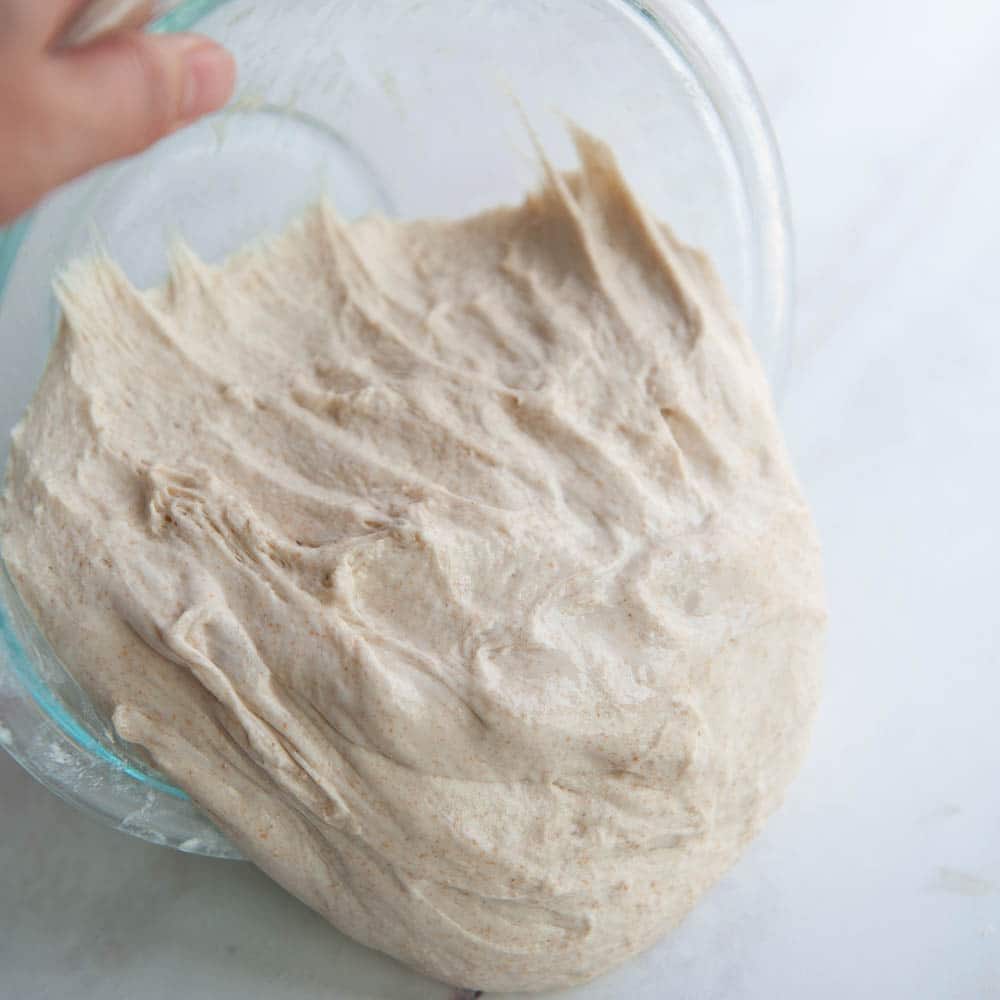
Dip your hand in some water and rub the water on the countertop. Water prevents sticking! Gently tip the bowl over and coax the dough onto the wet countertop.
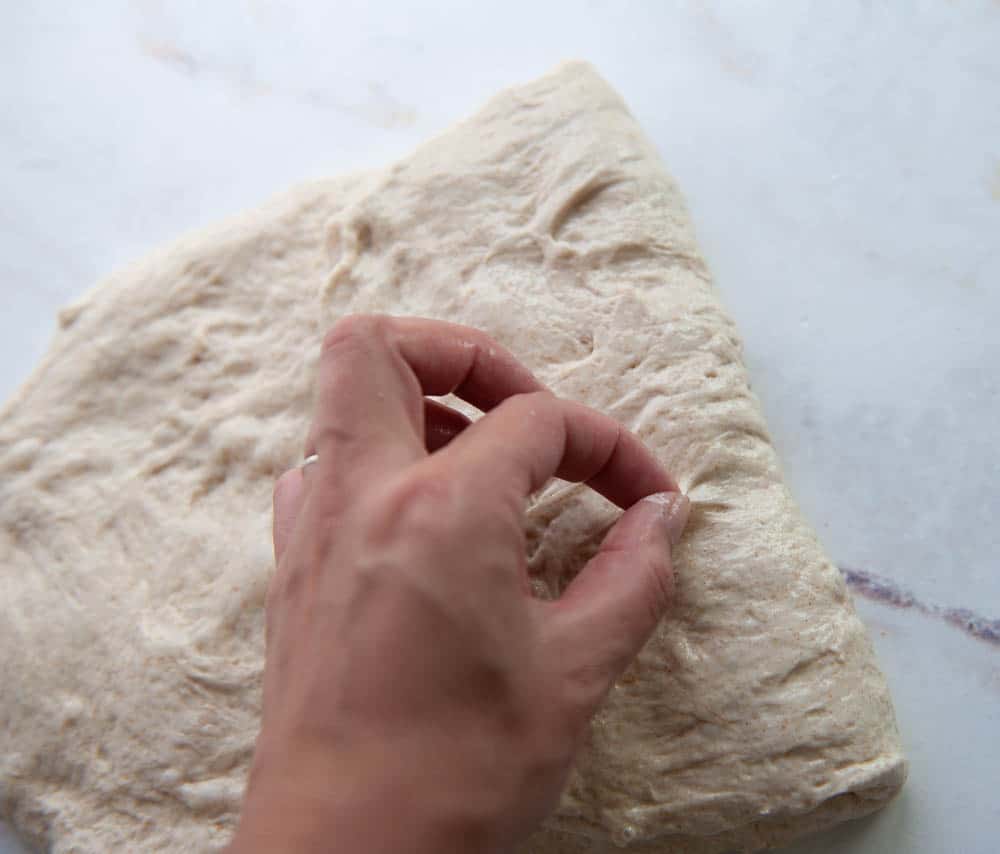
Pop any big bubbles that you see. Just like when you make regular bread and you "punch it down" you want to knock out any huge trapped air and redistribute the bubbles in the dough for a better rise.
With wet hands, spread the dough out into a rectangle that's about 8"x12" and looks like a sheet of paper placed vertically in front of you. Take one side and fold it over so that the edge meets the center.
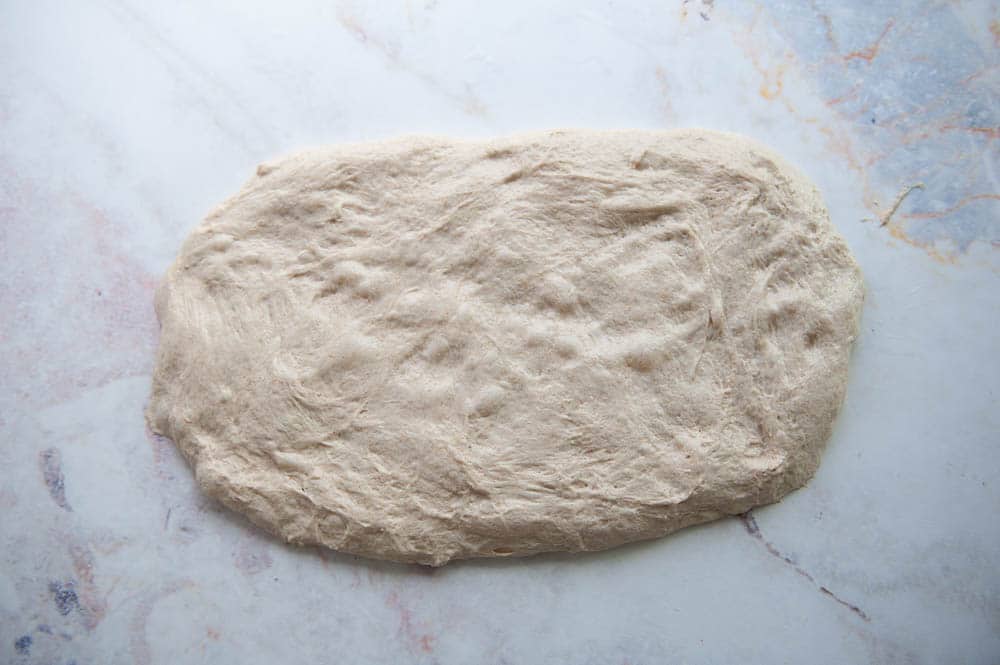
Lift the other side of the dough and fold it over the top of the first fold. Now we have evenly distributed all those lovely bubbles evenly so our crumb will look really great after the sourdough bread bakes.
Rotate the dough 45º and now roll it up like a cinnamon roll. Make sure the seam is on the bottom. Seal the sides by pinching them together. Pop any big bubbles that you see. This helps the gluten get even tighter and stronger so that it holds its shape when its rising.
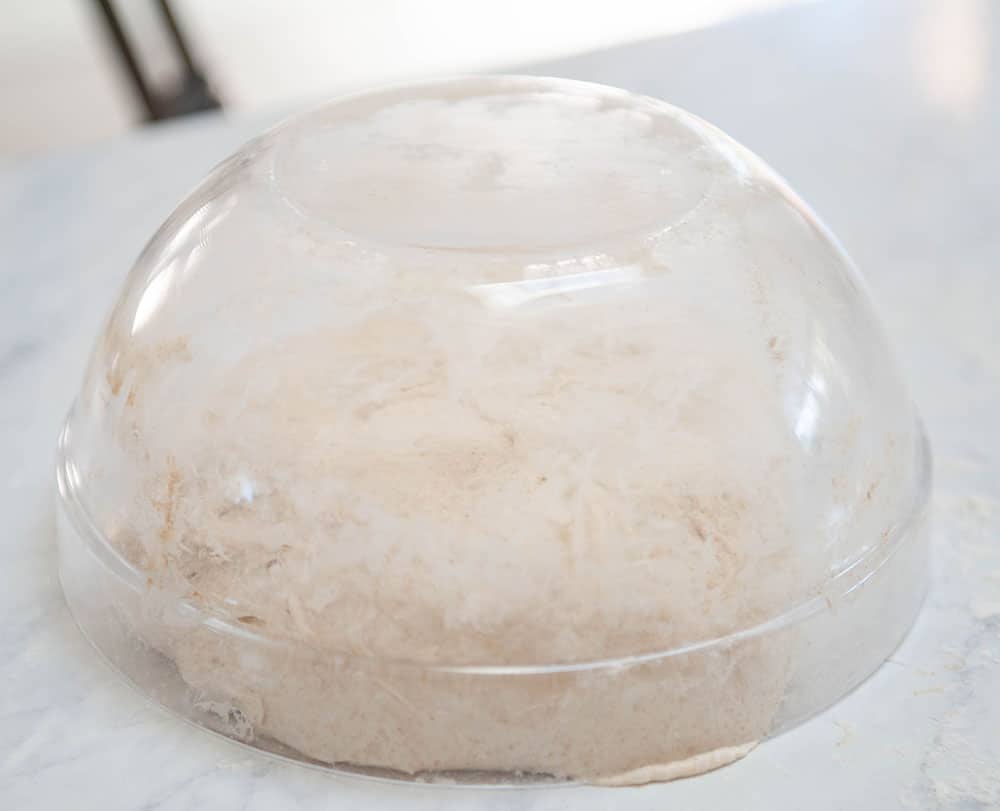
6:15 PM - Bench-Rest - Cover the dough with the bowl and let it rest for 15 minutes. This gives the seam time to seal shut and for the gluten to relax a little.
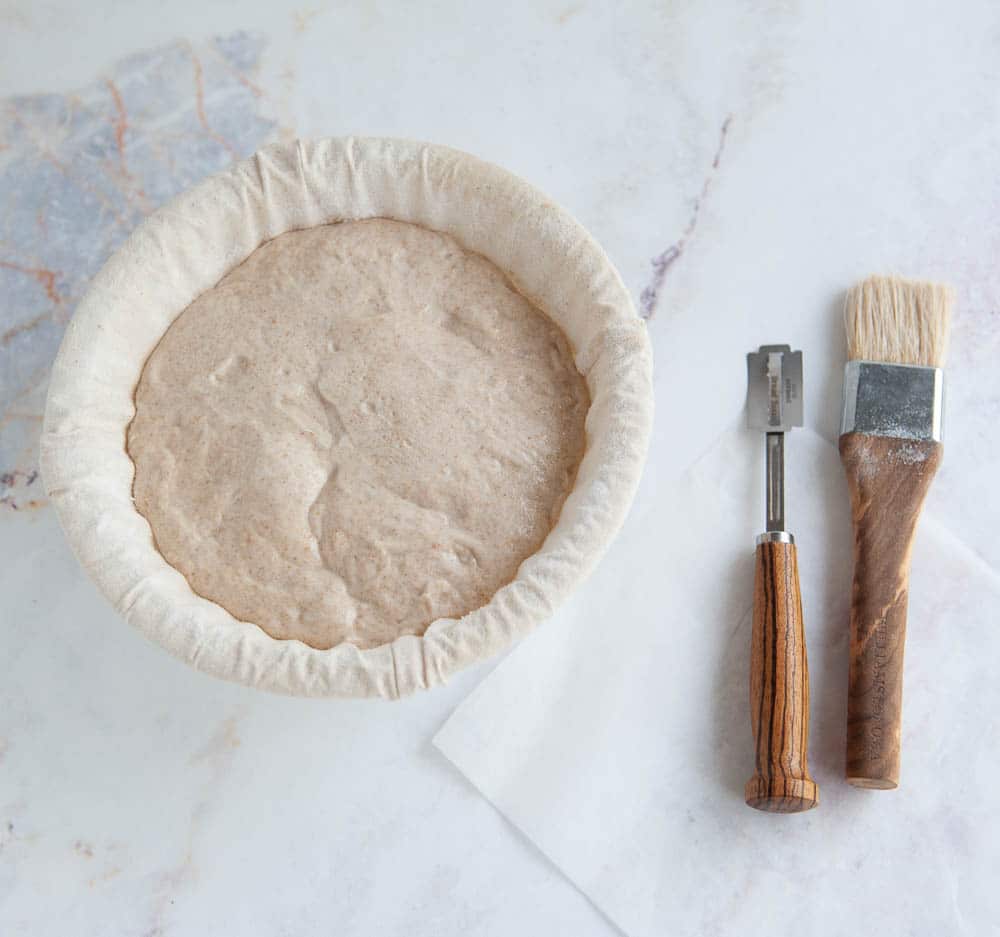
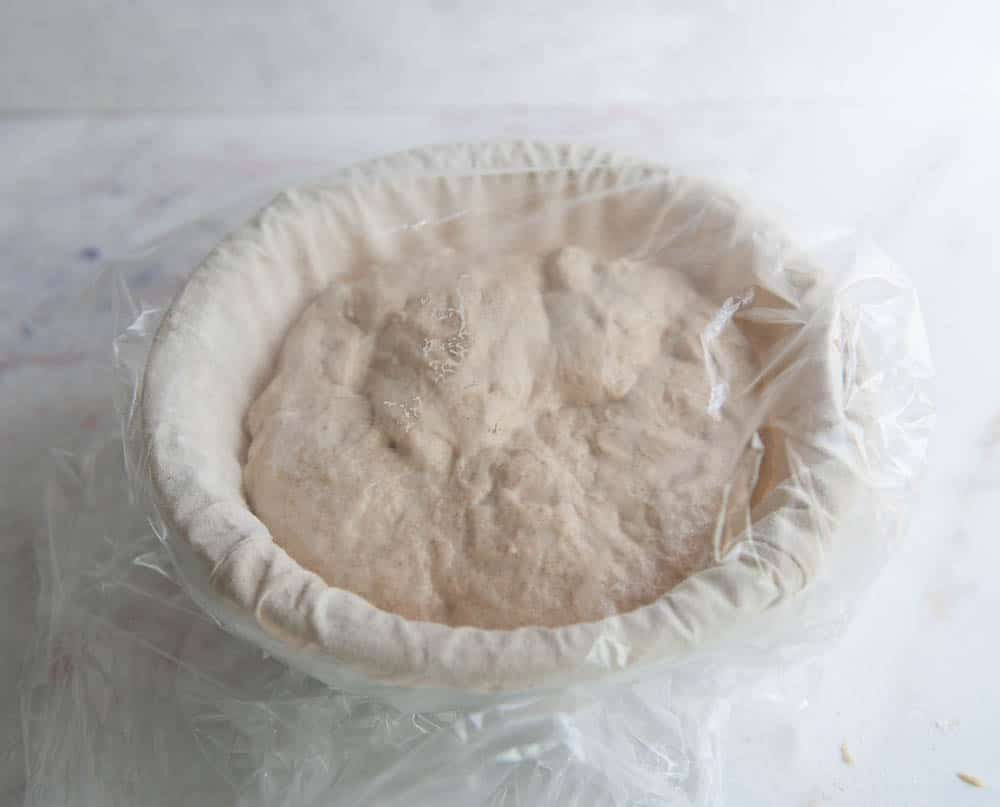
6:15 PM - Prepare Your Banneton - Dust your banneton with flour or place a tea towel into a medium-sized bowl and dust it with flour. This container provides a space for our very loose dough to hang out and keep its shape in the fridge overnight.
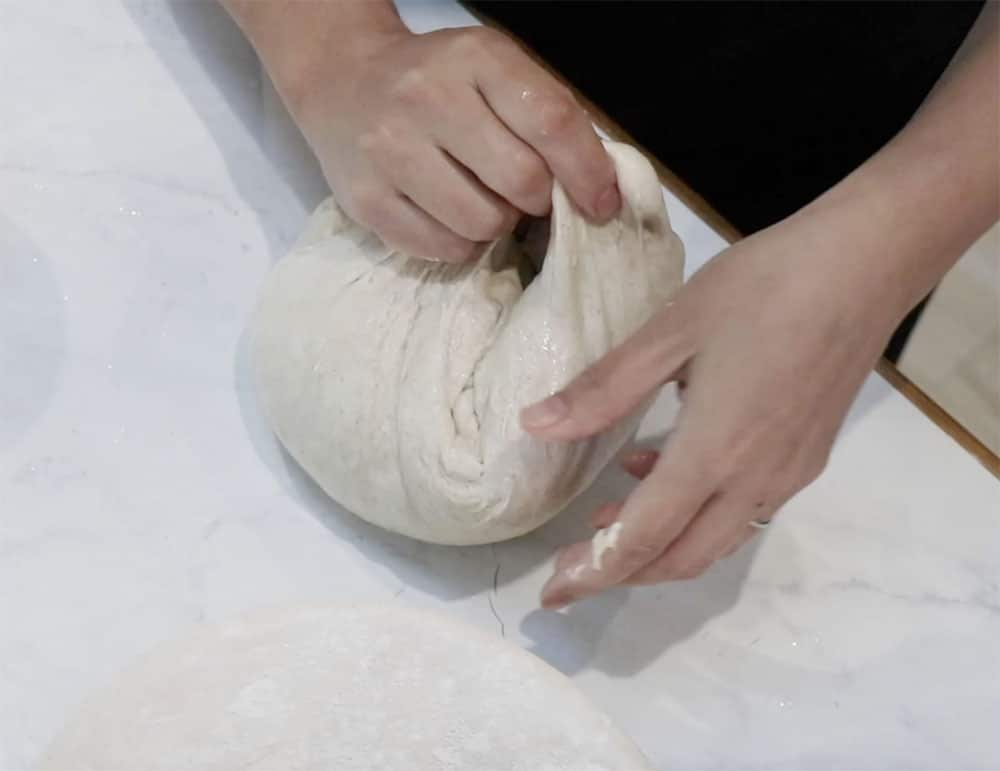
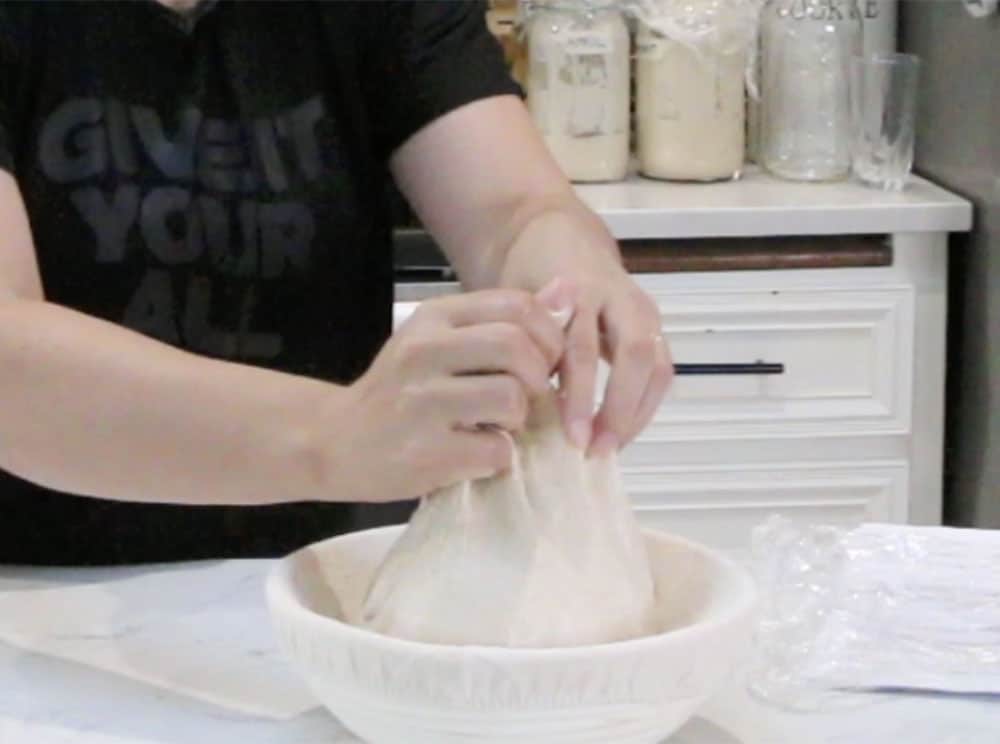
6:30 PM - Final Shaping - Turn the dough over and gather all the edges together in the center and hold them firmly with your fingertip. This makes the outer skin tighter. See this step better in the video below.
Lift the dough with your fingertips and place it into your floured banneton or bowl. Pinch all the edges together and seal them as best you can.
Protip - If your dough is too soft to lift this way, scoop it up with your hands and then flip it over into the banneton
Put the banneton in a plastic bag to keep it from drying out and put it into the fridge overnight. Remember, your sourdough isn't going to rise at all in the fridge so all its rising should already be done before it goes into the fridge. We will bake it straight from the fridge in the morning.
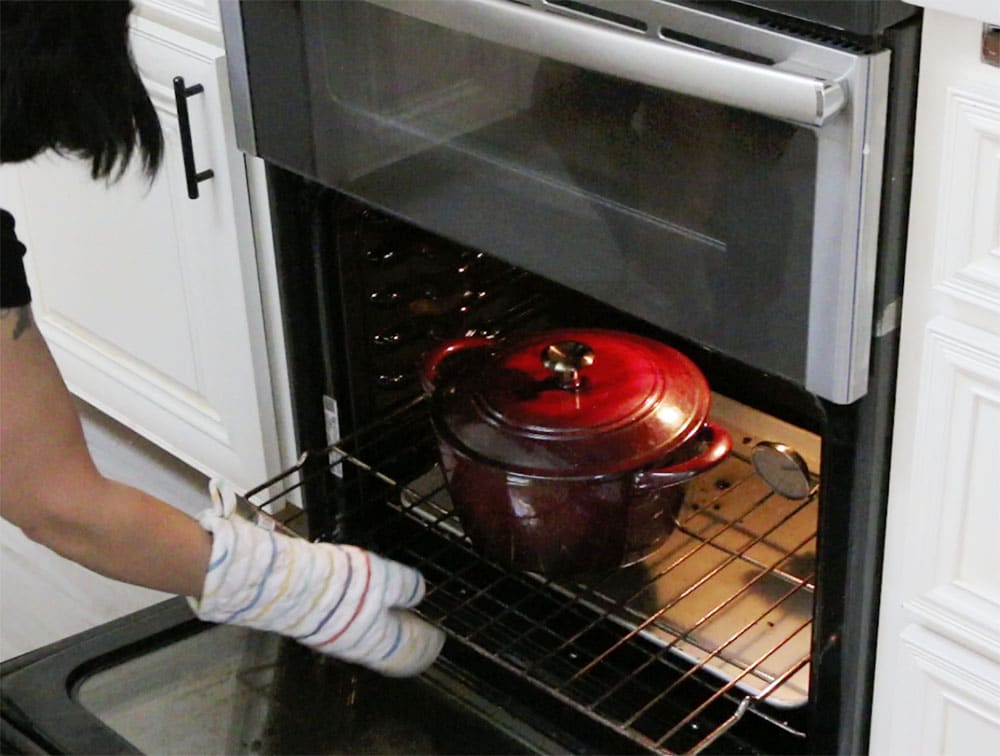
Day 2 - 8:30 AM - Preheat Your Oven Place your dutch oven into the oven and preheat the oven to 500ºF. We want the oven to be very hot to get a great rise!
I place a sheet pan on the bottom rack of the oven underneath the dutch oven to prevent the bottom of the loaf from browning too much.
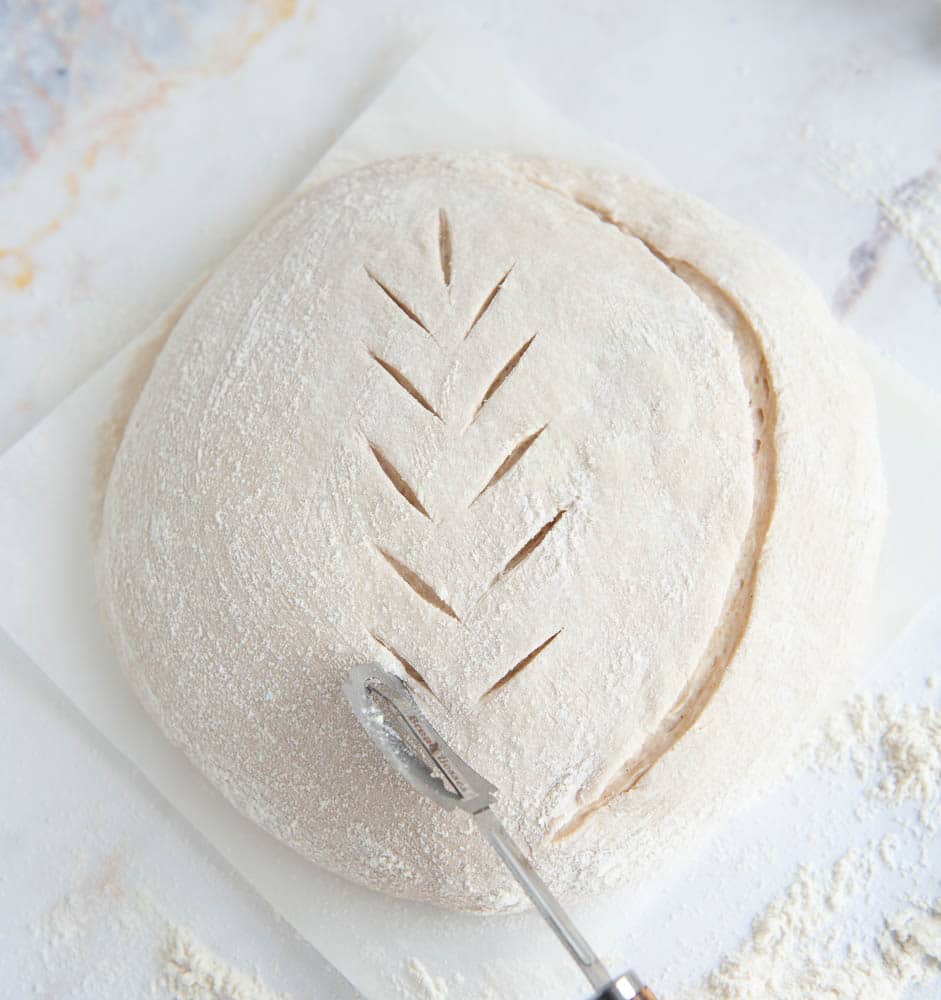
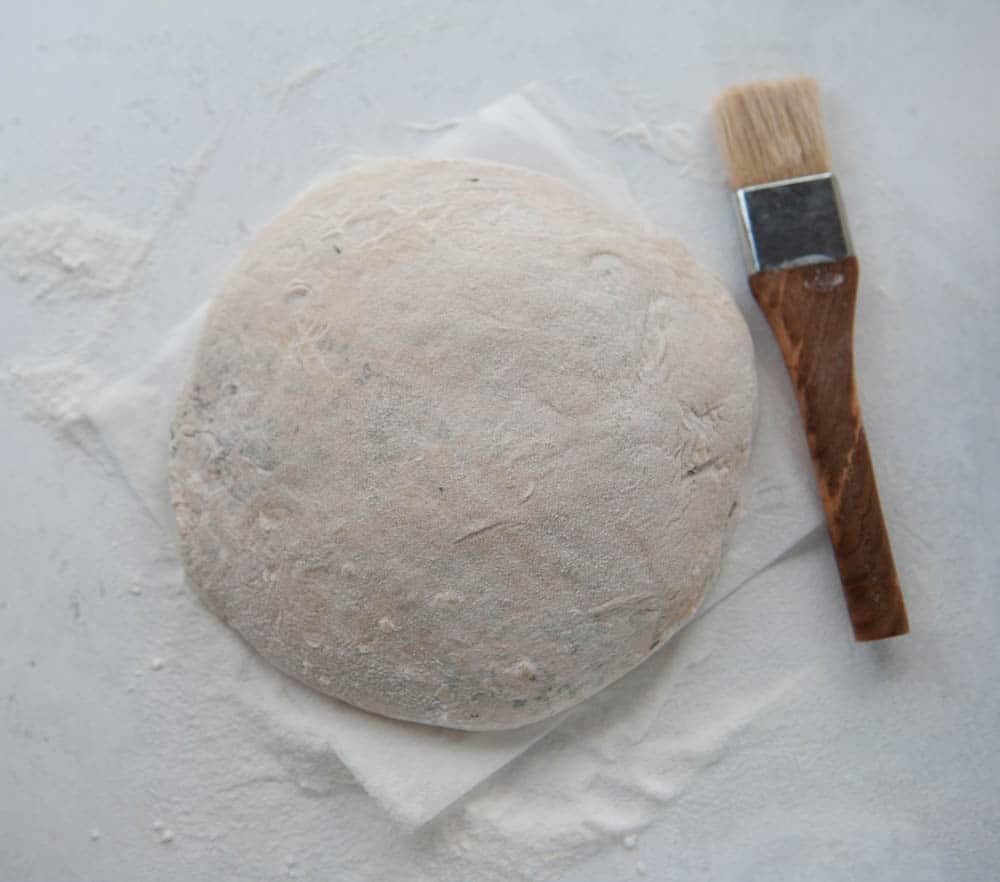
9:00 AM - Scoring - Cut a square of parchment paper that is 10"x10". Take your loaf out of the fridge and remove it from the bag.
Place the parchment square on the back of the loaf and flip it out onto the countertop, carefully removing it from the banneton or towel. The dough will spread out a bit and that is normal.
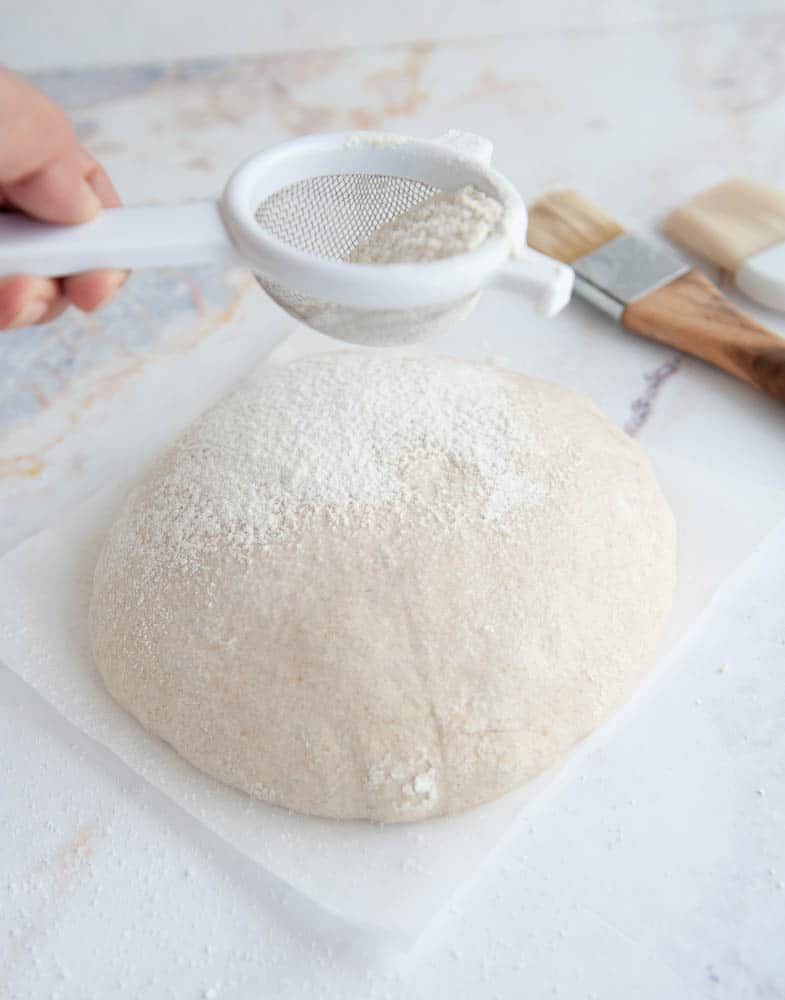
Remove any excess flour. I dust the surface of my dough with more flour for an even look but it's not necessary.
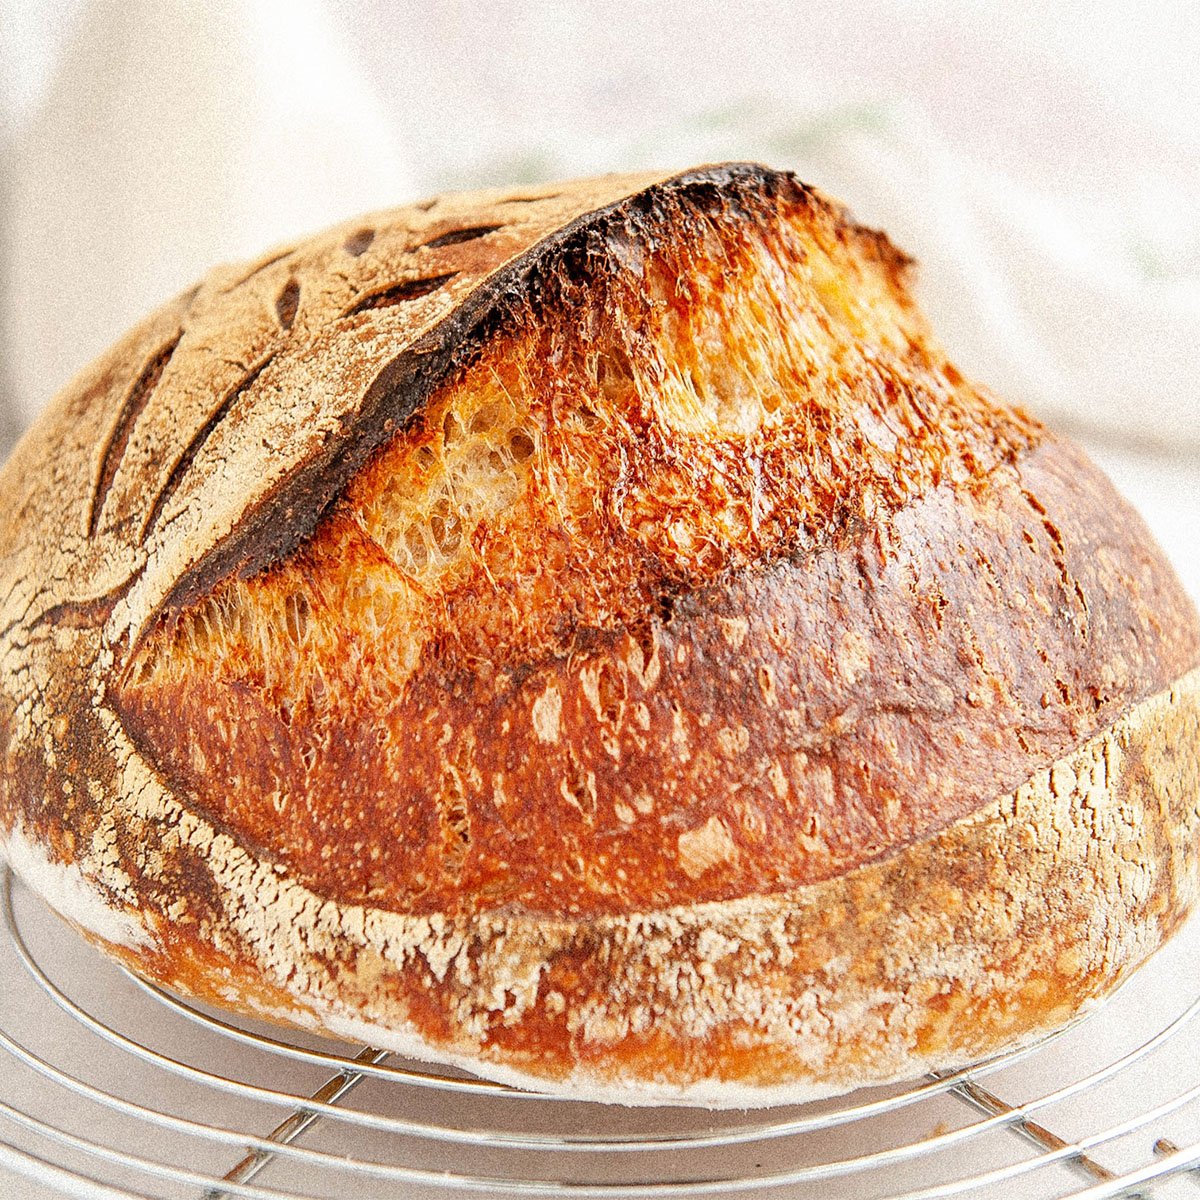
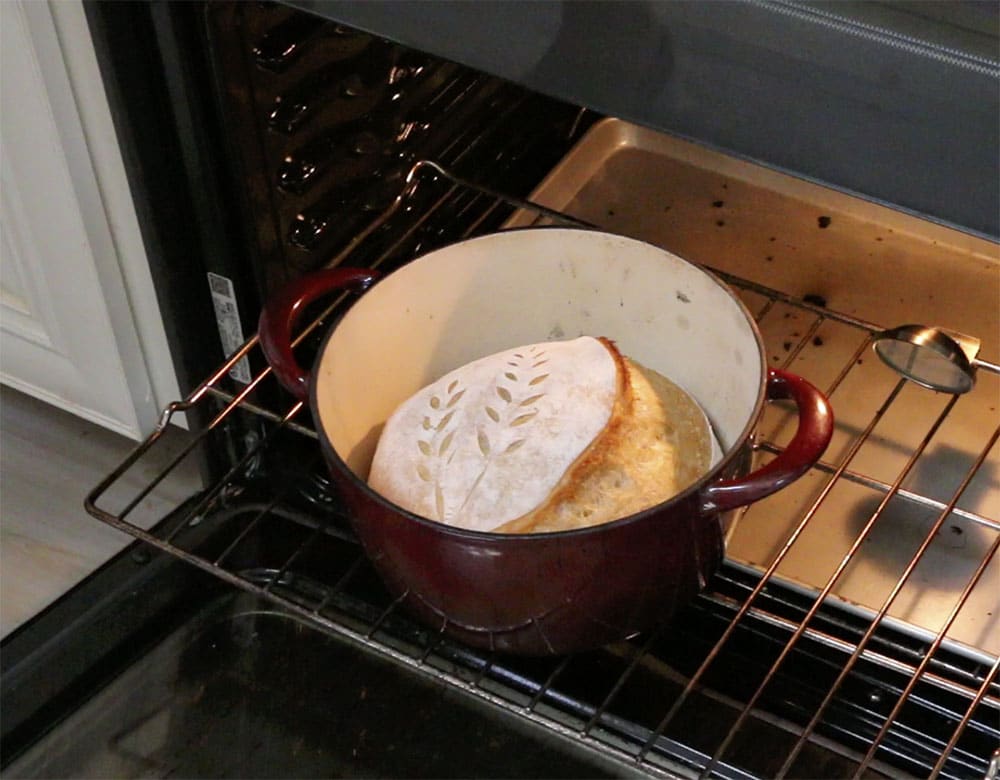
Use your Lame or sharp knife to cut a "C" shape on the right side of the loaf about ¼" deep to allow the bread to rise while baking. Move quickly and don't be afraid to cut the bread. If you're feeling extra fancy you can add a little wheat design off to the side. This decorative scoring is not very deep. Maybe 1/16th of an inch deep.
9:10 AM - Baking - Open the oven, remove the lid from the dutch oven. Lift the loaf by the corners of the parchment paper and quickly place your loaf inside the dutch oven. Place the lid back on top (make sure you use your oven mitts!) and close the door. Work as quickly and safely as possible to minimize heat loss.
Reduce the temperature of the oven to 450ºF
If you're nervous to handle a hot dutch oven you can start with a cold dutch oven but your lift may not be as high. Bake for 30 minutes covered. No peeking!
After 30 minutes you can remove the lid. This is my favorite part! Seeing how the bread is rising! Very satisfying!
Bake the bread for another 20-30 minutes depending on how dark you like your bread.
After your bread is baked, remove the dutch oven from the oven. Carefully tip the dutch oven over to get the bread out. The parchment keeps it from sticking.
Place the bread on a cooling rack to cool COMPLETELY before you slice it. This can take an hour or two. I know, it sucks to wait but you don't want the bread to be gummy!
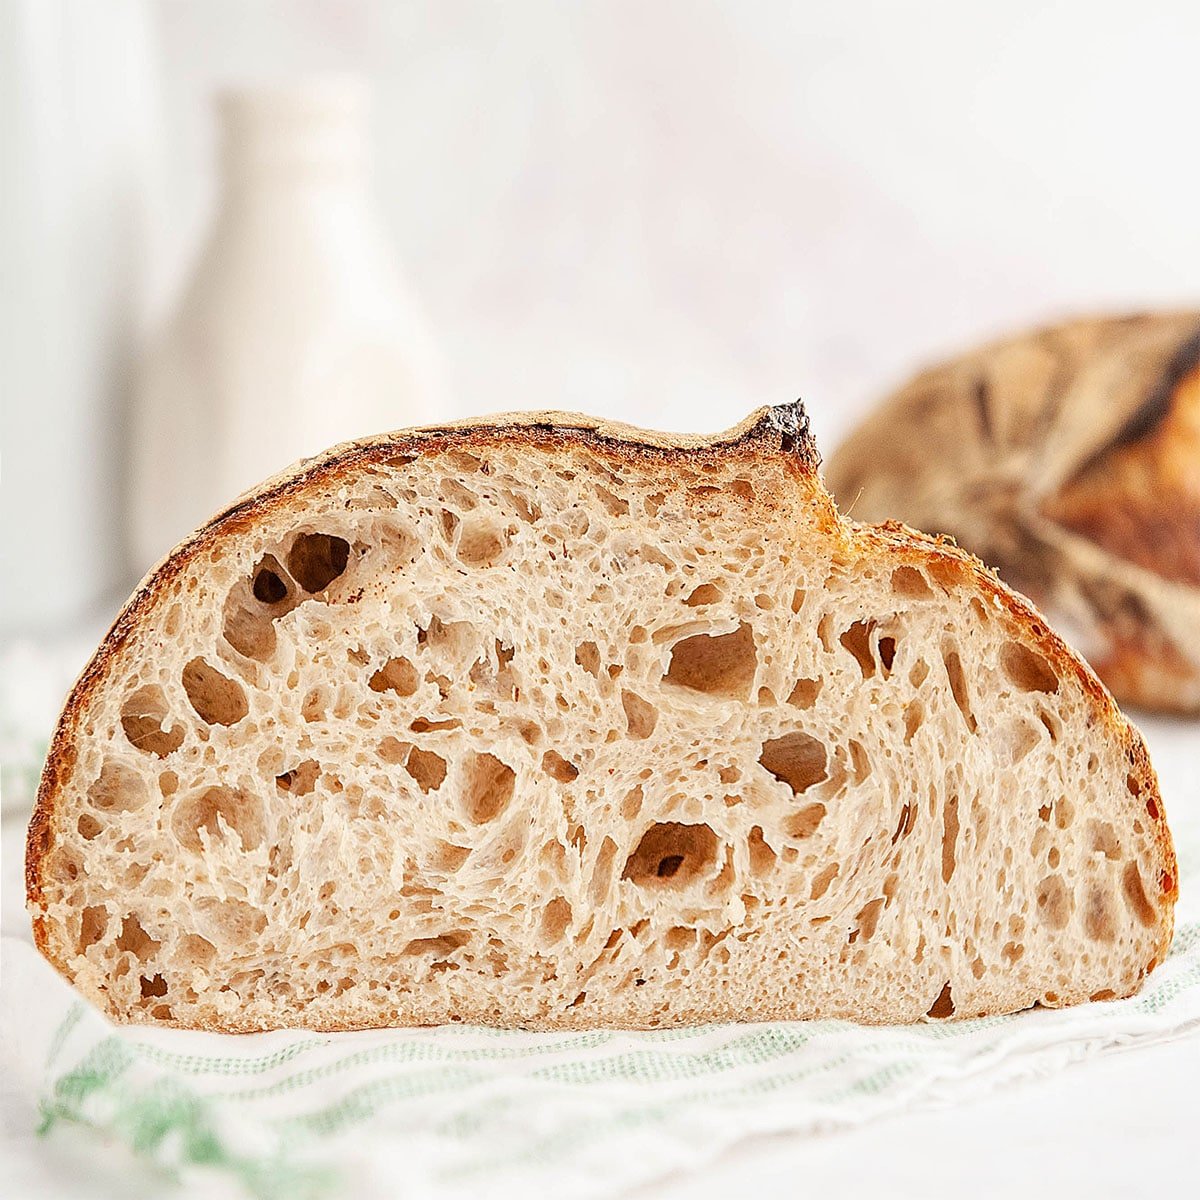
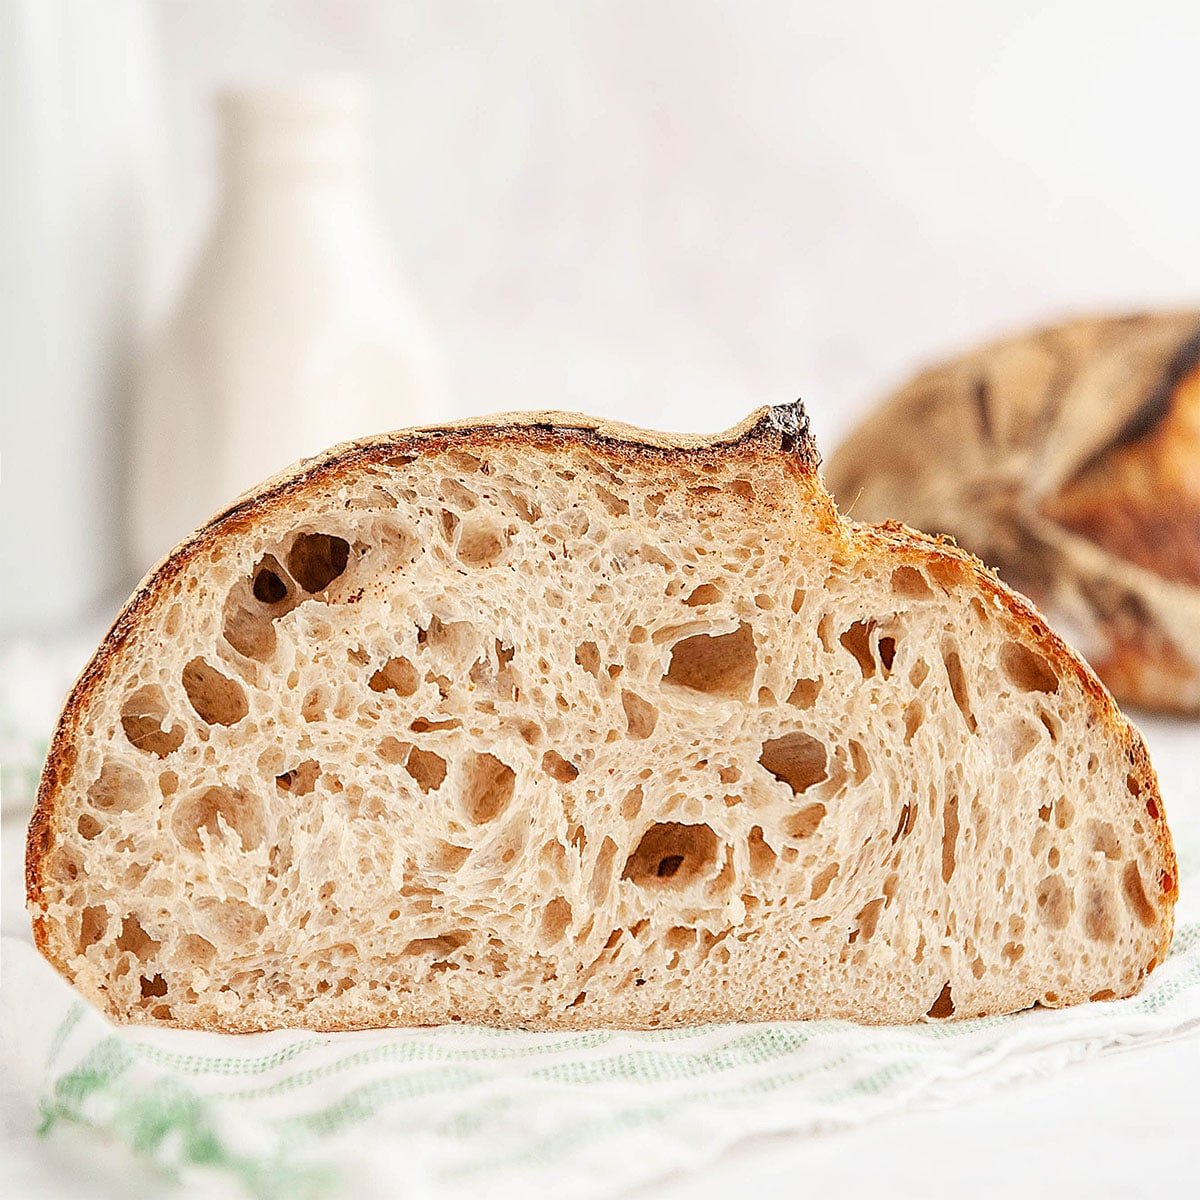
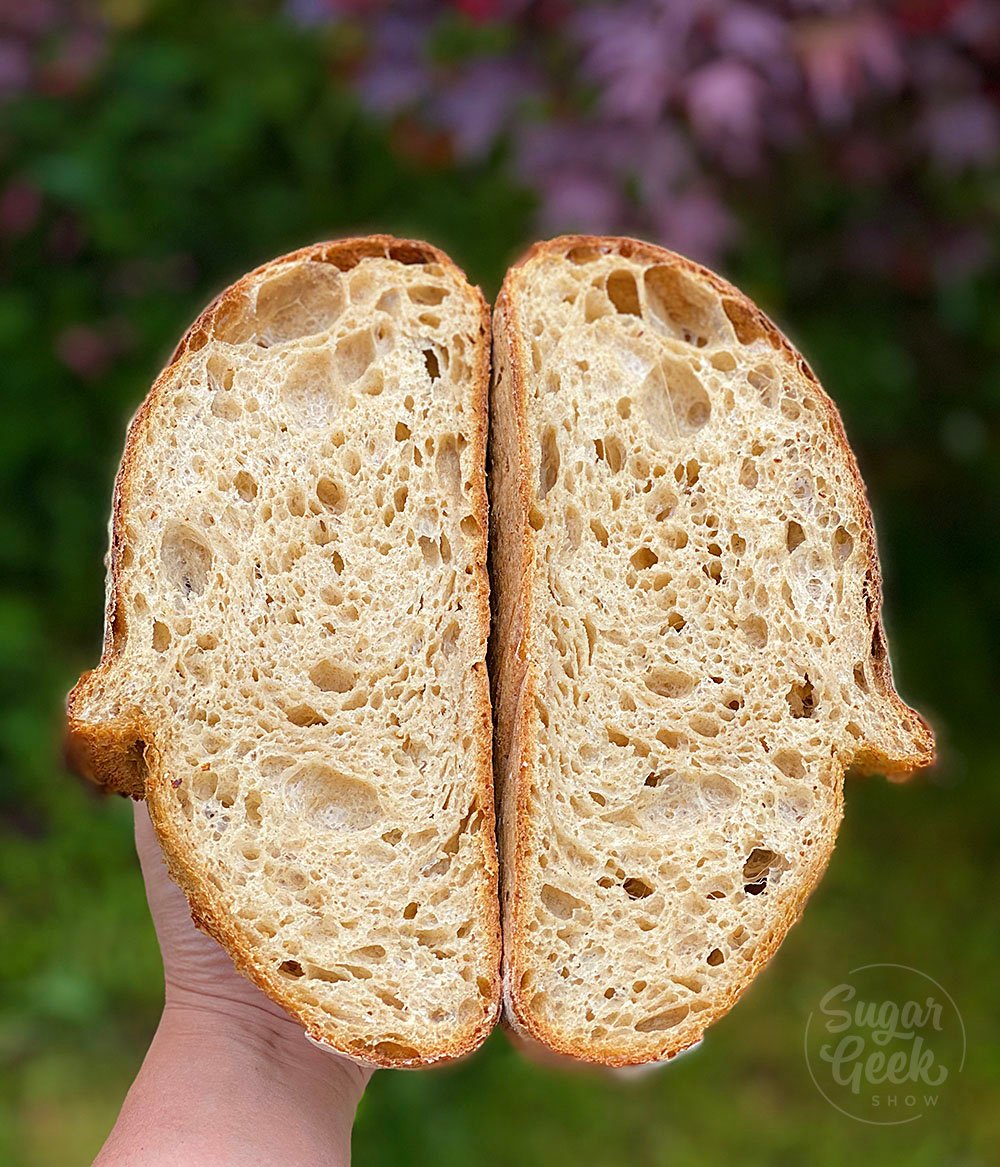
The next most satisfying part is to cut the bread open. I slice it right down the center so I can observe the crumb, smell it, and take note of the overall result.
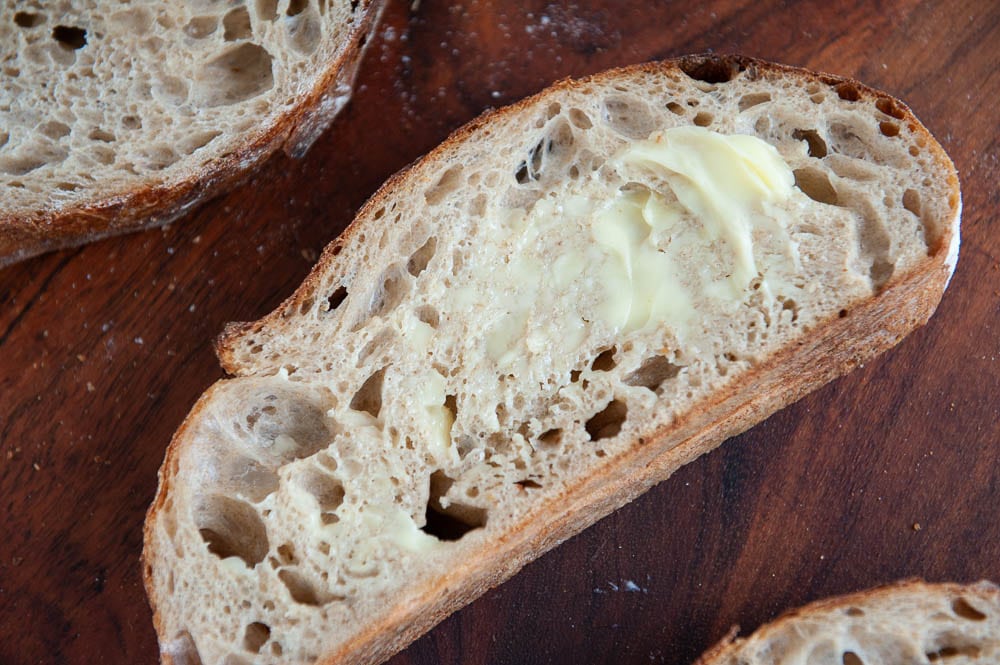
I love how open this crumb is but not so full of holes that it can't be slathered with butter.
Now most importantly, enjoy this wonderful result of your hard work. The first time I ate sourdough bread that I made from scratch, I almost cried. It's a lot of work but it's incredibly fulfilling and satisfying work.
We haven't eaten store-bought bread since! That was two months ago!

FAQ & Tips
How do I know when to bake my sourdough?
Do not bake your bread until it has doubled in size. You can't rush your yeast. It's not like commercial active dry yeast. It will rise according to how warm it is and how strong your starter is. It's important to give your dough enough time and warmth to rise.
The moment you add the levain to the dough, it will start rising. Even during stretching and folding, it will still be rising. The bulk ferment stage will take as long as it takes until the dough has visibly doubled in size. At this point, you can shape the dough and put it into the fridge to rest overnight.
The fridge is a pause button for sourdough. The dough won't rise or do much of anything in the fridge so you can leave it there until you're ready to bake it.
How do I make my sourdough loaf taller?
Baking in a pre-heated hot dutch oven with the lid on for 30-40 minutes will trap moisture inside the dutch oven and allow your sourdough loaf to rise higher.
Baking at higher temperatures gives the loaf lots of rising, also referred to as oven spring.
Making sure you do enough stretch and folds to give your loaf strength. Weak gluten cannot trap air and therefore will not rise in the oven.
Make sure your sourdough loaf has risen enough. The under-proofed dough won't rise because there won't be enough gas in the dough from the yeast to make it rise.
Why isn't my sourdough rising?
Your sourdough starter could be too young, your room is too cold, your dough has not proofed for long enough.
How can I make my sourdough sourer?
If you want a more sour loaf, use your starter after its peak. For instance, you can make your levain at 11 pm and then let it rise overnight.
Letting your sourdough loaf sit in the fridge for longer will also make it sourer. Some people leave their loaves in the fridge for two days to increase the sour flavor.
How can I improve the crumb of my sourdough?
Higher hydration levels create more holes in your sourdough loaf. This recipe is 80% hydration which is pretty high. Make sure to create a good structure for your loaf during the stretch and folds. Give your dough time to rise in the bulk ferment stage. Distribute the bubbles evenly during the book fold and cinnamon roll stage.
Whew, I know that was a ton of info for you but I hope it all made sense to you! If you have a question, feel free to leave me a comment below.
Tips for success!
- Remember, making sourdough takes time but not a lot of work. Only a few minutes here and there. Use your timer to remind you when its time to do a step.
- If your levain rises within 5 hours, it's strong enough to make bread
- Always use wet hands when handling the dough to prevent sticking
- Use stretch and folds, book folds and the cinnamon roll fold to create strength in your dough which helps it to rise taller and have an even, open crumb.
- Make sure your dough has doubled in size before you put it in the fridge. It won't rise at all in the fridge and we will bake it straight from the fridge in the morning.
- Don't be afraid to score deeply! this helps the bread rise. ¼"-½" deep with a lame or sharp knife.
- Store leftover bread (if you have any) in a plastic bag to keep it moist. Toast it in the oven or in a toaster oven to bring back that crispness to the crust!
Related Recipes
How to make an active sourdough starter
Sourdough discard pancakes
Sourdough discard pikelets
Fast bread recipe
Honey whole wheat fast bread
Sourdough Bread WorkBook
Sourdough Starter Workbook
Recipe
Equipment
- Banneton or medium bowl with tea towel
- Lame or sharp razor blade
- Dutch oven or cookie sheet with roasting lid
Ingredients
Levain
- 50 grams mature unfed starter
- 50 grams whole wheat flour or any unbleached flour
- 50 grams filtered or bottled water 90ºF
Sourdough Ingredients
- 300 grams bread flour
- 100 grams all purpose flour or more bread flour
- 100 grams whole wheat flour spelt or rye is great too
- 400 grams water any kind, doesn't have to be warm
- 11 grams salt
Instructions
Day 1
- In the morning, combine 50g of your unfed starter with the whole wheat flour and warm water in a clear container with straight sides and mix until no dry flour remains. This is your levain. Mark the height with a piece of tape or erasable marker.
- Place the levain into a warm area like the oven with the light on and the door cracked, on top of the fridge. A warm area is between 72ºF-95ºF. Starter will die if the temp rises above 130ºF
- Let your levain rise until it has reached its peak (the highest point in its rise before it starts to fall again). I track this by checking my levain hourly. If your levain doubles in size within 5 hours you can use it to make bread. If it doesn't your starter isn't strong enough yet or your room is too cold.
- While the levain is rising, make the autolyse (mixture of flour and water before adding the levain).
- Once your levain has peaked, add 140 grams to the autolyse. This is pretty much the whole container minus whatever is stuck to the sides. Also add in the salt and then mix it all together with your wet hands. Pinch, fold, push with your fingers until it's all cohesive and evenly mixed. Cover it with plastic wrap and let it rest for 30 minutes.
- Begin your first stretch and fold. With a wet hand, lift one side of the dough and pull it to the point of resistence but don't tear it. Fold it over the top of the dough. Rotate the bowl 45º and repeat the stretch and then fold the dough over. Do this for a total of 4 times. Cover the dough with plastic wrap and let it rest for 60 minutes in a warm area.
- After 60 minutes, begin your second stretch and fold. The same process as the first stretch and fold. Cover and rest 60 minutes in a warm area.
- After another 60 minutes, begin your third stretch and fold. Same process. Rest for 60 minutes. If the dough still feels really loose then you may want to do a fourth stretch and fold.
- After your stretch and folds are complete, cover your dough and let it rise for 1-2 hours until it has doubled in size. This can take even longer than 2 hours if your room is cold or your starter is weak so don't rush it and just wait until the dough is ready.
- Once your dough has doubled you can shape it. Take your wet hand and get the countertop a little wet. This prevents sticking. Gently pour the risen dough onto the counter and stretch it out into a rectangle horizontally in front of you, about the size of a sheet of paper. Pop any big bubbles just as you would if you were making regular bread. Big bubbles make problems in the bread later.
- Fold the right side of the dough over itself so that the right edge lines up with the center of the dough. Now take the left side of the dough and fold it over the top. This is called a simple book fold and helps distribute the bubbles more evenly in your final loaf so all your bubbles aren't on the top or bottom.
- Now roll the dough up like a cinnamon roll. Nice and tight. This helps make that gluten even stronger so our bread can rise in the oven. Make sure the seam is on the bottom. Cover the dough with the bowl and let it rest for 15 minutes.
- While the dough is resting, prepare your banneton. Dust on some flour generously. You can also use a bowl with a tea towel and it works just as well.
- Turn your dough over so the seam is facing up. Gather all the edges together and lift the dough like a bag and plop it into your floured banneton. Pinch together any loose edges.
- Place the whole basket into a plastic bag to keep it from drying out and put it into the fridge overnight. The dough will not rise or do much of anything in the fridge. It's like a pause button for sourdough so make sure all your shaping and rising is done before going into the fridge.
Day 2
- In the morning, preheat your oven to 500ºF with the dutch oven inside for 30 minutes. Place a sheet pan at the bottom of the oven to prevent your dough from getting too dark inside the dutch oven.
- Cut a piece of parchment paper about 10"x10" and place it on top of the dough. Turn the banneton upside down and gently remove the dough from the basket.
- Use your lame or razorblade to cut a big "c" into the side of the dough about ¼" to ½" deep. Don't be afraid to score! This allows the bread to rise nice and tall and you want tall bread right? You can also add in decorative scoring like wheat on the side if you desire.
- Lift the dough by grabbing the two corners of the parchment paper and place it into the hot dutch oven. Be quick but careful to avoid the sides of the dutch oven. We don't want any burns!
- Place the lid on top of the dutch oven and shut the door. Reduce the temperature to 450ºF and bake covered for 30-40 minutes.
- Remove the lid and bake for another 20-25 minutes depending on the color that you want!
- After baking, remove the bread from the hot dutch oven and place it on a cooling rack to cool for ONE HOUR. Don't cut it too soon or the inside will be gummy.
- Enjoy that bread! You worked hard for it!
Video
Notes
- Remember, making sourdough takes time but not a lot of work. Only a few minutes here and there. Use your timer to remind you when its time to do a step.
- If your levain rises within 5 hours, it's strong enough to make bread
- Always use wet hands when handling the dough to prevent sticking
- Use stretch and folds, book folds and the cinnamon roll fold to create strength in your dough which helps it to rise taller and have an even, open crumb.
- Make sure your dough has doubled in size before you put it in the fridge. It won't rise at all in the fridge and we will bake it straight from the fridge in the morning.
- Don't be afraid to score deeply! this helps the bread rise. ¼"-½" deep with a lame or sharp knife.
- Store leftover bread (if you have any) in a plastic bag to keep it moist. Toast it in the oven or in a toaster oven to bring back that crispness to the crust!





Kimberly L Lowry says
Hi Liz, I really love this recipe, and am sending a thank you for your step by step instructions. During this pandemic lock-down, un-lock-down, lock-down-again, time I wait for my job to come back, when the restaurant I work for re-opens (hope is in my heart), and I have time to do a lot of things around the house. Plus, due to staying isolated I cook and bake more, at home, than ever. My kitchen skills are in good shape, as 30 years of cooking, and baking a bit, in the food industry helps keep them strong. Though I can bake massive amounts of sweets I had never tried sourdough bread. Your recipe, and its understanding tips have worked well for me. Changes I made, or had to make due to lack of some ingredients are: got starter from the prime baker of the restaurant, fed and kept alive and healthy; at first only had all purpose flour and high gluten/bread flour in my kitchen; have no dutch oven; had no scale at home; knew nothing of chemistry of bread baking -- and so I tried the recipe by improvising a bit. The first loaf turned out alright. Its rise was higher than later loaves, perhaps due to the improvised amounts of weight of flours vs. cups of flours, or water amounts used. But as the months have gone by I got a scale, wheat flours (some special flours ordered from a well known bakery in my town) and am practicing more. I took your advice and reduced the grams of water when, after purchase of the scale, the dough was incredibly wet and hard to handle no matter how long I let it do its thing. All in all your recipe and advice has taught me a great deal about baking, chemistry and all that may come with patience. Thank you!
Michelle says
Thank you for your great step by step instructions! I baked off my first loaf and it came out great! After that, I realized I had a busy week coming up. I wouldn’t be able to keep up with the daily maintenance, so I put it in the refrigerator for a week. What should I do to get my starter ready to bake again?
Sugar Geek Show says
You can just feed it again on the same feeding schedule. Discard half, and feed it as normal and keep on the same schedule as you did before. Once you start feeding it again, it will come back to life after a few days. Hope this helps! I've left my starter in the fridge for like a year and it's come back to life before, so no need to worry 🙂
Tammy Heppner says
Thank you so much for your sourdough starter workbook. I just started my starter two days ago and following your instructions helps me to be more confident! I look forward to when I actually get to make sourdough bread!!