


Tender, flaky biscuits loaded with bits of crispy bacon, shredded cheddar cheese, and fresh chives. It's a whole meal in a biscuit and is ready to eat in only 20 minutes. These biscuits are adapted from my master flaky biscuit recipe.

What makes these biscuits so great!
Easy To Make - You only need one bowl and your hand for mixing!
Fast - Minutes to assemble and only 20 minutes to bake!
Customizable - The flavor options are endless!
What's in this blog post
What ingredients do you need?
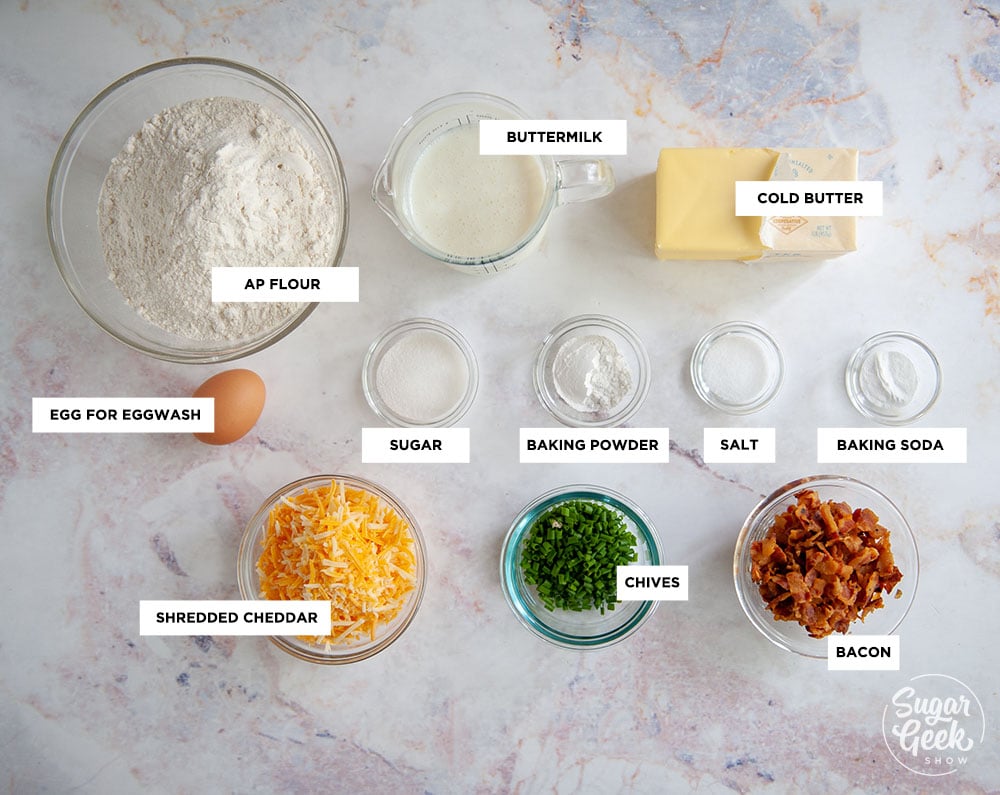
Buttermilk - Southern recipes often use buttermilk because of the addition of flavor and also it's tenderizing qualities.
Cold Unsalted Butter - Cold butter is extremely important to this recipe. Cold butter holds its shape in the dough and creates those beautiful layers. We're using unsalted so we can control the salt level of our biscuits.
Baking Powder - Gives our biscuits a fluffy and soft texture
Baking Soda - Reacts with the buttermilk to provide lift, color, and flavor
Shredded Cheddar - I like Colby jack cheese but you can use any hard cheese you prefer like pepper jack, white cheddar, or even parmesan. Stay away from soft cheeses. Shred your own since packaged cheese contains cornstarch which is drying.
Chives - I love the garlicky flavor of chives but you can leave them out or switch them out for another herb like rosemary or thyme.
Cooked Bacon - Bacon adds tons of flavor. Pre-cook your bacon before mixing into the dough to keep it crisp. Switch out the bacon for ham or prosciutto!
Useful Tools & Equipment
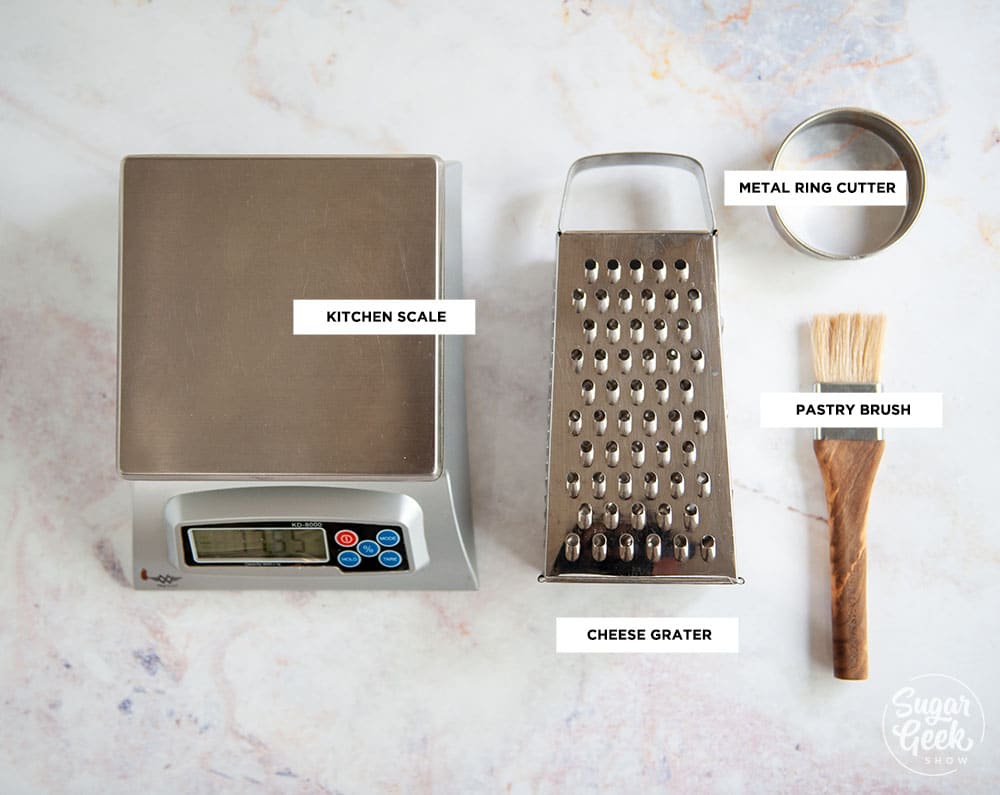
Kitchen Scale - Makes measuring incredibly easy and fewer dishes to clean. This is my favorite kitchen scale. You can learn more about how to use a kitchen scale for baking here.
Cheese Grater - I have tried many many different types of cheese graters but for whatever reason, I love this one the most. It makes huge chunky pieces of butter when I grate it cold and produces the best flaky biscuits. No cheese grater? Use a fork to "cut" the butter into your flour or use a pastry cutter.
Metal Cutter - A sharp metal ring cutter is going to produce the flakiest and tallest biscuits. If you don't have a metal cutter you can use a drinking glass or even a soda can cut in half.
Pastry Brush - A pastry brush is great for applying egg wash evenly for a beautiful golden brown biscuit. No Pastry brush? You can use a clean, unused paintbrush, paper towel, or even your fingers.
Pro Tip - Preheat your oven for at least 30 minutes. Perhaps the secret to the flakiest biscuits is using COLD butter and a HOT oven. A hot oven immediately causes butter to melt, water to evaporate lift those layers.

I honestly love making fresh biscuits for breakfast. It feels like you get a lot of reward for very little effort involved. I have broken down my process of making tall flaky biscuits below so you can follow along.
I've also included tons of tips for getting biscuits with a perfectly browned top, how to easily measure butter and ideas for more mix-ins to customize your biscuits.
Step-By-Step Instructions
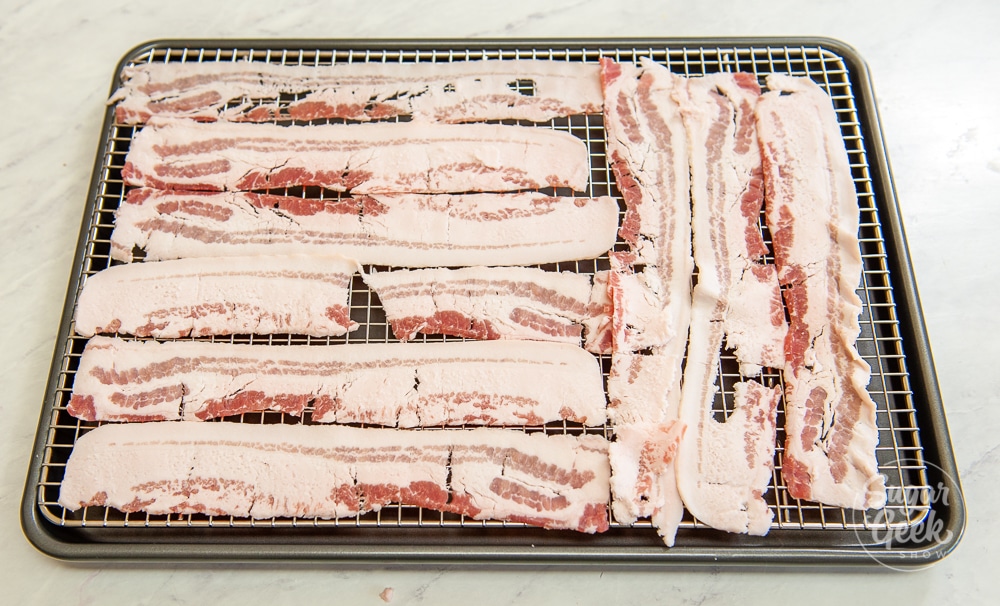
Step 1 - Prepare your mix-ins. I learned this trick for cooking bacon in pastry school. Arrange the bacon on a cooling rack (heat safe) and place that onto a sheet pan. Bake in a 400ºF oven for 15-20 minutes until it's nice and crispy. Let it cool and chop it up!
The cooling rack drains the fat away from the bacon and everything cooks evenly. Super easy.
Step 2 - While the bacon is cooking, chop your chives, and shred your cheese. How much you use is up to you. I just grabbed a handful of chives (about ¼ cup) and shredded about a cup of cheese.
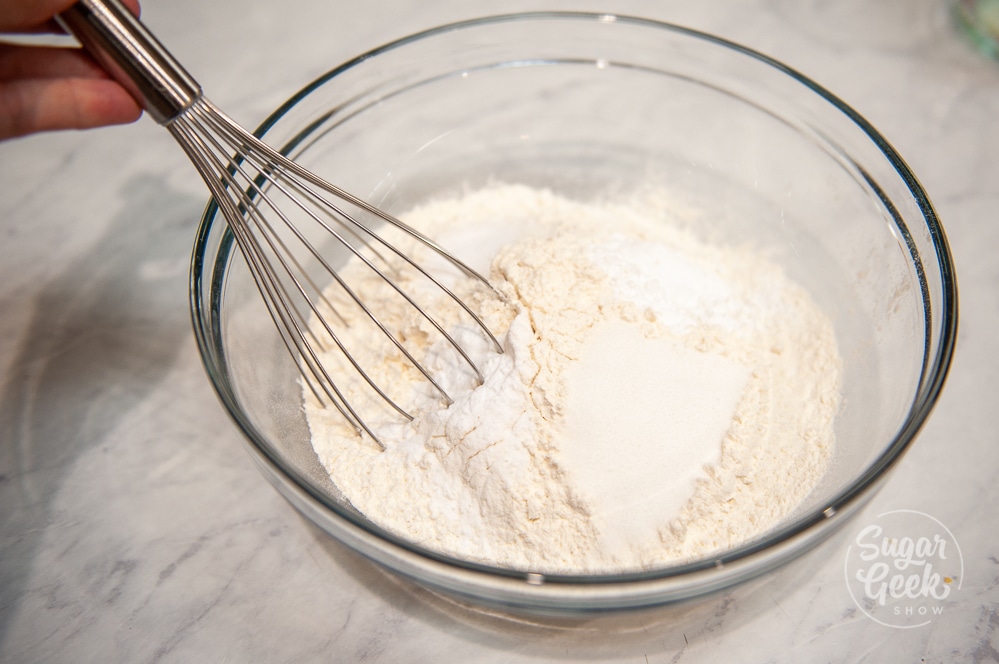
Step 3 - Once your bacon has cooled and has been chopped, you can start making your biscuits. Begin by placing the flour, sugar, salt, baking powder, and baking soda into a large bowl. Whisk to distribute everything evenly.
Step 4 - Turn on your kitchen scale, place the bowl of ingredients on top. Press the zero or tare button to remove the weight of the bowl and ingredients. The display should say zero.
Step 5 - Start grating your COLD butter directly into the bowl. So easy and such a time saver. No transferring butter from a separate bowl to the flour and getting soft. Halfway through I toss the butter and flour so I don't end up with a huge ball of butter. Then I continue grating until I have added the right amount.
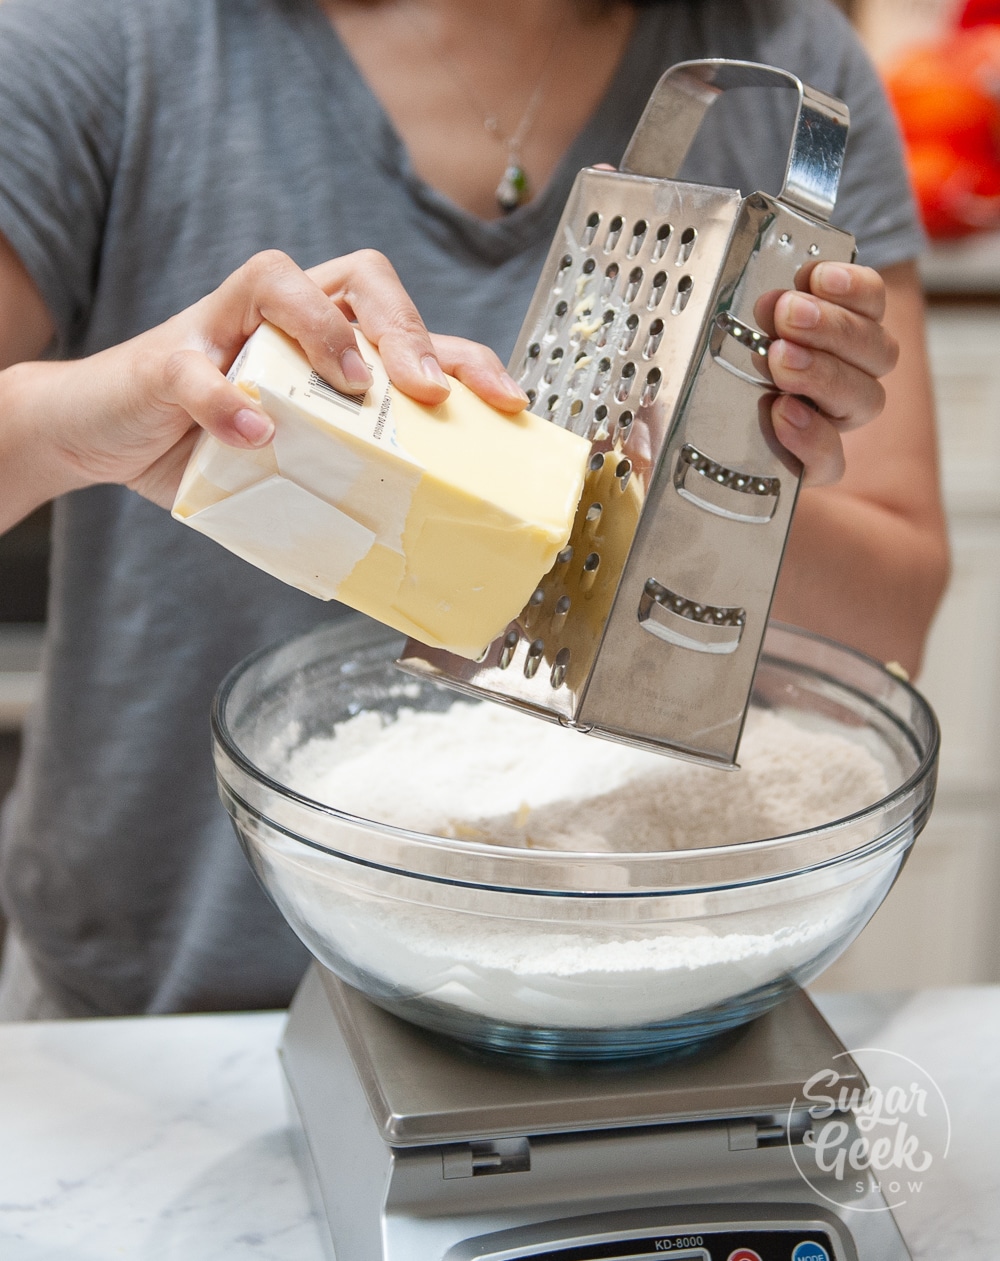
Step 6 - Toss the flour and butter together until all the butter is coated with flour. Do this quickly and lightly to avoid warming the butter up with your hands. You can also use a spoon if you have really hot hands.
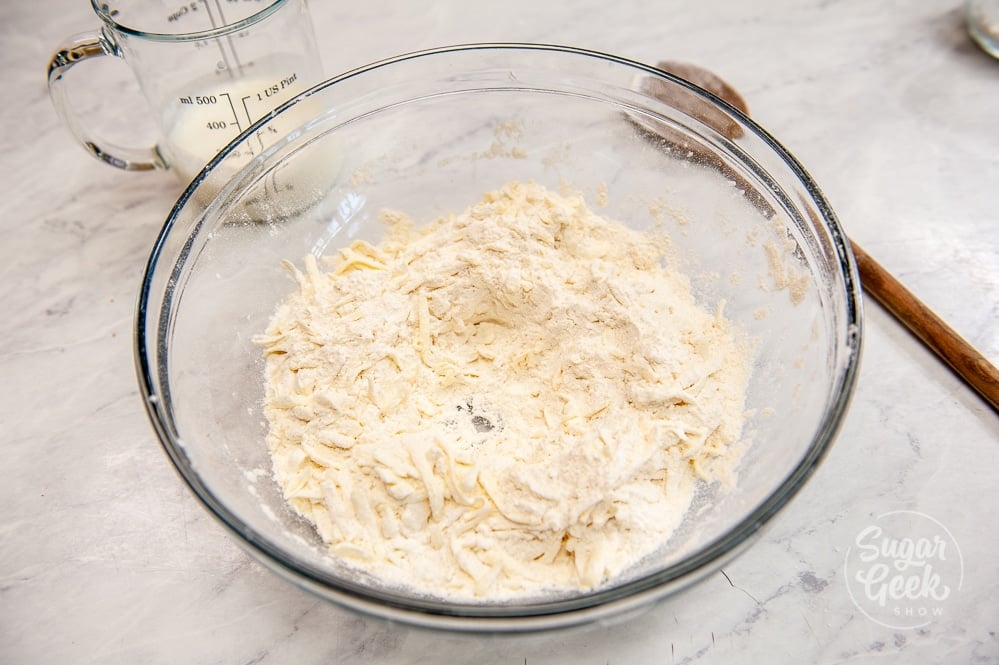
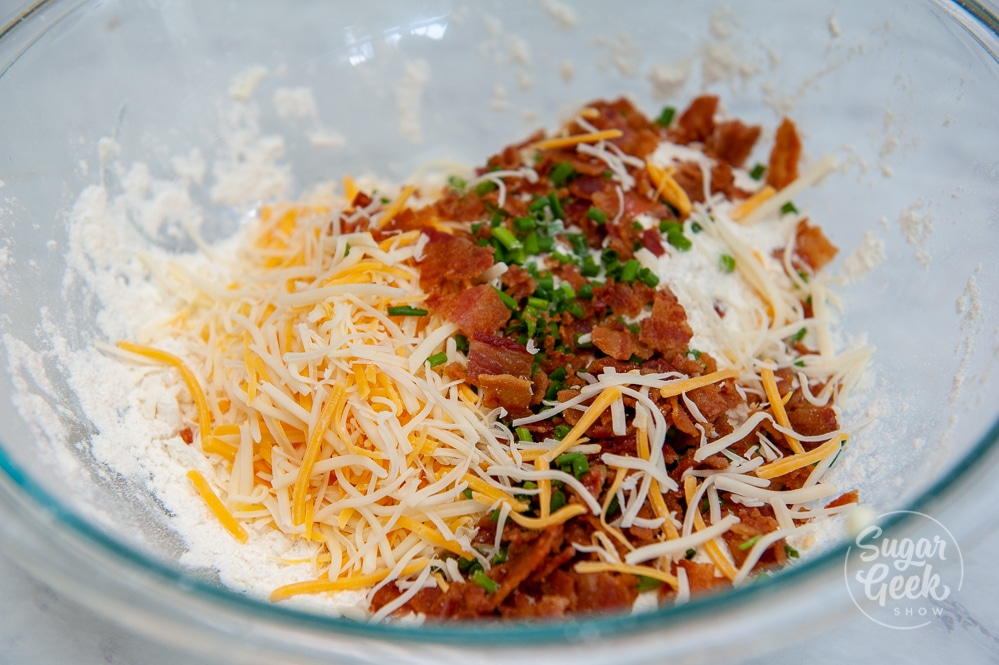
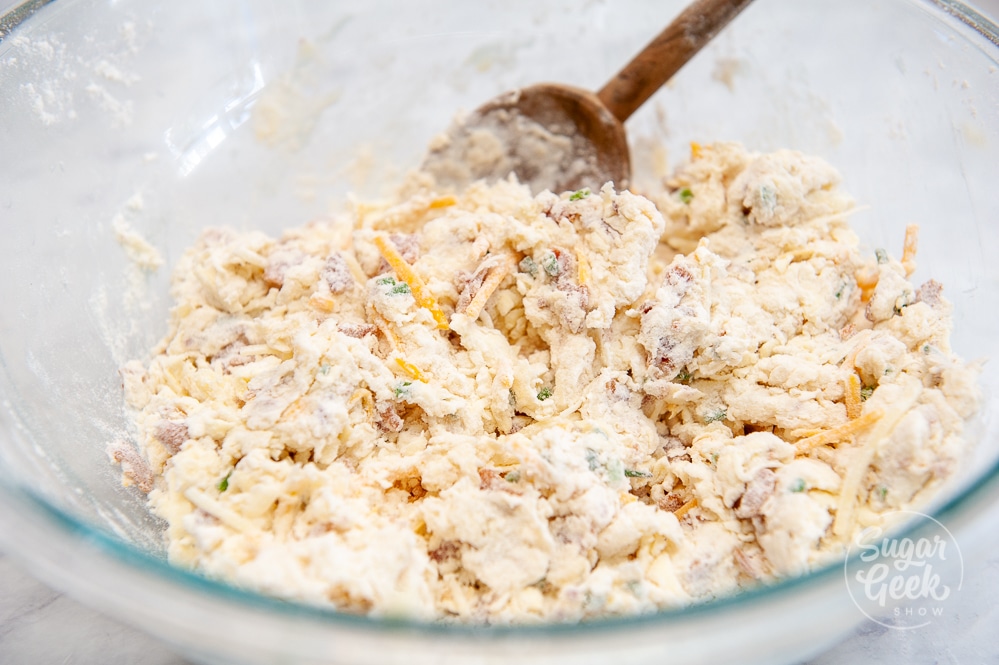
Step 7 - Add in your chopped bacon, chives, and cheddar cheese and toss to combine.
Step 8 - Make a well in the center of your ingredients and add in the COLD buttermilk. Straight from the fridge if you can. Again, you can place the bowl of ingredients onto your scale, press the tare button to zero out the weight of the bowl, and add in the milk until you reach the correct amount.
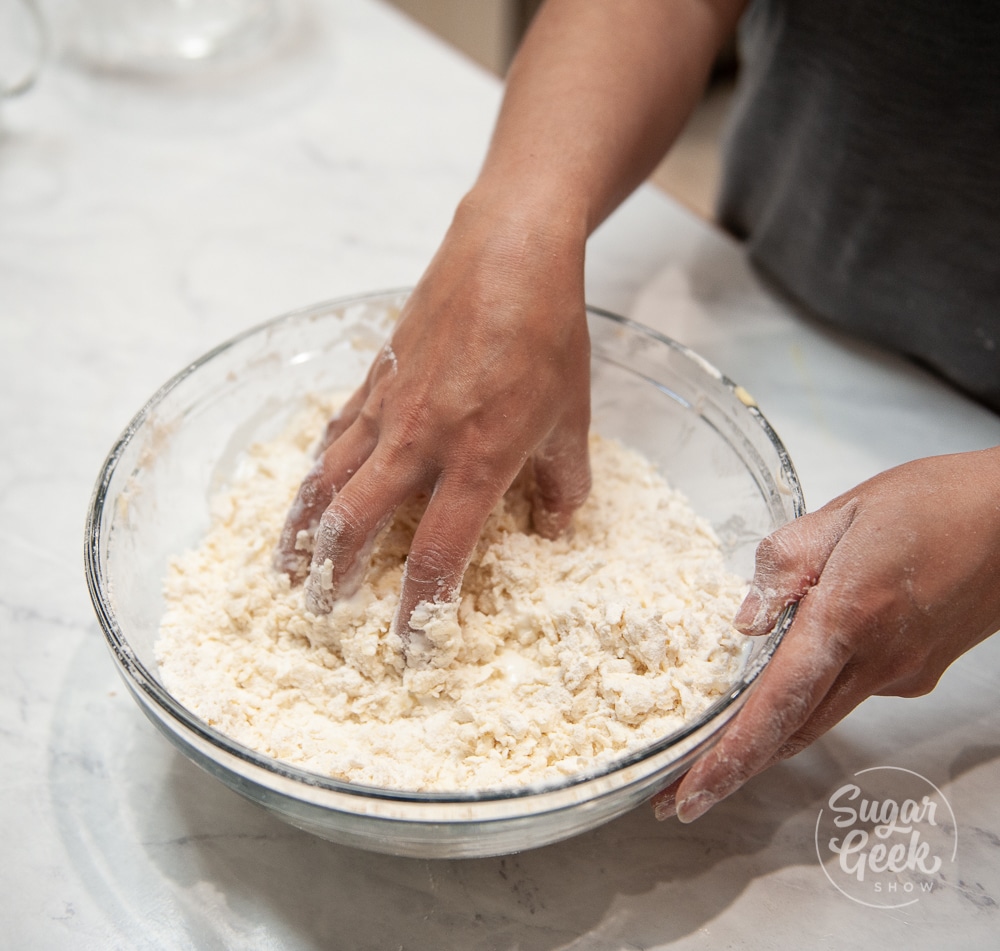
Step 9 - Make a "claw" with one hand and mix. The goal is to get rid of all the dry flour, not to make a smooth dough. The dough will look rough and should look rough. Ugly dough makes delicious biscuits. (I didn't have a photo of this so I used the photos from my master biscuits recipe or you can watch the video in the recipe card for a visual)
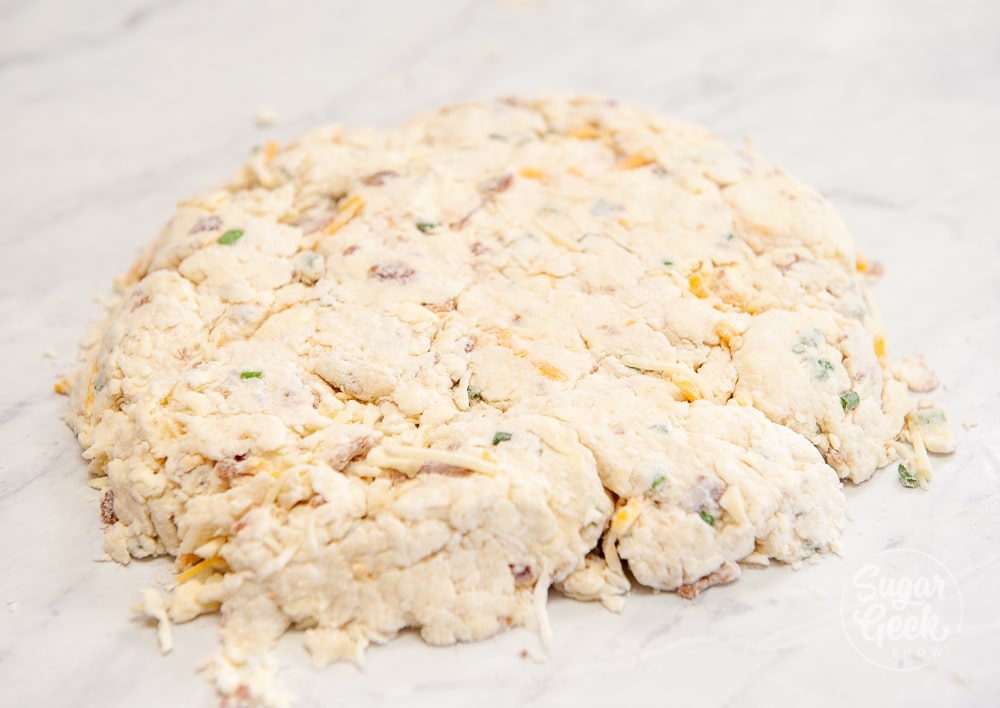
Step 10 - Once the dough looks like this, pour it onto a lightly floured surface
Step 11 - Press the dough into a rough circle shape. Don't worry if it's not sticking together.
Step 12 - Now we will begin folding the dough over onto itself. It will be rough and messy at first. This fold is called a "turn".
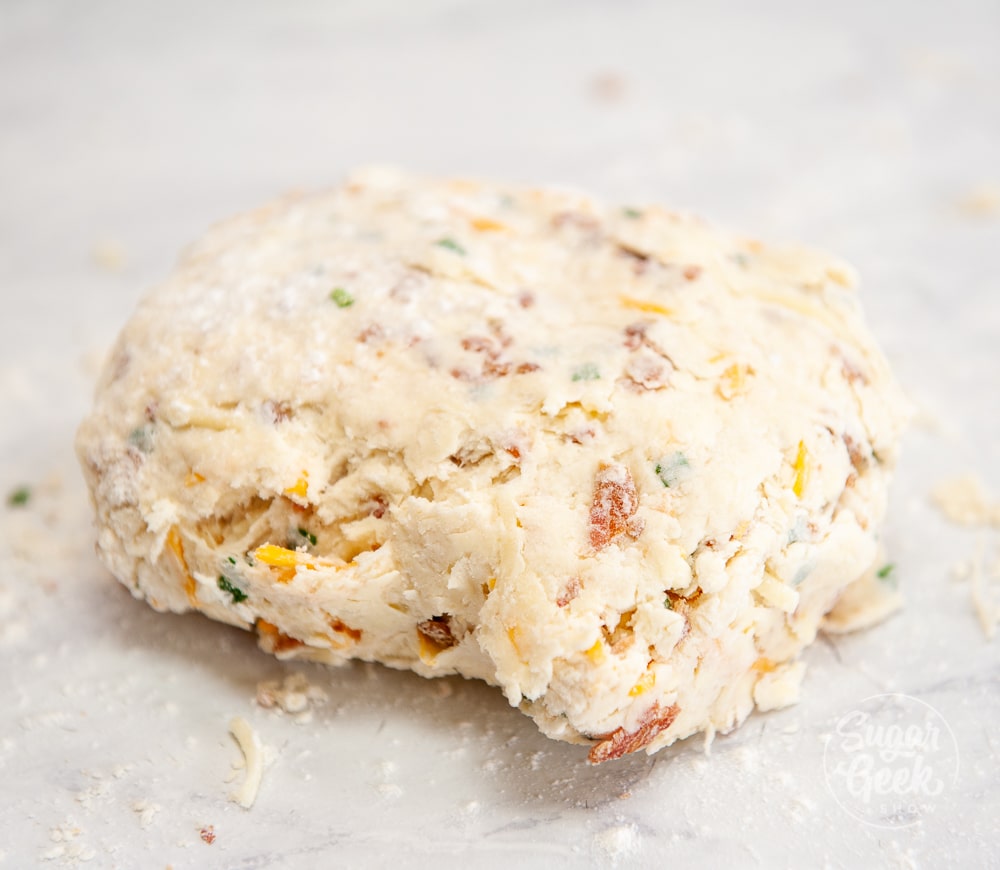
Step 13 - Now press the dough down until its about 2" tall. Then turn the dough 45º (so the top of the dough is rotated until it's facing your right hand) Now repeat the fold once again and press flat to 2" tall again. This is turn 2.
Pro Tip - Folding butter into dough this way is also called lamination and is the process of creating layers of butter between layers of flour. This butter expands during baking and is what causes flaky layers of butter to form.
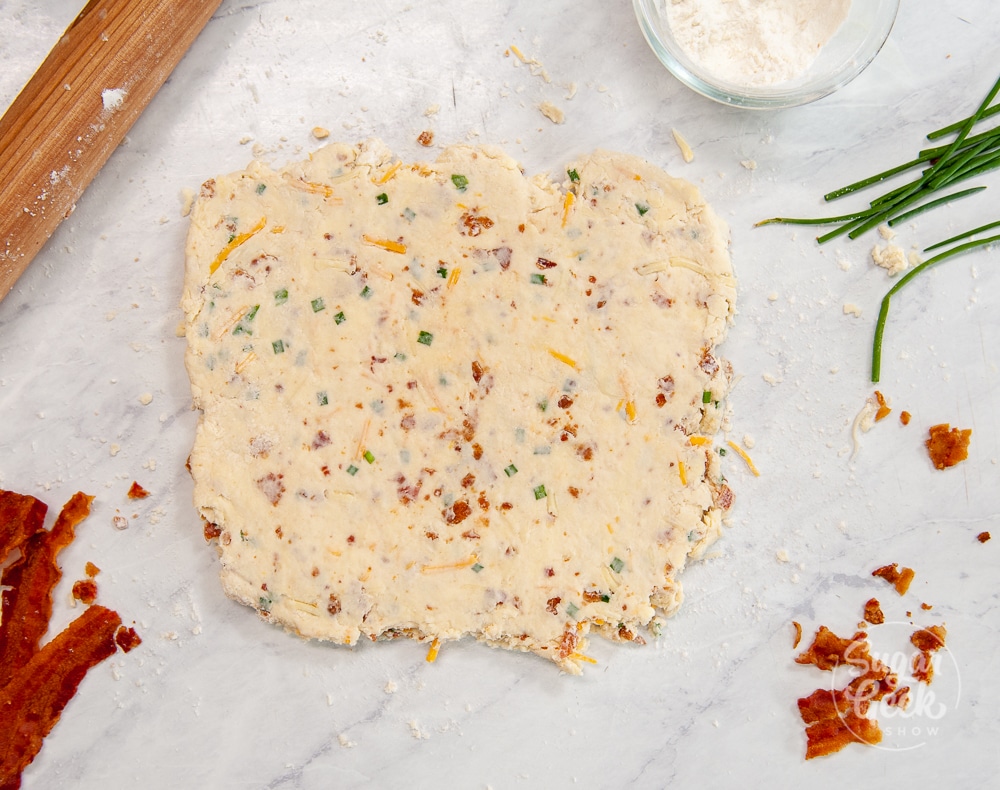
Step 14 - Repeat this process 4-5 times to create layers. If the dough ever feels stiff or stretchy, put it in the fridge for 10 minutes to let the gluten relax and continue folding. After the last fold, roll your dough out with a lightly floured rolling in until your dough is about 1" tall.
Pro Tip - Press straight down and pull straight for the best layers. Twisting will cause the dough to seal and stop your biscuits from rising.
Step 15 - Cut out your biscuits using a sharp metal cutter. I can usually get about 12 biscuits at first. Cut as close together as you can. Arrange them on a parchment covered sheet pan with about ¼" of space in between the biscuits which helps them rise evenly.
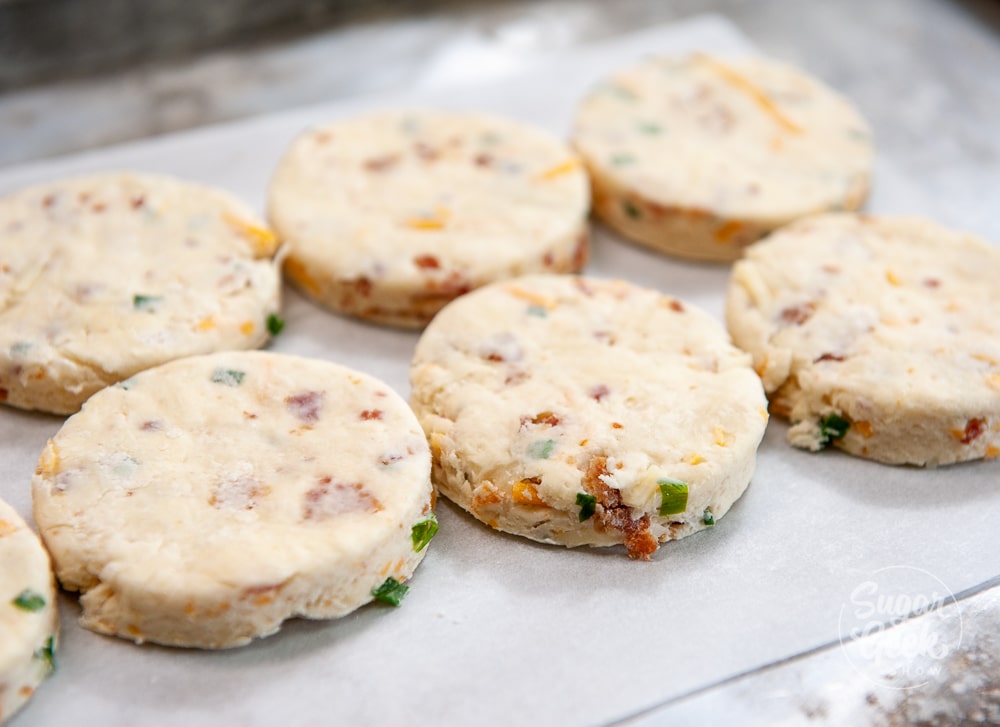
Step 16 - Press the leftover dough together. It will look ugly, it's ok. Get as many biscuits as you can out of the leftover dough. These generally don't rise as much because the layers are now misaligned but they will still taste great.
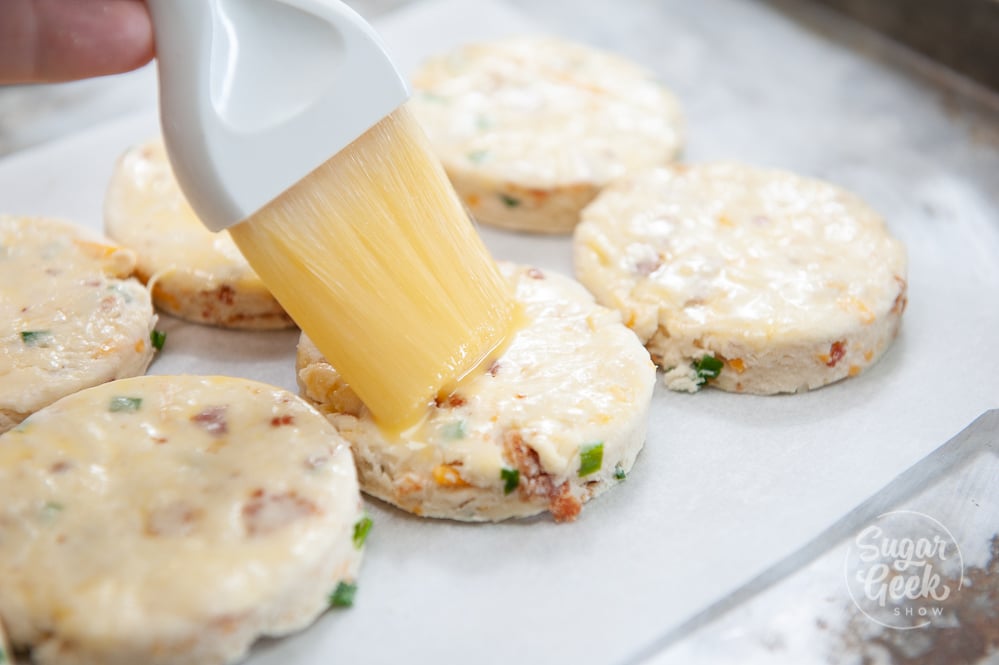
Step 17 - Brush the tops of your biscuits with egg wash. ONLY the tops. Any drips down the sides will seal your layers together and prevent them from rising.
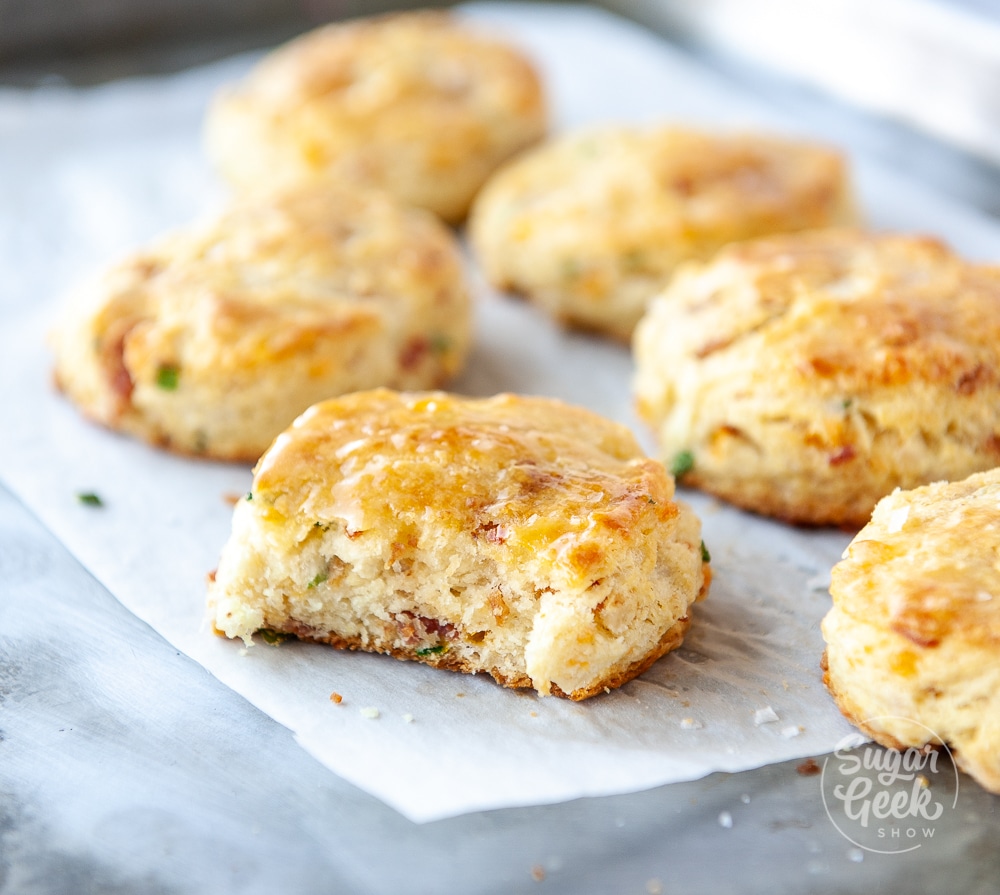
Step 18 - Preheat your oven to 375ºF. Bake the biscuits for 20-25 minutes. I rotate mine halfway through to promote even browning.
Step 19 - When your biscuits are done, take a moment to appreciate those gorgeous layers!! so pretty! Then immediately brush the tops with melted butter and sprinkle on some flaky salt (optional).
FAQ
You can change the size of your biscuits if you want them smaller or larger. The baking time will need to be adjusted. Smaller biscuits bake faster, larger biscuits will take more time.
You can use milk instead of eggs to promote browning on top of your biscuits.
The options for adding in other goodies into your biscuits are pretty much endless! Use your imagination. You can use ham cut into small pieces, shredded parmesan, chopped fresh rosemary, roasted garlic, prosciutto, jalapenos, thyme, or pepper jack cheese.
To freeze uncooked biscuits, place the whole pan of biscuits on parchment paper into the freezer overnight. The next day you can remove them from the parchment paper and place them into a freezer bag for up to 3 months.
To bake your frozen biscuits, let the biscuit defrost first then bake them as usual.
You can also freeze the leftover biscuits after they are baked. Just defrost the biscuit and re-warm it in the oven to refresh the texture of the biscuits.
Related Recipes
Flaky Buttermilk Biscuits
How To Make Buttermilk
How To Use A Kitchen Scale For Baking
Fast Bread Recipe
⭐⭐⭐⭐⭐ Have you made this recipe? Leave me a review below!
Recipe

Equipment
- Kitchen Scale
- Cheese grater
- pastry brush
- Metal cutter
Ingredients
Bacon Cheddar Chive Biscuits
- 20 ounces all-purpose flour
- 2 tablespoons granulated sugar
- 1 tablespoon baking powder
- 2 teaspoons baking soda
- 2 teaspoons salt
- 6 ounces unsalted butter cold, grated or cut into small pieces
- 12 ounces buttermilk cold
- 8 pieces bacon about ¼ cup baked and chopped
- 6 Tablespoons fresh chives about ¼ cup finely chopped
- 2 ounces melted butter for the tops of the biscuits
- 1 Tablespoon flaky salt for topping (optional)
- 4 ounces cheese shredded
Egg Wash
- 1 whole egg
- 1 Tablespoon water
Instructions
- Preheat your oven to 375ºF. Place the oven rack in the middle of the oven. Butter and buttermilk should be very cold, straight out of the fridge. Pre-measure the rest of your ingredients so mixing goes as quickly as possible.
For The Egg Wash
- Whisk the egg and water together until no egg white remains
For The Biscuits
- Sift together the flour, sugar, baking powder, baking soda, and salt in a large bowl.
- Grate the cold butter into the dry ingredients (using a scale makes this very easy) Halfway through, toss the butter into the flour and then continue until you've grated the total amount of butter into the flour mixture.
- Toss the ingredients together to coat all the butter with the flour mixture. Work quickly so you don't melt the butter with the heat of your hands.
- Add in the chopped bacon and chives and toss to combine
- Make a well in the center of your dry ingredients and then add in the cold buttermilk. Pull the dry ingredients towards the center. Make "claw" with your hand or use a fork and mix the dough with the intention of getting rid of all the dry flour. The dough will look rough and shaggy. Don't over-mix it or try to make it smooth.
- Turn the dough out onto a lightly floured countertop
- Flatten the dough roughly with your hands or rolling pin to about 2" in height. Do your best to lift half the dough and fold it in half. This will be messy! Flatten dough down to 2" again.
- Rotate your dough 45º and fold in half again. Repeat 4-5 times. If the dough becomes stretchy or tough, place it in the fridge for 10 minutes to relax the gluten. Then continue folding.
- Roll the dough out to 1" thick with a rolling pin dusted with flour.
- Use a 3" round biscuit cutter or sharp knife to make your biscuits. Press straight down and lift straight up. Do not twist.
- Place the biscuits on a parchment-lined sheet pan with about ¼" of space in between the biscuits. Brush the biscuits egg wash *see note. Do not brush the sides.
- Bake the biscuits at 375° F for 15-20 minutes or until they are golden brown. Rotate the pan halfway through baking for even browning.
- Immediately brush the tops of the biscuits with melted butter and sprinkle on flaky salt. Serve warm. Store leftover biscuits in an airtight container in the fridge. Re-heat to refresh them before serving.
Video
Notes
- Use COLD butter and buttermilk straight from the fridge for the best results. No buttermilk? Make your own homemade buttermilk
- Use a cheese grater to measure out your cold butter directly into the dry ingredients
- Preheat your oven 30 minutes ahead of time to give the biscuits the best lift
- Use a scale to easily measure all your ingredients into the same bowl. Learn more about how to use a kitchen scale for the best results in baking.
- You can use milk instead of egg for the wash
- Use a sharp metal cutter and press straight down into your biscuit dough and lift straight up for the tallest, flakiest biscuit layers.


Leave a Reply