
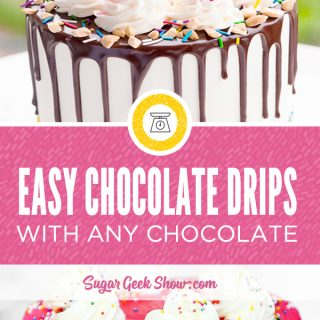

How to make a perfect chocolate drip with any kind of chocolate
A lot of people ask me how to make a chocolate drip for their drip cakes. I normally use water ganache for my drips with white chocolate and food coloring. This makes some colorful drips but sometimes you want a nice decadent chocolate drip.
Drip cakes seem to be the new naked cake and are very on trend right now. Getting the perfect drip can be frustrating if you're a drip cake novice. But don't worry, I'm going to break it down for you and teach you how to make the perfect chocolate drip.
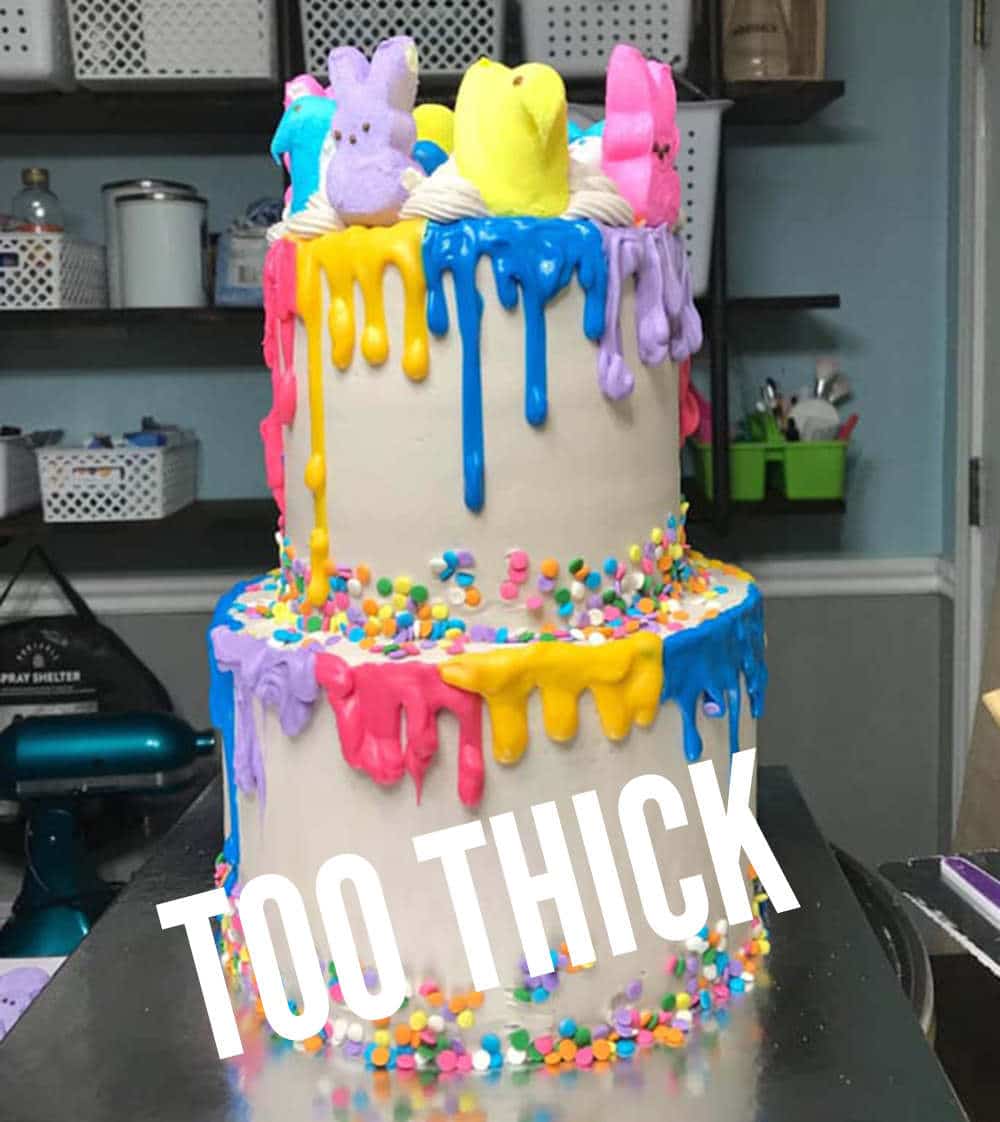
If you've never made a drip cake, don't worry. It's not very complicated at all. I often notice in my cake newbs cake decorating group that people have the most problems with the consistency of their drip. Either too thick or too thin.
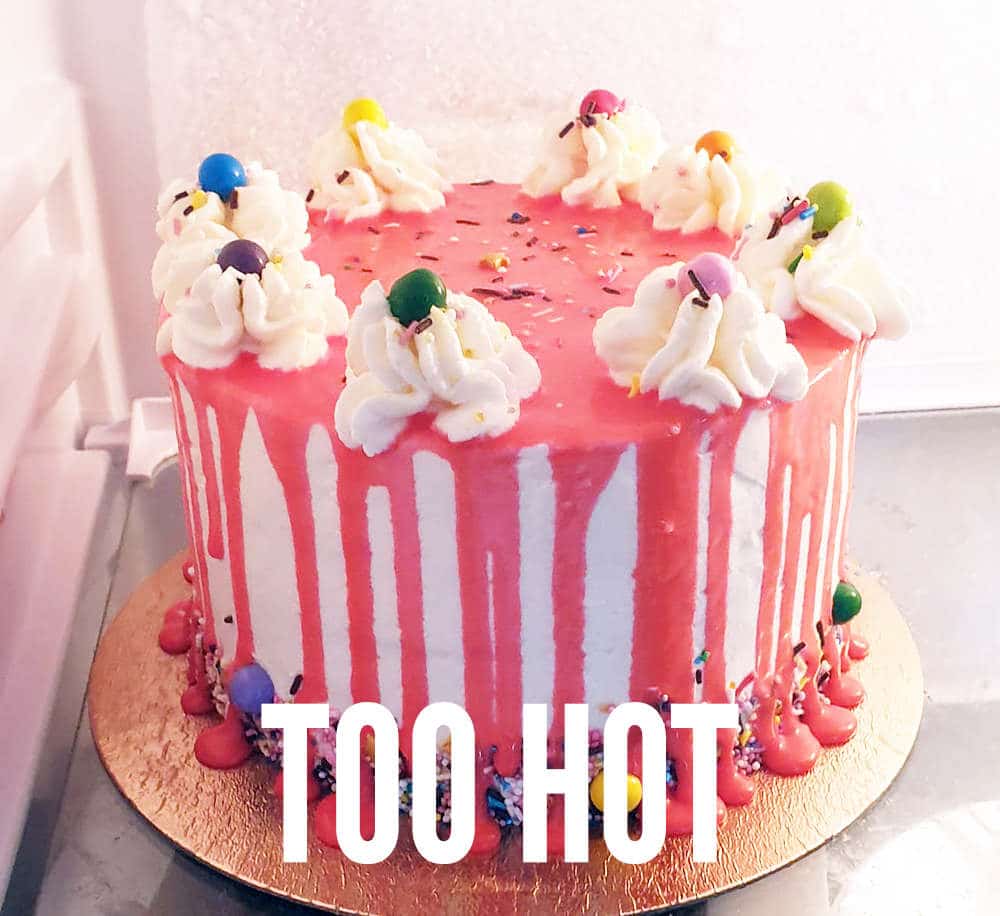
A chocolate drip that is too thin either contains too much liquid or is too hot
So let's dive into those two problems and how to avoid them when creating the perfect chocolate drip
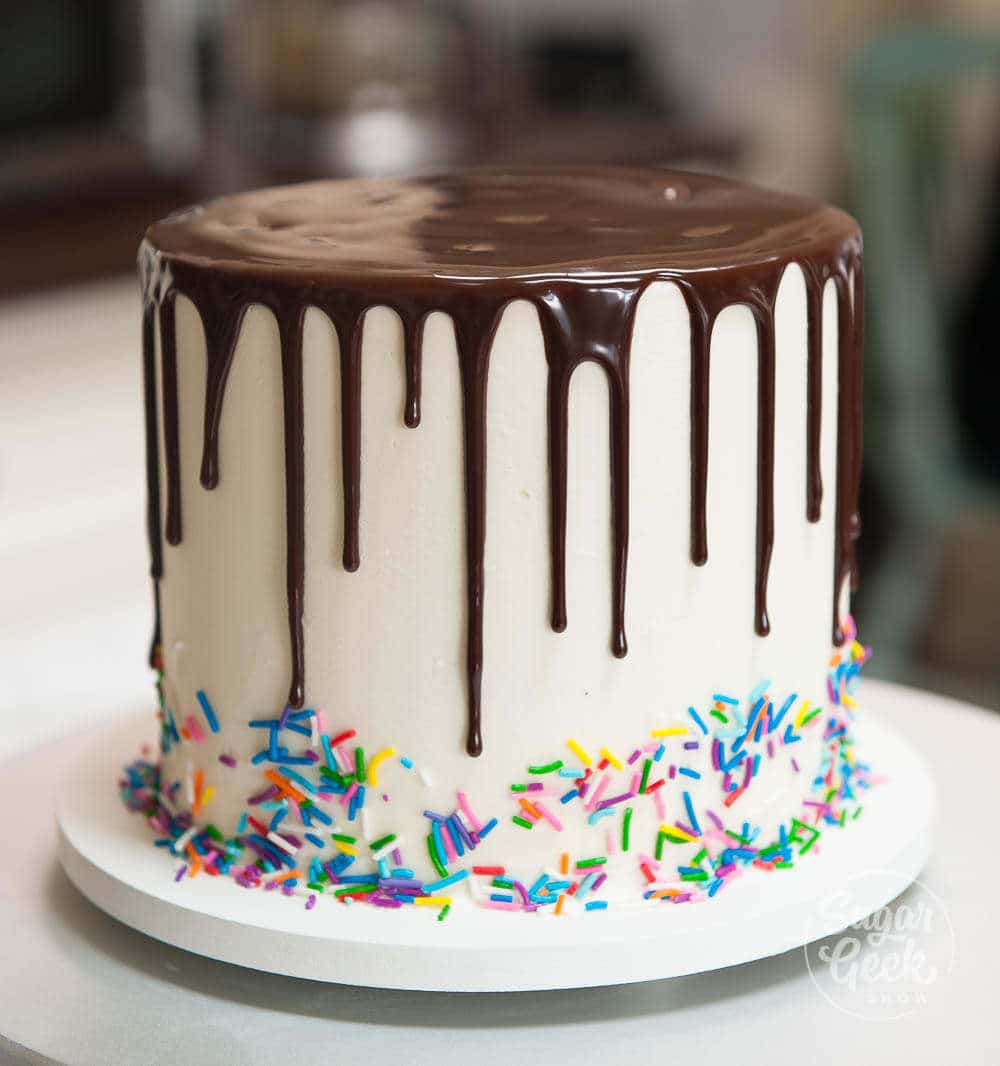
Chocolate drip made with heavy cream and chocolate
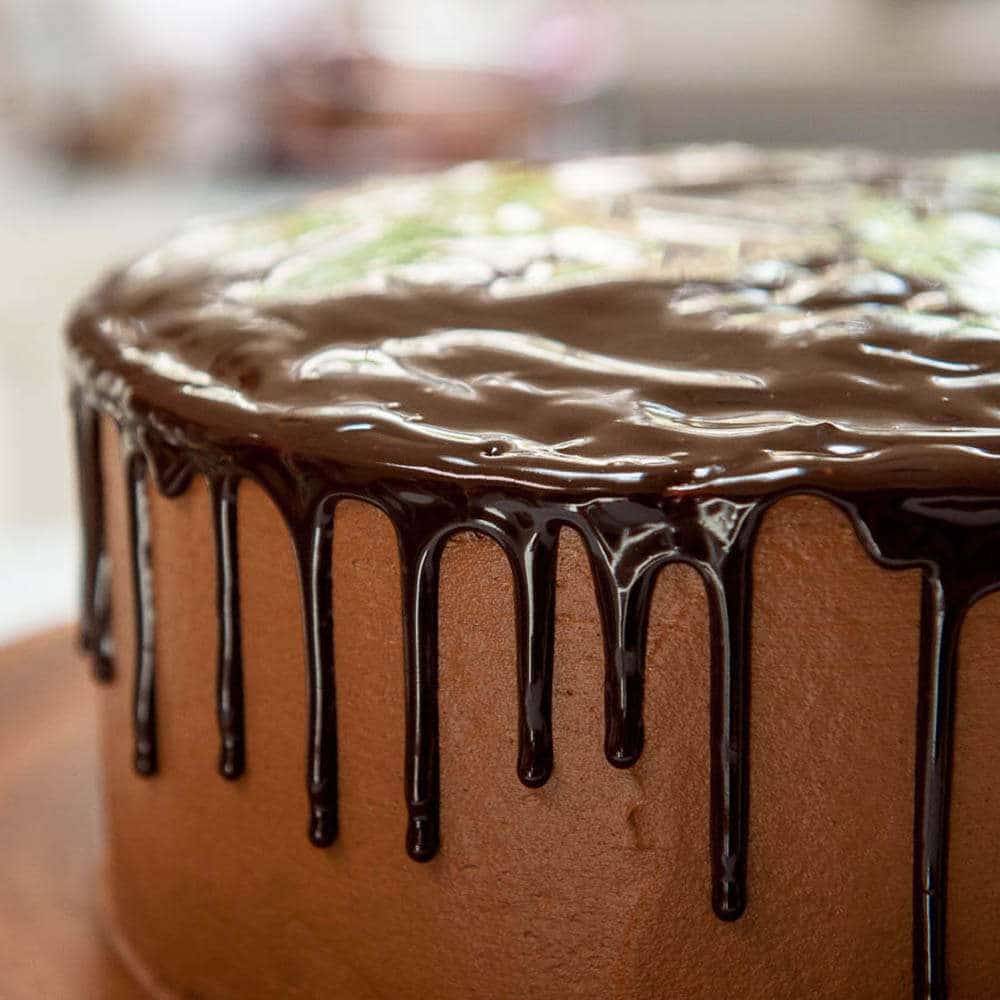
The most popular type of drip is made with chocolate and heavy cream. If you try to simply melt down chocolate and drip it on a cake, it will look very thick and the edges will not smooth out. The reason for this is chocolate by itself is not very liquid and as soon as it hits a cake, it starts to harden.
Chocolate needs some liquid to make it easier to drip. The most common form of liquid used is heavy cream. When you mix heavy cream with chocolate you get something called a ganache. Ganache creates a beautiful drip, sets firm enough to not be liquid but is still soft when you cut into it.
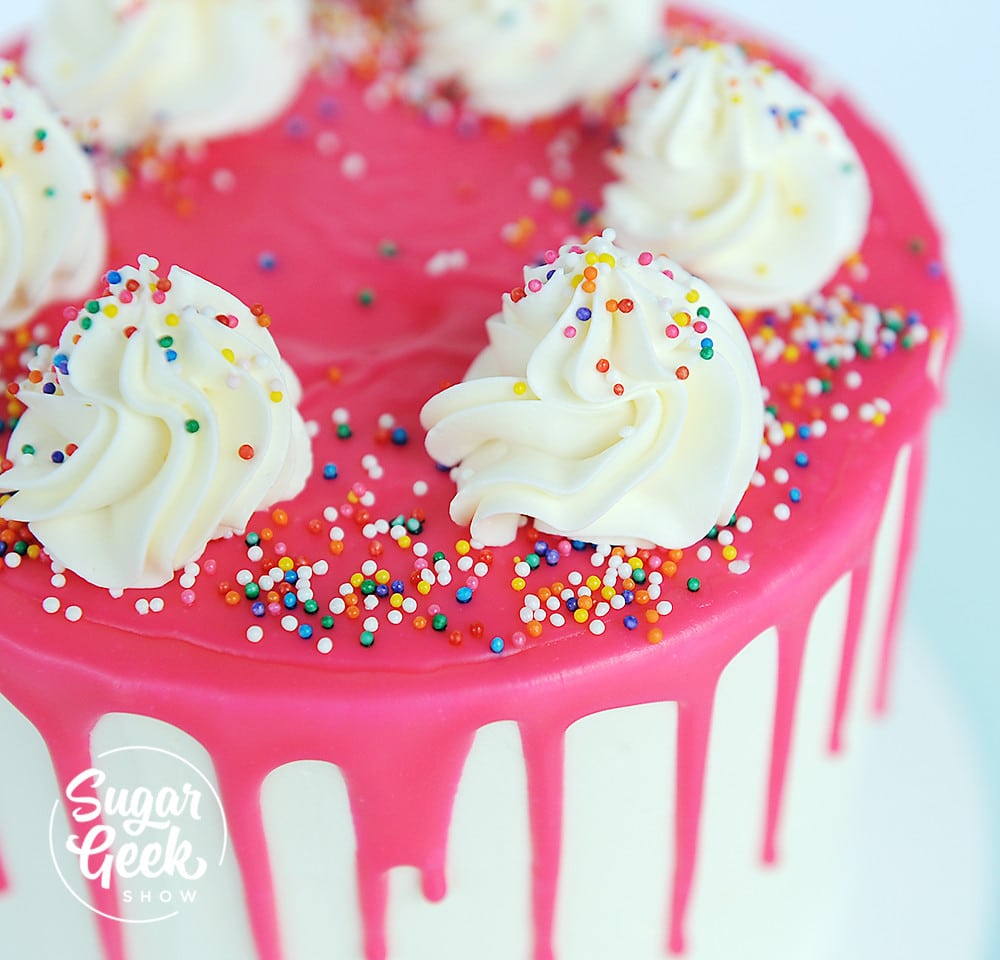
Here is the same cake with a ganache drip instead of just straight melted chocolate. Thank you to Sharp's Sweets for the photos!
Depending on the chocolate you use, you will need to adjust the amount of cream you add. This is VERY important. The darker the chocolate, the more cream you will need. It doesn't matter where you get your chocolate from. It can be chips, melties or from a bar. I like to use mini chocolate chips because they melt easier.
Dark chocolate or semi-sweet chocolate drip recipe
- 6 oz dark chocolate or semi-sweet chocolate
- 4 oz heavy cream
This ratio results in a perfect ganache drip and is what I used for my easy chocolate cake and my banana split cake. The chocolate stays very shiny.
Milk chocolate drip
- 6 oz milk chocolate
- 3 oz heavy cream
I don't usually use milk chocolate for a drip because of its light color but if it's all you have, or you prefer milk chocolate, you can use this ratio.
White chocolate drip
- 6 oz white chocolate
- 2 oz heavy cream
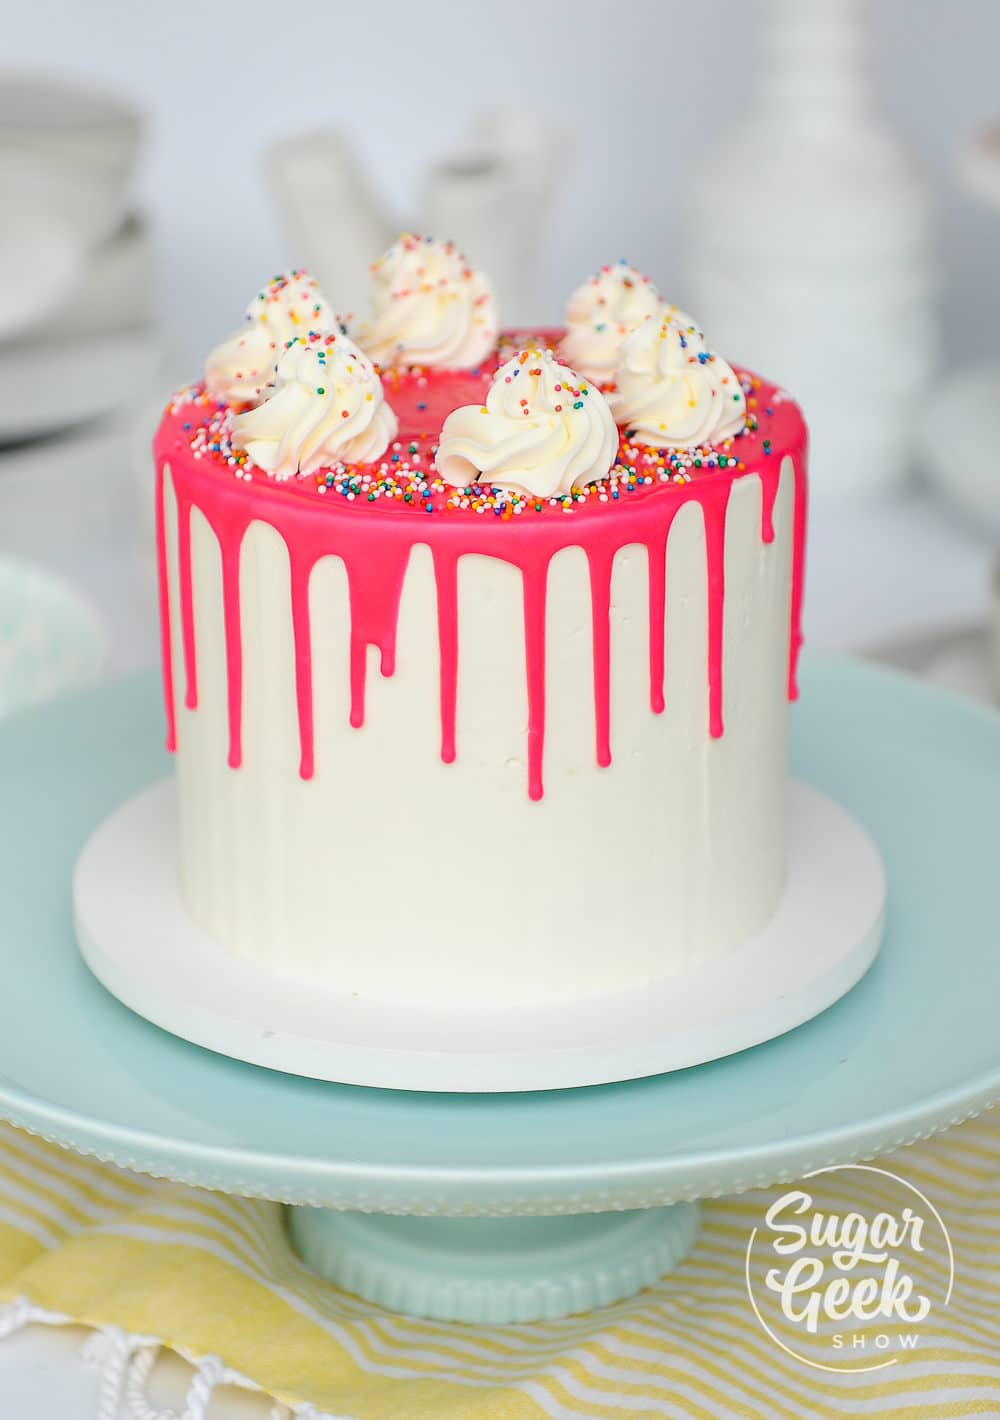
You can see that this ratio uses very little cream. Because white chocolate is a lot softer than dark chocolate. You can easily color your white chocolate drip by adding a drop of food coloring gel to the finished ganache. You do not need to use special food coloring for the ganache.
If your white chocolate drip is too transparent (you can see through it) you can add a drop of white food coloring to make it more opaque.
If you don't have any heavy cream on hand, you might want to try my water ganache drip which in my opinion makes the BEST white chocolate drips.
How to make a chocolate drip
Ok so you have your chocolate and you know how much cream to add. Now let's make our ganache drip. Because we are using such a small amount of cream and chocolate, I like to use the microwave but you can also use a saucepan and a stove top if you prefer.
- I heat my cream in the microwave for about 1 minute or until I can see some steam rising off the surface. Same thing applies to heating on the stovetop. DO NOT BOIL! This will make your cream too hot and will cause your ganache to be grainy.
- Then I microwave my chocolate for about 1 minute just to get it warm. I'm not trying to melt the chocolate at this point.
- Then pour the hot cream over the warm chocolate and let sit 2-3 minutes.
- Whisk the two together. If there are some un-melted lumps, pop back in the microwave for 30 seconds and whisk again until smooth
- Don't over mix or you will incorporate air into the ganache.
- You can now add your coloring.
Tips for a successful chocolate drip
So now we have our ganache made but we're not ready to drip quite yet! If you put the hot ganache on your cake your drips will run all the way to the bottom of the cake or melt your buttercream.
Make sure your cakes are chilled in the fridge for 20 minutes before applying your drip. The cold cake will help set the chocolate and keep it from dripping too far down the sides.
Let your chocolate ganache cool until it feels just barely warm to the touch. It should not feel hot.
The best tools for applying a chocolate drip
There are a lot of ways you can apply a chocolate drip to the cake. You can use a piping bag (my favorite) a plastic bottle or even a spoon. Each tool will create a slightly different look. A piping bag produces very thin drips. A spoon will have a more natural look. Either is ok!
Make sure you have an offset spatula or spoon on hand to smooth out the top of your cake as soon as you're done piping your drip.
How to create perfect drips
As I said, I like to use a piping bag for my drips. I place the piping bag into a cup and fold the top edges over the cup so I can fill it with chocolate easily. Then I snip off the tip. Not too big because I don't like big drips.
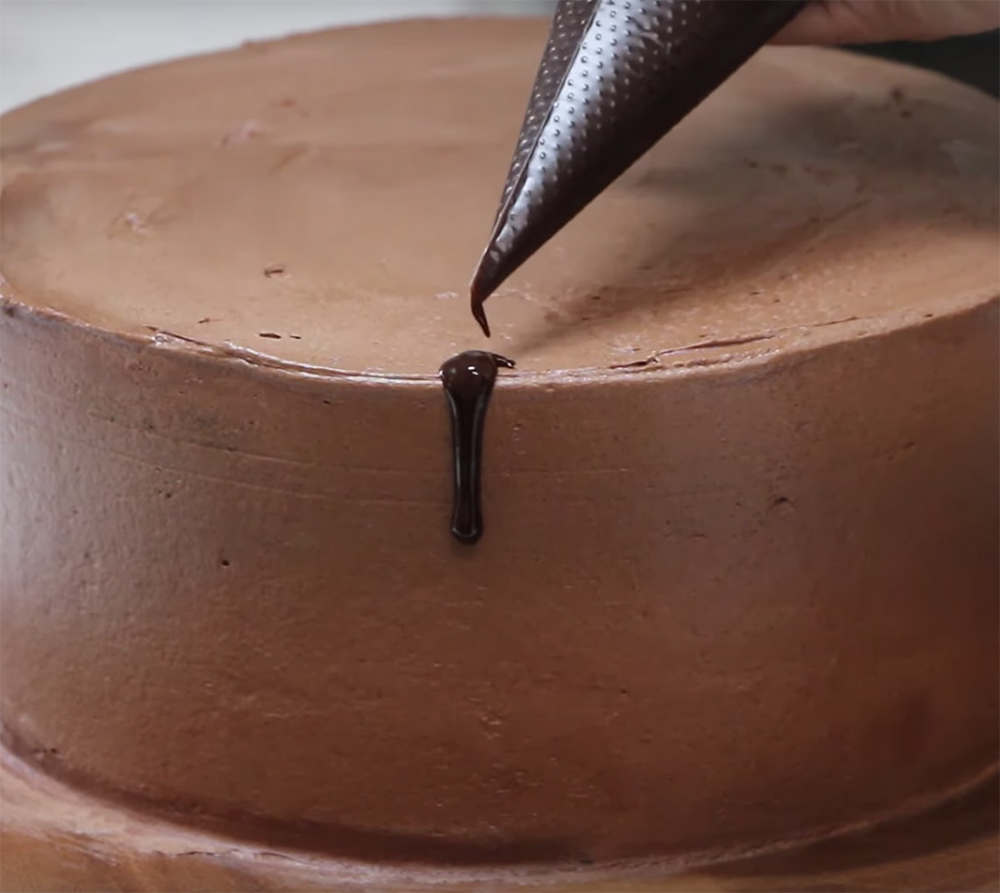
Do a test drip. Pipe a small amount on the edge of your cake and see if the consistency looks right and stops dripping about halfway down the cake. If it's too thin and looks flat on the cake, your ganache might be too hot or too thin.
If the ganache is very thick and doesn't drip at all, it could be too color or not thin enough. Now is the time to make adjustments. It's a lot easier to remove one bad drip from your cake then cover the whole thing, realize it's wrong and start all over again.
To make a perfect drip I start by piping a big drip by squeezing the piping bag gently, then I stop squeezing and move my piping bag over without lifting it from the cake. This drags the chocolate over. Then you can squeeze a little less to create a smaller drip. Keep alternating a big squeeze with a little squeeze to create an alternating drip look.
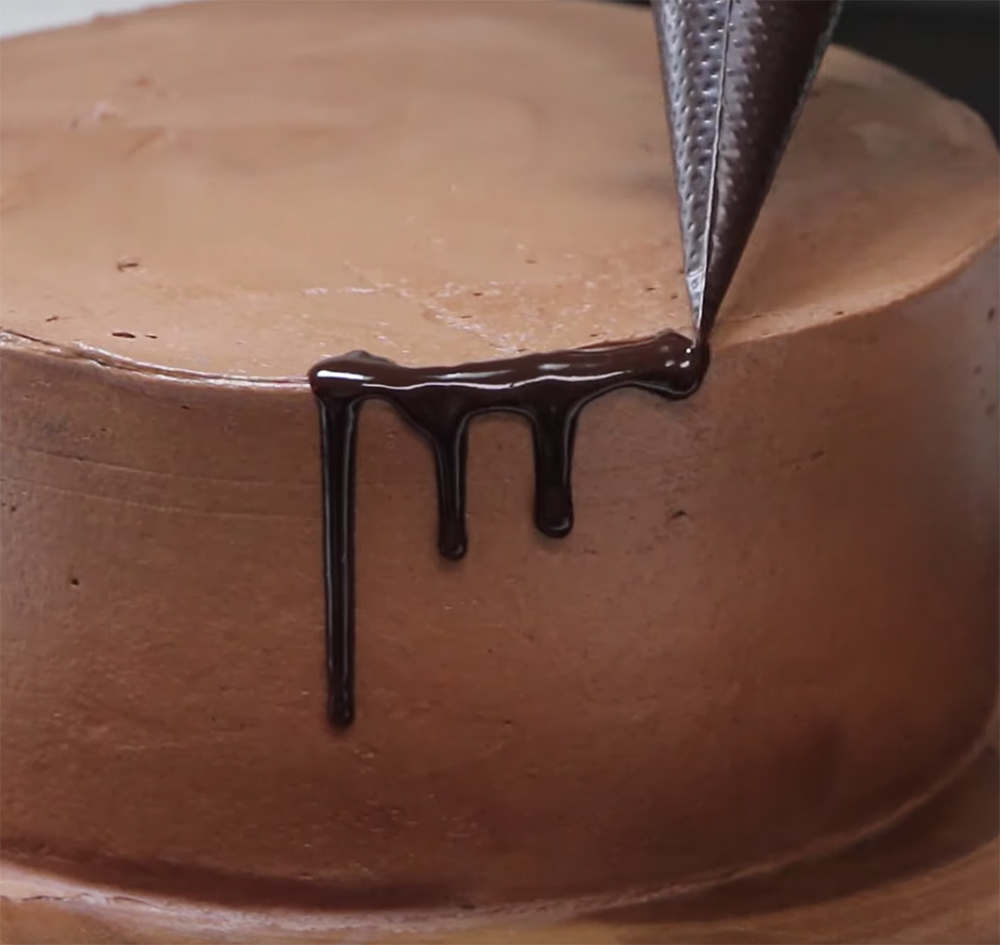
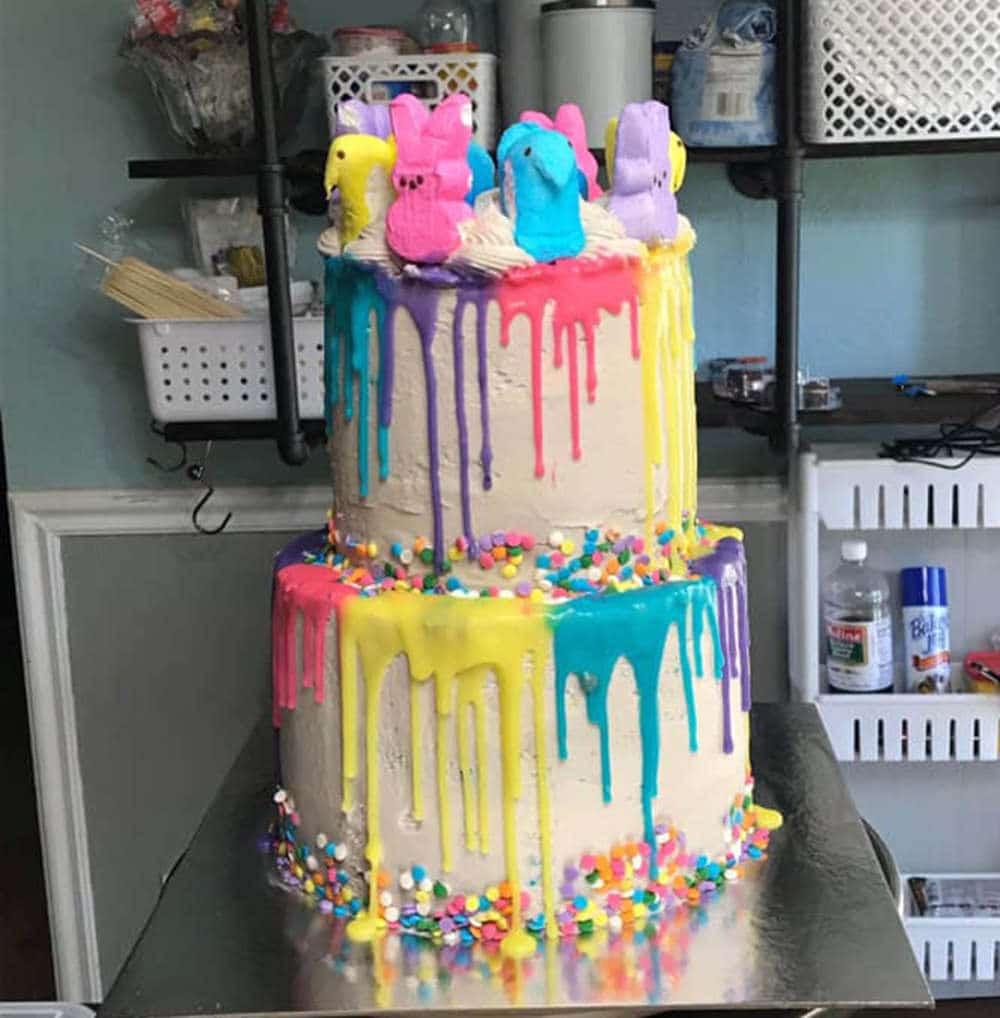
If you want all your drips to be the same, pipe your first drip then move over a little and pipe the same amount. It takes some practice to make these drips exactly the same. I often see these precise drips used on trendy sprinkle drip cakes.
So that's how you make a perfect chocolate drip for your drip cakes! I hope this clears up all of your chocolate drip fears and your next drip cake is a total success! Check out my video below on how to make chocolate drips!
Cake Batter and Frosting Calculator
Select an option below to calculate how much batter or frosting you need. Adjust the servings slider on the recipe card to change the amounts the recipe makes.
Choose a pan type
Choose a cake pan size
(based on 2" tall cake pan)
Choose a cake pan size
(based on 2" tall cake pan)
Cupcake Tin Size
Choose number of pans
Cups of Batter Needed
8 cups
Cups of Frosting Needed
5 cups
Note: measurements are estimated based off the vanilla cake recipe using standard US cake pans and sizes. Measurements used are for 2" tall cake pans only. Your results may vary. Do not overfill cake pans above manufacturer's recommended guidelines.
Recipe
Ingredients
Chocolate Drip
- 6 oz semi-sweet chocolate or dark chocolate
- 4 oz heavy whipping cream
Instructions
Chocolate drip recipe
- Heat cream until just steaming and pour over chocolate. Let sit 5 minutes then whisk until smooth. Let cool until slightly warm to the touch before piping onto your CHILLED cake.
Video
Nutrition


Kelsey says
This is the perfect ratio for a drip! Thanks!
Mrs Douglas says
Wow I like your video and I want to learn more. Thanks
Mia says
I would like to make my own chocolate drip instead of buying candy melts. But I have one question, can you use food coloring on it? I'd like for my drip to be orange for a Halloween cake I plan to make.
Thanks!!
The Sugar Geek Show says
You will need some sort of chocolate to make the drip. I used candy melts because they are cheap. Yes you can add food coloring.
Christine says
Hi do you weigh both cream and chocolate please
The Sugar Geek Show says
By weight with a scale
Monique says
This recipe legit saved my butt tonight! I tried another recipe and sat for two hours waiting for my ganache to set. Your recipe was quick, easy, and resulted in beautiful drips. Thank you for sharing your recipe and techniques.
The Sugar Geek Show says
Thank you so much, so glad it worked for you
Shiran Dhillon says
What consistency is best and how do you know?? X
The Sugar Geek Show says
I have lots of tips in the blog post regarding doing a test to make sure the drip is correct 🙂
Shawndey says
How long should I let the drips and the top of the cake set up before I do a border?
The Sugar Geek Show says
The drip will be set within ten minutes on a chilled cake
Ifeanyi says
After dripping can the cake still go back to the fridge and the dripping would get Frozen or damage..
Elizabeth Marek says
Yes it can go back in the fridge
Lilly says
Hi, can you make the drip then put it in the fridge and then put it on the cake or do you have to do it all at the same time?
Elizabeth Marek says
If you put the drip in the fridge it would get hard and you wouldn't be able to use it.
Liz says
Could I replace half and half for the heavy cream?
Elizabeth Marek says
I have not tried that so I'm not sure. It would probably be ok I think
Sar says
Can I use it on stabilized whipped cream icing or it would cause melt on whipped cream
Elizabeth Marek says
Yes you can use stabilized whipped cream. I would freeze the cake for 20 minutes before doing the drip just in case.
Rachael says
Can i use whipped cream instead of heavy cream
Elizabeth Marek says
If you mean whipping cream then yes 🙂
Amazing says
I wanted to know if I can melt dark choco bites and use it for my drips...
Elizabeth Marek says
Yes you can use any kind of chocolate.
Carm says
How do I thin out a ganache. I think i left it too long to cool and now it won't drip down the cake
Elizabeth Marek says
Warm it up again.
Shiri says
After dripping I put the cake in the freezer for 20 minutes. The drips were excellent before entering the freezer. But when I opened the door
I saw that they broke off the surface of the cake and slipped down.
Has this ever happened to you? Why can this happen?
Thanks, Shiri
Elizabeth Marek says
You don't need to put the cake in the freezer. The cake should be chilled, then add the drip. They will harden all on their own.
Cassandra says
This looks amazing! I can’t wait to try it on my fathers retirement cake. For this recipe how big of a cake would you say it will cover? I am making a round 12inch cake. Would this be enough? Thanks!
Elizabeth Marek says
It should be 🙂
Victoria says
Pls what do u mean by cream is it milk?
Sugar Geek Show says
heavy whipping cream
Foxi K says
Hello! If I’m using colored candy melts are the ratios the same? Thanks!!
Elizabeth Marek says
Yes you can
Meileen Donesa says
Hello,, i would like to try your choco drip recipe,, can I use all purpose cream instead of heavy cream? And I don't have microwave,, can I make it Tru baine Marie method or steaming to melt the chocolate chips?
Elizabeth Marek says
Yes you can and yes you can 🙂
Michelle Fernandez says
Hi Liz!. ☺️
Can this chocolate drip go over a semi naked cake with regular whipping frosting not buttercream?.
Please help!.
Thank you
Elizabeth Marek says
Yes you can as long as the whipped cream is cold