• Skip to primary navigation
  • Skip to main content
  • Skip to primary sidebar
  • Easter Recipes
  • Recipes
  • Sign Up
  • About Liz

Sugar Geek Show logo

menu icon
go to homepage
  • Easter Recipes
  • Recipes
  • Sign Up
  • About Liz
subscribe
search icon
Homepage link
  • Easter Recipes
  • Recipes
  • Sign Up
  • About Liz
×
Home › Blog › Wedding Cake Trends 2018: The Collaboration

Updated on April 9, 2024 by Liz Marek · This post may contain affiliate links ·

Wedding Cake Trends 2018: The Collaboration

714 shares
  • Facebook
  • Flipboard

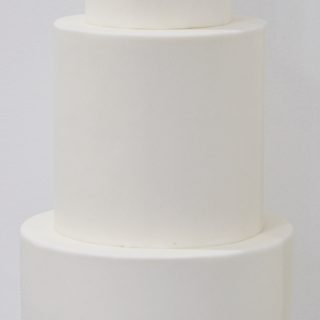
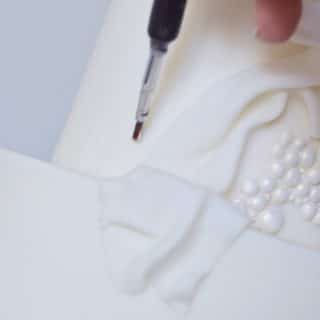
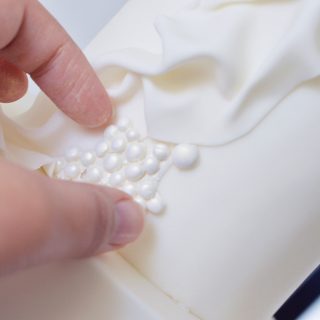
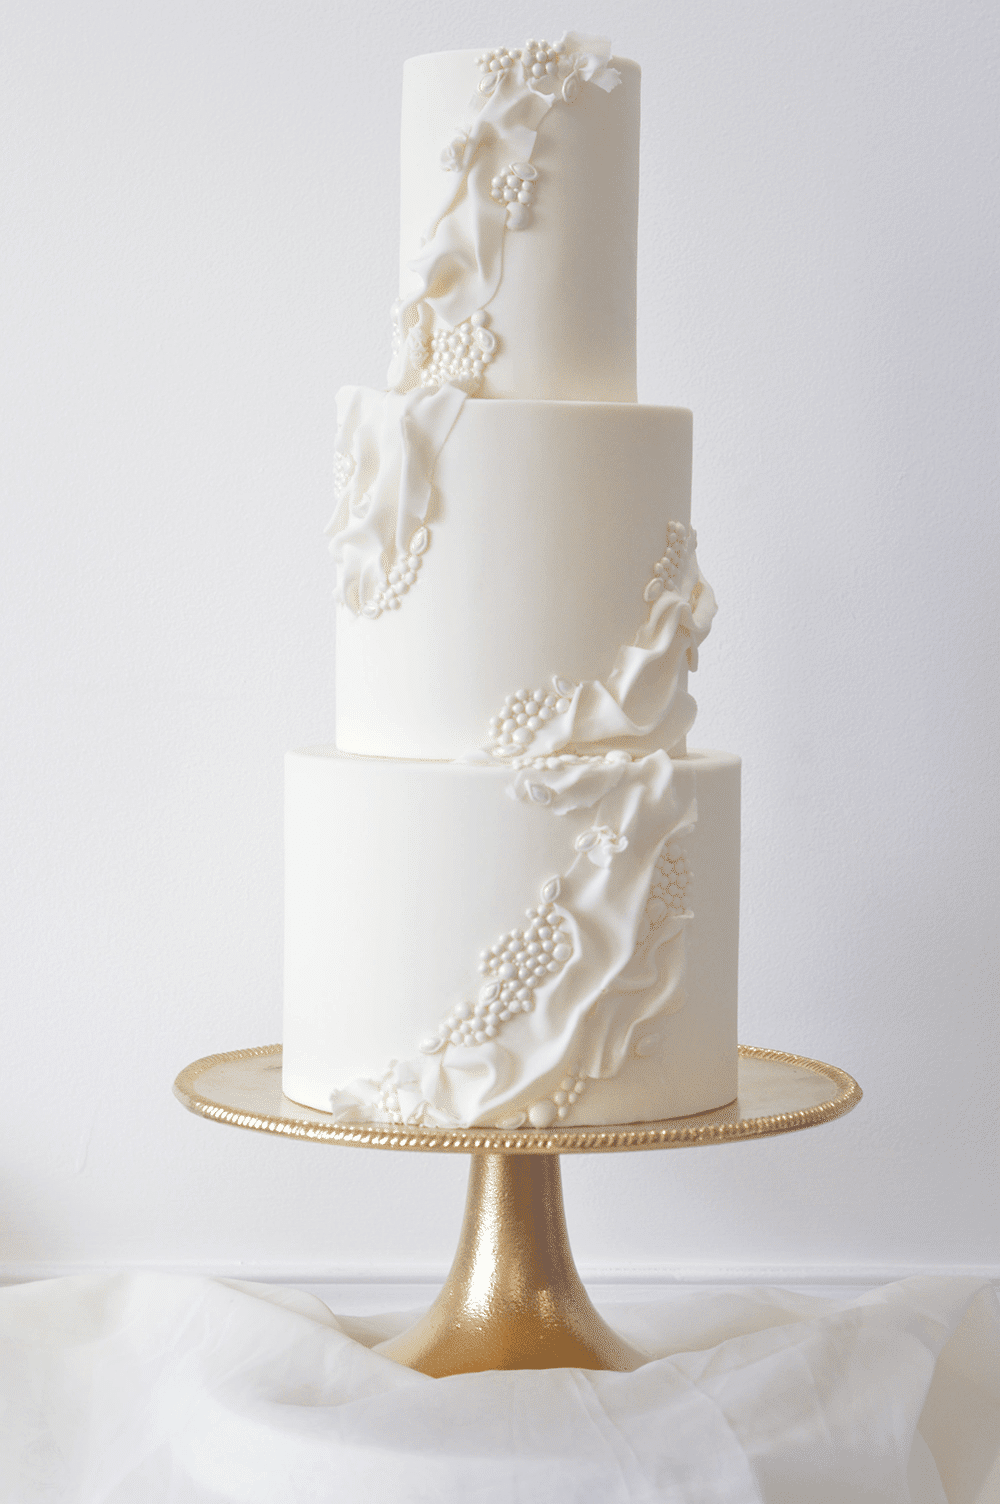
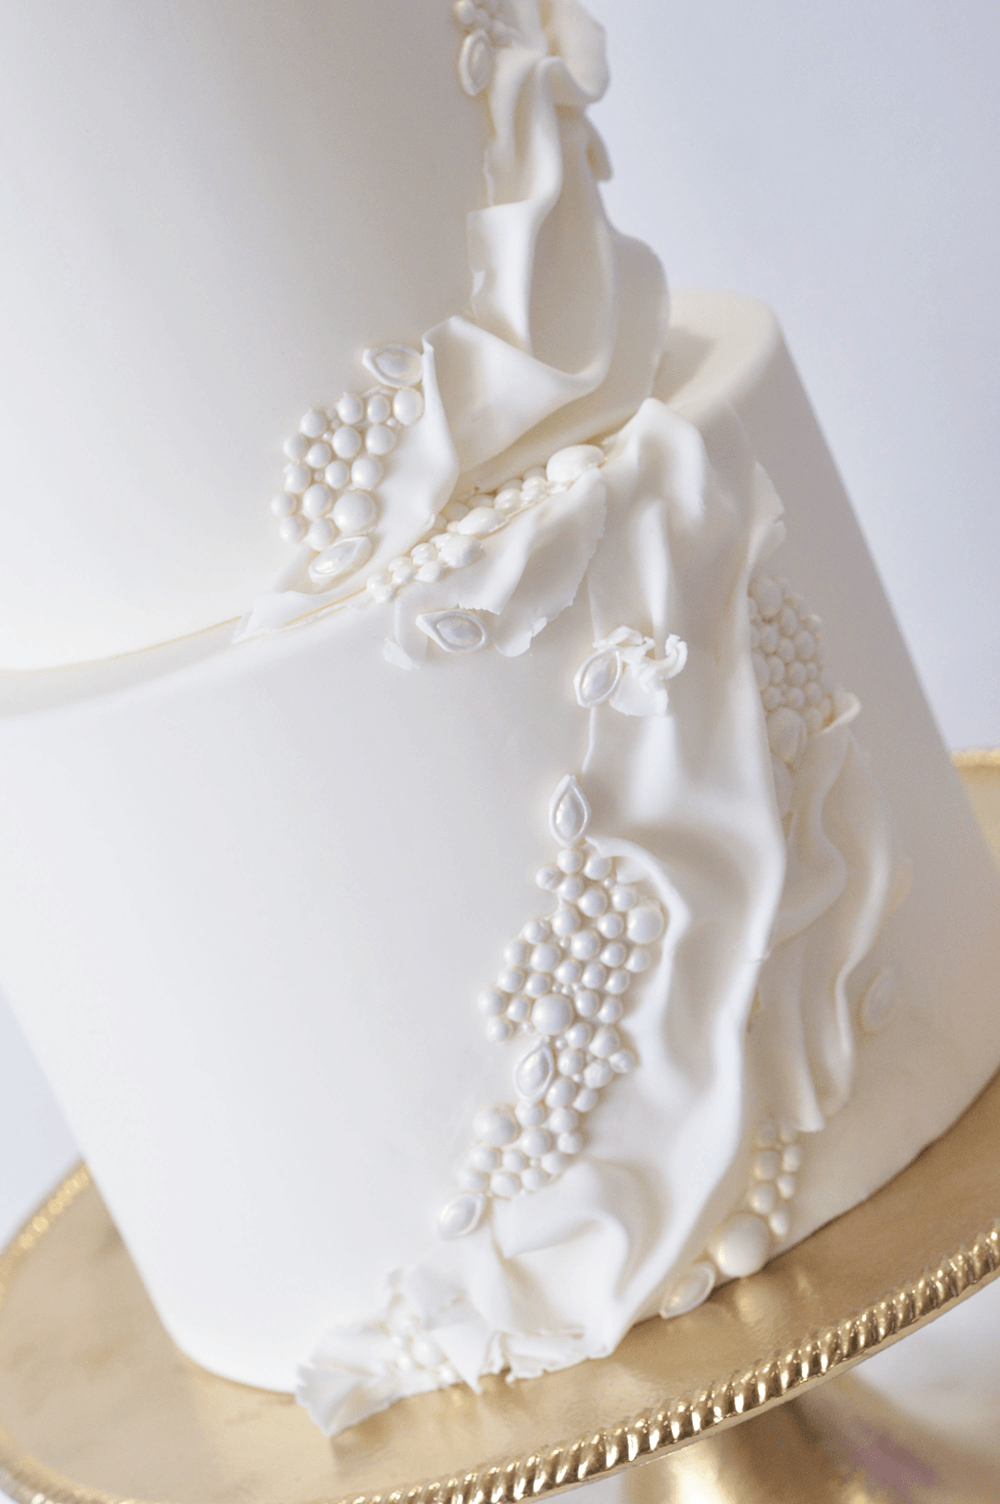
There's so much you can do with white texturess! We love this beautiful, textural white wedding cake created by Mimi Ospina of Whipped up by Mimi. Mimi is known for her unique visions in cake form and pristine work.

This modern textural wedding cake is a great design for a classic bridal affair with a nod to the traditional but still keeping it fresh and trendy! Your eye is led around the cake from the swirling layers and delicate details.

For flavors, you can't go wrong with the classic vanilla cake recipe which was perfected recently by Mimi to be ultra light and fluffy.

White wedding cake textures

white wedding cake

About this cake:

"I chose my design based on current fashion trends. We are seeing more fluidity and textures in wedding gowns, I wanted to incorporate that into my cake design in a sleek and simple way. I feel my design is simple enough to attract an array of clients and it offers that little artistic pop of texture to keep their interest." 

mimi ospina

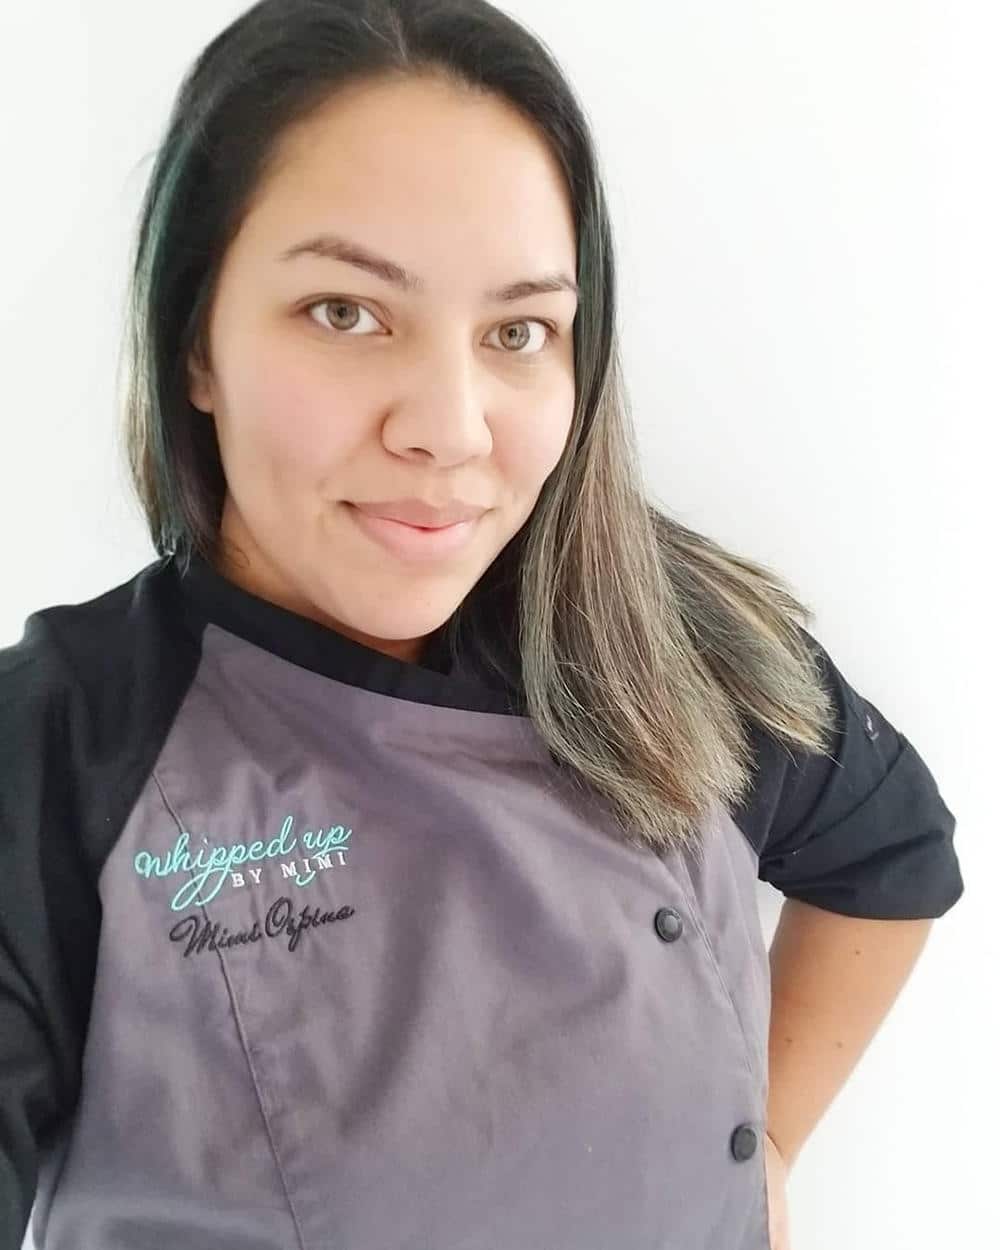
Mimi Ospina is a master cake designer, the owner and sole operator of Whipped Up by Mimi. Mimi stumbled upon this wonderful career in 2009 when she wanted to make her son the perfect birthday cake. Since then Mimi has perfected her skills in both pastry and artistically to provide her clients with delicious works of art.  Mimi describes her style as sleek and simplistic. Mimi has been featured on numerous Wedding Blogs such as Magnolia Rouge, The Perfect Palette, and more. She has also been published in world wide Wedding Magazines and local Virginia Magazines. 

Whipped up by mimi

Learn more about Mimi and her cake creations

Whipped Up by Mimi - Virginia Beach, Virginia

website: www.whippedupbymimi.com

Instagram: www.instagram.com/whippedupbymimi

Facebook: wwww.facebook.com/whippedupbymimi

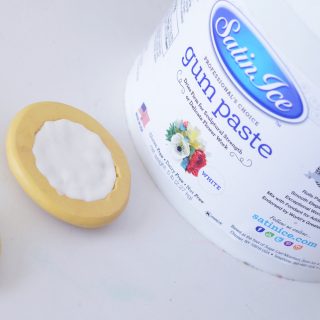
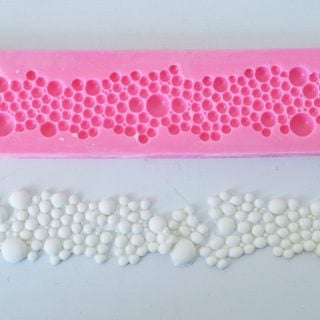
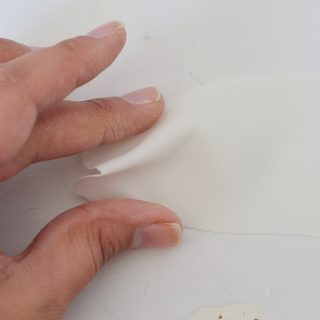
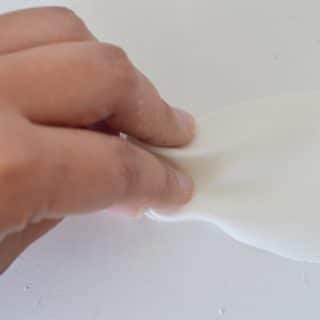
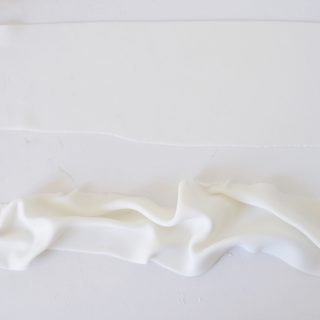
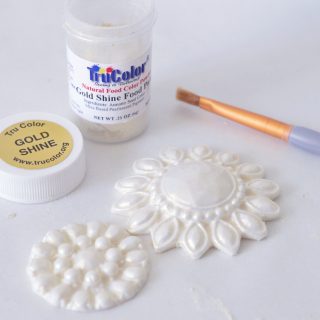
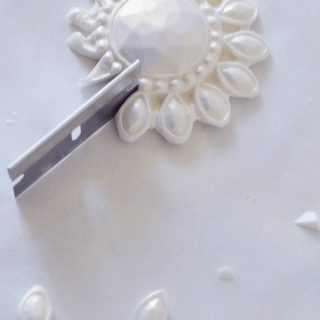
Check out this awesome tutorial from Mimi on how to create this beautiful white texture using generic brooch molds, gumpaste and some gold dust from trucolor.

White textures tutorial

  • Satin Ice Gum paste
  • Tru Colors Gold Shine Food Paint
  • Bubble Mold
  • Brooch Molds - custom made by Elizabeth Marek
  • Rolling Pin
  • Piping Gel
  • 2 Paint brushes
  • Blade for cutting
fondant for beginners
Take your Gum paste and fill your molds. Make sure they are firmly packed in and cut to have a level backing. I cut out 2 of each brooch and 2 bubble strips. Set aside.
Take your gum paste and roll out two 10” x 4” strips. You want to roll both out paper thin. Store under plastic wrap or a plastic sleeve until ready for the next step.
Step 3 Take your strip and cut in half long ways, set second strip aside.
Take your strip and gently scrunch together starting at the end and working your way down.
Manipulate as needed to create a fabric flowing effect.
Repeat with remaining strips. Cover with plastic wrap until ready to adhere to the cake. 

Take your molds and dry dust with Tru Color Gold Shine until fully coated. Brush off any access dust.
Cut out the individual jewels from your brooch and level the backings for easy applying to the cake. Next tear apart your bubble strip in patterns that are fluid. 

Time to apply your gum paste fabric. Take your piping gel and apply in the area that you would like your gum paste fabric to lay, if needed lay your fabric first prior to applying the piping gel to make sure that is where you want it to lay.
Lastly it is time to apply your bubble strip pieces and jewels. Find sections on your cake that is most visually appealing and goes with the fluidity of the fabric. Apply your piping gel and adhere. Once all applied your piece is all complete!
Pages: Page 1 Page 2 Page 3 Page 4 Page 5 Page 6 Page 7 Page 8 Page 9 Page 10 Page 11 Page 12 Page 13 Page 14 Page 15 Page 16 Page 17

More Blog

  • close up of fresh pasta held in two hands
    Easy Homemade Egg Pasta
  • jar of Speculaaskruiden
    Speculaaskruiden (Dutch Spice Mix)
  • homemade edible Christmas gift ideas
    Homemade Edible Christmas Gift Ideas Everyone Will Love
  • Crispy Parmesan Potato Stacks

About Liz Marek

Liz Marek is a professional cake artist, sweet and savory recipe developer, and the founder of Sugar Geek Show, where she teaches cooking, baking and cake decorating through detailed tutorials, food science explanations, and kitchen-tested recipes. She has been creating recipes and teaching baking techniques since 2008, helping bakers of all skill levels gain the confidence to make professional-quality desserts at home.

Liz is known for breaking down complex cooking and baking concepts into simple, approachable methods. Her work focuses on helping people understand not just how a recipe works, but why it works. Through Sugar Geek Show, she shares step-by-step recipes, cake decorating tutorials, and practical baking guides designed to make professional techniques accessible to everyone.

Over the years, Liz has taught thousands of students through online tutorials, classes, and educational content focused on real kitchen results. Her recipes are carefully tested and written to help people succeed the first time they make them.

When she’s not developing recipes or teaching baking techniques, Liz also hosts curated travel experiences for women through her travel brand Soul Sisters.

You can find Liz’s latest recipes, baking tutorials, and food science tips at Sugar Geek Show.

Primary Sidebar

Hi, I'm Liz! I'm passionate about creating reliable, foolproof recipes that don't just tell you how to cook, but why things work - so you can skip the guesswork and confidently make the best sweet and savory dishes of your life.

More about me →

Our Cake Greatest Hits

Check out our best cake recipes

🐰 Celebrate Easter

  • pink speckled cake with easter eggs on top
    Speckled Easter Cake
    Cook Time50 Minutes
  • bunny butt cake on a cake board
    Bunny Butt Cake
    Cook Time3 Hours
  • Carrot cake bar held up by a server
    Carrot Cake Bars
    Cook Time1 Hours 30 Minutes
  • M&M cookies on cooling
    Easy M&M Cookie Recipe
  • Moist carrot cake with pineapple, toasted coconut, candied pecans and big chunks of carrots. Frosted with brown butter cream cheese frosting
    Carrot Cake With Pineapple Recipe
    Cook Time55 Minutes
  • slice of pink velvet cake with whipped cream frosting and fresh raspberries on a white plate
    Pink Velvet Cake
    Cook Time40 Minutes

Popular Recipes

  • close up of ganache drizzling into a bowl
    The Best Chocolate Ganache Recipe
    Cook Time20 Minutes
  • Piping easy buttercream rosettes onto a cake using a 1M star piping tip
    Easy Buttercream Frosting
    Cook Time10 Minutes
  • close up slice of marble cake
    Moist and Fluffy Marble Cake Recipe
    Cook Time40 Minutes
  • close up of red velvet cake slice
    Red Velvet Cake Recipe
    Cook Time1 Hours 40 Minutes

Footer

↑ back to top

About

  • Privacy Policy
  • Terms of Service

Newsletter

  • Sign Up! for emails and updates

Contact

  • Contact
  • About Us

Copyright © 2024 Sugar Geek Show, Inc. All Rights Reserved.

714 shares