
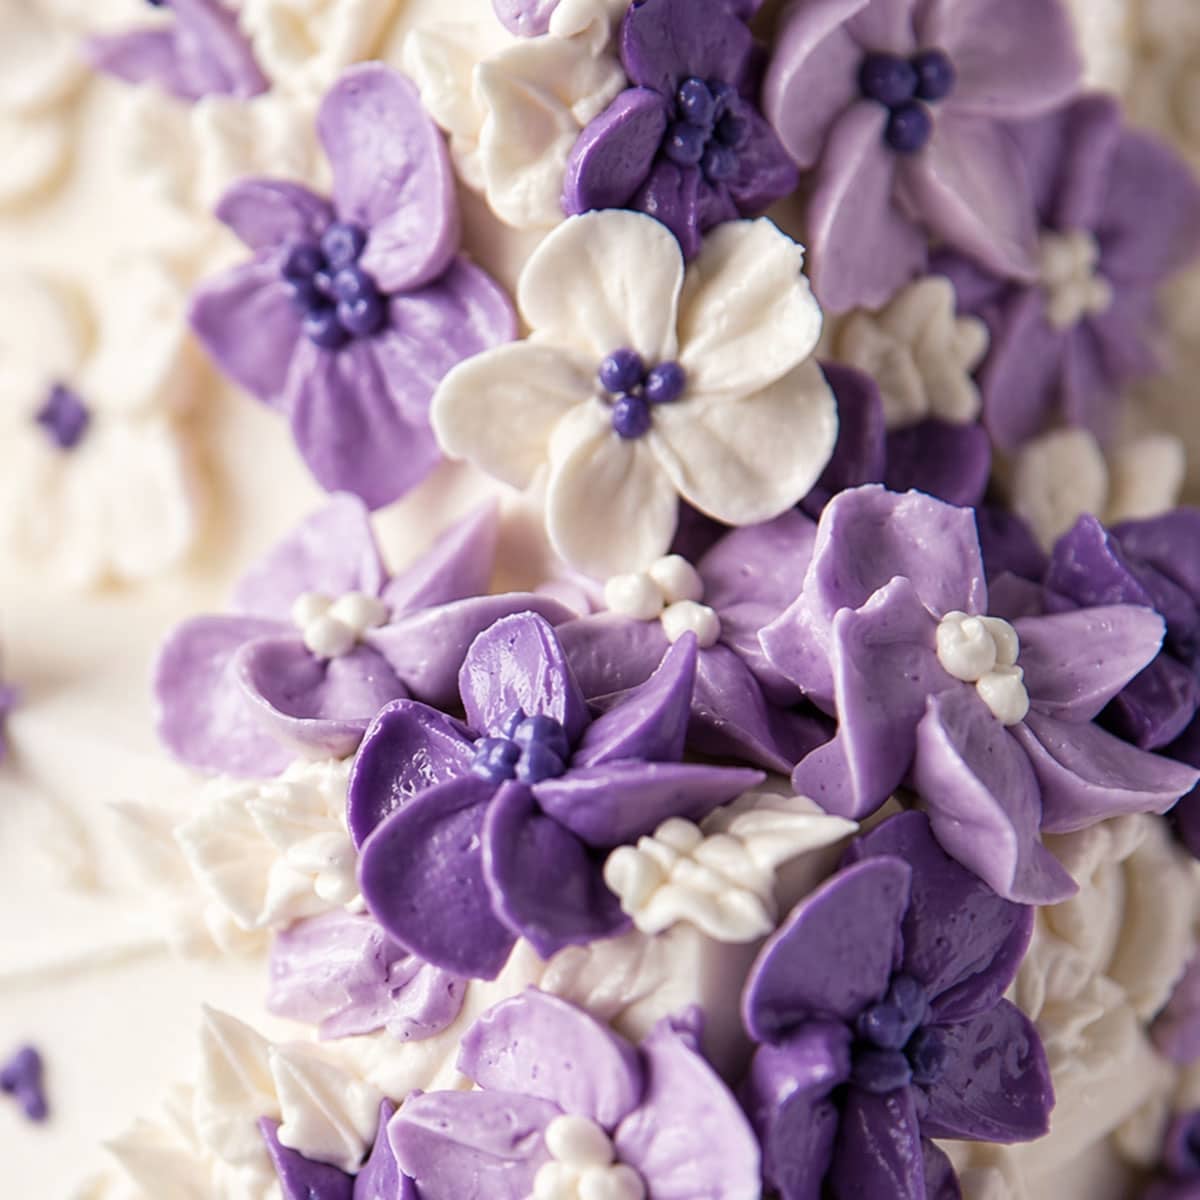
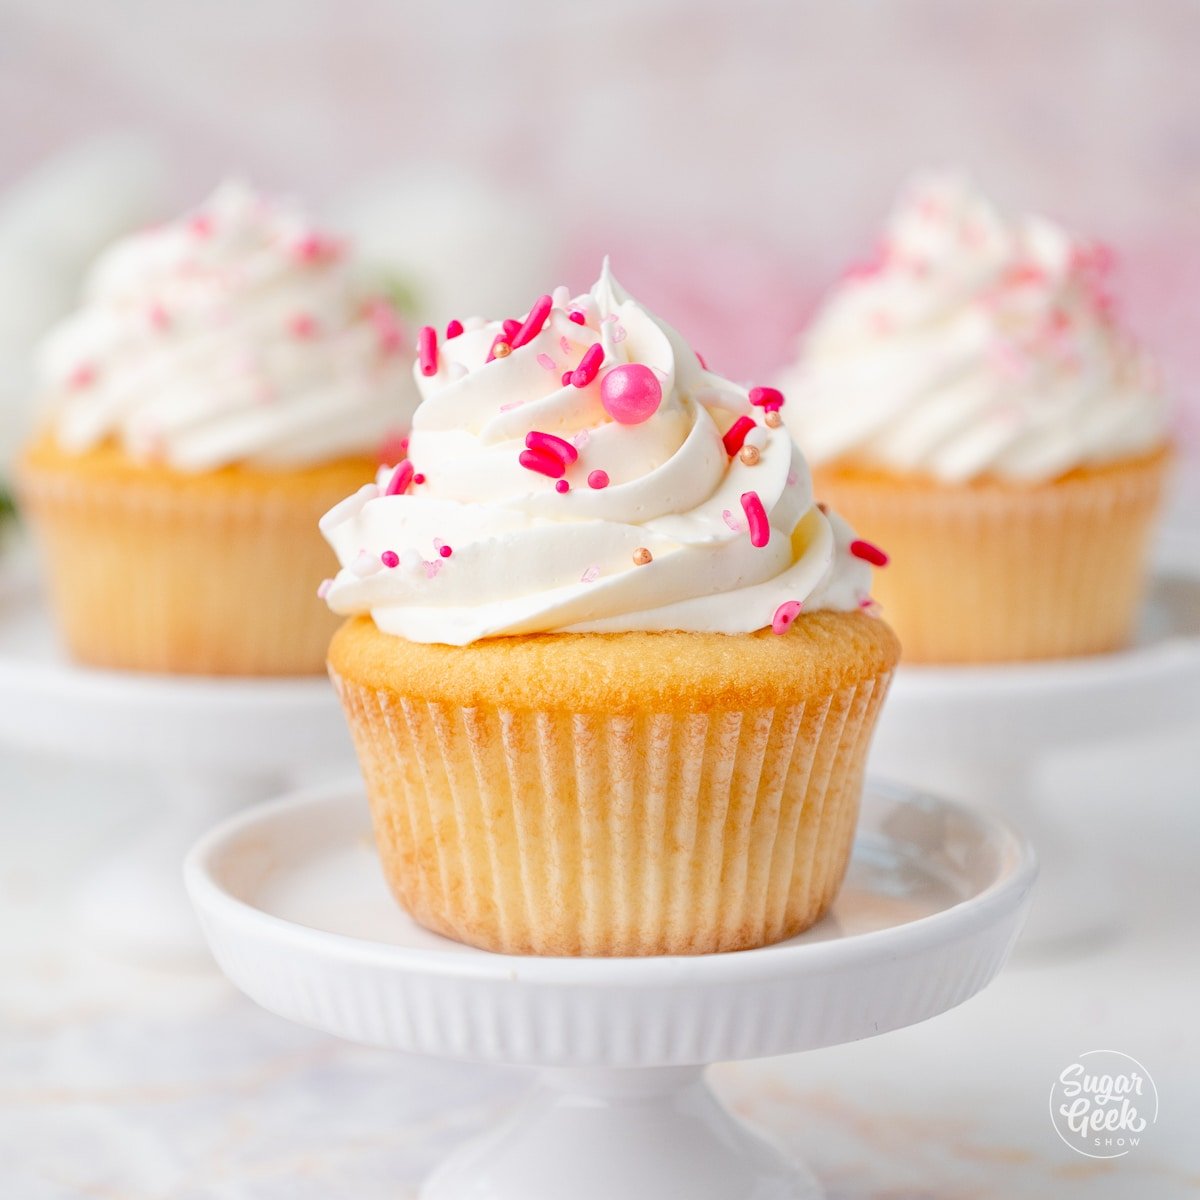
Easy buttercream flowers are the perfect beginner piping project, and the results look so professional that no one will believe you made them with one tip and a flower nail. The freeze-ahead method takes all the pressure off because you can make a whole batch days in advance and simply place them on your cake when you're ready. If you've never decorated a cake before, my how to make a cake tutorial walks through the whole process from baking to finishing.
Quick Glance: Easy Buttercream Flowers
- Recipe Name: Easy Buttercream Flowers
- Why You'll Love It: A beginner-friendly piping project that looks bakery-quality with just one tip and a flower nail.
- Time and Difficulty: Easy. About 30 minutes to pipe a full batch, plus freezing time.
- Main Ingredients: Easy Buttercream Frosting
- Method: Pipe 5-petal flowers with a 104-petal tip on a flower nail, freeze on parchment squares, then place on your cake.
- Texture and Flavor: Silky buttercream that holds crisp petal shape.
- Quick Tip: Practice 10 to 15 flowers first before keeping any. Your technique improves quickly once you get the feel for the squeeze.
Jump to:
- Quick Glance: Easy Buttercream Flowers
- What Makes These Buttercream Flowers So Easy
- Ingredients Needed
- Equipment Needed
- Tips For Success
- How To Make Easy Buttercream Flowers Step-By-Step
- How To Place Buttercream Flowers On Your Cake
- Common Buttercream Flower Mistakes
- Buttercream Flower FAQs
- More Buttercream Tutorials To Try
- Watch: How To Decorate A Cake Step-by-Step
Buttercream flowers are one of those decorating techniques that look intimidating but are actually really approachable once you know the one or two tricks that make them work. These 5-petal flowers are my go-to beginner project because they only require one piping tip, a flower nail, and a little practice. Once you get the motion down, you can pipe an entire bouquet in about 20 minutes.
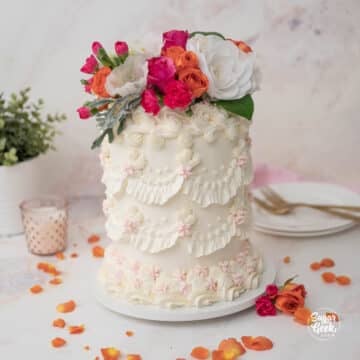
They're especially perfect for Mother's Day cakes, bridal showers, and birthdays. For a smaller-scale project, try my Cupcake Bouquet With Buttercream Flowers or top a Vintage Cake with these flowers for a stunning finished look.
What Makes These Buttercream Flowers So Easy
The reason these flowers are so beginner-friendly comes down to three things: the tip, the technique, and the freeze step.
The 104 petal tip does almost all of the work for you. The wide side of the tip creates the ruffled outer edge of the petal while the narrow side tapers it to a clean point in the center. Holding the tip correctly is really the only skill to master, and once you've piped 5 or 10 petals, your hand learns the angle automatically.
The 5-petal "U" shape is the simplest flower you can pipe. Each petal is just a small "U" that starts and stops at the center of the nail. You rotate the nail between petals, so the flower stays aligned without you having to think about it. If you can draw a letter U, you can pipe this flower.
The freezing step is what makes buttercream flowers stress-free. Instead of trying to pipe directly onto your finished cake (where every mistake is permanent), you pipe onto parchment squares, freeze them solid, and then simply peel and place them on the cake when you're ready. You can batch-make them days or even weeks in advance.
Ingredients Needed
The secret to beautiful buttercream flowers isn't complicated. It comes down to the right buttercream consistency and gel (not liquid) food coloring. Here's what you'll need and why each one matters.
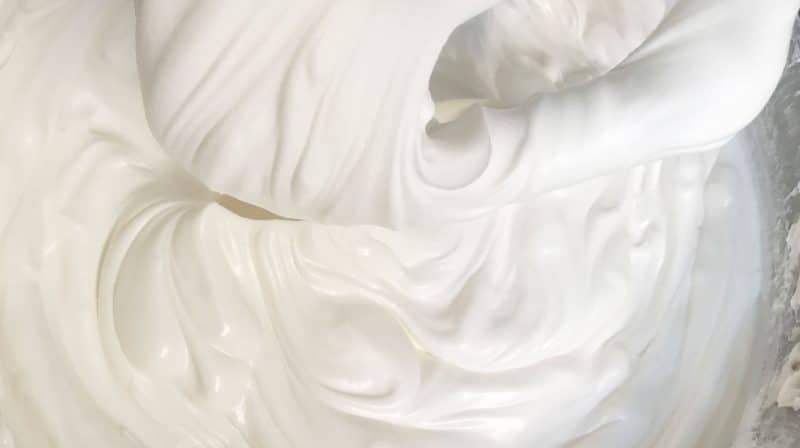
Easy Buttercream Frosting. This is my go-to buttercream for piping flowers because the pasteurized egg whites give it a silky, smooth texture that creates soft petal edges. It's slightly less stable in heat than American buttercream but the results look more polished. If you're piping in a warm kitchen or for an outdoor event, replace half the butter in the recipe with vegetable shortening to make the flowers sturdier.
Other buttercream options. Any buttercream that holds a peak will pipe flowers. My American Buttercream is stiffer and more heat-stable, but the petals will have slightly jagged edges because of the extra powdered sugar. Swiss Meringue Buttercream and Italian Meringue Buttercream both pipe beautifully with smooth finishes. For dairy-free, try vegan butter or Crisco in the easy buttercream recipe.
Gel Food Coloring. Use gel food coloring, not liquid. Liquid food coloring thins your buttercream and can cause it to break. Gel gives you saturated color without changing the consistency. I used electric pink and regal purple from Americolor for the flowers pictured here.
Parchment Paper Squares. Cut 3-inch by 3-inch squares of parchment paper for piping your flowers on. You can also use foil if you don't have parchment. The squares make it easy to lift each flower off the nail and transfer it to the freezer without smushing the petals.
Equipment Needed
- Flower nail. A small rotating disc on a metal handle. You pipe the flower directly onto the nail, rotating between petals. You cannot pipe these flowers without one.
- Wilton 104 piping tip. The workhorse petal tip for 5-petal flowers. The round end faces up toward the center of the flower when you pipe.
- Wilton #3 round tip (optional). For piping a small dot in the center of each flower.
- Wilton #352 leaf tip (optional). For piping leaves if you want to add greenery.
- Piping bags. Large enough to hold about 1 cup of buttercream comfortably. One bag per color.
- Coupler (optional). Lets you swap between different tips on the same bag. Useful if you're using multiple tips.
- Cookie sheet or flat pan. For transferring the parchment squares with flowers to the freezer.
- Freezer space. You'll need a flat area in your freezer to hold the cookie sheet of flowers.
Tips For Success
Run your buttercream through an immersion blender or paddle-mix it on low for 10 to 15 minutes before piping. This eliminates air bubbles that would otherwise create gaps in your petals.
Practice 10 to 15 flowers before you keep any. Scrape them back into the bowl. Your technique improves quickly once your hand learns the motion.
Hold the flower nail in your non-dominant hand and rotate it between petals. Don't try to move the piping bag around the nail, that's much harder.
Keep the wide (round) end of the 104 tip pointing up, toward the center of the flower. The narrow end faces out.
Apply consistent pressure. Uneven squeezing gives you lumpy, uneven petals.
Work with room temperature buttercream. Cold buttercream breaks and tears at the edges. Warm buttercream slumps.
Freeze the flowers before placing them on your cake. Frozen flowers are much easier to handle without damaging the petals.
How To Make Easy Buttercream Flowers Step-By-Step

- Cut your parchment paper into 3-inch squares. Aim for 20 to 30 squares to give yourself room to practice and produce a full batch.
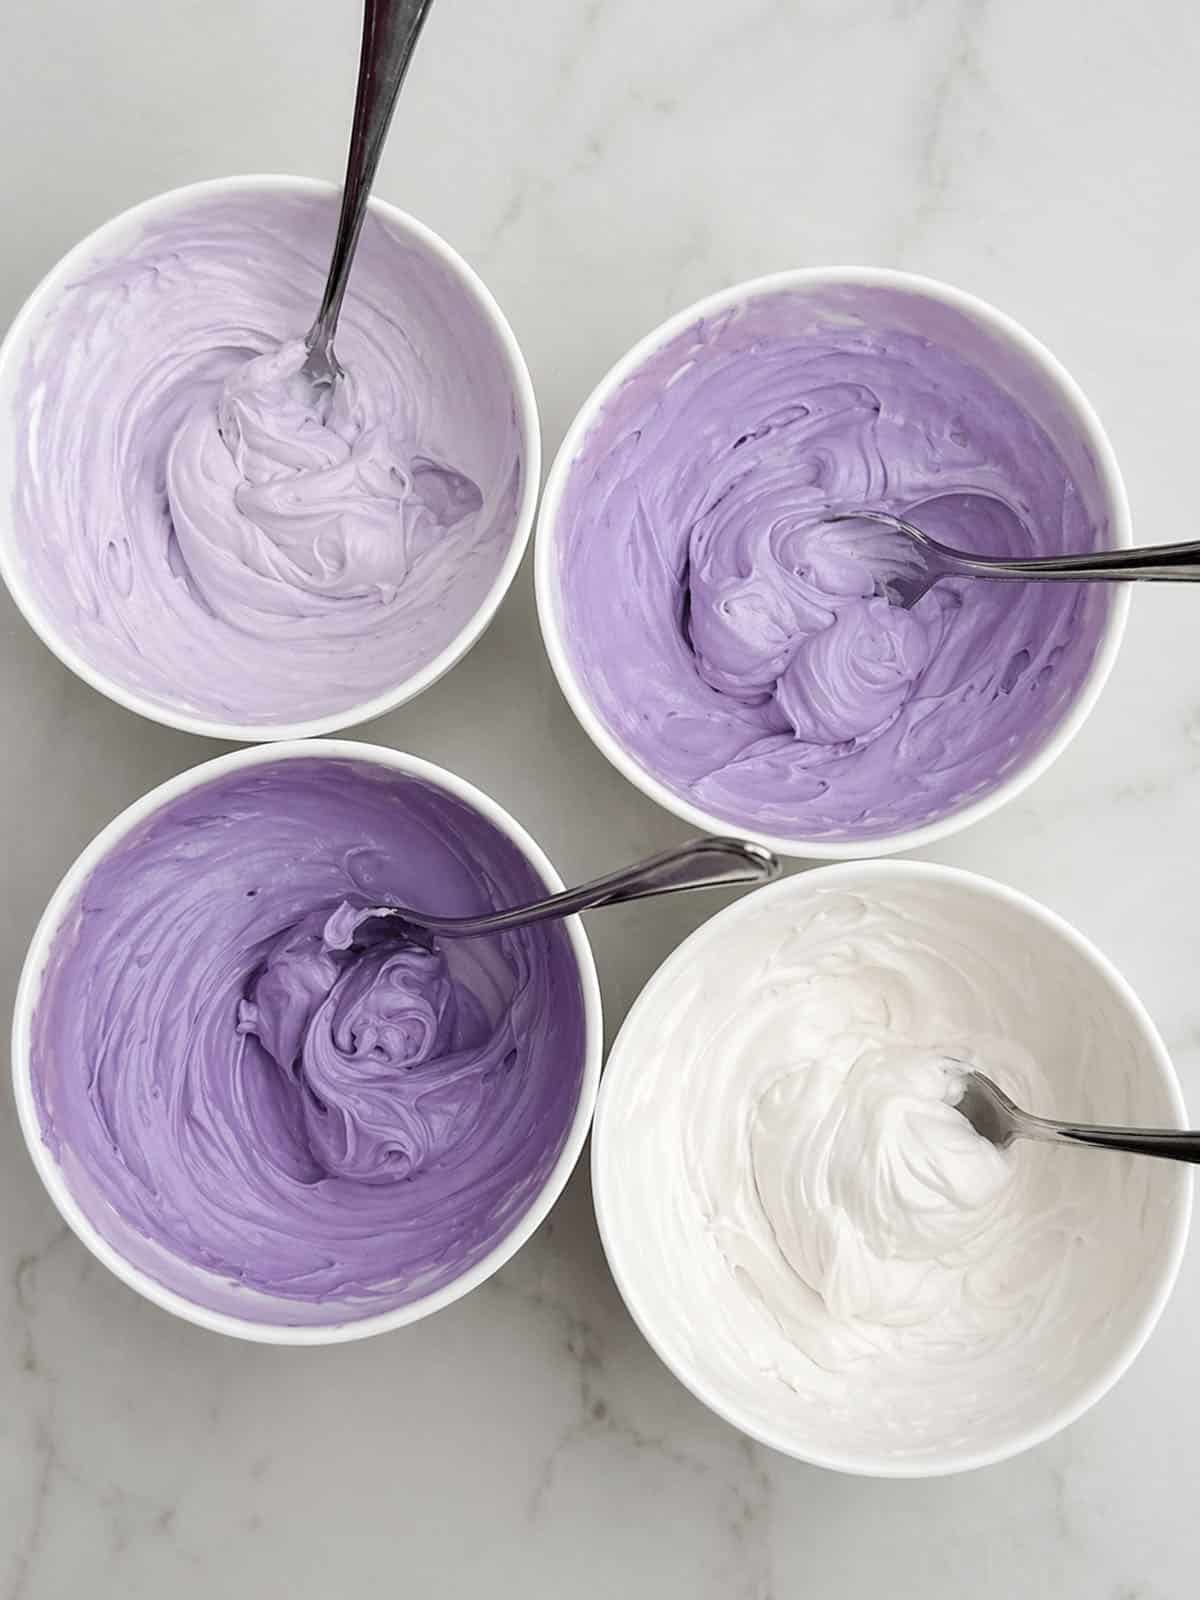
- Tint your buttercream in your chosen colors. Use gel food coloring and start with a small amount, you can always add more.
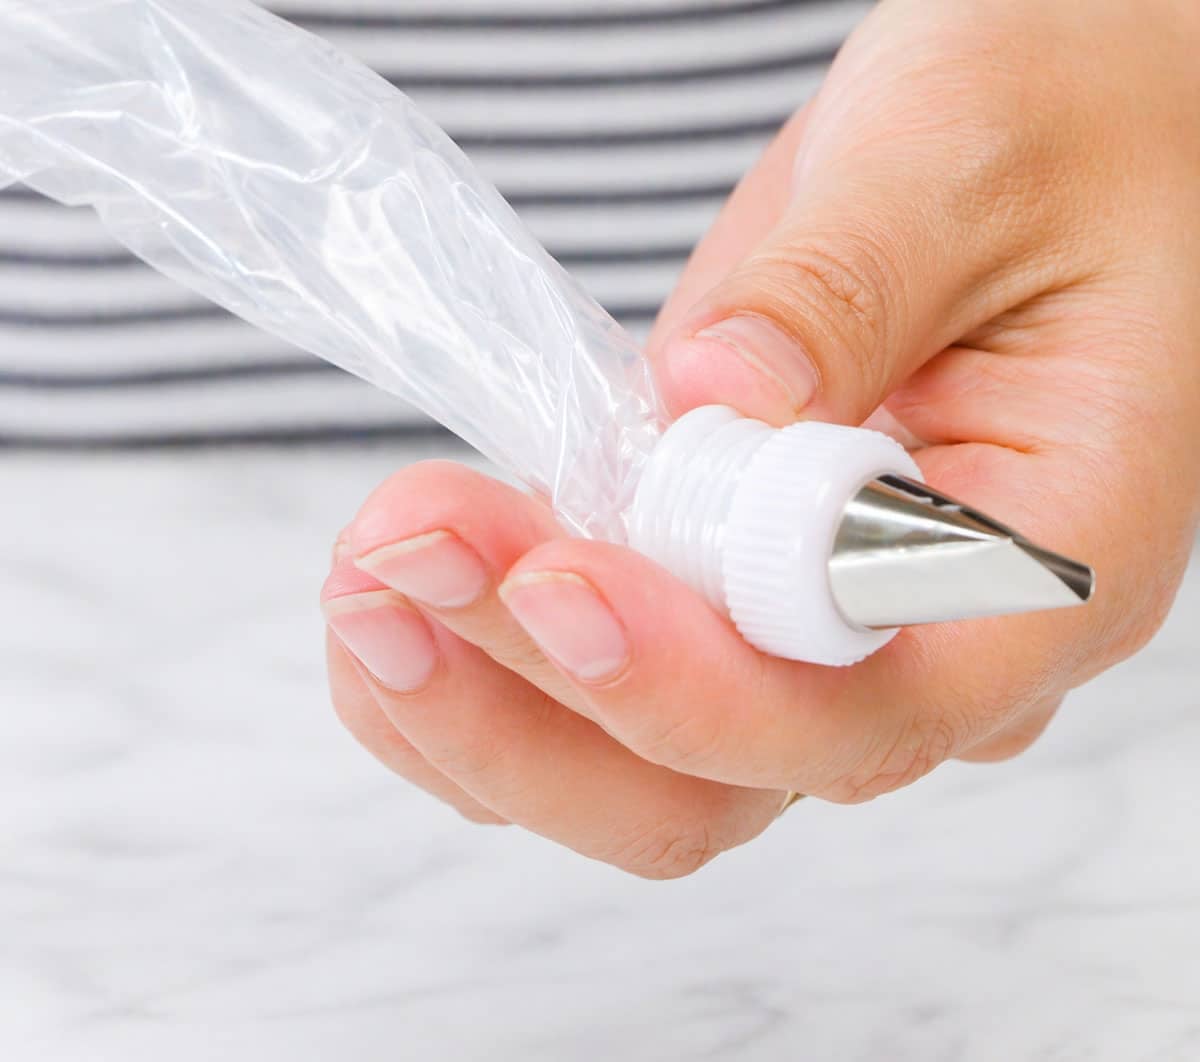
- Fit your piping bag with the 104 tip. If using a coupler, place the large part of the coupler inside the bag first, then attach the 104 tip from the outside and secure it with the coupler ring.
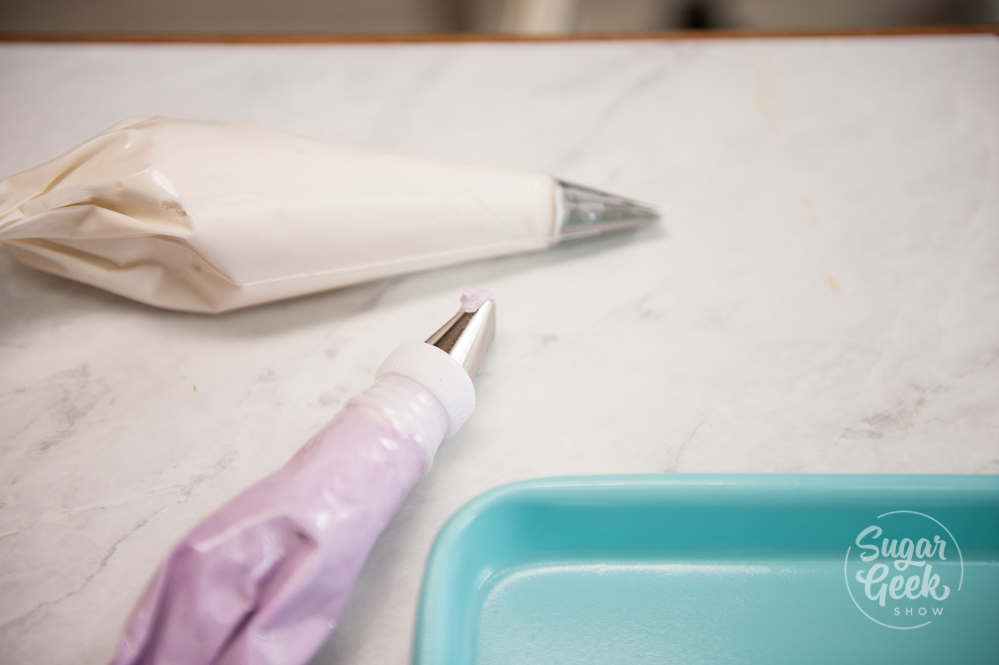
- Fill the bag about halfway with buttercream. Twist the top closed and squeeze the buttercream down toward the tip to eliminate air pockets.
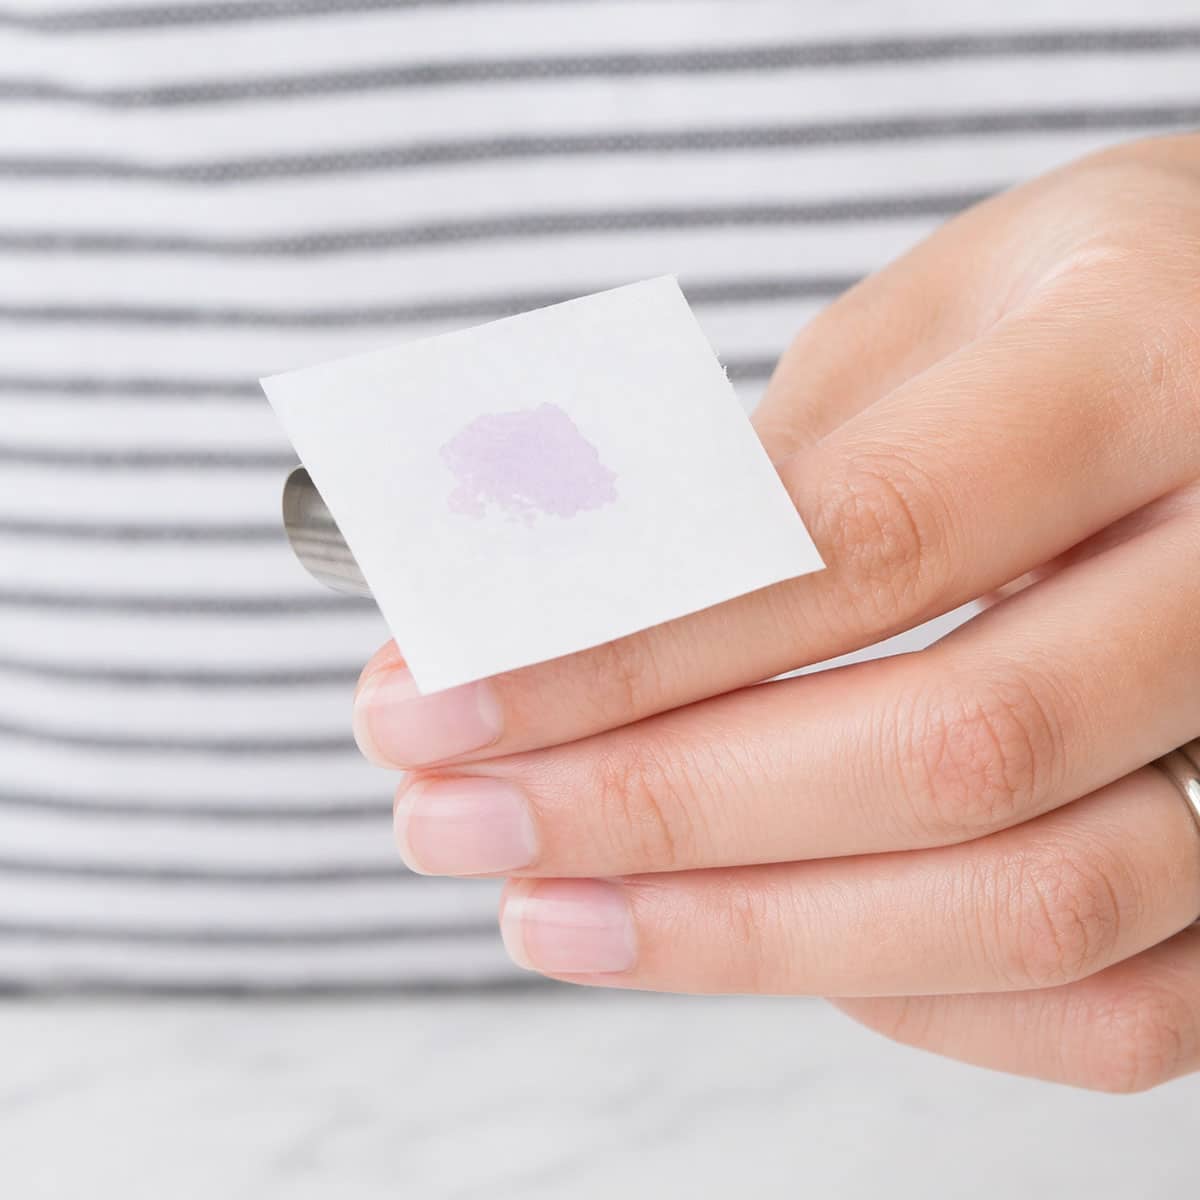
- Place a small dot of buttercream on the center of your flower nail. Press a parchment square onto it. The buttercream acts as glue to hold the parchment in place while you pipe.
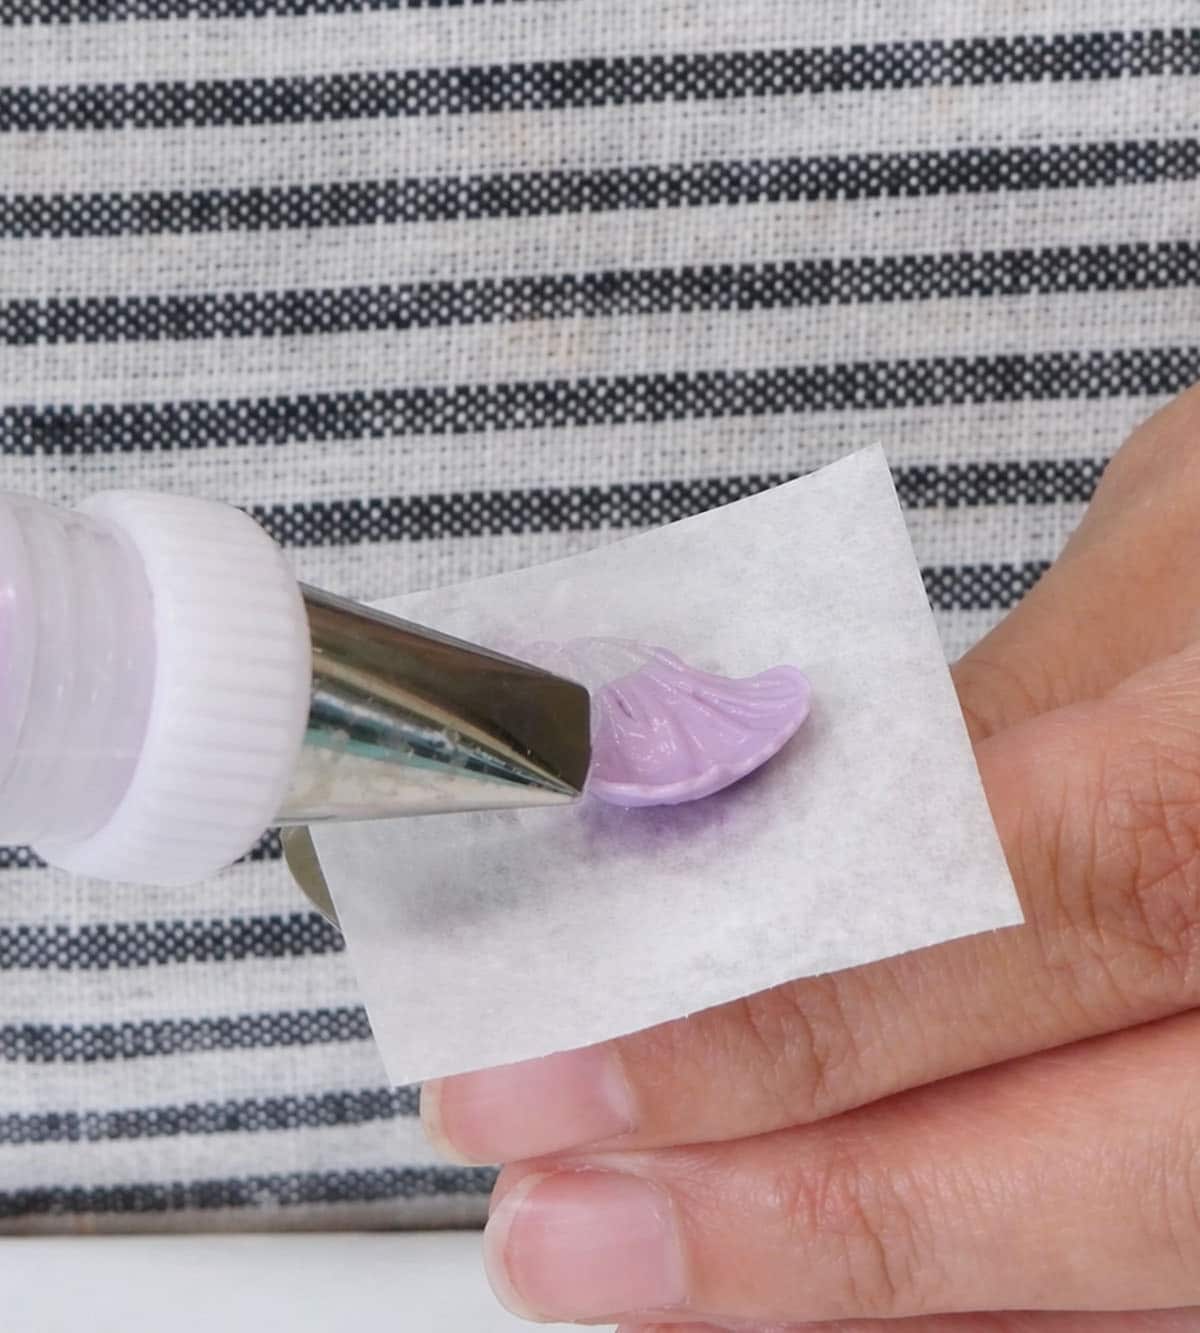
- Pipe the first petal by squeezing while moving the tip in a small "U" shape. Start at the center, move out about half an inch, curve around, and come back to the center. Release pressure before lifting the tip.
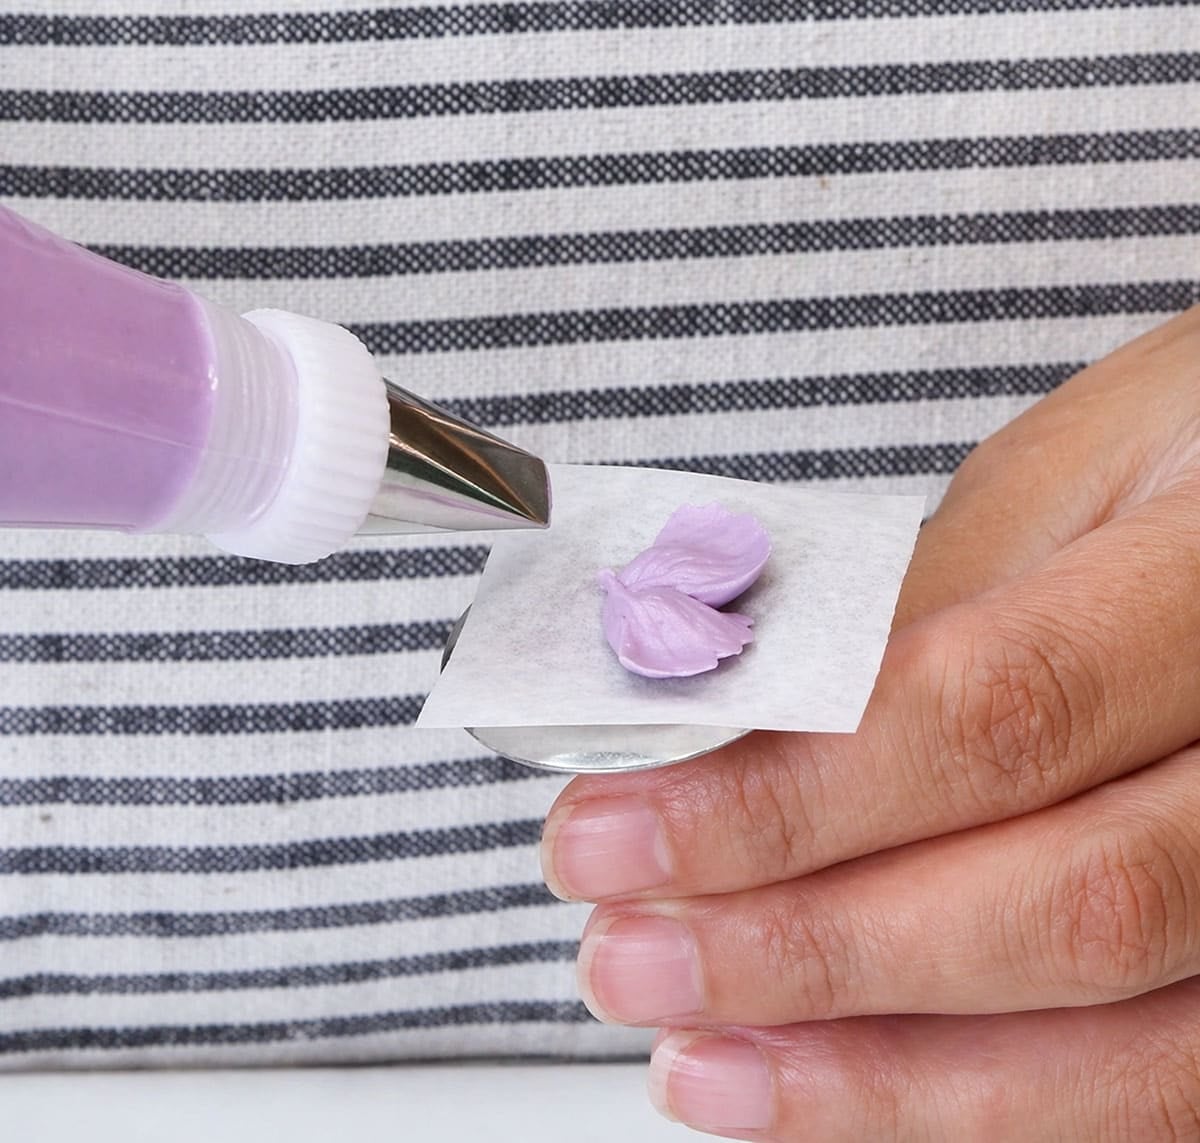
- Rotate the flower nail about a fifth of a turn and pipe the second petal the same way, starting and ending at the center. Each petal should just slightly overlap the previous one where they meet in the middle.
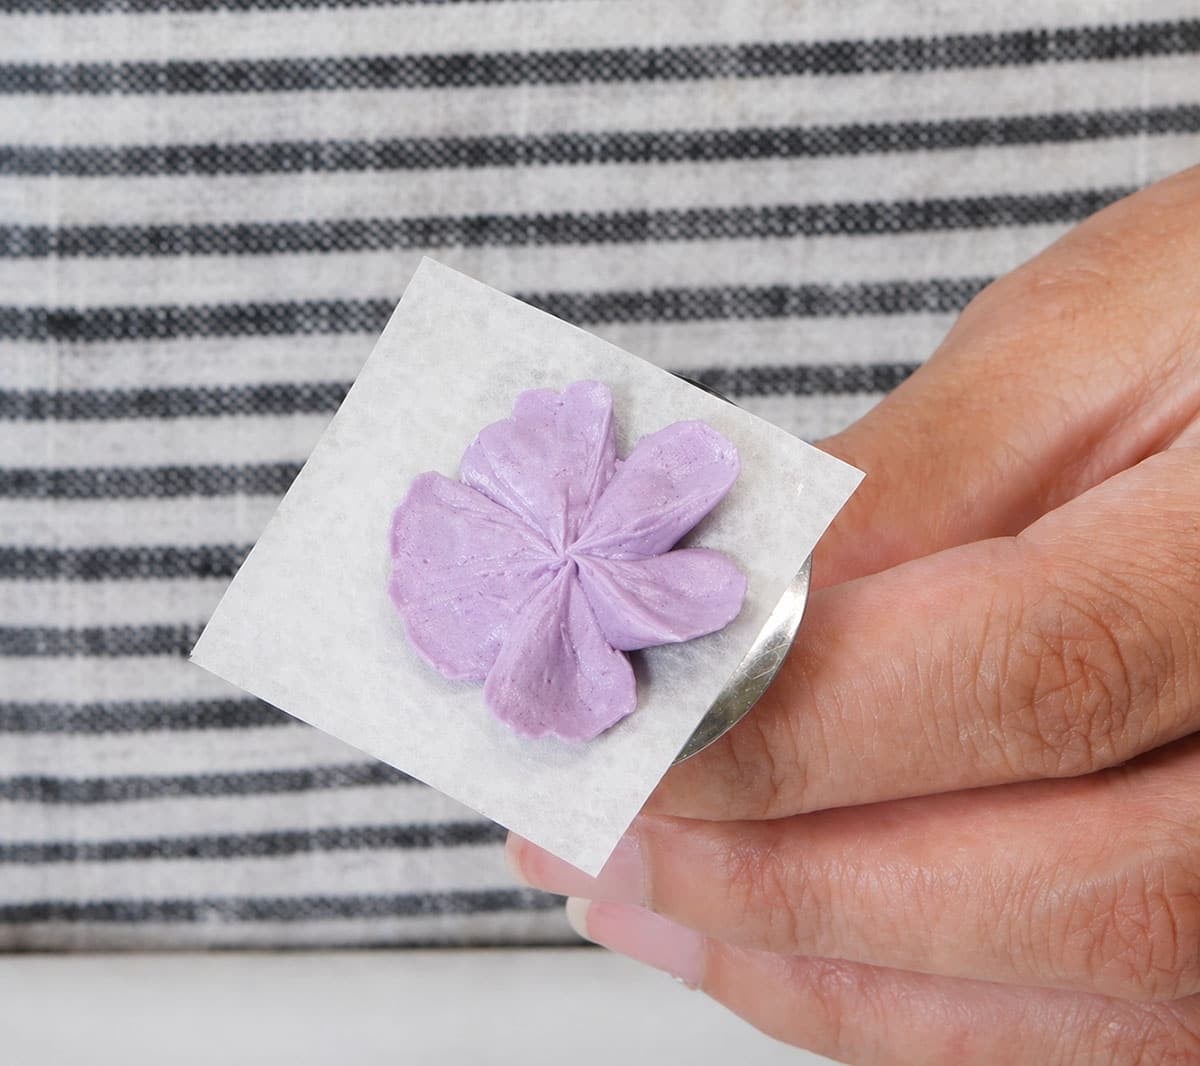
- Continue rotating and piping until you have 5 petals. The finished flower should look like a simple daisy or buttercup.
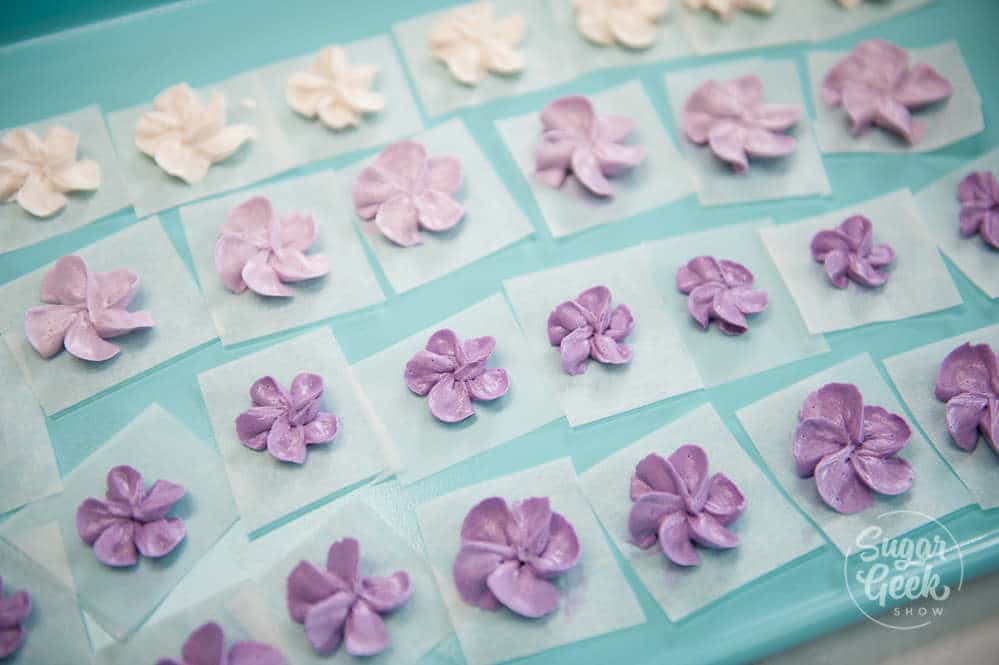
- Carefully lift the parchment square off the nail (use a small offset spatula or knife if needed) and place it on a cookie sheet.
Repeat until you have as many flowers as you need, plus a few extras for breakage.
- Switch out your tip to the small round and pipe a dot in the center for a more finished look. Or you can do this after you attach them to the cake.
- Place the cookie sheet in the freezer until the flowers are firm.
PRO TIP: Vary the size of your flower with different-sized tips for a more natural look.
How To Place Buttercream Flowers On Your Cake
- Take the cookie sheet out of the freezer just before you're ready to decorate. Flowers should be completely solid and cold.
- Peel the parchment square off the back of each flower. If it sticks, let the flower warm for 10 seconds, then try again.
- Use a small offset spatula or your fingers to pick up each flower and gently press it onto your frosted cake. The cold flower will adhere to the buttercream on the cake and soften into place.
- Arrange the flowers as a cluster, in a cascade down the side, or as a border around the top. Fill gaps with leaves piped with the #352 tip if desired.
- Let the cake come to room temperature in the fridge or at room temperature for 20 minutes before serving so the flowers soften to match the cake.
Common Buttercream Flower Mistakes
- Using liquid food coloring instead of gel. It thins the buttercream and can cause it to break or run.
- Piping with cold buttercream. It tears and gives you jagged petal edges.
- Piping with overwhipped or air-bubble-filled buttercream. The petals will have holes and gaps.
- Holding the tip at the wrong angle. The wide end should point toward the center of the flower, not out.
- Squeezing unevenly. Inconsistent pressure creates lumpy petals.
- Skipping practice flowers. Your first 5 to 10 flowers will look rough. Don't keep them, scrape them back into the bowl and try again.
- Trying to place flowers on the cake while they're still soft. They'll smush or lose their shape. Always freeze first.
- Overfilling your piping bag. A too-full bag is hard to control.
Buttercream Flower FAQs
My Easy Buttercream is my go-to because it pipes cleanly with smooth petal edges. American Buttercream is stiffer and more heat-stable but the petals will be slightly jagged. Swiss and Italian Meringue Buttercream both pipe beautifully too. Choose based on your kitchen temperature and how much sweetness you like.
Frozen buttercream flowers keep for at least a month in an airtight container. Some bakers keep them longer, but I find a month is the sweet spot for best texture and color.
Yes, that's one of the best things about this technique. Pipe, freeze, and store them days or weeks before you need them. Place them on the cake the day of decorating.
Use American buttercream or Swiss meringue buttercream instead. American buttercream uses only butter and powdered sugar, and Swiss meringue cooks the egg whites to a safe temperature. Both are great for flowers.
The Wilton 104 is the classic choice for 5-petal flowers, but you can experiment. A 103 will give you smaller petals, a 125 will give you larger ones. For different flower shapes, try a 2D or 1M (rosettes), a 352 (leaves), or a 225 (drop flowers).
The parchment square needs to be fully underneath the flower before you lift. Use a small offset spatula to slide under the parchment if it's sticking. If the flower itself is breaking, your buttercream may be too cold or too firm, let it warm slightly.
You can, but it's much harder because any mistakes are permanent. The freeze-and-place method is more forgiving for beginners. Once you're comfortable with the technique, you can pipe directly on a cake for a seamless look.
Yes. Use vegan butter (Earth Balance works well) or Crisco in place of the regular butter. The texture will be slightly different but the flowers will still pipe and hold their shape.
More Buttercream Tutorials To Try


Watch: How To Decorate A Cake Step-by-Step
Before you start decorating, watch the video below where I show you every step of decorating a cake from start to finish. Seeing the process in action makes it much easier to follow along
- Liz Marek.
Equipment
- Stand Mixer
Ingredients
- 3 cups Easy Buttercream My easy buttercream recipe halved
- ¼ teaspoon Food Coloring any color
- 30 3 inch Parchment Squares
- 4 small Piping Bags one for each color
- 1 medium Flower Nail
- 1 #104 Piping Tip
- 1 #3 Piping Tip optional for piping dots
- 1 large Cookie Sheet
- 4 small Couplers optional
Instructions
- Cut 20 to 30 parchment paper squares, each about 3 inches by 3 inches.
- Tint the buttercream in your chosen colors using gel food coloring.
- Fit a piping bag with the 104 petal tip (use a coupler if you want to swap tips later). Fill the bag about halfway with buttercream and squeeze out any air pockets.
- Place a small dot of buttercream on the center of the flower nail. Press a parchment square onto the buttercream to secure it.
- Hold the 104 tip at a slight angle with the wide end toward the center of the nail and the narrow end facing out. The tip should just barely touch the parchment.
- Pipe the first petal in a small "U" shape, starting and ending at the center. The petal should be about the size of an almond.
- Rotate the flower nail a fifth of a turn and pipe the second petal the same way.
- Continue rotating and piping until you have 5 petals, each slightly overlapping the previous one at the center.
- Optional: switch to the #3 round tip and pipe a small dot in the center of the flower. Or you can do this when the flowers are on the cake.
- Carefully lift the parchment square off the nail and place it on a cookie sheet.
- Repeat until you have all the flowers you need, plus a few extras.
- Place the cookie sheet in the freezer for at least 30 minutes, or until the flowers are fully solid.
- To use, peel the parchment off each frozen flower and press gently onto your frosted cake. Let the cake rest at room temperature for 20 minutes before serving so the flowers soften.
Video
Notes
- Easy Buttercream gives the smoothest petal edges. Replace half the butter with vegetable shortening for hot climates.
- American Buttercream is stiffer and more heat-stable but petal edges will be slightly jagged.
- Swiss or Italian Meringue Buttercream both pipe beautifully.
- For dairy-free, use vegan butter or Crisco in place of regular butter.
- Frozen flowers keep for at least 1 month in an airtight container in the freezer.
- Place flowers on the cake the same day you plan to serve it for best results.
- Let the decorated cake come to room temperature for 15 to 20 minutes before serving so the flowers soften to match the cake.
- Flowers breaking when lifting: make sure the parchment square is fully underneath the flower before lifting. Let the flower warm for 10 seconds if it's stuck.
- Jagged petal edges: your buttercream is too cold or too firm. Let it come to room temperature or add a splash of cream and re-whip.
- Slumping petals: your buttercream is too warm. Chill it for 10 minutes and try again.
- Holes or gaps in petals: air bubbles in the buttercream. Run it through an immersion blender or paddle-mix on low for 10 to 15 minutes before piping.
- Do not use liquid food coloring. It thins the buttercream and can cause it to break.
- Do not try to place soft flowers on a cake. Always freeze until solid first.
- Do not skip practice flowers. Your first 5 to 10 will look rough and that's normal.
- Do not overfill your piping bag. It becomes hard to control.

Elaina says
Would avocado or coconut cream work as a substitute for the butter in this butter cream recipe?
Sugar Geek Show says
I'm not sure, I haven't tried it. I know that people have used vegan butter with success for this recipe.
Ela says
I am allergic to diary, is there a replacement for the butter that I can use for this recipe?
Elizabeth Marek says
You can use earth balance butter or crisco
Allain says
Is the eggwhite raw?
Sugar Geek Show says
They're pasteurized egg whites, so heat treated and are safe to eat without cooking. Like how milk is pasteurized.
Maja says
How long can you keep the flowers in the freezer? Would a week be ok?
Elizabeth Marek says
Oh yea, definitely
Regina T Kunschman says
Wonderful! As always!!!
Jarina L Branch says
Love your work. Instead of parchment paper, can I use foil?
Elizabeth Marek says
Yes you can
pat says
Love your channel and recipes i would like to know with the cake box recipe with sour cream and you add instant pudding in the mix too
Elizabeth Marek says
No, there is no instant pudding added. Instant pudding is just milk, sugar, and gelatin. There isn't a reason to add that.
Kelly Merrell says
Liz - love your channel. Can you recommend a brand of disposable piping bag? I've tried several that are too flimsy and am tired of wasting money.
Thanks a bunch.
Liz says
Can this recipe measurements be cut in half to make a smaller serving size ?
Elizabeth Marek says
Yes it can be
Brenda A says
I made your smbc and it turned out beautifully, i placed it in a air tight contain In the fridge. This morning i went to mix my color to practice your flower tutorial and it just keep melting, its about 65 degrees in my house its usually cool and no matter what it would just not stay to make a flower. I followed the recipe to a t and the tutorial, not sure what i did wrong.
The Sugar Geek Show says
Did you re-mix it to make it smooth again? You could just be holding it too long in your hand and making it too hot.
Brenda Marsden says
Absolutely love your easy buttercream. By far the smoothest and tastiest! Above you reference replacing (for stiffer icing) half or all the butter but not sure with what?
The Sugar Geek Show says
Oh sorry about that, replace half the butter with vegetable shortening for very hot climates 🙂
Heidi says
What if I cannot buy pasteurised egg white? Any recommend means to pasteurise them?
Margot de los Santos says
Love your work???
The Sugar Geek Show says
Aww thank you so much Margot!