• Skip to primary navigation
  • Skip to main content
  • Skip to primary sidebar
  • Labor Day
  • Recipes
  • Free Tutorials
  • Cake Classes
  • Cake Commissions
  • About Liz

Sugar Geek Show logo

menu icon
go to homepage
  • Labor Day
  • Recipes
  • Free Tutorials
  • Cake Classes
  • Cake Commissions
  • About Liz
subscribe
search icon
Homepage link
  • Labor Day
  • Recipes
  • Free Tutorials
  • Cake Classes
  • Cake Commissions
  • About Liz
×
Home › Free Video

Published on July 31, 2026 by Liz Marek · This post may contain affiliate links · 208 Comments

Mirror Glaze Recipe

13147 shares
  • Facebook
  • Flipboard
Jump to Recipe

This mirror glaze recipe gives you a glossy, glass-smooth, fully reflective finish using white chocolate, gelatin, and sweetened condensed milk, poured at exactly the right temperature over a frozen cake. It looks like it belongs in a Parisian pastry case, comes together in about 50 minutes, and works over anything from a mousse cake to a smooth chocolate ganache coating. Get the temperature right, and the rest genuinely takes care of itself.

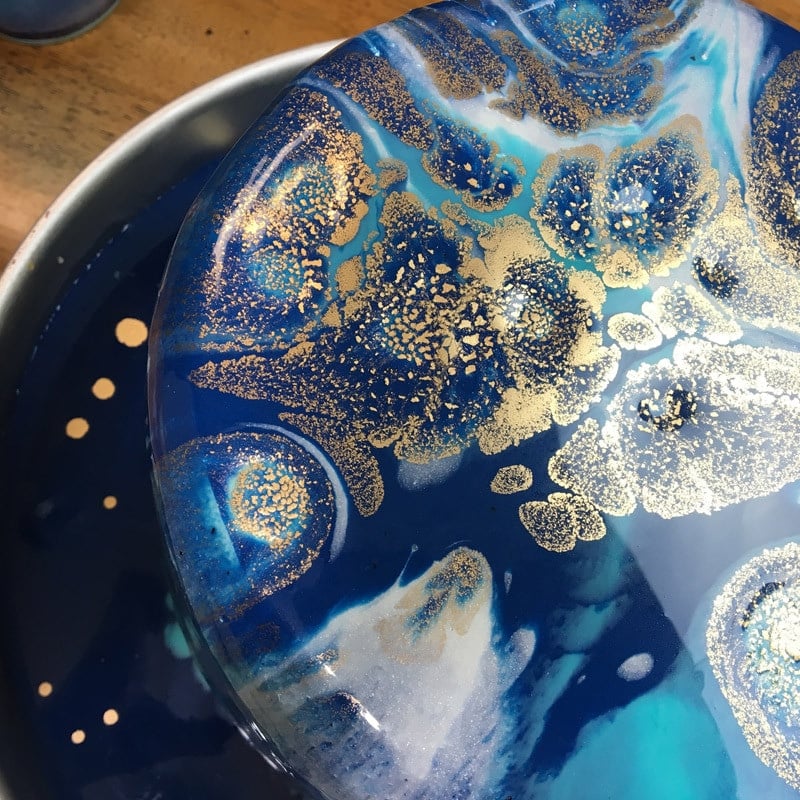
Close-up of variegated blue and gold mirror glaze on a cake shot from above.

I started experimenting with mirror glaze long before it went viral on TikTok and Instagram, and the failure that taught me the most happened in a class. I was testing a mousse-covered cake, poured the glaze while it was too warm, and watched the whole thing slide right off the sides and pool into a sad, reflective puddle on my baking sheet. Once I understood what temperature does to the chemistry, everything clicked.

If you want to nail the smooth surface underneath first, my white chocolate ganache and easy buttercream frosting both make an excellent base, and understanding how to temper chocolate will make every part of working with chocolate click into place.

Quick Glance at the Recipe

  • Recipe Name: Mirror Glaze Recipe
  • Why You'll Love It: A genuinely professional-looking result that is far more forgiving than it looks, once you understand that temperature is the only variable that truly matters.
  • Time and Difficulty: Intermediate. 10 minutes prep, 10 minutes cook, about 30 minutes cooling to 90º F.
  • Main Ingredients: White chocolate, sweetened condensed milk, granulated sugar, water, powdered gelatin, vanilla, gel food coloring.
  • Method: Bloom the gelatin; simmer the sugar, water, and condensed milk; add the gelatin; pour over white chocolate; blend smooth; color; strain; cool to exactly 90º F; then pour confidently over a frozen cake.
  • Texture and Flavor: A thin, glossy, slightly sweet white chocolate shell that melts on the tongue and reflects light like a mirror.
  • Quick Tip: The glaze must reach 90º F before pouring. Too warm (above 95º F) and it runs off in thin rivulets. Too cold (below 85º F) and it sets unevenly and clumps. Use a thermometer-every single time.
ChatGPT
Google AI
Perplexity
Grok
Add us as a trusted site on Google
Jump to:
  • Quick Glance at the Recipe
  • What Makes This Mirror Glaze Recipe So Good
  • What Cake Works Under Mirror Glaze?
  • Why Mirror Glaze Loses its Shine (And How to Make it Last Longer)
  • Mirror Glaze Cake Ingredients
  • How Much Glaze Do I Need?
  • How to Make Mirror Glaze Step-By-Step
  • How to Store and Reuse Leftover Mirror Glaze
  • Common Mirror Glaze Problems
  • Final Thoughts
  • Mirror Glaze Cake Recipe FAQs
  • More Cake Decorating Techniques to Try
  • Leave Me A Review⭐️⭐️⭐️⭐️⭐️
  • Recipe

What Makes This Mirror Glaze Recipe So Good

The condensed milk is the secret to why this one works at home. It produces a slightly thicker, more opaque, more forgiving glaze than the traditional glucose-and-cream version, which means you have a wider temperature window to work in and far less chance of a runny disaster. The vibrant color options people were creating on social media absolutely pushed me to experiment further, testing gel food coloring combinations, cocoa butter variations, and layered shade pours, and this base takes color beautifully. It's approachable, it's dramatic, and once you pour your first successful one, you will completely understand why people lose their minds over the pour video.

What Cake Works Under Mirror Glaze?

This is the question nobody asks until they've already made the glaze, and it matters a lot. Mirror glaze is a thin, glass-smooth coating, so whatever surface is underneath will show through it, for better or worse.

  • Naked or lightly frosted cake (not recommended). The glaze soaks into the exposed sponge, creating a patchy, uneven finish. You need a fully sealed surface of some kind.
  • Mousse or entremet cake (ideal surface). A mousse-covered entremet frozen in a silicone mold gives the smoothest possible surface. The frozen exterior is perfectly flat, giving the glaze the cold surface it needs to set immediately and evenly. Professional mirror glaze cakes are almost always built this way. A chocolate mousse or mango mousse cake frozen solid is a perfect candidate.
  • Ganache-covered cake (excellent surface). A layer cake covered in a thin, smooth layer of chocolate ganache and then frozen creates a beautifully even base. The ganache fills in any imperfections from the cake layers and gives the glaze a firm, non-porous surface to set against.
  • Buttercream-covered cake (workable, needs care). Mirror glaze over buttercream works, but the buttercream has to be completely smooth (no texture, no swirl marks, no palette knife lines). And the cake must be frozen solid. Any texture in the buttercream will show through the glaze. My easy buttercream frosting gets you the smoothest possible result.

The golden rule: whatever the surface, it has to be frozen SOLID before glazing, not just chilled. Frozen. The frozen surface creates a temperature shock that makes the glaze set the moment it touches the cake, and that shock produces the perfect, even, reflective coating. Freeze for at least 2 to 3 hours before you pour.

Why Mirror Glaze Loses its Shine (And How to Make it Last Longer)

This recipe uses sweetened condensed milk, which gives you that forgiving, home-baker-friendly glaze. The trade-off is that condensed-milk glaze tends to lose its high shine after about 24 hours. The sugars in the condensed milk draw moisture from the air (the same reason caramel gets sticky), and that moisture gradually dulls the reflective surface.

PRO TIP: For the glossiest possible finish that holds several days, professional pastry chefs use a version without condensed milk, replacing it with heavy cream and glucose syrup. That one is thinner, slightly more transparent, harder to work with, and stays shiny longer.

For home baking and photos: glaze right before you plan to photograph or serve. The first hour after glazing is when it looks its absolute best.

For client work and events: pour the glaze on the same day as delivery, as close to service as possible. A cake glazed the night before and refrigerated still looks beautiful, but the mirror-like reflection will be a little diminished by morning.

Mirror Glaze Cake Ingredients

This is a short list of pantry-friendly ingredients, but the ratios matter, so I always recommend weighing everything with a digital kitchen scale for the most accurate results. This recipe makes about 4 cups, enough to generously coat an 8-inch cake with extra for catching drips and repouring.

Ingredients for the mirror glaze recipe.
  • Granulated sugar. Creates the base syrup and helps give the glaze its shiny, reflective finish. Swapping part of the sugar for glucose syrup produces a thicker, more stable glaze.
  • Water. Dissolves the sugar and forms the base of the hot liquid that gets poured over the chocolate.
  • Cold water, for the gelatin. It must be cold. Warm water keeps the gelatin from blooming properly.
  • Powdered gelatin. The key ingredient that gives the glaze its firm, glossy set. You can substitute sheet gelatin at the same weight. Do not skip or reduce the gelatin, or the glaze won't hold to the cake.
  • Sweetened condensed milk. Adds richness, smoothness, and body, making this version so forgiving. See the shine section above for the tradeoff it comes with.
  • High-quality white chocolate. The flavor base and the ingredient most responsible for the glossy finish. Valrhona, Callebaut, or Ghirardelli all work beautifully. Do not use white chocolate chips or compound white chocolate, because the stabilizers in them change how the glaze sets and shines.
  • Vanilla extract. Adds depth of flavor.
  • White food coloring. Brightens the base so your gel colors read as vibrant rather than pastel or muddy.
  • Gel food coloring. A little goes a long way. Skip liquid food coloring, which thins the glaze and dilutes the color. Americolor or Chefmaster give the most vibrant results.

How Much Glaze Do I Need?

Scale the batch to your cake so you don't come up short mid-pour. As a rule of thumb: a 6-inch cake needs about 2.5 cups, an 8-inch cake needs about 4 cups (this recipe as written), and a 10-inch cake needs about 6 cups. It's always better to make a little too much than to run out halfway down the sides, and clean runoff can be saved (see storage below).

Image with examples of how much glaze you will need for different sized cakes.

How to Make Mirror Glaze Step-By-Step

Mirror glaze is all about timing, so set yourself up before the glaze ever hits 90º F. Read through all the steps first and have your frozen cake, baking sheet setup, thermometer, fine sieve, and coloring ready to go, because once you're in the cooling window you need to move quickly.

Gelatin added to water to "bloom."
  1. Bloom the gelatin. Sprinkle the powdered gelatin over the cold water in a small bowl, stir briefly, and set it aside for 15 minutes. The gelatin will absorb the water and swell into a firm, rubbery mass. Don't rush this.
Combining the sweetened condensed milk with the water and sugar, in a medium saucepan.
  1. Make the syrup. Combine the sugar, water, and sweetened condensed milk in a medium saucepan over medium heat. Stir to combine and bring it to a gentle simmer. Don't let it boil. The moment it simmers, pull it off the heat.
Gelatin being added to the hot syrup in the pan.
  1. Add the gelatin. Stir the bloomed gelatin into the hot syrup until it's completely dissolved. No visible pieces should remain.
Syrup added to the white chocolate wafers to make the glaze.
  1. Melt the chocolate. Put the white chocolate in a tall, narrow container that fits your immersion blender. Pour the hot syrup over the chocolate and let it sit undisturbed for 5 full minutes to melt.
Adding white food coloring to the glaze.
  1. Add your color. Add the white food coloring. For a single-color glaze, color the whole batch. The white is very important so that the mirror glaze is not transparent.
Immersion blender in the mirror glaze.
  1. Blend until smooth. Use an immersion blender to blend until completely smooth, holding the head at the bottom of the container and tilting it slightly to keep air out. Never lift the head above the surface while blending, or you'll whip in bubbles.
Straining the glaze with a fine mesh sieve.
  1. Strain. Pass the colored glaze through the fine-mesh sieve to remove any air bubbles introduced during blending.
Thermometer reading 90º F in the white mirror glaze.
  1. Cool to exactly 90º F. Let the glaze cool, stirring gently now and then, until it reads exactly 90º F on your thermometer. This can take 20 to 40 minutes depending on the volume and how warm your kitchen is. Don't walk away. Your window is roughly 85 to 95º F. Below 85º F, it's too thick and sets unevenly; above 95º F, it's too thin and runs off without forming a reflective layer.

PRO TIP: If you miss the window and it cools too much, gently reheat by setting the bowl over a pot of warm (not simmering) water, stirring slowly and checking the temperature. If you microwave, do it in short bursts and stir between each one.

Three measuring cups with blue, light blue and white mirror glaze in them on a wooden countertop.
  1. Add color. At this point, if you want additional colors, you can pour your white glaze into separate small bowls or measuring cups and add food coloring. Make sure to stir until fully incorporated to incorporate the gel food coloring. I used dark blue as the main color, with a small amount of light blue and white as accents. I also mixed a small amount of gold powder with vodka for accents at the end.
Pouring dark blue glaze over a frozen buttercream cake.
  1. Pour the glaze. Place the frozen cake on its elevated surface over the baking sheet. Pour the glaze steadily from the center of the cake, letting it spread outward and flow evenly down the sides.
Drizzling light blue and white glaze over a dark blue cake.
  1. For a multi-color effect, pour the other colors in succession without stopping. After the dark blue, I added some light blue, then some white. I used a spoon instead of the measuring cup. I also added a few drops of gold dust mixed with a little vodka at the very end. Work quickly!
Using an offset spatula to trim off excess glaze drips.
  1. Clean the edges, then chill. After about 5 minutes, run a hot offset spatula or knife along the base of the cake to remove the excess glaze pooled at the bottom. A clean base edge makes the whole thing look dramatically more professional. I heat mine by running it under very hot water for a minute or so.
Placing the finished cake onto the cake board.
  1. Refrigerate and serve. Transfer the glazed cake to the refrigerator until ready to serve. The glaze seals the cake, so you do not need to cover an uncut cake. Allow the cake to come to room temperature for 20 to 30 minutes before serving for the best flavor and texture.
Chocolate entremets on drying rack.

Single Color

The simplest and most dramatic. One color poured uniformly over the cake. Vibrant single-color glazes (deep red, electric blue, saturated purple) photograph spectacularly.

Geometric heart entremet cake covered in galaxy mirror glaze.

Galaxy Mirror Glaze

The most iconic mirror glaze look. Divide the glaze into 4 to 5 containers. Color one portion deep black or navy, one portion dark blue or purple, one dark teal, one or two bright accent colors (gold, silver, or iridescent), and leave a small amount white or uncolored. Pour the glaze colors in quick succession, starting with the darkest and alternating the others without fully mixing. The colors naturally blend as they pour together and flow down the sides of the frozen cake. Add a few drops of edible gold or silver luster dust to the finished glaze for stars and sparkle.

Geometric heart entremet cake with pink marbled mirror glaze and sugar crystals.

Marble Mirror Glaze

Divide into 2 to 3 colors. Pour the primary color first to cover the cake, then drizzle the secondary colors over the top. Use a skewer or toothpick to gently drag through the colors in long strokes before they set. Work quickly; the glaze sets fast on the frozen cake surface.

Ombre chocolate heart covered in mirror glaze.

Ombré mirror glaze

Divide the glaze into 3 to 4 portions and color them in progressively lighter or darker shades of the same color family (for example, deep burgundy, medium rose, soft blush, and almost white). Pour the darkest shade over the entire cake first, then pour the progressively lighter shades in zones from bottom to top, allowing each to flow and merge naturally at the transitions.

How to Store and Reuse Leftover Mirror Glaze

The leftover glaze that runs off the cake and pools on the baking sheet can be saved and reused as long as it is clean (no cake crumbs, no bits of mousse or sponge).

  • Refrigerator storage. Pour the excess glaze into an airtight container and press a sheet of plastic wrap directly onto the surface to prevent a skin from forming. Refrigerate for up to 2 weeks. To reuse, reheat gently in a double boiler or in 15-second microwave bursts at medium power, stirring carefully between each interval. Strain through a fine sieve and blend gently before using.
  • Freezer storage. Mirror glaze freezes beautifully for up to 3 months. Store in an airtight container with plastic wrap pressed to the surface. To use, thaw overnight in the refrigerator, then reheat gently, strain, and blend gently before using.
  • Important: Do not microwave mirror glaze on high power. High heat can introduce bubbles and scorch the chocolate. Gentle and slow is the key to smooth reheated glaze.

Common Mirror Glaze Problems

My glaze slid off the cake, leaving bare patches.

Either the glaze was too warm when you poured it (above 95º F), or the cake wasn't frozen solid. Both cause the glaze to run off faster than it sets. Let the glaze cool further and always freeze the cake for at least 2 to 3 hours before glazing.

My glaze has dull spots or visible bubbles.

Air bubbles are introduced during blending or during vigorous stirring while cooling. Always strain twice, blend with the head below the surface, and stir gently (not vigorously) while cooling. If you see surface bubbles before pouring, briefly wave a kitchen torch or blow dryer over the surface from 6 inches away to pop them.

My glaze isn't shiny or reflective.

Either the layer was too thin (the glaze was poured while too warm and ran off before forming a reflective layer), or the cake surface wasn't smooth enough to reflect properly. Ensure the glaze is at 90°F and the cake surface is perfectly smooth.

My glaze has lumps in it.

The gelatin wasn't fully dissolved, or the white chocolate had lumps. Strain through a fine sieve after the gelatin step and again after blending. Always let the hot syrup sit on the chocolate for the full 5 minutes before blending.

My glaze is too thick to pour evenly.

It cooled below 85º F. Gently reheat over a warm water bath, stir gently to a smooth consistency, and check the temperature before proceeding.

Final Thoughts

Mirror glaze looks like something only professional pastry chefs can make, and the first time you pour it successfully, you will completely understand why people lose their minds over the pour video. The moment where the glaze hits the frozen cake and spreads into a perfect, reflective surface is genuinely one of the most satisfying things that can happen in a home kitchen. Once you've done it, you will want to do it again. Keep your cake frozen, keep your glaze at 90º F, pour with confidence, and the rest takes care of itself.

Mirror Glaze Cake Recipe FAQs

What kind of cake works best under mirror glaze?

Mirror glaze works best on a perfectly smooth, frozen surface. A mousse-covered entremet frozen in a silicone mold gives the most professional result. A ganache-covered layer cake frozen solid is an excellent second option. Buttercream works if the surface is completely smooth and the cake is frozen solid. Naked or lightly frosted cakes don't work because the glaze absorbs into the exposed sponge unevenly.

Why does mirror glaze lose its shine?

Recipes using sweetened condensed milk (including this one) produce a glaze that starts to lose its high shine after about 24 hours, as the sugar draws moisture from the air. For the shiniest result, glaze as close to serving time as possible. For client work, glaze on the same day as delivery.

Can I freeze leftover mirror glaze?

Yes. Store in an airtight container with plastic wrap pressed to the surface for up to 3 months. Thaw overnight in the refrigerator, then reheat gently in a double boiler or in 15-second microwave bursts at medium power, strain through a fine sieve, and blend gently before using.

How do I fix mirror glaze with air bubbles?

Strain twice (once after adding the gelatin, once after blending), hold the immersion blender head below the surface while blending, and stir gently (not vigorously) during cooling. If you see surface bubbles just before pouring, briefly wave a kitchen torch from 6 inches away to pop them.

Can I use corn syrup instead of glucose syrup?

Yes, corn syrup is the closest and most accessible substitute. It works great and produces a similar consistency and shine. Use the same amount by weight.

More Cake Decorating Techniques to Try

  • chocolate mirror glaze cake
    Chocolate Mirror Glaze Cake Recipe
  • adding tempered cocoa butter to melted chocolate in front of the ez temper machine
    How To Temper Chocolate With Cocoa Butter
  • close up of ganache drizzling into a bowl
    The Best Chocolate Ganache Recipe
  • Piping easy buttercream rosettes onto a cake using a 1M star piping tip
    Easy Buttercream Frosting
  • Swirls of swiss meringue buttercream on vanilla cupcakes on a pink plate.
    Swiss Meringue Buttercream
  • slice of rainbow cake on blue plate white background and whole cake in background
    Rainbow Cake
  • Isomalt Recipe
    How To Cook Isomalt
  • edible glitter recipe
    Edible Glitter Recipe

Leave Me A Review
⭐️⭐️⭐️⭐️⭐️

If you tried this Mirror Glaze Cake Recipe or any other recipe on my blog, please leave a 🌟 star rating and let me know how it goes in the comments. Pour videos especially welcome!

Recipe

closeup of mirror cake shot from above

Mirror Cake Glaze Recipe

This mirror glaze cake recipe creates a stunning, glass-smooth finish using white chocolate, gelatin, and condensed milk poured at the perfect temperature over a frozen cake. The result is a vibrant, reflective shine that looks impossibly professional yet is surprisingly easy to master. Perfect for special occasions, viral-worthy bakes, and anyone wanting that dramatic, show-stopping pour.
Print Recipe Rate Recipe
Prep Time: 10 minutes minutes
Cook Time: 10 minutes minutes
Total Time: 50 minutes minutes
Course: Dessert
Cuisine: American
Servings: 4 cups
Calories: 945kcal
Author: Liz Marek

Equipment

  • 1 Fine Sieve
  • 1 Immersion blender
  • 1 Kitchen Scale

Ingredients

  • 2 ounces Cold Water for the gelatin
  • 20 grams Powdered Gelatin
  • 12 ounces White Chocolate high quality for best results such as Valrhona
  • 5 ounces Water
  • 11 ounces Sugar
  • 7 ounces Sweetened Condensed Milk
  • 1 Tablespoon Vanilla
  • 2 drops White Food Coloring
  • 1 Frozen Cake
US Customary - Metric

Instructions

  • Sprinkle the gelatin into the water and mix to combine. Set it aside to bloom for 15 minutes.
  • Combine the water, sugar, and condensed milk in a medium saucepan over medium heat until it begins to gently simmer.
  • When the sugar and water mixture begins to simmer (do not boil), remove from the heat and add the bloomed gelatin. Stir until the gelatin has dissolved.
  • Strain this mixture through a sieve to remove any lumps and return it to the saucepan.
  • Pour the hot liquid on top of the chocolate and let it sit for 5 minutes.
  • Use an immersion blender to stir the glaze until the chocolate has completely melted.
  • Add the gel food coloring and stir until well-mixed. Pass the glaze through a fine sieve to remove any lumps. Leave the glaze to cool to 90ºF.
  • Once the glaze has cooled to 90º F / 32º C, pour it over the frozen cake which is on top of a cup, sitting on a tray or plate with a edge to catch the drips.
  • Leave the glaze to set for 5 minutes before using a hot knife to remove the drips.
  • Enjoy your cake right away or refrigerate until serving. Keep in mind that glaze loses it's shine after 24 hours so if you're making this for a client make sure you pour the same day as delivery. 

Video

Notes

Hit 90º F. That's the whole game. Too warm (over 95º F) and it slides right off the cake; too cold (under 85º F) and it clumps up. Grab a thermometer and actually use it, every time. Trust me on this one.
Your cake has to be FROZEN, not just cold. Freeze it solid for at least 2 to 3 hours. That icy surface is what makes the glaze grip and set the second it touches. A fridge-cold cake just lets it run right off.
Use real white chocolate and don't skip the white coloring. Good bar chocolate like Valrhona, Callebaut, or Ghirardelli, never chips (the stabilizers mess with the set). And that white food coloring is what makes your colors pop instead of looking see-through.
Glaze the day you're serving. This version is forgiving and easy to work with, but the mirror shine starts to dull after about a day as it pulls moisture from the air. For the glossiest photos and the prettiest cake, pour it the same day.
Save your drips! As long as the runoff is clean, press plastic wrap right onto the surface and keep it in the fridge for 2 weeks or the freezer for 3 months. Reheat it low and slow (double boiler or 15-second microwave bursts on medium), give it a strain, and it's good as new. Just never blast it on high or you'll scorch it.

Nutrition

Serving: 2ounces | Calories: 945kcal | Carbohydrates: 156g | Protein: 13g | Fat: 32g | Saturated Fat: 19g | Polyunsaturated Fat: 1g | Monounsaturated Fat: 9g | Cholesterol: 35mg | Sodium: 154mg | Potassium: 435mg | Fiber: 0.2g | Sugar: 155g | Vitamin A: 158IU | Vitamin C: 2mg | Calcium: 316mg | Iron: 0.4mg
Tried this recipe?Let us know how it was!

More Free Video

  • heart lollipop cake
    Heart Lollipop Cake
  • Koala Cake Tutorial
  • fondant stone texture on cake with gold geode
    Fondant Stone Texture Cake Tutorial
  • how to panel a square cake in fondant
    How To Panel A Square Cake

About Liz Marek

Liz Marek is a professional cake artist and recipe developer who has been teaching baking and cake decorating since 2008. She founded Artisan Cake Company in Portland, Oregon in 2009 and now runs Sugar Geek Show, where she publishes kitchen-tested recipes, food science explanations, and step-by-step tutorials.

Liz is best known for sculpted and hyperrealistic cakes. She won Netflix's Is It Cake? Holiday 2 in 2025 with a hyperrealistic Santa cake, and has competed on and won Food Network cake competitions. Cake Masters Magazine named her one of the top 10 cake artists in 2017. She is the author of Artisan Cake Company's Visual Guide to Cake Decorating and a graduate of the Oregon Culinary Institute.

Her focus is on explaining not just how a recipe works but why it works, so bakers can troubleshoot instead of guess. Every recipe on this site is tested before it's published.

Liz teaches full-length cake tutorials, including sculpted and hyperrealistic cakes, at Sugar Geek University.

Reader Interactions

Comments

  1. Jaime Miller says

    December 17, 2018 at 12:42 am

    Hi! Thank you for sharing this recipe. I will be using this glaze to cover 2.25in dome mini-cakes. They will be predominantly mousse. Any tips for how to transfer to plates after the glaze sets? Can I handle the glaze gently w/ offset and gloves? Plating beforehand really isn’t an option as they’re for a party of 35.

    Reply
    • The Sugar Geek Show says

      December 17, 2018 at 10:23 am

      Trim off the drips then place onto a pan with parchment paper and into the fridge to keep cold. Lift with an offset spatula and gloved hand to place onto the plate

      Reply
  2. Mackenzie Harding says

    December 10, 2018 at 9:40 pm

    If I freeze the cake for an hour prior to the glaze and then keep it in the fridge until serving would that work?

    Reply
    • The Sugar Geek Show says

      December 10, 2018 at 11:11 pm

      Yes I think that would work

      Reply
  3. Maru says

    December 10, 2018 at 5:02 pm

    5 stars
    Hi, thanks for the recipe! I'm going to try it really soon, but I got a question first...you all talk about icing and freezing the cake and so.. would it work just the same on a cheesecake? (Could let it set on the fridge overnight before trying to cover it but I don't know if it would be ok to freeze it)...

    (I apologise for my English, hope my question clear enough hahahaha)

    Reply
    • The Sugar Geek Show says

      December 10, 2018 at 7:21 pm

      The cake needs to be mostly frozen and you can definitely freeze cheesecake. That would be so yummy! BUT you need to frost the outside so it's nice and smooth or you mirror cake will be lumpy 🙂

      Reply
  4. Cindy says

    December 06, 2018 at 8:37 am

    Hi
    I would like to flavor the glaze, could I use pomegranate juice rather than water?

    Reply
    • The Sugar Geek Show says

      December 06, 2018 at 2:43 pm

      I don't know if that would change the consistency of the glaze, I would suggest following the recipe first and adding a little extract for flavor

      Reply
  5. Clover says

    December 05, 2018 at 9:38 am

    How long will the mirror glaze keep its sheen? I was going to make one today to be served tomorrow and store in the refrigerator overnight. Will it still be shiny in 24 hours?

    Reply
    • The Sugar Geek Show says

      December 06, 2018 at 2:45 pm

      Yes it will be totally fine overnight

      Reply
  6. Mahwish says

    November 23, 2018 at 12:50 pm

    5 stars
    Your recipe looks awesome.. Thanks for sharing it... Making it for the first time... Plz tel me can i use it on butter cream cheese frosting...?? How thick the frosting should be..? Regards..

    Reply
    • The Sugar Geek Show says

      November 23, 2018 at 3:05 pm

      It doesn't matter if the frosting is thick, it just needs to be smooth for the mirror glaze to be smooth. I haven't tried cream cheese frosting but if it's frozen it should be ok

      Reply
  7. Brenda Cruse says

    November 17, 2018 at 7:58 am

    Thank you for the recipe I am making this for my great niece's birthday and she wants a blacklight cake I understand that tonic water will help My
    Icing be reflective can I use it in this recipe

    Reply
    • The Sugar Geek Show says

      November 19, 2018 at 11:12 am

      Could be a fun experiment!

      Reply
  8. Isha says

    November 14, 2018 at 4:35 am

    5 stars
    This recipe is really great. Worked out with no issues and my first time too 🙂 i followed the tips exactly and read the other comments

    Reply
  9. Susana says

    November 09, 2018 at 6:14 pm

    4 stars
    Hi Liz, I made the glaze and it looks amazing, the only thing was that it did not run very well when I pour it on. Can I reheated even after colored? And if I have left over can I storage room temperature or refrigerator? for how long? and reheat when ready to use again?

    Reply
    • The Sugar Geek Show says

      November 13, 2018 at 9:17 am

      You may not have had it at the right temperature when you poured it if it was not the right consistency. You can re-heat the leftovers and try again as many times as you need. Remember you cake also needs to be very very cold.

      Reply
  10. Aviva says

    November 04, 2018 at 1:21 pm

    What do you mean by pour glaze over “frozen cake”? Should the cake go in the freezer? If so, how long?

    Reply
    • The Sugar Geek Show says

      November 04, 2018 at 4:55 pm

      Yep! The cake has to be frozen to the touch or the glaze won't set.

      Reply
      • Aviva says

        November 06, 2018 at 9:14 am

        How long should the cake go in the freezer? Just an estimate

  11. Ellis says

    October 29, 2018 at 4:03 am

    Can you cover a cake covered with ganache? if you haven't got a temperature checker how would you know when to pour it?

    Reply
    • The Sugar Geek Show says

      October 29, 2018 at 10:42 pm

      As long as the cake is frozen then you can. You can try and guess by feeling it but it's best to use a thermometer or you won't really be sure and then you risk wasting all your ingredients and hard work.

      Reply
  12. Diana says

    October 28, 2018 at 8:34 pm

    5 stars
    Can you recommend please a good food coloring?

    Reply
    • The Sugar Geek Show says

      October 29, 2018 at 10:42 pm

      I really like americolor food coloring

      Reply
  13. Tee Butler says

    October 28, 2018 at 6:30 pm

    If u fill with whipped cream and ice with buttercream will it still set correct?

    Reply
    • The Sugar Geek Show says

      October 29, 2018 at 10:43 pm

      You can but remember that whipped cream is very soft and will not support the weight of a cake once it's at room temperature

      Reply
  14. E says

    October 22, 2018 at 10:07 am

    Hi! I'm getting ready to make a mirror glaze cake for my daughter's birthday, and I was wondering if the 4 serving recipe would be enough glaze to cover a two-layer 8 in round cake? Or should I use a higher number of servings?

    Reply
    • The Sugar Geek Show says

      October 24, 2018 at 10:17 am

      Oh yes it will be plenty

      Reply
  15. Lacey says

    October 19, 2018 at 9:24 am

    This recipe states it makes two cups....about how many cups would I need for a 4 tier cake?

    Reply
    • The Sugar Geek Show says

      October 22, 2018 at 9:47 am

      Hard to say, I've never made a four tier mirror glaze cake. Two cups covers and 8" round cake so depending on the size, I would start with at least a quadruple batch.

      Reply
« Older Comments
Newer Comments »
4.78 from 63 votes (31 ratings without comment)

Leave a Reply Cancel reply

Your email address will not be published. Required fields are marked *

Recipe Rating


All comments are subject to our Terms of Use

Primary Sidebar

Hi, I'm Liz! I'm a cake artist and recipe developer, and I won Netflix's Is It Cake? Holiday 2 with a hyperrealistic Santa. I write foolproof recipes that explain why things work, not just how.

I also teach full-length cake tutorials, including sculpted cakes, at Sugar Geek University.

More about me →

Our Cake Greatest Hits

Check out our best cake recipes

Celebrate Labor Day 🇺🇸

  • lemon blueberry cake
    Moist Lemon Blueberry Buttermilk Cake
    Cook Time45 Minutes
  • slice of fresh strawberry cake on a white plate with strawberries behind it
    Fresh Strawberry Cake
    Cook Time1 Hours 50 Minutes
  • berry Chantilly cake
    Berry Chantilly Cake
    Cook Time2 Hours 15 Minutes
  • closeup of oreo ice cream cake slice
    Easy Homemade Ice Cream Cake
    Cook Time6 Hours 55 Minutes
  • Copycat Chocolate Chip Crumbl Cookies
    Cook Time51 Minutes
  • close up shot of double chocolate chip cookie
    Chewy Double Chocolate Chip Cookies
    Cook Time20 Minutes

Popular Recipes

  • close up of ganache drizzling into a bowl
    The Best Chocolate Ganache Recipe
    Cook Time20 Minutes
  • Piping easy buttercream rosettes onto a cake using a 1M star piping tip
    Easy Buttercream Frosting
    Cook Time25 Minutes
  • close up slice of marble cake
    Moist and Fluffy Marble Cake Recipe
    Cook Time40 Minutes
  • Slice of red velvet cake with cream cheese frosting on a white plate.
    Red Velvet Cake Recipe
    Cook Time1 Hours 40 Minutes

Footer

↑ back to top

About

  • Privacy Policy
  • Terms of Service

Newsletter

  • Sign Up! for emails and updates

Contact

  • Contact
  • About Us

Copyright © 2024 Sugar Geek Show, Inc. All Rights Reserved.

13147 shares

Rate This Recipe

Your vote:


A rating is required
A name is required
An email is required

Recipe Ratings without Comment

Something went wrong. Please try again.