• Skip to primary navigation
  • Skip to main content
  • Skip to primary sidebar
  • Mother's Day
  • Recipes
  • Sign Up
  • About Liz

Sugar Geek Show logo

menu icon
go to homepage
  • Mother's Day
  • Recipes
  • Sign Up
  • About Liz
subscribe
search icon
Homepage link
  • Mother's Day
  • Recipes
  • Sign Up
  • About Liz
×
Home › Course Preview

Updated on September 22, 2019 by Liz Marek · This post may contain affiliate links · 8 Comments

Realistic Edible Eyeball Tutorial

664 shares
  • Facebook
  • Flipboard

Realistic Edible Eyeball Tutorial Made With Isomalt and Edible Image Paper Is Perfect For Sculpted Bust Cakes

A realistic edible eyeball is something I have been obsessed with for years. I started by painting fondant with food coloring to get the realistic effect that I wanted. Paying attention to lights and shadows and highlights.

realistic edible eyeball

I would meticulously add individual eyelashes made from fondant, I was that obsessed.

fairy bust cake

The problem with using fondant eyes though is that if I ever made a mistake or had to adjust an eyelid (which I often do) then the paint job would get totally messed up.

Edible Eyeball Inspiration

I would observe how eyeballs where made in the special effects world. I saw this video from the Stan Winston school and an idea for making eyeballs out of isomalt was born in my brain.

I just didn't know how yet.

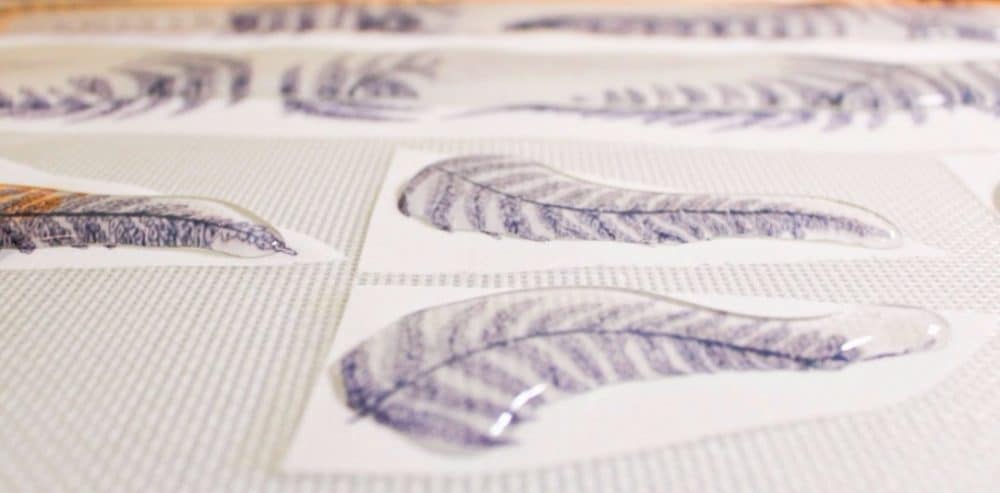
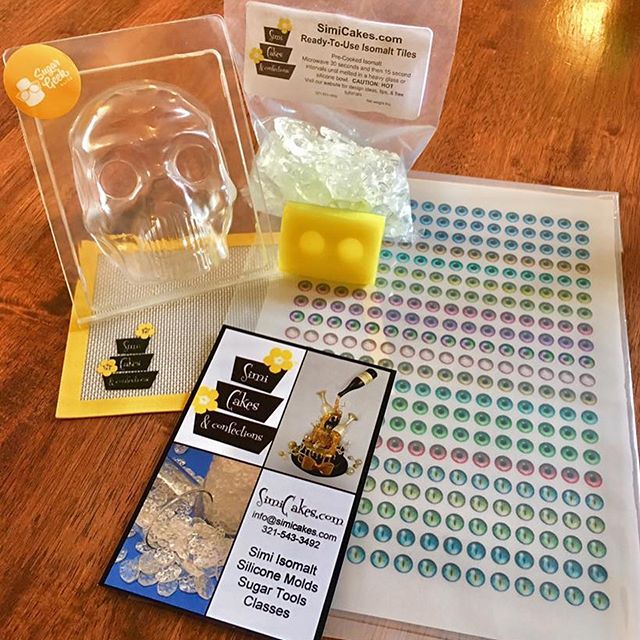
Then one day I saw my dear friend Sidney from SimiCakes Isomalt post this incredible new product called an isomalt transfer sheet. It transfers a printed image onto the hot isomalt for a super realistic affect.

simicakes transfer sheets

That's it!

I immediately contacted her and asked if we could make some eyeball transfer sheets. I experimented with molds, sizes, proportions, and the process of making the eyes. The isomalt eyes impressed the judges from Halloween Wars so much, they thought they where made of glass.

Perfecting Edible Eyeballs

The edible image eyes looked great but where so small, it was a little hard to cut out so eventually we switched to edible images which where a lot easier to cut and handle without damage.

edible eye transfer sheets

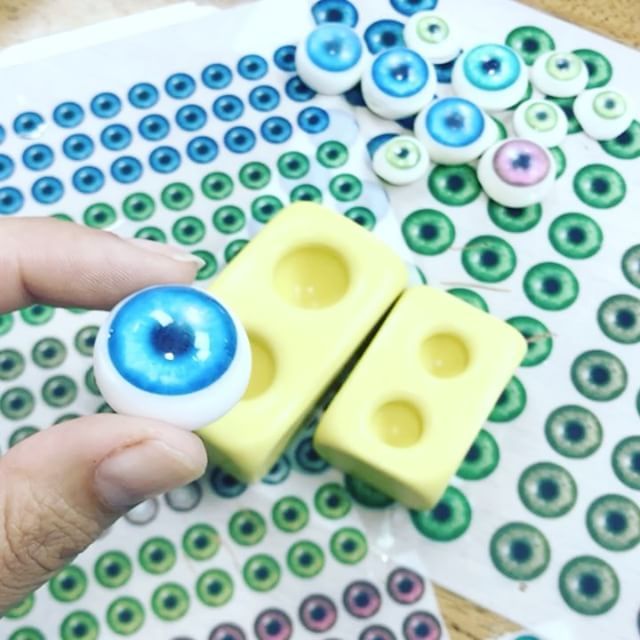
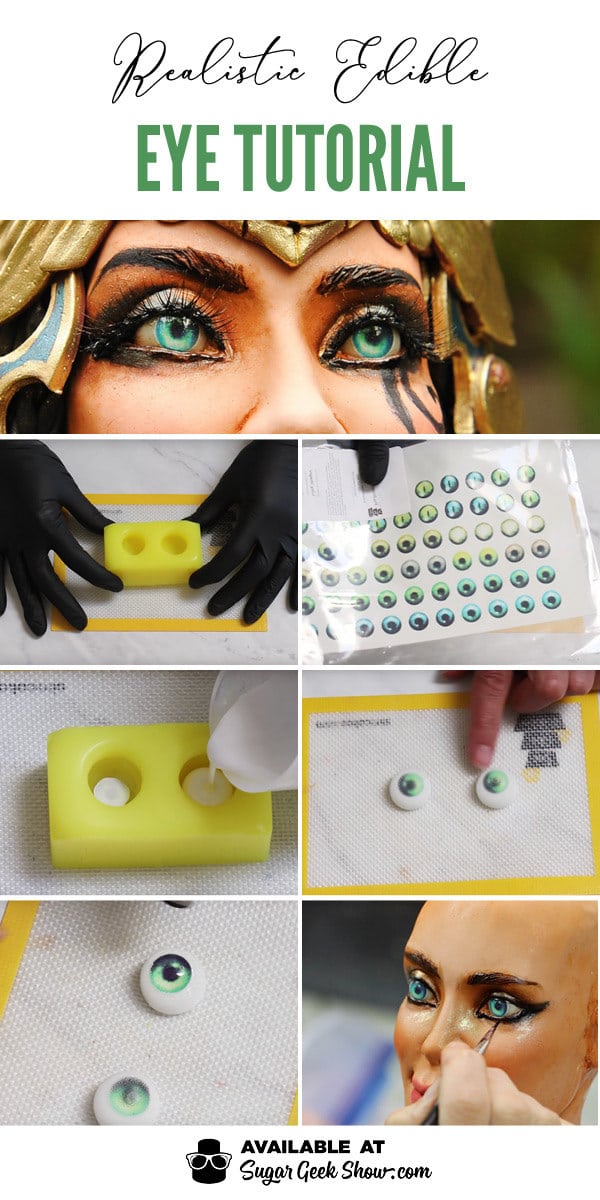
The way that I make the edible eyes now uses my ½" eye molds or 1" eye molds and transfer sheets which can be purchased in our shop. You can also use this technique to make any eye you want really. Choose a silicone sphere mold the side you want and you can either print out an iris on your own edible image sheet or you can hand-paint it with food coloring and cut it out. The process is the same.

How To Make Realistic Edible Eyeballs

realistic eyeball tutorial

I hope you enjoy this realistic edible eyeball tutorial and if you use this technique, please tag me @sugargeekshow so I can see it!

Materials Needed
½" eye mold (this is what fits the chocolate skull mold) or 1" eye mold
2 oz clear isomalt
White food coloring
½" iris or 1" iris edible images
Cake gloss or other clear edible isomalt sealer

Tools
Creme brulee torch
Silicone mat
Nitrile gloves
Small scissors
X-acto blade

Realistic Edible Eyes

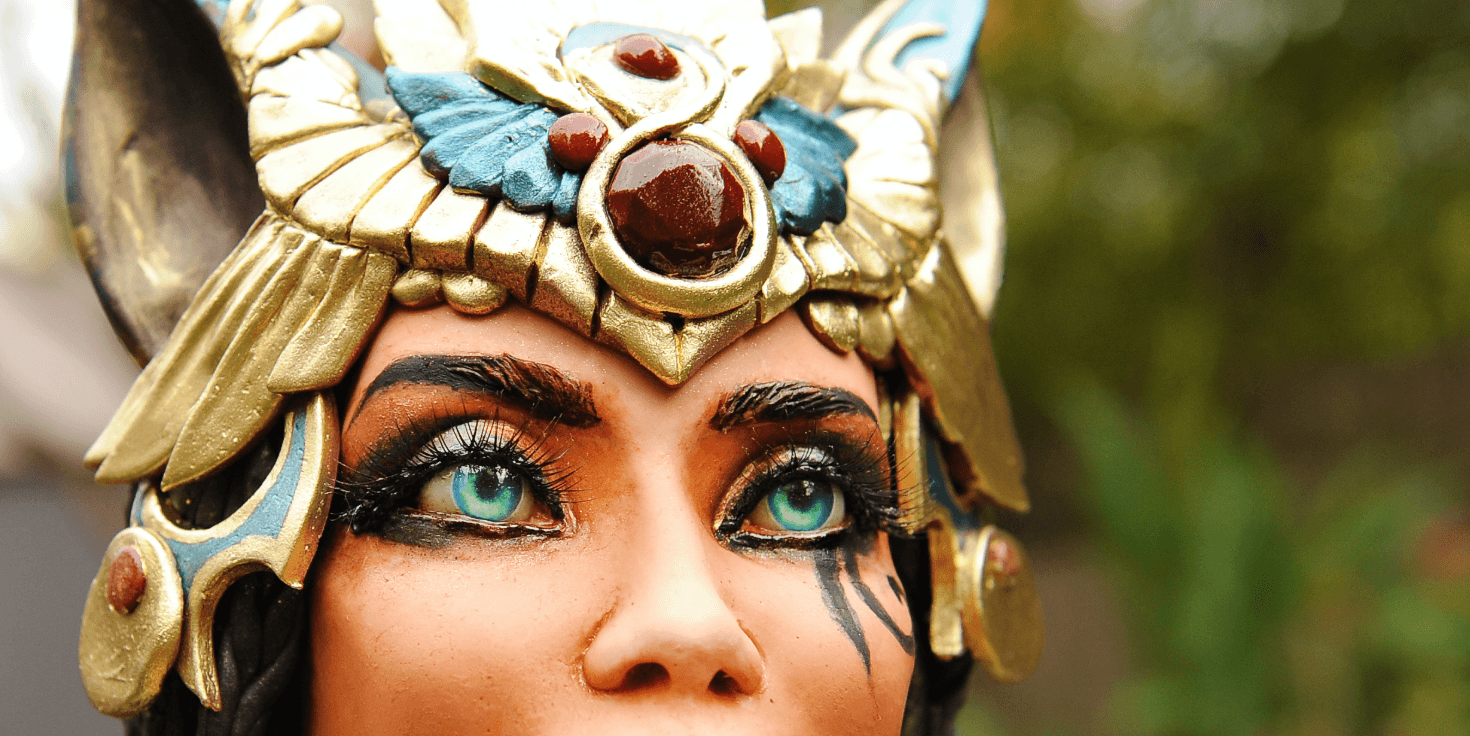
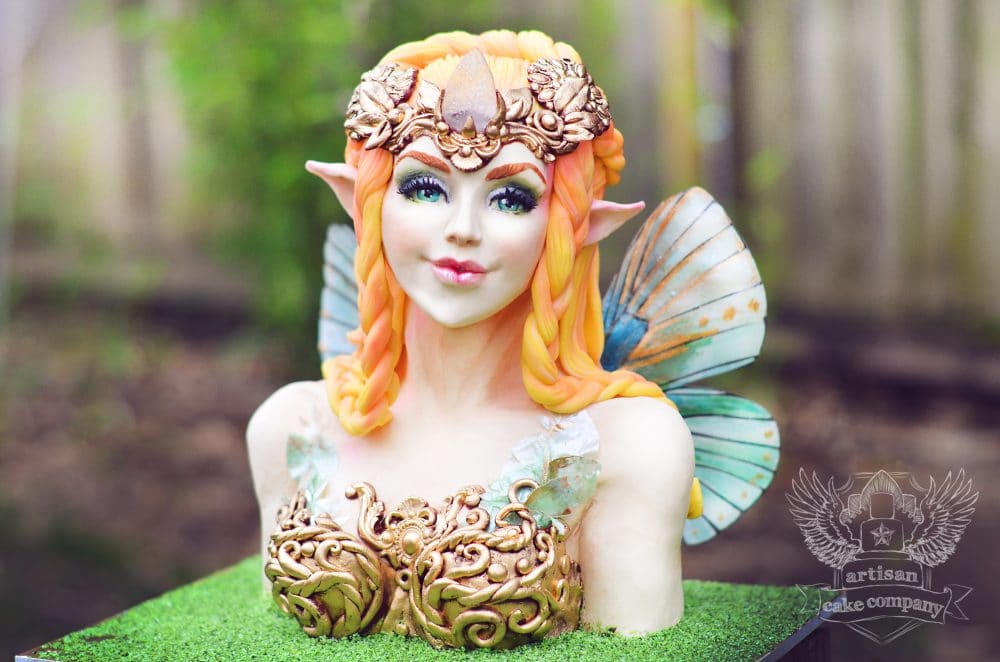
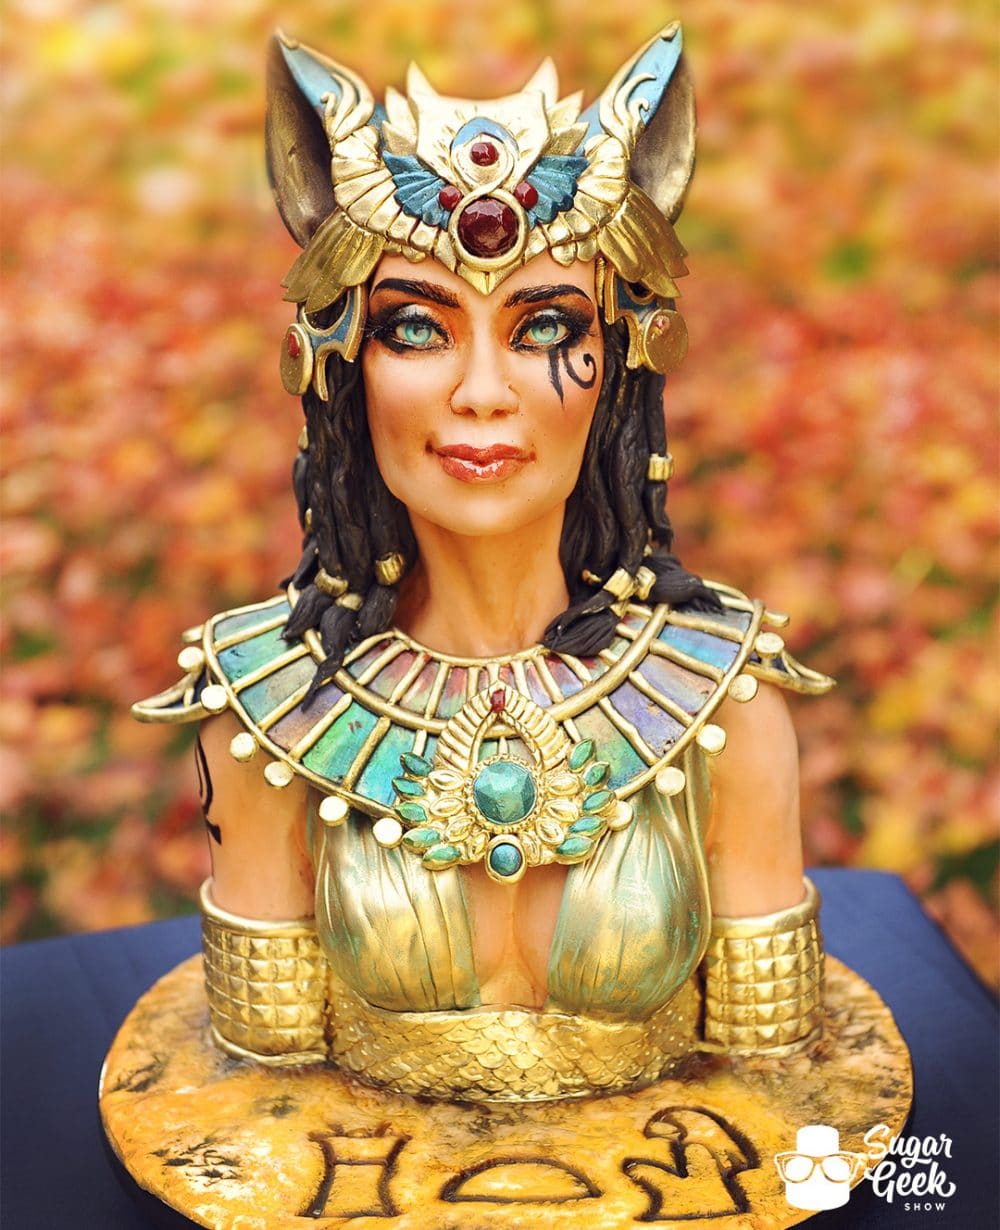
I love the way these realistic edible eyes look on the finished bust cake. I really feel like it gives my sculpted cakes a whole new level of life. If you want to learn more about sculpting realistic faces, bust cakes and facial anatomy, check out my Egyptian Goddess Cake Tutorial.

egyptian bust cake tutorial

Be sure to watch the full video tutorial below on how to make your own realistic edible eyeballs.

More Course Preview

  • Cake sculpted to look like a volcano
    Volcano Cake Tutorial
  • Cake sculpted and decorated to look like strawberries
    Strawberry Summer Cake Tutorial
  • Cake sculpted to look like a woman playing Candy Crush on her phone
    Candy Crush Bust Cake Tutorial
  • Cake decorated to look like a 3D jelly flower cake with astronaut topper
    Astronaut Gelatin Flower Cake Tutorial

About Liz Marek

Liz Marek is a professional cake artist, sweet and savory recipe developer, and the founder of Sugar Geek Show, where she teaches cooking, baking and cake decorating through detailed tutorials, food science explanations, and kitchen-tested recipes. She has been creating recipes and teaching baking techniques since 2008, helping bakers of all skill levels gain the confidence to make professional-quality desserts at home.

Liz is known for breaking down complex cooking and baking concepts into simple, approachable methods. Her work focuses on helping people understand not just how a recipe works, but why it works. Through Sugar Geek Show, she shares step-by-step recipes, cake decorating tutorials, and practical baking guides designed to make professional techniques accessible to everyone.

Over the years, Liz has taught thousands of students through online tutorials, classes, and educational content focused on real kitchen results. Her recipes are carefully tested and written to help people succeed the first time they make them.

When she’s not developing recipes or teaching baking techniques, Liz also hosts curated travel experiences for women through her travel brand Soul Sisters.

You can find Liz’s latest recipes, baking tutorials, and food science tips at Sugar Geek Show.

Reader Interactions

Comments

  1. Jodi P says

    November 09, 2020 at 7:06 pm

    I just wanted to say thank you again for the reply! The eyes turned out perfect for my owl!

    Reply
  2. Jodi P says

    October 19, 2020 at 4:19 am

    Thank you so much for the reply! Much appreciated!

    Reply
  3. Jodi Pry says

    October 14, 2020 at 4:15 am

    5 stars
    Hi Liz! I'm going to be making a snowy owl cake for my daughter's birthday. This is a great tutorial! If you were to make the eyes for the owl, would you use an all black pupil/iris and color the isomalt to more of a translucent yellow? Any advice would be much appreciated!

    Reply
    • Elizabeth Marek says

      October 14, 2020 at 11:46 am

      I would make the Iris clear and paint the back of the iris yellow and black then add the white

      Reply
  4. Farnaz says

    November 25, 2019 at 10:33 pm

    Amazing! I've made eyes with resin in a method similar to this ?? i still have a big unsolved problem...what to do for realistic edible eyelashes...?

    Reply
    • The Sugar Geek Show says

      November 26, 2019 at 9:17 am

      I use very thinly rolled pieces of fondant

      Reply
  5. Patricia D says

    January 15, 2019 at 1:15 pm

    ????

    Reply
  6. Ruth montoya arias says

    August 26, 2018 at 6:30 am

    Hola soy colombiana me llamo ruth chevere que tubiera traductor tus videos y tengo una duda todo se puede comer craneo ojos y demas. me encantaria aprender

    Reply

Leave a Reply Cancel reply

Your email address will not be published. Required fields are marked *

Recipe Rating


All comments are subject to our Terms of Use

Primary Sidebar

Hi, I'm Liz! I'm passionate about creating reliable, foolproof recipes that don't just tell you how to cook, but why things work - so you can skip the guesswork and confidently make the best sweet and savory dishes of your life.

More about me →

Our Cake Greatest Hits

Check out our best cake recipes

👩 Celebrate Mother's Day 💐

  • Easy chocolate cake recipe slice on a white plate with cake in the background.
    Easy Chocolate Cake Recipe
    Cook Time40 Minutes
  • close up of sliced lemon pound cake
    Lemon Pound Cake Recipe
    Cook Time1 Hours 30 Minutes
  • sliced olive oil cake
    Lemon Olive Oil Cake
    Cook Time1 Hours
  • slice of angel food cake with strawberries on top
    Angel Food Cake Recipe
    Cook Time3 Hours
  • tiramisu cheesecake cut open
    Tiramisu Cheesecake
    Cook Time1 Hours 28 Minutes
  • vintage cake with fresh flowers
    Vintage Cake With Buttercream Piping
    Cook Time1 Hours 50 Minutes

Popular Recipes

  • close up of ganache drizzling into a bowl
    The Best Chocolate Ganache Recipe
    Cook Time20 Minutes
  • Piping easy buttercream rosettes onto a cake using a 1M star piping tip
    Easy Buttercream Frosting
    Cook Time10 Minutes
  • close up slice of marble cake
    Moist and Fluffy Marble Cake Recipe
    Cook Time40 Minutes
  • close up of red velvet cake slice
    Red Velvet Cake Recipe
    Cook Time1 Hours 40 Minutes

Footer

↑ back to top

About

  • Privacy Policy
  • Terms of Service

Newsletter

  • Sign Up! for emails and updates

Contact

  • Contact
  • About Us

Copyright © 2024 Sugar Geek Show, Inc. All Rights Reserved.

664 shares