Whether it’s a Thanksgiving charcuterie board, a simple charcuterie board for movie night, or a small board I throw together when friends stop by. There’s something so fun about mixing different textures, colors, and flavors on a large board and watching everyone light up when they find their favorite cheese hiding in one of the little bowls.
The best part is that a charcuterie board looks fancy, but it’s really just a collection of simple ingredients styled in a way that feels special. There are no fast rules, just a few good guidelines, a little bit of prep, and the willingness to play with different cheeses, a variety of meats, and plenty of fresh fruit.
What's In This Blog Post?
Ingredients Needed
From creamy brie to crisp apples and salty prosciutto, the best charcuterie boards use a variety of ingredients that pair well together. Start with these essentials and build from there.

Building the Base of Your Board
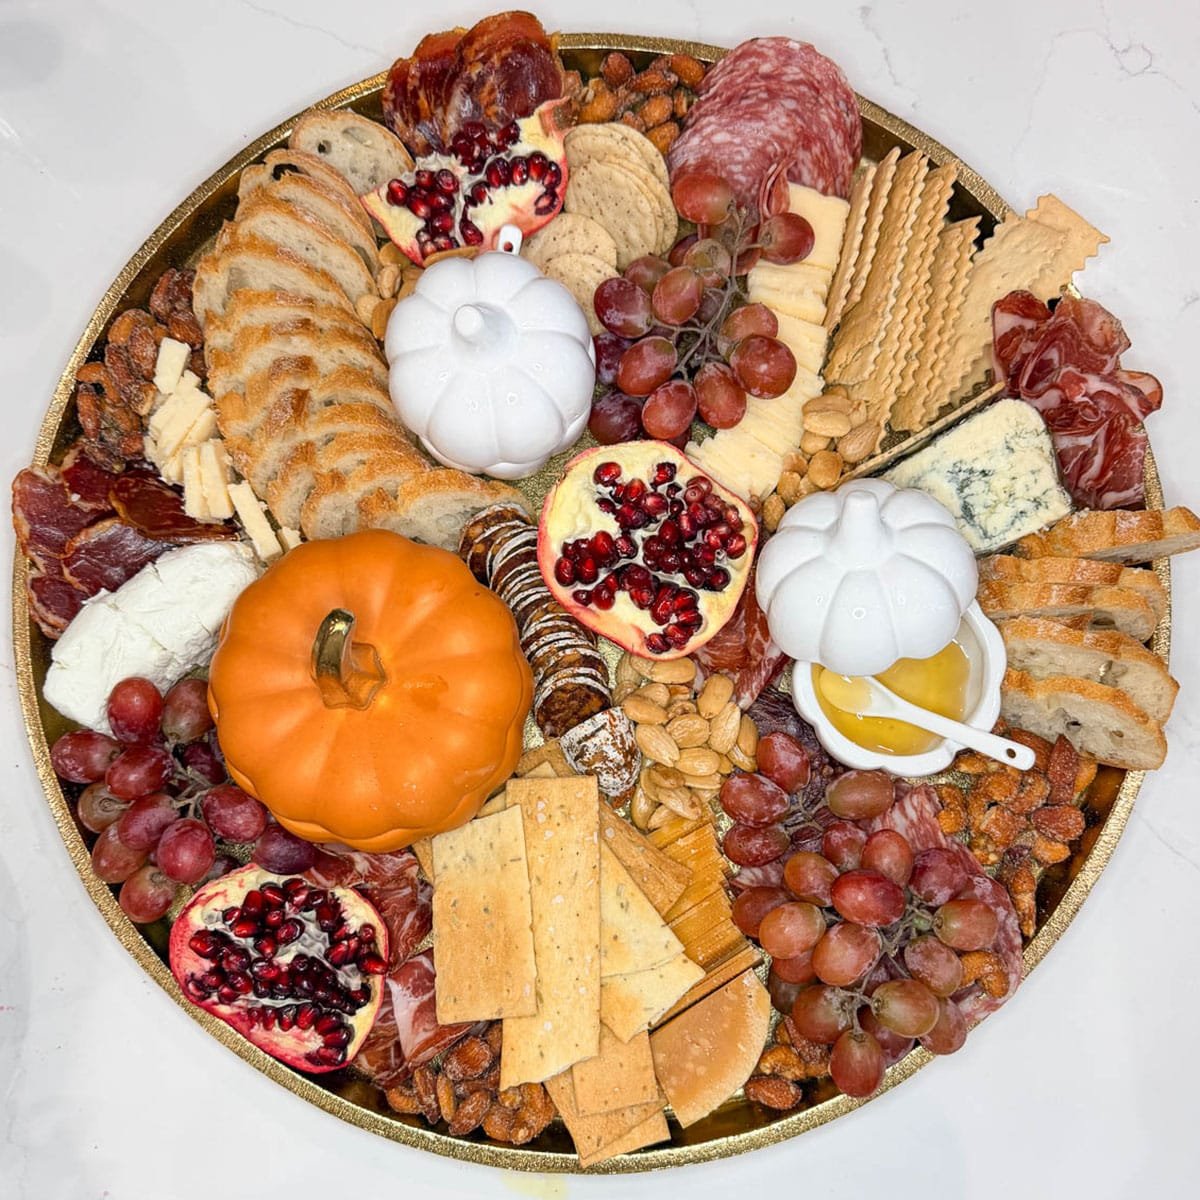
When you’re assembling the elements of a charcuterie board, think about a variety of textures, flavors, and colors. A good rule of thumb is sticking to the “3-3-3 Rule”: three cheeses, three meats, three accompaniments. It’s an easy way to build a traditional charcuterie board without overthinking it. Tight budget? Those scraps are a perfect way to try different cheeses without committing to big blocks.
- Fresh Fruit & Veggies - Apples, grapes, berries, strawberries, baby carrots, snap peas, broccoli, olives, mini pickles, and apple slices are all great options. Fresh fruit is the perfect way to add sweetness and visual interest.
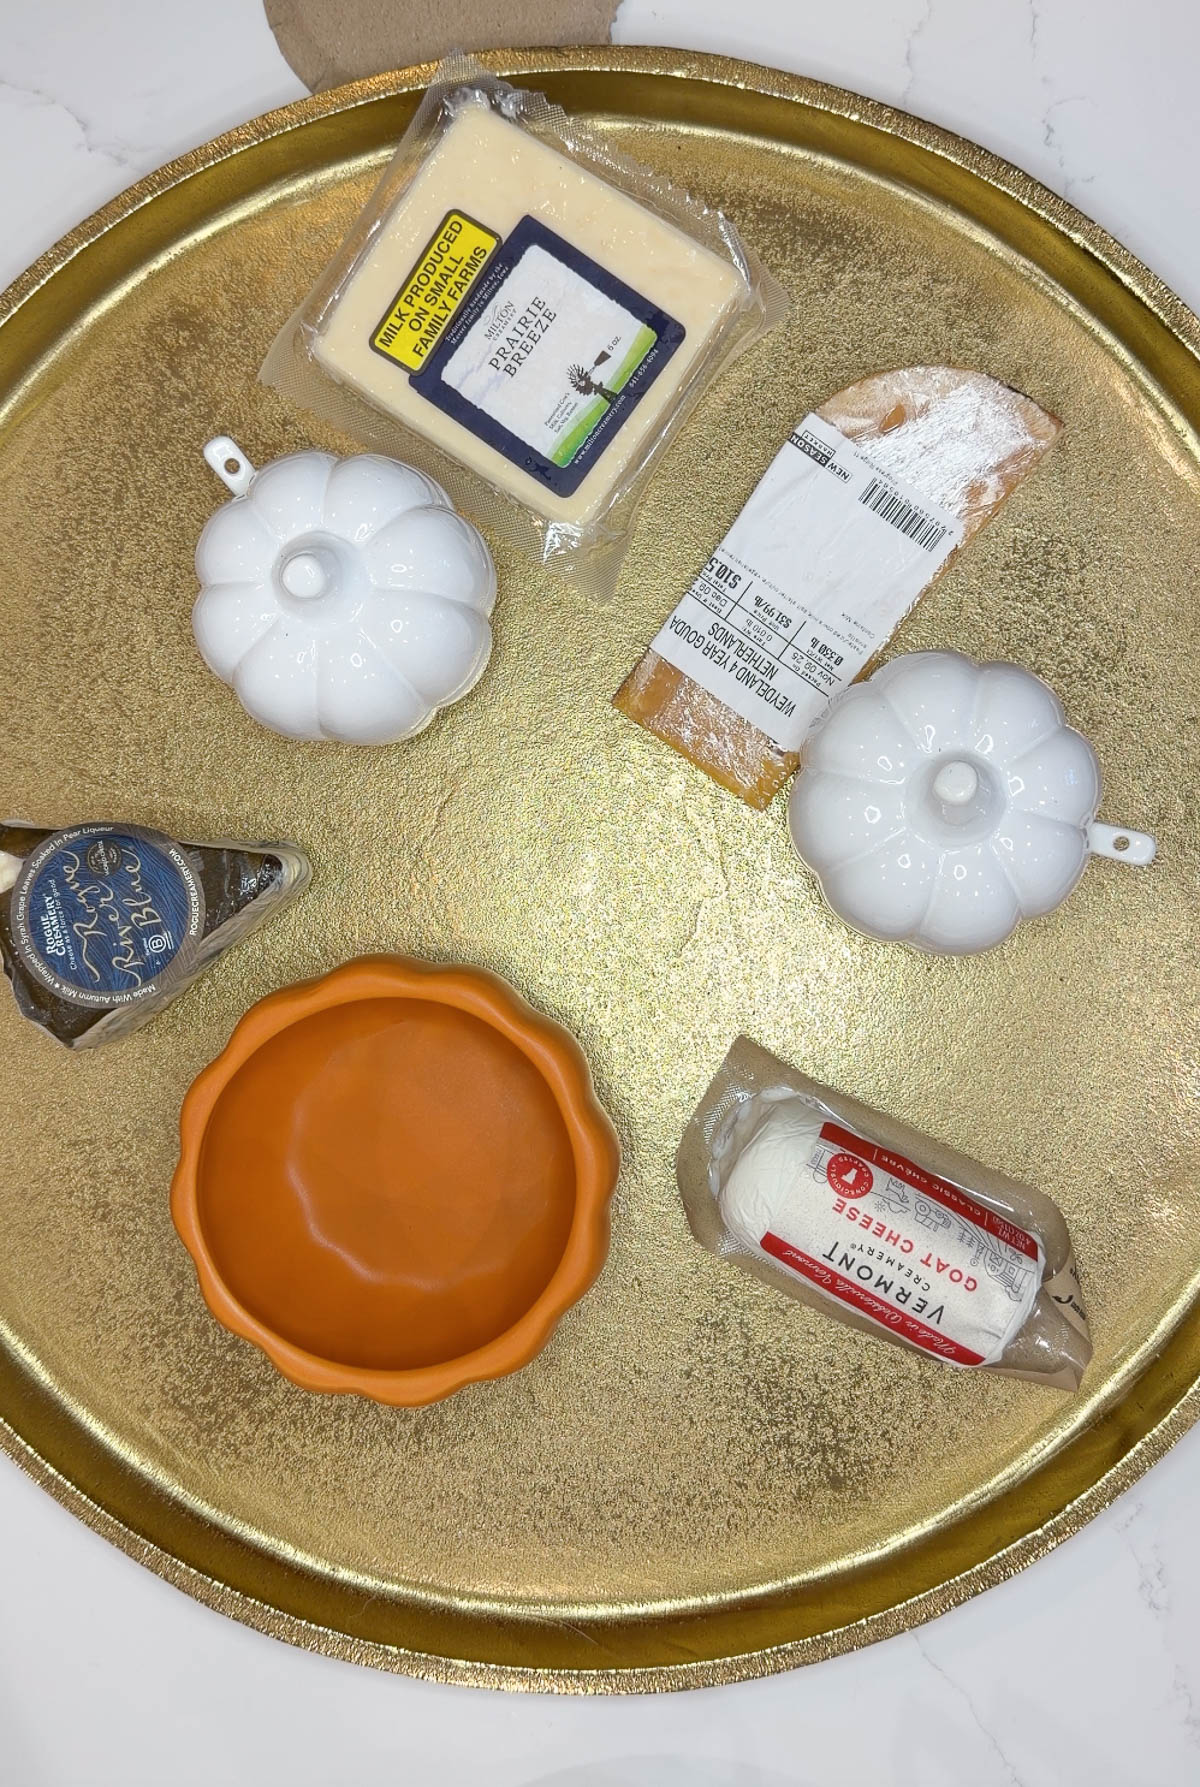
- Cheeses - Think about the kinds of cheeses you want to feature. The best charcuterie board has a blend of:
- Hard cheeses (Parmesan, aged Gouda)
- Firm cheeses (cheddar, manchego, white cheddar, colby)
- Semi-soft cheeses (havarti, muenster)
- Soft cheeses (brie, burrata, mascarpone)
- Blue cheese (gorgonzola, Dunbarton blue)
- Spreadable cheese (goat cheese, boursin-style spreads)
- Don’t overthink it—your favorite cheese always belongs on the board. Trader Joes is a great place to pick up a variety of flavors or even check the discount cheese bin at your local grocery store for end pieces.
- Meats - You can build a full meat board or stick to traditional meats like prosciutto, salami, pepperoni, mortadella, bresaola, soppressata, and summer sausage. Hard salami slices easily and holds its shape. Deli meats like sliced turkey or ham work when you want a great meat option without breaking the bank.
Cutting the Cheese (Literally)
Different types of cheese deserve different cuts because it adds variety of textures and visual interest:
• Soft creamy cheeses – Cut into wedges
• Logs – Slice into rounds
• Crumbly cheeses – Rough cuts
• Hard cheeses – Triangles
• Blocks of cheese – Cube or slice into triangles and fan them out
If cheese sticks to your knife, make rustic cuts or use a wire cheese knife. For boursin-style cheese, a butter knife is the best way to keep things tidy. Keep fruits away from strong spreadable cheeses so the flavors don’t clash.
Tools & Basic Equipment
• Wooden or glass cutting board – The base for your serving platter. You can also use a cookie sheet or deeper trays if you’re traveling.
• Small bowls or ramekins – Perfect for corralling dips, mini pickles, kalamata olives, small candies, and anything with juice.
• Mini tongs – Great way to help guests serve themselves without touching everything.
• Mini wooden spoons or small spoons – Perfect for jams, honey, and soft cheeses.
• Cheese knives – Helps with cutting cheese wedges, cheese cubes, and soft cheeses.
• Sharp knife or wire cheese knife – Ideal for thin slices of cheese or cutting hard cheeses cleanly.
What Is a Charcuterie Board?
Charcuterie comes from a French word referring to prepared meats, but the modern charcuterie platter has become so much more—almost like edible art. I love that even a cookie sheet or wooden cutting board from the grocery store can turn into a huge hit. Over time, I’ve learned that the most successful charcuterie board isn’t about spending a ton of money. It’s about combining different shapes, different textures, and different cheeses with fun savory options and sweet bites so every guest finds something they love.
Professional Tips (That Make a Big Difference)
- Divide the number of guests in half to find the number of types of cheese you need.
- Smaller board: 3–4 cheeses.
- Large board: 4–5 cheeses.
- Appetizer portions: 1 ounce of cheese per person.
- Main meal: 1.5 ounces of cheese per person.
- Keep everything at room temperature for the best flavor.
- Place small bowls first, then larger items, finishing with smaller items to fill empty space.
- If you run out of room, put the variety of crackers in a bowl off to the side.
- If it isn’t meant to be eaten, skip it (no rosemary sprigs stuck in every corner).
- Use odd numbers—they’re more visually appealing.
- If someone is gluten-free, keep all crackers separate and skip blue cheese.
How to Make a Charcuterie Board
Now that you’ve gathered your ingredients, let’s walk through the simple steps for assembling a charcuterie board that’s beautiful, balanced, and easy to put together.
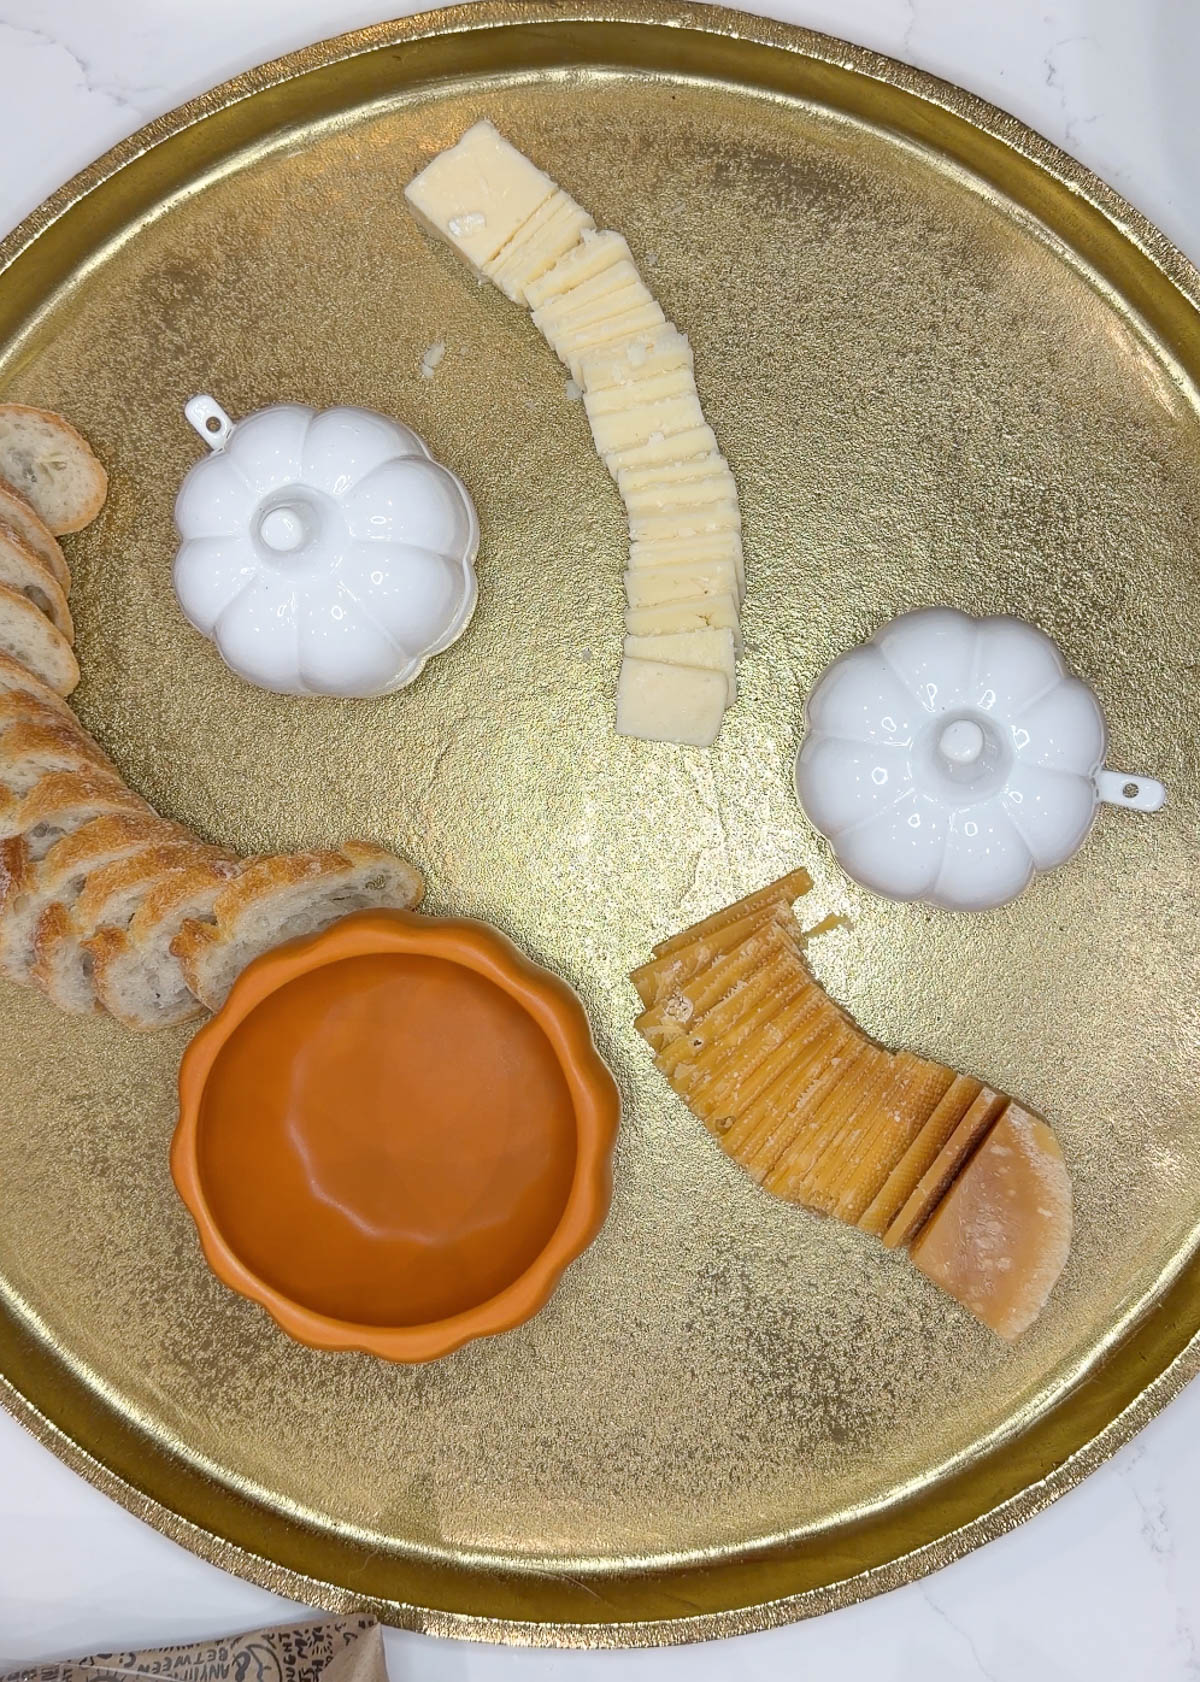

- Choose your board. Pick a wooden board, cutting board, baking sheet, or serving platter large enough to hold a mix of cheeses, meats, fruit, and accompaniments.
- Place your small bowls first. Add ramekins or small cups for items like olives, pickles, jams, honey, or anything juicy that needs containing.
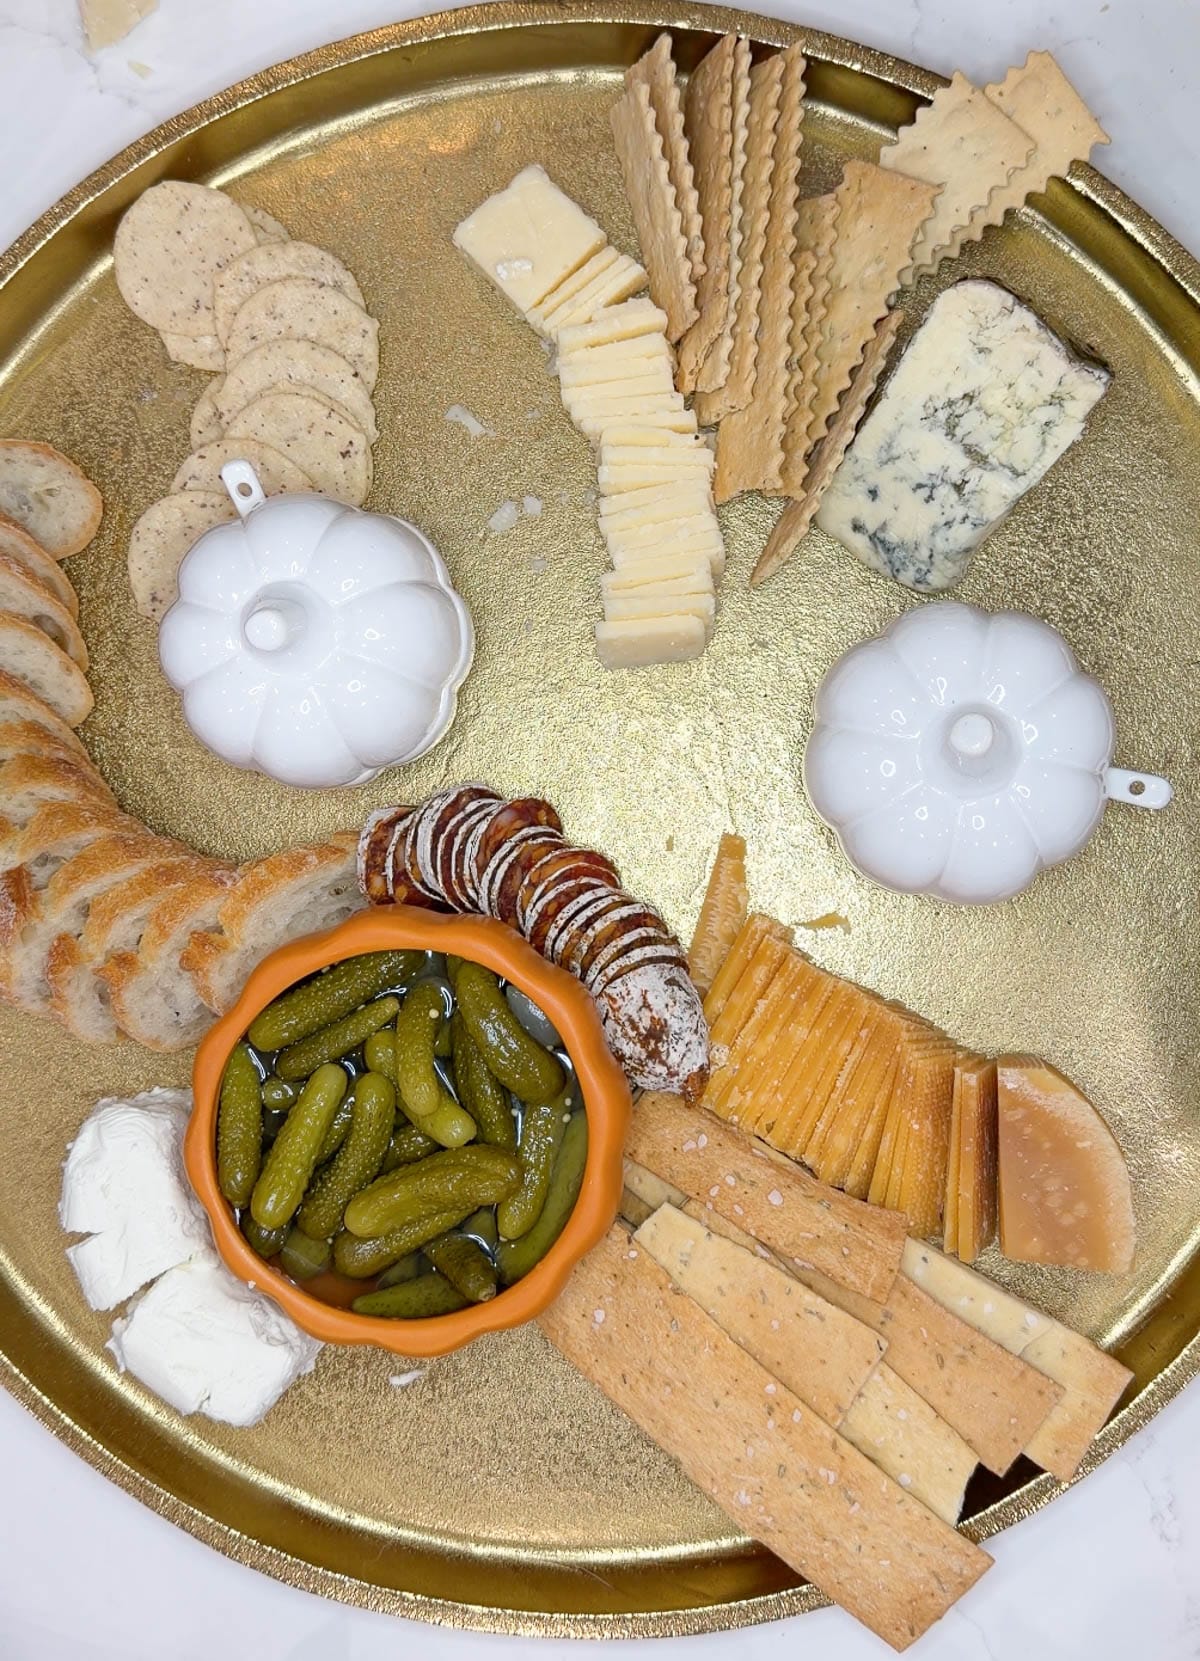
- Select your cheeses. Aim for 3–5 cheeses in different textures—soft, semi-soft, firm, hard, and blue. Cut them into a mix of wedges, slices, cubes, or rustic chunks to add variety.
- Arrange the cheeses on the board. Spread them out around the bowls, leaving space in between for meats and accompaniments.
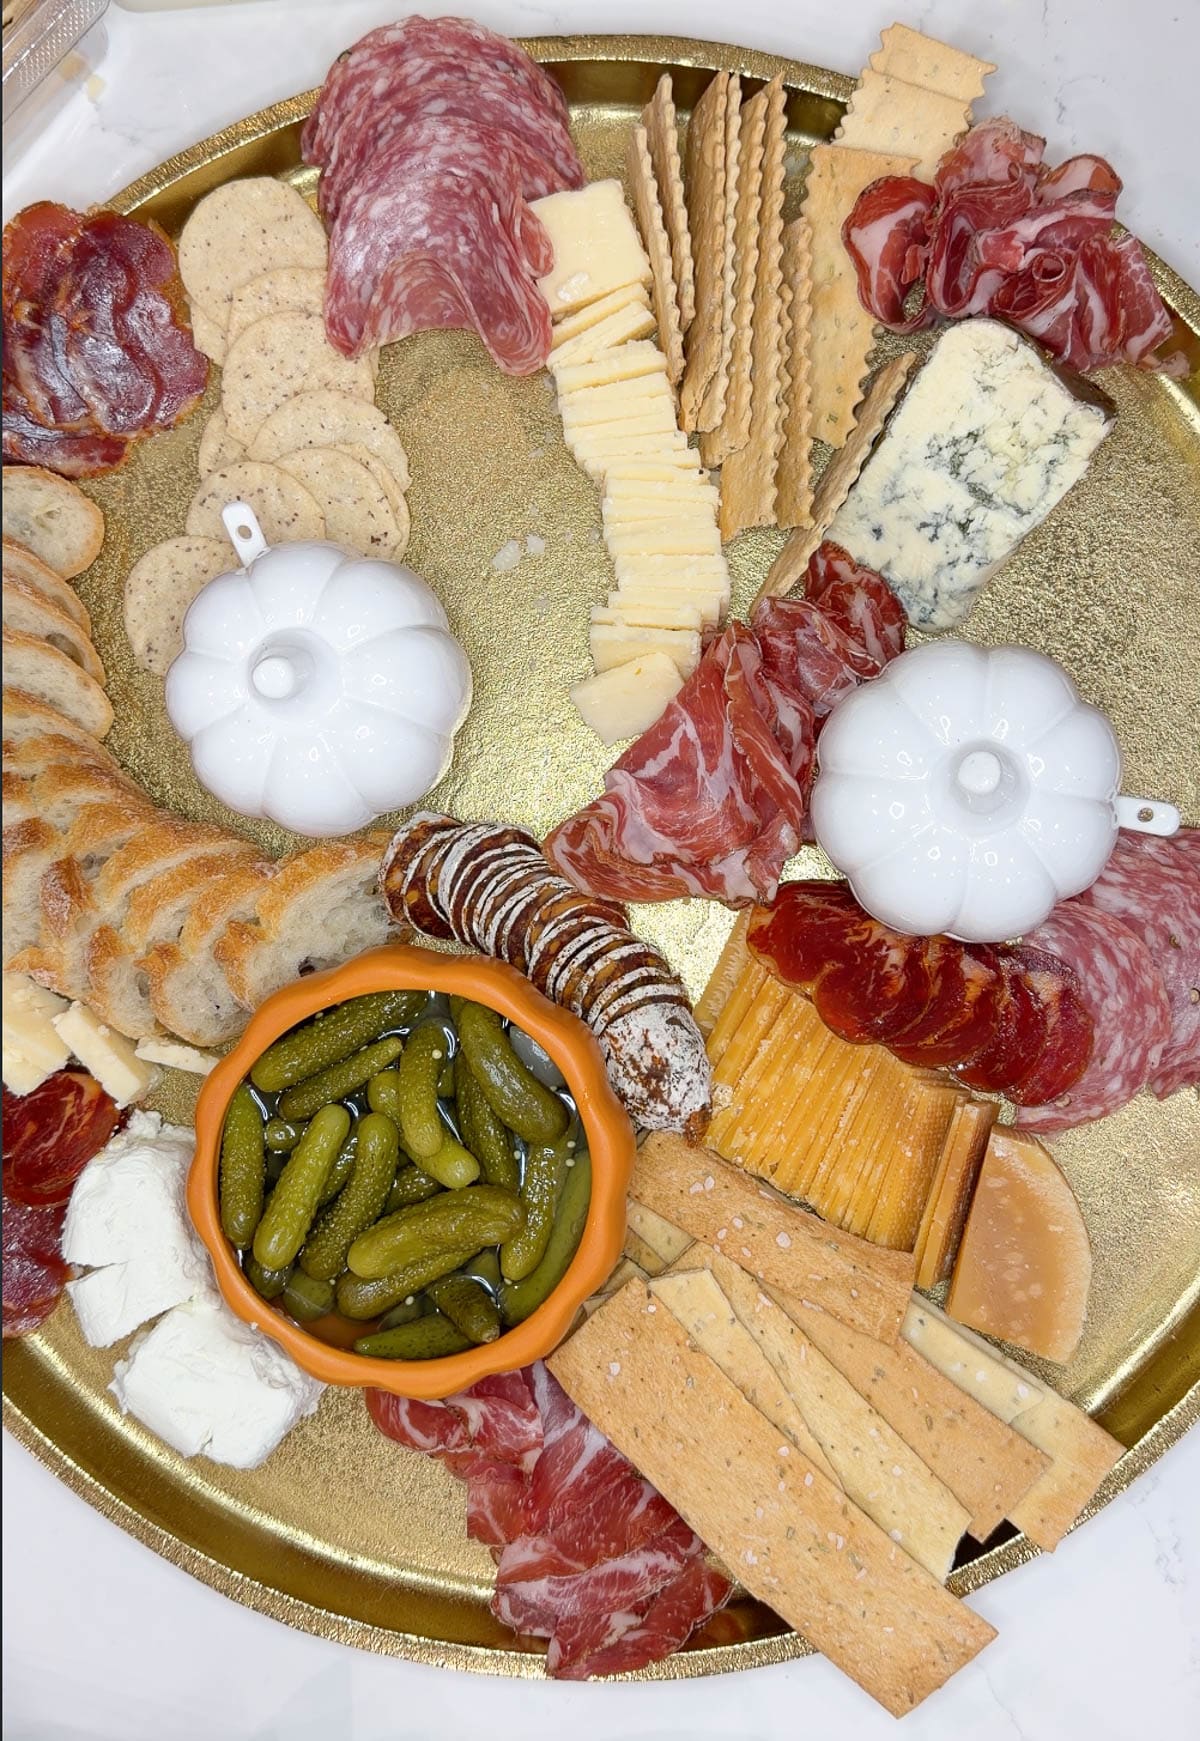
- Add the meats. Fold, roll, or fan salami, prosciutto, pepperoni, or other cured meats and place them near the cheeses they pair well with.
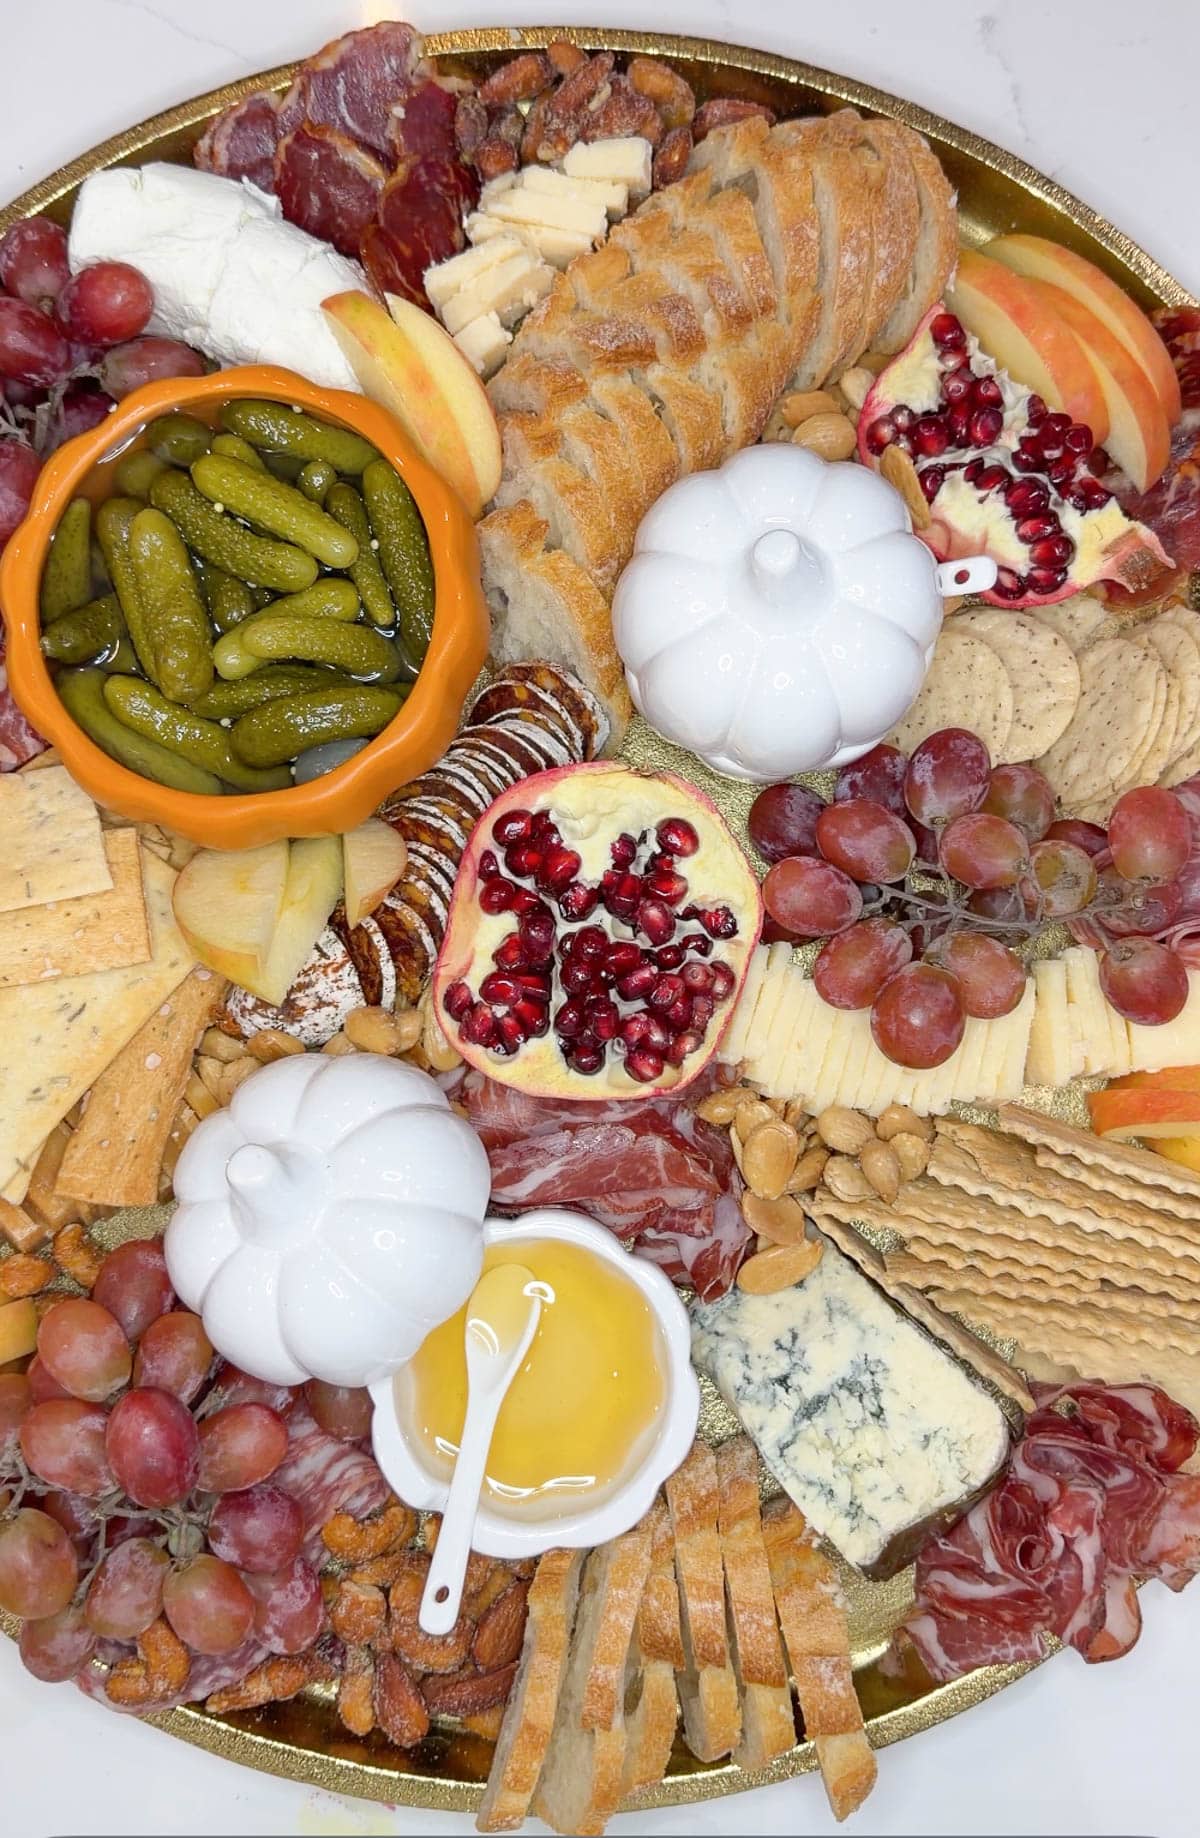
- Layer in fresh fruit and veggies. Fill open spaces with grapes, berries, sliced apples, carrots, snap peas, or bell peppers for color, sweetness, and crunch.
- Add sweet and savory accompaniments. Scatter nuts, dried fruit, chocolates, pretzels, crackers, baguette slices, or mini breadsticks throughout the board.
- Fill in the gaps. Tuck small items—like nuts, dried apricots, cherry tomatoes, or mini pickles—into empty spaces to make the board look full and abundant.
- Add finishing touches. Place cheese knives, mini tongs, and small spoons on the board. Let everything sit at room temperature for the best flavor before serving.
- Serve and enjoy. Set out extra crackers or bread on the side if you run out of space, and let guests help themselves to a variety of flavors and textures.
Sweet, Savory & Crunchy Accompaniments
Sweet
Fresh fruit, dried fruit, figs, apricots, dates, chocolate, candied pecans, honey, hot honey, fruit preserves, and maple-glazed nuts. Dessert boards use almost all of these.
Savory
Crackers, baguette slices, grilled bread, pita chips, pretzels, table crackers, marcona almonds, hummus, grainy mustard, bacon jam, olive tapenade, mini pickles, gherkins, kalamata olives, sliced bell peppers, and cherry tomatoes. There are endless types of crackers you can use, so mix shapes for variety of textures.
Other Helpful Tips
• Use 1–2 oz disposable cups for anything juicy like raspberries or olives.
• Precut everything. Slices of cheese, small segments of meats, and cubes help guests grab quickly.
• Snack-sized packs of dried fruit, nuts, and mini beef sticks are an easy way to add smaller items without waste.
• If someone has a dairy allergy, set up a smaller board with dairy-free dips and a dairy-free cheese option.
• Honeycomb is delicious but optional—it shines best on creamy brie.
• Many grocery stores have cheese sticks wrapped in prosciutto, meat trios, flavored dips, and charcuterie pinwheels that are great options when you need an easy way to fill a board fast.
• Thick-cut cheese slices from the deli counter are the perfect way to get uniform triangles or cubes.
• The last step is always filling in the gaps. Smaller items make the whole board look full and abundant.
Final Thoughts
A classic charcuterie board isn’t about perfection or rules—it’s about having fun, mixing flavors, and giving people something beautiful and delicious to snack on. Whether you’re hosting a party, bringing a charcuterie platter to a holiday gathering, or throwing together a sandwich board on a weeknight, this is the perfect way to feed people without overthinking it. With the full list of items above, you can build anything from a simple charcuterie board to something totally over-the-top.
Frequently Asked Questions
A great charcuterie board includes a mix of cheeses, cured meats, crackers or bread, fresh fruit, dried fruit, nuts, spreads, and something sweet or crunchy. Aim for a variety of textures and flavors so every guest can find something they love.
Most boards work well with 3–5 cheeses in different textures—soft, semi-soft, firm, hard, and blue. A simple rule is to divide your number of guests in half to estimate how many types of cheese you’ll need.
For an appetizer, plan about 1 ounce of cheese and 1–2 ounces of meat per person. If the charcuterie board is the main meal, increase to 1.5–2 ounces of cheese and 3–4 ounces of meat per person.
Yes! Assemble most of the board up to 24 hours in advance, then wrap tightly in plastic wrap and refrigerate. Add crackers and anything that gets soggy right before serving, and let the cheeses come to room temperature for the best flavor.
Toss cut apples or pears with a little lemon juice to keep them looking fresh. You can also wait to slice them until just before serving if you want the brightest color.
They don’t have to be. You can save money by buying cheese end pieces, choosing affordable deli meats, using in-season produce, and filling the board with budget-friendly items like nuts, chocolate, or crackers.
Transfer leftover meats and cheeses to airtight containers and refrigerate for up to 3–4 days. Crackers should be stored separately in a sealed bag or container to keep them crisp.
Recipe
Equipment
- 1 wooden or glass cutting board
- small bowls or ramekins
- mini tongs
- mini spoons
- cheese knives
- 1 sharp knife or wire cheese knife
Ingredients
- 3-5 cheeses soft, semi-soft, firm, hard, and blue.
- 3-5 meats salami, prosciutto, pepperoni, or other cured meats.
- 3-5 fruits and veggies grapes, berries, sliced apples, carrots, snap peas, or bell peppers.
- 3-5 sweet and savory accompaniments nuts, dried fruit, chocolates, pretzels, crackers, baguette slices, or mini breadsticks.
- 3-5 nuts, dried apricots, cherry tomatoes, or mini pickles
Instructions
- Choose your board. Pick a wooden board, cutting board, baking sheet, or serving platter large enough to hold a mix of cheeses, meats, fruit, and accompaniments.
- Place your small bowls first. Add ramekins or small cups for items like olives, pickles, jams, honey, or anything juicy that needs containing.
- Select your cheeses. Aim for 3–5 cheeses in different textures—soft, semi-soft, firm, hard, and blue. Cut them into a mix of wedges, slices, cubes, or rustic chunks to add variety.
- Arrange the cheeses on the board. Spread them out around the bowls, leaving space in between for meats and accompaniments.
- Add the meats. Fold, roll, or fan salami, prosciutto, pepperoni, or other cured meats and place them near the cheeses they pair well with.
- Layer in fresh fruit and veggies. Fill open spaces with grapes, berries, sliced apples, carrots, snap peas, or bell peppers for color, sweetness, and crunch.
- Add sweet and savory accompaniments. Scatter nuts, dried fruit, chocolates, pretzels, crackers, baguette slices, or mini breadsticks throughout the board.
- Fill in the gaps. Tuck small items—like nuts, dried apricots, cherry tomatoes, or mini pickles—into empty spaces to make the board look full and abundant.
- Add finishing touches. Place cheese knives, mini tongs, and small spoons on the board. Let everything sit at room temperature for the best flavor before serving.
- Serve and enjoy. Set out extra crackers or bread on the side if you run out of space, and let guests help themselves to a variety of flavors and textures.
Notes
- Make-Ahead Instructions: Assemble most of the board up to 24 hours in advance, then wrap tightly in plastic wrap and refrigerate. Add crackers and anything that gets soggy right before serving, and let the cheeses come to room temperature for the best flavor.
- Storage Instructions: Transfer leftover meats and cheeses to airtight containers and refrigerate for up to 3–4 days. Crackers should be stored separately in a sealed bag or container to keep them crisp.