
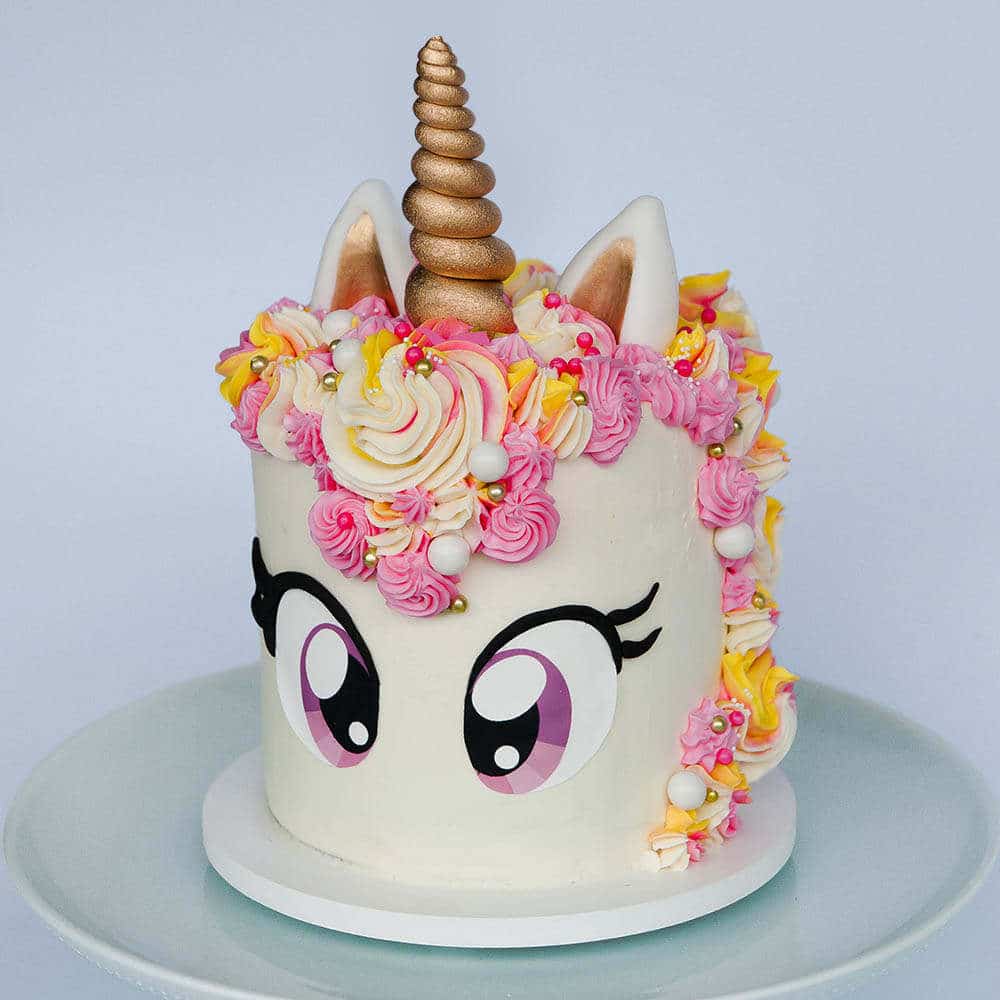
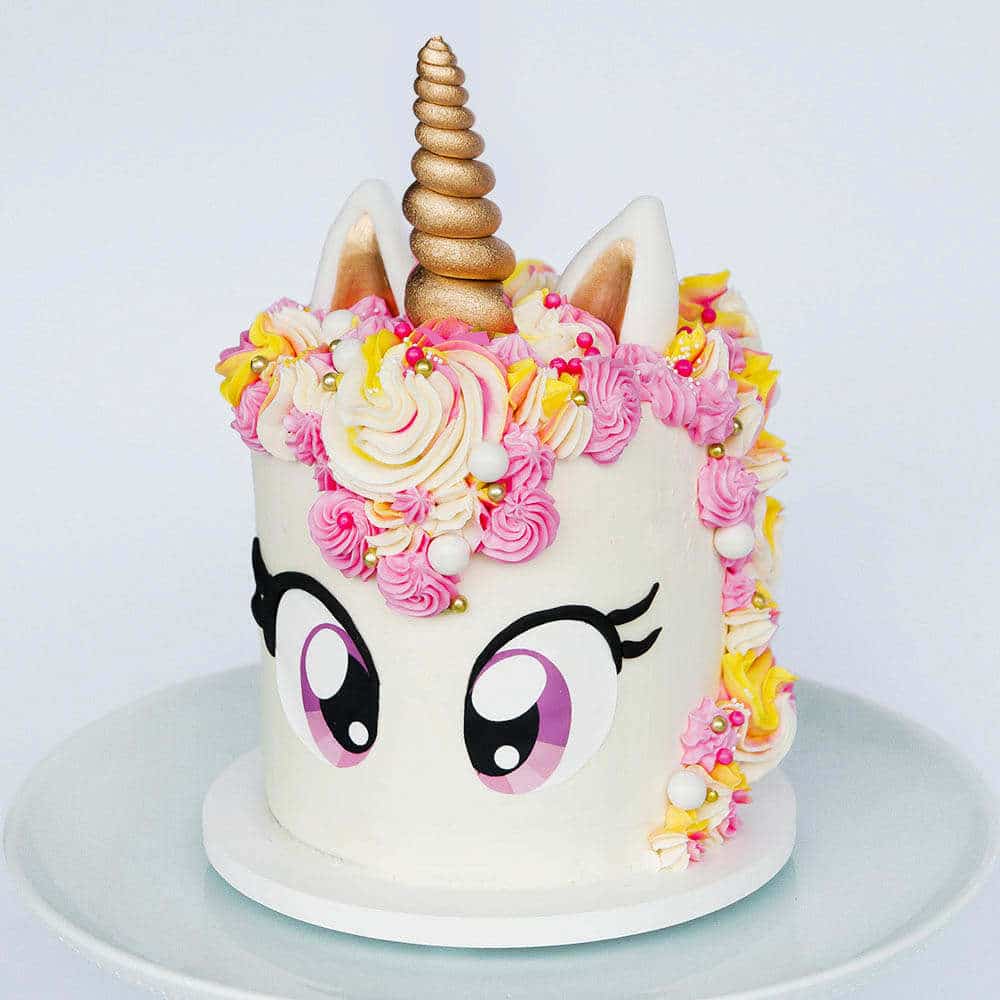
Easy unicorn cake with rainbow hair, golden horn, and easy sparkly eyes
An easy rainbow unicorn cake that's soooo cute! This unicorn cake is rainbow on the inside and outside! I love how pretty the rainbow cake batter turned out using my white velvet buttermilk cake recipe. The rainbow buttercream mane topped with sprinkles and a pretty gold unicorn horn just makes this the cutest rainbow unicorn cake evah!
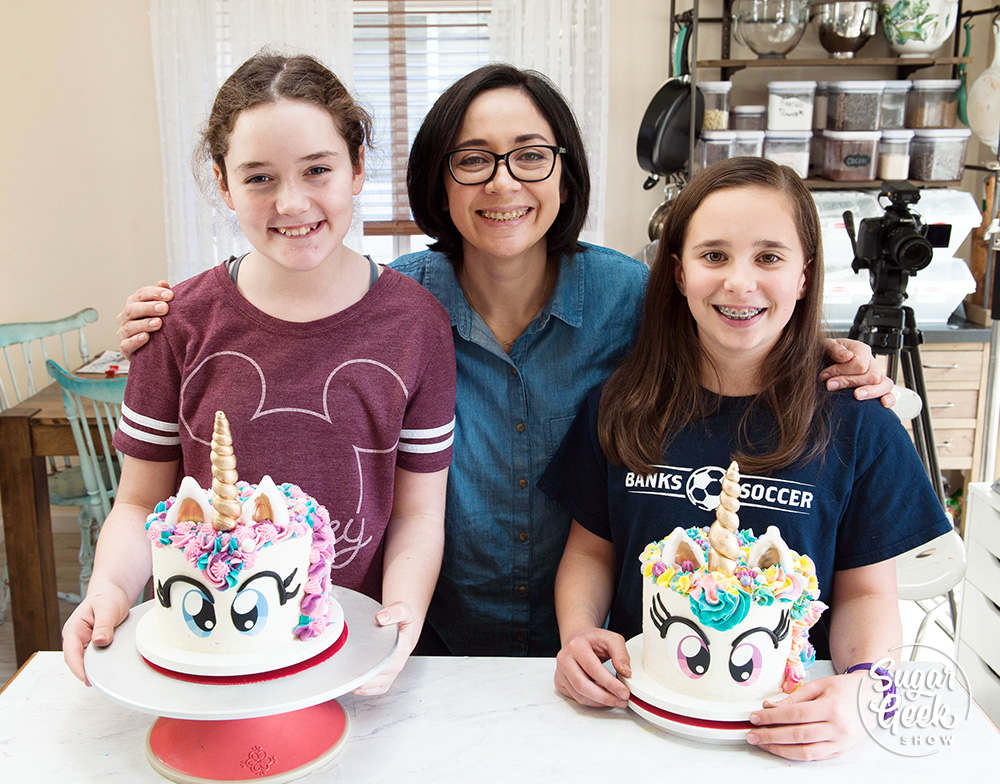
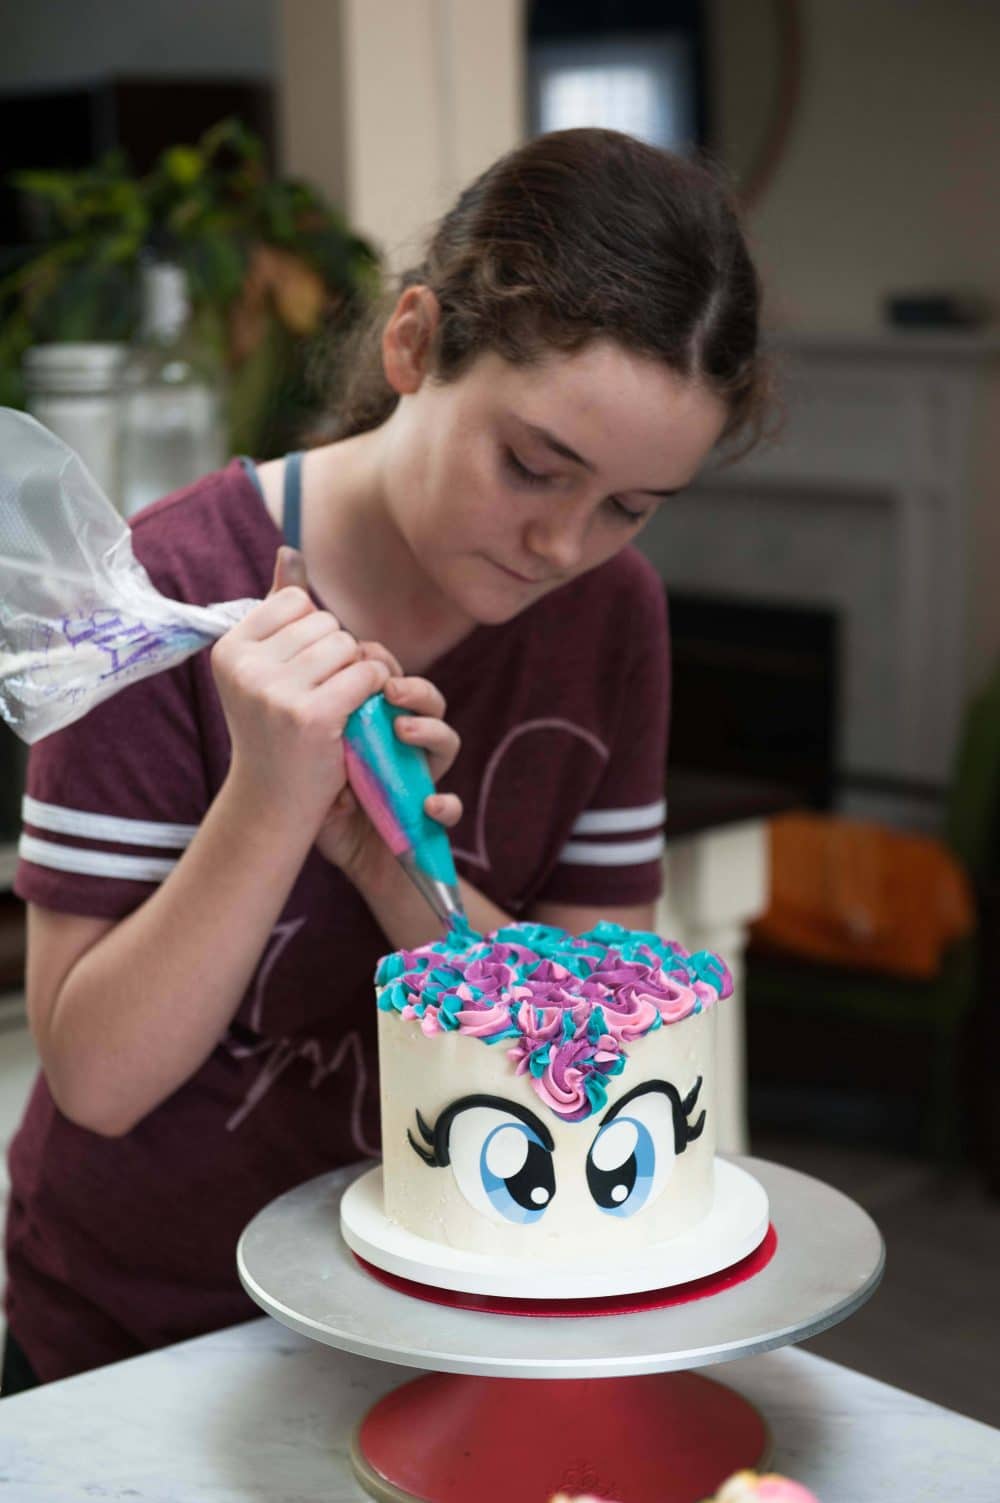
I first created this unicorn cake class for a friends daughter and her bestie. I pre-made the cakes and frosted them so all they had to do was decorate them. I was really impressed with how well the girls did with the piping of the hair! The thing they struggled with the most was rolling out fondant eyelashes lol.
Rainbow cake recipe
Ok the first step, make the cakes. I whipped up a batch of my white velvet cake for this recipe because it tastes AMAZING but also is a very white cake so it takes the color really well. Other good options are the white cake recipe and WASC cake. Vanilla cake uses egg yolks so the batter tends to make the blue turn green.
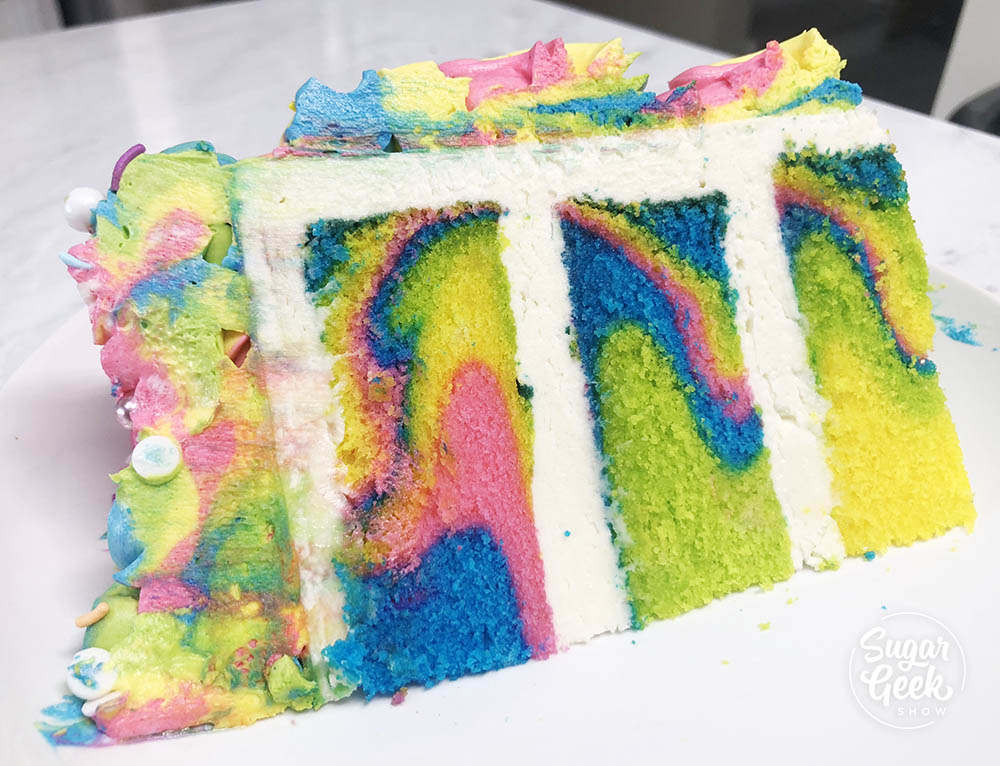
I love how this rainbow cake turned out! It's super fun to make and a great excuse to get colorful!
- Divide your cake batter into 4 bowls.
- I used Americolor electric food coloring because I love their bright neon colors. I used electric pink, electric blue, electric yellow, and electric green.
- Add 1-2 teaspoon of food coloring to each bowl and mix.
- Layer your cake batter into three 6" cake pans that are prepared with cake goop (homemade pan release)
- I layered my colors in this order, blue, pink, yellow, green (repeat).
- Bake in the oven at 335ºF for 30-35 minutes until a toothpick comes out clean.
- Immediately tap the cake on the counter to release air pockets and reduce shrinking.
- Let cool 10 minutes before removing from the pan by inverting onto a cake rack. Freeze 1 hour before frosting or wrap in plastic wrap and chill overnight.
How to make the unicorn cake
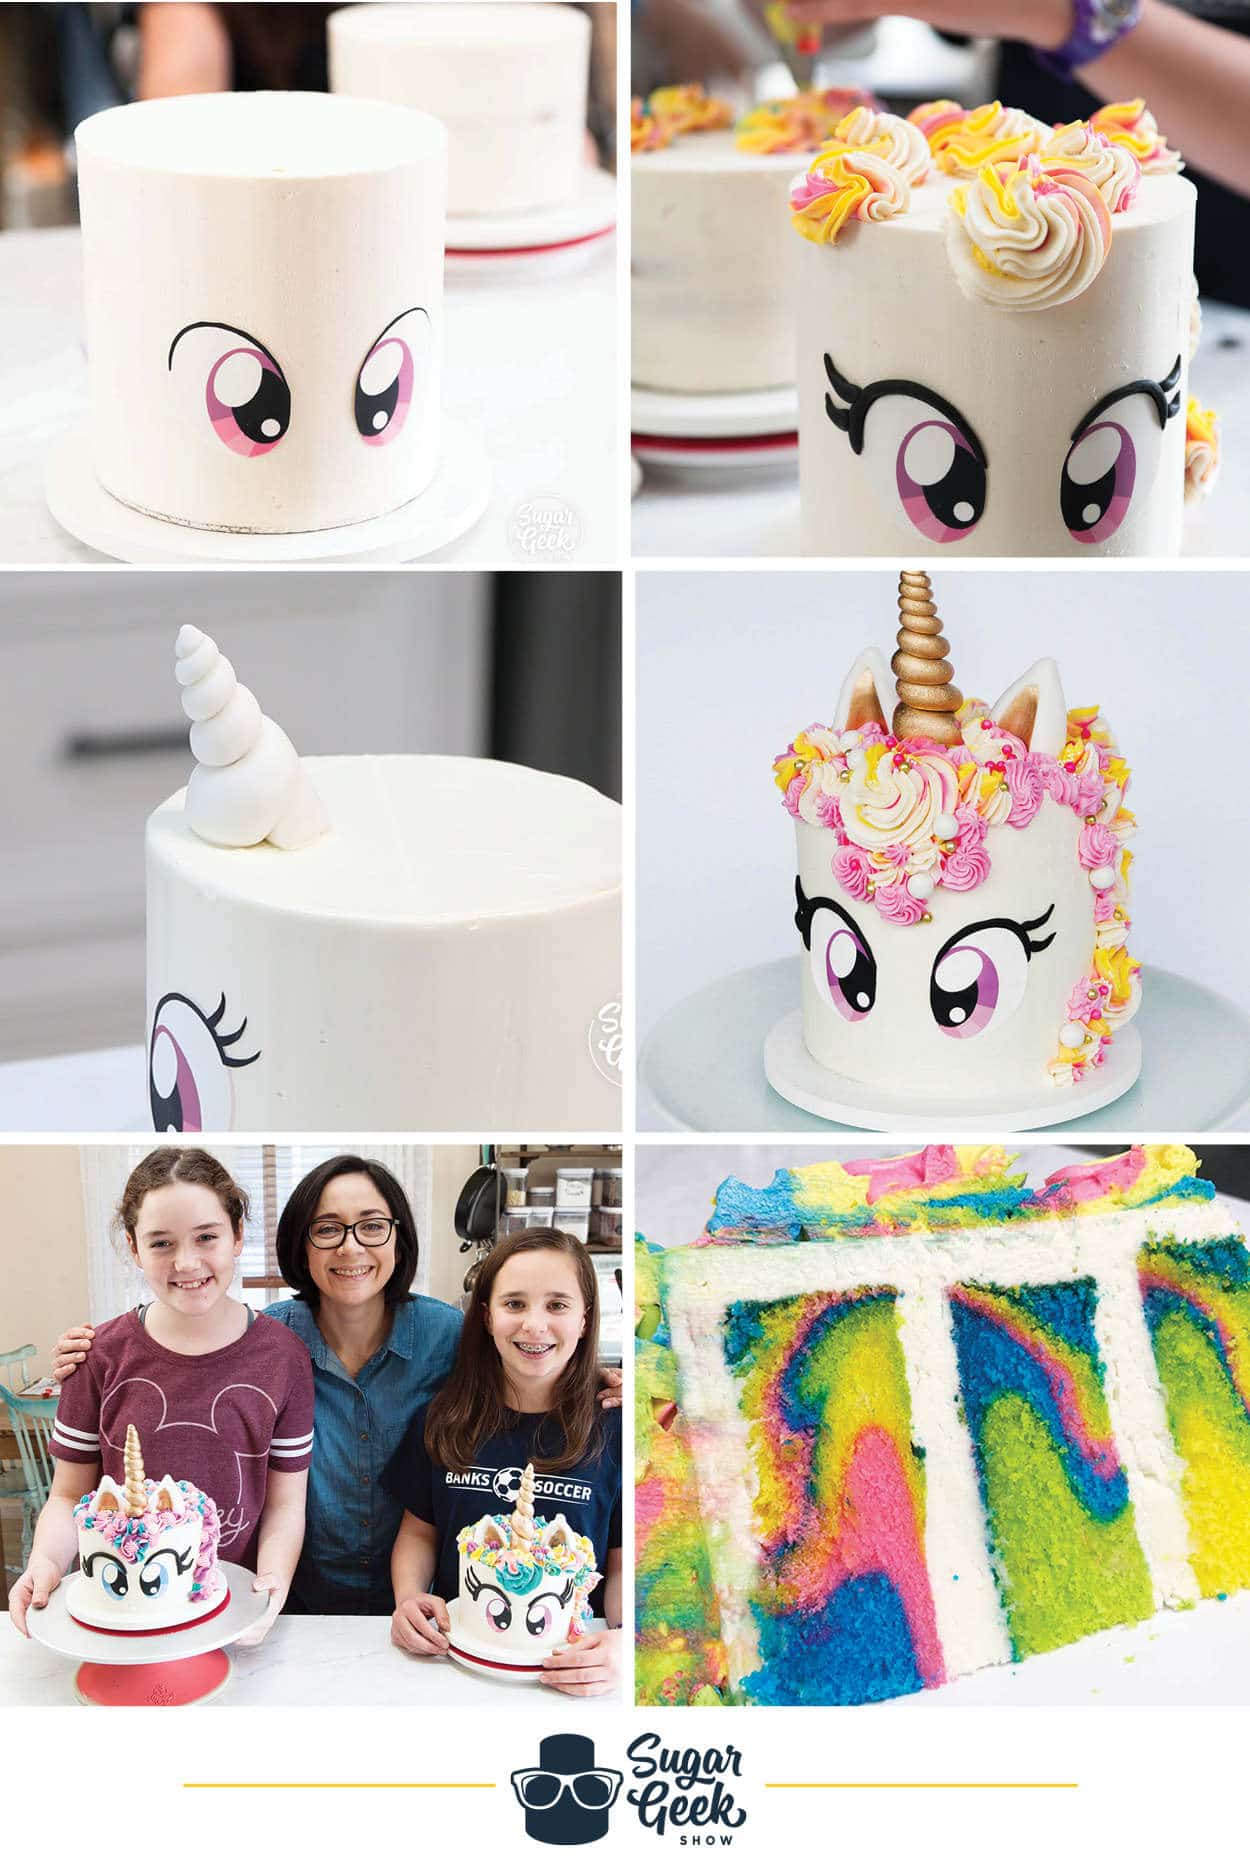
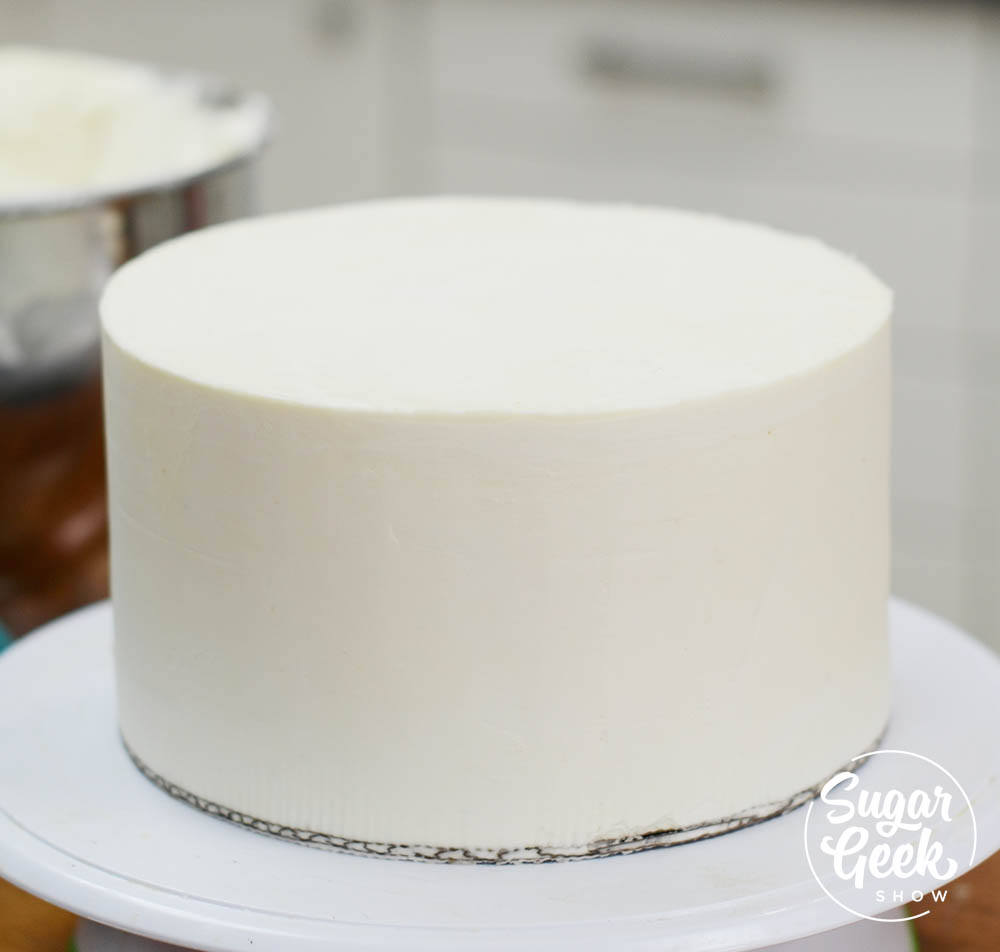
After my cakes are chilled, I stack and fill them with my easy buttercream recipe and smooth out the buttercream with a bench scraper. If you need more info on how to decorate a cake, check out my free tutorial on the basics of how to make your first cake.
I don't worry too much about getting the sides perfectly smooth but if you follow the last step in my easy buttercream recipe, you'll have buttercream that is pretty much bubble free.
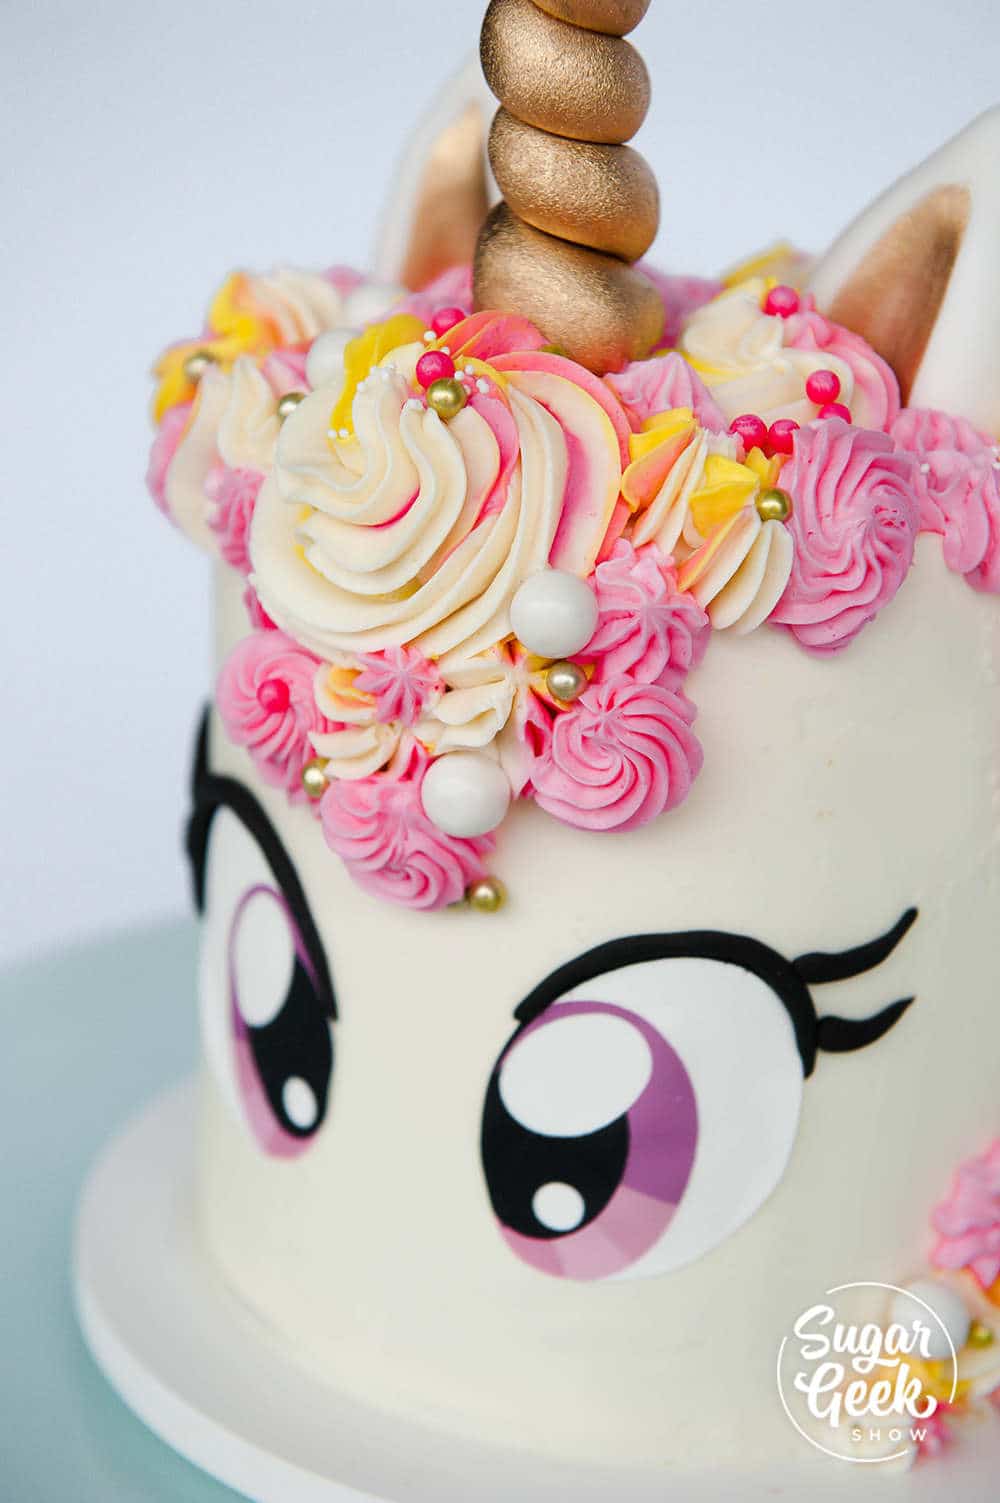
How to make the unicorn cake eyes
I know most unicorn cakes have eyes that are closed and kind of piped very simply but I wanted to do something a bit different. I'm a big fan of my little pony and anime so I wanted my unicorn to have more expressive eyes.
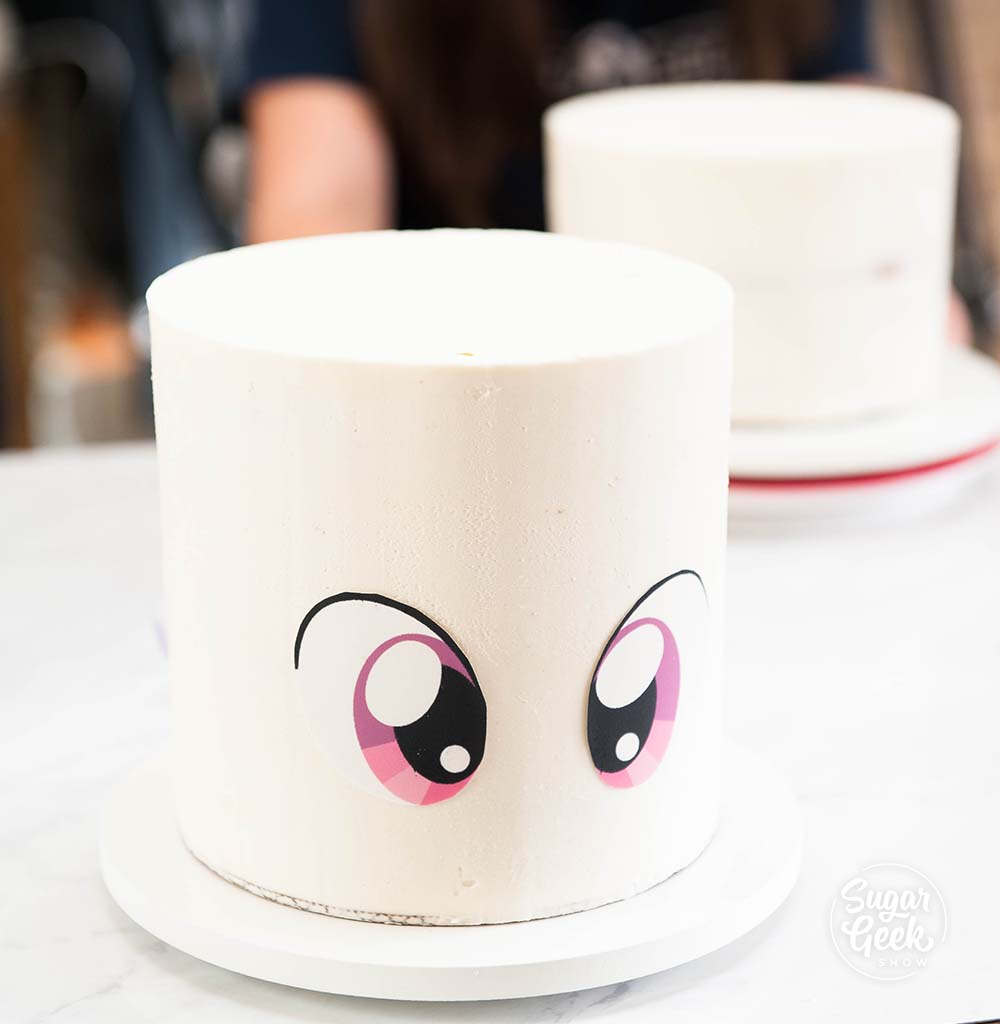
I designed these unicorn eyes that you can download and print out using your edible ink printer. I prefer my Canon MG6821 printer, Photofrost edible image sheets and edible ink. It hasn't clogged on me once and I hardly ever print.
Tips for printing edible images
- Make sure your print settings are set to BEST QUALITY PHOTO and your paper is set to photo paper. Otherwise, you can get streaking and lines in your paper.
- Use fresh edible image paper that is flexible or it can be hard to cut out.
- Cut your images using cuticle scissors or an x-acto blade.
Once your eyes are printed and cut out you can just place them onto the cake. I put mine towards the bottom of the cake so they look cute and cartoony. If you put them higher up, you won't have room for the hair. Get your free unicorn eyes here.
[optin-monster slug="neyfb52qlffjjynclird"]
How to make a unicorn cake horn
Now it's time to put on the unicorn horn! I place my cake pop stick on top of the head and roll out some fondant into a snake. One end is much fatter than the other.
Wrap the fondant snake around the cake pop stick so it's nice and snug. Use your hands to fill in any gaps or holes in the fondant. If you don't like how it looks, just pull it off and try again. Don't get discouraged if it takes you a few tries.
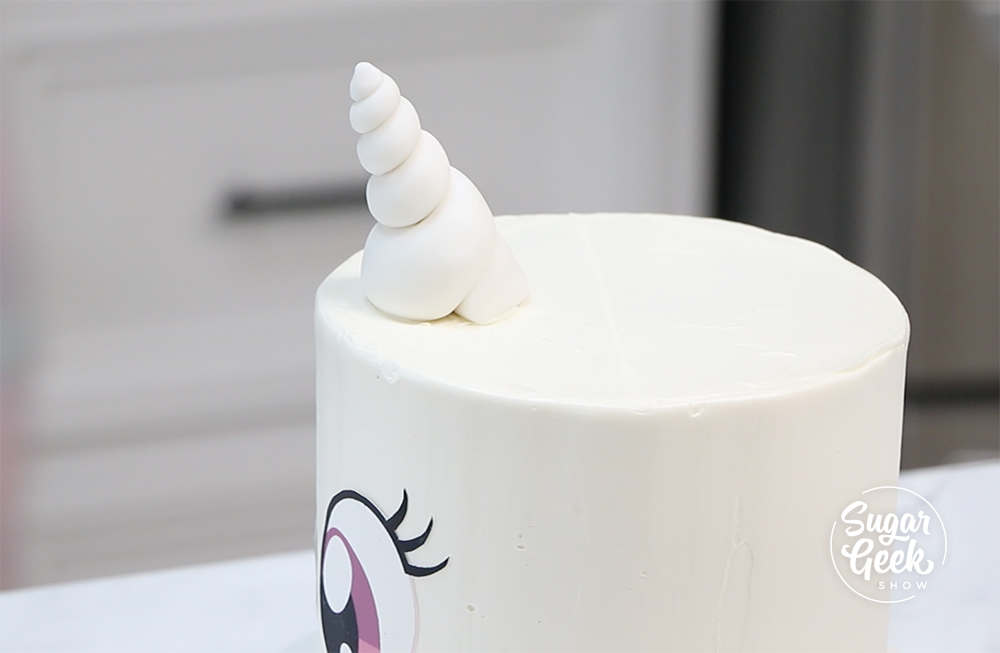
If you don't want to fuss with fondant, you can use my friend's awesome unicorn horn mold. Fill it with chocolate or isomalt and you'll have a perfect unicorn horn for your cake!
Paint your unicorn horn with a mixture of TMP super gold mixed with a few drops of grain alcohol (I used Everclear) to make a thick paint. TMP is non-toxic. Other good brands of gold are edible artist decorative paints metallics.
How to pipe hair on a unicorn cake
Now the fun part! Making the unicorn mane! I colored about 1 cup of easy buttercream for each color (electric blue, green, yellow and pink). Spread the buttercream onto a piece of plastic wrap (see video) to make a buttercream bullet.
The girls in my class loved deciding what color schemes and piping tips they were going to use to pipe the unicorn hair!
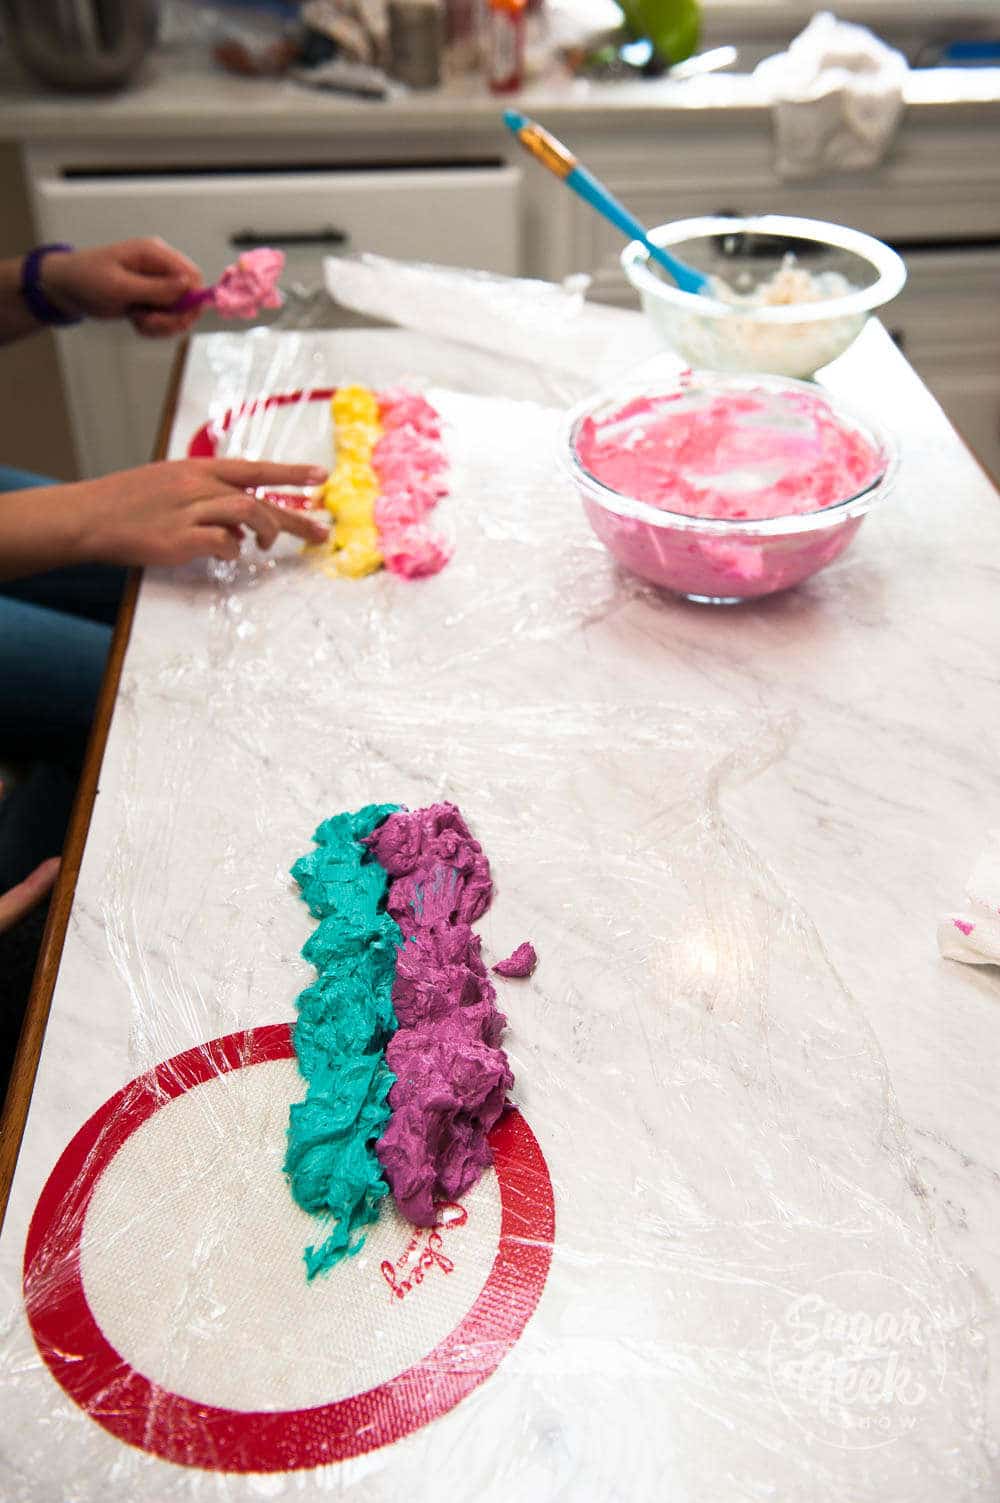
Place the bullet inside a piping bag with a 1M star piping tip and start making some rosettes! You really can't mess this up and it's what gives the unicorn cake it's personality.
I followed up the rosettes with a smaller star tip (not sure the size) and some yellow buttercream. Then I added on some sprinkles from Sweetapolita (affiliate link) twinkle mix for some extra magic!
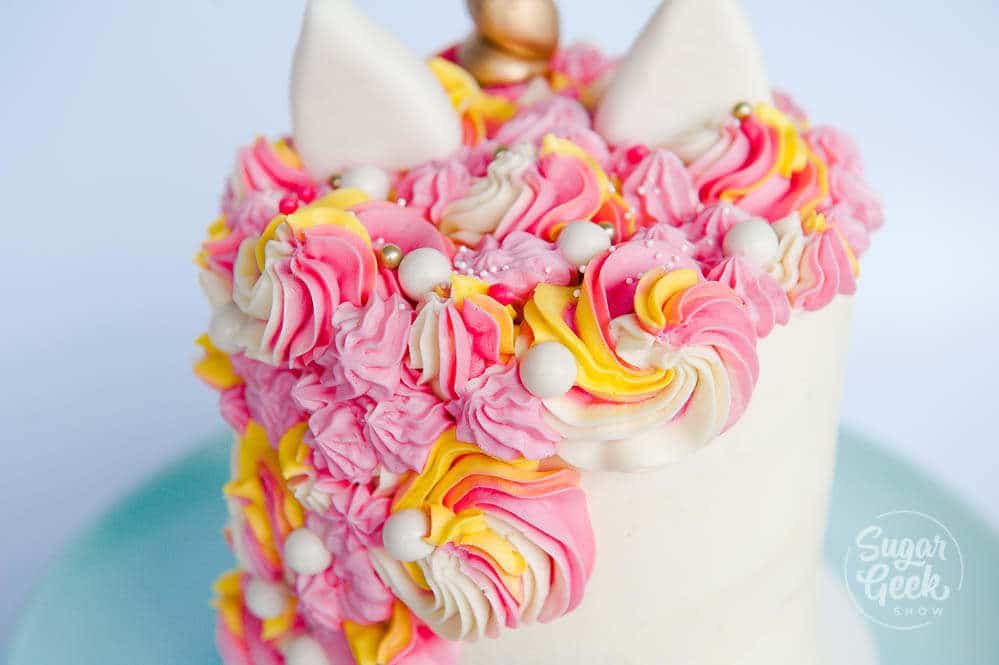
How to make ears for your unicorn cake
I used fondant to make my unicorn ears. Just roll some fondant into a ball and then flatten slightly to make a leaf shape. Cut in half to make two ears (see video). I hollowed out the center of the ear a tad and dusted the insides with some pink petal dust.
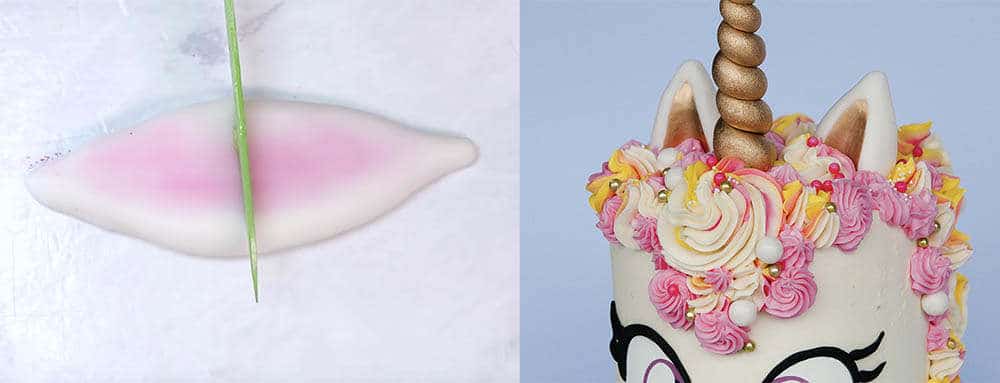
You can place the ears right on the buttercream and they will stick or you can insert a piece of dried spaghetti and use that to stick into the cake. Don't use toothpicks, they are dangerous and can poke someone's mouth.
Finishing the unicorn cake
The last thing I did was pipe a small white border around the bottom of the cake with a #4 round piping tip and some white buttercream. You do not need to refrigerate this cake if you are eating it the same day. If you do refrigerate it, make sure you bring it to room temperature a few hours before eating it so the butter has time to soften and become delicious again.
Be sure to watch my video tutorial on how to make a unicorn cake below!
Recipe
Ingredients
Rainbow Cake Ingredients
- 12 oz cake flour
- 12 oz granulated sugar
- 1 teaspoon salt
- 1 tablespoon baking powder
- ½ teaspoon baking soda
- 5 oz egg whites room temperature
- 4 oz vegetable oil
- 10 oz buttermilk room temperature or slightly warm
- 6 oz butter unsalted and softened
- 2 teaspoon vanilla
Easy Buttercream
- 8 oz pasteurized egg whites
- 32 oz unsalted butter softened to room temp (not melted)
- 32 oz powdered sugar sifted
- 1 tablespoon vanilla extract
- 1 teaspoon salt
Instructions
White Velvet Cake Instructions
- NOTE: It is SUPER IMPORTANT that all the room temperature ingredients listed above are room temperature and measured by weight so that the ingredients mix and incorporate correctly. Heat oven to 335º F/168º C — 350º F/177º C. I tend to use lower setting to prevent my cakes from getting too dark on the outside before the inside is done baking.
- Prepare three 6"x2" cake pans with cake goop or preferred pan spray. Fill your pans about ¾ of the way full of batter. You might have a little batter leftover. You can make these into cupcakes!
- Whisk together the flour, sugar, baking powder, baking soda and salt in the bowl of a stand mixer with the paddle attachment. Mix 10 seconds to combine.
- Next, combine ½ cup of the milk and the oil together and set aside.
- Combine the remaining milk, egg whites and vanilla together, whisk to break up the eggs and set aside.
- Add your softened butter to the dry ingredients and mix on low until mixture resembles a coarse sand (about 30 seconds). Add in your milk/oil mixture and let mix until dry ingredients are moistened and then bump up to med (setting 4 on my kitchenaid) and let mix for 2 minutes to develop the cakes structure. If you don't let your cake mix on this step your cake could collapse.
- Scrape your bowl and then reduce speed to low. Add in your egg white mixture in three batches, letting the batter mix for 15 seconds between additions.
- Divide cake batter into four bowls. Add 1-2 teaspoon of food coloring to each bowl and stir until just combined.
- Divide batter into three 6" cake pans prepared with cake goop or another preferred pan release. Bake 30-35 minutes until a toothpick inserted into the center comes out cleanly but the cake has not begun to shrink yet from the sides of the pan.
- IMMEDIATELY TAP PAN FIRMLY on countertop once to release the steam from the cake. This stops the cake from shrinking.
- Let cakes cool for 10 minutes inside the pan before flipping them out. Flip onto a cooling rack and let cool fully. I chill my cakes in the freezer for one hour before using or you can wrap in plastic wrap and chill in the fridge overnight.
Easy Buttercream Frosting Instructions
- Place egg whites and powdered sugar in a stand mixer bowl. Attach the whisk and combine ingredients on low and then whip on high for 5 minutes
- Add in your butter in chunks and whip with the whisk attachment to combine. It will look curdled at first. This is normal. It will also look pretty yellow. Keep whipping.
- Let whip on high for 8-10 minutes until it's very white, light and shiny.
- Switch to a paddle attachment and mix on low for 15-20 minutes to make the buttercream very smooth and remove air bubbles. This isn't required but if you want really creamy frosting, you don't want to skip it. You can now color your buttercream as needed.
DKerr says
Liz ......... after asking if I could freeze the cake, I opted out. Because of COVID our dinner was called off so I made up the cake and even surprised myself. I delivered it to the kids place. It's not picture perfect but for me I was pretty pleased with it and so was my granddaughter and her family. They all thought it was awesome and tasted wonderful. I magnified the eyes onto regular paper and then used rice paper and traced the eyes with icing gel and a little of the colored icing. Considering it's a little unconventional, I feel it went somewhat O.K. I've been told by my son that he is now going to put in requests for his own birthday cakes from now on! Guess I've gone and done it now! LOL
D. Kerr says
Great news! My granddaughter has requested a Unicorn cake for her birthday (age 5) and I'm looking forward to trying yours! I'm so glad to hear I can do this cake ahead of time as I'll have my hands full doing dinner and such. I'm not really an artsy-fartsy type but I would love to tackle this one. Your video is very helpful and I figure I can tackle it. It is so cute and I think it will be a hit with my granddaughter!
D. Kerr says
Once this cake is all frosted and decorated, can it be frozen? If so, for how long?
Sugar Geek Show says
Yes! You can freeze it for up to 6 months, and then defrost it for 24 hours in the fridge.