
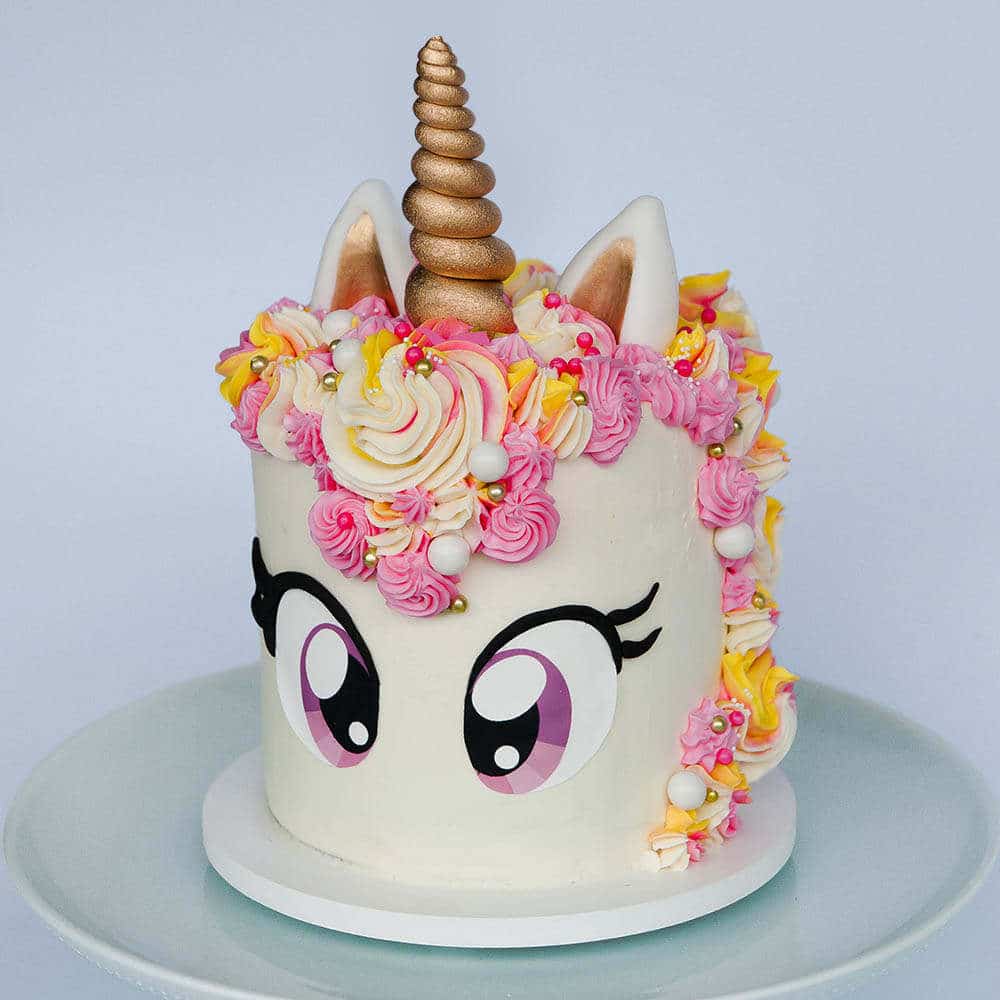
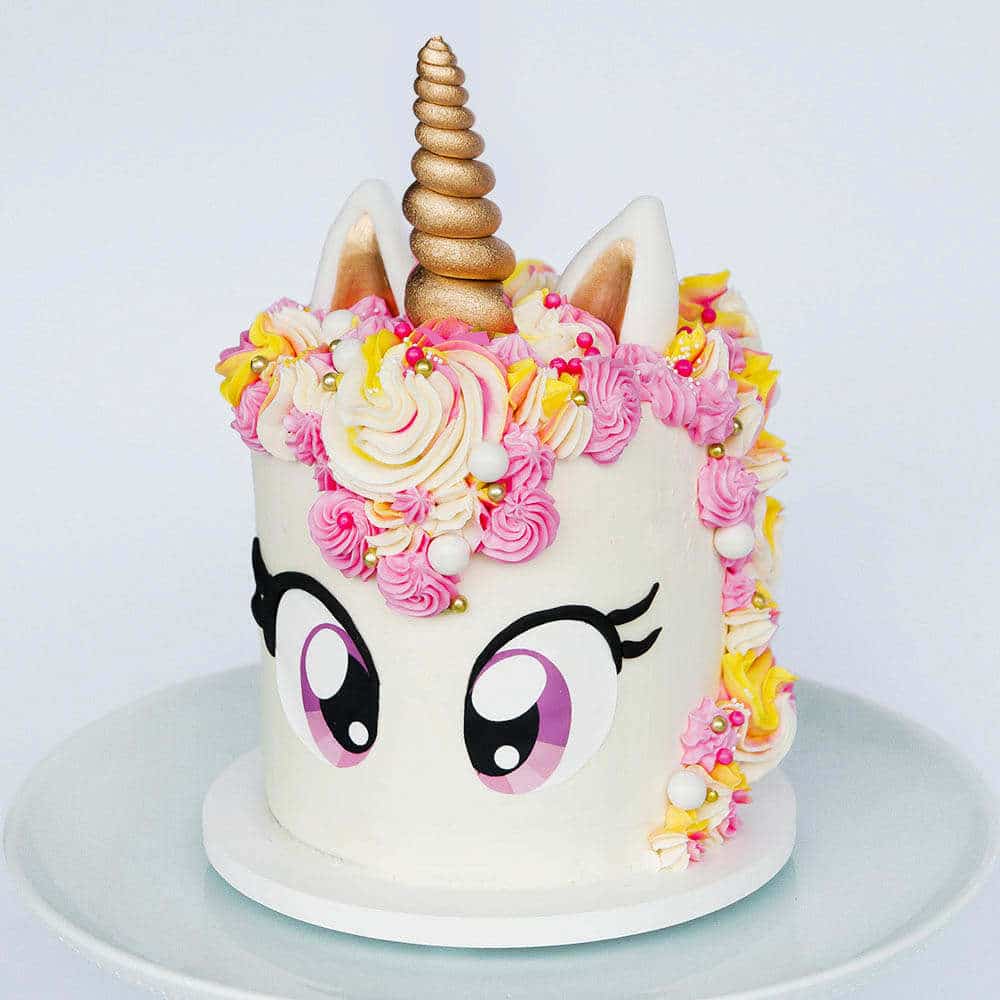
Easy unicorn cake with rainbow hair, golden horn, and easy sparkly eyes
An easy rainbow unicorn cake that's soooo cute! This unicorn cake is rainbow on the inside and outside! I love how pretty the rainbow cake batter turned out using my white velvet buttermilk cake recipe. The rainbow buttercream mane topped with sprinkles and a pretty gold unicorn horn just makes this the cutest rainbow unicorn cake evah!
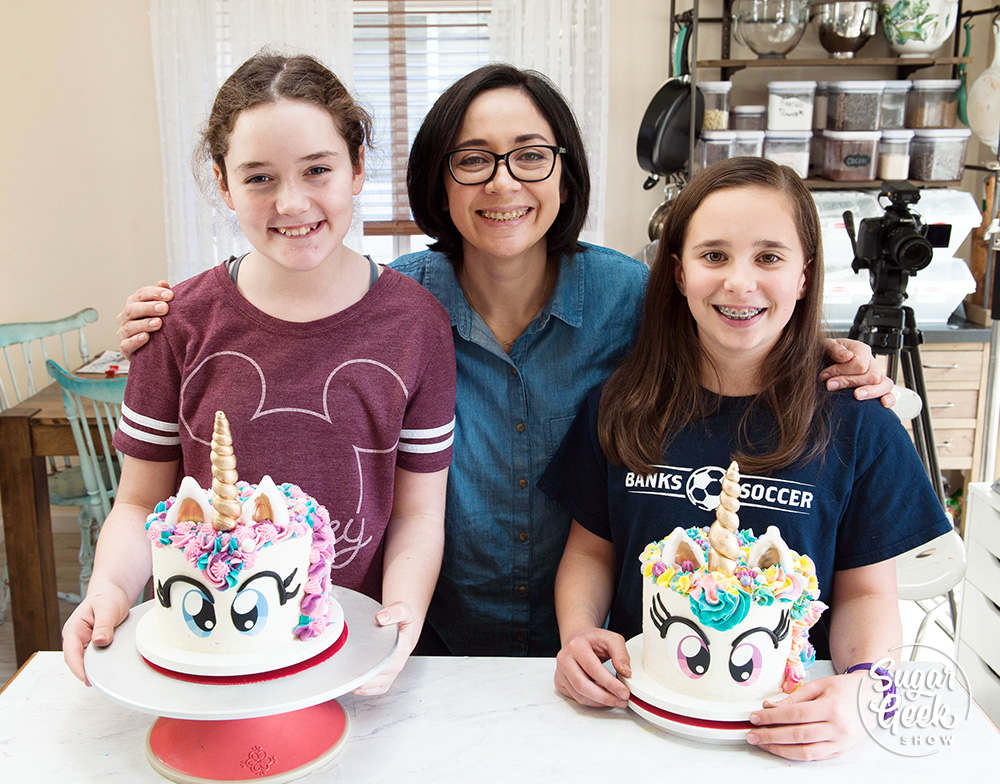
I first created this unicorn cake class for a friends daughter and her bestie. I pre-made the cakes and frosted them so all they had to do was decorate them. I was really impressed with how well the girls did with the piping of the hair! The thing they struggled with the most was rolling out fondant eyelashes lol.
Rainbow cake recipe
Ok the first step, make the cakes. I whipped up a batch of my white velvet cake for this recipe because it tastes AMAZING but also is a very white cake so it takes the color really well. Other good options are the white cake recipe and WASC cake. Vanilla cake uses egg yolks so the batter tends to make the blue turn green.
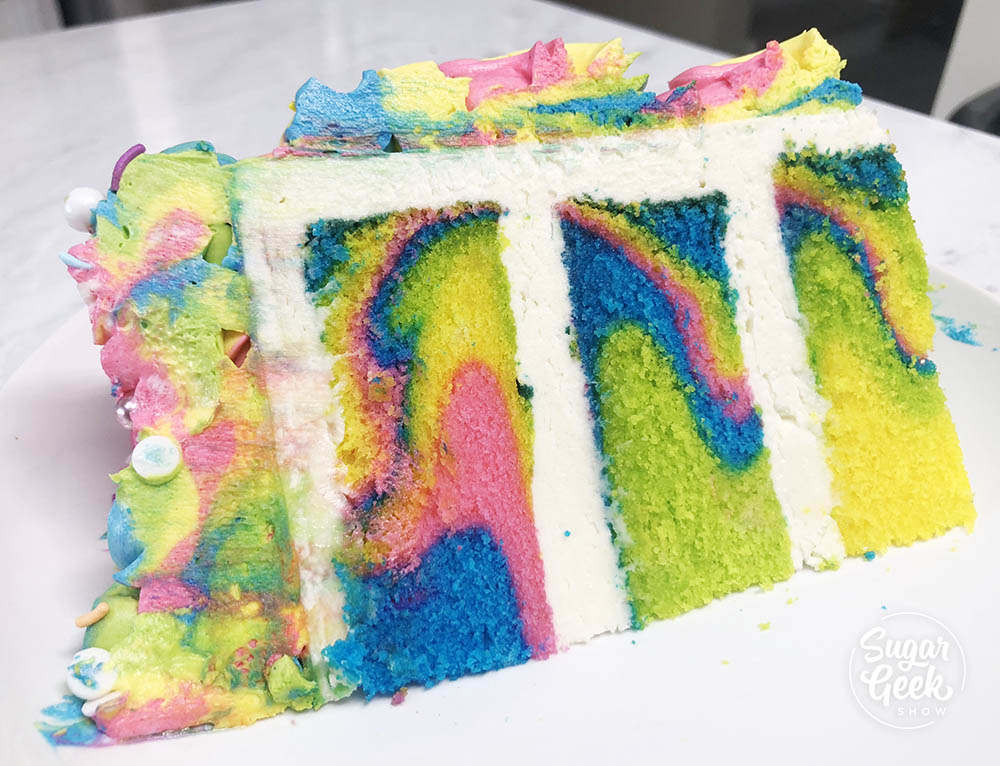
I love how this rainbow cake turned out! It's super fun to make and a great excuse to get colorful!
- Divide your cake batter into 4 bowls.
- I used Americolor electric food coloring because I love their bright neon colors. I used electric pink, electric blue, electric yellow, and electric green.
- Add 1-2 teaspoon of food coloring to each bowl and mix.
- Layer your cake batter into three 6" cake pans that are prepared with cake goop (homemade pan release)
- I layered my colors in this order, blue, pink, yellow, green (repeat).
- Bake in the oven at 335ºF for 30-35 minutes until a toothpick comes out clean.
- Immediately tap the cake on the counter to release air pockets and reduce shrinking.
- Let cool 10 minutes before removing from the pan by inverting onto a cake rack. Freeze 1 hour before frosting or wrap in plastic wrap and chill overnight.
How to make the unicorn cake
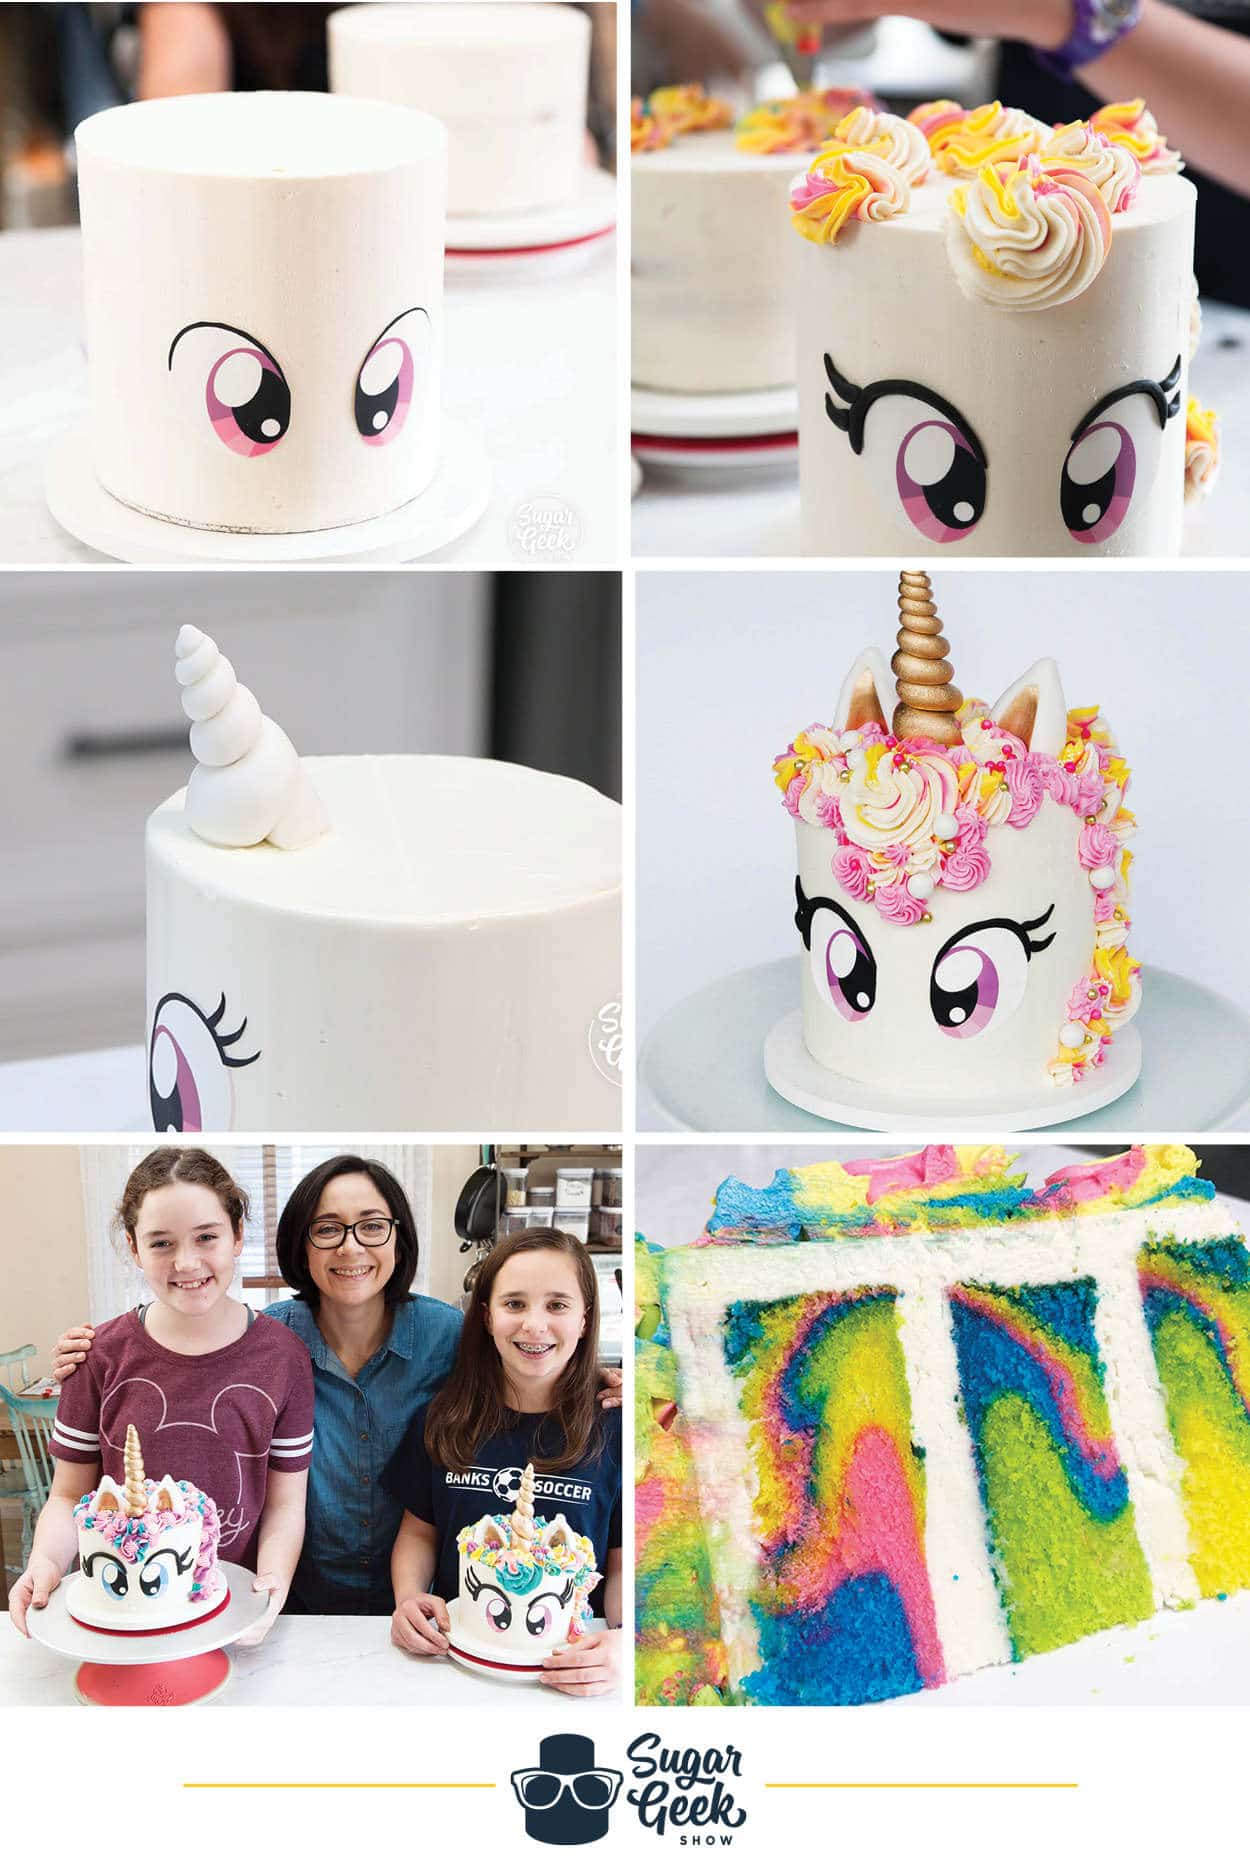
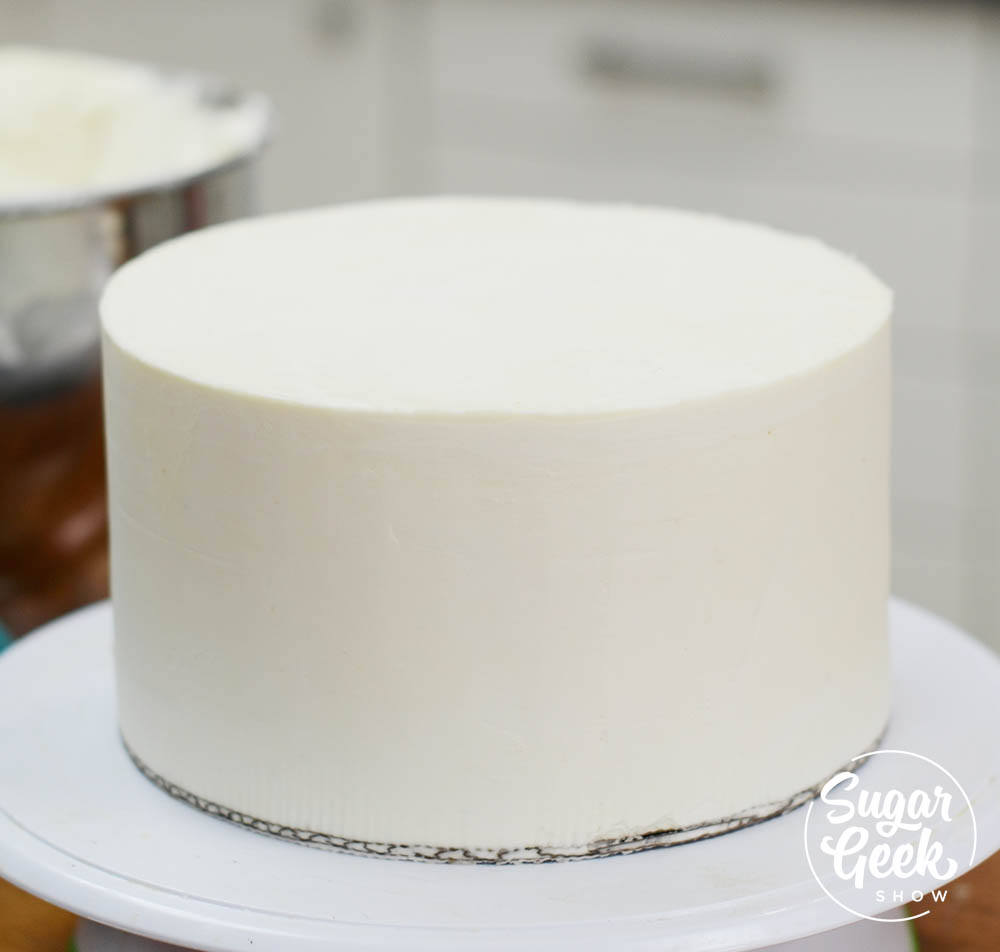
After my cakes are chilled, I stack and fill them with my easy buttercream recipe and smooth out the buttercream with a bench scraper. If you need more info on how to decorate a cake, check out my free tutorial on the basics of how to make your first cake.
I don't worry too much about getting the sides perfectly smooth but if you follow the last step in my easy buttercream recipe, you'll have buttercream that is pretty much bubble free.
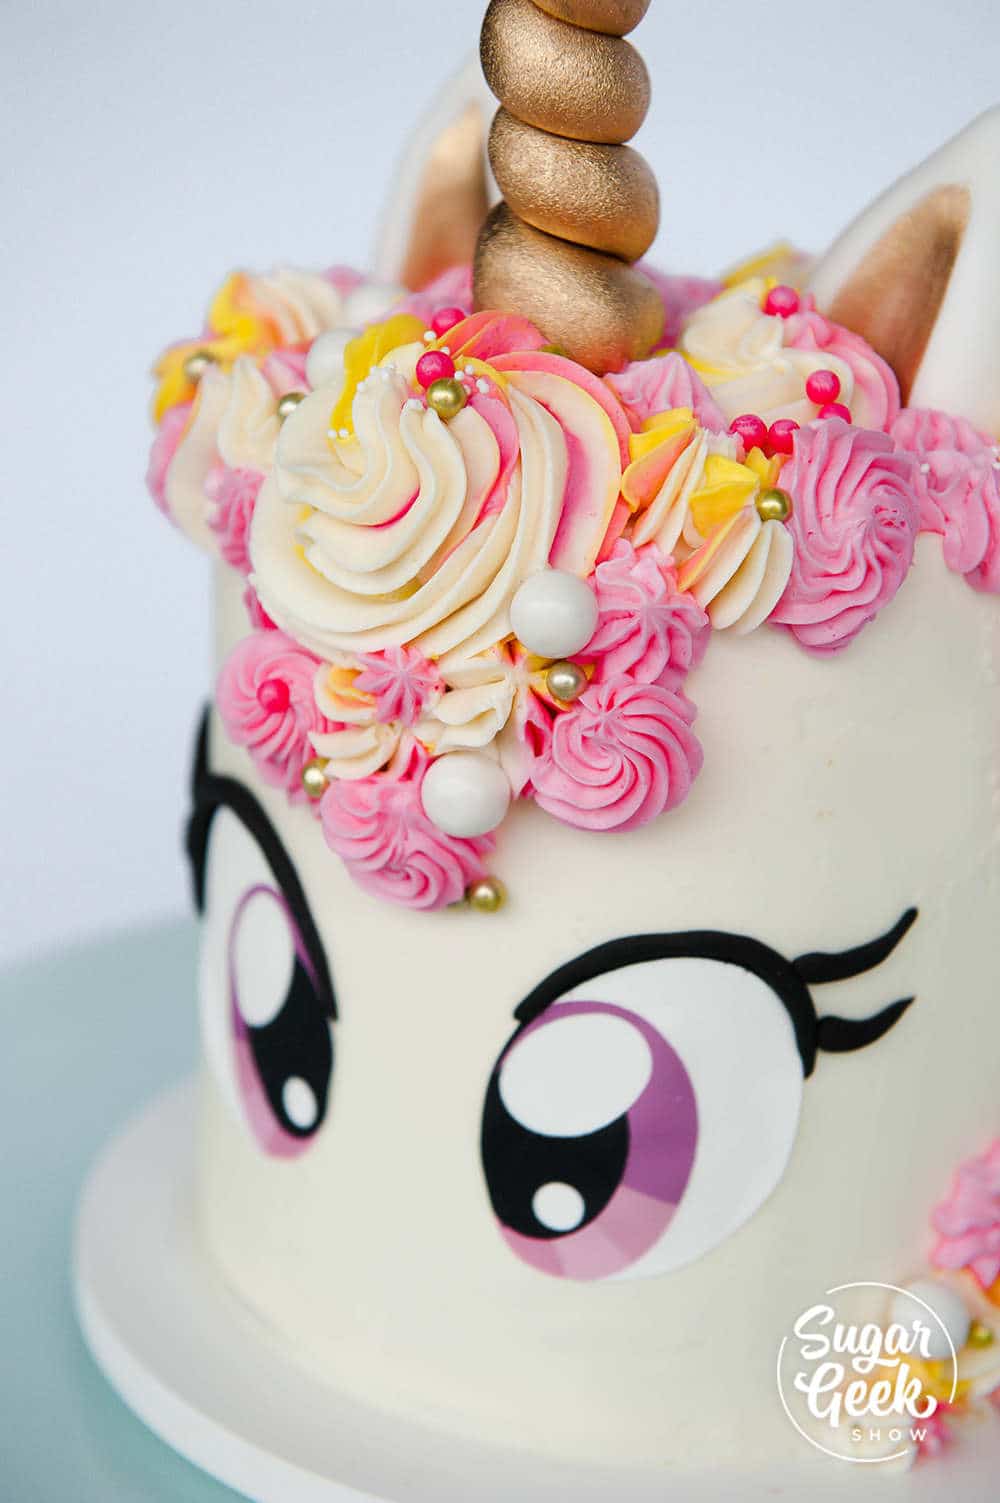
How to make the unicorn cake eyes
I know most unicorn cakes have eyes that are closed and kind of piped very simply but I wanted to do something a bit different. I'm a big fan of my little pony and anime so I wanted my unicorn to have more expressive eyes.
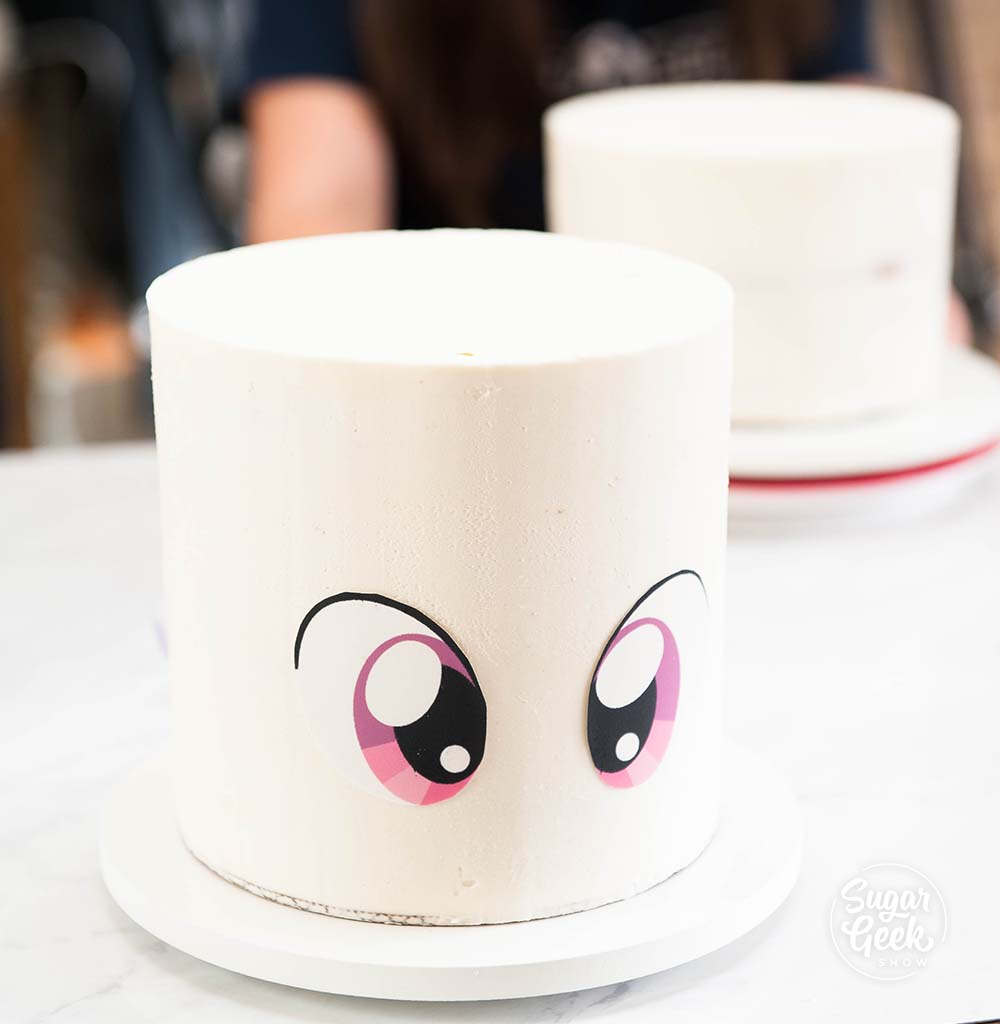
I designed these unicorn eyes that you can download and print out using your edible ink printer. I prefer my Canon MG6821 printer, Photofrost edible image sheets and edible ink. It hasn't clogged on me once and I hardly ever print.
Tips for printing edible images
- Make sure your print settings are set to BEST QUALITY PHOTO and your paper is set to photo paper. Otherwise, you can get streaking and lines in your paper.
- Use fresh edible image paper that is flexible or it can be hard to cut out.
- Cut your images using cuticle scissors or an x-acto blade.
Once your eyes are printed and cut out you can just place them onto the cake. I put mine towards the bottom of the cake so they look cute and cartoony. If you put them higher up, you won't have room for the hair. Get your free unicorn eyes here.
[optin-monster slug="neyfb52qlffjjynclird"]
How to make a unicorn cake horn
Now it's time to put on the unicorn horn! I place my cake pop stick on top of the head and roll out some fondant into a snake. One end is much fatter than the other.
Wrap the fondant snake around the cake pop stick so it's nice and snug. Use your hands to fill in any gaps or holes in the fondant. If you don't like how it looks, just pull it off and try again. Don't get discouraged if it takes you a few tries.
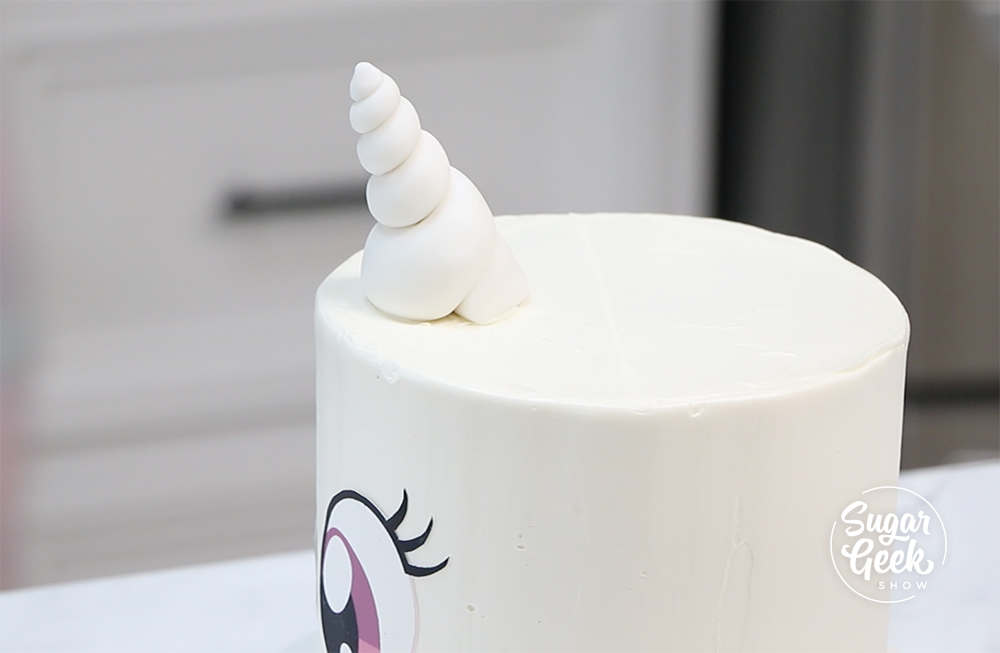
If you don't want to fuss with fondant, you can use my friend's awesome unicorn horn mold. Fill it with chocolate or isomalt and you'll have a perfect unicorn horn for your cake!
Paint your unicorn horn with a mixture of TMP super gold mixed with a few drops of grain alcohol (I used Everclear) to make a thick paint. TMP is non-toxic. Other good brands of gold are edible artist decorative paints metallics.
How to pipe hair on a unicorn cake
Now the fun part! Making the unicorn mane! I colored about 1 cup of easy buttercream for each color (electric blue, green, yellow and pink). Spread the buttercream onto a piece of plastic wrap (see video) to make a buttercream bullet.
The girls in my class loved deciding what color schemes and piping tips they were going to use to pipe the unicorn hair!
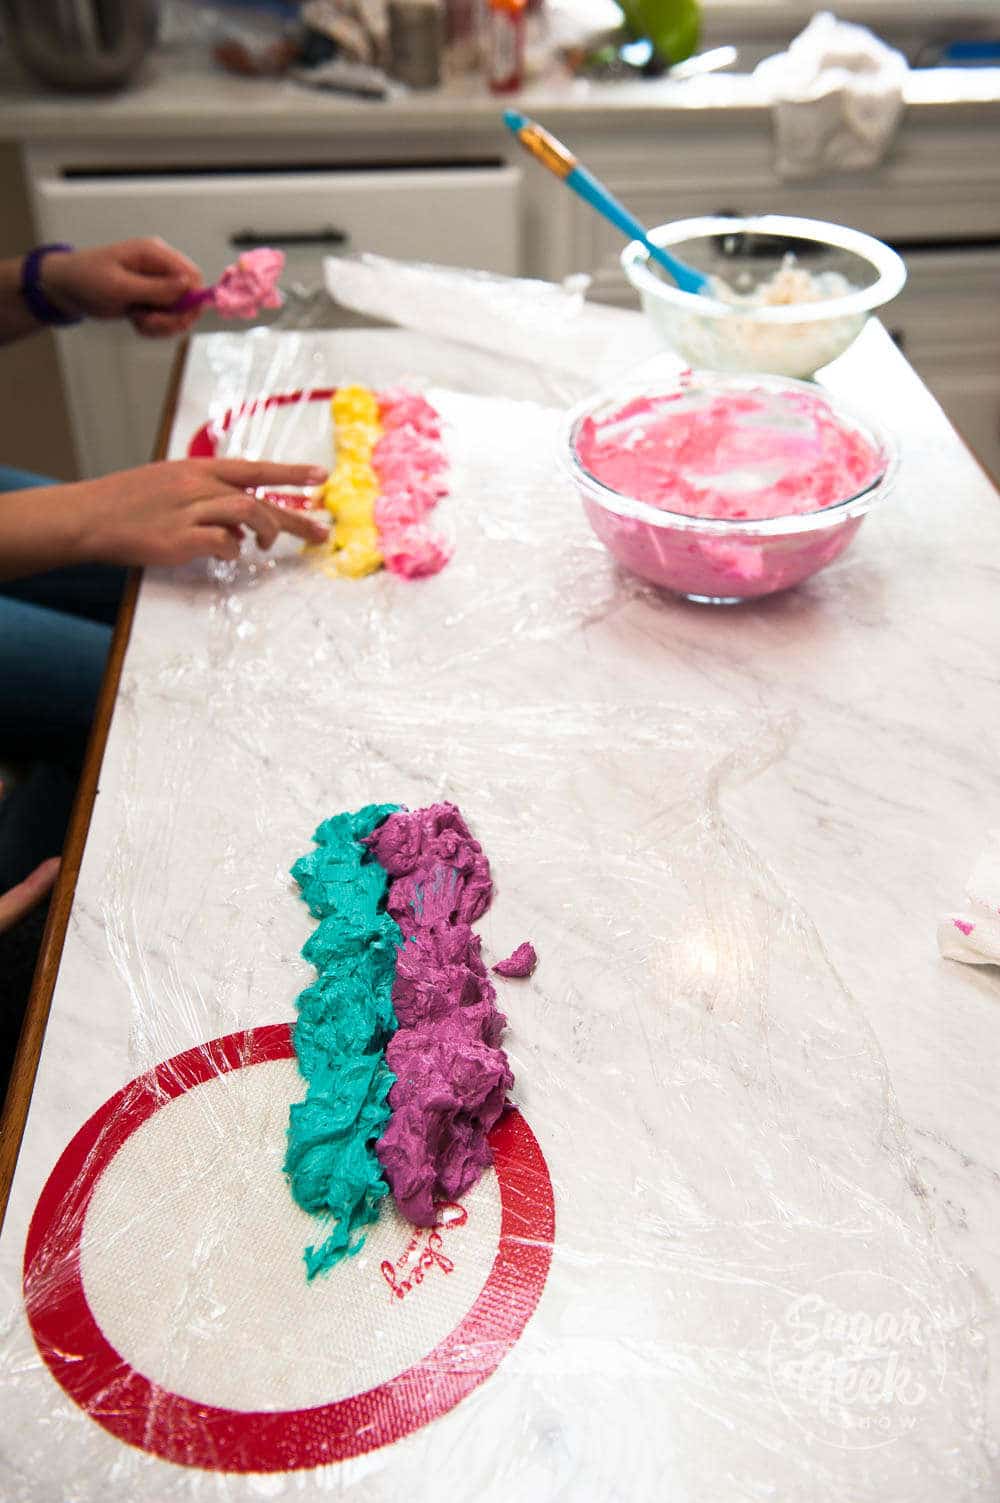
Place the bullet inside a piping bag with a 1M star piping tip and start making some rosettes! You really can't mess this up and it's what gives the unicorn cake it's personality.
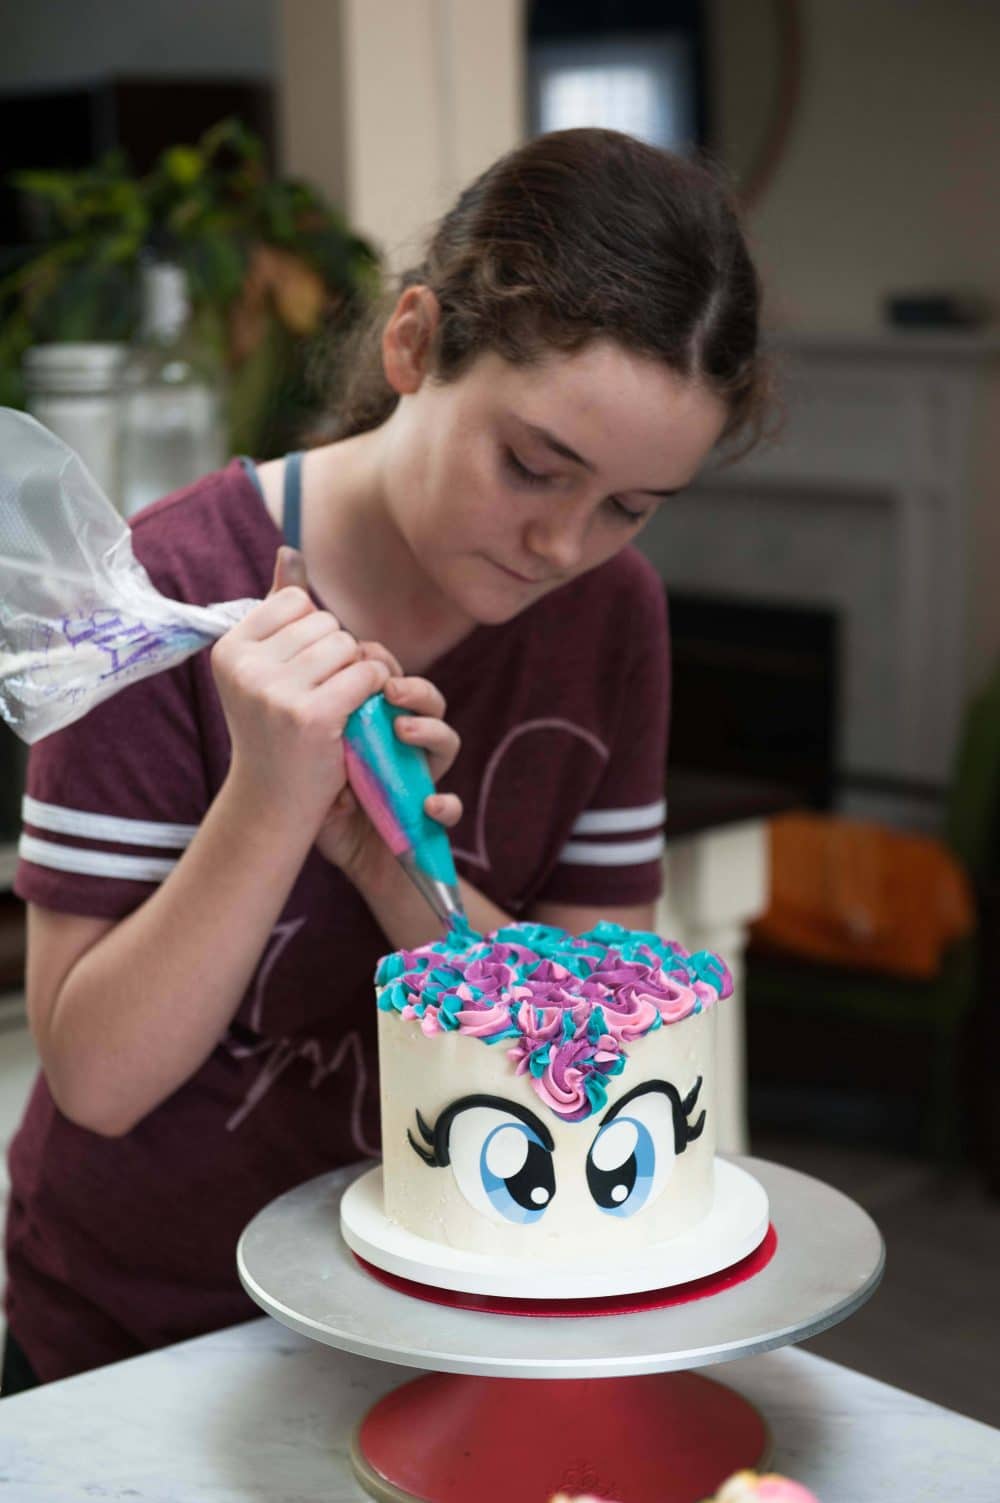
I followed up the rosettes with a smaller star tip (not sure the size) and some yellow buttercream. Then I added on some sprinkles from Sweetapolita (affiliate link) twinkle mix for some extra magic!
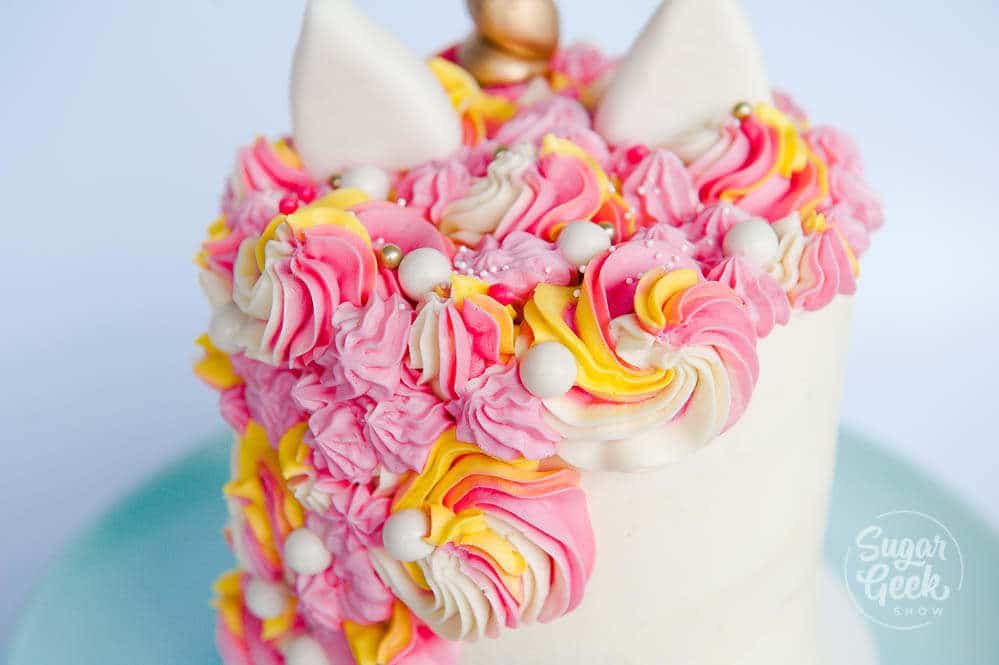
How to make ears for your unicorn cake
I used fondant to make my unicorn ears. Just roll some fondant into a ball and then flatten slightly to make a leaf shape. Cut in half to make two ears (see video). I hollowed out the center of the ear a tad and dusted the insides with some pink petal dust.
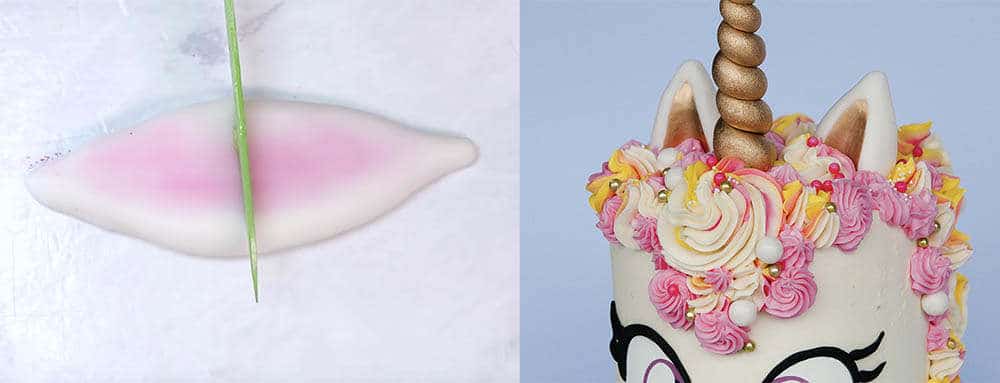
You can place the ears right on the buttercream and they will stick or you can insert a piece of dried spaghetti and use that to stick into the cake. Don't use toothpicks, they are dangerous and can poke someone's mouth.
Finishing the unicorn cake
The last thing I did was pipe a small white border around the bottom of the cake with a #4 round piping tip and some white buttercream. You do not need to refrigerate this cake if you are eating it the same day. If you do refrigerate it, make sure you bring it to room temperature a few hours before eating it so the butter has time to soften and become delicious again.
Be sure to watch my video tutorial on how to make a unicorn cake below!
Recipe
Ingredients
Rainbow Cake Ingredients
- 12 oz cake flour
- 12 oz granulated sugar
- 1 teaspoon salt
- 1 tablespoon baking powder
- ½ teaspoon baking soda
- 5 oz egg whites room temperature
- 4 oz vegetable oil
- 10 oz buttermilk room temperature or slightly warm
- 6 oz butter unsalted and softened
- 2 teaspoon vanilla
Easy Buttercream
- 8 oz pasteurized egg whites
- 32 oz unsalted butter softened to room temp (not melted)
- 32 oz powdered sugar sifted
- 1 tablespoon vanilla extract
- 1 teaspoon salt
Instructions
White Velvet Cake Instructions
- NOTE: It is SUPER IMPORTANT that all the room temperature ingredients listed above are room temperature and measured by weight so that the ingredients mix and incorporate correctly. Heat oven to 335º F/168º C — 350º F/177º C. I tend to use lower setting to prevent my cakes from getting too dark on the outside before the inside is done baking.
- Prepare three 6"x2" cake pans with cake goop or preferred pan spray. Fill your pans about ¾ of the way full of batter. You might have a little batter leftover. You can make these into cupcakes!
- Whisk together the flour, sugar, baking powder, baking soda and salt in the bowl of a stand mixer with the paddle attachment. Mix 10 seconds to combine.
- Next, combine ½ cup of the milk and the oil together and set aside.
- Combine the remaining milk, egg whites and vanilla together, whisk to break up the eggs and set aside.
- Add your softened butter to the dry ingredients and mix on low until mixture resembles a coarse sand (about 30 seconds). Add in your milk/oil mixture and let mix until dry ingredients are moistened and then bump up to med (setting 4 on my kitchenaid) and let mix for 2 minutes to develop the cakes structure. If you don't let your cake mix on this step your cake could collapse.
- Scrape your bowl and then reduce speed to low. Add in your egg white mixture in three batches, letting the batter mix for 15 seconds between additions.
- Divide cake batter into four bowls. Add 1-2 teaspoon of food coloring to each bowl and stir until just combined.
- Divide batter into three 6" cake pans prepared with cake goop or another preferred pan release. Bake 30-35 minutes until a toothpick inserted into the center comes out cleanly but the cake has not begun to shrink yet from the sides of the pan.
- IMMEDIATELY TAP PAN FIRMLY on countertop once to release the steam from the cake. This stops the cake from shrinking.
- Let cakes cool for 10 minutes inside the pan before flipping them out. Flip onto a cooling rack and let cool fully. I chill my cakes in the freezer for one hour before using or you can wrap in plastic wrap and chill in the fridge overnight.
Easy Buttercream Frosting Instructions
- Place egg whites and powdered sugar in a stand mixer bowl. Attach the whisk and combine ingredients on low and then whip on high for 5 minutes
- Add in your butter in chunks and whip with the whisk attachment to combine. It will look curdled at first. This is normal. It will also look pretty yellow. Keep whipping.
- Let whip on high for 8-10 minutes until it's very white, light and shiny.
- Switch to a paddle attachment and mix on low for 15-20 minutes to make the buttercream very smooth and remove air bubbles. This isn't required but if you want really creamy frosting, you don't want to skip it. You can now color your buttercream as needed.
Siri says
I’m unable to see the link to download those beautiful eyes..
Sugar Geek Show says
If you scroll down the page it should pop up 🙂
Katherine says
I used your velvet cake Recipe and color layering technique for rainbow cupcakes. They are gorgeous!! So glad to learn about the electric food colors. I am making the Cakes for my granddaughters 6th birthday party and am just about to make a rainbow bullet for the frosting plus sprinkles. This is so much fun! Thank you.
Eileen S says
Amazing cake, made it for my daughter's 1st birthday. We all love it, cake was so smooth and buttercream was amazing. Thanks Liz for the amazing recipe!!
Anita says
Hi - I loved the texture of the buttercream for frosting the cake, but found it tasted way too buttery and had a greasy mouth feel - I don’t have a stand mixer so used a hand mixer with beaters (no whisk attachment) - I did do the final step of beating for 20 mins - since the whole process was with hand mixer with beaters I wonder if I actually ended up over mixing it . Could that have given it the greasy feel? Is it possible to reduce the butter in the recipe without ruining the creamy texture?
Elizabeth Marek says
Since you used a hand-mixer, the buttercream was most likely not whipped enough. If it still tastes like butter, its not whipped enough.
Star says
Hey Liz, wondering if the pasteurized eggs have to be room temperature?
Elizabeth Marek says
No they do not but just keep in mind you have to mix the buttercream for a while because they will get kind of curdled looking while mixing and you just keep mixing.
Gemma Hicks says
Hi,
Will this cake do OK in the fridge overnight? I know the buttercream will be fine but I'm worried about the eyes going goopy and the fondant in the horn sweating and running. I am going to cover my unicorn horn in silver leaf - any thoughts on how that will go in the fridge?
Thanks!
GH
Elizabeth Marek says
Yes the cake can go in the fridge. Sweating does not hurt fondant. It will stop sweating when it warms up. Silver leaf won't be effected by the fridge.
Barbara G says
Liz cake icing was awesome, cake was perfect... did you get
My pic of my ssd looking cake. To be fair I had multiple issues..
My computer died for the eyes, my board was 8”not 6 making it
Difficult to make cake smooth, finally the color for purple did not turn out as expected, but I did not want to waste this delicious icing. I will hang in and see if I can improve cause I love baking! I won’t resend my sad photo, but thank goodness
Looks aren’t everything! (But it does help)
Elizabeth Marek says
You did a great job 🙂 Keep trying and sharing your work!
Carey says
Thank you! Starting tomorrow!
Carey says
Hello
Never made a cake before but want to serve a few more people. Should I do it in 8" pans instead? Or possible just add an 8" layer to the bottom? I just ordered and picked up a 6" pan and it looks tiny (even though it's being stacked).
The Sugar Geek Show says
If you want to make a bigger cake yes you can use 8" pans but you will need to increase the recipe as well to 1 plus 1/2 batch. You can adjust the servings on the recipe card to adjust the ingredients
Elaine Lee says
Hi, would you share the brand of piping bag you use? Awesome tutorial!
The Sugar Geek Show says
I'm not sure the brand because I got it from my local cake decorating store but I think the number is standard 🙂
Radhika Venigalla says
superb cake and may i know the measurements of butter cream frosting only for hair decoration.thank u in advance.
The Sugar Geek Show says
The measurements for the buttercream are in the recipe card
Lia says
In video you use all the egg but in recipe you say only whites. which is it?
The Sugar Geek Show says
Egg whites 🙂
Marilyn says
Where do you get your pasteurized egg whites?
The Sugar Geek Show says
They are in the egg section of the grocery store, usually on the top shelf. They come in a box
Nathaniel L says
Hey Liz,
I don't own a printer do you know of a way for me to make those eyes without having to print them
The Sugar Geek Show says
You could hand paint them onto fondant and then cut the fondant out and put it on the cake 🙂
Elaine magalhaes says
Hi; can you use AP flour for the reverse method ; and in the recipe has just 4 oz of sugar is that correct? Thanks
Brittany says
Hey Liz do you recommend a certain type of edible ink for the printer you mentioned above? Any specific edible image sheets good for the printer referenced?
Nisa Brice says
If you look under the How to Make Unicorn Eyes section she tells you what she uses.