• Skip to primary navigation
  • Skip to main content
  • Skip to primary sidebar
  • Recipes
  • Tutorials
  • Online Shop
  • About Us
  • Contact Us

Sugar Geek Show logo

menu icon
go to homepage
  • Recipes
  • Tutorials
  • Online Shop
  • About Us
  • Contact Us
subscribe
search icon
Homepage link
  • Recipes
  • Tutorials
  • Online Shop
  • About Us
  • Contact Us
×
Home › Blog

Updated: Oct 6, 2017 · Published: May 23, 2017 by Shannon Mayes · This post may contain affiliate links ·

Newbie-Proof Cake Travel

I see this question asked over and over, how do I safely travel with a cake that is two tiers or more? Do you stack and travel, do you stack on sight, what kind of supports do you use? What happens if there is some damage to the cake? How do you fix a cake on site? These are all problems that I have dealt with over the course of my cake decorating career and I will explain the full-proof process that I used with every cake delivery from how to store the cake before delivery to setting it up and fixing any boo-boos easily.

How to travel with a cake


Crumb Coat & Chill

First of all, you gotta chill those cakes. An un-chilled cake is a disaster waiting to happen. Cakes at room temperature are great for eating, not so great for traveling. When a cake is not chilled, the supports in the cake are more likely to fall over and the buttercream is more likely to slip and slide during those turns. I always chill my cakes in the fridge overnight before traveling. Chilling sets the buttercream or ganache so that it helps keeps the cake stable and if your cake has butter in it then that will help keep the cake stable as well. Live in a humid area? Chill your cakes in cardboard boxes so they can be taken straight from the fridge to the (air conditioned) car. The box helps insulate the cakes and keeps the condensation off of them. Btw, condensation in small amounts does not hurt cakes. So don’t sweat a little cake sweat.


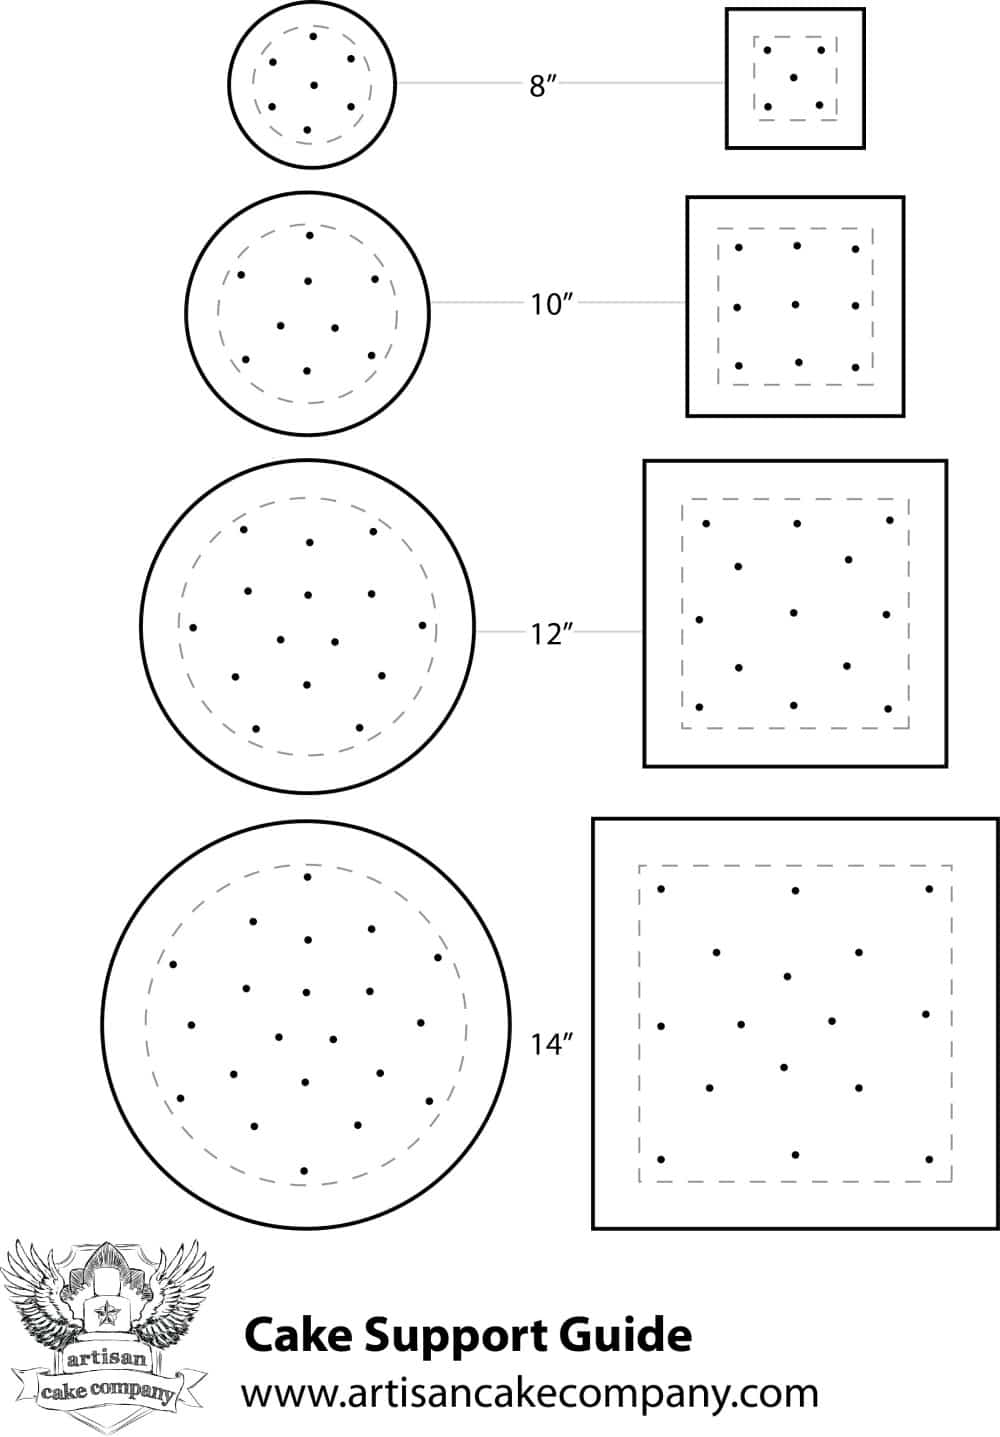
Let’s Talk Cake Supports

Now this is one of those things that is really a personal choice but again, I’ll tell you what I use.
For regular stacked cakes (nothing sculpted) I have always used just regular milkshake straws.
They are a thicker version of a regular drinking straw and not quite as fat as a boba straw. Here
is a video on how I use those straws to support cake tiers and a visual guide on how many to
use for each sized tier. Remember to put your straws as close to the edge of the cake as
possible on the outside so that the weight is distributed properly. If you only have a few straws in
the center, the edges of the cake can be unsupported and start to crush the cake below it and
possibly collapse.


To Stack or Not to Stack?

A lot of cake newbies ask how to transport a two tier cake. It might feel like a big deal to jump
from one tier to two tiers but really it’s not. Three tiers is really when you want to start worrying.
First off, let’s talk about the inside of a cake. Every cake. Yes even if it’s only two tiers.
Every cake tier has a cake board underneath it. This is so that there is a food safe barrier
between the cake and the cake stand and a nice surface for whomever is cutting the cake to cut
the slices from. If you have more than one tier, this cardboard (also called a cake card) provides
support for the cake so that you can put straws or dowels underneath, stopping the cake tier
from crushing the one below it. Cake is heavy! So the more cake tiers you stack, the more
important it is to have good supports.
If your cakes are chilled and stacked properly, you can easily travel with two tiers stacked
together no problem. If you are newbie, you might want to travel with tiers unstacked and stack
on site for anything over two tiers. Even for the simple fact that fully stacked cakes are HEAVY
and really hard to manage on your own. I travel with individual tiers in their own boxes and bring
them to the cake table. I then place the largest tier and begin stacking. All my straws are already
in the cake and everything is chilled so the cakes are easy to handle. I also add any
decorations, toppers etc at this point and take a photo of the finished cake. If you’re traveling
with your tier’s separated, there is no need for a center dowel and a two tier can never needs a
center dowel.
Cake Support Guide

Don’t forget the OH SH*T KIT!

Pardon the language but if you forget your fix-it kit, you’ll definitely be dropping some less-than-
nice words! I always, ALWAYS bring with me a kit to fix any boo-boos. This includes extra
straws, scissors, x-acto, small cutting board, small rolling pin, extra buttercream and fondant in
the colors of the cake, small spatula and pins for popping any bubbles that may develop during
travel. I also have paper towels, paint brush and a bottle of water since a sink is not usually
nearby. I keep all this in a plastic box that always goes with me on every delivery and has saved
me many many times.
Interested in watching a series of videos to walk you through the process of stacking a cake?
Check out this old playlist from Artisan Cake Company’s Youtube Channel. This will show you
everything from recipes, to how to stack the cake.

If you follow these very simple steps, you’ll avoid every type of cake mis-hap. In my almost 10
years of cake decorating I have never had a cake fall over, fall apart or melt. Thank you OCD! I
knew that would come in handy someday.
Happy Caking!

- Liz

More Blog

  • close up of creamsicle cake
    Orange Creamsicle Cake
  • closeup of cake slice on a white plate
    Eggless Chocolate Cake
  • close up of sliced lemon pound cake
    Lemon Pound Cake Recipe
  • closeup of strawberry shortcake slice on a white plate
    Strawberry Shortcake Cake

Primary Sidebar

Liz Marek with strawberry cake

Hi, I'm Liz! I'm an artist and cake decorator from Portland, Oregon. Cakes are my obession, which is why I'm dedicated to crafting tried-and-true recipes, small cake tutorials, as well as advanced online cake courses!

More about me →

Buy Flawless Fondant

Sugar Geek Flawless Fondant
It's incredibly stretchy, stays soft on the cake and can be rolled 50% thinner than other brands without tearing or becoming transparent. No elephant skin, no frustration, just flawless fondant every time. Buy Fondant

Our Cake Greatest Hits

Check our our best cake recipes

Summer Recipes

  • closeup of vanilla cake with vanilla buttercream slice on a white plate
    Moist Vanilla Cake Using Cake Flour
    Cook Time45 Minutes
  • slice of pink velvet cake with whipped cream frosting and fresh raspberries on a white plate
    Pink Velvet Cake
    Cook Time40 Minutes
  • slice of fresh strawberry cake on a white plate with strawberries behind it
    Fresh Strawberry Cake
    Cook Time1 Hours 10 Minutes
  • close up shot of double chocolate chip cookie
    Chewy Double Chocolate Chip Cookies
    Cook Time20 Minutes
  • Fast Bread Recipe
    Cook Time1 Hours
  • sourdough bread cut open to show crumb
    Beginners Sourdough Bread Recipe Step-By-Step
    Cook Time25 Hours 10 Minutes

Popular Recipes

  • ganache cake with dark, milk, and white chocolate on it
    The Best Chocolate Ganache Recipe
    Cook Time20 Minutes
  • close up of easy buttercream rosettes
    Easy Buttercream Frosting
    Cook Time10 Minutes
  • close up slice of marble cake
    Moist and Fluffy Marble Cake Recipe
    Cook Time40 Minutes
  • close up of red velvet cake slice
    Red Velvet Cake Recipe
    Cook Time1 Hours 40 Minutes

Footer

↑ back to top

About

  • Privacy Policy
  • Terms of Service
  • Fondant

Newsletter

  • Sign Up! for emails and updates

Contact

  • Contact
  • About Us
  • About Liz Marek

Copyright © 2024 Sugar Geek Show, Inc. All Rights Reserved.