
A mirror glaze cake is one of those baking moments where science meets literal magic. The first time I poured a traditional mirror glaze over a frozen cake, I swear I stopped breathing for a second. Watching the whole thing turn into a glossy, reflective finish that looked like it came straight from TikTok was so satisfying. And the good news? Even though mirror glaze cakes look complicated, they're actually super doable once you understand the right temperature, the right consistency, and the base of every mirror glaze recipe.
I started making mirror glaze cakes long before they blew up on social media, but I'll be honest - the vibrant color options and different looks people make on TikTok and Instagram totally inspired me to play with gel food coloring, cocoa butter variations, and different shade combinations. Whether you're glazing an entremet cake, an eight-inch layer cake, or even a chocolate cake covered in buttercream frosting, the technique is exactly the same: start with a frozen cake, get your glaze to the appropriate temperature, and pour with confidence.
What's In This Blog Post
My Inspiration
My own mirror glaze journey began when I was testing a mousse-covered cake for class and accidentally poured the glaze too warm. The colors combine, the glaze slid right off the sides of the cake, and I ended up with a run-off glaze disaster on my baking sheet. But that failure taught me the biggest difference between a beautiful creation and a sad puddle on parchment paper: temperature. Once I stuck to 90ºF and kept my cake frozen solid, everything changed.
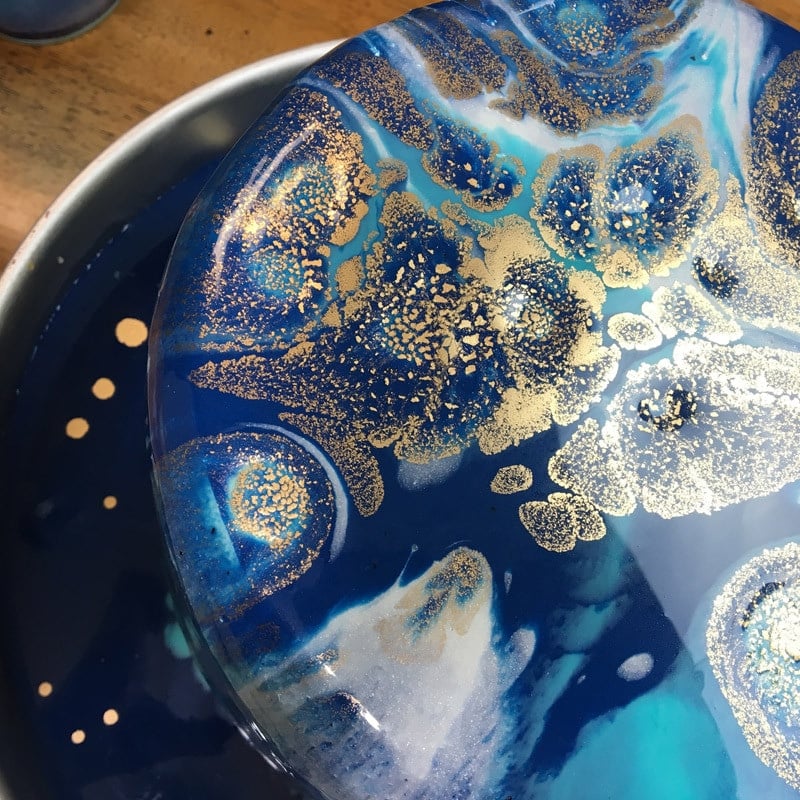
And because I love bright colors, I always experiment with different colors in smaller bowls so I can swirl, drizzle, and layer them over the center of the cake. If you're glazing for the first time, trust me - play with color. A tiny bit of liquid food coloring or a very small amount of gel food coloring makes a huge difference in the final result.
Mirror Glaze Cake Ingredients
- Granulated sugar - Helps create the shiny reflective finish. Replace with equal parts glucose syrup and sugar if you want a thicker layer of glaze.
- Sweetened condensed milk - Adds richness and smoothness. Can be replaced with milk chocolate or real chocolate for a different type of glaze.
- Water - Used to hydrate the gelatin and dissolve the sugar. Cold water works best for blooming gelatin.
- Gelatin powder - The key ingredient for the outer layer texture. You can use plain gelatin or sheet gelatin.
- White chocolate - The best results come from high-quality white chocolate. Valrhona is amazing, but any real chocolate works.
- Gel food coloring - Gives a vibrant color without thinning the glaze. Replace with liquid food coloring sparingly.
- White food coloring - Helps brighten the whole thing so your glaze color pops.
- Plastic wrap & airtight container - Important for storing leftover glaze without air bubbles.
Tips & Tricks
Keep your cake frozen. Keep your glaze at 90ºF. And always strain everything to avoid lumps. If you're making this for uploading & non-users on social media, use bright colors and a clean cake board so the whole cake looks flawless. Set your cake on a wire rack over a baking sheet to catch the excess glaze and keep your workspace clean.
And don't rush your pour. Confidence is the secret glazing technique nobody talks about.
Step-by-Step Mirror Glaze Cake Instructions
- Heat the sugar mixture
Add the granulated sugar and the first amount of water to a saucepan. Bring it to a gentle simmer - not a boil - and let it dissolve. - Bloom your gelatin
Mix the second quantity of cold water and the gelatin powder together and let it absorb for 15 minutes. This step ensures the right consistency. - Prepare your chocolate base
Combine the white chocolate and sweetened condensed milk in a large bowl. - Add gelatin to the syrup
Once the sugar mixture is hot (but not boiling), remove from heat and add the bloomed gelatin. Stir until completely dissolved. - Melt everything together
Pour the hot mixture over the chocolate and condensed milk. Let it sit for 5 minutes so the chocolate can melt, then whisk or use an immersion blender until smooth. - Color your glaze
Add gel food coloring, white food coloring, or several different colors split into smaller bowls if you want a multi-shade effect. - Strain and cool
Pass the glaze through a fine strainer to remove air bubbles and lumps. Let it cool to 90 degrees F - this is the most important part. - Glaze your cake
Place the frozen cake on a circular object or small cake pan turned upside-down on a baking sheet. Pour the glaze over the center of the cake, letting it flow down the sides of the cake until the entire cake is coated. - Finish your edges
After about 5 minutes, scrape off excess glaze at the bottom with a hot knife or offset spatula. - Serve or store
Refrigerate until serving. Finished cakes keep their shine for about 24 hours. Store leftover glaze in an airtight container wrapped with plastic wrap touching the surface to prevent a skin from forming.
Final Thoughts
A mirror glaze cake might look like something only professional pastry chefs make, but once you understand the consistency of the glaze and the appropriate temperature, it becomes one of the most fun techniques in baking. You can go minimalist with one glaze color or mix up different colors for a vibrant shade marble effect. Whether you're making this for a special event, your first time experimenting, or just to impress social media, you'll end up with something gorgeous.
Frequently Asked Questions
How much mirror glaze do I need?
This recipe is enough to glaze an eight-inch cake or a small entremet cake with tons of glaze for extra coverage.
Why does my glaze slide off?
Your cake wasn't frozen or your glaze was too warm.
Can I use corn syrup instead of glucose syrup?
Yes - it works great and is the closest substitute.
How do I store leftover glaze?
Pour it into a container, press plastic wrap onto the surface, and refrigerate. Reheat gently to reuse.
Can I glaze a buttercream cake?
Yes, as long as the buttercream frosting is super smooth and the cake is well-chilled.
Want me to turn this into a short-form version, a Pinterest title, or an Instagram caption?
Recipe
Equipment
- 1 Fine Sieve
- 1 Immersion blender
- 1 Kitchen Scale
Ingredients
- 2 ounces Cold Water for the gelatin
- 20 grams Powdered Gelatin
- 12 ounces White Chocolate high quality for best results such as Valrhona
- 5 ounces Water
- 11 ounces Sugar
- 7 ounces Sweetened Condensed Milk
- 1 Tablespoon Vanilla
- 2 drops White Food Coloring
- 1 Frozen Cake
Instructions
- Sprinkle the gelatin into the water and mix to combine. Set it aside to bloom for 15 minutes.
- Combine the water, sugar, and condensed milk in a medium saucepan over medium heat until it begins to gently simmer.
- When the sugar and water mixture begins to simmer (do not boil), remove from the heat and add the bloomed gelatin. Stir until the gelatin has dissolved.
- Strain this mixture through a sieve to remove any lumps and return it to the saucepan.
- Pour the hot liquid on top of the chocolate and let it sit for 5 minutes.
- Use an immersion blender to stir the glaze until the chocolate has completely melted.
- Add the gel food coloring and stir until well-mixed. Pass the glaze through a fine sieve to remove any lumps. Leave the glaze to cool to 90ºF.
- Once the glaze has cooled to 90º F / 32º C, pour it over the frozen cake which is on top of a cup, sitting on a tray or plate with a edge to catch the drips.
- Leave the glaze to set for 5 minutes before using a hot knife to remove the drips.
- Enjoy your cake right away or refrigerate until serving. Keep in mind that glaze loses it's shine after 24 hours so if you're making this for a client make sure you pour the same day as delivery.
Video
Nutrition


Tom B says
I recently made a couple of mirror glaze cakes but I needed to pour the glaze over the Cake twice because the first time it almost ran straight off the cake. The glaze was around 30-35degrees so presume that wasn’t the problem. Could it be that my buttercream icing wasn’t cool enough and smooth enough? How long would you recommend cooling or freezing the iced cake to make sure the glaze sticks first time?
Hopefully I’ll be able to enter it in a local cake competition 🙂
Thank you!!
The Sugar Geek Show says
The cake needs to be very cold on the outside, also try using a good quality chocolate if you arent already
Help says
Arghhhh! No reply to how much water to use in which step!? I've been reading the comments hoping for an answer but it seems to be the only comment without a reply...
The Sugar Geek Show says
Hi Angela, I can update the recipe for you but for future reference, a recipe is written in the order of ingredients you use. So step one indicates you combine the first three ingredients including water together. Step two is combining the second amount of water with gelatin.
Saba salman says
The 1/2 cup water goes with the sugar and condensed milk, and one tablespoon with gelatin.
Vanessa C says
The first amount of water is 1/2cup and the 1 Tbsp... it goes with the sugar and condensed milk. That’s the first 3 ingredients.
The second amount of water was listed after the gelatin- it’s another 1/2 cup of water that gets mixed with the gelatin, so the gelatin can bloom.
Jenn says
Great recipe - I love that the ratio conversion is there for smaller (or larger) amounts. I made some today for a galaxy drip beach cake (long story)... but I was concerned the drip would be too fluid and too thin (I didnt want it down the height of the cake, just over the edges) so I let the mixture set up a bit more than would be desired for a normal cake coating... but then - as expected - it was a bit lumpy. I learned 2 handy tips from this - a brulee torch is very handy! a) to smooth it out, and make it drip more if needed (as it raises the temp again, and melts the gelatin), and b) that it will pop ANY bubbles that are coming or just under the surface!
Thanks again for sharing your recipe!
The Sugar Geek Show says
Great tip! I wonder if a hair dryer would work too? 😀
Colleen says
Don’t use a hair dryer, even on low it creates ripples or waves.
Morrisonmama says
I'm guessing that any flame, such as a long stem lighter would work. We used flame to pop bubbles in epoxy coating at work.
The Sugar Geek Show says
Lighter fluid leave a taste on the cake so it's not recommended which is why we use a butane torch.
Kristin says
So funny! I came here to see your cake that I am making for my daughter, Avalan! (pronounced Avalon!) I haven't met another Avalan (Avalon) before 🙂
The Sugar Geek Show says
Yay! It's a pretty great name 🙂
Bernadette says
Can the glaze be used on chocolate buttercream that has been frozen the appropriate time? Do you think the chocolate color of the frosting would alter the color of the glaze? I am making one large sheet cake by putting two quarter sheet cakes, one vanilla with white frosting and the other chocolate with chocolate frosting, together, but the client would like the entire cake blue. Do you think it could work if the seam is smooth?
The Sugar Geek Show says
Yes you can do that 🙂
Mary says
If I used a frosting made with granulated sugar to coat the cake, would it still behave the same as a powdered sugar buttercream?
The Sugar Geek Show says
I'm not sure what you mean, I assume you mean like a Swiss meringue buttercream? In that case yes it would be just fine 🙂
Vicki Pittman says
Hi Liz, just wondering if there is a way to get the glaze just on top of the cake and not sides for an ocean effect, maybe parchment paper type around sides on fondant and let set up??
The Sugar Geek Show says
Sure, if you made a collar around the cake using parchment or acetate and then poured the glaze on top and let it set then peeled away the collar it would totally stay on the top
Dee says
Can a cake covered with mirror glaze be frozen
The Sugar Geek Show says
No, the glaze will lose it's shine after a while
Tanja Smith says
I am ready to try this recipe! Can you use flavored gelatin?
The Sugar Geek Show says
I wouldn't
Marry says
I love the reciep so bad but the only thing what i missed is mirror glaze is transparent. I follow the steps properly and 3 times my glaze doesn't have density!!!
Thanks
The Sugar Geek Show says
Are you adding color? once you add color it shouldn't be transparent or maybe you're pouring at too warm of a temperature?
NONFLUENCER says
Wouldn't the addition of the white chocolate affect the opacity? Regardless whether or not color is added.
nonfluencer says
Wouldn't the addition of the white chocolate affect the transparency, whether or not color was added? Might it have been accidentally omitted? What is the purpose of the white chocolate anyway?
The Sugar Geek Show says
Flavor, setting the mirror glaze, color etc.
Dianne says
Hi in the first instruction it says to add water with the sugar so on and the second instruction is to add water with the gelatine powder.. Im curious is it the half cup water with the sugar, condensed milk so on and the tbsp with the gelatine or the other way around. Thankyou
Gabe Patterson says
I was wondering the same thing!
The Sugar Geek Show says
Step one is the first three ingredients in the recipe including the water. Step two is the second amount of water with the gelatin. Recipes are usually written in the order of ingredients used.
kris says
can the glaze be put on a regular cake?
The Sugar Geek Show says
Yes but you have to have the buttercream very smooth and frozen for an hour so it sets the glaze. Do not freeze your cake solid
hevan2020 says
what if you can't find that chocolate
The Sugar Geek Show says
Just use whatever high quality chocolate you have access to 🙂
lisa says
liked to share a pic of my fantasy forest baby shower mirror cake, can I upload here?
The Sugar Geek Show says
Of course! Would love to see it
Shelley Bodoh says
I am going to use this for a gallexy baby shower cake I am doing. My question is how to attach fondant accents (in this case fondant stars of vavious sizes) to the side of the mirror glazed cake?
The Sugar Geek Show says
You can't put fondant on mirror glaze, it will make the fondant get sticky and wet
Miss Belle says
Thank you! This turned out perfectly.
Pinuccio Tisi says
Hi, I made the mirror glaze and it was pretty easy, but I have a couple of questions; although the finishing was very shiny at first, after 10 minutes or so it lost the sheen and also it developed some bubbles. Any idea why this could have happened? I am ready for a second try but any advice would be helpful. Thank you , Pinuccio
The Sugar Geek Show says
If there are bubbles that means you mixed it a little too vigorously and trapped air in the mixture. Next time use a spoon or spatula. What did you do with the cake after you poured the glaze?
Alfonso Villegas says
Some sites recommend sifting the glaze through a tight mesh first before pouring.
The Sugar Geek Show says
You definitely could do that to prevent some lumps