
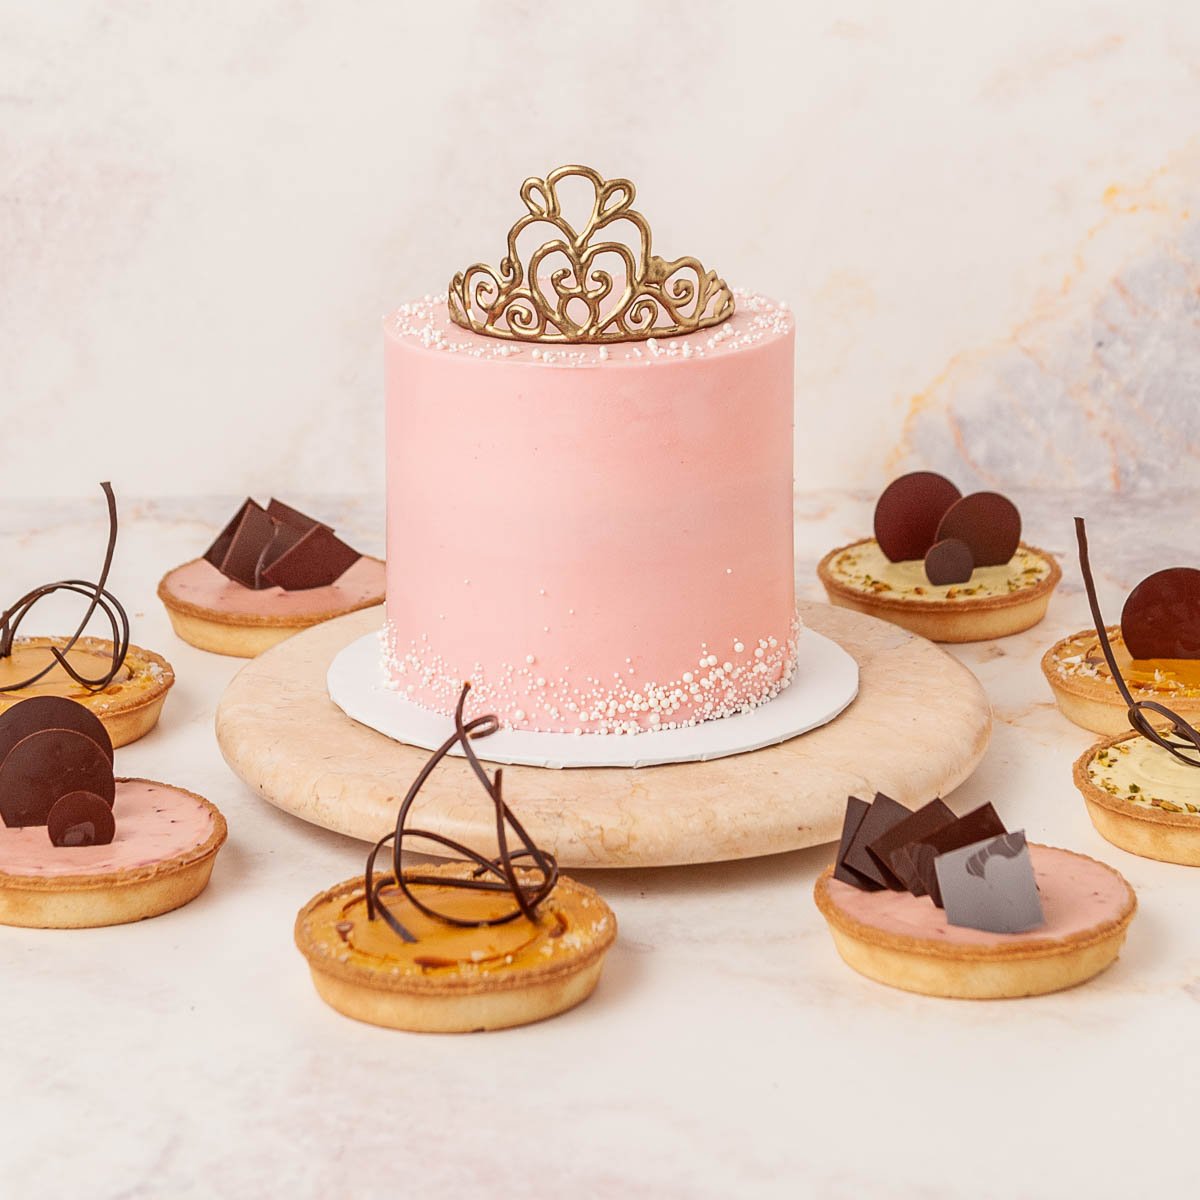
Making simple chocolate decorations is one of the first things a pastry chef in training learns (right after learning how to properly temper chocolate). Today Chef Christophe is going to show us how to make simple chocolate shapes, chocolate curls, and a beautiful chocolate tiara!
Chef Christophe has so many great tips and tricks for you in this blog post like how to clean your surface without water, and the best way to get gold dust to stick to chocolate! I can't wait for you to see them! So let's get our tools together and let's get started!
Tools & Equipment Needed
- EZ Tempering Machine
- Chocolate Warmer
- Offset Spatula
- Acetate Sheets
- Tiara Template
- Circle Cutters
- Cake Comb With Teeth (for chocolate curls)
- Bench Scraper
- Small Paring Knife
- Piping Bag (for tiara)
- 6" cake dummy or coffee can
- Grand Marnier (alcohol)
- Gold Luster Dust
- Airbrush
- Tape
If you haven't watched Christophe's video on how to temper chocolate with the EZ Temper machine, you'll want to watch that first.
No tempering machine? No problem! You can temper your chocolate in the microwave or use the traditional seeding method to get your chocolate tempered.
How To Make Chocolate Circles
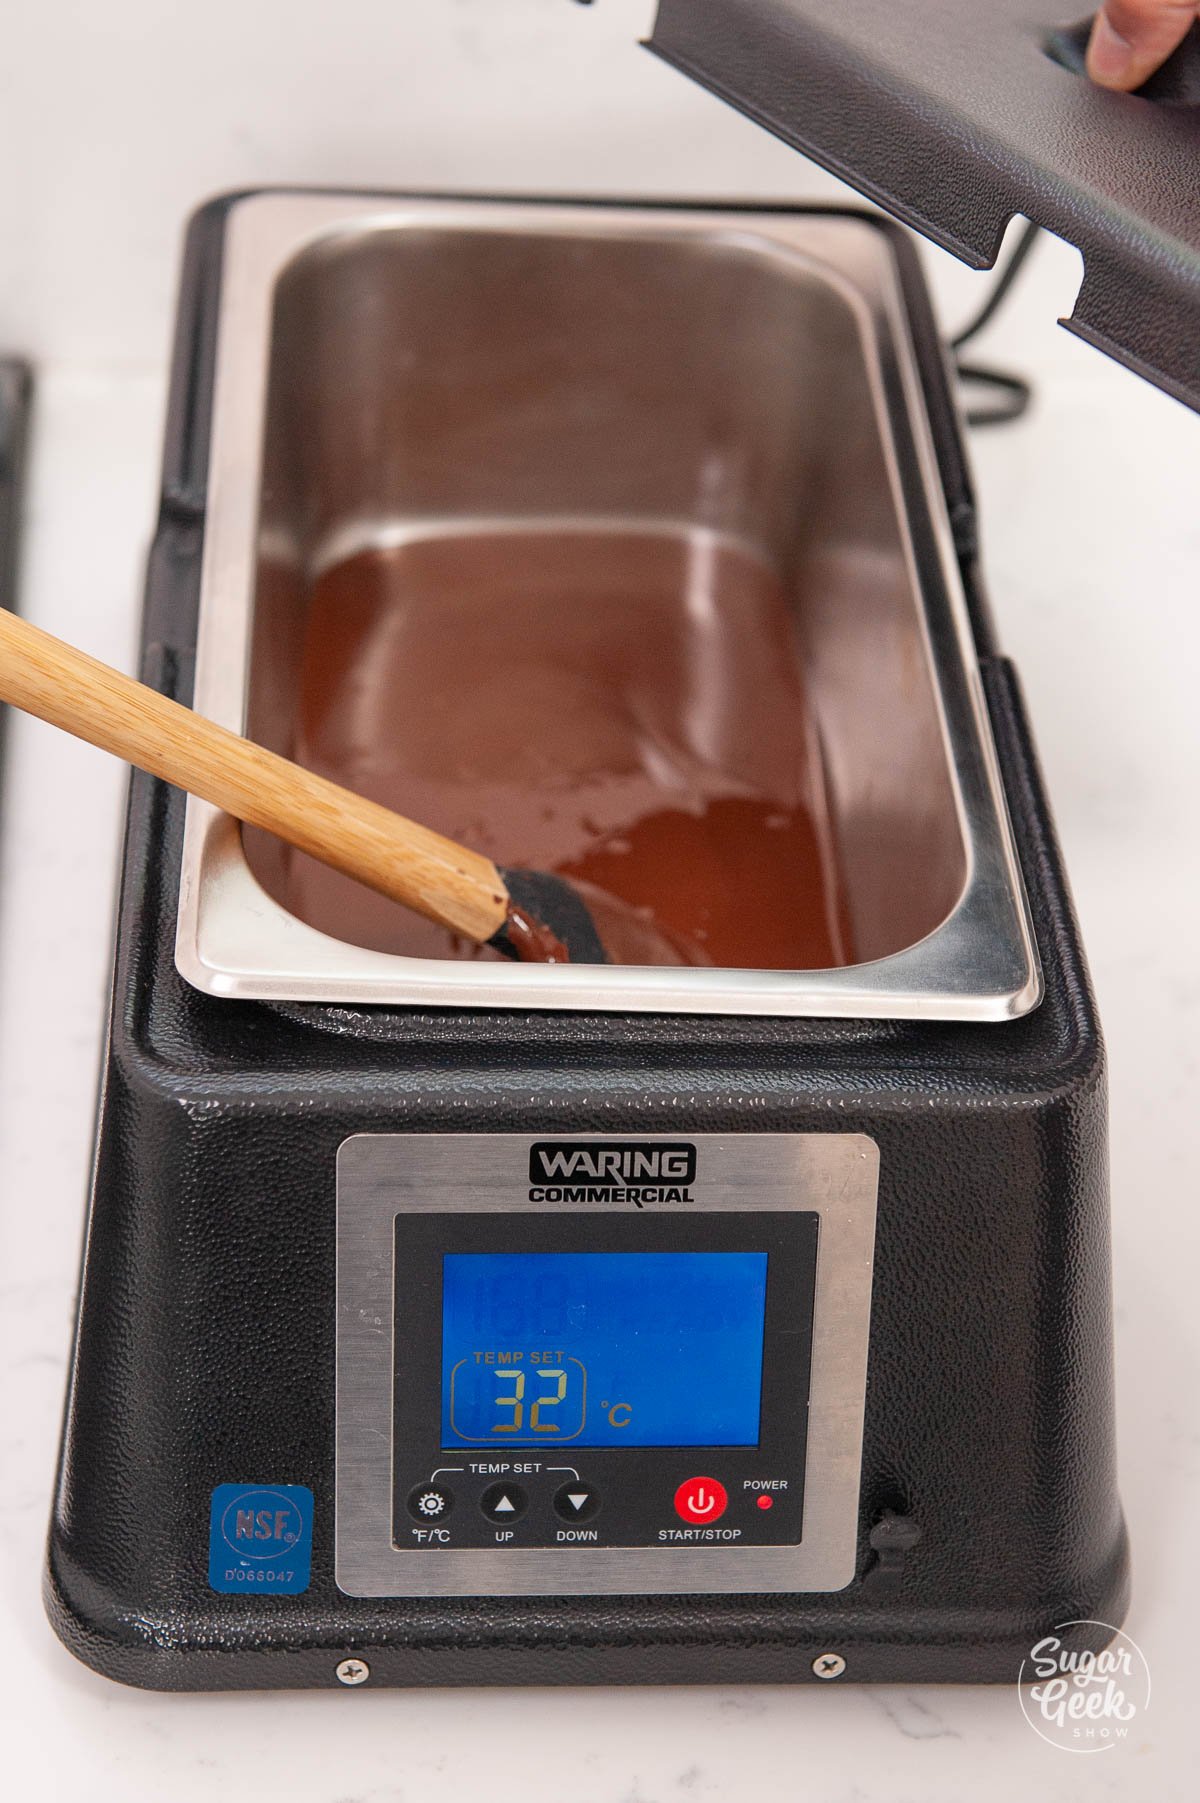
- Prepare your tempered dark chocolate and keep it in the warmer at 89ºF (32ºC). The working temperature for both white chocolate and milk chocolate is between 82ºF and 86ºF (29ºC and 30ºC).

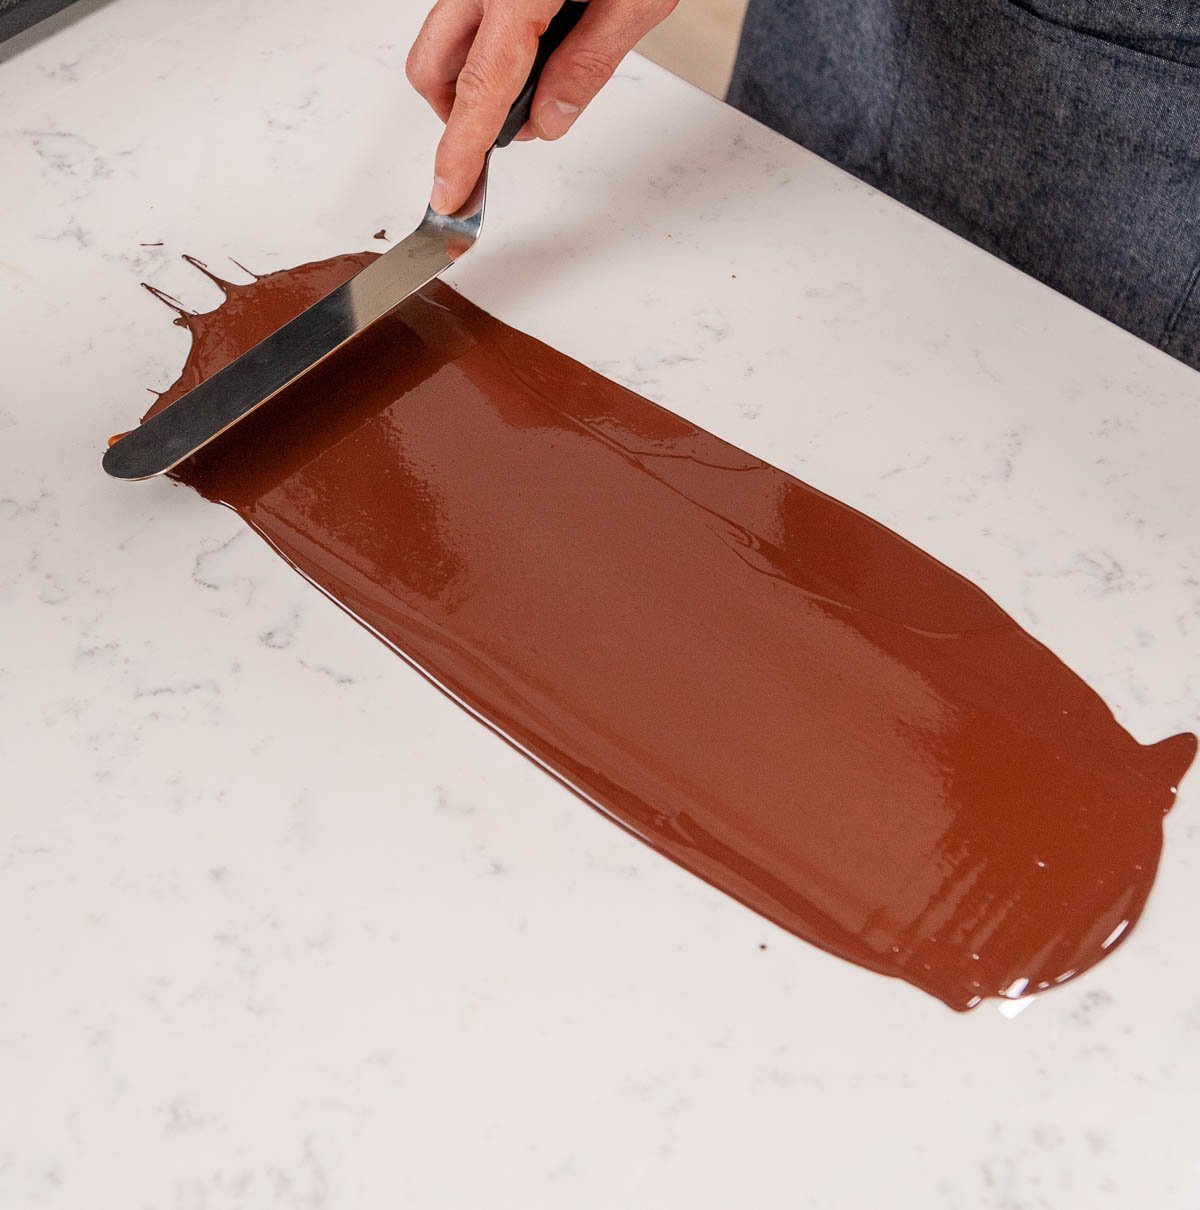
- Place your acetate on top of your work surface.
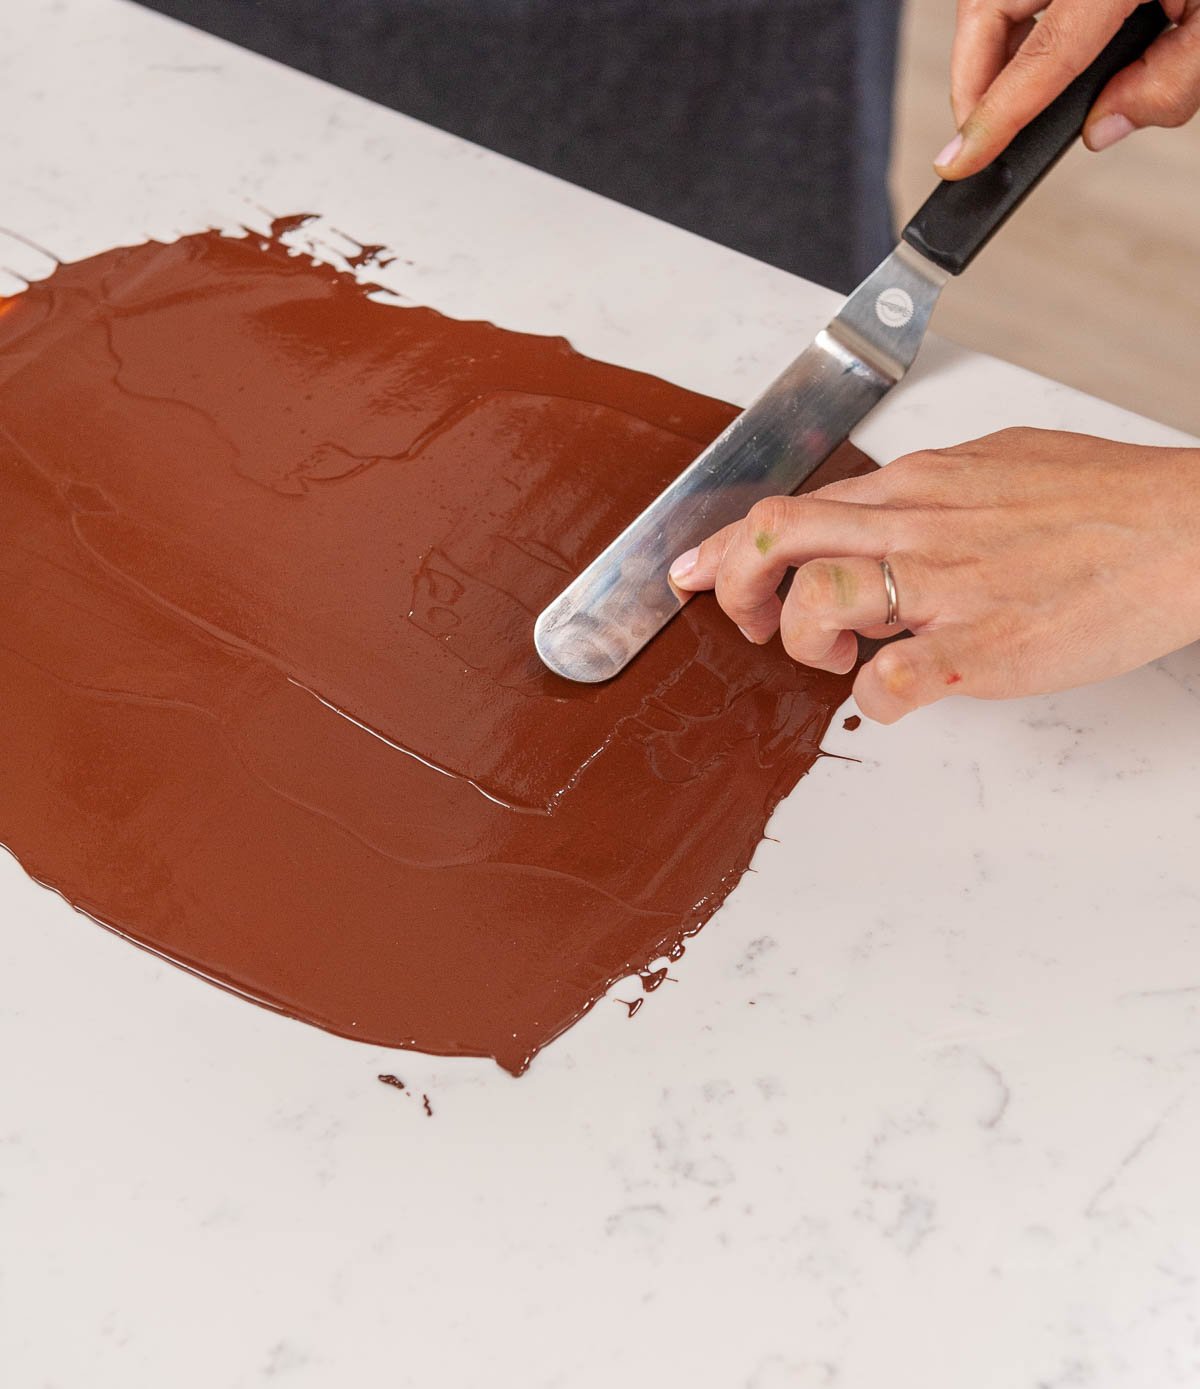
- Spread your tempered chocolate over your acetate sheet very thin and as evenly as possible with your offset spatula.

- Pick the acetate up carefully and move it over to detach it from the chocolate that went over the edges.
- After a few minutes, the chocolate will begin to lose it's shine and look matte but is still soft.
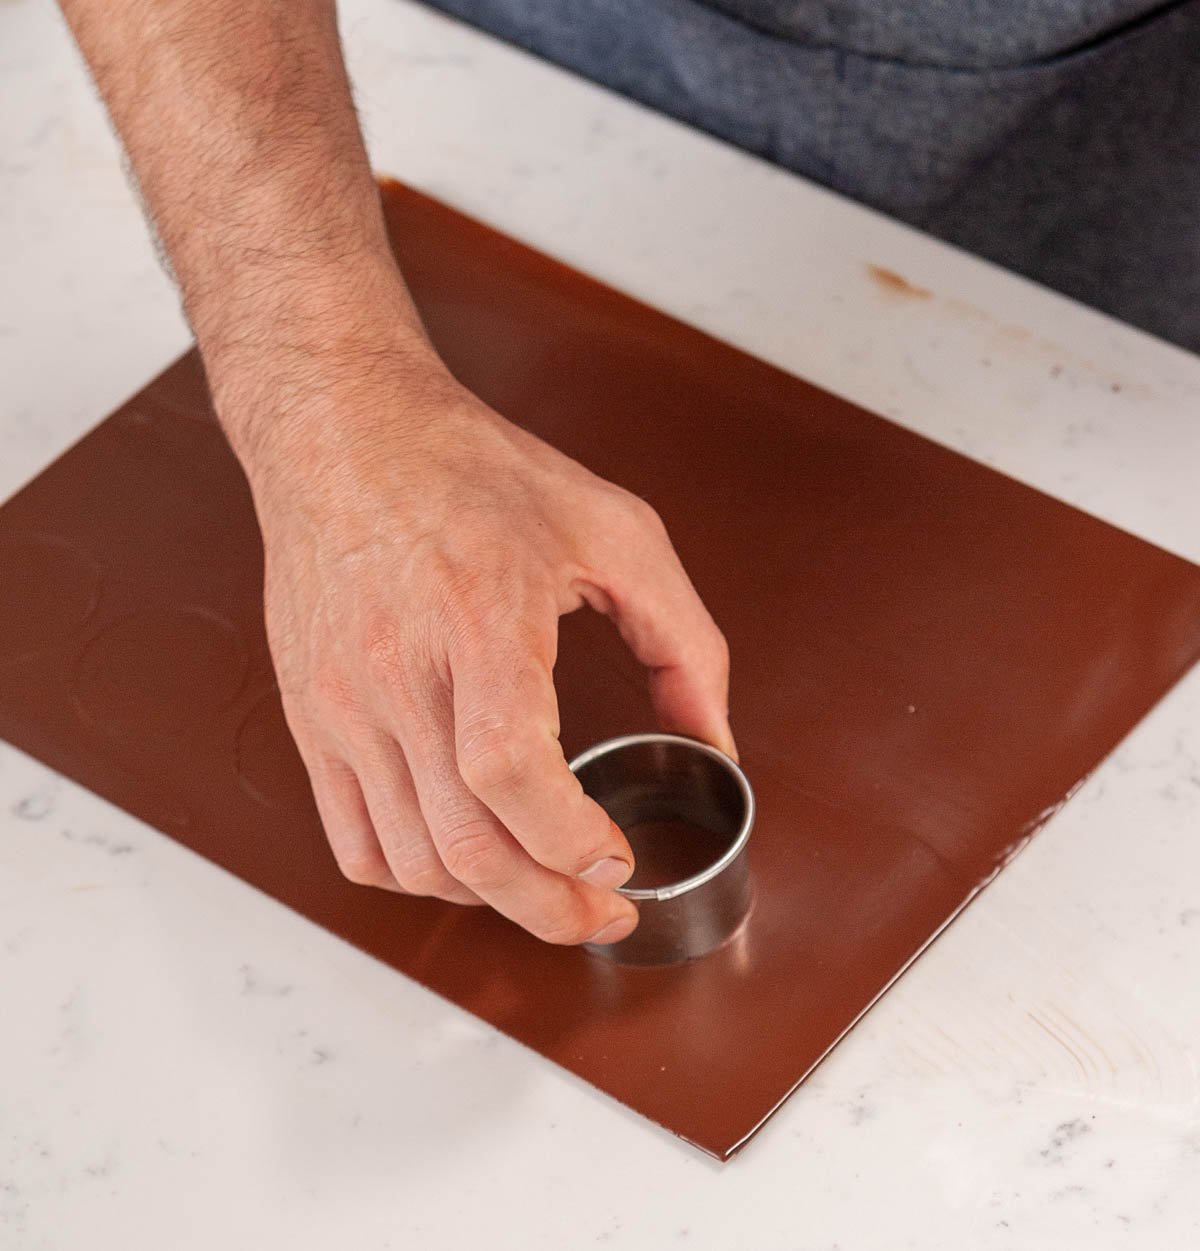
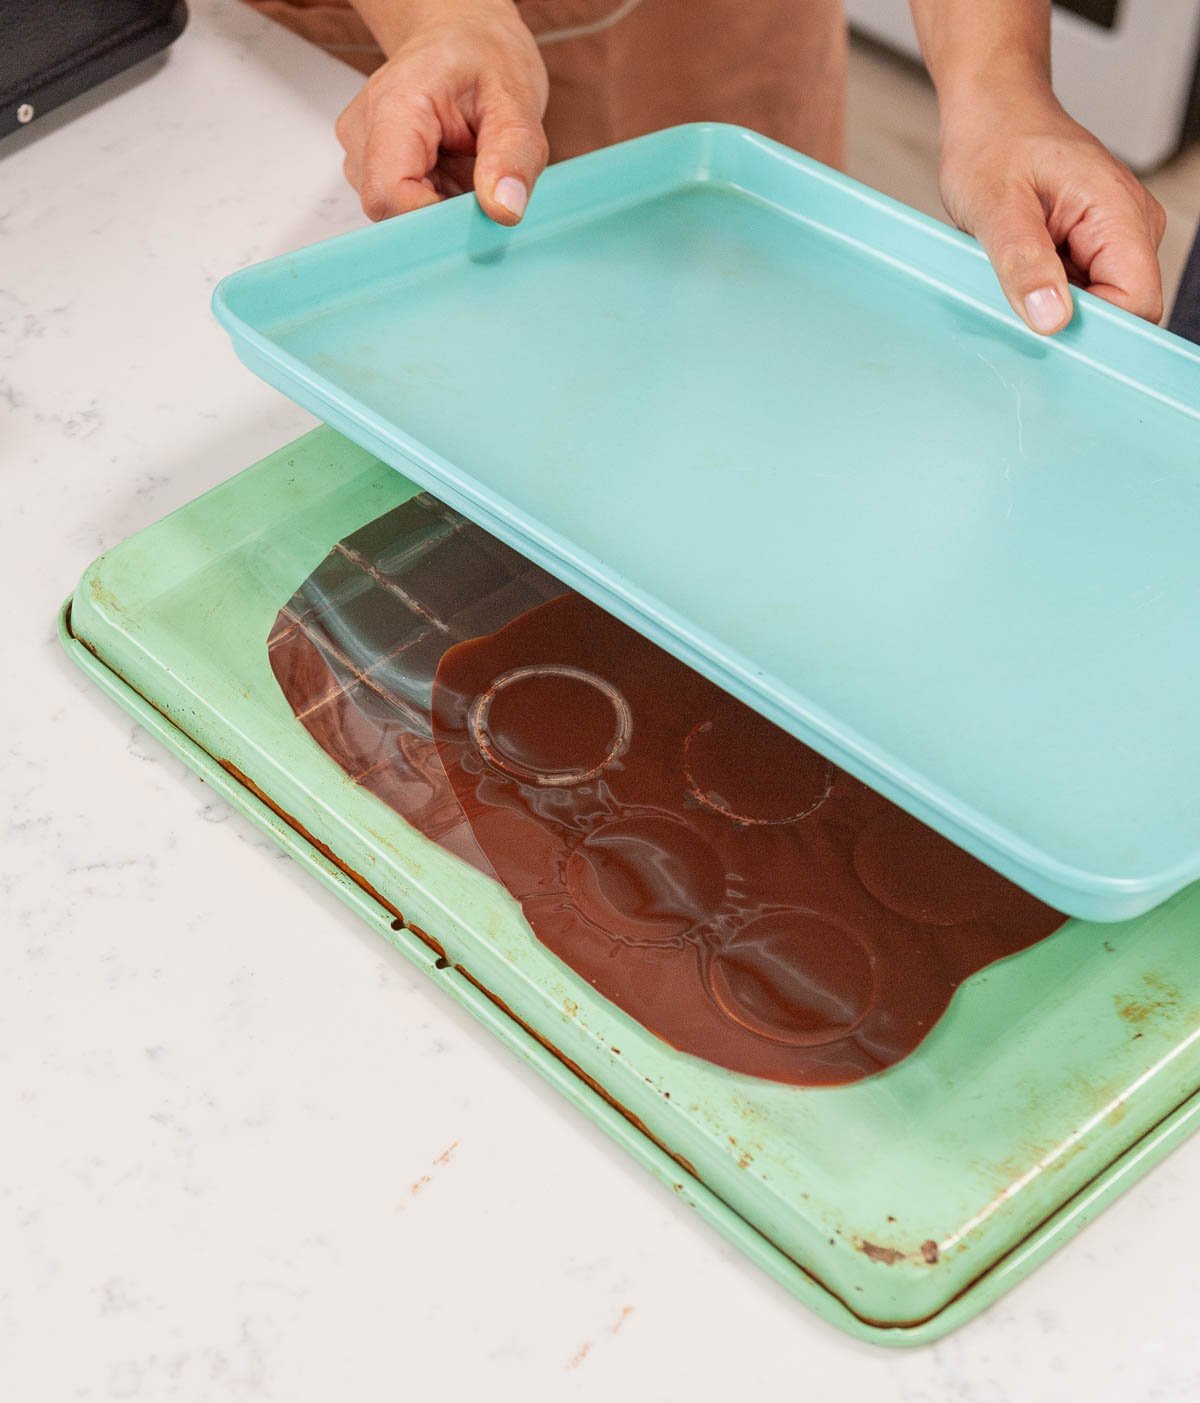
- Now is the time to use your circle cutter to cut some shapes. Work quickly.

- You can also use a knife to free-hand shapes or use different size cutters.
- Place the acetate and chocolate in between two pieces of parchment paper and sandwich between two sheet pans to fully crystalize. (About 10 minutes in the refrigerator.) This is to prevent the chocolate from curling.

- Clean your surface with a bench scraper, not water so you do not contaminate your surface.
- Carefully peel the acetate off the back of the squares and handle them with gloved hands so that you avoid leaving fingerprints.


How To Make Chocolate Squares
- Prepare your tempered chocolate and keep it in the warmer at 89ºF (32ºC)
- Place your acetate on top of your work surface
- Spread your tempered chocolate over your acetate sheet very thin and as evenly as possible with your offset spatula.
- Pick the acetate up carefully and move it over to detach it from the chocolate that went over the edges.
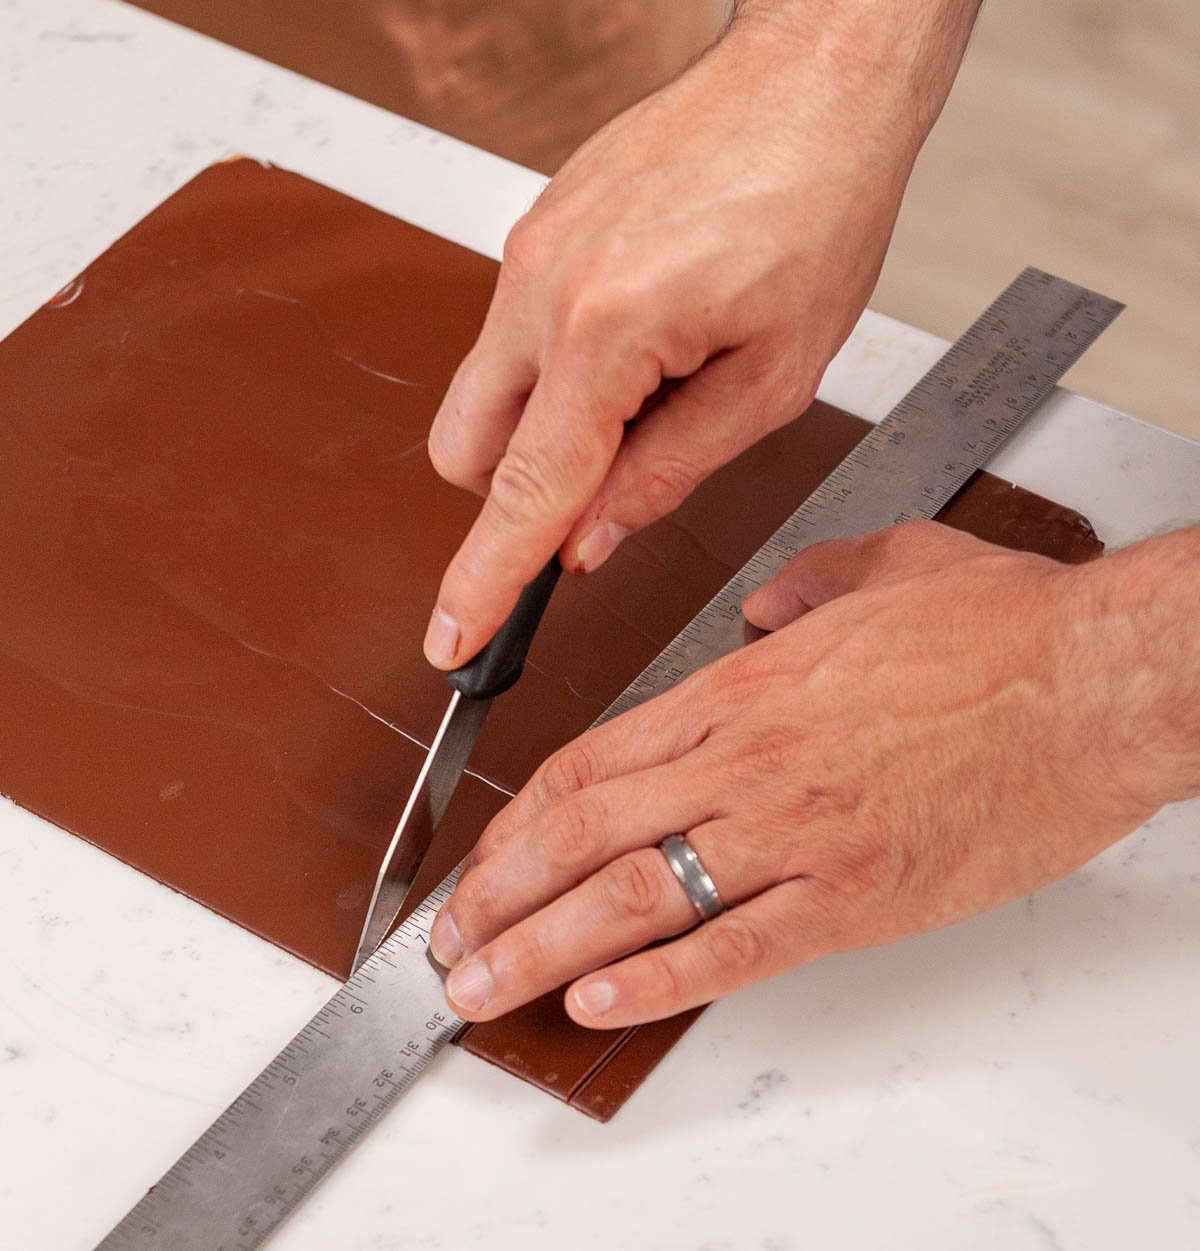
- After a few minutes, the chocolate will begin to lose it's shine and look matte but is still soft.
- Use a ruler to cut the lines in the chocolate to make your squares.
- Place the acetate and chocolate in between two pieces of parchment paper and sandwich between two sheet pans to fully crystalize. (About 10 minutes in the refrigerator.) This is to prevent the chocolate from curling.
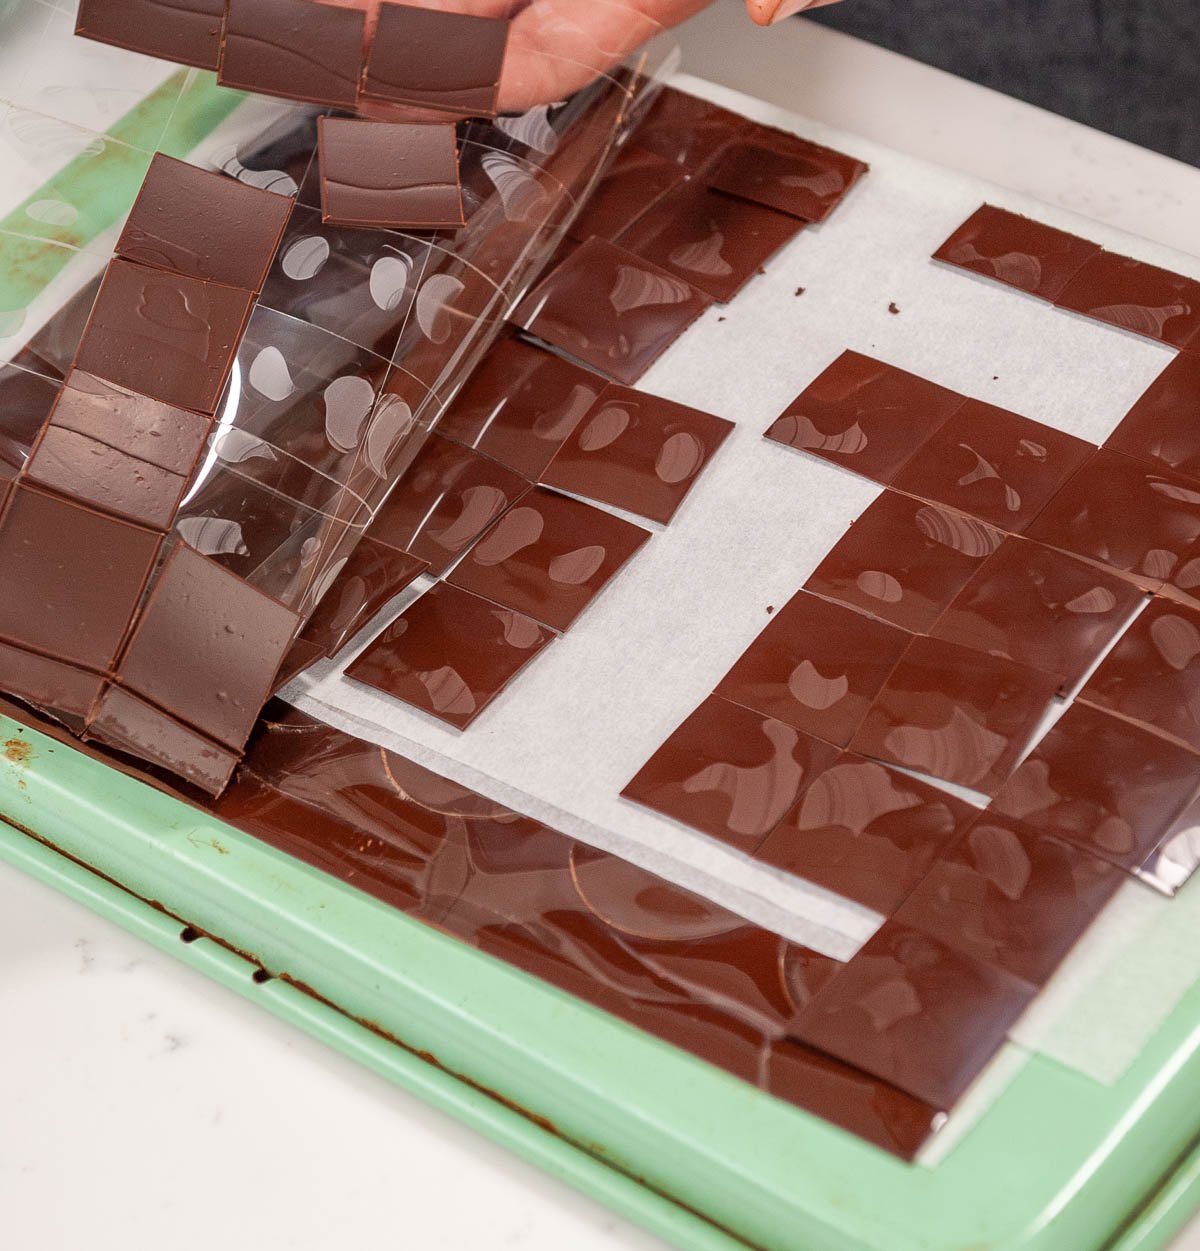
- Clean your surface with a bench scraper, not water so you do not contaminate your surface.
- Carefully peel the acetate off the back of the squares and handle them with gloved hands so that you avoid leaving fingerprints.
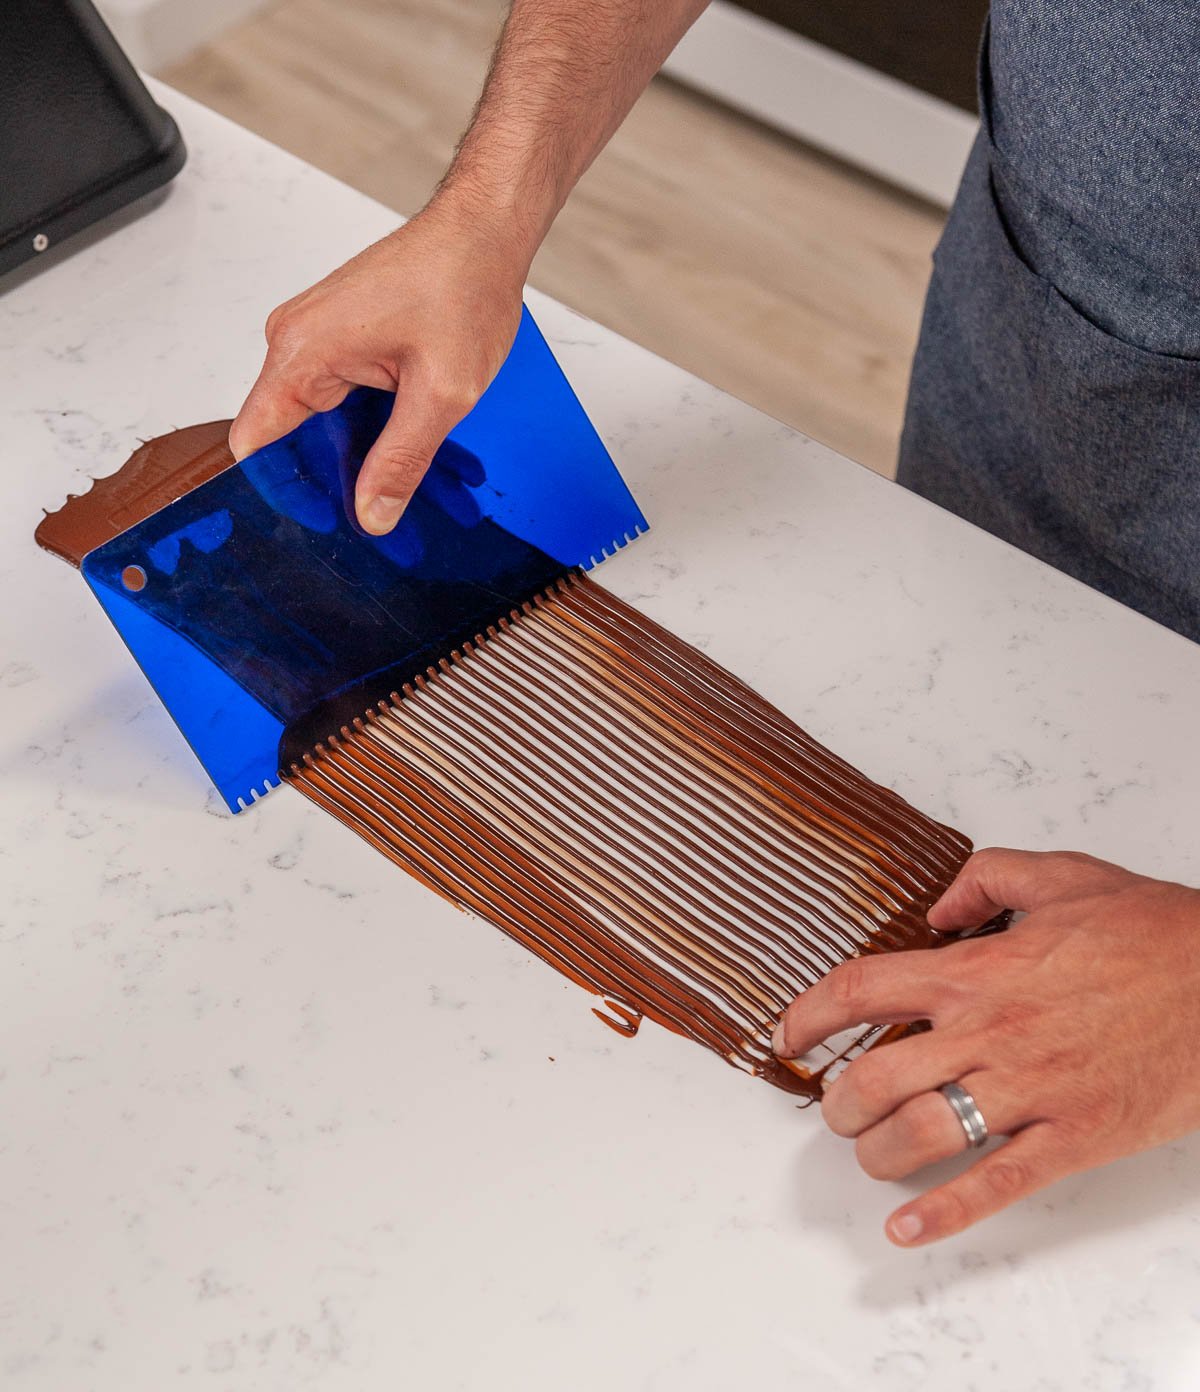
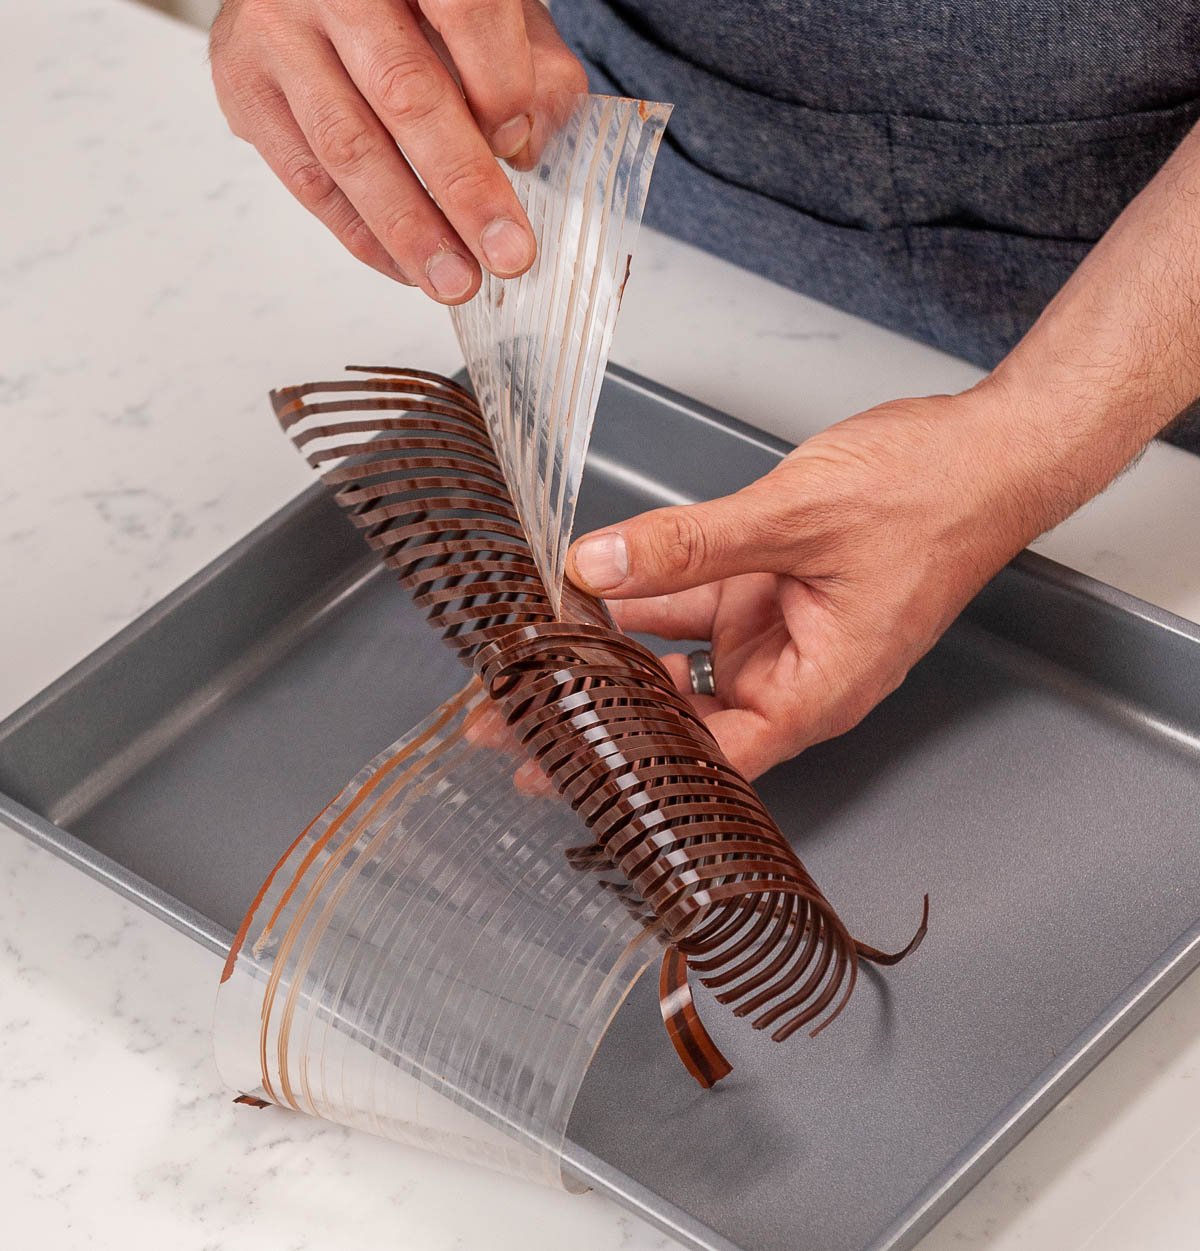
How To Make Chocolate Curls
- Prepare your tempered chocolate and keep it in the warmer at 89ºF (32ºC)
- Place your acetate (6"X18") on top of your work surface
- Spread your tempered chocolate over your acetate sheet very thin and as evenly as possible with your offset spatula.

- Use your cake comb to remove some of the chocolate from the acetate and make lines.

- Pick the acetate up carefully and move it over to detach it from the chocolate that went over the edges.

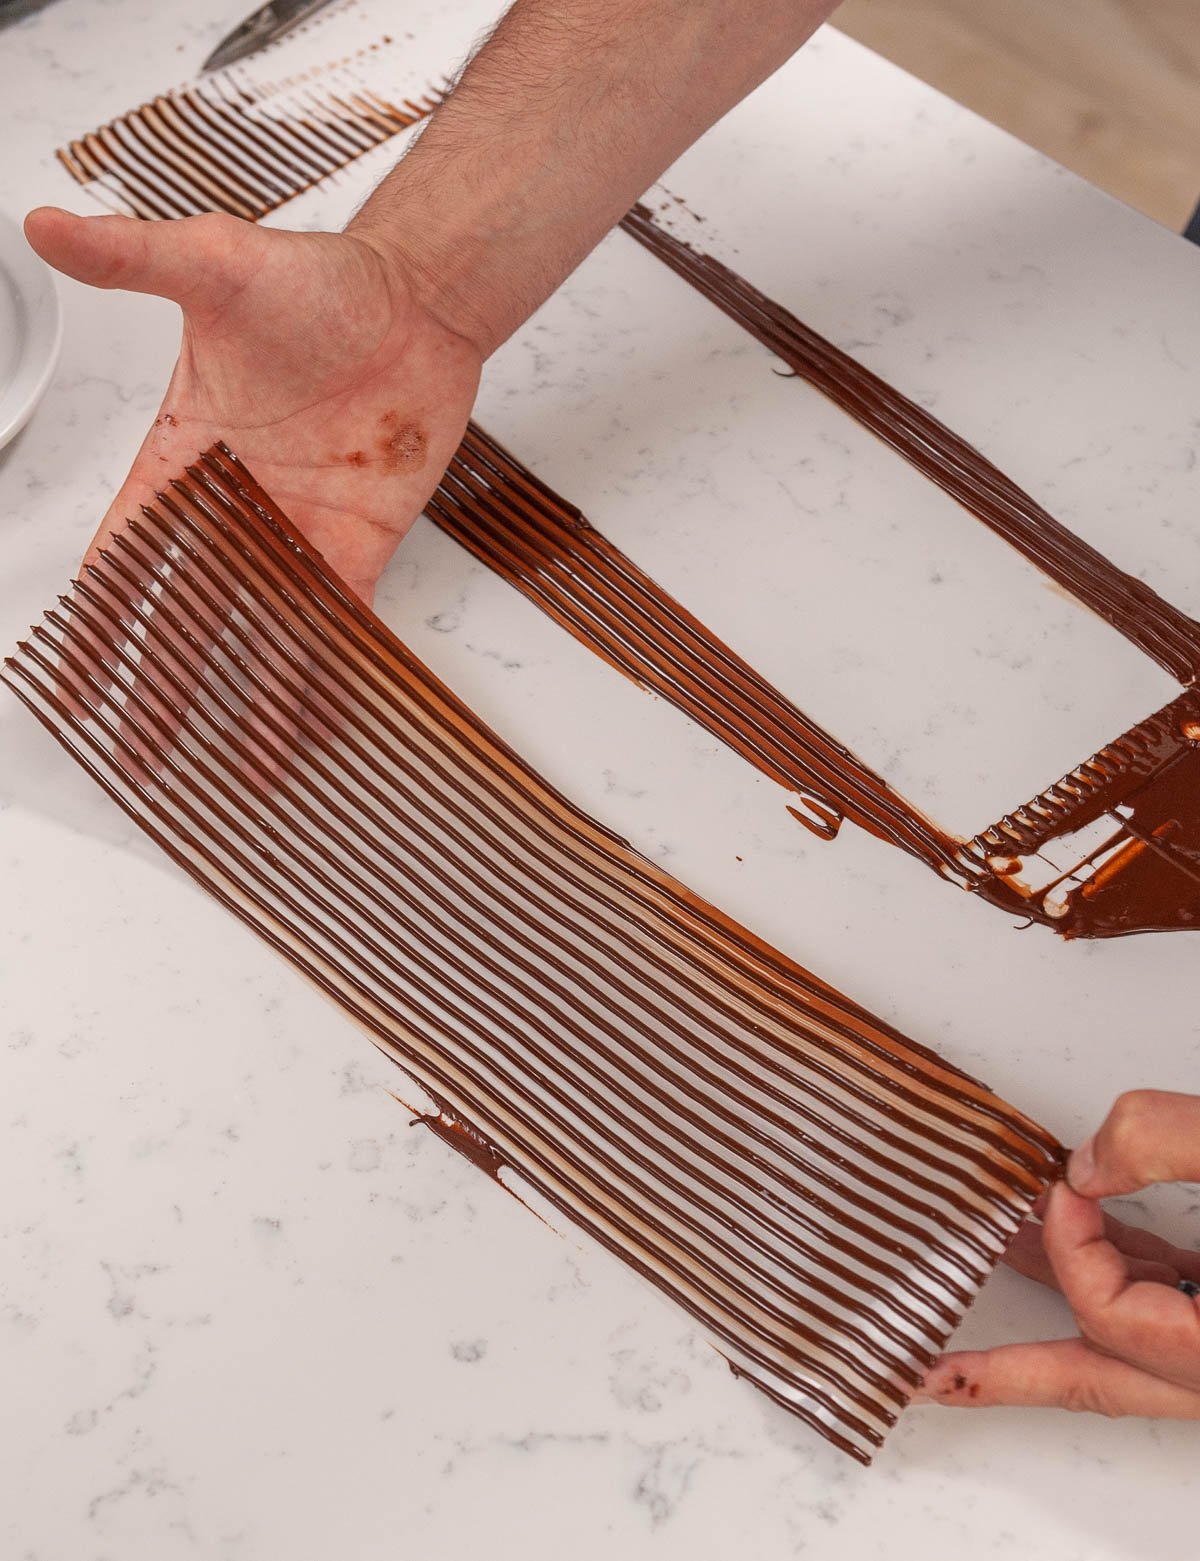
- Wait for the chocolate to lose it's shine and look matte but still soft
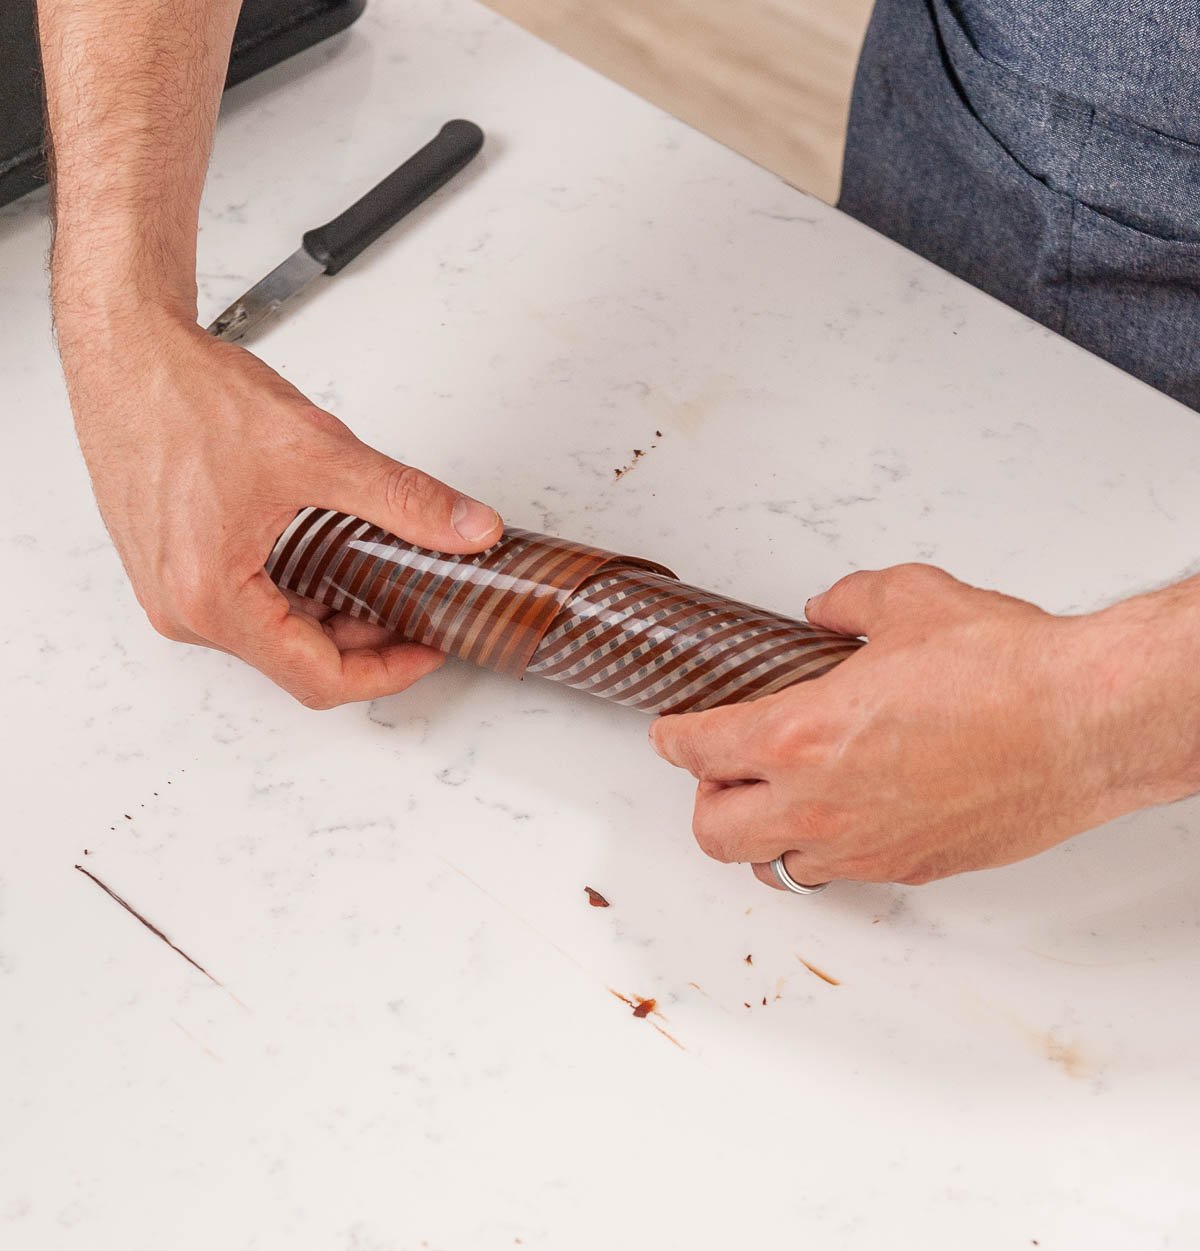
- Carefully twist the acetate over onto itself.
- Let it fully crystalize (5-10 minutes)
- Carefully peel off the acetate from the curls. Some will break and that is normal and to be expected.
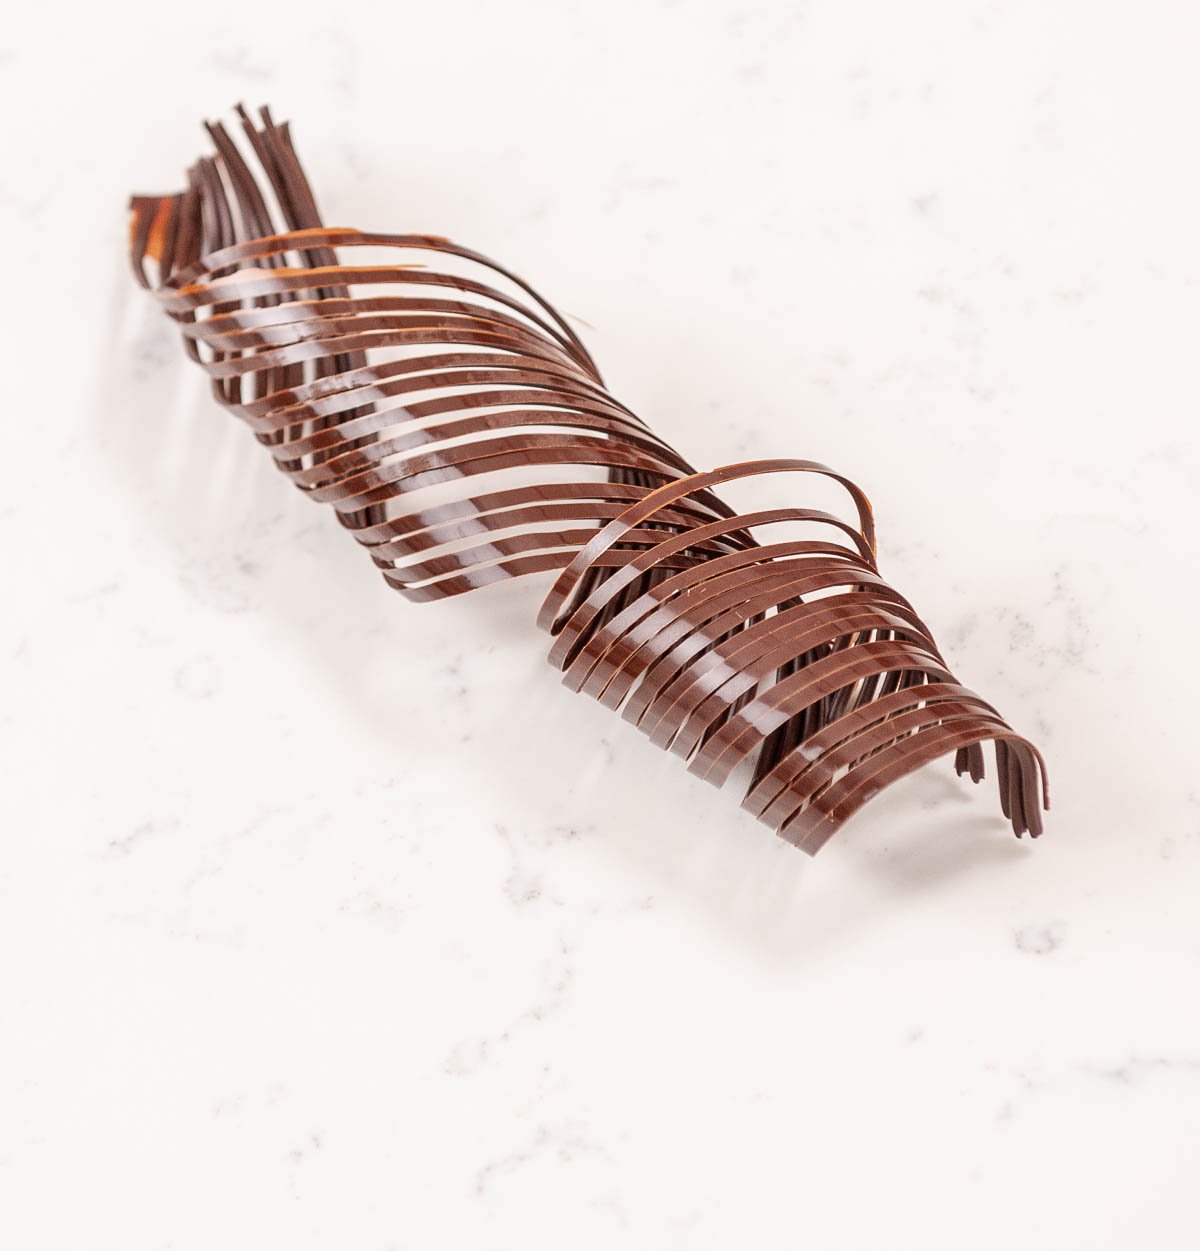
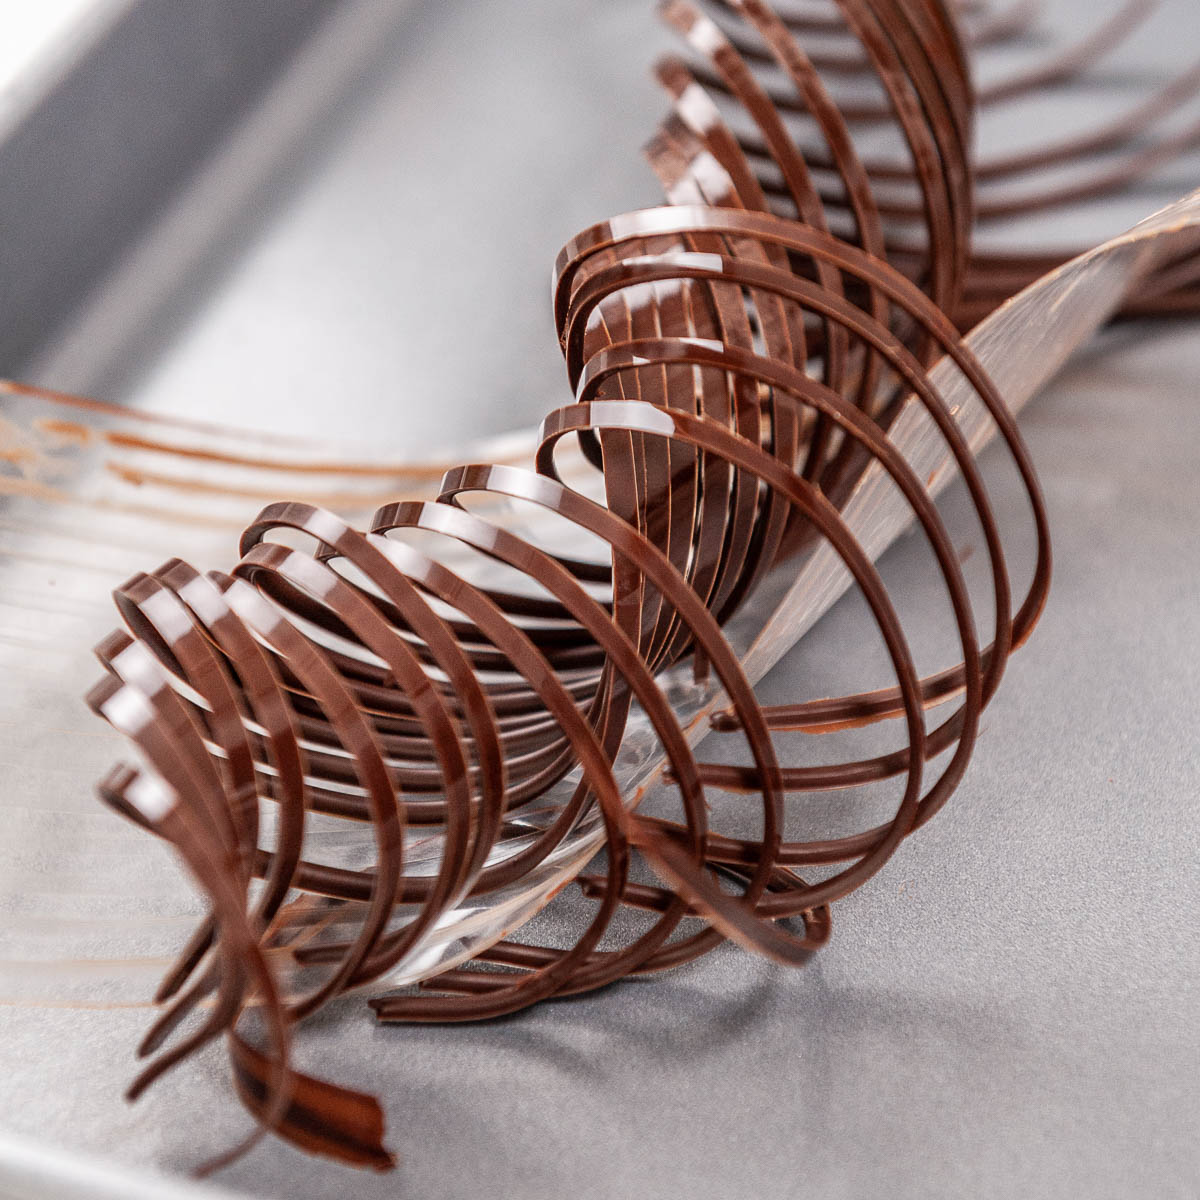
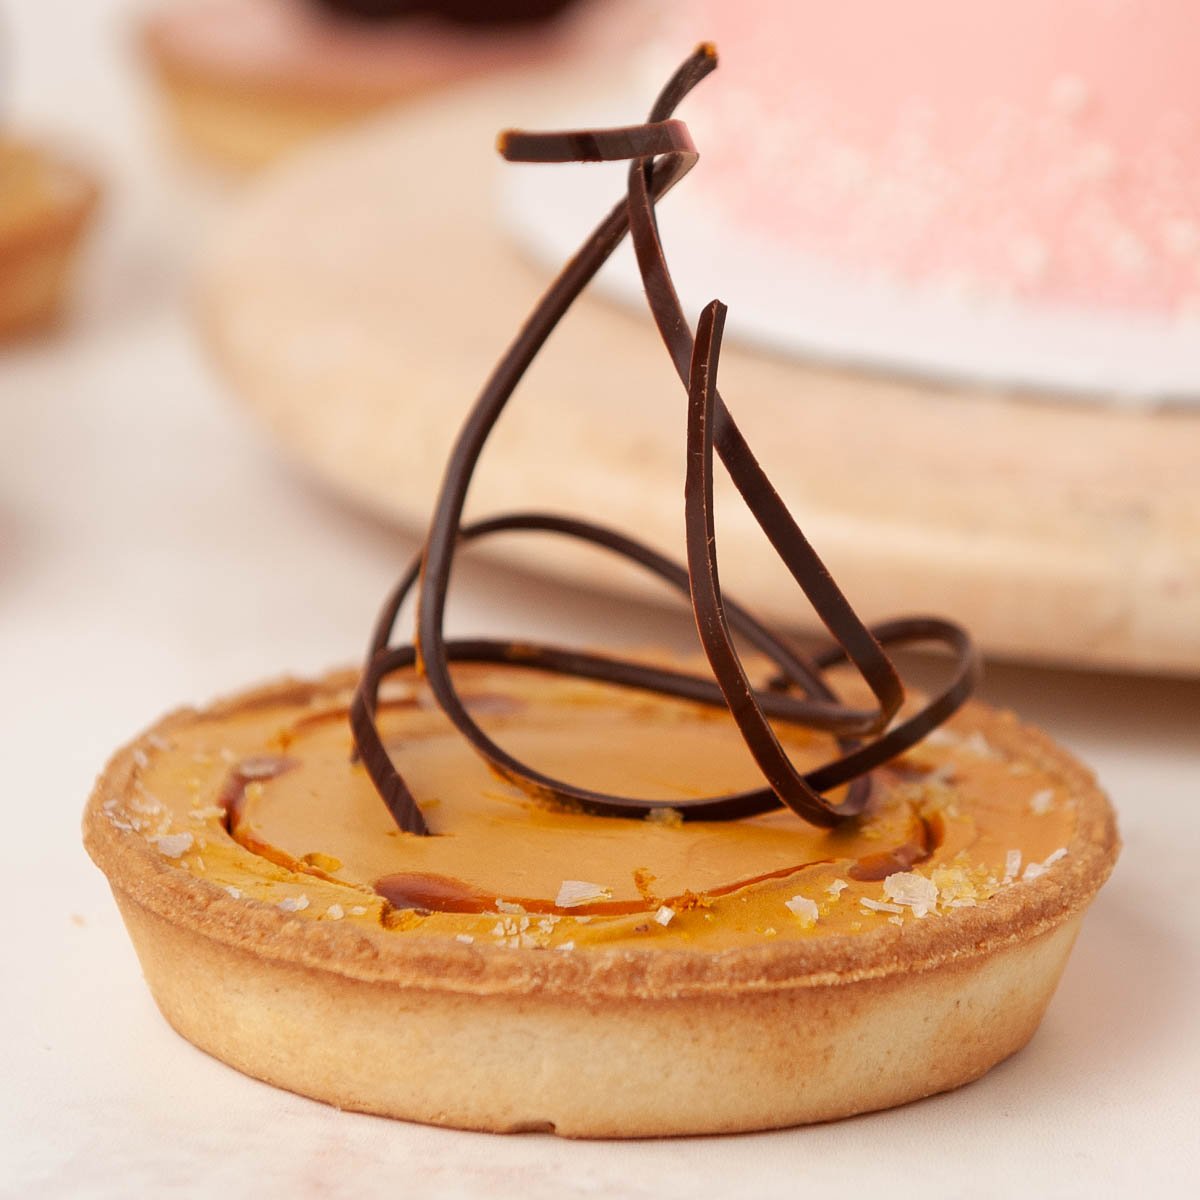
Now you can add the curls to the top of your tarts or cakes!
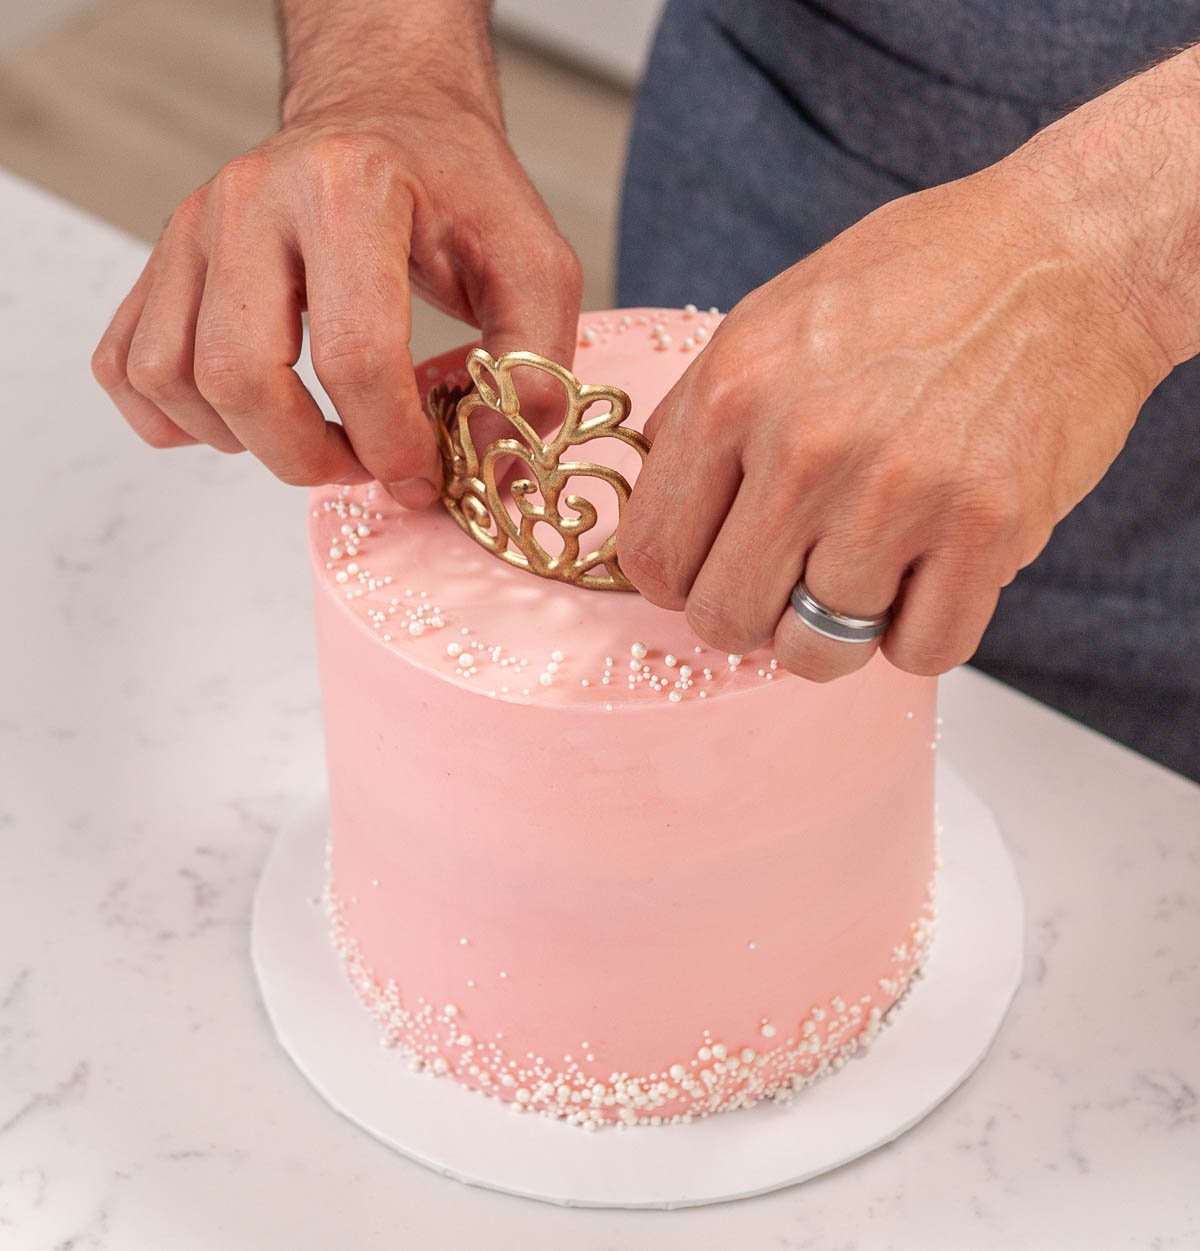
How To Make A Chocolate Tiara
- Prepare your tempered chocolate and keep it in the warmer at 89ºF (32ºC)
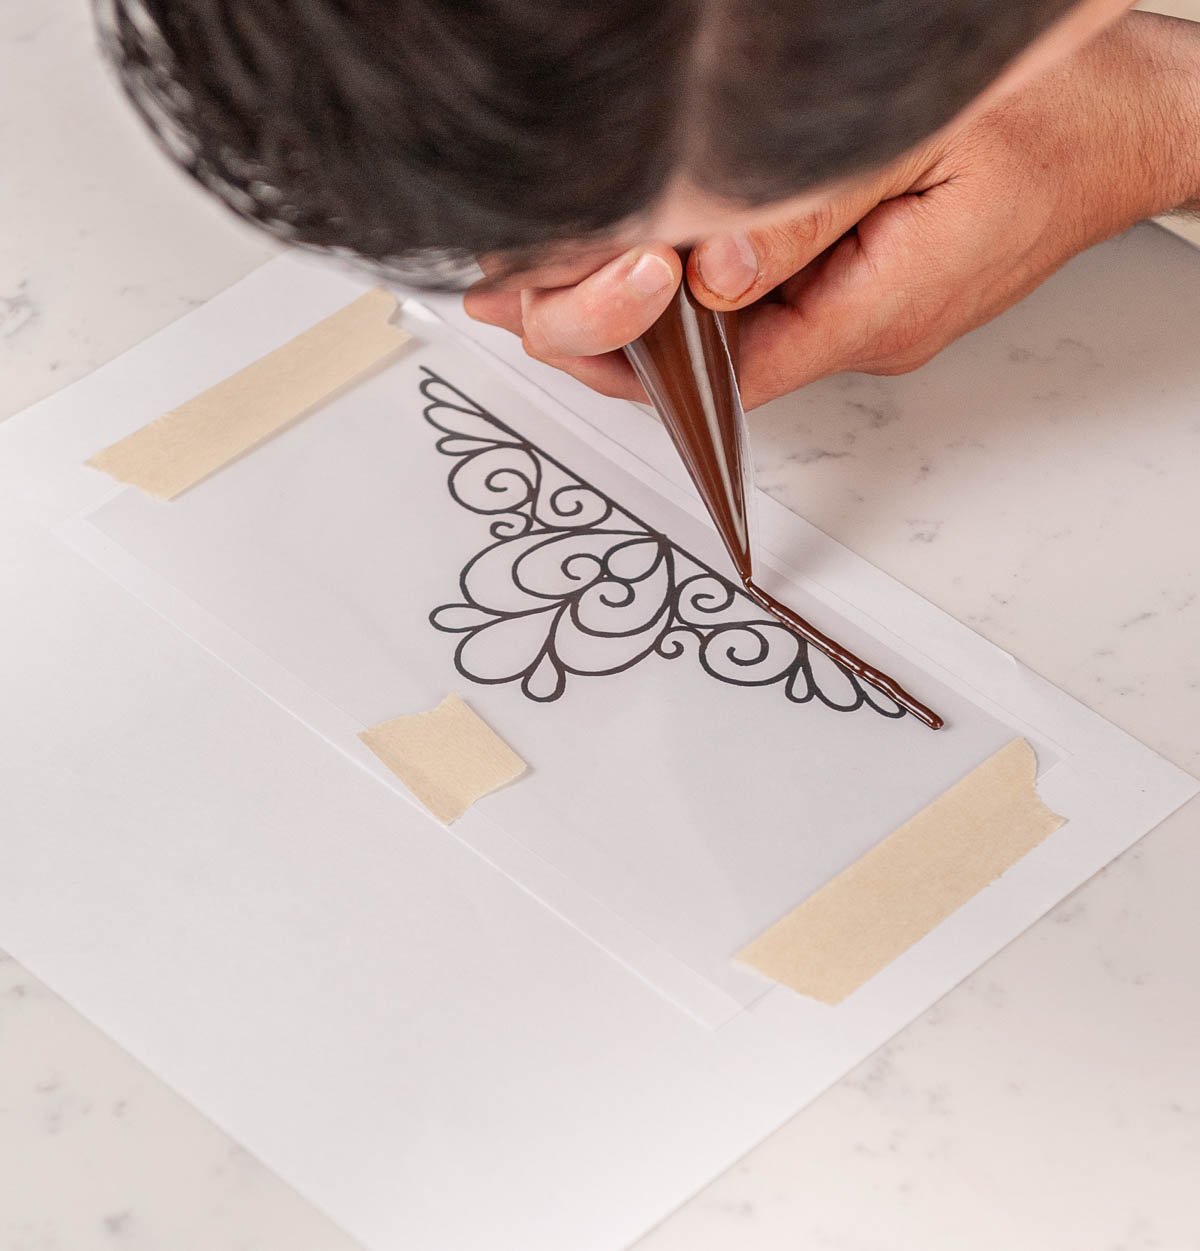
- Place your acetate over your tiara template and tape it down so that it doesn't shift.
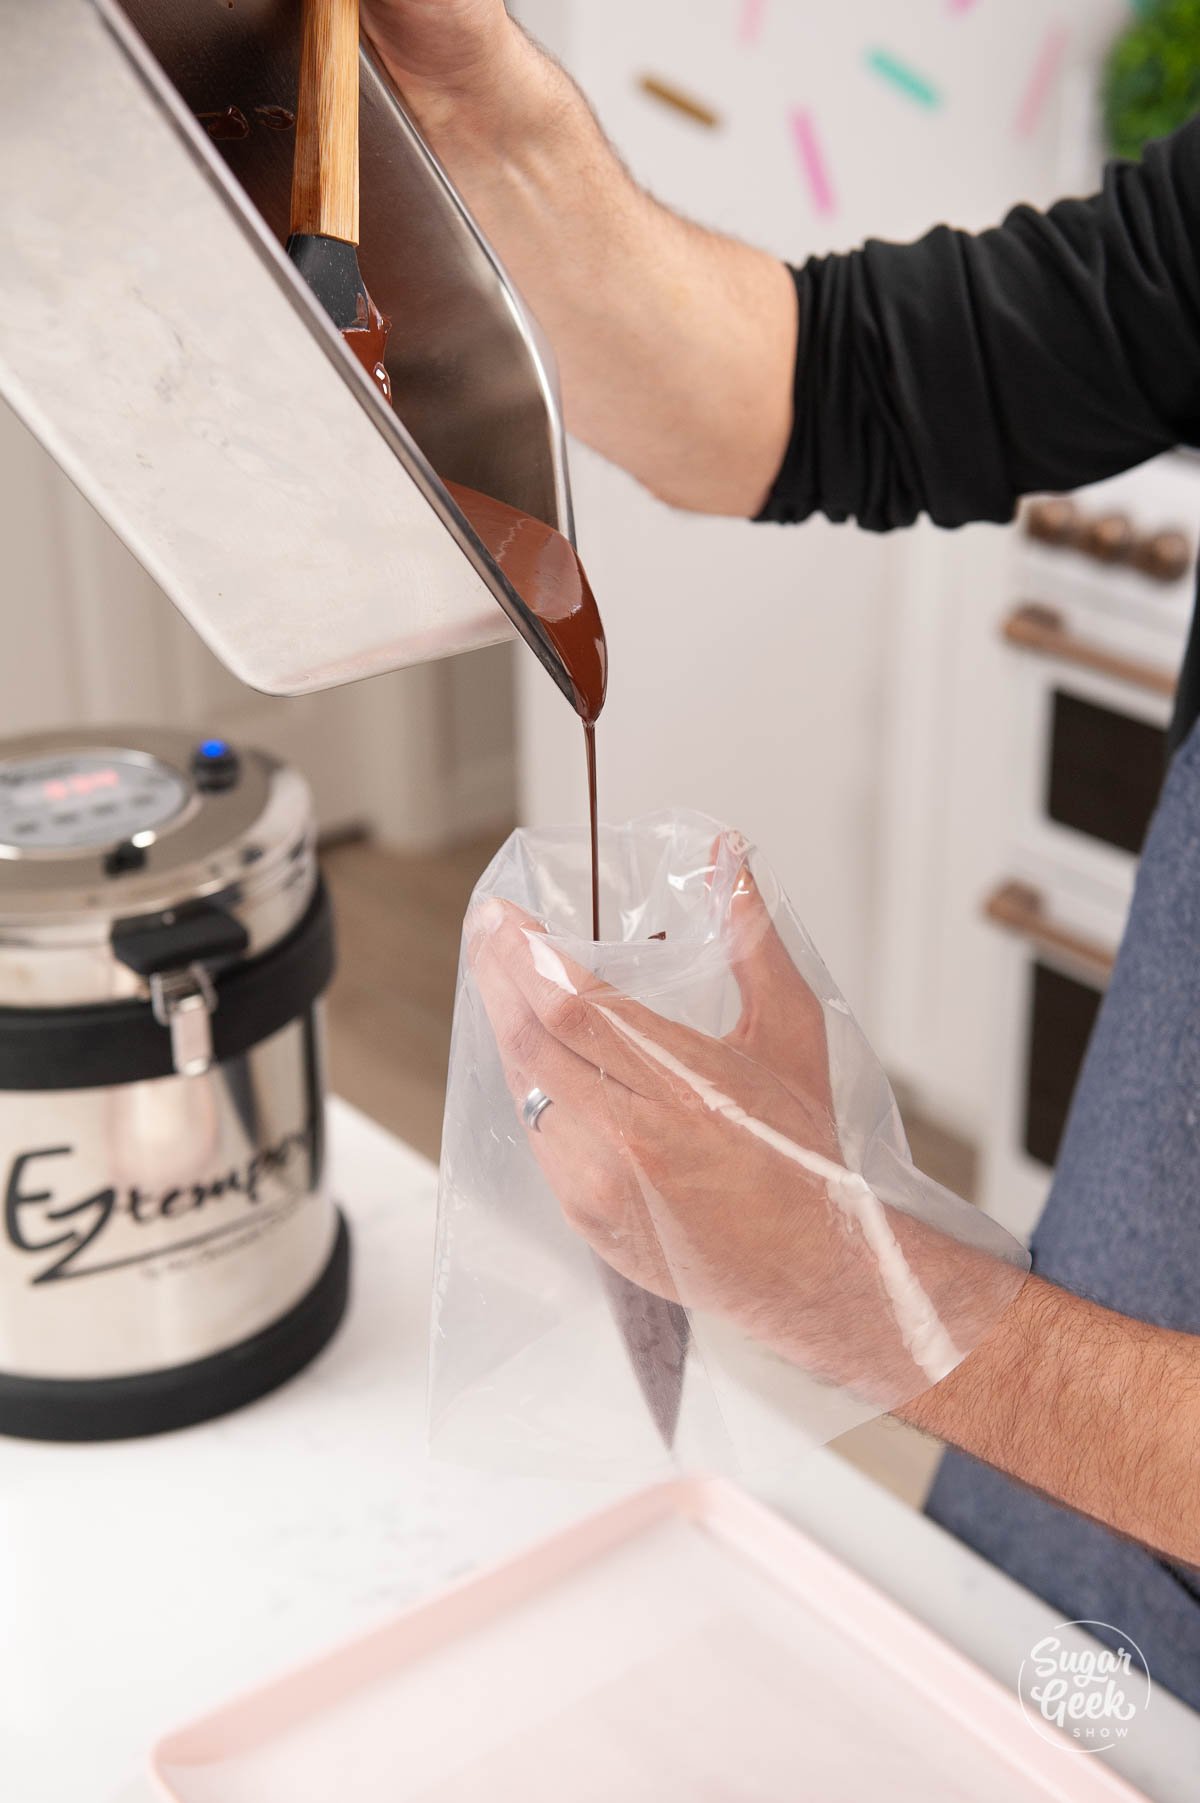
- Pour your tempered chocolate into your piping bag and snip off the tip, not too big!
- Pipe the chocolate onto the acetate, following the lines of the template.
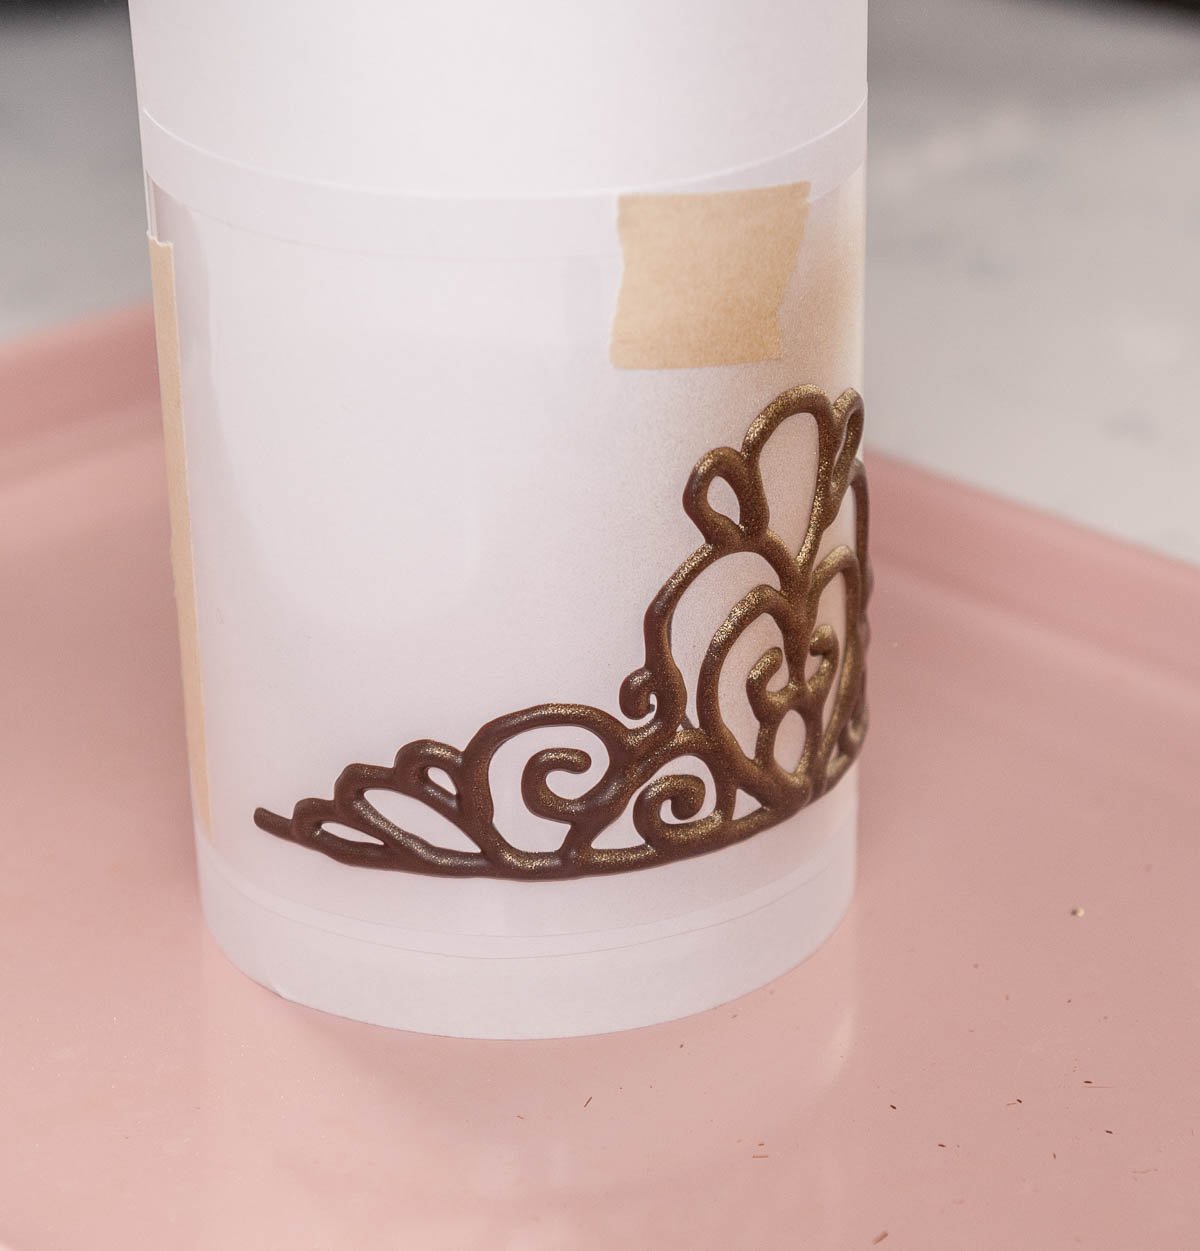
- After your chocolate loses it's shine but is still soft, you can tape the tiara to the styrofoam dummy to give it a curve.
- Allow the tiara to fully crystalize in the fridge for 5 minutes.
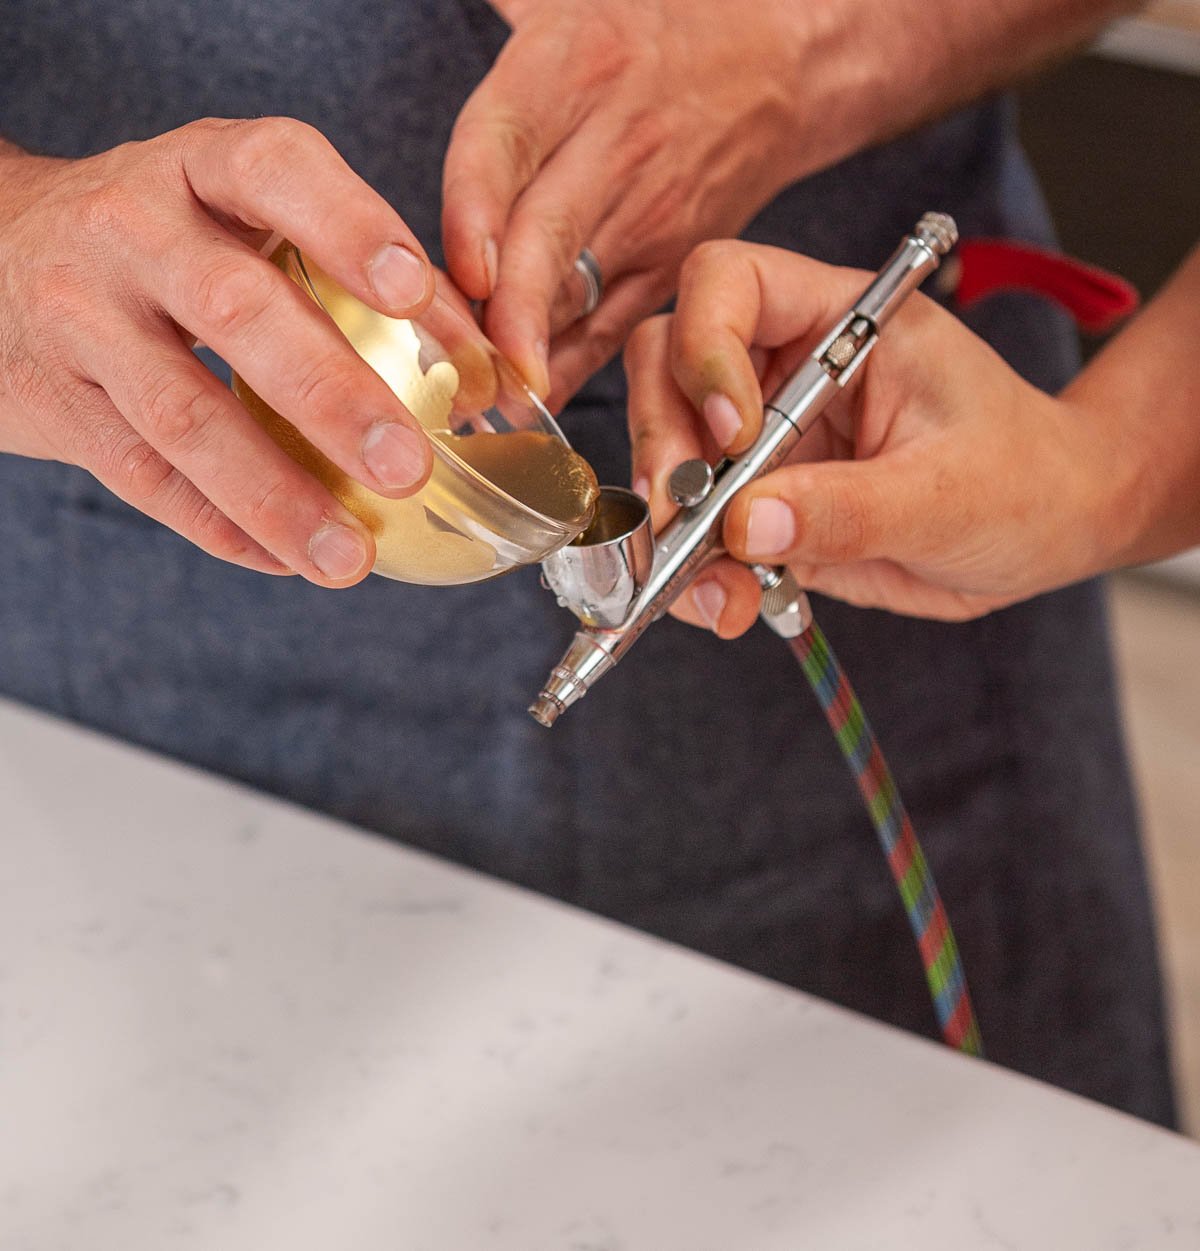
- Mix 1 Tablespoon Grand Marnier and 1 teaspoon super gold dust together. Grand Marnier makes the gold stick to the chocolate really well so that it doesn't rub off! So cool!

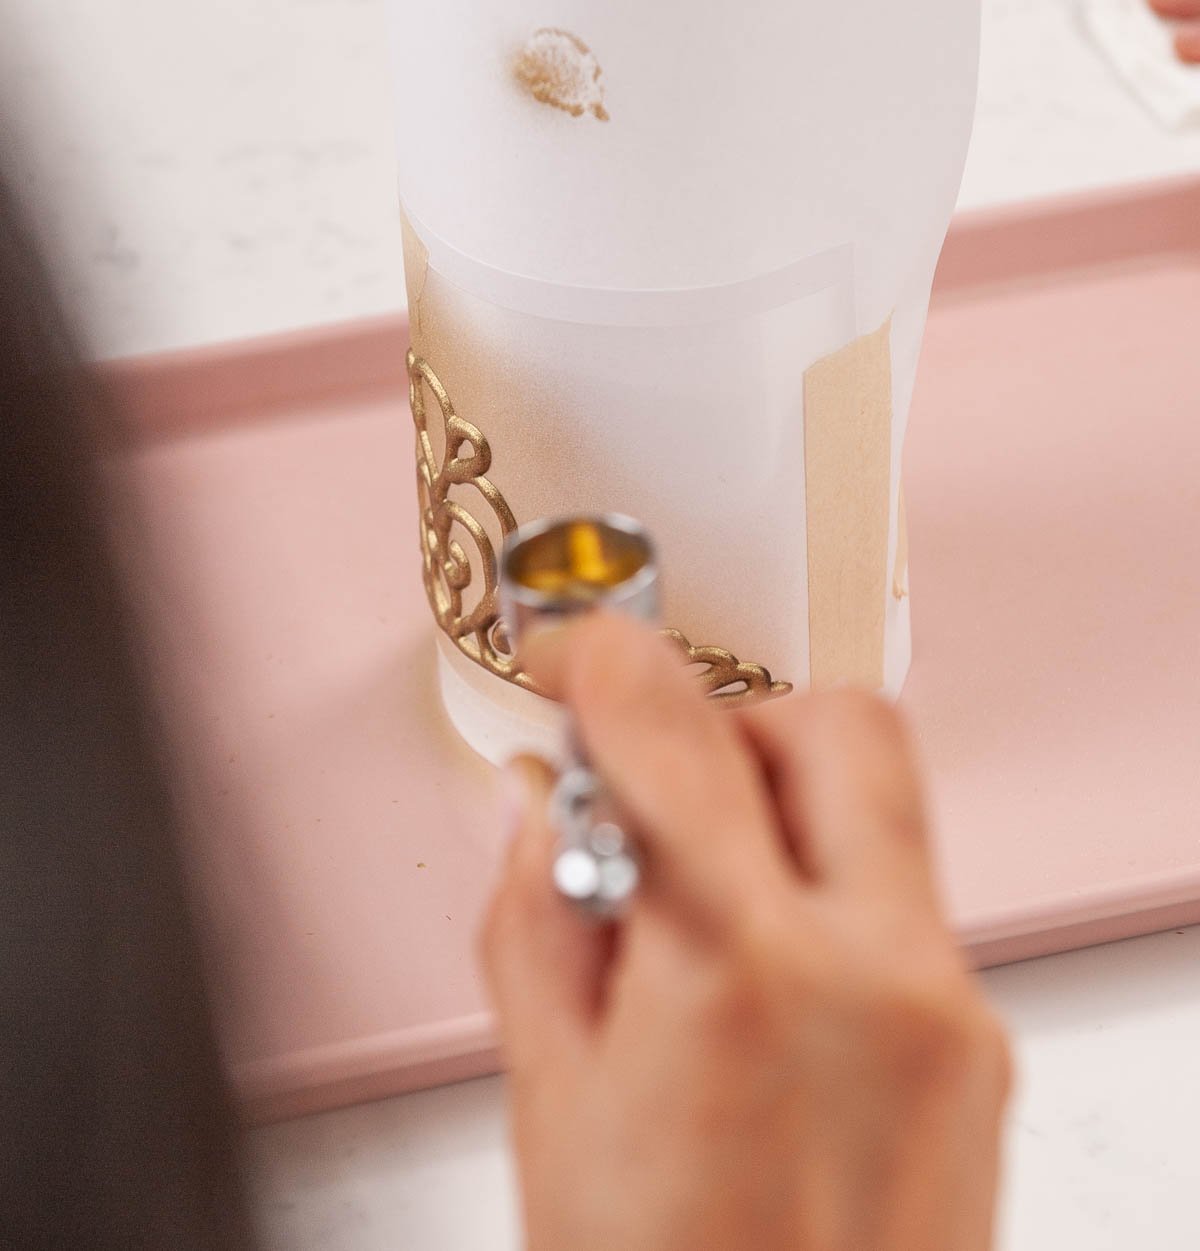
- Add the gold mixture to your airbrush and spray your chocolate tiara.

- Very carefully remove the styro from the paper by lifting the paper, not lifting the chocolate.
- Bend the acetate off the back of the tiara carefully to release it from the acetate.
- Now you can place the tiara on top of the cake!


There are so many fun ways to make tempered chocolate decorations and we're barely scratching the surface. we've got more fun chocolate projects coming to you from Chef Christophe so let us know in the comments what you want to learn!
More Chocolate Recipes & Tutorials
How to temper chocolate with the EZ Temper machine
How to temper chocolate the easy way
How to make hot chocolate bombs
Chocolate covered strawberries
Recipe

Equipment
- EZ Tempering Machine
- Waring Chocolate Warmer
- Thermometer
- Acetate strips and sheets
- Spatula
- Piping Bags
Ingredients
- 600 grams Chocolate https://www.cacao-barry.com/en-US/chocolate-couverture-cocoa/chd-p64ebpu/extra-bitter-guayaquil
- 6 grams Cocoa Butter https://ifigourmet.com/collections/chocolate-products/products/cocoa-butter-1
Instructions
How To Temper Chocolate
- Place your cocoa butter into the internal warmer of the EZ Tempering Machine the day before you need it. Let it warm overnight. If you don't have an EZ Tempering Machine, temper your chocolate using the traditional seeding method.
- Melt 600 grams of bittersweet chocolate in the microwave or over a double boiler to 113ºF (45ºC) It's important to melt the chocolate to this temperature so that all the crystals in the cocoa butter are broken down properly and new crystals can re-form successfully.
- Add in a few handfuls of tempered (chocolate comes tempered) chocolate to bring the temperature down. Stirring occasionally, cool your chocolate to 95ºF (35ºC).
- At 89ºF (32ºC) add in 6-7 grams (1-2% of total chocolate weight) of your tempered cocoa butter paste from the EZ temper machine to the melted chocolate.
- Stir and cool the mixture to 32ºF. At this point, the chocolate is tempered but make sure you do a test to make sure your chocolate is in temper before using it.
- Carefully warm your chocolate to the ideal working temperature (usually found on the side of the bag if your chocolate is from Cacoa Barry) before using.
How To Make Chocolate Decorations
- After you've tempered your chocolate, you can do almost anything with it! Make sure to keep it at the correct working temperatures for the type of chocolate you are using. Dark chocolate: 89ºF (32ºC)White and milk chocolate: 82ºF and 86ºF (29ºC and 30ºC)
- Watch the video tutorial or read the blog post above for steps on how to make chocolate circles, squares, curls, and a tiara.


Leave a Reply