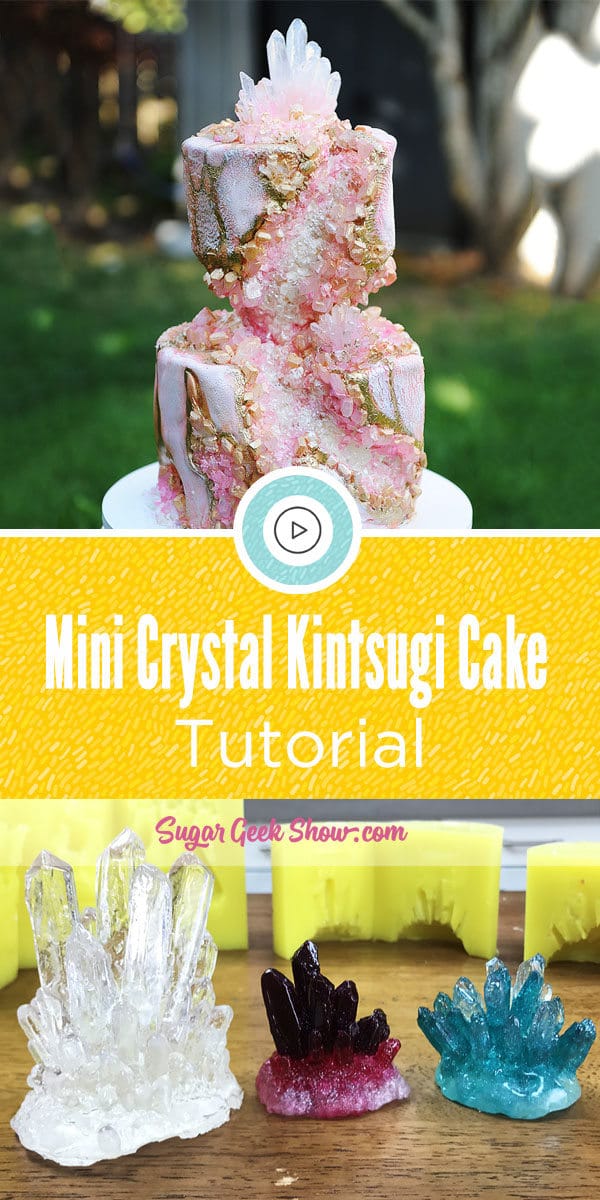
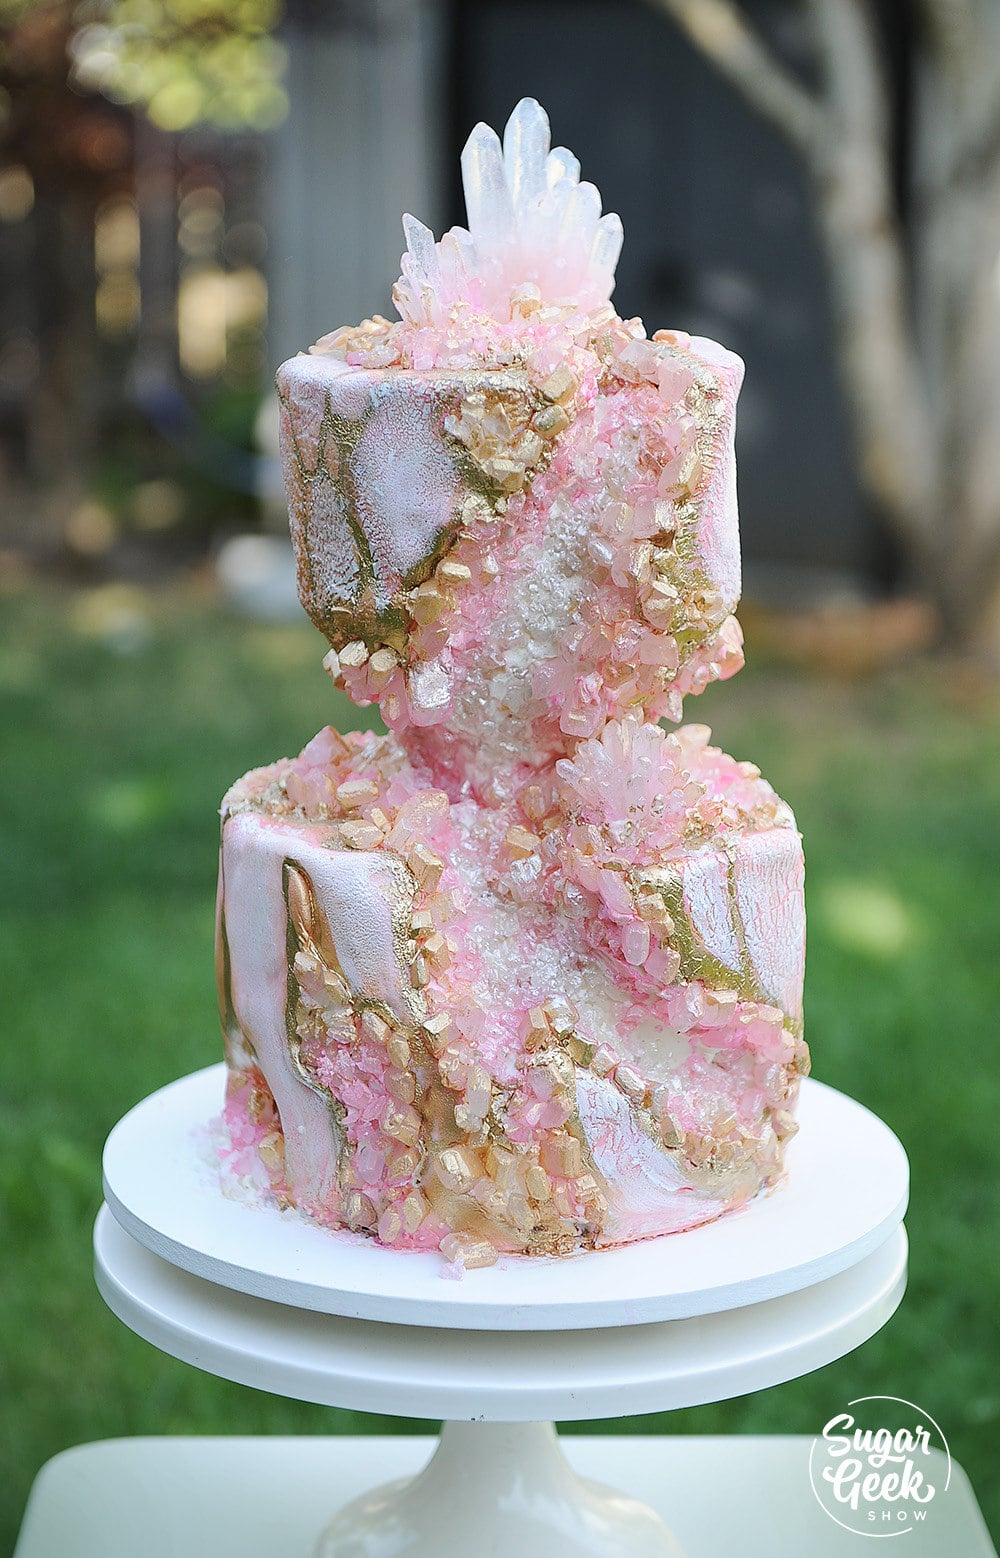
The Crystal Kintsugi Cake Is A Must-See Cake Trend
In case you haven't noticed, the geode trend is just hotter than ever. Just when we thought we had seen it all, more versions of these crystalline cakes keep popping up. Want to learn to make one yourself? Of course you do! I've created an adorable mini crystal kintsugi cake that doesn't require a degree in engineering and is OH so fun to make!
Enter in the crystal kintsugi cake.
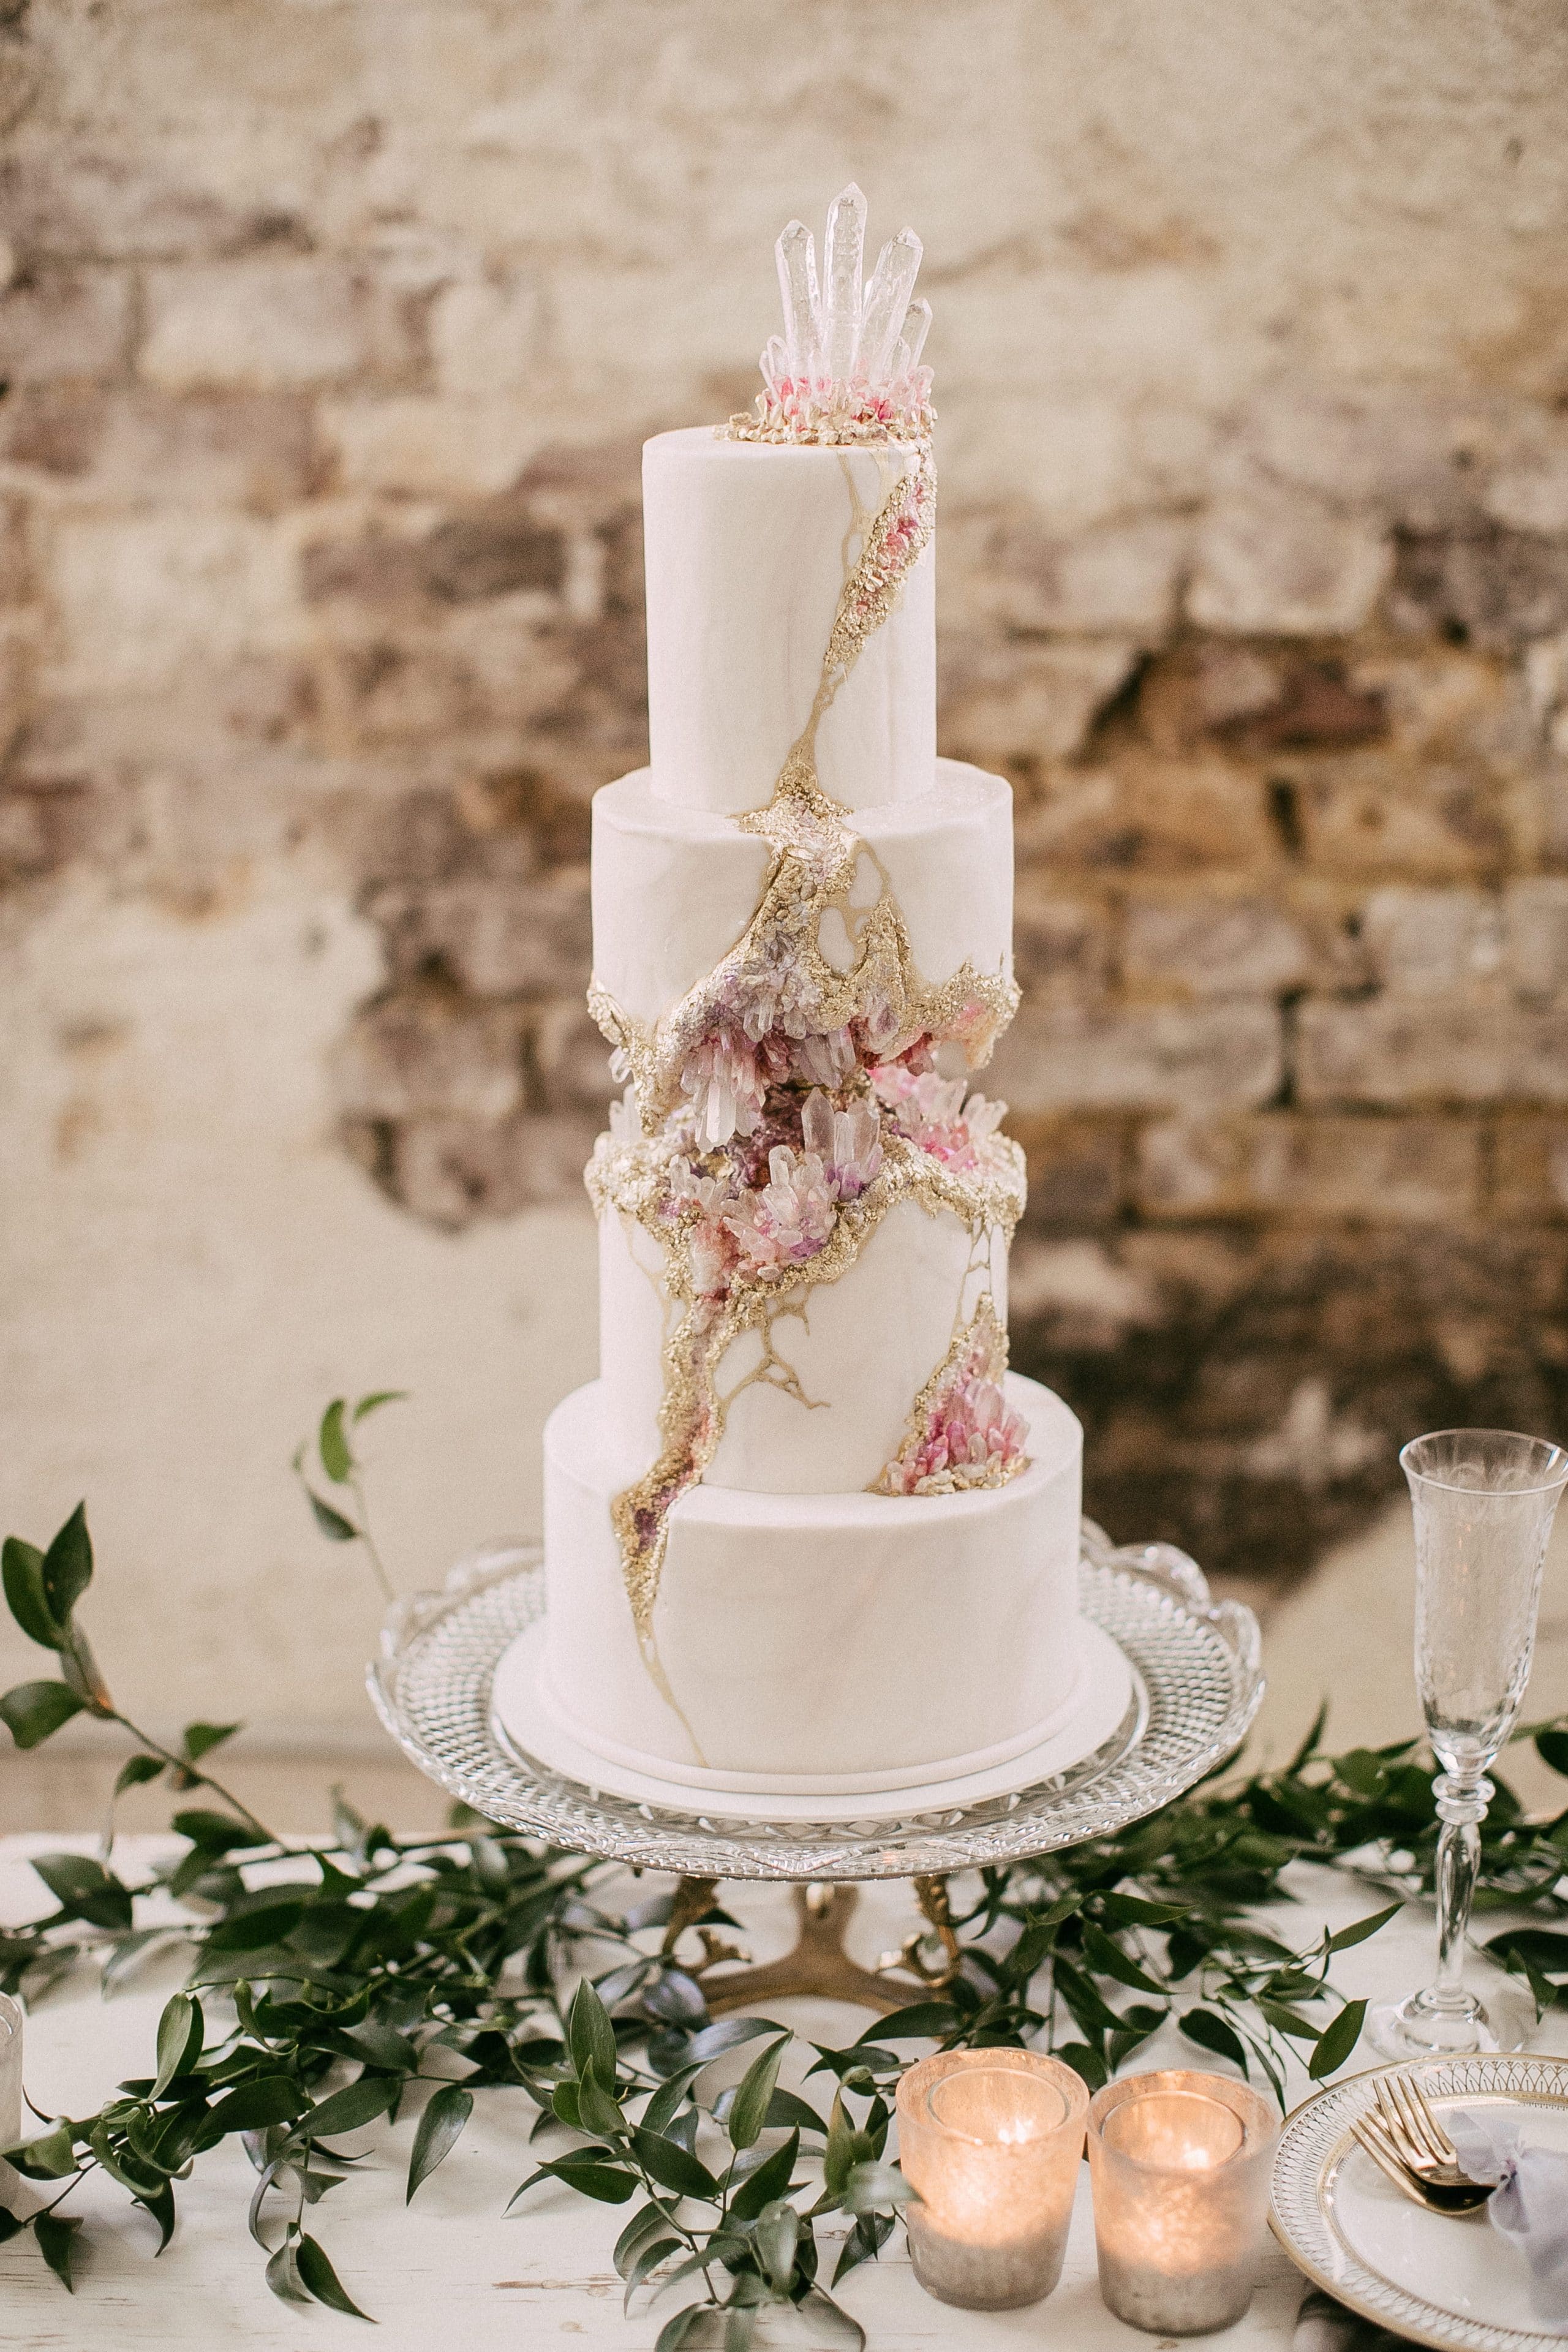
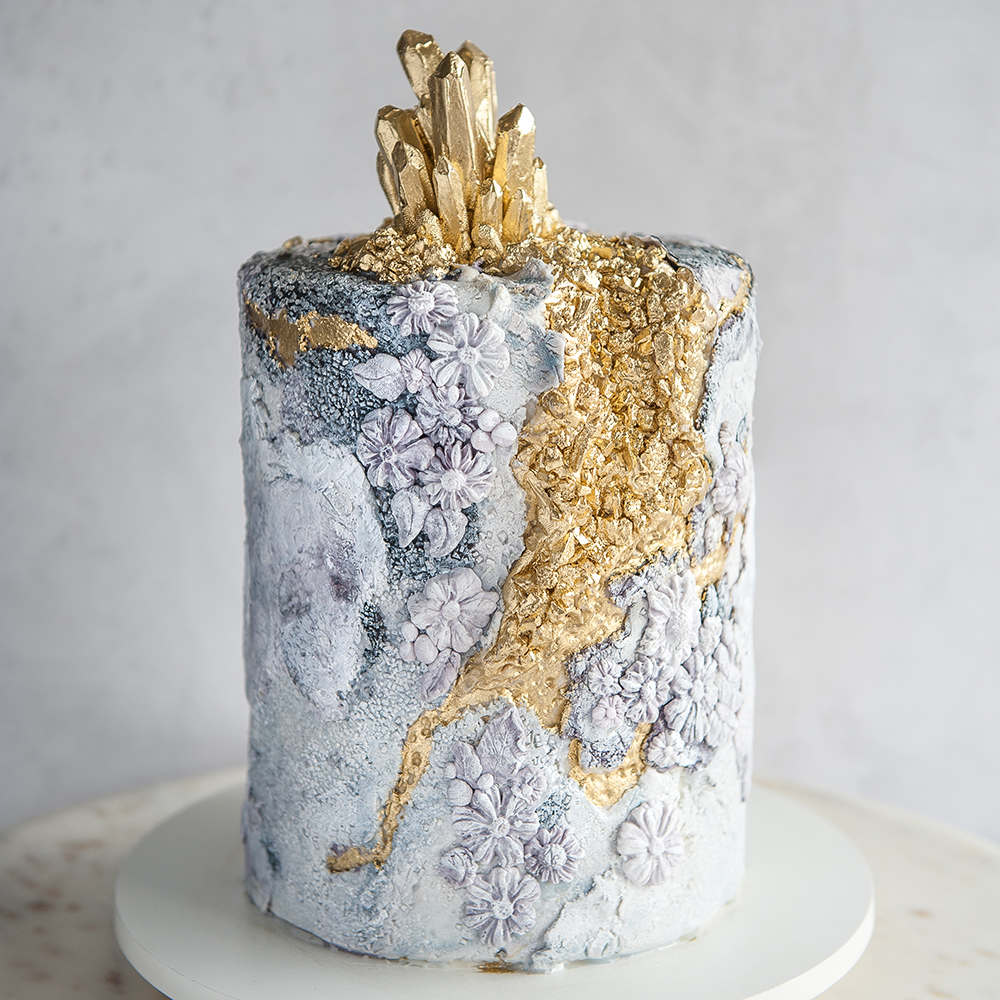
I originally created the crystal kintsugi cake for a crystal inspired wedding shoot. I am always so lucky when I work with the amazing vendors here in Portland. They trust me to just go with the theme and create something that hasn't been done before. I SO appreciate that freedom! No one likes to copy another cakers design.
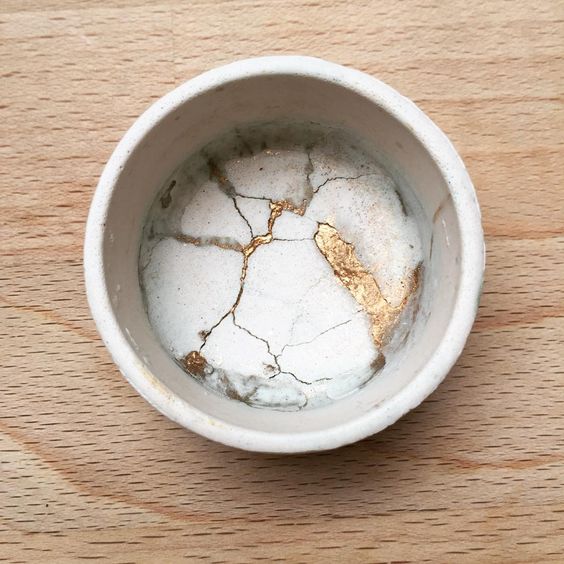
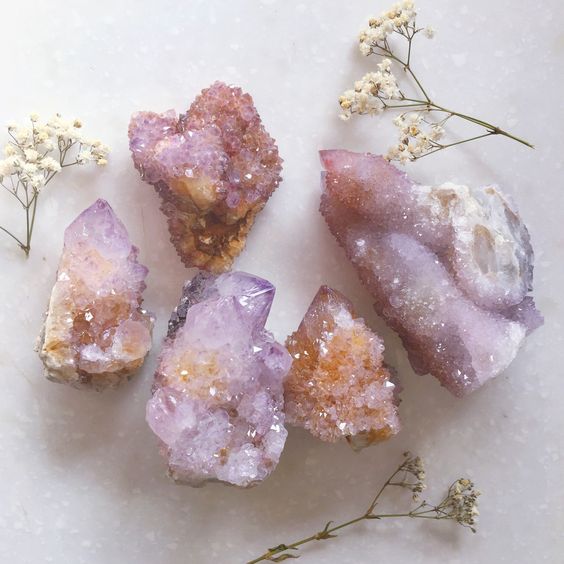
After I saw the inspiration board for the shoot, I was immediately inspired by two photos. This broken ceramic bowl that had been repaired with gold and this beautiful crystal called a "spirit crystal". I fell in love with the colors and immediately started imagining how to re-create them in sugar!
Designing The Crystal Kintsugi Cake
Sometimes you spend a lot of time sketching out a cake design and fretting over details and colors and other times... you draw it out in 5 minutes on a scrap of paper and call it good. This was my sketch for the kintsugi cake. NOT that detailed but it got my idea across to the rest of the team!
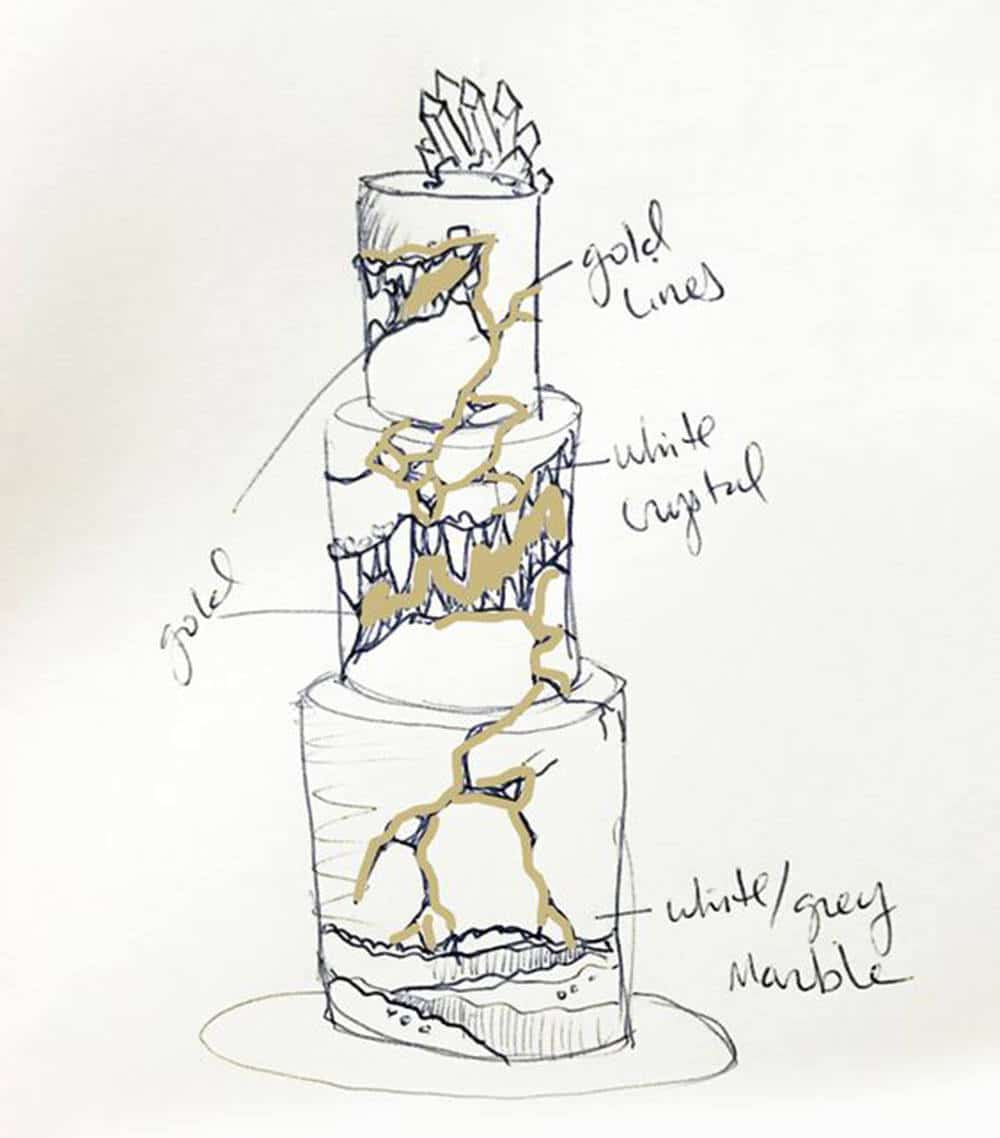
My idea was simple. Apply the principles of Kintsugi pottery to a cake.
Kintsugi is the Japanese practice of fusing together broken pottery with a mixture of resin and gold or silver powder. This pottery is considered to be more beautiful for having been broken. If that isn't inspiration for a cake, I don't know what is.
Making Sugar Crystals
The hard thing about creating a new cake trend is always figuring out how to do something for the first time. I knew I wanted some beautiful sugar crystal clusters to adorn this cake but no crystal molds existed at this time! I thought ok, I'll just mold a crystal cluster. I spent so much time googling crystals to buy but nothing was quite the right shape.
So I made one. I actually sculpted the crystal cluster with oven baked clay and added in some small real crystals to the base to create the shapes I wanted. I then molded them and made an acrylic master to send to my good friends at Simi Cakes and Confections to make crystal molds for me so I could make them out of isomalt!!
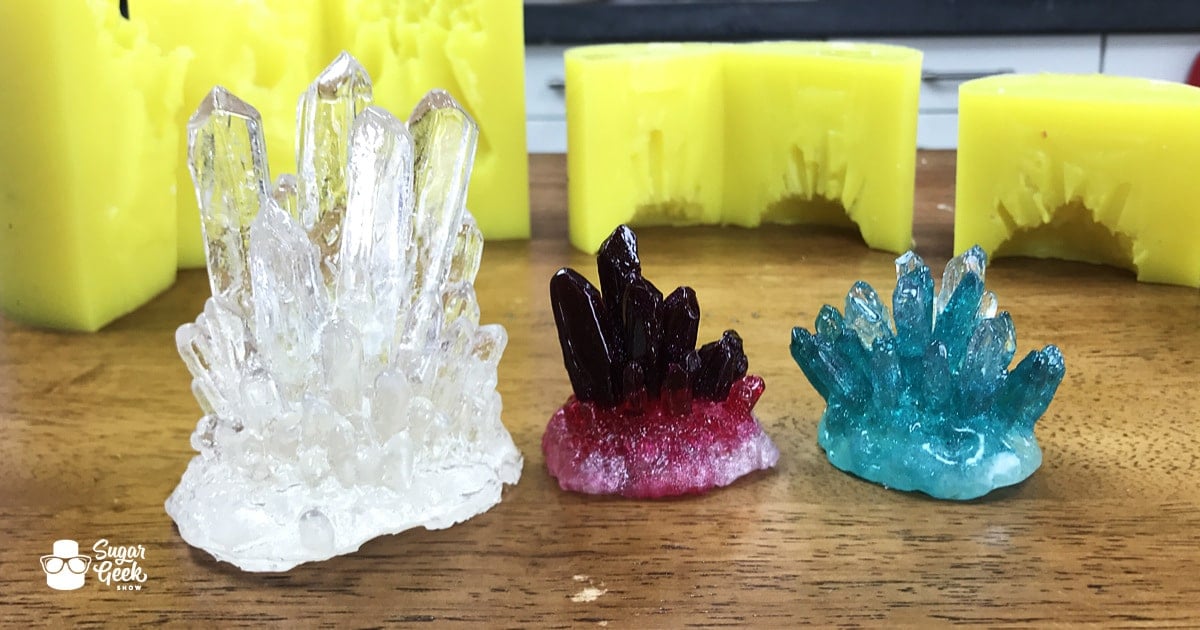
Figuring out how to make a mold that would not break the delicate crystals was quite the feat! Sometimes you might see a two part mold but for the large crystal, they had to make a three part mold! EPIC! Pouring the crystal molds was a ton of fun and the secret to keeping the edges sharp is a hot knife and a blow torch.
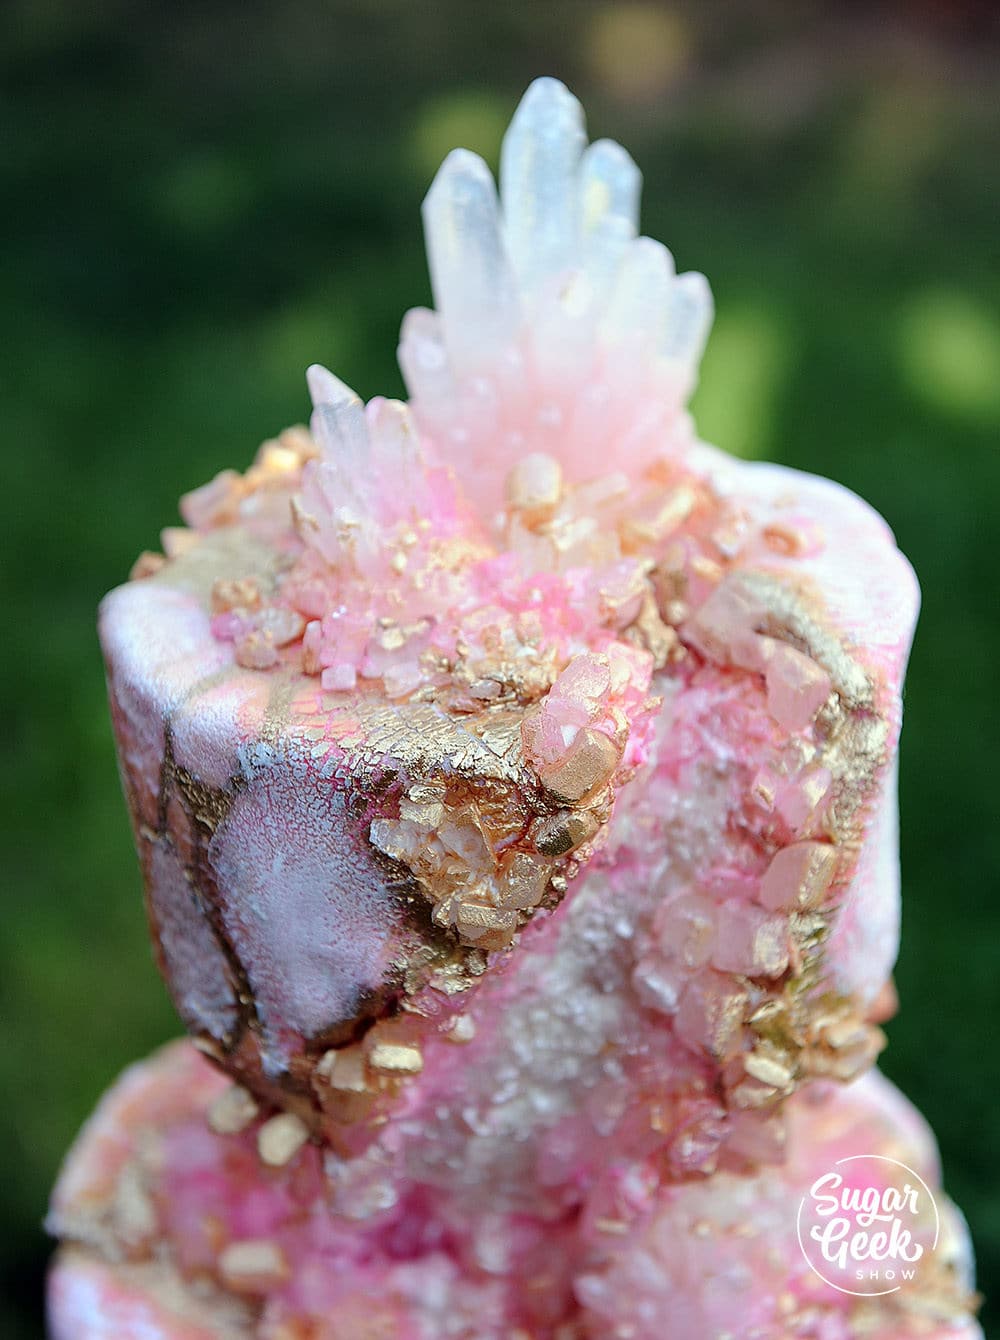
I use the large mold for the top of the kintsugi cake and the smaller molds to create clusters around the edges. A combination of rock candy and broken crystals filled in the gaps.
I could not have been happier with the final cake! I think it's my most favorite wedding cake so far!
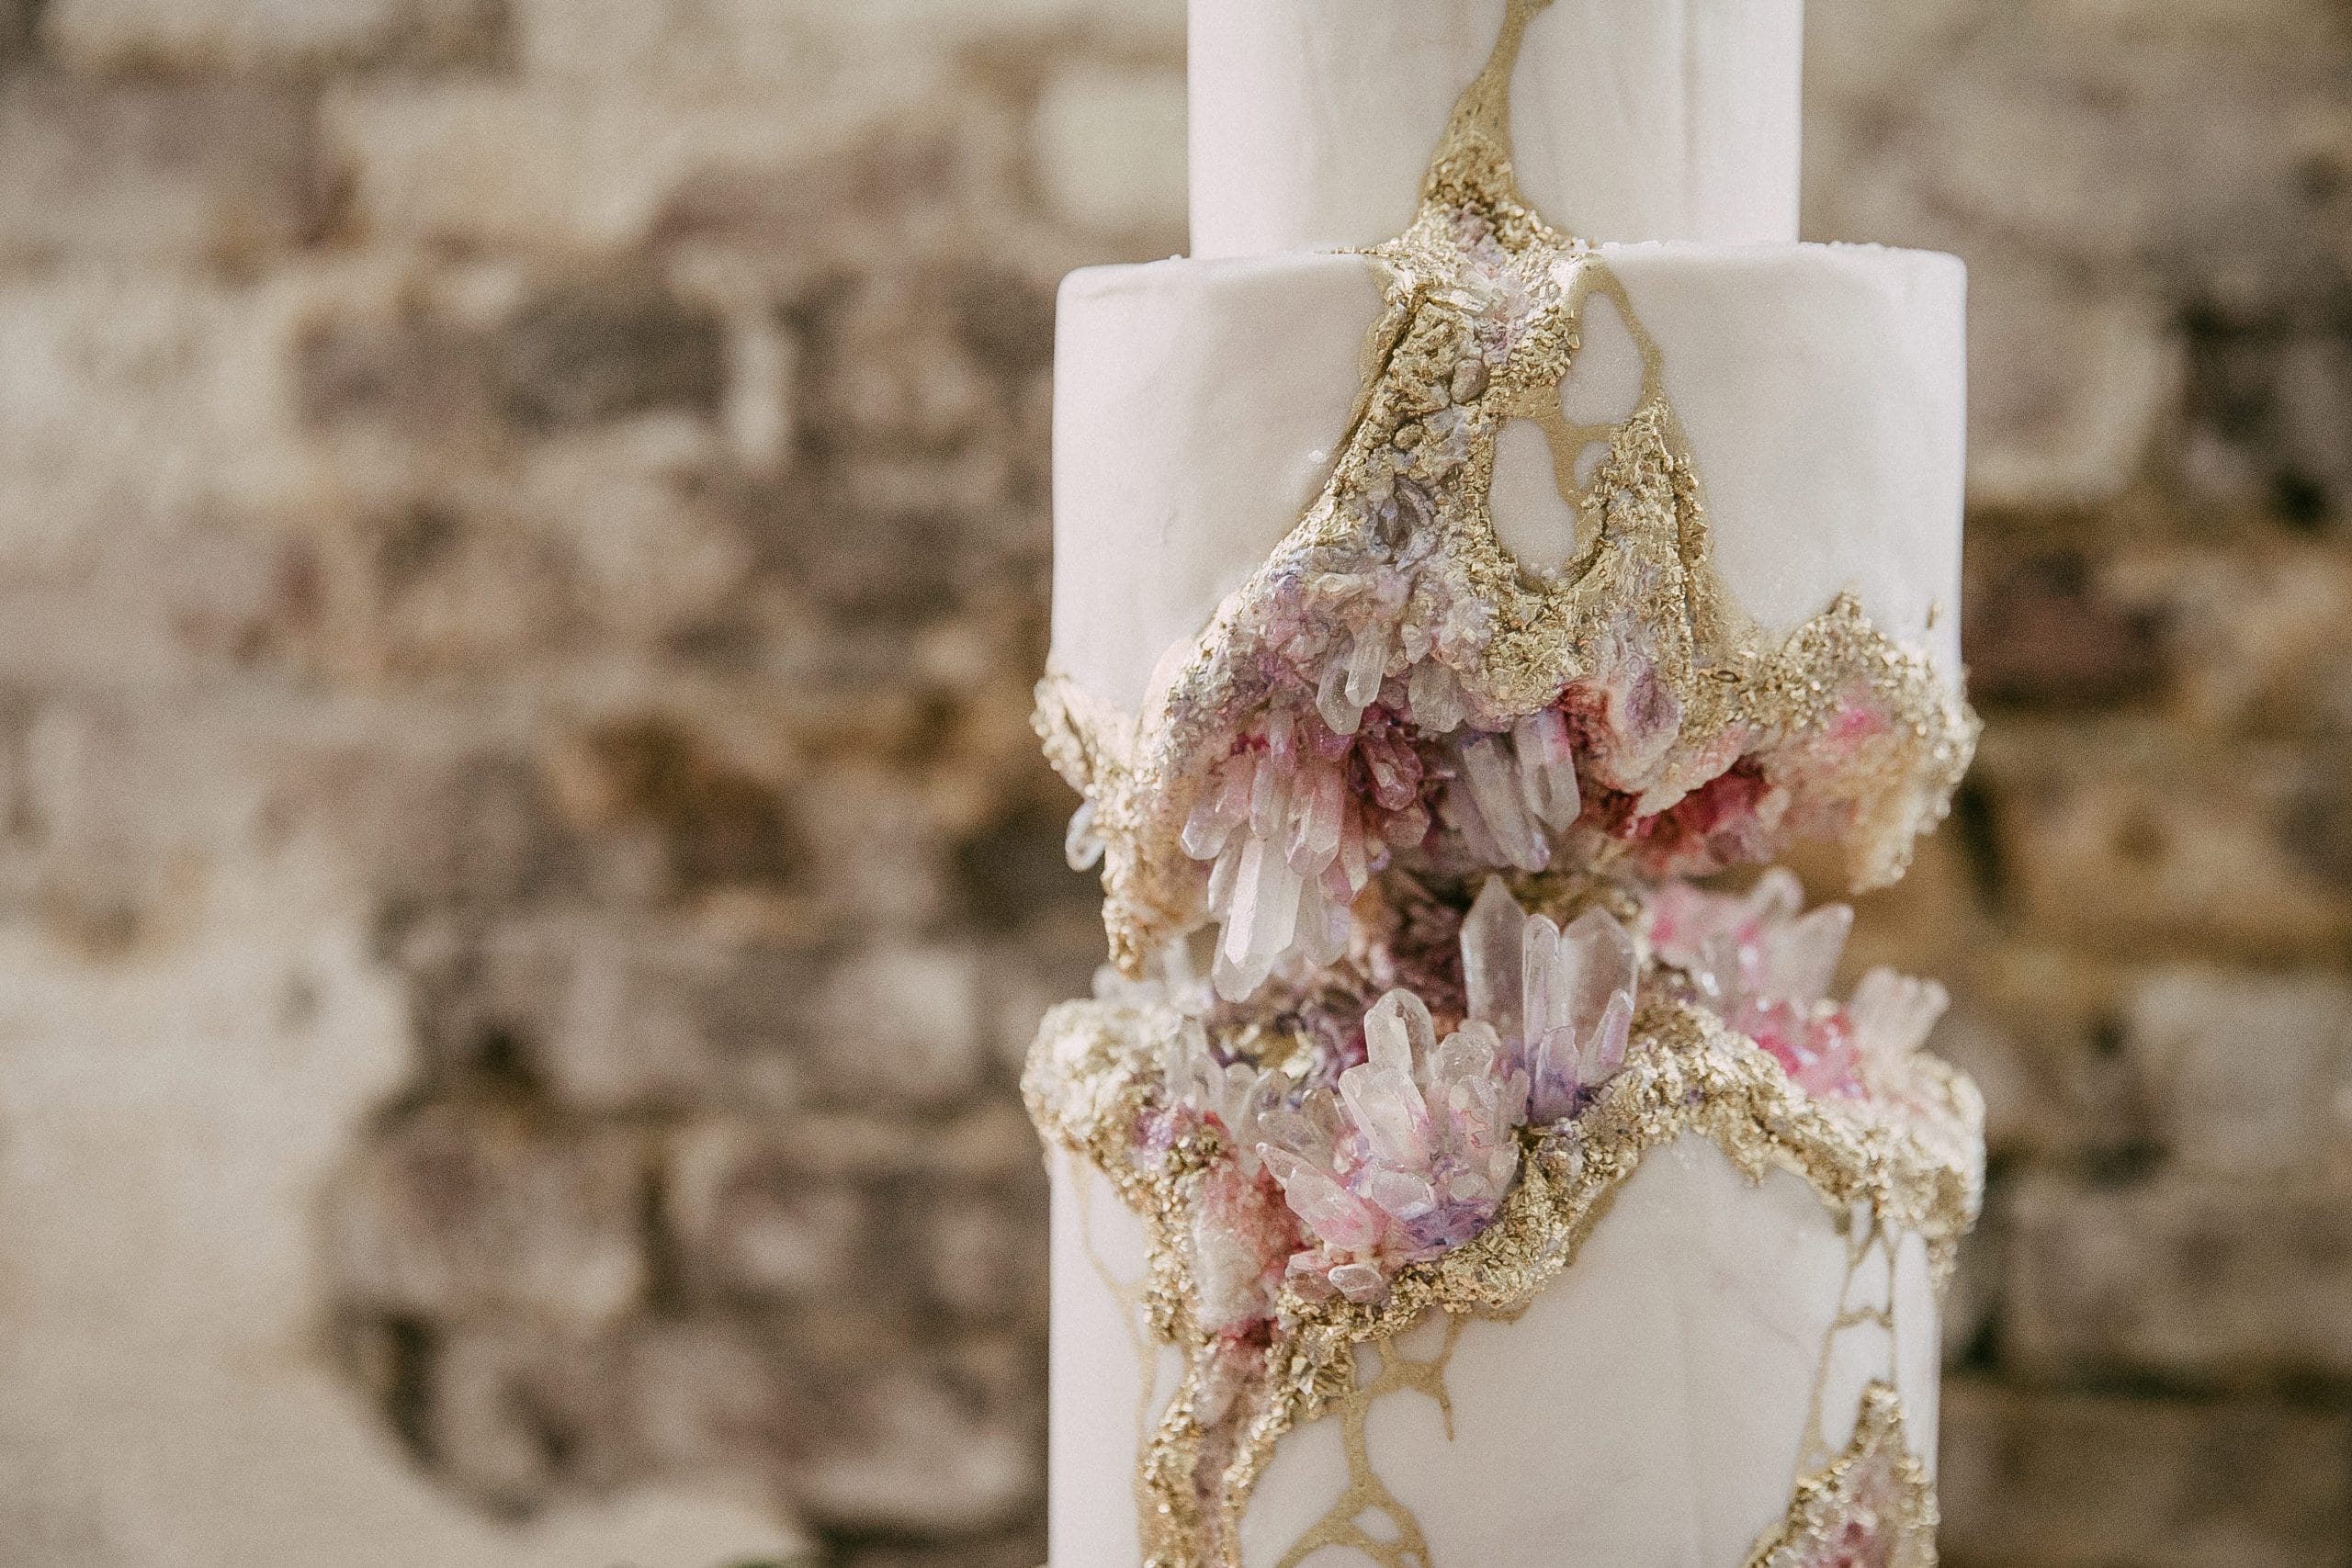
One of the most challenging parts of this cake design was of course the middle tier which featured a huge gap in the cake filled with crystals. To create this gravity defying cake, I had to carefully work out some technical details and create a pretty elaborate structure (covered in the original kintsugi cake tutorial).
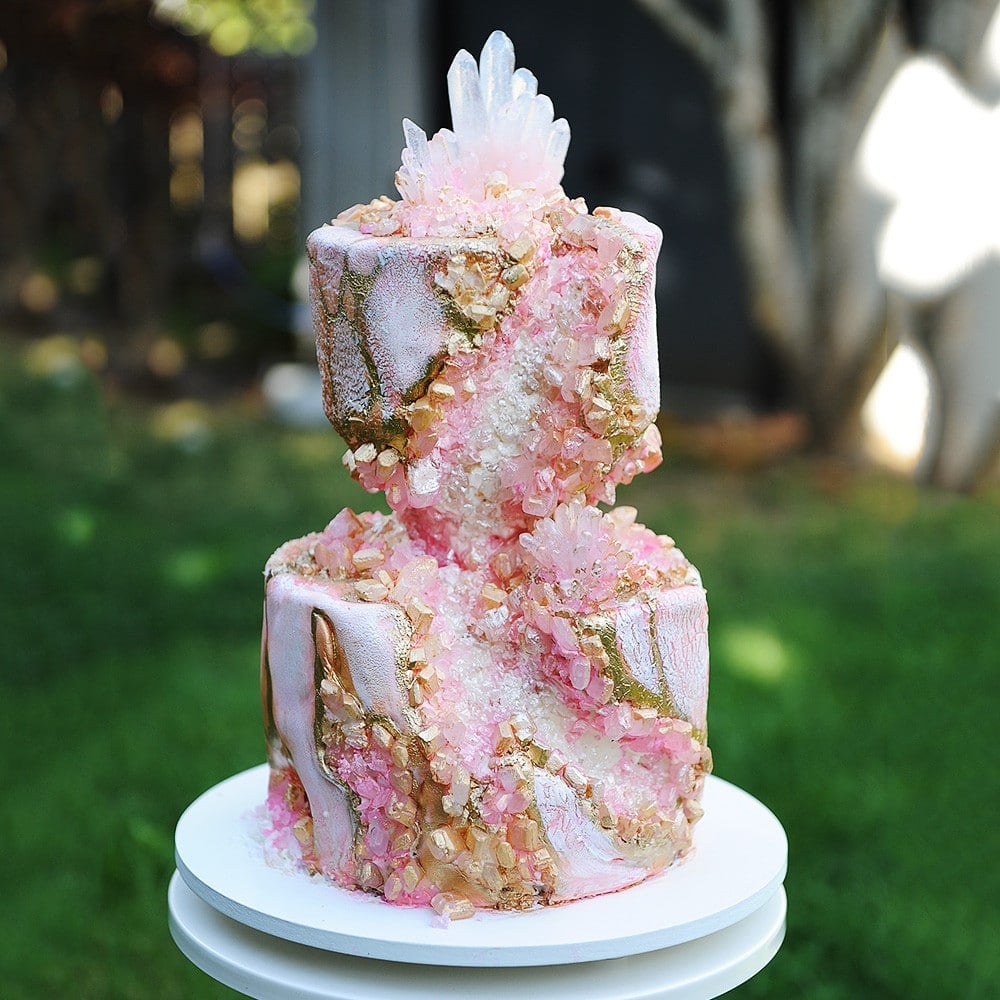
How To Make A Mini Kintsugi Cake
But like all things, once I had made this cake a few times, I thought of a slightly simpler way of doing things.
I was asked to make a version of this kintsugi cake for a fundraiser for the local rocks and mineral museum.
The cake had to be smaller since it was for a fundraiser and easy to transport home. I came up with a cake design that features all the fun part of the original cake tutorial but with a simpler structure.
To make my crystals, I mixed a little edible glitter (flash dust) into my melted isomalt and poured it into the crystal molds until they where about half full. Then I colored the rest of the isomalt with a touch of light pink then filled up the molds the rest of the way. This creates a nice gradient effect for the sugar crystals. They take a while to cool so do this first.
First I formed a dome of RKT with chocolate added to it over a 6" cake board around a ½" wooden dowel, making sure there's lots of chocolate around the dowel so it cools very firmly. I put it in the fridge to speed up the process. Once cooled, I trimmed the dowel to be the same height as my 8" round cake.
You start out with a wooden cake board, a ½" metal flange, male adaptor and ½" pvc pipe. Cut a hole in your 8" round cake board that is the same size as the flange. Then attach your flange to the board and screw in the adaptor. Put in your pvc pipe and trim it so that it's the same height as your 8" cake.

Take your 8" round crumb coated cake and place it onto the cake board and thread it over the pvc pipe and it should fit snugly over the flange. You should be able to see the pvc pipe poking up through the cake at this point. Fill up the center of the pvc pipe with some melted candy melts. Insert the RKT dome into the pipe and use a level to make sure it's straight up and down. You can place little pieces of fondant in the gap between the dowel and the edge of the pipe to hold things in place until the chocolate cools. Place the whole thing in the fridge to chill until firm.
While the cake is chilling, you can crumbcoat yoru 6" round cake. Take your cake out of the fridge and place the 6" cake on top. I attached mine with some melted chocolate to make sure it stays in place.
Now comes the fun part! Carving! I carved some jagged areas away from the cake to create the crystal look. I tried to be as random as possible and keep things looking natural.
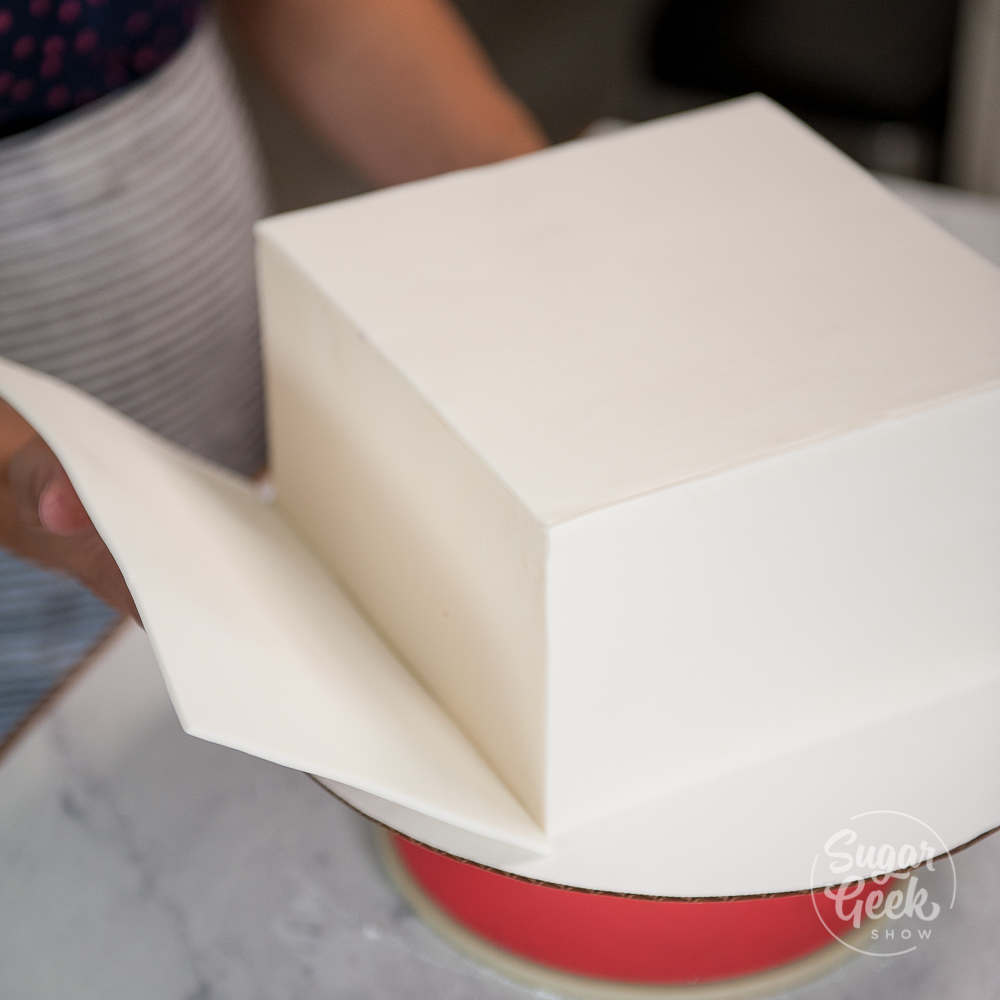
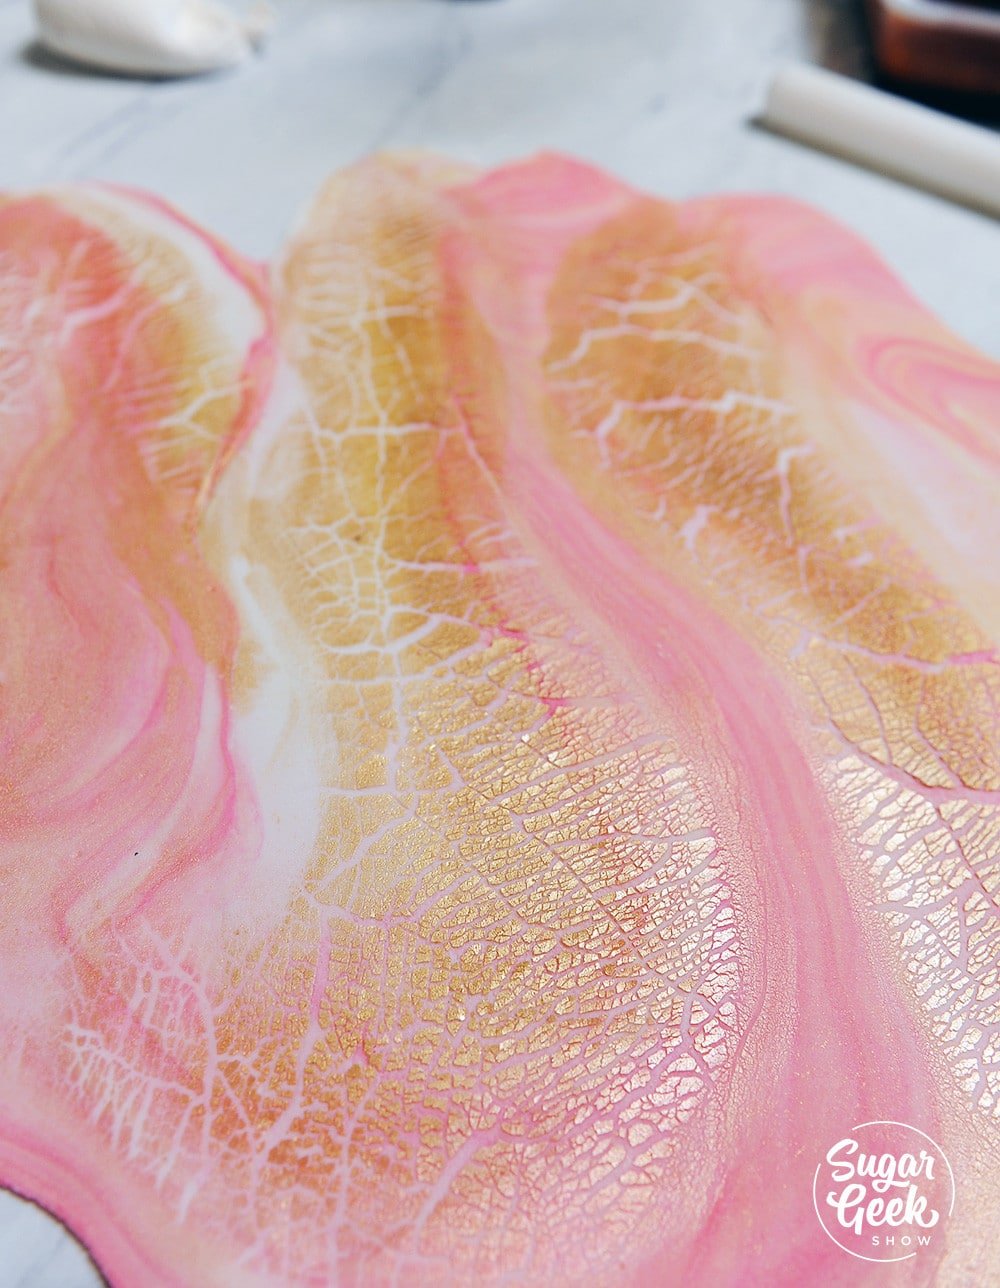
For the fondant, I swirled together some pink, ivory and white. A little bit different than my original design but that's the beauty of this cake, you can adjust it to whatever colors you like! I torched the surface a bit to make some texture and then paneled the 8" cake with the fondant. I cut away the excess where the cake is carved. I then repeat the process on the 6" cake.
I smoothed the fondant out a bit but not too much. It's natural after all! No need for super sharp edges. I covered the RKT and the inside of the carved cakes with more buttercream and layered up some rock candy and some isomalt crystals. I painted the edges with a combination of gold paint and pink food coloring mixed with everclear.
Lastly I painted on some gold lines between some of the cracks in the fondant to mimic the kintsugi look of the pottery. I also outlined all the carved areas with the rock candy with gold to bring it all together, plus I just really like gold!
Want to learn how to make the original kintsugi cake tutorial? Check out the full tutorial on Sugar Geek Show! It's free to try! So what have you got to lose?
Want to learn how to make the mini version? You can watch the making of the mini kintsugi cake process! Have a question? Just leave me a comment 🙂
Materials Needed
Edible:
- Two 8" round chocolate cakes
- One 6" round chocolate cake
- Easy Buttercream
- Lump Candy
- Rock Candy
- Fondant
- Edible Gold Paint
- Pink, Ivory food coloring
- Everclear or vodka
- Rice cereal mixture
- White chocolate melties
- 16 oz pre-cooked isomalt
Structure:
- 10" cake board
- ½" metal flange
- ½" male adaptor
- ½" pvc pipe
- ⅜" wooden dowel
- 8" cardboard round
- 6" cardboard round
Tools:
- Pvc pipe cutters
- Paintbrush
- Small - Medium - Large crystal molds
- Silicone bowl for melting isomalt
- Cake spatula
- Blow Torch