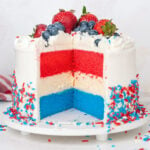
Red White And Blue Ice Cream Cake
Red and blue layers of moist vanilla cake and vanilla ice cream make the most festive 4th of July cake ever! You won't believe how easy it is to make your own ice cream cake!
Servings 8 cups
Calories 208kcal
Equipment
- Stand Mixer
- Two 8"x2" cake pans
- Tin foil
- Bench scraper or spatula
Ingredients
Cake Ingredients
- 14 ounces cake flour
- 13 ounces granulated sugar
- 1 teaspoon salt
- 1 Tablespoon baking powder
- ½ teaspoon baking soda
- 5 ounces egg whites room temperature
- 4 ounces vegetable oil
- 10 ounces buttermilk slightly warm and divided into two cups evenly
- 6 ounces butter unsalted and softened
- 2 teaspoons vanilla
- 1 Tablespoon super red food coloring, I use Americolor gel colors
- 1 Tablespoon electric blue food coloring
Ice Cream Layer
- 48 ounces vanilla ice cream
Stabilized Whipped Cream
- 16 ounces Heavy Whipping Cream
- 3 ounces Powdered Sugar
- 1 ½ teaspoons Vanilla
- 1 ½ teaspoons Powdered Gelatin I use KNOX
- 2 Tablespoons Cool Water
- 1 ½ teaspoons Heavy Whipping Cream
- 2 Tablespoons Red White And Blue Sprinkles For garnish
Instructions
- NOTE: It is SUPER IMPORTANT that all the room temperature ingredients listed above are room temperature and measured by weight so that the ingredients mix and incorporate correctly. Learn more about how and why to use a scale for baking in my tutorial.
Making the Red and Blue Cake Layers
- Preheat your oven to 335ºF (170ºC) and prepare two 8"x2" cake pans with cake goop or your preferred pan release.
- Bring your buttermilk, egg whites, and butter to room temperature (a little warm is even better) so that your ingredients mix together smoothly and your cake bakes up properly. If you don't have buttermilk, check out my buttermilk substitutes blog post for alternatives.
- Combine the flour, sugar, baking powder, baking soda, and salt in the bowl of a stand mixer with the paddle attachment.
- Divide your buttermilk in half. Combine ½ of the buttermilk with the oil and set aside.
- Combine the other ½ of the buttermilk, egg whites, and vanilla extract together, whisk to break up the eggs, and set aside.
- Add the softened butter to the dry ingredients and mix on low until the mixture resembles coarse sand.
- Add in your buttermilk/oil mixture and let it mix until the dry ingredients are moistened, then bump the speed up to medium (setting 4 on my KitchenAid, speed 2 on my Bosch) and let it mix for 2 full minutes to develop the cake's structure. If you don't let your cake mix on this step your cake may not rise properly. The batter should look white and fluffy and not broken or curdled.
- Scrape the sides of the bowl and then reduce the speed to low. Add in your egg white mixture in three batches, letting the batter mix for 15 seconds between additions. Mix until everything is combined. The finished cake batter should look smooth and not curdled.
- Divide your cake batter evenly into two bowls. I like to weigh my cake pans so that I know each layer is even.
- Add 1 Tablespoon of red food coloring to the first bowl and stir until fully mixed. I like the Super Red gel food color by Americolor.
- Add 1 Tablespoon of electric blue food coloring to the second bowl and stir until fully mixed.
- Pour each cake batter into the cake pans.
- Bake the layers for 30-35 minutes or until the center bounces back when you lightly touch it.
- Once your layer is baked, remove it from the oven and immediately tap it on the countertop to release excess air. This helps prevent shrinking as the cake cools.
- Let the cake cool for 10-15 minutes in the pan and then flip the cake out onto a wire rack.
- Once your cake has cooled down a little, carefully trim off the dome of your cake layer so it's nice and flat on top.
- Wrap your warm cake in plastic wrap and place it into the freezer until it's time to assemble the red white and blue ice cream cake. PRO TIP – Freezing your cake while it's still warm locks in the moisture, you can then freeze your cake for a few days without it drying out.
Making the Ice Cream layer
- Take the ice cream out of the freezer 30 minutes before you need to use it to allow it to soften.
- Cover the inside of an 8" cake pan in aluminum foil or parchment paper.
- Spread the softened ice cream into the cake pan evenly and smooth out the top.
- Place it back into the freezer overnight or for a minimum of 6 hours.
Making Stabilized Whipped Cream
- Sprinkle the gelatin over the water and let it bloom for 5 minutes. If you don't want to use gelatin, check out my stabilized whipped cream blog post for 5 other substitutes.
- Microwave the gelatin for 15 seconds and then stir. If the gelatin isn't fully melted continue melting in 5-second increments until the liquid is clear. Don't over-heat it.
- Add 1 Tablespoon of cream to the gelatin and stir to combine. Set aside while you make the whipped cream.
- Begin whipping your heavy whipping cream in the bowl of your stand mixer with the whisk attachment on medium speed.
- Once the whipped cream is thick and foamy, add in the powdered sugar and the vanilla.
- Continue whipping the cream until you see lines beginning to form in the surface of the cream (soft peaks).
- Reduce the speed to low and then begin drizzling in the melted gelatin in a steady stream.
- Continue mixing until firm peaks (holding their shape but still creamy) form but don't over-mix it or it will begin to curdle and turn to butter.
Assembling the Cake
- Place your frozen blue layer cake onto your cake platter or cake board and apply a thin layer of whipped cream to the top.
- Unwrap your ice cream layer from the foil and place it on top of the blue layer, then spread another thin layer of whipped cream on top.
- Add the second layer of cake on top.
- Cover the outside of the cake with more whipped cream and smooth it out with your offset spatula and bench scraper. If it starts to melt, freeze it after doing the crumb coat before doing a final coat of frosting on the entire cake.
- Pipe the remaining frosting with a 1M piping tip and piping bag to make a cute shell border.
- Place the red white and blue ice cream cake into the freezer until you're ready to serve it.
- Right before serving, you can add some patriotic sprinkles, fresh berries, and fresh strawberries on the outside and on top of the cake. Leave this part to the end so that the berries don't get all soggy and the sprinkles don't melt and get weird-looking after being frozen.
Video
Notes
Important Things To Note Before You Start
1. Bring all your ingredients to room temperature or even a little warm (eggs, buttermilk, butter, etc) to ensure your batter does not break or curdle.
2. Use a scale to weigh your ingredients (including liquids) unless otherwise instructed (Tablespoons, teaspoons, pinch, etc). Metric measurements are available in the recipe card. Scaled ingredients are much more accurate than using cups and help ensure the success of your recipe.
3. Practice Mise en Place (everything in its place). Measure out your ingredients ahead of time and have them ready before you start mixing to reduce the chances of accidentally leaving something out.
4. Freeze your cakes and ice cream layer a minimum of 6 hours before assembling the cake.
6. If the recipe calls for specific ingredients like cake flour, replacing it with all-purpose flour and cornstarch is not recommended unless specified in the recipe that it’s ok. Substituting ingredients may cause this recipe to fail.
7. Gel food coloring works best for this cake, I like to use Americolor super red and electric blue. Using liquid food coloring will not have the same desired effect.
8. If you don't have buttermilk, check out my buttermilk substitutes blog post for alternatives.
9. No cake flour where you live? Try searching for Shipton mills soft cake and pastry flour, or use any flour that has a protein content of 9% or less.
Nutrition
Serving: 1serving | Calories: 208kcal | Carbohydrates: 21g | Protein: 1g | Fat: 13g | Saturated Fat: 8g | Cholesterol: 28mg | Sodium: 111mg | Potassium: 60mg | Sugar: 15g | Vitamin A: 335IU | Calcium: 31mg | Iron: 0.2mg