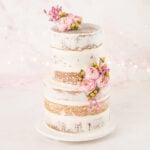
Naked Wedding Cake
In this recipe tutorial, I will walk you through step-by-step how to bake, assemble, decorate, and transport a naked wedding cake! This naked wedding cake is made using my easy vanilla cake recipe and my easy buttercream recipe!
Servings 36 servings
Calories 680kcal
Equipment
- turntable (or a large lazy susan)
- cake boards for each size tier that you're making (for this tutorial, we're using 8" and 6")
- Offset Spatula
- skewers
- If you are decorating the cake with flowers, you will also need plastic wrap, straws, and scissors to safely add the flowers to the cake.
Ingredients
Naked Wedding Cake
- 32 ounces all purpose flour
- 32 ounces granulated sugar
- 2 teaspoons salt
- 2 teaspoons baking soda
- 1 teaspoon baking powder
- 6 large eggs room temperature
- 10 ounces vegetable oil
- 20 ounces buttermilk room temperature
- 8 ounces melted unsalted butter (melted, but not hot)
- 4 teaspoons vanilla extract
Easy Vanilla Buttercream
- 48 ounces unsalted butter room temperature. You can use salted butter, but it will affect the taste and you need to leave out additional salt.
- 48 ounces powdered sugar sifted if not from a bag
- 4 teaspoons vanilla extract
- 1 teaspoon salt
- 12 ounces pasteurized egg whites room temperature
- 2 TINY drops purple food coloring (optional) for whiter frosting
Instructions
Making the Naked Wedding Cake Batter
- First, preheat the oven to 335ºF (168ºC).
- Prepare two 8” cake pans with cake goop or another pan release.
- Then, measure out all of your ingredients using a digital kitchen scale. You can mix the wet and dry ingredients separately for a finer texture, or just measure and add directly into the bowl of your stand mixer for fewer dishes.
- In a mixing bowl, combine and mix together the buttermilk, butter, oil, eggs, and vanilla. Your wet ingredients should all be slightly warm. I microwave my buttermilk for about 30 seconds and place my eggs (still in the shell) in a bowl of warm water.
- Next, in the bowl of your stand mixer using a paddle attachment, combine the flour, sugar, salt, baking soda, and baking powder. Let the mixer slowly combine for a few seconds.
- While the mixer is on low, pour the wet ingredients into the dry ingredients.
- Then, turn the mixer up to medium speed and mix until the batter is combined. Scrape the bowl to make sure all of the ingredients are combined.
- Let the batter mix on speed 2 for 1 minute. It should look kind of like pancake batter.
- Divide the batter evenly between the prepared cake pans and place them into the oven on a middle rack.
- Bake the cakes for 40-50 minutes, or until a toothpick inserted in the center comes out clean.
- Finally, allow the cake to cool for 10 minutes and flip out onto a cooling rack. If you plan to frost and decorate the cake on the same day, you can place the cakes into the freezer unwrapped for about an hour or until they are cold (but not frozen). PRO TIP: If you plan to decorate your cake at a later date, then you will wrap the cakes in plastic wrap first before placing them in the freezer.
Easy Buttercream Instructions
- First, place the egg whites and the powdered sugar in a stand mixer bowl. Attach the whisk and combine the ingredients on low, and then whip them on high for 4-5 minutes (until shiny) to dissolve the powdered sugar.
- Then, add in the salt and the vanilla extract. If you are adding in any food coloring, this is the point where you would do that. PRO TIP: Use a toothpick to transfer 1-2 drops of food coloring to your frosting to avoid putting too much color in your buttercream.
- Next, add in your softened butter piece-by-piece, and whip it with the whisk attachment to combine. It will look curdled at first. This is definitely normal. It will also look pretty yellow. Keep whipping.
- If your buttercream looks curdled, remove about 1 cup of buttercream and melt it in the microwave for 10-15 seconds until it is just barely melted. Then, pour it back into the whipping buttercream to bring it all together.
- Optional: Add in 2 drops of purple food coloring to make the buttercream whiter. You can use any food coloring you want, but if you want my recommendation, I use Chef Master gel food coloring. Use code “SUGARGEEKTEN” to get 10% off your order!
- Then, whip it on high with the whisk attachment for 8-10 minutes until the buttercream is white, light, and shiny. Taste test the buttercream. If it tastes like sweet ice cream, then it's ready!
- Finally, switch to a paddle attachment and mix the buttercream on low speed for up to 15-20 minutes to make the buttercream ultra smooth and remove any air bubbles. Ultimately, this step is optional. But, if you want really creamy frosting, then you don't want to skip this final step.
Preparing the Naked Wedding Cake Tiers
- First, trim off the dome of your cake layers. Do not trim off the sides of the cake. If you trim off the sides of the cake, then your cake will lose moisture quicker since this is a naked cake and the sides won’t be covered in buttercream.
- Then, trim your cake boards to be a little bit smaller than the width of the cake.
- Apply a small amount of tape to your turntable, and then place your cake board on top. This will keep the cake board from sliding around.
- Next, place your cake on top of the cake board.
- Spread a thin layer of buttercream on top of the cake using an offset spatula. The layer of buttercream should be between ¼″ to ½” thick. When smoothing out the buttercream onto the cake, keep the buttercream as level as possible (i.e. avoid large bumps of buttercream).
- Then, repeat this process with the second cake layer, and then add your final layer of cake on top.
- Spread a very thin layer of buttercream around the sides and top of the cake. This thin layer will seep into the small air bubbles of the cake and help seal in the moisture.
- Next, use a bench scraper to remove the buttercream from the sides of the cake.
- Finally, use a spatula to smooth out the buttercream on top of the cake.
- Then, repeat this process as needed for any additional layers of cake you have left depending on how servings of cake you are making.
- If you need to transfer your cake from your turntable to your cake stand, then use an offset spatula to carefully and gently lift one side of the cake so that you can get your fingers underneath it. Then, you can lift the cake by the cake board to move it to wherever it needs to go like the freezer for storage or moving it onto a cake stand.
Assembling the Naked Wedding Cake
- Download my cake support guide to help get you started!
- Begin with your bottom cake tier in front of you.
- Grab the cake pan you used that is the same size as the smaller cake tier you want to stack on top of your bottom cake tier. Place the smaller cake pan right on top of the bottom tier so that the cake pan is sitting on top of the buttercream.
- Use a spatula to trace along the edge of the cake pan to mark a line. This will show you where you need to place your straws and skewers to support the weight of the next cake tier.
- Place a straw through the top of the bottom tier cake right in the center. After you’ve placed the straw through the cake tier, move your thumb to the spot where the top of the cake ends and then use scissors to trim off the excess straw. You don’t want to see any straw popping out of the top of the cake.
- Then, use the trimmed straw as a guide to cut all of your remaining straws so they are all the same height as the cake tier.
- Next, stick your straws through your cake about ¼″ inward from the line you created using the cake pan in a circle. If you’re unsure how many straws you need, generally, you need 1 straw per inch of cake you’re needing to support (i.e. for a 6” cake, you need 6 straws as supports beneath it to keep the top cake from collapsing).
- Then, after you’ve placed the straws, use a spatula to smooth buttercream over the top to hide the straw holes.
- Now you are ready to place your smaller cake tier on top of the bottom (larger) cake tier.
- Make sure the cake tier is centered, and then insert a skewer through the center of the top cake tier. Place the skewer all of the way inside the cake (it will puncture the cake board and that is okay). Cover the spot where the skewer is with a little bit of buttercream and smooth it out.
- Repeat as needed until all of your cake tiers are stacked onto your cake.
- Place the cake in the refrigerator overnight until you need to deliver the cake to the wedding or event.
Packaging the Wedding Cake for Delivery
- You will need a box that is the same width as the bottom (largest) tier of your cake. For instance, if your bottom cake tier is 10” x 10”, you will use a 10” x 10” width cardboard box.
- First, you trim your box to create a flap on one side. Use an X-acto blade to cut downwards along 2 corners of the box, and then bend that side downward to create a flap where your cake will enter in and out of the box.
- If you have a piece of cardboard on the bottom that is sticking up where your cake is going to be, use a piece of tape to stick it down.
- Next, carefully slide your cake on top of the flap and into the cardboard box.
- If your cake is taller than your cardboard box, then you can move the box flaps upward and use tape to join the flaps with the corners so the box becomes taller.
- Want additional coverage on top? You can cover the exposed top of the box with some plastic wrap to protect the cake. This is especially helpful if it’s a windy day and you’re worried about dust, debris, or rain getting on the cake.
- Now your cake is ready to travel to the venue! When you arrive at the wedding and it’s time to unbox your cake, remove the tape from the box and slide it out and move it to the cake table.
Decorating Your Cake with Fresh Flowers Safely
- Now that you’ve arrived at the wedding venue and it’s time to decorate the cake with flowers, use a small amount of buttercream to fill in any gaps where the cake tiers meet and along the bottom of the cake tier on the cake plate. Smooth out the buttercream you added.
- First, prepare your fresh flowers by trimming them down so that you have about 2”-3” of stem. Remove any of the bad petals that appear bruised.
- Then, wrap all of your flower and plant stems in plastic wrap. This will keep the water from the flower trapped inside of the stem which will not only keep the flowers fresh for longer, but it will protect the cake from being contaminated by the plant.
- Next, insert your flower that is wrapped in plastic wrap into a straw.
- Insert the straw into the cake where you want the flower to sit. If you find yourself hitting the cardboard, take the straw out of the cake and remove the flower from the straw and trim it down and try again.
- Repeat until you have decorated your cake with flowers and plants to your liking.
Video
Notes
Important Things To Note Before You Start:
- Download my straw support cake guide to get started!
- Bake your cakes 2 days before the wedding or event. For instance, if your event is on Saturday, then bake your cakes on Thursday. On Friday, focus on frosting and stacking the cakes. Then, when Saturday comes, all you’ll need to focus on is delivering the cake to its final destination and then adding in any fresh flowers after you arrive at the venue.
- In the long run, a chilled cake is going to transfer much easier than a freshly frosted cake. Ultimately, this is why it’s crucial to take several days to prepare the wedding cake so you can freeze or refrigerate your frosted and stacked cake until it is ready to travel to the event.
- Generally speaking, when you are choosing what flowers to use to decorate your cake, think about how big the cake is. If you don’t have a huge cake, then you don’t want huge flowers. Think about the ratio of how big a flower looks on a cake tier, and use a little bit of greenery in addition to colorful flowers. Ultimately, use the bouquet/boutonniere as your guide to decide what flowers to include and how much. When in doubt, stick with the rule of 3s (three of the same flower, three types of flowers/plants, groups of three grouped together, etc).
- The best investment you can make when you’re getting started with baking is a digital kitchen scale! Weighing your ingredients will help you avoid cake failure. Using a kitchen scale for baking is super easy and gives you the best results every single time.
- Practice Mise en Place (everything in its place). Measure out your ingredients ahead of time and have them ready before you start mixing to reduce the chances of accidentally leaving something out.
- Need more help with making your first cake? Check out my how to decorate your first cake blog post.
- Make sure all of your cold ingredients (e.g. butter, eggs, milk) are at room temperature or a little warm. Why? Because we want to create an emulsion and allow the ingredients to fully mix together.
- Make your own pan release (cake goop!) The best pan release ever!
- If you want to add food coloring to this frosting, then you will add in any food coloring while you are mixing the egg whites with the powdered sugar (before you add in the butter). PRO TIP: Use a toothpick to transfer 1-2 drops of food coloring to your frosting to avoid putting too much color in your buttercream.
- You can use whichever food coloring you have, but if you want a recommendation I would suggest the Chef Master gel food coloring. Use code “SUGARGEEKTEN” to get 10% off your order!
Nutrition
Serving: 1serving | Calories: 680kcal | Carbohydrates: 83g | Protein: 5g | Fat: 37g | Saturated Fat: 23g | Polyunsaturated Fat: 2g | Monounsaturated Fat: 10g | Trans Fat: 1g | Cholesterol: 124mg | Sodium: 346mg | Potassium: 83mg | Fiber: 1g | Sugar: 63g | Vitamin A: 1250IU | Calcium: 42mg | Iron: 2mg