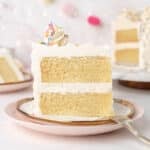
Easy Vanilla Cake (One Bowl)
The best easy vanilla cake recipe! This cake has a fantastic flavor and texture. Everything comes together in one bowl, no special mixing method required!
Servings 8 cups
Calories 913kcal
Equipment
- Digital Kitchen Scale
- 2 8" cake pans
Ingredients
- 16 ounces all-purpose flour
- 16 ounces granulated sugar
- 1 teaspoon salt
- 1 teaspoon baking soda
- ½ teaspoon baking powder
- 3 large eggs slightly warm
- 5 ounces vegetable oil
- 10 ounces buttermilk slightly warm
- 4 ounces melted unsalted butter melted, but not hot
- 2 teaspoons vanilla extract
Easy Buttercream Ingredients
- 6 ounces pasteurized egg whites (from a box)
- 24 ounces powdered sugar sifted if not from a bag
- 2 teaspoons vanilla extract
- ½ teaspoon salt
- 24 ounces unsalted butter, softened You can use salted butter, but it will affect the taste and you need to leave out the additional salt
- 1 tiny drop of purple food coloring optional for white frosting
Instructions
How to Make Easy Vanilla Cake
- First, preheat the oven to 335ºF (168ºC).
- Prepare two 8” cake pans with cake goop or another pan release.
- Then, measure out all of your ingredients using a digital kitchen scale. You can mix the wet and dry ingredients separately for a finer texture, or just measure and add directly into the bowl of your stand mixer for fewer dishes.
- In a mixing bowl, combine and mix together the buttermilk, butter, oil, eggs, and vanilla. Your wet ingredients should all be slightly warm. I microwave my buttermilk for about 30 seconds and place my eggs (still in the shell) in a bowl of warm water.
- Next, in the bowl of your stand mixer using a paddle attachment, combine the flour, sugar, salt, baking soda, and baking powder. Let the mixer slowly combine for a few seconds.
- While the mixer is on low, pour the wet ingredients into the dry ingredients.
- Then, turn the mixer up to medium speed and mix until the batter is combined. Scrape the bowl to make sure all of the ingredients are combined.
- Let the batter mix on speed 2 for 1 minute. It should look kind of like pancake batter.
- Divide the batter evenly between the prepared cake pans and place them into the oven on a middle rack.
- Bake the cakes for 40-50 minutes, or until a toothpick inserted in the center comes out clean.
- Finally, allow the cake to cool for 10 minutes and flip out onto a cooling rack. If you plan to frost and decorate the cake on the same day, you can place the cakes into the freezer unwrapped for about an hour or until they are cold (but not frozen). If you plan to decorate your cake at a later date, then you will wrap the cakes in plastic wrap first before placing them in the freezer.
Preparing the Easy Buttercream Frosting
- First, place the egg whites and the powdered sugar in a stand mixer bowl. Attach the whisk and combine the ingredients on low, and then whip them on high for 4-5 minutes (until shiny) to dissolve the powdered sugar.
- Then, add in the salt and the vanilla extract. If you are adding in any food coloring, this is the point where you would do that. PRO TIP: Use a toothpick to transfer 1-2 drops of food coloring to your frosting to avoid putting too much color in your buttercream.
- Next, add in your softened butter piece-by-piece, and whip it with the whisk attachment to combine. It will look curdled at first. This is definitely normal. It will also look pretty yellow. Keep whipping.
- If your buttercream looks curdled, remove about 1 cup of buttercream and melt it in the microwave for 10-15 seconds until it is just barely melted. Then, pour it back into the whipping buttercream to bring it all together.
- Optional: Add in 1 drop of purple food coloring to make the buttercream whiter. You can use any food coloring you want, but if you want my recommendation, I use Chef Master gel food coloring.
- Then, whip it on high with the whisk attachment for 8-10 minutes until the buttercream is white, light, and shiny. Taste test the buttercream. If it tastes like sweet ice cream, then it's ready!
- Finally, switch to a paddle attachment and mix the buttercream on low speed for up to 15-20 minutes to make the buttercream ultra smooth and remove any air bubbles. Ultimately, this step is optional. But, if you want really creamy frosting, then you don't want to skip this final step.
Stacking and Assembling the Vanilla Cake
- Optional: Trim the brown layer off of the top of the cake and on the sides. This is an extra step I like to take for my cakes to get a cleaner look.
- First, place your cake on a cake board. Or, you could use a flat plate or cake platter.
- Then, spread a layer of buttercream over the top of the cake. It should be about ½“ thick since this is only a two layer cake.
- Next, stack the second layer of cake on top.
- Add another layer of buttercream about ½“ thick and spread it out over the top of the cake.
- Then, spread a thin layer of buttercream all over the cake. Scrape off any extra buttercream off of the top. This is called the “crumb coat.” The crumb coat will seal in the crumbs so that they do not get into your final layer of cake.
- Put your cake in the fridge or freezer for 15 minutes, or until the buttercream is firm to the touch.
- Next, place your final coat of buttercream on your cake and smooth it out. PRO TIP: Start by scooping your buttercream on top of the cake and then smooth out the top first to make it flat. Then, apply a thick layer of buttercream to the sides and smooth it out.
- Then, use your bench scraper to slowly scrape away the excess frosting. Hold the scraper straight up and down, and slowly turn the cake until you’ve removed all of the excess buttercream This will give your cake straight edges.
- Wipe off any excess buttercream off the top starting at the edge of the cake and moving toward the center. Now your cake is ready to decorate!
Decorating the Vanilla Cake
- You can decorate this cake however you prefer! If you want more cake decorating ideas or if you are new to cake decorating, you can read my tutorial on how to decorate your first cake. But for this cake decoration, here is what I did:
- Start by placing your spatula in the center of the top of the cake. Apply a little bit of pressure on the buttercream, and turn the cake. As you turn the cake, slowly move your spatula outwards toward the edge so you begin to create a spiral in the buttercream. If you don’t like your spiral and want to start over, you can smooth the buttercream out and start over.
- Then, after you’ve created your spiral, use your spatula to add small dabs of buttercream to the sides of the cake to create a rustic texture. As you transfer the buttercream to the cake, make a slight swoop (backwards “C” shape) and layer them on top of one another.
- Next, prepare a piping bag with your buttercream. I used a Wilton 1M piping tip, but you can use whatever one you have!
- Pipe small dollops of buttercream along the top edge of the cake, and add one dollop of buttercream in the center.
- Finally, add some confetti sprinkles or whatever sprinkles you like all around the top of the cake!
Video
Notes
Important Things To Note Before You Start
- The best investment you can make when you’re getting started with baking is a digital kitchen scale! Weighing your ingredients will help you avoid cake failure. Using a kitchen scale for baking is super easy and gives you the best results every single time.
- Practice Mise en Place (everything in its place). Measure out your ingredients ahead of time and have them ready before you start mixing to reduce the chances of accidentally leaving something out.
- Need more help with making your first cake? Check out my how to decorate your first cake blog post.
- Make sure all of your cold ingredients (e.g. butter, eggs, milk) are at room temperature or a little warm. Why? Because we want to create an emulsion and allow the ingredients to fully mix together.
- Make your own pan release (cake goop!) The best pan release ever!
- If you are baking your cake in a large baking sheet pan that’s 10” or larger, apply cake goop or your preferred pan release and add in a layer of parchment paper. This cake cools differently in larger pans, and the added layer of parchment paper will ensure the cake comes out of the pan better.
- Chill your cakes before frosting and filling. You can cover a frosted and chilled cake in fondant if you wish. This cake is also great for stacking!
- If you want to add food coloring to this frosting, then you will add in any food coloring while you are mixing the egg whites with the powdered sugar (before you add in the butter). PRO TIP: Use a toothpick to transfer 1-2 drops of food coloring to your frosting to avoid putting too much color in your buttercream.
- You can use whichever food coloring you have, but if you want a recommendation I would suggest the Chef Master gel food coloring. Use code “SUGARGEEKTEN” to get 10% off your order!
Nutrition
Serving: 1serving | Calories: 913kcal | Carbohydrates: 187g | Protein: 9g | Fat: 15g | Saturated Fat: 9g | Polyunsaturated Fat: 1g | Monounsaturated Fat: 4g | Trans Fat: 1g | Cholesterol: 104mg | Sodium: 742mg | Potassium: 169mg | Fiber: 2g | Sugar: 142g | Vitamin A: 514IU | Calcium: 76mg | Iron: 3mg