Beginners Sourdough Bread Recipe Step-By-Step
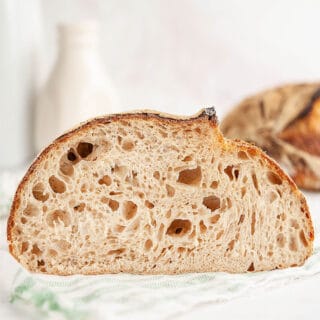
How to make a perfect sourdough loaf that rises nice and tall and has a beautiful open crumb. Step-by-step instructions for the ultimate beginner! I cover everything including technical terms and how to know when your bread is ready to bake.
Servings 8 servings
Calories 245kcal
Equipment
- Banneton or medium bowl with tea towel
- Lame or sharp razor blade
- Dutch oven or cookie sheet with roasting lid
Ingredients
Levain
- 50 grams mature unfed starter
- 50 grams whole wheat flour or any unbleached flour
- 50 grams filtered or bottled water 90ºF
Sourdough Ingredients
- 300 grams bread flour
- 100 grams all purpose flour or more bread flour
- 100 grams whole wheat flour spelt or rye is great too
- 400 grams water any kind, doesn't have to be warm
- 11 grams salt
Instructions
Day 1
- In the morning, combine 50g of your unfed starter with the whole wheat flour and warm water in a clear container with straight sides and mix until no dry flour remains. This is your levain. Mark the height with a piece of tape or erasable marker.
- Place the levain into a warm area like the oven with the light on and the door cracked, on top of the fridge. A warm area is between 72ºF-95ºF. Starter will die if the temp rises above 130ºF
- Let your levain rise until it has reached its peak (the highest point in its rise before it starts to fall again). I track this by checking my levain hourly. If your levain doubles in size within 5 hours you can use it to make bread. If it doesn't your starter isn't strong enough yet or your room is too cold.
- While the levain is rising, make the autolyse (mixture of flour and water before adding the levain).
- Once your levain has peaked, add 140 grams to the autolyse. This is pretty much the whole container minus whatever is stuck to the sides. Also add in the salt and then mix it all together with your wet hands. Pinch, fold, push with your fingers until it's all cohesive and evenly mixed. Cover it with plastic wrap and let it rest for 30 minutes.
- Begin your first stretch and fold. With a wet hand, lift one side of the dough and pull it to the point of resistence but don't tear it. Fold it over the top of the dough. Rotate the bowl 45º and repeat the stretch and then fold the dough over. Do this for a total of 4 times. Cover the dough with plastic wrap and let it rest for 60 minutes in a warm area.
- After 60 minutes, begin your second stretch and fold. The same process as the first stretch and fold. Cover and rest 60 minutes in a warm area.
- After another 60 minutes, begin your third stretch and fold. Same process. Rest for 60 minutes. If the dough still feels really loose then you may want to do a fourth stretch and fold.
- After your stretch and folds are complete, cover your dough and let it rise for 1-2 hours until it has doubled in size. This can take even longer than 2 hours if your room is cold or your starter is weak so don't rush it and just wait until the dough is ready.
- Once your dough has doubled you can shape it. Take your wet hand and get the countertop a little wet. This prevents sticking. Gently pour the risen dough onto the counter and stretch it out into a rectangle horizontally in front of you, about the size of a sheet of paper. Pop any big bubbles just as you would if you were making regular bread. Big bubbles make problems in the bread later.
- Fold the right side of the dough over itself so that the right edge lines up with the center of the dough. Now take the left side of the dough and fold it over the top. This is called a simple book fold and helps distribute the bubbles more evenly in your final loaf so all your bubbles aren't on the top or bottom.
- Now roll the dough up like a cinnamon roll. Nice and tight. This helps make that gluten even stronger so our bread can rise in the oven. Make sure the seam is on the bottom. Cover the dough with the bowl and let it rest for 15 minutes.
- While the dough is resting, prepare your banneton. Dust on some flour generously. You can also use a bowl with a tea towel and it works just as well.
- Turn your dough over so the seam is facing up. Gather all the edges together and lift the dough like a bag and plop it into your floured banneton. Pinch together any loose edges.
- Place the whole basket into a plastic bag to keep it from drying out and put it into the fridge overnight. The dough will not rise or do much of anything in the fridge. It's like a pause button for sourdough so make sure all your shaping and rising is done before going into the fridge.
Day 2
- In the morning, preheat your oven to 500ºF with the dutch oven inside for 30 minutes. Place a sheet pan at the bottom of the oven to prevent your dough from getting too dark inside the dutch oven.
- Cut a piece of parchment paper about 10"x10" and place it on top of the dough. Turn the banneton upside down and gently remove the dough from the basket.
- Use your lame or razorblade to cut a big "c" into the side of the dough about ¼" to ½" deep. Don't be afraid to score! This allows the bread to rise nice and tall and you want tall bread right? You can also add in decorative scoring like wheat on the side if you desire.
- Lift the dough by grabbing the two corners of the parchment paper and place it into the hot dutch oven. Be quick but careful to avoid the sides of the dutch oven. We don't want any burns!
- Place the lid on top of the dutch oven and shut the door. Reduce the temperature to 450ºF and bake covered for 30-40 minutes.
- Remove the lid and bake for another 20-25 minutes depending on the color that you want!
- After baking, remove the bread from the hot dutch oven and place it on a cooling rack to cool for ONE HOUR. Don't cut it too soon or the inside will be gummy.
- Enjoy that bread! You worked hard for it!
Video
Notes
Tips for success!
- Remember, making sourdough takes time but not a lot of work. Only a few minutes here and there. Use your timer to remind you when its time to do a step.
- If your levain rises within 5 hours, it's strong enough to make bread
- Always use wet hands when handling the dough to prevent sticking
- Use stretch and folds, book folds and the cinnamon roll fold to create strength in your dough which helps it to rise taller and have an even, open crumb.
- Make sure your dough has doubled in size before you put it in the fridge. It won't rise at all in the fridge and we will bake it straight from the fridge in the morning.
- Don't be afraid to score deeply! this helps the bread rise. ¼"-½" deep with a lame or sharp knife.
- Store leftover bread (if you have any) in a plastic bag to keep it moist. Toast it in the oven or in a toaster oven to bring back that crispness to the crust!
Nutrition
Serving: 1serving | Calories: 245kcal | Carbohydrates: 50g | Protein: 8g | Fat: 1g | Saturated Fat: 1g | Sodium: 4mg | Potassium: 119mg | Fiber: 3g | Sugar: 1g | Calcium: 15mg | Iron: 2mg