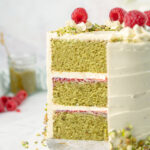
Pistachio Cake with Raspberry Filling and French Buttercream
Moist and tender pistachio cake layered with tart raspberry filling and creamy, sweet French buttercream. This pistachio cake is a pistachio lover’s dream come true! Made with homemade pistachio butter.
Servings 8 cups
Calories 1569kcal
Equipment
- Food processor
Ingredients
Raspberry Filling
- 13 ounces fresh or frozen raspberries
- 5 ounces granulated sugar
- 1 ounce lemon zest
- 1 ounce fresh lemon juice
- 2 ounces water
- 1 ounce Clear Jel or cornstarch
Pistachio Cake
- 14 ounces all purpose flour
- 7 ounces granulated sugar
- 7 ounces brown sugar
- 1 teaspoon salt
- 1 teaspoon baking soda
- ½ teaspoon baking powder
- 10 ounces buttermilk (room temperature)
- 2 eggs (room temperature)
- 6 ounces oil
- 4 ounces pistachio butter
- 1 teaspoon vanilla extract
- ¼ teaspoon green food color (optional)
- 4 oz chopped pistachios plus more for garnish
French Buttercream
- 8 large eggs
- ½ teaspoon salt
- 14 ounces granulated sugar
- 24 ounces unsalted butter
- 2 teaspoons vanilla extract
Instructions
- For timing purposes, I recommend you start with the raspberry filling to let it chill, then make the pistachio butter if you aren't buying it, then make the pistachio cake, and while the cakes are cooling, make the buttercream.
Raspberry Filling
- First, combine the raspberries and sugar in a saucepan and bring them to a boil.
- Then, use an immersion blender to make the filling smooth (or leave it chunky if you prefer).
- In a separate container, combine your Clear Jel (or cornstarch) and water to make a slurry.
- Then, pour it into the raspberry mixture and let it simmer until the mixture is clear and thickened.
- Remove the raspberry filling from heat, and then stir in the lemon juice and zest.
- Pour the filling into a heatproof bowl and cover with plastic wrap so it’s touching the surface of the filling to prevent skin from forming.
- Finally, cool the raspberry filling entirely before using it. Store any leftovers in the fridge for up to a week or in the freezer for up to 6 months.
Pistachio Cake
- Prepare three 6” round cake pans with cake goop or another preferred pan spray.
- Preheat your oven to 335ºF (168ºC).
- First, in the bowl of your stand mixer, combine the dry ingredients. This includes flour, sugar, brown sugar, salt, baking soda, and baking powder. Mix them to combine.
- Then, in a separate bowl, combine the room temperature eggs, buttermilk, and vanilla. Whisk gently to combine and set aside.
- Next, using a large measuring cup, combine the oil and the pistachio butter. It is ok if these don’t completely mix together. Ultimately, the mixer will do most of the work for you.
- In the bowl of your stand mixer, add in the buttermilk/egg mix to the dry ingredients while mixing on low speed.
- Once it has evenly combined into the dry ingredients and thoroughly moistened it, add in the oil and pistachio butter.
- Mix your cake batter on medium speed until the batter is fully incorporated and smooth. Scrape the bowl to ensure that all of the ingredients are combined.
- Next, add in your desired amount of green food coloring to achieve the “pistachio color” you are wanting. I use one drop of avocado green. When you bake the batter, it will be slightly green but it tends to look more yellow if you do not use any green food coloring.
- Divide the cake batter evenly into your prepared cake pans, and bake them at 335ºF (168ºC) for 30-35 minutes or until a toothpick comes out from the center cleanly. Add 5 more minutes at a time until the cake is finished baking.
- Finally, cool your cakes for 10 minutes inside the cake pans before attempting to remove them from their pans onto a cooling rack. Freeze them for 1 hour before frosting.
French Buttercream
- In the bowl of your stand mixer, combine the eggs and salt and whisk them until the yolks and whites are combined.
- Then, add in your sugar and whisk it to combine.
- Next, place the bowl over a water bath of simmering water over medium heat.
- Whisking occasionally, heat the eggs and sugar until the sugar is dissolved. It should feel smooth when you rub it together with your fingers.
- Periodically stir the eggs and watch them to ensure they do not heat unevenly. If you don’t occasionally stir and watch the eggs, they will likely cook on the side of the bowl. Another thing to look out for is the sugar can sink to the bottom of the bowl causing uneven heating.
- Store bought eggs come pre-pasteurized, so heating them to a particular temperature is unnecessary. However, you must have the sugar dissolved for the meringue to whip properly.
- Then, once the eggs and sugar are ready, move the bowl to your mixer and begin to whip them at high speed using your whip attachment.
- After about 5-8 minutes, the meringue will almost double in size and form into firm (but not stiff) peaks. FYI: The addition of the egg yolks will keep the meringue from becoming stiff like an all-white meringue.
- Once the meringue has cooled (feel the bowl with your hand), begin to add in your butter in chunks while mixing on low.
- Then, after you add in all of your butter, whip the buttercream a few more minutes until the texture changes to a whipped cream-like texture. Once you have the right consistency, add in your vanilla extract.
- Stop whipping the buttercream when it does not have a strong butter flavor anymore, and it is light and creamy in texture.
- While the paddle is mixing, add 2 oz of pistachio butter, and 1-2 drops of green food color to reach your desired color. Allow to mix on low to combine completely. Next, switch to your paddle attachment on your stand mixer and allow the meringue to paddle on low for 8-10 minutes. Ultimately, this will push out the air bubbles to get you the most desirable texture.
- Finally, prepare a piping bag to use your buttercream, or wrap it up and refrigerate it until you are ready to use it (or store it in the freezer as you would with Swiss meringue buttercream).
Assembling the Pistachio Cake
- First, trim off the dome of your cake layers and the brown edges around the sides and bottom.
- Place the first cake layer onto your cardboard cake round. Then, spread a thin layer of raspberry filling on top of the cake.
- Next, spread on about ¼″ of your buttercream, and then add your next layer of cake.
- Repeat this process with layer two, and then add your final layer of cake on top.
- Cover the entire cake in a thin layer of buttercream. This is called the “crumb coat.”
- Then, place your cake into the fridge or freezer for 20 minutes to set the buttercream layer.
- Apply your final coat of buttercream and smooth out any edges you don’t like.
- Next, with clean hands, scoop up a handful of chopped up pistachios and carefully press them into the buttercream around the bottom of your cake.
- Sprinkle more chopped up pistachios on top of the cake in a circle around the edge.
- Finally, as an optional step, pipe a few dollops of buttercream using a piping bag and then place a few fresh raspberries on top. The reason you want to include pistachios and raspberries into your cake decoration is because you want someone to look at the cake and know what’s inside of it without having to cut into it!
Video
Notes
Important Things To Note Before You Start
- Weigh your ingredients to avoid cake failure. Using a kitchen scale for baking is super easy and gives you the best results every single time.
- Make sure all your cold ingredients are room temperature or slightly warm (butter, milk, eggs, to create a cohesive batter. Curdled batter causes cakes to collapse.
- No buttermilk? You can make your own buttermilk
- Need more help with making your first cake? Check out my how to decorate your first cake blog post.
- Make your own pan release (cake goop!) The best pan release ever!
- Chill your cakes before frosting and filling. You can cover a frosted and chilled cake in fondant if you wish. This cake is also great for stacking. I always keep my cakes chilled in the refrigerator before delivery for easy transporting.
Nutrition
Serving: 1cup | Calories: 1569kcal | Carbohydrates: 163g | Protein: 15g | Fat: 98g | Saturated Fat: 48g | Polyunsaturated Fat: 10g | Monounsaturated Fat: 34g | Trans Fat: 3g | Cholesterol: 414mg | Sodium: 716mg | Potassium: 347mg | Fiber: 5g | Sugar: 121g | Vitamin A: 2530IU | Vitamin C: 18mg | Calcium: 152mg | Iron: 4mg